steering INFINITI QX80 2020 Owner's Guide
[x] Cancel search | Manufacturer: INFINITI, Model Year: 2020, Model line: QX80, Model: INFINITI QX80 2020Pages: 516, PDF Size: 1.89 MB
Page 175 of 516

3 Pre-driving checks and adjustments
Keys ........................................................................\
.............. 3-2Intelligent Key .............................................................. 3-2
Valet hand-off ............................................................. 3-4
Doors ........................................................................\
............ 3-4 Locking with mechanical key ................................... 3-4
Opening and closing windows with the
mechanical key ............................................................. 3-5
Locking with inside lock knob ................................. 3-5
Locking with power door lock switch ................... 3-5
Automatic door locks ................................................. 3-6
Child safety rear door lock ...................................... 3-6
Intelligent Key system ...................................................... 3-7 Intelligent Key operating range ............................... 3-9
Door locks/unlocks precaution ............................... 3-9
Intelligent Key operation ......................................... 3-10
Battery saver system ............................................... 3-12
Warning signals ......................................................... 3-12
Troubleshooting guide ............................................. 3-13
Remote keyless entry system ...................................... 3-15 How to use remote keyless entry system .......... 3-16
Remote engine start (if so equipped) ........................ 3-18 Remote engine start operating range ................. 3-19
Remote starting the engine ................................... 3-19
Extending engine run time ...................................... 3-19 Canceling a remote engine start ......................... 3-19
Conditions the remote engine start will
not work ................................................................... 3-20
Hood ........................................................................\
.......... 3-21
Liftgate ........................................................................\
..... 3-21 Operating manual liftgate .................................... 3-22
Operating power liftgate ...................................... 3-22
Auto closure ............................................................ 3-25
Liftgate release lever ............................................. 3-26
Fuel-filler door ................................................................ 3-26
Opening the fuel-filler door ................................. 3-26
Fuel-filler cap ........................................................... 3-27
Tilt/telescopic steering ................................................. 3-29
Electric operation .................................................... 3-29
Sun visors ........................................................................\
. 3-29
Mirrors ........................................................................\
..... 3-30
Inside mirror ............................................................. 3-30
Outside mirrors ........................................................ 3-36
Vanity mirror ............................................................ 3-38
Automatic drive positioner .......................................... 3-39
Entry/exit function ................................................. 3-39
Memory storage ...................................................... 3-39
Setting memory function ..................................... 3-40
System operation .................................................... 3-41
Page 202 of 516

3-28Pre-driving checks and adjustments
SPA2753
To remove the fuel-filler cap:
1. Turn the fuel-filler cap counterclockwiseto remove.
2. Put the fuel-filler cap on the cap holder
while refueling.
To install the fuel-filler cap:
1. Insert the fuel-filler cap straight into the fuel-filler tube.
2. Turn the fuel-filler cap clockwise until a single click is heard.
WAD0096X
Loose Fuel Cap warning
The Loose Fuel Cap warning appears on the
vehicle information display when the fuel-
filler cap is not tightened correctly after the
vehicle has been refueled. It may take a few
driving trips for the warning to be displayed.
To turn off the warning, perform the
following:
1. Remove and install the fuel-filler cap assoon as possible. (See “Fuel-filler cap”
(P.3-27).)
2. Tighten the fuel-filler cap until it clicks.
3. Push the
switchon the steering
wheel to turn off the Loose Fuel Cap
warning after tightening the fuel-filler cap.
Page 203 of 516
WARNING
.Do not adjust the steering wheel
while driving. You could lose control
of your vehicle and cause an accident.
. Do not adjust the steering wheel any
closer to you than is necessary for
proper steering operation and com-
fort. The driver’s air bag inflates with
great force. If you are unrestrained,
leaning forward, sitting sideways or
out of position in any way, you are at
greater risk of injury or death in a
crash. You may also receive serious or
fatal injuries from the air bag if you
are up against it when it inflates.
Always sit back against the seatback
and as far away as practical from the
steering wheel. Always use the seat
belts.
SPA2754
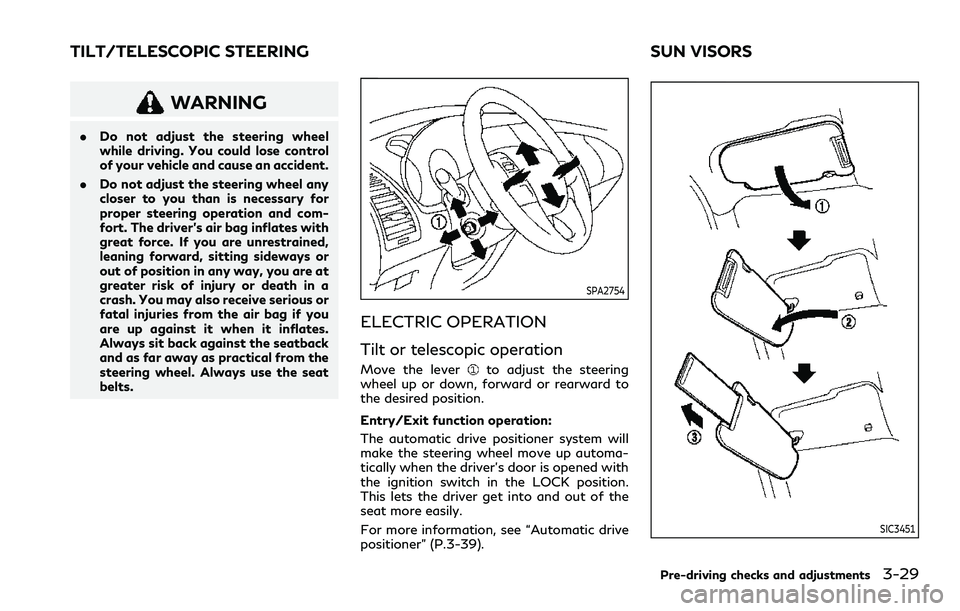
ELECTRIC OPERATION
Tilt or telescopic operation
Move the leverto adjust the steering
wheel up or down, forward or rearward to
the desired position.
Entry/Exit function operation:
The automatic drive positioner system will
make the steering wheel move up automa-
tically when the driver’s door is opened with
the ignition switch in the LOCK position.
This lets the driver get into and out of the
seat more easily.
For more information, see “Automatic drive
positioner” (P.3-39).
SIC3451
Pre-driving checks and adjustments3-29
TILT/TELESCOPIC STEERING SUN VISORS
Page 213 of 516
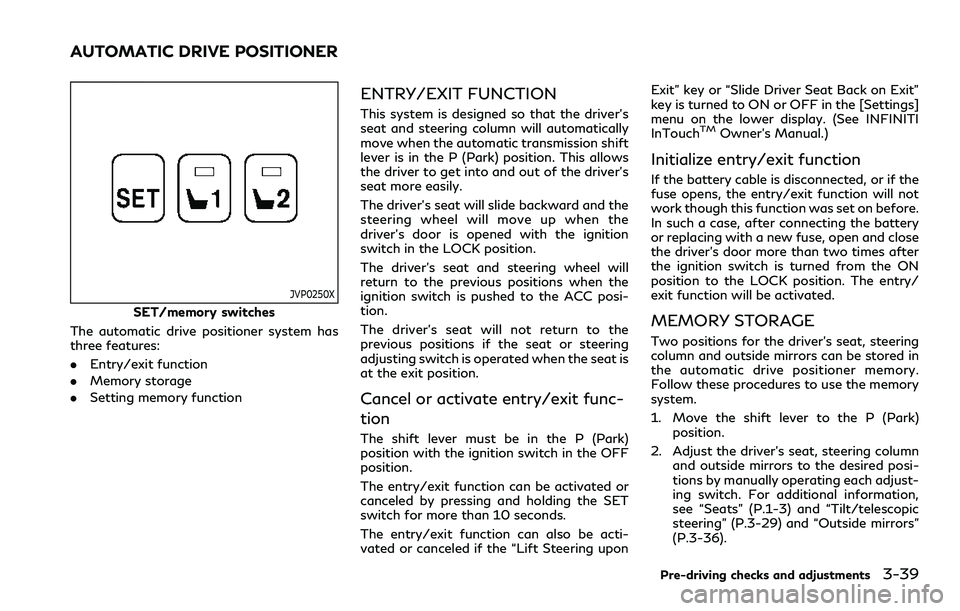
JVP0250X
SET/memory switches
The automatic drive positioner system has
three features:
. Entry/exit function
. Memory storage
. Setting memory function
ENTRY/EXIT FUNCTION
This system is designed so that the driver’s
seat and steering column will automatically
move when the automatic transmission shift
lever is in the P (Park) position. This allows
the driver to get into and out of the driver’s
seat more easily.
The driver’s seat will slide backward and the
steering wheel will move up when the
driver’s door is opened with the ignition
switch in the LOCK position.
The driver’s seat and steering wheel will
return to the previous positions when the
ignition switch is pushed to the ACC posi-
tion.
The driver’s seat will not return to the
previous positions if the seat or steering
adjusting switch is operated when the seat is
at the exit position.
Cancel or activate entry/exit func-
tion
The shift lever must be in the P (Park)
position with the ignition switch in the OFF
position.
The entry/exit function can be activated or
canceled by pressing and holding the SET
switch for more than 10 seconds.
The entry/exit function can also be acti-
vated or canceled if the “Lift Steering upon Exit” key or “Slide Driver Seat Back on Exit”
key is turned to ON or OFF in the [Settings]
menu on the lower display. (See INFINITI
InTouch
TMOwner’s Manual.)
Initialize entry/exit function
If the battery cable is disconnected, or if the
fuse opens, the entry/exit function will not
work though this function was set on before.
In such a case, after connecting the battery
or replacing with a new fuse, open and close
the driver’s door more than two times after
the ignition switch is turned from the ON
position to the LOCK position. The entry/
exit function will be activated.
MEMORY STORAGE
Two positions for the driver’s seat, steering
column and outside mirrors can be stored in
the automatic drive positioner memory.
Follow these procedures to use the memory
system.
1. Move the shift lever to the P (Park)
position.
2. Adjust the driver’s seat, steering column and outside mirrors to the desired posi-
tions by manually operating each adjust-
ing switch. For additional information,
see “Seats” (P.1-3) and “Tilt/telescopic
steering” (P.3-29) and “Outside mirrors”
(P.3-36).
Pre-driving checks and adjustments3-39
AUTOMATIC DRIVE POSITIONER
Page 214 of 516
3-40Pre-driving checks and adjustments
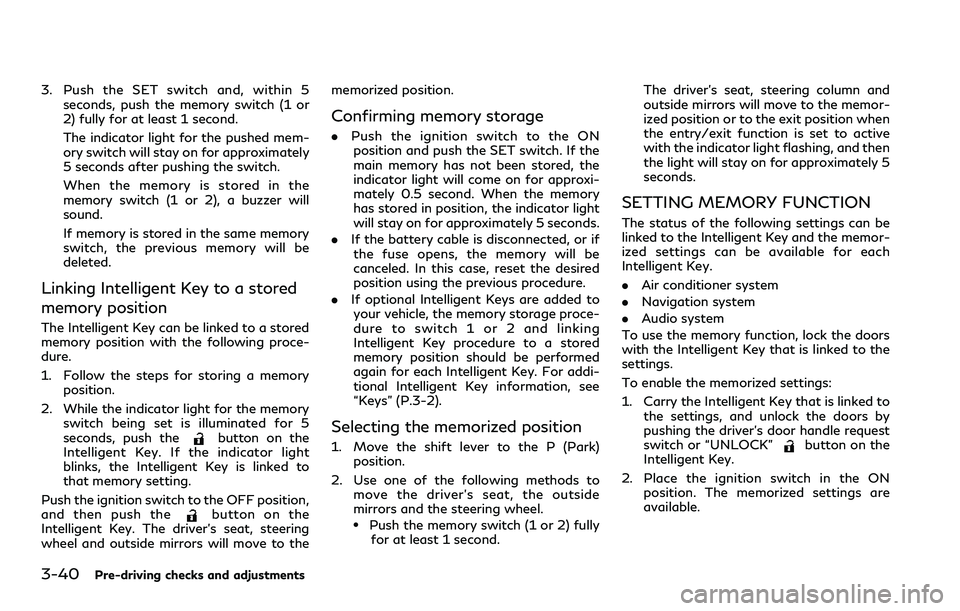
3. Push the SET switch and, within 5seconds, push the memory switch (1 or
2) fully for at least 1 second.
The indicator light for the pushed mem-
ory switch will stay on for approximately
5 seconds after pushing the switch.
When the memory is stored in the
memory switch (1 or 2), a buzzer will
sound.
If memory is stored in the same memory
switch, the previous memory will be
deleted.
Linking Intelligent Key to a stored
memory position
The Intelligent Key can be linked to a stored
memory position with the following proce-
dure.
1. Follow the steps for storing a memoryposition.
2. While the indicator light for the memory switch being set is illuminated for 5
seconds, push the
button on the
Intelligent Key. If the indicator light
blinks, the Intelligent Key is linked to
that memory setting.
Push the ignition switch to the OFF position,
and then push the
button on the
Intelligent Key. The driver’s seat, steering
wheel and outside mirrors will move to the memorized position.
Confirming memory storage
.
Push the ignition switch to the ON
position and push the SET switch. If the
main memory has not been stored, the
indicator light will come on for approxi-
mately 0.5 second. When the memory
has stored in position, the indicator light
will stay on for approximately 5 seconds.
. If the battery cable is disconnected, or if
the fuse opens, the memory will be
canceled. In this case, reset the desired
position using the previous procedure.
. If optional Intelligent Keys are added to
your vehicle, the memory storage proce-
dure to switch 1 or 2 and linking
Intelligent Key procedure to a stored
memory position should be performed
again for each Intelligent Key. For addi-
tional Intelligent Key information, see
“Keys” (P.3-2).
Selecting the memorized position
1. Move the shift lever to the P (Park) position.
2. Use one of the following methods to move the driver’s seat, the outside
mirrors and the steering wheel.
.Push the memory switch (1 or 2) fully
for at least 1 second. The driver’s seat, steering column and
outside mirrors will move to the memor-
ized position or to the exit position when
the entry/exit function is set to active
with the indicator light flashing, and then
the light will stay on for approximately 5
seconds.
SETTING MEMORY FUNCTION
The status of the following settings can be
linked to the Intelligent Key and the memor-
ized settings can be available for each
Intelligent Key.
.
Air conditioner system
. Navigation system
. Audio system
To use the memory function, lock the doors
with the Intelligent Key that is linked to the
settings.
To enable the memorized settings:
1. Carry the Intelligent Key that is linked to the settings, and unlock the doors by
pushing the driver’s door handle request
switch or “UNLOCK”
button on the
Intelligent Key.
2. Place the ignition switch in the ON position. The memorized settings are
available.
Page 215 of 516

SYSTEM OPERATION
The automatic drive positioner system will
not work or will stop operating under the
following conditions:
.When the vehicle speed is above 0 MPH
(0 km/h) or 4 MPH (7 km/h) for some
limited functions such linking an Intelli-
gent Key to the vehicle when the power
source is turned on from off or during the
Exit function.
. When any of the memory switches are
pushed while the automatic drive posi-
tioner is operating.
. When the adjusting switch for the dri-
ver’s seat and steering column is turned
on while the automatic drive positioner is
operating.
. When the seat has already been moved
to the memorized position.
. When no seat position is stored in the
memory switch.
. When the shift lever is moved from the P
(Park) position to any other position.
Pre-driving checks and adjustments3-41
Page 221 of 516
viewed in the rear view and outside
mirrors.
. Use the mirrors or actually look to
properly judge distances to other
objects.
. The distance between objects viewed
in the rear view differs from actual
distance because a wide-angle lens is
used.
. On a snow-covered or slippery road,
there may be a difference between
the predictive course lines and the
actual course line.
. The vehicle width and predictive
course lines are wider than the actual
width and course.
. The displayed lines on the rear view
will appear slightly off to the right
because the rearview camera is not
installed in the rear center of the
vehicle.
SAA1840
Front view
WAE0216X
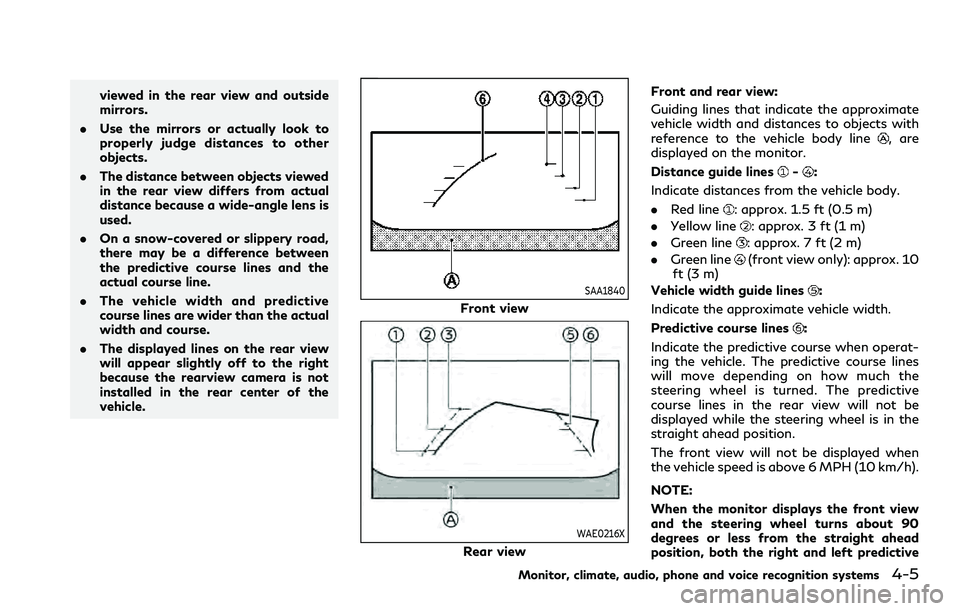
Rear view Front and rear view:
Guiding lines that indicate the approximate
vehicle width and distances to objects with
reference to the vehicle body line
, are
displayed on the monitor.
Distance guide lines
-:
Indicate distances from the vehicle body.
. Red line
: approx. 1.5 ft (0.5 m)
. Yellow line
: approx. 3 ft (1 m)
. Green line
: approx. 7 ft (2 m)
. Green line
(front view only): approx. 10
ft (3 m)
Vehicle width guide lines
:
Indicate the approximate vehicle width.
Predictive course lines
:
Indicate the predictive course when operat-
ing the vehicle. The predictive course lines
will move depending on how much the
steering wheel is turned. The predictive
course lines in the rear view will not be
displayed while the steering wheel is in the
straight ahead position.
The front view will not be displayed when
the vehicle speed is above 6 MPH (10 km/h).
NOTE:
When the monitor displays the front view
and the steering wheel turns about 90
degrees or less from the straight ahead
position, both the right and left predictive
Monitor, climate, audio, phone and voice recognition systems4-5
Page 222 of 516
4-6Monitor, climate, audio, phone and voice recognition systems
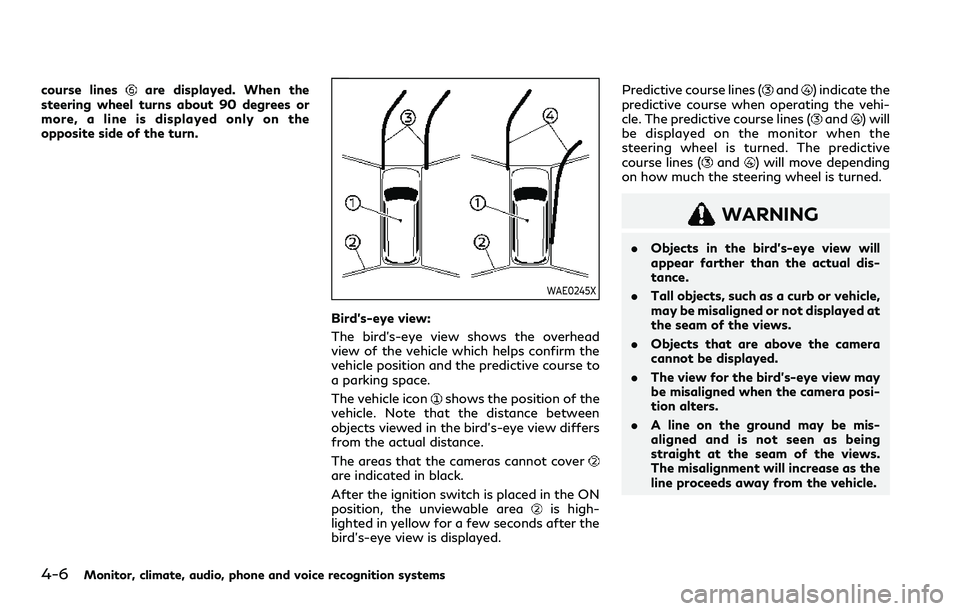
course linesare displayed. When the
steering wheel turns about 90 degrees or
more, a line is displayed only on the
opposite side of the turn.
WAE0245X
Bird’s-eye view:
The bird’s-eye view shows the overhead
view of the vehicle which helps confirm the
vehicle position and the predictive course to
a parking space.
The vehicle icon
shows the position of the
vehicle. Note that the distance between
objects viewed in the bird’s-eye view differs
from the actual distance.
The areas that the cameras cannot cover
are indicated in black.
After the ignition switch is placed in the ON
position, the unviewable area
is high-
lighted in yellow for a few seconds after the
bird’s-eye view is displayed. Predictive course lines (
and) indicate the
predictive course when operating the vehi-
cle. The predictive course lines (
and) will
be displayed on the monitor when the
steering wheel is turned. The predictive
course lines (
and) will move depending
on how much the steering wheel is turned.
WARNING
. Objects in the bird’s-eye view will
appear farther than the actual dis-
tance.
. Tall objects, such as a curb or vehicle,
may be misaligned or not displayed at
the seam of the views.
. Objects that are above the camera
cannot be displayed.
. The view for the bird’s-eye view may
be misaligned when the camera posi-
tion alters.
. A line on the ground may be mis-
aligned and is not seen as being
straight at the seam of the views.
The misalignment will increase as the
line proceeds away from the vehicle.
Page 226 of 516
4-10Monitor, climate, audio, phone and voice recognition systems
up course.
How to park with predictive course
lines
WARNING
.If the tires are replaced with different
sized tires, the predictive course lines
may not be displayed correctly.
. On a snow-covered or slippery road,
there may be a difference between
the predictive course lines and the
actual course line.
. If the battery is disconnected or
becomes discharged, the predictive
course lines may be displayed incor-
rectly. If this occurs, please perform
the following procedures:
— Turn the steering wheel from lock to lock while the engine is running.
— Drive the vehicle on a straight road for more than 5 minutes.
WAE0289X
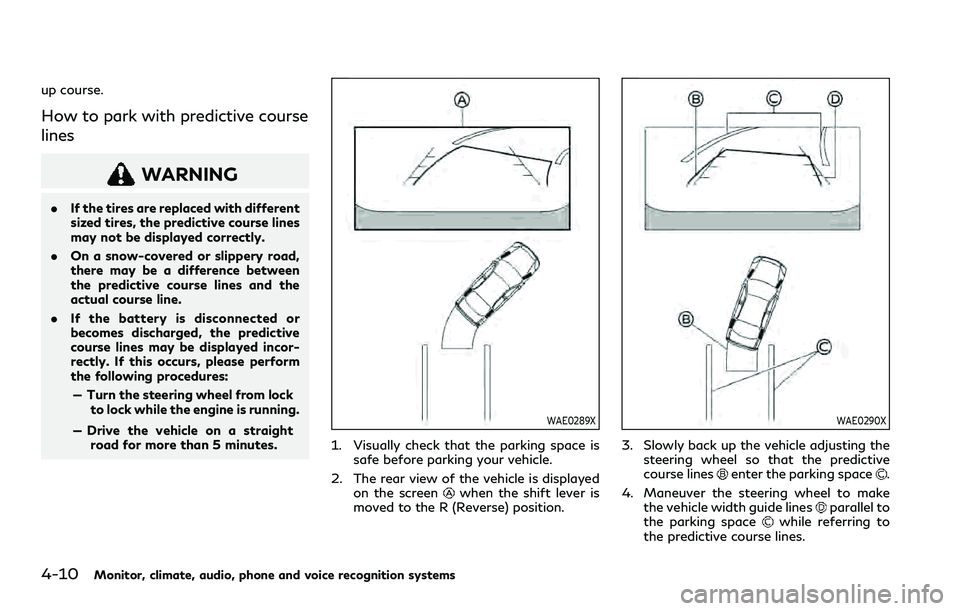
1. Visually check that the parking space is safe before parking your vehicle.
2. The rear view of the vehicle is displayed on the screen
when the shift lever is
moved to the R (Reverse) position.
WAE0290X
3. Slowly back up the vehicle adjusting the steering wheel so that the predictive
course lines
enter the parking space.
4. Maneuver the steering wheel to make the vehicle width guide lines
parallel to
the parking spacewhile referring to
the predictive course lines.
Page 257 of 516

4WD shift switch .................................................... 5-116
4WD shift indicator ................................................ 5-117
4WD warning light ................................................. 5-117
Hill Start Assist system ............................................... 5-119
Parking/parking on hills ............................................. 5-120
TOW mode ..................................................................... 5-121
SNOW mode .................................................................. 5-121
Power steering .............................................................. 5-122
Brake system .................................................................. 5-122 Braking precautions ................................................ 5-122
Parking brake break-in .......................................... 5-122
Brake assist .................................................................... 5-123 Brake assist ............................................................... 5-123
Anti-lock Braking System (ABS) ......................... 5-123 Vehicle Dynamic Control (VDC) system ............... 5-124
Vehicle Dynamic Control (VDC)
OFF switch ............................................................. 5-126
Cold weather driving ................................................... 5-127
Freeing a frozen door lock ................................. 5-127
Antifreeze ................................................................ 5-127
Battery ..................................................................... 5-127
Draining of coolant water .................................. 5-127
Tire equipment ....................................................... 5-127
Special winter equipment ................................... 5-127
Driving on snow or ice ......................................... 5-127
Engine block heater (if so equipped) .............. 5-128