Washer INFINITI QX80 2021 User Guide
[x] Cancel search | Manufacturer: INFINITI, Model Year: 2021, Model line: QX80, Model: INFINITI QX80 2021Pages: 529, PDF Size: 2.05 MB
Page 136 of 529

JVI0972X
REAR WINDOW WIPER AND
WASHER OPERATION
If the rear window wiper operation is
interrupted by snow etc., the wiper may
stop moving to protect its motor. If this
occurs, turn the wiper switch to OFF and
remove the snow etc. on and around the
wiper arms. After about 1 minute, turn the
switch ON again to operate the wiper.
The rear window wiper and washer operate
when the ignition switch is in the ON
position.
Turn the switch clockwise from the OFF
position to operate the wiper.
Intermittent (INT) — intermittent op-
eration (not adjustable)
Low (ON) — continuous low speed
operation
Push the switch forward
to operate the
washer. Then the wiper will also operate
several times.
JVI1777X
REAR WINDOW AND OUTSIDE
MIRROR DEFROSTER
To defog/defrost the rear window glass and
outside mirrors, start the engine and push
the switch
on. The indicator lightwill
come on. Push the switch again to turn the
defroster off.
It will automatically turn off in approxi-
mately 15 minutes.
CAUTION
When cleaning the inner side of the rear
window, be careful not to scratch or
Instruments and controls2-39
REAR WINDOW AND OUTSIDE
MIRROR DEFROSTER SWITCH
Page 142 of 529
Daytime running light system
The daytime running lights automatically
illuminate when the engine is started with
the parking brake released. The daytime
running lights operate with the headlight
switch in the OFF position or in the
position. Turn the headlight switch to theposition for full illumination when driv-
ing at night.
If the parking brake is applied before the
engine is started, the daytime running lights
do not illuminate. The daytime running lights
illuminate once the parking brake is released.
The daytime running lights will remain on
until the ignition switch is pushed to the OFF
position.
WARNING
When the daytime running light system
is active, tail lights on your vehicle are
not on. It is necessary at dusk to turn on
your headlights. Failure to do so could
cause an accident injuring yourself and
others.
Adaptive Front lighting System
(AFS) (if so equipped)
The Adaptive Front lighting System (AFS)
will automatically adjust the headlights (low
beam) toward the turning direction to
improve the driver’s view. When the head-
light switch is ON and the driver operates
the steering wheel in a turn, the AFS system
will be activated.
The AFS will operate:
. when the headlight switch is ON.
. when the shift lever is in any position
other than P (Park) or R (Reverse).
. when the vehicle is driven at above 3
MPH (5 km/h) for the left-side head-
light. Note that the right-side low beam
headlight will swivel but the left-side
headlight will not swivel when the vehicle
is below 3 MPH (5 km/h) and the
steering wheel is turned.
AFS will also adjust the headlight to a proper
axis automatically, depending on the number
of occupants in the vehicle, the load the
vehicle is carrying and the road conditions.
If the AFS OFF indicator light blinks after
the ignition switch has been pushed to the
ON position, this may indicate that the AFS
is not functioning properly. Have the system
checked. It is recommended you visit an
INFINITI retailer for this service. When the engine is started, the headlights will vibrate
to check the system condition. This is not a
malfunction.HEADLIGHT WASHER (if so
equipped)
The headlight washer operates when the
headlight is on and the ignition switch is in
the ON position.
Pull the windshield washer switch toward
you. The headlight washer operates with the
windshield washer operation. This operation
activates once each time either the ignition
switch or the headlight switch is turned off
and on.
After the first operation, the headlight
washer operates once at every fifth opera-
tion of the windshield washer.
CAUTION
.
Do not operate the washer continu-
ously for longer than 30 seconds.
. Do not operate the headlight washer
if the window washer fluid reservoir
is empty.
Instruments and controls2-45
Page 215 of 529
3-32Pre-driving checks and adjustments
properly. Driving without adjusting
the mirror may cause difficulty in
watching the display at Smart Rear-
view Mirror mode (camera view
mode) due to the reflection from the
surface of the mirror.
. If the Smart Rearview Mirror mal-
functions, immediately switch the
system to the conventional rearview
mirror mode.
. When strong light (for example, sun-
light or high beams from following
vehicles) enters the camera, a light
beam or a glaring light may appear on
the monitor screen of the Smart
Rearview Mirror. In that case, switch
the system to the conventional rear-
view mirror mode appropriately.
. If dirt, rain or snow accumulates on
the exterior glass surface covering
the camera, the Smart Rearview
Mirror may not display objects
clearly. Use of the rear window
wiper/washer may improve visibility,
but if not, switch the Smart Rearview
Mirror to the conventional rearview
mirror mode until a time the glass
covering the camera can be cleaned.
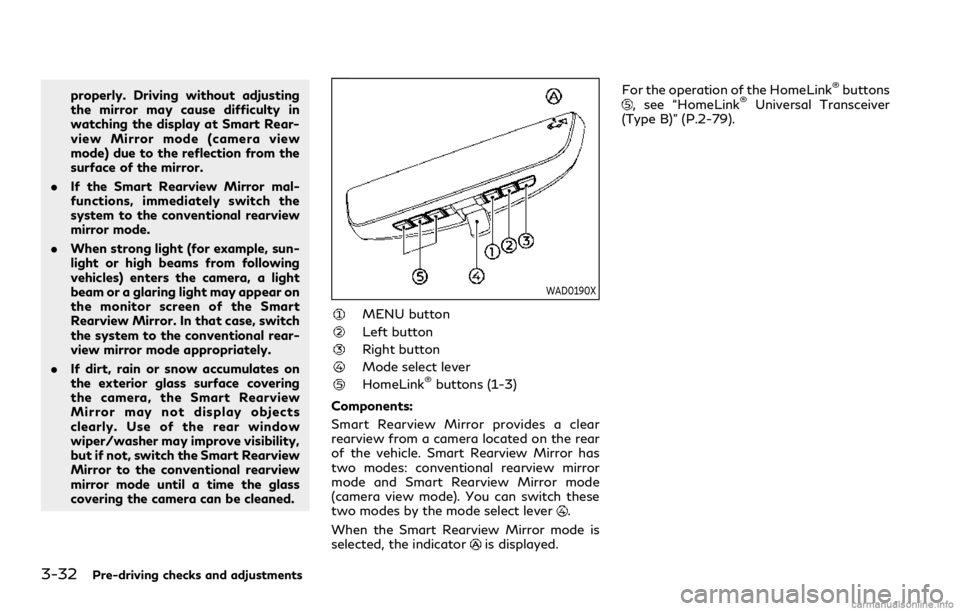
WAD0190X
MENU button
Left button
Right button
Mode select lever
HomeLink®buttons (1-3)
Components:
Smart Rearview Mirror provides a clear
rearview from a camera located on the rear
of the vehicle. Smart Rearview Mirror has
two modes: conventional rearview mirror
mode and Smart Rearview Mirror mode
(camera view mode). You can switch these
two modes by the mode select lever
.
When the Smart Rearview Mirror mode is
selected, the indicator
is displayed. For the operation of the HomeLink
®buttons, see “HomeLink®Universal Transceiver
(Type B)” (P.2-79).
Page 278 of 529

the brake pedal within 10 seconds after
the chime sounds. The engine will start.
After step 3 is performed, when the ignition
switch is pushed without depressing the
brake pedal, the ignition switch position will
change to ACC.
NOTE:
. When the ignition switch is pushed to
the ACC or ON position or the engine is
started by the above procedures, the
“Key Battery Low” message appears on
the vehicle information display even if
the Intelligent Key is inside the vehicle.
This is not a malfunction. To turn off the
Intelligent Key battery discharge indi-
cator, touch the ignition switch with the
Intelligent Key again.
. If the “Key Battery Low” message
appears, replace the battery as soon as
possible. (See “Battery” (P.8-11).) .
Make sure the area around the vehicle is
clear.
. Check fluid levels such as engine oil,
coolant, brake fluid and window washer
fluid as frequently as possible, or at least
whenever you refuel.
. Check that all windows and lights are
clean.
. Visually inspect tires for their appearance
and condition. Also check tires for proper
inflation.
. Lock all doors.
. Position seat and adjust head restraints/
headrests.
. Adjust inside and outside mirrors.
. Fasten seat belts and ask all passengers
to do likewise.
. Check the operation of warning lights
when the ignition switch is pushed to the
ON position. (See “Warning lights, in-
dicator lights and audible reminders”
(P.2-11).) 1. Apply the parking brake.
2. Move the shift lever to the P (Park) or N
(Neutral) position. (P is recommended.)
The starter is designed not to operate
unless the shift lever is in either of the
above positions.
3. Push the ignition switch to the ON position. Firmly depress the brake pedal
and push the ignition switch to start the
engine.
To start the engine immediately, push
and release the ignition switch while
depressing the brake pedal with the
ignition switch in any position.
.If the engine is very hard to start inextremely cold weather or when re-
starting, depress the accelerator ped-
al a little (approximately 1/3 to the
floor) and while holding, crank the
engine. Release the accelerator pedal
when the engine starts.
.If the engine is very hard to start
because it is flooded, depress the
accelerator pedal all the way to the
floor and hold it. Push the ignition
switch to the ON position to start
cranking the engine. After 5 or 6
seconds, stop cranking by pushing
the ignition switch to OFF. After
cranking the engine, release the accel-
erator pedal. Crank the engine with
Starting and driving5-15
BEFORE STARTING THE ENGINE STARTING THE ENGINE
Page 391 of 529
5-128Starting and driving
FREEING A FROZEN DOOR LOCK
To prevent a door lock from freezing, apply
deicer through the key hole. If the lock
becomes frozen, heat the key before insert-
ing it into the key hole or use the Intelligent
Key system.
ANTIFREEZE
In the winter when it is anticipated that the
outside temperature will drop below 32°F
(0°C), check antifreeze to assure proper
winter protection. For additional informa-
tion, see “Engine cooling system” (P.8-4).
BATTERY
If the battery is not fully charged during
extremely cold weather conditions, the bat-
tery fluid may freeze and damage the
battery. To maintain maximum efficiency,
the battery should be checked regularly. For
additional information, see “Battery” (P.8-
11).
DRAINING OF COOLANT WATER
If the vehicle is to be left outside without
antifreeze, drain the cooling system, includ-
ing the engine block. Refill before operating
the vehicle. For details, see “Engine cooling
system” (P.8-4).
TIRE EQUIPMENT
SUMMER tires have a tread designed to
provide superior performance on dry pave-
ment. However, the performance of these
tires will be substantially reduced in snowy
and icy conditions. If you operate your
vehicle on snowy or icy roads, INFINITI
recommends the use of MUD & SNOW or
ALL SEASON tires on all four wheels. It is
recommended you consult an INFINITI re-
tailer for the tire type, size, speed rating and
availability information.
For additional traction on icy roads, studded
tires may be used. However, some U.S.
states and Canadian provinces prohibit their
use. Check local, state and provincial laws
before installing studded tires.
Skid and traction capabilities of studded
snow tires, on wet or dry surfaces, may be
poorer than that of non-studded snow tires.
Tire chains may be used. For details, see
“Tire chains” (P.8-34).
For four-wheel drive
If you install snow tires, they must also be
the same size, brand, construction and tread
pattern on all four wheels.
SPECIAL WINTER EQUIPMENT
It is recommended that the following items
be carried in the vehicle during winter:
.A scraper and stiff-bristled brush to
remove ice and snow from the windows
and wiper blades.
. A sturdy, flat board to be placed under
the jack to give it firm support.
. A shovel to dig the vehicle out of
snowdrifts.
. Extra window washer fluid to refill the
reservoir tank.
DRIVING ON SNOW OR ICE
WARNING
. Wet ice (32°F, 0°C and freezing rain),
very cold snow or ice can be slick and
very hard to drive on. The vehicle will
have much less traction or “grip”
under these conditions. Try to avoid
driving on wet ice until the road is
salted or sanded.
. Whatever the condition, drive with
caution. Accelerate and slow down
with care. If accelerating or down-
shifting too fast, the drive wheels will
lose even more traction.
COLD WEATHER DRIVING
Page 424 of 529

8 Do-it-yourself
Maintenance precautions ............................................... 8-2
Engine compartment check locations ......................... 8-3VK56VD engine model .............................................. 8-3
Engine cooling system ..................................................... 8-4 Checking engine coolant level ................................. 8-5
Changing engine coolant .......................................... 8-5
Engine oil ........................................................................\
..... 8-6 Checking engine oil level ........................................... 8-6
Changing engine oil and filter .................................. 8-6
Automatic Transmission Fluid (ATF) .......................... 8-8
Power steering fluid ......................................................... 8-8
Brake fluid ........................................................................\
... 8-9 Brake fluid ..................................................................... 8-9
Window washer fluid ................................................... 8-10
Battery ........................................................................\
....... 8-11 Jump starting ............................................................. 8-12
Variable voltage control system ................................. 8-13
Drive belts ........................................................................\
. 8-13
Spark plugs ....................................................................... 8-14 Replacing spark plugs .............................................. 8-14
Air cleaner ........................................................................\
. 8-14 Windshield wiper blades .............................................. 8-15
Cleaning ..................................................................... 8-15
Replacing ................................................................... 8-16
Rear window wiper blades .......................................... 8-16
Brakes ........................................................................\
........ 8-17 Self-adjusting brakes ............................................. 8-17
Brake pad wear warning ....................................... 8-17
Brake booster ........................................................... 8-17
Fuses ........................................................................\
.......... 8-18 Engine compartment .............................................. 8-18
Passenger compartment ...................................... 8-20
Intelligent Key battery replacement ......................... 8-21
Lights ........................................................................\
......... 8-23
Headlights ................................................................ 8-24
Exterior and interior lights ................................... 8-24
Wheels and tires ............................................................. 8-27
Tire pressure ............................................................. 8-27
Tire labeling .............................................................. 8-31
Types of tires ........................................................... 8-33
Tire chains ................................................................ 8-34
Changing wheels and tires ................................... 8-35
Page 426 of 529

WAA0134X
VK56VD ENGINE MODEL
1. Window washer fluid reservoir
2. Fuse/fusible link holder
3. Engine oil dipstick
4. Power steering fluid reservoir
5. Engine oil filler cap6. Brake fluid reservoir
7. Fuse/fusible link holder
8. Battery
9. Radiator filler cap
10. Engine coolant reservoir
11. Drive belts12. Air cleaner
Do-it-yourself8-3
ENGINE COMPARTMENT CHECK
LOCATIONS
Page 430 of 529
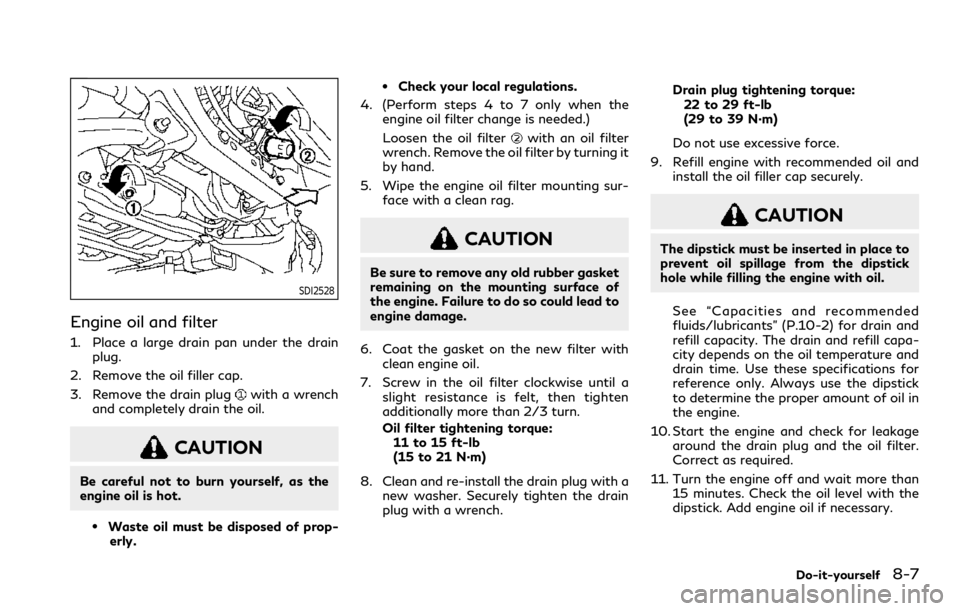
SDI2528
Engine oil and filter
1. Place a large drain pan under the drainplug.
2. Remove the oil filler cap.
3. Remove the drain plug
with a wrench
and completely drain the oil.
CAUTION
Be careful not to burn yourself, as the
engine oil is hot.
.Waste oil must be disposed of prop- erly.
.Check your local regulations.
4. (Perform steps 4 to 7 only when the engine oil filter change is needed.)
Loosen the oil filter
with an oil filter
wrench. Remove the oil filter by turning it
by hand.
5. Wipe the engine oil filter mounting sur- face with a clean rag.
CAUTION
Be sure to remove any old rubber gasket
remaining on the mounting surface of
the engine. Failure to do so could lead to
engine damage.
6. Coat the gasket on the new filter with clean engine oil.
7. Screw in the oil filter clockwise until a slight resistance is felt, then tighten
additionally more than 2/3 turn.
Oil filter tightening torque:11 to 15 ft-lb
(15 to 21 N·m)
8. Clean and re-install the drain plug with a new washer. Securely tighten the drain
plug with a wrench. Drain plug tightening torque:
22 to 29 ft-lb
(29 to 39 N·m)
Do not use excessive force.
9. Refill engine with recommended oil and install the oil filler cap securely.
CAUTION
The dipstick must be inserted in place to
prevent oil spillage from the dipstick
hole while filling the engine with oil.
See “Capacities and recommended
fluids/lubricants” (P.10-2) for drain and
refill capacity. The drain and refill capa-
city depends on the oil temperature and
drain time. Use these specifications for
reference only. Always use the dipstick
to determine the proper amount of oil in
the engine.
10. Start the engine and check for leakage around the drain plug and the oil filter.
Correct as required.
11. Turn the engine off and wait more than 15 minutes. Check the oil level with the
dipstick. Add engine oil if necessary.
Do-it-yourself8-7
Page 433 of 529
8-10Do-it-yourself
mended types of brake fluid.)
NOTE:
When the ignition switch is placed in the ON
position after adding brake fluid up to the
MAX line
in the reservoir, the brake fluid
decreases below the MAX line. This is
normal.
If fluid must be added frequently, the system
should be checked. It is recommended you
visit an INFINITI retailer for this service.
SDI2517
WARNING
Antifreeze is poisonous and should be
stored carefully in marked containers
out of the reach of children.
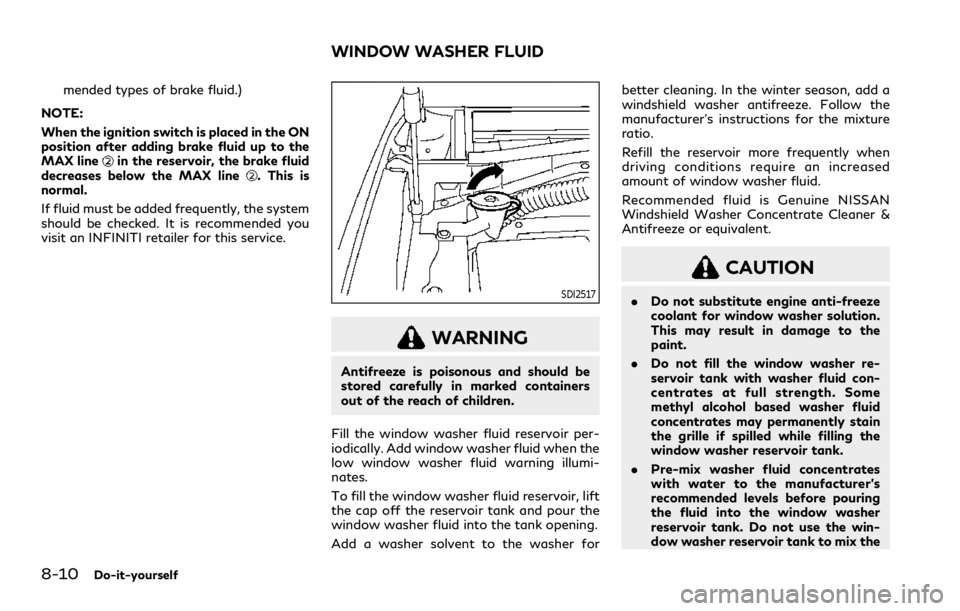
Fill the window washer fluid reservoir per-
iodically. Add window washer fluid when the
low window washer fluid warning illumi-
nates.
To fill the window washer fluid reservoir, lift
the cap off the reservoir tank and pour the
window washer fluid into the tank opening.
Add a washer solvent to the washer for better cleaning. In the winter season, add a
windshield washer antifreeze. Follow the
manufacturer’s instructions for the mixture
ratio.
Refill the reservoir more frequently when
driving conditions require an increased
amount of window washer fluid.
Recommended fluid is Genuine NISSAN
Windshield Washer Concentrate Cleaner &
Antifreeze or equivalent.
CAUTION
.
Do not substitute engine anti-freeze
coolant for window washer solution.
This may result in damage to the
paint.
. Do not fill the window washer re-
servoir tank with washer fluid con-
centrates at full strength. Some
methyl alcohol based washer fluid
concentrates may permanently stain
the grille if spilled while filling the
window washer reservoir tank.
. Pre-mix washer fluid concentrates
with water to the manufacturer’s
recommended levels before pouring
the fluid into the window washer
reservoir tank. Do not use the win-
dow washer reservoir tank to mix the
WINDOW WASHER FLUID
Page 434 of 529
washer fluid concentrate and water..
Keep the battery surface clean and dry.
Clean the battery with a solution of
baking soda and water.
. Make certain the terminal connections
are clean and securely tightened.
. If the vehicle is not to be used for 30 days
or longer, disconnect the negative (−)
battery terminal cable to prevent dis-
charging it.
NOTE:
Care should be taken to avoid situations
that can lead to potential battery discharge
and potential no-start conditions such as:
1. Installation or extended use of electro-
nic accessories that consume battery
power when the engine is not running
(Phone chargers, GPS, DVD players,
etc.)
2. Vehicle is not driven regularly and/or
only driven short distances.
In these cases, the battery may need to be
charged to maintain battery health.
WARNING
. Do not expose the battery to flames
or electrical sparks. Hydrogen gas
generated by the battery is explosive.
Do not allow battery fluid to contact
your skin, eyes, fabrics, or painted surfaces. After touching a battery or
battery cap, do not touch or rub your
eyes. Thoroughly wash your hands. If
the acid contacts your eyes, skin or
clothing, immediately flush with
water for at least 15 minutes and
seek medical attention.
. Do not operate the vehicle if the fluid
in the battery is low. Low battery
fluid can cause a higher load on the
battery which can generate heat,
reduce battery life, and in some cases
lead to an explosion.
. When working on or near a battery,
always wear suitable eye protection
and remove all jewelry.
. Battery posts, terminals and related
accessories contain lead and lead
compounds. Wash hands after hand-
ling.
. Keep the battery out of the reach of
children.
Do-it-yourself8-11
BATTERY