steering wheel INFINITI QX80 2021 Owner's Guide
[x] Cancel search | Manufacturer: INFINITI, Model Year: 2021, Model line: QX80, Model: INFINITI QX80 2021Pages: 529, PDF Size: 2.05 MB
Page 223 of 529

3-40Pre-driving checks and adjustments
JVP0250X
SET/memory switches
The automatic drive positioner system has
three features:
. Entry/exit function
. Memory storage
. Setting memory function
ENTRY/EXIT FUNCTION
This system is designed so that the driver’s
seat and steering column will automatically
move when the automatic transmission shift
lever is in the P (Park) position. This allows
the driver to get into and out of the driver’s
seat more easily.
The driver’s seat will slide backward and the
steering wheel will move up when the
driver’s door is opened with the ignition
switch in the LOCK position.
The driver’s seat and steering wheel will
return to the previous positions when the
ignition switch is pushed to the ACC posi-
tion.
The driver’s seat will not return to the
previous positions if the seat or steering
adjusting switch is operated when the seat is
at the exit position.
Cancel or activate entry/exit func-
tion
The shift lever must be in the P (Park)
position with the ignition switch in the OFF
position.
The entry/exit function can be activated or
canceled by pressing and holding the SET
switch for more than 10 seconds.
The entry/exit function can also be acti-
vated or canceled if the “Lift Steering upon Exit” key or “Slide Driver Seat Back on Exit”
key is turned to ON or OFF in the [Settings]
menu on the lower display. (See INFINITI
InTouch
TMOwner’s Manual.)
Initialize entry/exit function
If the battery cable is disconnected, or if the
fuse opens, the entry/exit function will not
work though this function was set on before.
In such a case, after connecting the battery
or replacing with a new fuse, open and close
the driver’s door more than two times after
the ignition switch is turned from the ON
position to the LOCK position. The entry/
exit function will be activated.
MEMORY STORAGE
Two positions for the driver’s seat, steering
column and outside mirrors can be stored in
the automatic drive positioner memory.
Follow these procedures to use the memory
system.
1. Move the shift lever to the P (Park)
position.
2. Adjust the driver’s seat, steering column and outside mirrors to the desired posi-
tions by manually operating each adjust-
ing switch. For additional information,
see “Seats” (P.1-3) and “Tilt/telescopic
steering” (P.3-29) and “Outside mirrors”
(P.3-37).
AUTOMATIC DRIVE POSITIONER
Page 224 of 529

3. Push the SET switch and, within 5seconds, push the memory switch (1 or
2) fully for at least 1 second.
The indicator light for the pushed mem-
ory switch will stay on for approximately
5 seconds after pushing the switch.
When the memory is stored in the
memory switch (1 or 2), a buzzer will
sound.
If memory is stored in the same memory
switch, the previous memory will be
deleted.
Linking Intelligent Key to a stored
memory position
The Intelligent Key can be linked to a stored
memory position with the following proce-
dure.
1. Follow the steps for storing a memoryposition.
2. While the indicator light for the memory switch being set is illuminated for 5
seconds, push the
button on the
Intelligent Key. If the indicator light
blinks, the Intelligent Key is linked to
that memory setting.
Push the ignition switch to the OFF position,
and then push the
button on the
Intelligent Key. The driver’s seat, steering
wheel and outside mirrors will move to the memorized position.
Confirming memory storage
.
Push the ignition switch to the ON
position and push the SET switch. If the
main memory has not been stored, the
indicator light will come on for approxi-
mately 0.5 second. When the memory
has stored in position, the indicator light
will stay on for approximately 5 seconds.
. If the battery cable is disconnected, or if
the fuse opens, the memory will be
canceled. In this case, reset the desired
position using the previous procedure.
. If optional Intelligent Keys are added to
your vehicle, the memory storage proce-
dure to switch 1 or 2 and linking
Intelligent Key procedure to a stored
memory position should be performed
again for each Intelligent Key. For addi-
tional Intelligent Key information, see
“Keys” (P.3-2).
Selecting the memorized position
1. Move the shift lever to the P (Park) position.
2. Use one of the following methods to move the driver’s seat, the outside
mirrors and the steering wheel.
.Push the memory switch (1 or 2) fully
for at least 1 second. The driver’s seat, steering column and
outside mirrors will move to the memor-
ized position or to the exit position when
the entry/exit function is set to active
with the indicator light flashing, and then
the light will stay on for approximately 5
seconds.
SETTING MEMORY FUNCTION
The status of the following settings can be
linked to the Intelligent Key and the memor-
ized settings can be available for each
Intelligent Key.
.
Air conditioner system
. Navigation system
. Audio system
To use the memory function, lock the doors
with the Intelligent Key that is linked to the
settings.
To enable the memorized settings:
1. Carry the Intelligent Key that is linked to the settings, and unlock the doors by
pushing the driver’s door handle request
switch or “UNLOCK”
button on the
Intelligent Key.
2. Place the ignition switch in the ON position. The memorized settings are
available.
Pre-driving checks and adjustments3-41
Page 231 of 529

4-6Monitor, climate, audio, phone and voice recognition systems
Front and rear view:
Guiding lines that indicate the approximate
vehicle width and distances to objects with
reference to the vehicle body line
, are
displayed on the monitor.
Distance guide lines
-:
Indicate distances from the vehicle body.
. Red line
: approx. 1.5 ft (0.5 m)
. Yellow line
: approx. 3 ft (1 m)
. Green line
: approx. 7 ft (2 m)
. Green line
(front view only): approx. 10
ft (3 m)
Vehicle width guide lines
:
Indicate the approximate vehicle width.
Predictive course lines
:
Indicate the predictive course when operat-
ing the vehicle. The predictive course lines
will move depending on how much the
steering wheel is turned. The predictive
course lines in the rear view will not be
displayed while the steering wheel is in the
straight ahead position.
The front view will not be displayed when
the vehicle speed is above 6 MPH (10 km/h).
NOTE:
When the monitor displays the front view
and the steering wheel turns about 90
degrees or less from the straight ahead
position, both the right and left predictive course lines
are displayed. When the
steering wheel turns about 90 degrees or
more, a line is displayed only on the
opposite side of the turn.
WAE0245X
Bird’s-eye view:
The bird’s-eye view shows the overhead
view of the vehicle which helps confirm the
vehicle position and the predictive course to
a parking space.
The vehicle icon
shows the position of the
vehicle. Note that the distance between
objects viewed in the bird’s-eye view differs
from the actual distance.
The areas that the cameras cannot cover
are indicated in black.
After the ignition switch is placed in the ON
position, the unviewable area
is high-
lighted in yellow for a few seconds after the
bird’s-eye view is displayed.
Page 232 of 529

Predictive course lines (and) indicate the
predictive course when operating the vehi-
cle. The predictive course lines (
and) will
be displayed on the monitor when the
steering wheel is turned. The predictive
course lines (
and) will move depending
on how much the steering wheel is turned.
WARNING
. Objects in the bird’s-eye view will
appear farther than the actual dis-
tance.
. Tall objects, such as a curb or vehicle,
may be misaligned or not displayed at
the seam of the views.
. Objects that are above the camera
cannot be displayed.
. The view for the bird’s-eye view may
be misaligned when the camera posi-
tion alters.
. A line on the ground may be mis-
aligned and is not seen as being
straight at the seam of the views.
The misalignment will increase as the
line proceeds away from the vehicle.
JVH1141X
Front-side view:
Guiding lines:
Guiding lines that indicate the width and the
front end of the vehicle are displayed on the
monitor.
The front-of-vehicle line
shows the front
part of the vehicle.
The side-of-vehicle line
shows the vehicle
width including the outside mirror.
The extensions
of both the frontand
sidelines are shown with a green dotted
line.
CAUTION
The turn signal light may look like the
side-of-vehicle line. This is not a mal-
function.
Monitor, climate, audio, phone and voice recognition systems4-7
Page 235 of 529
4-10Monitor, climate, audio, phone and voice recognition systems
JVH1216X
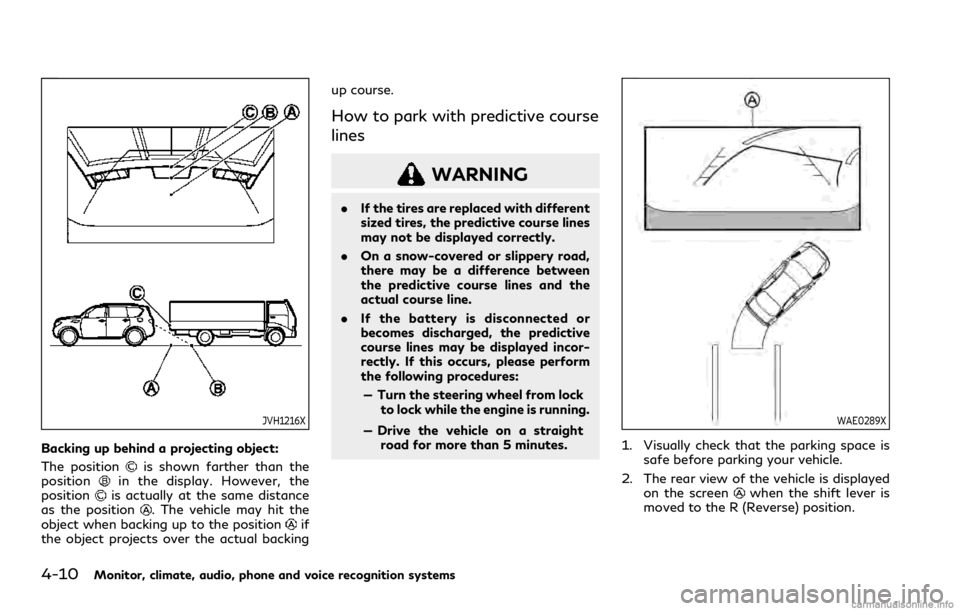
Backing up behind a projecting object:
The position
is shown farther than the
positionin the display. However, the
positionis actually at the same distance
as the position. The vehicle may hit the
object when backing up to the positionif
the object projects over the actual backing up course.
How to park with predictive course
lines
WARNING
.
If the tires are replaced with different
sized tires, the predictive course lines
may not be displayed correctly.
. On a snow-covered or slippery road,
there may be a difference between
the predictive course lines and the
actual course line.
. If the battery is disconnected or
becomes discharged, the predictive
course lines may be displayed incor-
rectly. If this occurs, please perform
the following procedures:
— Turn the steering wheel from lock to lock while the engine is running.
— Drive the vehicle on a straight road for more than 5 minutes.
WAE0289X
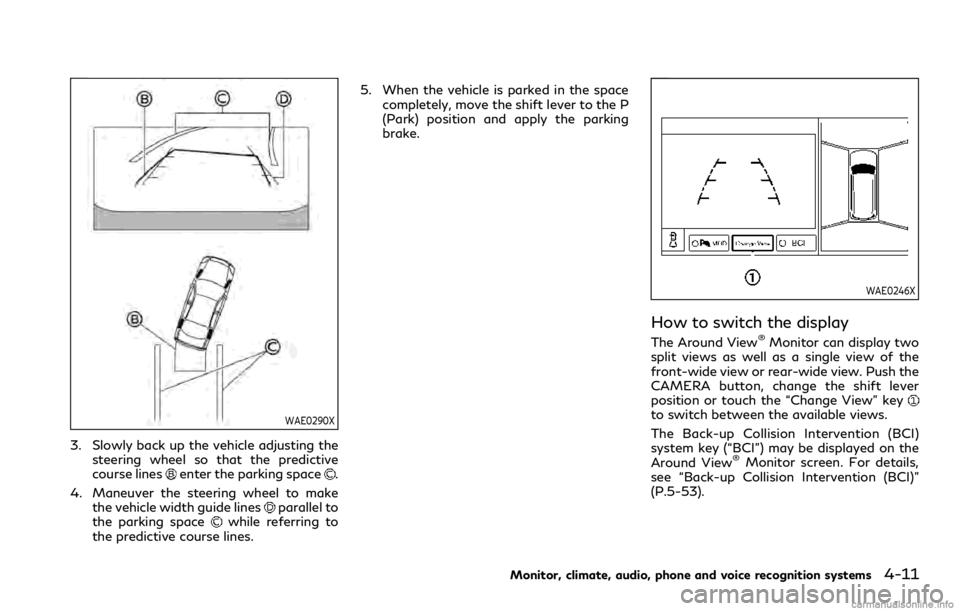
1. Visually check that the parking space is safe before parking your vehicle.
2. The rear view of the vehicle is displayed on the screen
when the shift lever is
moved to the R (Reverse) position.
Page 236 of 529
WAE0290X
3. Slowly back up the vehicle adjusting thesteering wheel so that the predictive
course lines
enter the parking space.
4. Maneuver the steering wheel to make the vehicle width guide lines
parallel to
the parking spacewhile referring to
the predictive course lines. 5. When the vehicle is parked in the space
completely, move the shift lever to the P
(Park) position and apply the parking
brake.
WAE0246X
How to switch the display
The Around View®Monitor can display two
split views as well as a single view of the
front-wide view or rear-wide view. Push the
CAMERA button, change the shift lever
position or touch the “Change View” key
to switch between the available views.
The Back-up Collision Intervention (BCI)
system key (“BCI”) may be displayed on the
Around View
®Monitor screen. For details,
see “Back-up Collision Intervention (BCI)”
(P.5-53).
Monitor, climate, audio, phone and voice recognition systems4-11
Page 269 of 529
5-6Starting and driving
not detect a sudden drop in tire pressure
(for example, a flat tire while driving).
. The low tire pressure warning light does
not automatically turn off when the tire
pressure is adjusted. After the tire is
inflated to the recommended pressure,
the vehicle must be driven at speeds
above 16 MPH (25 km/h) to activate the
TPMS and turn off the low tire pressure
warning light. Use a tire pressure gauge
to check the tire pressure.
. The “Tire Pressure Low Add Air” warning
appears in the vehicle information dis-
play when the low tire pressure warning
light is illuminated and low tire pressure
is detected. The “Tire Pressure Low Add
Air” warning turns off when the low tire
pressure warning light turns off.
The “Tire Pressure Low Add Air” warning
appears each time the ignition switch is
placed in the ON position as long as the
low tire pressure warning light remains
illuminated.
The “Tire Pressure Low Add Air” warning
does not appear if the low tire pressure
warning light illuminates to indicate a
TPMS malfunction.
. Tire pressure rises and falls depending on
the heat caused by the vehicle’s opera-
tion and the outside temperature. Do not
reduce the tire pressure after driving
because the tire pressure rises after driving. Low outside temperature can
lower the temperature of the air inside
the tire which can cause a lower tire
inflation pressure. This may cause the
low tire pressure warning light to illumi-
nate. If the warning light illuminates in
low ambient temperature, check the tire
pressure for all four tires.
. You can also check the pressure of all
tires (except the spare tire) on the vehicle
information display. (See “10. Tire pres-
sures” (P.2-32).)
For additional information, see “Low tire
pressure warning light” (P.2-16) and “Tire
Pressure Monitoring System (TPMS) ” (P.6-
3).
WARNING
. If the low tire pressure warning light
illuminates while driving, avoid sud-
den steering maneuvers or abrupt
braking, reduce vehicle speed, pull
off the road to a safe location and
stop the vehicle as soon as possible.
Driving with under-inflated tires may
permanently damage the tires and
increase the likelihood of tire failure.
Serious vehicle damage could occur
and may lead to an accident and
could result in serious personal injury. Check the tire pressure for all four
tires. Adjust the tire pressure to the
recommended COLD tire pressure
shown on the Tire and Loading
Information label to turn the low tire
pressure warning light OFF. If the
light still illuminates while driving
after adjusting the tire pressure, a
tire may be flat or the TPMS may be
malfunctioning. If you have a flat tire,
replace it with a spare tire as soon as
possible. If no tire is flat and all tires
are properly inflated, it is recom-
mended you consult an INFINITI
retailer.
. Since the spare tire is not equipped
with the TPMS, when a spare tire is
mounted or a wheel is replaced, the
TPMS will not function and the low
tire pressure warning light will flash
for approximately 1 minute. The light
will remain on after 1 minute. Have
your tires replaced and/or TPMS
system reset as soon as possible. It
is recommended you visit an INFINITI
retailer for these services.
. Replacing tires with those not origin-
ally specified by INFINITI could affect
the proper operation of the TPMS.
. Do not inject any tire liquid or aerosol
tire sealant into the tires, as this may
Page 272 of 529
OFF-ROAD RECOVERY
While driving, the right side or left side
wheels may unintentionally leave the road
surface. If this occurs, maintain control of
the vehicle by following the procedure
below. Please note that this procedure is
only a general guide. The vehicle must be
driven as appropriate based on the condi-
tions of the vehicle, road and traffic.
1. Remain calm and do not overreact.
2. Do not apply the brakes.
3. Maintain a firm grip on the steeringwheel with both hands and try to hold
a straight course.
4. When appropriate, slowly release the accelerator pedal to gradually slow the
vehicle.
5. If there is nothing in the way, steer the vehicle to follow the road while the
vehicle speed is reduced. Do not attempt
to drive the vehicle back onto the road
surface until vehicle speed is reduced.
6. When it is safe to do so, gradually turn the steering wheel until both tires return
to the road surface. When all tires are on
the road surface, steer the vehicle to stay
in the appropriate driving lane.
.If you decide that it is not safe toreturn the vehicle to the road surface
based on vehicle, road or traffic conditions, gradually slow the vehicle
to a stop in a safe place off the road.
RAPID AIR PRESSURE LOSS
Rapid air pressure loss or a “blow-out” can
occur if the tire is punctured or is damaged
due to hitting a curb or pothole. Rapid air
pressure loss can also be caused by driving
on under-inflated tires.
Rapid air pressure loss can affect the
handling and stability of the vehicle, espe-
cially at highway speeds.
Help prevent rapid air pressure loss by
maintaining the correct air pressure and
visually inspect the tires for wear and
damage. See “Wheels and tires” (P.8-27).
If a tire rapidly loses air pressure or “blows-
out” while driving maintain control of the
vehicle by following the procedure below.
Please note that this procedure is only a
general guide. The vehicle must be driven as
appropriate based on the conditions of the
vehicle, road and traffic.
WARNING
The following actions can increase the
chance of losing control of the vehicle if
there is a sudden loss of tire air pressure.
Losing control of the vehicle may cause a
collision and result in personal injury.
.
The vehicle generally moves or pulls
in the direction of the flat tire.
. Do not rapidly apply the brakes.
. Do not rapidly release the accelerator
pedal.
. Do not rapidly turn the steering
wheel.
1. Remain calm and do not overreact.
2. Maintain a firm grip on the steering wheel with both hands and try to hold
a straight course.
3. When appropriate, slowly release the accelerator pedal to gradually slow the
vehicle.
4. Gradually steer the vehicle to a safe location off the road and away from
traffic if possible.
5. Lightly apply the brake pedal to gradu- ally stop the vehicle.
6. Turn on the hazard warning flashers and either contact a roadside emergency
service to change the tire or see “Chan-
ging a flat tire” (P.6-4).
Starting and driving5-9
Page 274 of 529
and fade, resulting in loss of control
and an accident. Apply brakes lightly
and use a low range to control your
speed.
. Unsecured cargo can be thrown
around when driving over rough
terrain. Properly secure all cargo so
it will not be thrown forward and
cause injury to you or your passen-
gers.
. To avoid raising the center of gravity
excessively, do not exceed the rated
capacity of the roof rack (if so
equipped) and evenly distribute the
load. Secure heavy loads in the cargo
area as far forward and as low as
possible. Do not equip the vehicle
with tires larger than specified in this
manual. This could cause your vehicle
to roll over.
. Do not grip the inside or spokes of the
steering wheel when driving off-
road. The steering wheel could move
suddenly and injure your hands. In-
stead drive with your fingers and
thumbs on the outside of the rim.
. Before operating the vehicle, ensure
that the driver and all passengers
have their seat belts fastened.
. Always drive with the floor mats in
place as the floor may became hot. .
Lower your speed when encountering
strong crosswinds. With a higher
center of gravity, your INFINITI is
more affected by strong side winds.
Slower speeds ensure better vehicle
control.
. Do not drive beyond the performance
capability of the tires, even with
4WD engaged.
. For 4WD equipped vehicles, do not
attempt to raise two wheels off the
ground and shift the transmission to
any drive or reverse position with the
engine running. Doing so may result
in drivetrain damage or unexpected
vehicle movement which could result
in serious vehicle damage or personal
injury.
. Do not attempt to test a 4WD
equipped vehicle on a 2-wheel dy-
namometer (such as the dynam-
ometers used by some states for
emissions testing), or similar equip-
ment even if the other two wheels are
raised off the ground. Make sure you
inform test facility personnel that
your vehicle is equipped with 4WD
before it is placed on a dynamometer.
Using the wrong test equipment may
result in drivetrain damage or unex-
pected vehicle movement which could result in serious vehicle damage or
personal injury (4WD models).
. When a wheel is off the ground due
to an unlevel surface, do not spin the
wheel excessively.
. Accelerating quickly, sharp steering
maneuvers or sudden braking may
cause loss of control.
. If at all possible, avoid sharp turning
maneuvers, particularly at high
speeds. Your vehicle has a higher
center of gravity than a conventional
passenger car. The vehicle is not
designed for cornering at the same
speeds as conventional passenger
cars. Failure to operate this vehicle
correctly could result in loss of con-
trol and/or a rollover accident.
. Always use tires of the same type,
size, brand, construction (bias, bias-
belted or radial), and tread pattern
on all four wheels. Install tire chains
on the rear wheels when driving on
slippery roads and drive carefully.
. Be sure to check the brakes immedi-
ately after driving in mud or water.
See “Brake system” (P.5-123) for
wet brakes.
. Avoid parking your vehicle on steep
hills. If you get out of the vehicle and
Starting and driving5-11
Page 289 of 529
![INFINITI QX80 2021 Owners Guide 5-26Starting and driving
JVS1214X
HOW TO ENABLE/DISABLE THE
LDW SYSTEM
Perform the following steps to enable or
disable the LDW system.
1. Push the MENU button
and touch
[Driver Assistance] on the low INFINITI QX80 2021 Owners Guide 5-26Starting and driving
JVS1214X
HOW TO ENABLE/DISABLE THE
LDW SYSTEM
Perform the following steps to enable or
disable the LDW system.
1. Push the MENU button
and touch
[Driver Assistance] on the low](/img/42/35183/w960_35183-288.png)
5-26Starting and driving
JVS1214X
HOW TO ENABLE/DISABLE THE
LDW SYSTEM
Perform the following steps to enable or
disable the LDW system.
1. Push the MENU button
and touch
[Driver Assistance] on the lower display.
2. Touch [Lane Assist].
3. Touch [Lane Departure Warning] to enable or disable the system.
The displayed keys on the lower display may
vary depending on models, specifications
and software versions.
LDP SYSTEM OPERATION (if so
equipped)
The LDP system operates above approxi-
mately 45 MPH (70 km/h) and the lane
markings are clear.
If the vehicle approaches either the left or
right side of the traveling lane, the LDW
indicator on the vehicle information display
will flash and a warning chime will sound.
Then, the LDP system will automatically
apply the brakes for a short period of time to
help assist the driver to return the vehicle to
the center of the traveling lane.
NOTE:
. The LDP system is not designed to work
when you operate the lane change signal
and change traveling lanes in the direc-
tion of the signal. (The LDP system will
become operable again approximately 2
seconds after the lane change signal is
turned off.)
. The LDP braking assist will not operate
or will stop operating and only a warn-
ing chime will sound under the following
conditions.
— When the brake pedal is depressed.
— When the steering wheel is turned as
far as necessary for the vehicle to
change lanes. —
When the accelerator pedal is de-
pressed while brake control assist is
provided.
— When the Intelligent Cruise Control
(ICC), Distance Control Assist (DCA),
Blind Spot Intervention
®(BSI), Blind
Spot Warning (BSW), Predictive For-
ward Collision Warning (PFCW) or
Forward Emergency Braking (FEB)
warnings sound.
— When the hazard warning flashers
are operated.
— When driving on a curve at a high
speed.
. While the LDP system is operating, you
may hear a sound of brake operation.
This is normal and indicates that the
LDP system is operating properly.