center console INFINITI QX80 2021 Owner's Manual
[x] Cancel search | Manufacturer: INFINITI, Model Year: 2021, Model line: QX80, Model: INFINITI QX80 2021Pages: 529, PDF Size: 2.05 MB
Page 23 of 529

0-10Illustrated table of contents
WAA0133X
1. Side ventilator (P.4-27)
2. Meters and gauges (P.2-6)
3. Hazard warning flasher switch (P.6-2)
4. Center ventilator (P.4-27)
5. Upper touch screen display (upper dis-play) (See INFINITI InTouch
TMOwner’s Manual.)
— Around View
®Monitor (P.4-3)
— Navigation system (See INFINITI
InTouch
TMOwner’s Manual.) 6. Lower touch screen display (lower dis-
play) (See INFINITI InTouch
TMOwner’s
Manual.)
7. Heater and air conditioner control (P.4-28)
— Heated seats switch (P.2-48)
— Climate controlled seats switch (if so
equipped) (P.2-50)
— Defroster switch (P.2-39)
8. Front passenger air bag status light (P.1-60)
9. Audio system (See INFINITI InTouch
TM
Owner’s Manual.)
10. Front passenger supplemental air bag (P.1-52)
11. Fuse box (P.8-20)
12. Parking brake (P.5-22)
13. Hood release handle (P.3-21)
14. Steering wheel — Horn (P.2-48)
— Driver supplemental air bag (P.1-52)
— Power steering system (P.5-123)
15. Push-button ignition switch (P.5-12)
16. Front console — Power outlet (P.2-56)
— USB connection port (See Infiniti
InTouch Owner’s Manual.)
INSTRUMENT PANEL
Page 35 of 529
1-8Safety — seats, seat belts and supplemental restraint system
SSS1116
3RD ROW SEATS
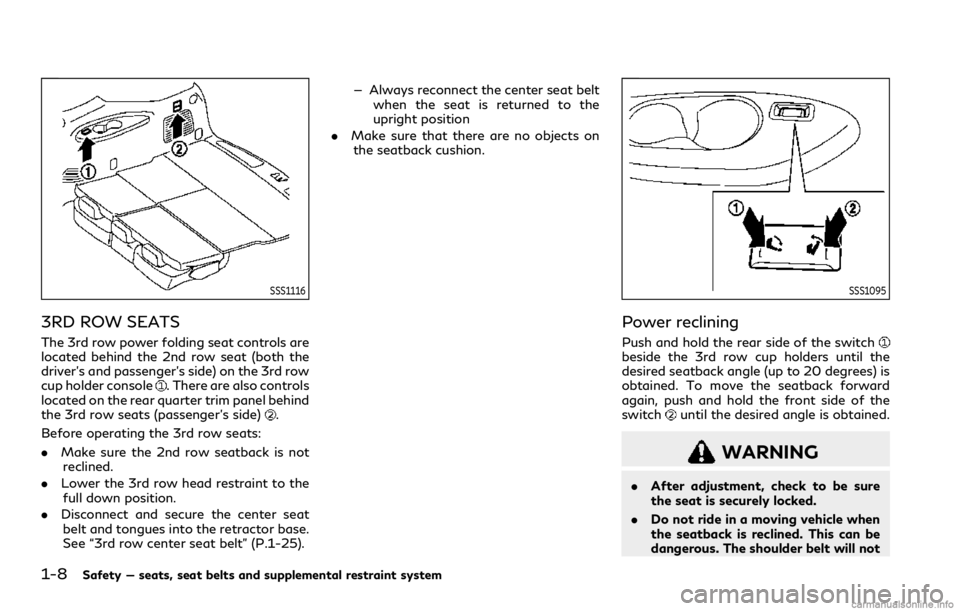
The 3rd row power folding seat controls are
located behind the 2nd row seat (both the
driver’s and passenger’s side) on the 3rd row
cup holder console
. There are also controls
located on the rear quarter trim panel behind
the 3rd row seats (passenger’s side)
.
Before operating the 3rd row seats:
. Make sure the 2nd row seatback is not
reclined.
. Lower the 3rd row head restraint to the
full down position.
. Disconnect and secure the center seat
belt and tongues into the retractor base.
See “3rd row center seat belt” (P.1-25). — Always reconnect the center seat belt
when the seat is returned to the
upright position
. Make sure that there are no objects on
the seatback cushion.
SSS1095
Power reclining
Push and hold the rear side of the switchbeside the 3rd row cup holders until the
desired seatback angle (up to 20 degrees) is
obtained. To move the seatback forward
again, push and hold the front side of the
switch
until the desired angle is obtained.
WARNING
. After adjustment, check to be sure
the seat is securely locked.
. Do not ride in a moving vehicle when
the seatback is reclined. This can be
dangerous. The shoulder belt will not
Page 38 of 529
killed.
. Do not allow people to ride in any
area of your vehicle that is not
equipped with seats and seat belts.
Be sure everyone in your vehicle is in
a seat and using a seat belt properly.
. Do not fold down the rear seats when
occupants are in the rear seat area or
any cargo is on the rear seats.
. Head restraints should be adjusted
properly as they may provide signifi-
cant protection against injury in an
accident. Always replace and adjust
them properly if they have been
removed for any reason.
. If the head restraints are removed for
any reason, they should be securely
stored to prevent them from causing
injury to passengers or damage to the
vehicle in case of sudden braking or
an accident.
. When returning the seatbacks to the
upright position, be certain they are
completely secured in the latched
position. If they are not completely
secured, passengers may be injured in
an accident or sudden stop.
. Properly secure all cargo to help
prevent it from sliding or shifting.
Do not place cargo higher than the seatbacks. In a sudden stop or colli-
sion, unsecured cargo could cause
personal injury.
. When folding the bench seat seat-
back down for maximum storage,
make sure the seat base is in the
latched position by rocking the seat
base. If the seat base is not properly
secured, cargo stored on top of a
folded seatback may become a pro-
jectile causing personal injury or
vehicle damage.
CAUTION
.When folding the 2nd row seat for
maximum cargo hauling, be sure that
cargo does not contact the center
console of the captain’s seat (if so
equipped) to avoid possible damage
to the console.
. When folding or returning the seat(s)
to the upright position, to avoid
injury to yourself and others:
— Make sure that the seat path is clear before moving the seat.
— Be careful not to allow hands or feet to get caught or pinched in
the seat.
Stowing 2nd and 3rd row seats
To stow 2nd and 3rd row seats for maximum
cargo capacity:
Safety — seats, seat belts and supplemental restraint system1-11
Page 40 of 529
CAUTION
When folding the 2nd row seat for
maximum cargo hauling, be sure that
cargo does not contact the center con-
sole of the captain’s seat (if so equipped)
to avoid possible damage to the console.
WARNING
Head restraint/headrest supplement the
other vehicle safety systems. They may
provide additional protection against
injury in certain rear end collisions.
Adjustable head restraints/headrests
must be adjusted properly, as specified
in this section. Check the adjustment
after someone else uses the seat. Do not
attach anything to the head restraint/
headrest stalks or remove the head
restraint/headrest. Do not use the seat
if the head restraint/headrest has been
removed. If the head restraint/headrest
was removed, reinstall and properly
adjust the head restraint/headrest be-
fore an occupant uses the seating posi-
tion. Failure to follow these instructions
can reduce the effectiveness of the head
restraint/headrest. This may increase
the risk of serious injury or death in a
collision.
Safety — seats, seat belts and supplemental restraint system1-13
HEAD RESTRAINTS/HEADRESTS
Page 90 of 529

sensors:
.An object weighing over 9.1 lbs (4 kg)
hanging on the seat or placed in the
seatback pocket.
. A child restraint or other object pressing
against the rear of the seatback.
. A rear passenger pushing or pulling on
the back of the front passenger seat.
. Forcing the front seat or seatback
against an object on the seat or floor
behind it.
. An object placed under the front passen-
ger seat.
. An object placed between the seat
cushion and center console or between
the seat cushion and the door.
If the vehicle is moving, please come to a
stop when it is safe to do so. Check and
correct any of the above conditions. Restart
the vehicle and wait 1 minute.
NOTE:
A system check will be performed during
which the front passenger air bag status
light will remain lit for about 7 seconds
initially.
If the light is still ON after this, it is
recommended that the vehicle be checked
by an INFINITI retailer as soon as possible.
2. If the light is ON with an adult occupy- ing the front passenger seat: .
Occupant is a small adult — the front
passenger air bag status light is func-
tioning as intended. The front passenger
air bag is suppressed.
However, if the occupant is not a small adult,
then this may be due to the following
conditions that may be interfering with the
weight sensors:
. Occupant is not sitting upright, leaning
against the seatback, and centered on
the seat cushion with his/her feet com-
fortably extended to the floor.
. A child restraint or other object pressing
against the rear of the seatback.
. A rear passenger pushing or pulling on
the back of the front passenger seat.
. Forcing the front seat or seatback
against an object on the seat or floor
behind it.
. An object placed under the front passen-
ger seat.
. An object placed between the seat
cushion and center console or between
the seat cushion and the door.
If the vehicle is moving, please come to a
stop when it is safe to do so. Check and
correct any of the above conditions. Restart
the vehicle and wait 1 minute. NOTE:
A system check will be performed during
which the front passenger air bag status
light will remain lit for about 7 seconds
initially.
If the light is still ON after this, the person
should be advised not to ride in the front
passenger seat and it is recommended that
the vehicle be checked by an INFINITI
retailer as soon as possible.
3. If the light is OFF with a small adult, child or child restraint occupying the
front passenger seat.
This may be due to the following
conditions that may be interfering with
the weight sensors:
. Small adult or child is not sitting upright,
leaning against the seatback, and cen-
tered on the seat cushion with his/her
feet comfortably extended to the floor.
. The child restraint is not properly in-
stalled, as outlined. (See “Child re-
straints” (P.1-31).)
. An object weighing over 9.1 lbs (4 kg)
hanging on the seat or placed in the
seatback pocket.
. A child restraint or other object pressing
against the rear of the seatback.
. A rear passenger pushing or pulling on
the back of the front passenger seat.
Safety — seats, seat belts and supplemental restraint system1-63
Page 91 of 529
1-64Safety — seats, seat belts and supplemental restraint system
.Forcing the front seat or seatback
against an object on the seat or floor
behind it.
. An object placed under the front passen-
ger seat.
. An object placed between the seat
cushion and center console.
If the vehicle is moving, please come to a
stop when it is safe to do so. Check and
correct any of the above conditions. Restart
the vehicle and wait 1 minute.
NOTE:
A system check will be performed during
which the front passenger air bag status
light will remain lit for about 7 seconds
initially.
If the light is still OFF after this, the small
adult, child or child restraint should be
repositioned in the rear seat and it is
recommended that the vehicle be checked
by an INFINITI retailer as soon as possible.Other supplemental front-impact
air bag precautions
WARNING
. Do not place any objects on the
steering wheel pad or on the instru-
ment panel. Also, do not place any
objects between any occupant and
the steering wheel or instrument
panel. Such objects may become
dangerous projectiles and cause in-
jury if the front air bags inflate.
. Do not place objects with sharp edges
on the seat. Also, do not place heavy
objects on the seat that will leave
permanent impressions in the seat.
Such objects can damage the seat or
occupant classification sensors
(weight sensors). This can affect the
operation of the air bag system and
result in serious personal injury.
. Do not use water or acidic cleaners
(hot steam cleaners) on the seat. This
can damage the seat or occupant
classification sensors. This can also
affect the operation of the air bag
system and result in serious personal
injury. .
Immediately after inflation, several
front air bag system components will
be hot. Do not touch them; you may
severely burn yourself.
. No unauthorized changes should be
made to any components or wiring of
the supplemental air bag system. This
is to prevent accidental inflation of
the supplemental air bag or damage
to the supplemental air bag system.
. Do not make unauthorized changes
to your vehicle’s electrical system,
suspension system or front end struc-
ture. This could affect proper opera-
tion of the front air bag system.
. Tampering with the air bag system
may result in serious personal injury.
Tampering includes changes to the
steering wheel and the instrument
panel assembly by placing material
over the steering wheel pad and
above the instrument panel or by
installing additional trim material
around the air bag system.
. Removing or modifying the front
passenger seat may affect the func-
tion of the air bag system and result
in serious personal injury.
. Modifying or tampering with the
front passenger seat may result in
serious personal injury. For example,
Page 102 of 529

WAA0133X
1. Side ventilator
2. Meters and gauges
3. Hazard warning flasher switch
4. Center ventilator5. Upper touch screen display (upper dis-
play)
— Around View
®Monitor
— Navigation system
6. Lower touch screen display (lower dis- play) 7. Heater and air conditioner control
— Heated seats switch
— Climate controlled seats switch (if so
equipped)
— Defroster switch
8. Front passenger air bag status light
9. Audio system
10. Front passenger supplemental air bag
11. Fuse box
12. Parking brake
13. Hood release handle
14. Steering wheel — Horn
— Driver supplemental air bag
— Power steering system
15. Push-button ignition switch
16. Front console — Power outlet
— USB connection port
17. Cup holder/Tray
18. Glove box
Instruments and controls2-5
INSTRUMENT PANEL
Page 147 of 529
2-50Instruments and controls
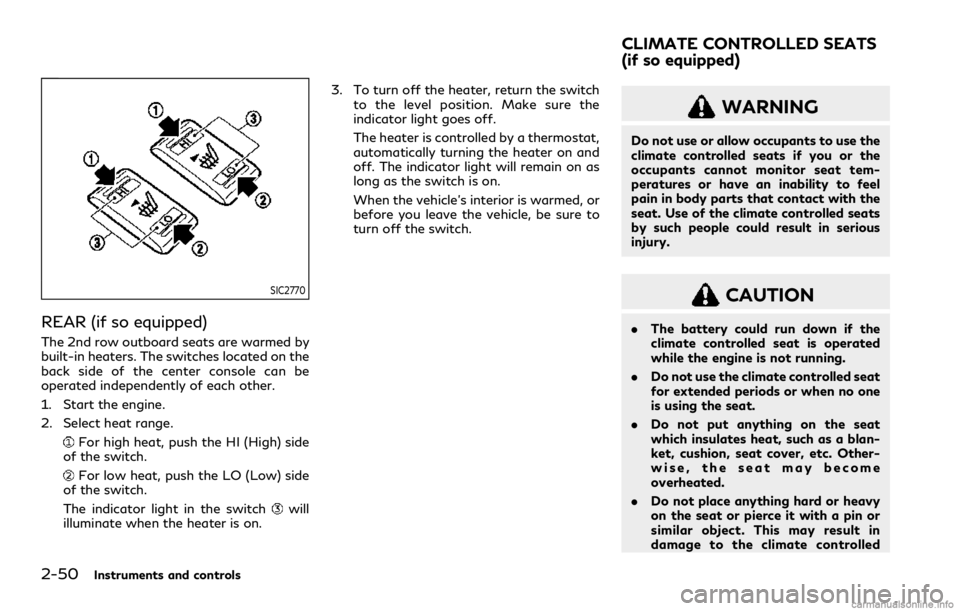
SIC2770
REAR (if so equipped)
The 2nd row outboard seats are warmed by
built-in heaters. The switches located on the
back side of the center console can be
operated independently of each other.
1. Start the engine.
2. Select heat range.
For high heat, push the HI (High) side
of the switch.
For low heat, push the LO (Low) side
of the switch.
The indicator light in the switch
will
illuminate when the heater is on. 3. To turn off the heater, return the switch
to the level position. Make sure the
indicator light goes off.
The heater is controlled by a thermostat,
automatically turning the heater on and
off. The indicator light will remain on as
long as the switch is on.
When the vehicle’s interior is warmed, or
before you leave the vehicle, be sure to
turn off the switch.
WARNING
Do not use or allow occupants to use the
climate controlled seats if you or the
occupants cannot monitor seat tem-
peratures or have an inability to feel
pain in body parts that contact with the
seat. Use of the climate controlled seats
by such people could result in serious
injury.
CAUTION
.The battery could run down if the
climate controlled seat is operated
while the engine is not running.
. Do not use the climate controlled seat
for extended periods or when no one
is using the seat.
. Do not put anything on the seat
which insulates heat, such as a blan-
ket, cushion, seat cover, etc. Other-
wise, the seat may become
overheated.
. Do not place anything hard or heavy
on the seat or pierce it with a pin or
similar object. This may result in
damage to the climate controlled
CLIMATE CONTROLLED SEATS
(if so equipped)
Page 258 of 529

detects odors outside the vehicle such as
pulp or chemicals, and exhaust gas such as
gasoline or diesel. When such odors or gases
are detected, the display and the system
automatically change from the fresh air
mode to the recirculation mode.
When the automatic air circulation control
mode is on, for the first 5 minutes, the air
recirculation mode is selected to prevent
dust, dirt and pollen from entering the
vehicle and to clean the air inside of the
vehicle.
After 5 minutes, the sensor detects exhaust
gas and automatically alternates between
the air recirculation mode and the fresh air
mode.
NOTE:
The automatic air recirculation mode can be
activated under the following conditions.
.The air flow control is not in the wind-
shield defrosting mode (the indicator
light on the “
” front defroster but-
ton is turned off).
. The outside temperature is approxi-
mately 32 °F (0 °C) or above.
Ion control:
The Advanced Climate Control system unit
generates highly concentrated Plasmaclus-
ter
®ions into the air blown from the
ventilators to reduce odor absorbed into the interior trim and to suppress airborne
bacteria. The high-density Plasmacluster
®
ions also have a proven skin moisture
preserving effect.
The Plasmacluster
®icon on the Climate
screen indicates the status of the Plas-
macluster
®ion emission from the system
and changes with the amount of the air flow.
REAR AUTOMATIC AIR CONDI-
TIONING SYSTEM
The front air conditioning system must be
turned on to activate the rear air condition-
ing system.
The rear air conditioning system can be
operated with the buttons on the front air
conditioner control panel, the touch panel
screen and the buttons on the rear air
conditioner control panel at the rear of the
center console.
To turn on and off the rear air conditioning
system from the front seats, touch the “Rear
CLIMATE” key on the Climate screen and
then touch the “ON/OFF” key on the Rear
climate screen.
When the Rear climate screen is displayed,
the rear air conditioning system can also be
controlled on the front air conditioner con-
trol panel. (See “Automatic air conditioner”
(P.4-29).) The front air conditioner control panel
cannot be used to operate the front air
conditioning system when the Rear climate
screen is shown on the lower display. To use
the front air conditioner control panel for the
front air conditioning system operation,
push the CLIMATE button or touch the
“
” key on the Rear climate screen so that
the Rear climate screen is not shown on the
lower display. (See “Operations on touch
panel screen” (P.4-31).)
This table shows the relation between the
front air conditioner control panel and the
rear air conditioner control panel.
Display status
Rear climate
screen is dis-
played. Rear climate
screen is not dis-
played (Climate
screen).
Front air
condition-
er control
panel Only the rear
automatic air
conditioning
system can be
operated. Only the front air
conditioner can
be operated.
Rear air
condition-
er control
panel Cannot be op-
erated. Only the rear
automatic air
conditioning sys-
tem can be oper-
ated.
Monitor, climate, audio, phone and voice recognition systems4-33
Page 260 of 529

.“Auto”
Touch to turn the auto mode on/off.
. “Mode”
Touch to select different air flow mode.
WAE0470X
1. “” on/off button
2. “
” fan speed control button
3. AUTO button
4. Display
5. MODE button
6. TEMP button
Rear air conditioner control panel
operation
Rear control buttons:
The rear seat passengers can adjust the rear
automatic air conditioning system using the
control switches on the rear of the center
console.
The rear control buttons do not function
when the Rear climate screen is shown on
the front display. To activate the rear control
buttons, push the CLIMATE button and
switch the screen to the Climate screen.
. “
” on/off button:
Rear automatic air conditioning system
on and off
. “
” fan speed control button:
Rear fan speed control up/down
. AUTO button:
Rear automatic air conditioning system
on, AUTO mode on
. MODE button:
Rear air flow control change
. TEMP button:
Rear temperature control up/down
Monitor, climate, audio, phone and voice recognition systems4-35