battery INFINITI QX80 2023 Service Manual
[x] Cancel search | Manufacturer: INFINITI, Model Year: 2023, Model line: QX80, Model: INFINITI QX80 2023Pages: 590, PDF Size: 2.57 MB
Page 275 of 590

public institution rules that apply in your
country/area.
CAUTION
.Always ensure that the battery is
inserted in the correct direction as
shown in the battery compartment.
. When the battery fails to function,
replace it immediately.
. Remove the battery if the remote
control is not used for a month or
longer.
. Storage in extreme cold can weaken
the battery. Keep the remote control
stored in a cool, dry place.
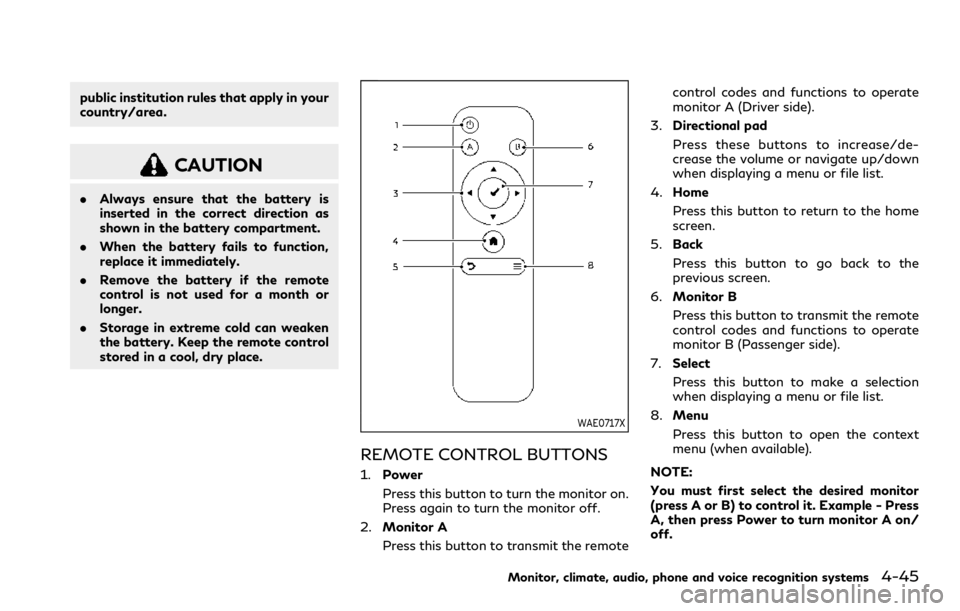
WAE0717X
REMOTE CONTROL BUTTONS
1. Power
Press this button to turn the monitor on.
Press again to turn the monitor off.
2. Monitor A
Press this button to transmit the remote control codes and functions to operate
monitor A (Driver side).
3. Directional pad
Press these buttons to increase/de-
crease the volume or navigate up/down
when displaying a menu or file list.
4. Home
Press this button to return to the home
screen.
5. Back
Press this button to go back to the
previous screen.
6. Monitor B
Press this button to transmit the remote
control codes and functions to operate
monitor B (Passenger side).
7. Select
Press this button to make a selection
when displaying a menu or file list.
8. Menu
Press this button to open the context
menu (when available).
NOTE:
You must first select the desired monitor
(press A or B) to control it. Example - Press
A, then press Power to turn monitor A on/
off.
Monitor, climate, audio, phone and voice recognition systems4-45
Page 276 of 590

4-46Monitor, climate, audio, phone and voice recognition systems
WAE0718X
WIRELESS HEADPHONE OP-
ERATION
Installing the batteries
Before attempting to operate the head-
phones, install the batteries as described
below:1. Remove the headphone battery cover by
using a screwdriver.
2. Install two “AAA” batteries into the headphones. Make sure that proper
polarity (+ or -) is observed.
3. Reinstall headphone battery cover.
Headphone operation
Press the power buttonon the head-
phones to turn on and off the headphones.
The amber (Monitor A) or green (Monitor B)
LED will illuminate when the headphone is
turned on. Set the select switch to “A” or “B”
for use with the “A” monitor or “B” monitor
respectively. Use the volume thumb wheel
to adjust the volume level for the headphone
audio.
NOTE:
If the headphones are accidentally left on
and system is powered off, a battery saver
feature will automatically turn off the
headphones after approximately 3 minutes.
WARNING
Keep the batteries out of the reach of
children. In case the batteries are acci-
dentally swallowed, immediately consult
a doctor. Also, when disposing of used
batteries, please comply with govern-
mental regulations or environmental
public institution rules that apply in your
country/area.
Page 277 of 590

CAUTION
.Always ensure that the batteries are
inserted with the positive and nega-
tive terminals in the correct direction
as shown in the battery compartment
.
. Different types of batteries have
different characteristics. Do not mix
different types.
. Do not mix old and new batteries.
Mixing old and new batteries will
shorten battery life and/or cause
chemical leaks from the old batteries.
. When batteries fail to function, re-
place them immediately.
. Remove the batteries if the head-
phones are not used for a month or
longer.
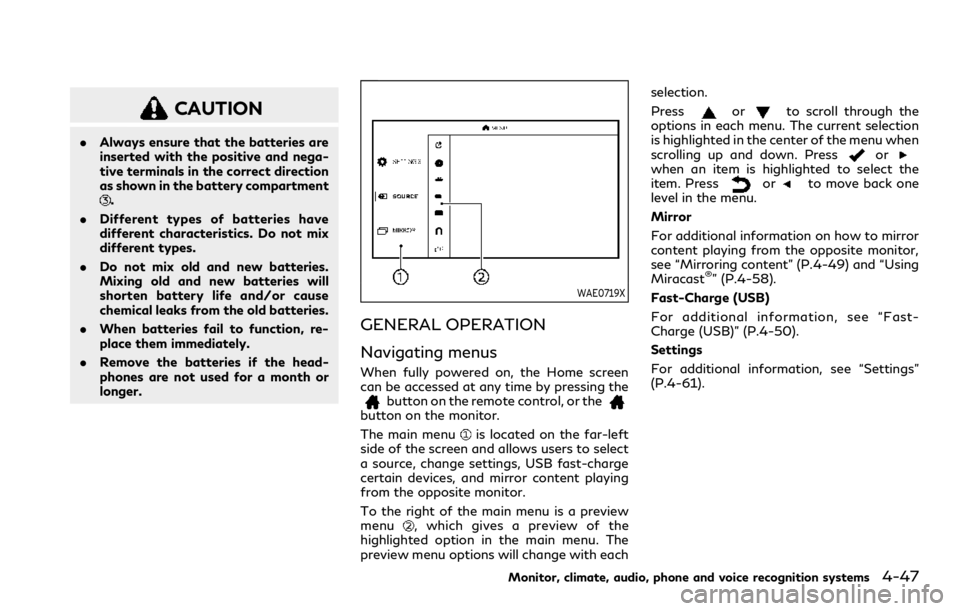
WAE0719X
GENERAL OPERATION
Navigating menus
When fully powered on, the Home screen
can be accessed at any time by pressing the
button on the remote control, or thebutton on the monitor.
The main menu
is located on the far-left
side of the screen and allows users to select
a source, change settings, USB fast-charge
certain devices, and mirror content playing
from the opposite monitor.
To the right of the main menu is a preview
menu
, which gives a preview of the
highlighted option in the main menu. The
preview menu options will change with each selection.
Press
orto scroll through the
options in each menu. The current selection
is highlighted in the center of the menu when
scrolling up and down. Press
orwhen an item is highlighted to select the
item. Pressorto move back one
level in the menu.
Mirror
For additional information on how to mirror
content playing from the opposite monitor,
see “Mirroring content” (P.4-49) and “Using
Miracast
®” (P.4-58).
Fast-Charge (USB)
For additional information, see “Fast-
Charge (USB)” (P.4-50).
Settings
For additional information, see “Settings”
(P.4-61).
Monitor, climate, audio, phone and voice recognition systems4-47
Page 288 of 590

4-58Monitor, climate, audio, phone and voice recognition systems
WAE0736X
Exiting Slingplayer®
There are two ways to exit the Slingplayer®
application. Pressorwhile on the
main screen to return to the main menu.
When exiting the application, you will be
prompted to confirm: "Are you sure you
want to exit Slingplayer? There will be no
data usage once exited". Select “Yes” to
return to the Home Screen or select “No” to
return to the stream.
Connection quality
The quality of a mobile network connection,
whether it’s Wi-Fi or a mobile hotspot can
vary, due to network conditions. Connection
speed and bandwidth can fluctuate, creating conditions that aren’t optimal for smooth
streaming.
Slingbox®compatibility
The following legacy Slingbox®devices are
not supported: Slingbox PRO, Slingbox AV,
Slingbox TUNER, Slingbox Classic.
Visit www.slingbox.com for more informa-
tion on Slingbox
®or where to purchase.
MIRACAST®
About Miracast®
Miracast®is a dedicated wireless connection
technology that allows content streaming
between a mobile device and the RSI system.
The connection is made without cables or a
network connection. It provides the ability to
“cast” (display) content, such as images or
videos from the mobile device to the RSI
system. There is no need for an external
internet connection and the ability to con-
nect is inside Miracast-certified devices.
NOTE: Miracast
®works with Android OS
mobile devices only. This feature is not
supported on iOS devices.
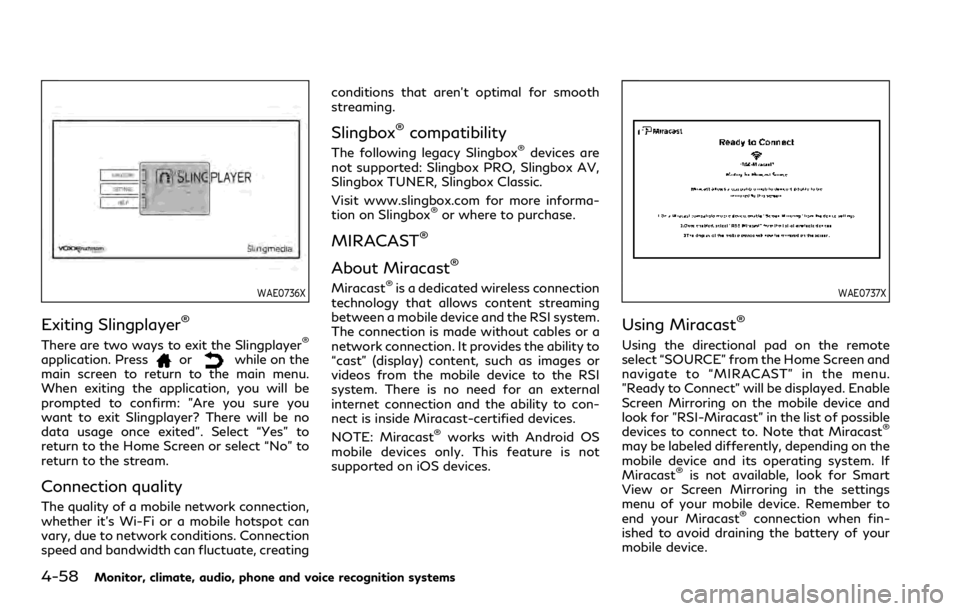
WAE0737X
Using Miracast®
Using the directional pad on the remote
select “SOURCE” from the Home Screen and
navigate to “MIRACAST” in the menu.
"Ready to Connect" will be displayed. Enable
Screen Mirroring on the mobile device and
look for "RSI-Miracast" in the list of possible
devices to connect to. Note that Miracast
®
may be labeled differently, depending on the
mobile device and its operating system. If
Miracast
®is not available, look for Smart
View or Screen Mirroring in the settings
menu of your mobile device. Remember to
end your Miracast
®connection when fin-
ished to avoid draining the battery of your
mobile device.
Page 298 of 590

4-68Monitor, climate, audio, phone and voice recognition systems
TROUBLESHOOTING
SymptomRemedy
Monitor does not power on Verify the vehicle is in the ON or ACC position.
Verify the battery is installed correctly in the remote control.
Verify the in-line fuse protection is good. Refer to the RSI system installation instructions for vehicle-specific
fuse location.
Monitor front panel controls flash red For further diagnosis, it is recommended that you visit an INFINITI retailer.
System frozen - will not respond Soft reset the system by pressing and holding the power button on the top of the driver side monitor for 5
seconds.
Hard reset the system by turning the ignition off, then back on.
No picture Check that the signal source is connected.
Check the menu source setting. Match your monitor mode with the source correctly.
No sound or distorted sound Make sure that the external media device is connected properly, and all cables are securely inserted into the
appropriate jacks.
Verify that the batteries in the headphones are fresh.
If you are using the wireless headphones, make sure you turn on the power and select the correct monitor (A or
B).
Verify the volume is turned up on headphones and the system.
Verify nothing is blocking the path between the monitor IR sensor and headphones.
When placing the headphones on your head, make sure to observe the Left and Right orientation. The
headphones must be oriented correctly (facing forward) to receive the audio signal.
Monitor feels warm When the monitor is in use for a long period of time, the surface will be warm. This is normal.
Cannot connect mobile device to the internal
RSI Wi-Fi network Check to make sure Wi-Fi is enabled on the mobile device.
Check to make sure RSI is set to Access Point mode.
Check to make sure the correct password is used. For additional information, see “Using Wi-Fi” (P.4-61).
Cannot connect RSI system to an external Wi-
Fi network Check to make sure RSI is set to Client Mode. Check to make sure the correct password is used. For additional
information, see “Using Wi-Fi” (P.4-61).
Page 305 of 590

5 Starting and driving
Precautions when starting and driving ...................... 5-4Exhaust gas (carbon monoxide) .............................. 5-4
Three-way catalyst ..................................................... 5-4
Tire Pressure Monitoring System (TPMS) ........... 5-5
Avoiding collision and rollover ................................. 5-8
On-pavement and off-road
driving precautions ..................................................... 5-8
Off-road recovery ....................................................... 5-9
Rapid air pressure loss ............................................... 5-9
About lowering of the rear of the vehicle ......... 5-10
Drinking alcohol/drugs and driving ..................... 5-10
Driving safety precautions ..................................... 5-10
Push-button ignition switch ........................................ 5-12
Operating range for engine start function ........ 5-12
Push-button ignition switch positions ................ 5-13
Emergency engine shut off .................................... 5-14
Intelligent Key battery discharge .......................... 5-14
Before starting the engine ........................................... 5-15
Starting the engine ......................................................... 5-15 Remote start (if so equipped) ................................ 5-16
Driving the vehicle .......................................................... 5-17 Engine protection mode .......................................... 5-17
Automatic transmission ........................................... 5-18
Parking brake ................................................................... 5-22 Lane Departure Warning (LDW) ............................... 5-22
LDW system operation ......................................... 5-24
How to enable/disable the LDW system ........ 5-24
LDW system limitations ........................................ 5-25
System temporarily unavailable .......................... 5-26
System malfunction ................................................ 5-26
System maintenance .............................................. 5-27
Lane Departure Prevention (LDP) (if
so equipped) .................................................................... 5-27 LDP system operation ........................................... 5-29
How to enable/disable the LDP system ......... 5-30
LDP system limitations ........................................ 5-30
System temporarily unavailable .......................... 5-32
System malfunction ................................................ 5-33
System maintenance .............................................. 5-33
Blind Spot Warning (BSW) ......................................... 5-34
BSW system operation .......................................... 5-35
How to enable/disable the BSW system ......... 5-36
BSW system limitations ........................................ 5-36
BSW driving situations .......................................... 5-37
System temporarily unavailable ......................... 5-40
System malfunction ............................................... 5-40
System maintenance .............................................. 5-41
Page 307 of 590

Increasing fuel economy ............................................. 5-116
INFINITI all-mode 4WD®(if so equipped) ............ 5-116
INFINITI all-mode 4WD®system ....................... 5-117
4WD shift switch ................................................... 5-120
4WD shift indicator ................................................ 5-121
4WD warning light ................................................. 5-121
Hill Start Assist system ............................................... 5-123
Parking/parking on hills ............................................. 5-124
TOW mode ..................................................................... 5-125
SNOW mode .................................................................. 5-125
Front and rear sonar system ..................................... 5-126
System operation .................................................... 5-127
Sonar function settings ........................................ 5-128
Turning on and off the sonar function ............ 5-130
Sonar limitations ..................................................... 5-131
System temporarily unavailable .......................... 5-132
System maintenance .............................................. 5-132
Power steering .............................................................. 5-132 Brake system ................................................................. 5-133
Braking precautions .............................................. 5-133
Parking brake break-in ........................................ 5-133
Brake assist ................................................................... 5-134
Brake assist ............................................................ 5-134
Anti-lock Braking System (ABS) ...................... 5-134
Vehicle Dynamic Control (VDC) system ................ 5-135 Vehicle Dynamic Control (VDC)
OFF switch ............................................................. 5-137
Cold weather driving ................................................... 5-137 Freeing a frozen door lock ................................. 5-137
Antifreeze ................................................................ 5-137
Battery ..................................................................... 5-137
Draining of coolant water .................................. 5-137
Tire equipment ...................................................... 5-138
Special winter equipment .................................. 5-138
Driving on snow or ice ........................................ 5-138
Engine block heater (if so equipped) .............. 5-138
Page 317 of 590

SSD1021
When the ignition switch is pushed without
depressing the brake pedal, the ignition
switch position will change as follows:
.Push center once to change to ACC.
. Push center two times to change to ON.
. Push center three times to change to
OFF. (No position illuminates.)
. Push center four times to return to ACC.
. Open or close any door to return to
LOCK during the OFF position.
The ignition lock is designed so that the
ignition switch position cannot be switched
to LOCK until the shift lever is moved to the
P (Park) position.
When the ignition switch cannot be pushed
toward the LOCK position, proceed as follows:
1. Move the shift lever into the P (Park)
position.
2. Push the ignition switch to the OFF position. The ignition switch position
indicator will not illuminate.
3. Open the door. The ignition switch will change to the LOCK position.
The shift lever can be moved from the P
(Park) position if the ignition switch is in the
ON position and the brake pedal is de-
pressed.
If the battery of the vehicle is discharged,
the push-button ignition switch cannot be
turned from the LOCK position.
Some indicators and warnings for operation
are displayed on the vehicle information
display between the speedometer and tach-
ometer. (See “Vehicle information display”
(P.2-20).)
PUSH-BUTTON IGNITION
SWITCH POSITIONS
LOCK (Normal parking position)
The ignition switch can only be locked in this
position.
The ignition switch will be unlocked when it
is pushed to the ACC position while carrying
the Intelligent Key.
ACC (Accessories)
This position activates electrical accessories
such as the radio, when the engine is not
running.
ACC has a battery saver feature that will
turn the ignition switch to the OFF position
after a period of time under the following
conditions:
. all doors are closed.
. shift lever is in P (Park).
. turn signal/hazard indicator lights are
not flashing.
The battery saver feature will be cancelled if
any of the following occur:
. any door is opened.
. shift lever is moved out of P (Park).
. ignition switch changes position.
ON (Normal operating position)
This position turns on the ignition system
and electrical accessories.
ON has a battery saver feature that will turn
the ignition switch to the OFF position, if the
vehicle is not running, after some time under
the following conditions:
.all doors are closed.
. shift lever is in P (Park).
. turn signal/hazard indicator lights are
not flashing.
Starting and driving5-13
Page 318 of 590

5-14Starting and driving
The battery saver feature will be cancelled if
any of the following occur:
.any door is opened.
. shift lever is moved out of P (Park).
. ignition switch changes position.
OFF
The engine can be turned off in the position.
The ignition lock is designed so that the
ignition switch cannot be switched to the
LOCK position until the shift lever is moved
to the P (Park) position.
CAUTION
Do not leave the vehicle with the push-
button ignition switch in ACC or ON
positions when the engine is not running
for an extended period. This can dis-
charge the battery.
EMERGENCY ENGINE SHUT OFF
To shut off the engine in an emergency
situation while driving, perform the follow-
ing procedure:
.Rapidly push the push-button ignition
switch 3 consecutive times in less than
1.5 seconds, or .
Push and hold the push-button ignition
switch for more than 2 seconds.
JVS0404X
INTELLIGENT KEY BATTERY DIS-
CHARGE
If the battery of the Intelligent Key is
discharged, or environmental conditions in-
terfere with the Intelligent Key operation,
start the engine according to the following
procedure:
1. Move the shift lever to the P (Park) position.
2. Firmly apply the foot brake.
3. Touch the ignition switch with the Intelligent Key as illustrated. (A chime
will sound.)
4. Push the ignition switch while depressing
Page 319 of 590

the brake pedal within 10 seconds after
the chime sounds. The engine will start.
After step 3 is performed, when the ignition
switch is pushed without depressing the
brake pedal, the ignition switch position will
change to ACC.
NOTE:
. When the ignition switch is pushed to
the ACC or ON position or the engine is
started by the above procedures, the
“Key Battery Low” message appears on
the vehicle information display even if
the Intelligent Key is inside the vehicle.
This is not a malfunction. To turn off the
Intelligent Key battery discharge indi-
cator, touch the ignition switch with the
Intelligent Key again.
. If the “Key Battery Low” message
appears, replace the battery as soon as
possible. (See “Battery” (P.8-11).) .
Make sure the area around the vehicle is
clear.
. Check fluid levels such as engine oil,
coolant, brake fluid and window washer
fluid as frequently as possible, or at least
whenever you refuel.
. Check that all windows and lights are
clean.
. Visually inspect tires for their appearance
and condition. Also check tires for proper
inflation.
. Lock all doors.
. Position seat and adjust head restraints/
headrests.
. Adjust inside and outside mirrors.
. Fasten seat belts and ask all passengers
to do likewise.
. Check the operation of warning lights
when the ignition switch is pushed to the
ON position. (See “Warning lights, in-
dicator lights and audible reminders”
(P.2-11).)1. Apply the parking brake.
2. Move the shift lever to the P (Park) or N
(Neutral) position. (P is recommended.)
The starter is designed not to operate
unless the shift lever is in either of the
above positions.
3. Push the ignition switch to the ON position. Firmly depress the brake pedal
and push the ignition switch to start the
engine.
To start the engine immediately, push
and release the ignition switch while
depressing the brake pedal with the
ignition switch in any position.
.If the engine is very hard to start inextremely cold weather or when re-
starting, depress the accelerator ped-
al a little (approximately 1/3 to the
floor) and while holding, crank the
engine. Release the accelerator pedal
when the engine starts.
.If the engine is very hard to start
because it is flooded, depress the
accelerator pedal all the way to the
floor and hold it. Push the ignition
switch to the ON position to start
cranking the engine. After 5 or 6
seconds, stop cranking by pushing
the ignition switch to OFF. After
cranking the engine, release the accel-
erator pedal. Crank the engine with
Starting and driving5-15
BEFORE STARTING THE ENGINE STARTING THE ENGINE