engine coolant ISUZU KB P190 2007 Workshop Repair Manual
[x] Cancel search | Manufacturer: ISUZU, Model Year: 2007, Model line: KB P190, Model: ISUZU KB P190 2007Pages: 6020, PDF Size: 70.23 MB
Page 3150 of 6020

Engine Cooling – V6 Engine Page 6B1–15
2.8 Engine Coolant Temperature Sensor
An Engine Coolant Temperature (ECT) sensor (2) is
mounted in the left-hand side cylinder head, just above
the exhaust manifold. The ECT sensor is used in
conjunction with the instrument panel temperature gauge.
The ECT sensor generates a signal, which is used by the
engine management system for calculation of the various
engine management functions.
Figure 6B1 – 13 shows the wiring harness connector (1)
and the ECT sensor (2).
Refer to 6C1-1 Engine Management General Information
for further information on the ECT sensor.
Figure 6B1 – 13
BACK TO CHAPTER INDEX
TO MODEL INDEX
ISUZU KB P190 2007
Page 3151 of 6020
Engine Cooling – V6 Engine Page 6B1–16
3 Service Operations
3.1 Service Notes
Safety
• To avoid serious personal injury, never
remove the coolant filler pressure cap on
the coolant outlet housing when the
engine is hot, even if the cooling system
should require filling. Sudden release of
cooling system pressure is very
dangerous.
• The vehicle is fitted with an electric
radiator cooling fan. When working around
the engine compartment, keep clear of the
fan as it may start without warning.
Before removing the coolant filler cap, allow the engine to cool, then place a shop rag over the coolant filler cap and then
slowly turn the cap anticlockwise, approximately 1½ turns, until the pressure relief position is reached. The pressure
relief position will allow any remaining pressure within the system to escape into the coolant recovery reservoir. Continue
to rotate the cap anticlockwise until the cap can be safely removed.
Periodic Servicing
The cooling system requires little attention except for maintaining the coolant to the correct level in the recovery reservoir
and periodic servicing at the time or distance intervals as outlined in 0B Lubrication and Service.
Periodic servicing includes:
1 Checking coolant level. Refer to 3.3 Draining and Filling Cooling System in this Section.
2 Checking coolant concentration. Refer to 3.2 Coolant Maintenance – Testing Coolant Concentration in this Section.
3 Pressure test cooling system and coolant filler cap. Refer to 3.7 Pressure Testing in this Section.
4 Tighten hose clamps and inspect all hoses. Refer to 3.6 Coolant Hoses in this Section. Replace hoses if swollen or deteriorated.
Always wear protective safety glasses when
working with spring type hose clamps. Failure
to do so could result in eye injury.
5 Clean out cooling system, refer to 3.4 Cleaning Cooling System – Cooling System Flush, in this Section and refill. Refer to 3.3 Draining and Filling Cooling System in this Section.
Environmental Issues
To reduce environmental impact and maintenance cost, whenever the coolant is drained from any engine, the service
records are to be checked to determine when the coolant was last changed. If more than six months life is left before the
next coolant change, then the following procedure is to be followed:
1 W hen draining the coolant from the engine, use a clean container to hold at least 12 litres of coolant and ensure that the coolant is not contaminated in the draining process.
2 After repairs have been completed, refill the engine cooling system with the drained coolant.
BACK TO CHAPTER INDEX
TO MODEL INDEX
ISUZU KB P190 2007
Page 3152 of 6020
Engine Cooling – V6 Engine Page 6B1–17
3 Top up as required, using a 50 / 50 mix of clean water and the recommended coolant, which is either DEX-COOL®
long-life coolant or its equivalent, known as Extended Life Anti-freeze Coolant conforming to GM specification
6277M. Refer to 3.2 Coolant Maintenance and 3.3 Draining and Filling Cooling System in this Section, for the
necessary procedures and further information.
3.2 Coolant Maintenance
Do not mix different types of anti-freeze or
corrosion inhibitors, as they may be
incompatible. If a different type has been used
in the cooling system, flush the system with
clean water, refer to 3.4 Cleaning Cooling
System – Cooling System Flush in this
Section and refill cooling system with the
correct coolant. Refer to 3.3 Draining and
Filling Cooling System in this Section.
The cooling system is designed to use a coolant (a mixture of ethylene glycol antifreeze with added corrosion inhibitors,
and water), rather than plain water. The use of glycol also raises the boiling point and increases the cooling system
efficiency. For this reason, it is of the utmost importance that the correct concentration level of ethylene glycol in the
cooling system is maintained.
Addition of plain water into the cooling system when 'topping-up' may dilute the coolant mixture to a point where the
antifreeze / anti-boil and corrosion inhibitor properties of ethylene glycol become ineffective.
The coolant should comprise of a mixture 50% ethylene glycol antifreeze / inhibitor with 50% clear, clean water.
Ethylene glycol conforming to the correct specification is either named DEX-COOL® long-life coolant or its equivalent,
known as Extended Life Anti-freeze Coolant conforming to GM specification 6277M. Both are available in a number of
different quantities. Check the current release of Partfinder™ for specific details.
BACK TO CHAPTER INDEX
TO MODEL INDEX
ISUZU KB P190 2007
Page 3153 of 6020
Engine Cooling – V6 Engine Page 6B1–18
Topping Up the Cooling System
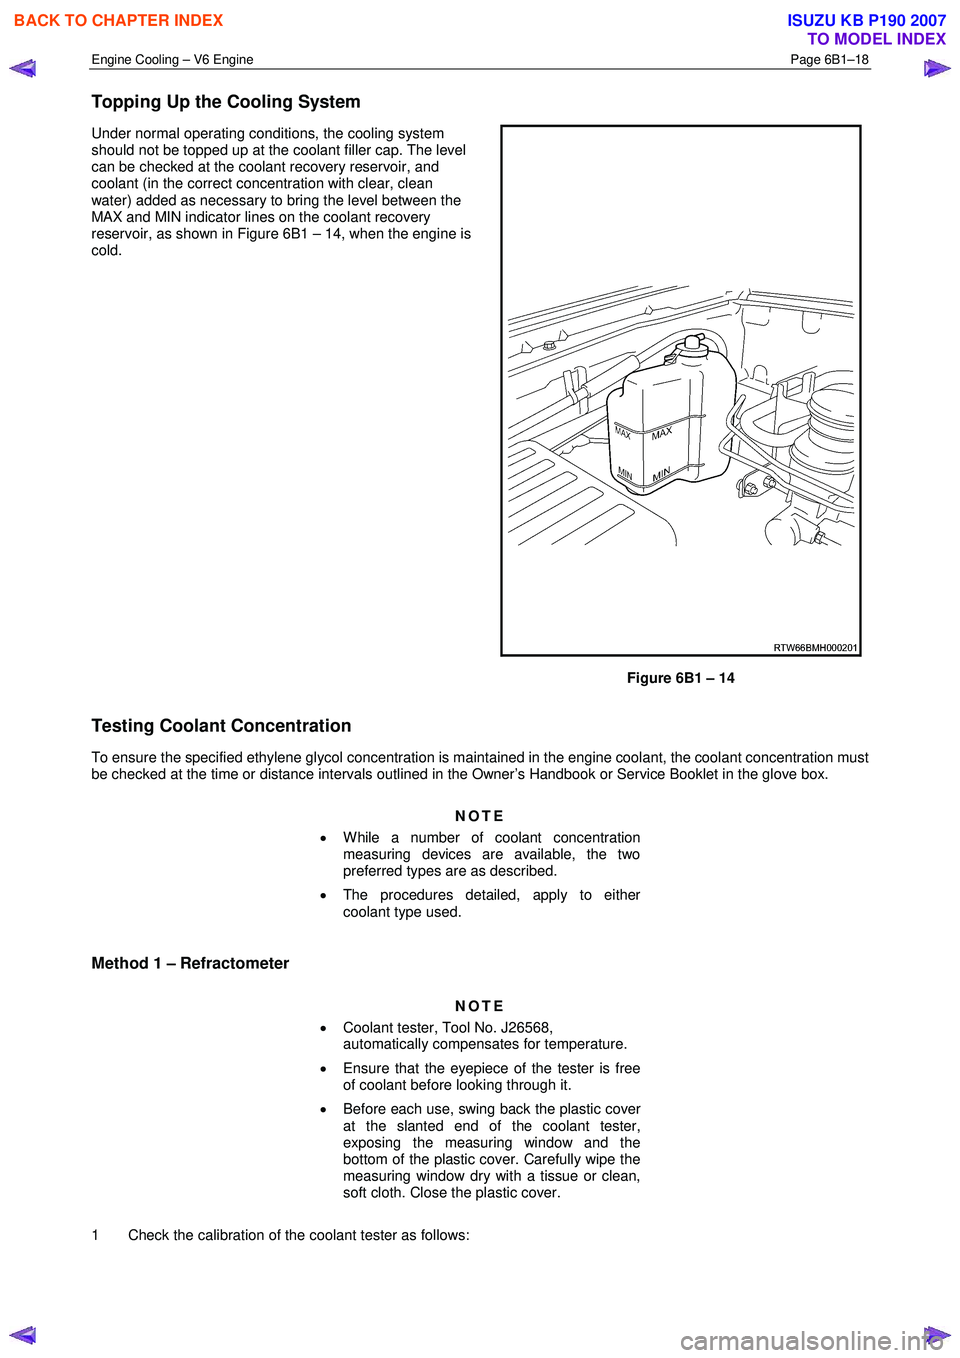
Under normal operating conditions, the cooling system
should not be topped up at the coolant filler cap. The level
can be checked at the coolant recovery reservoir, and
coolant (in the correct concentration with clear, clean
water) added as necessary to bring the level between the
MAX and MIN indicator lines on the coolant recovery
reservoir, as shown in Figure 6B1 – 14, when the engine is
cold.
Figure 6B1 – 14
Testing Coolant Concentration
To ensure the specified ethylene glycol concentration is maintained in the engine coolant, the coolant concentration must
be checked at the time or distance intervals outlined in the Owner’s Handbook or Service Booklet in the glove box.
NOTE
• While a number of coolant concentration
measuring devices are available, the two
preferred types are as described.
• The procedures detailed, apply to either
coolant type used.
Method 1 – Refractometer
NOTE
• Coolant tester, Tool No. J26568,
automatically compensates for temperature.
• Ensure that the eyepiece of the tester is free
of coolant before looking through it.
• Before each use, swing back the plastic cover
at the slanted end of the coolant tester,
exposing the measuring window and the
bottom of the plastic cover. Carefully wipe the
measuring window dry with a tissue or clean,
soft cloth. Close the plastic cover.
1 Check the calibration of the coolant tester as follows:
BACK TO CHAPTER INDEX
TO MODEL INDEX
ISUZU KB P190 2007
Page 3154 of 6020
Engine Cooling – V6 Engine Page 6B1–19
a Place a few drops of distilled water (between 21 and 29° C) onto the measuring window, then close the
plastic cover.
b Point the tester toward any light source, look into the eyepiece and check that the indicated reading is zero. If not, then re-calibrate the tester as detailed at the end of this Test Method, Calibrating the Tester.
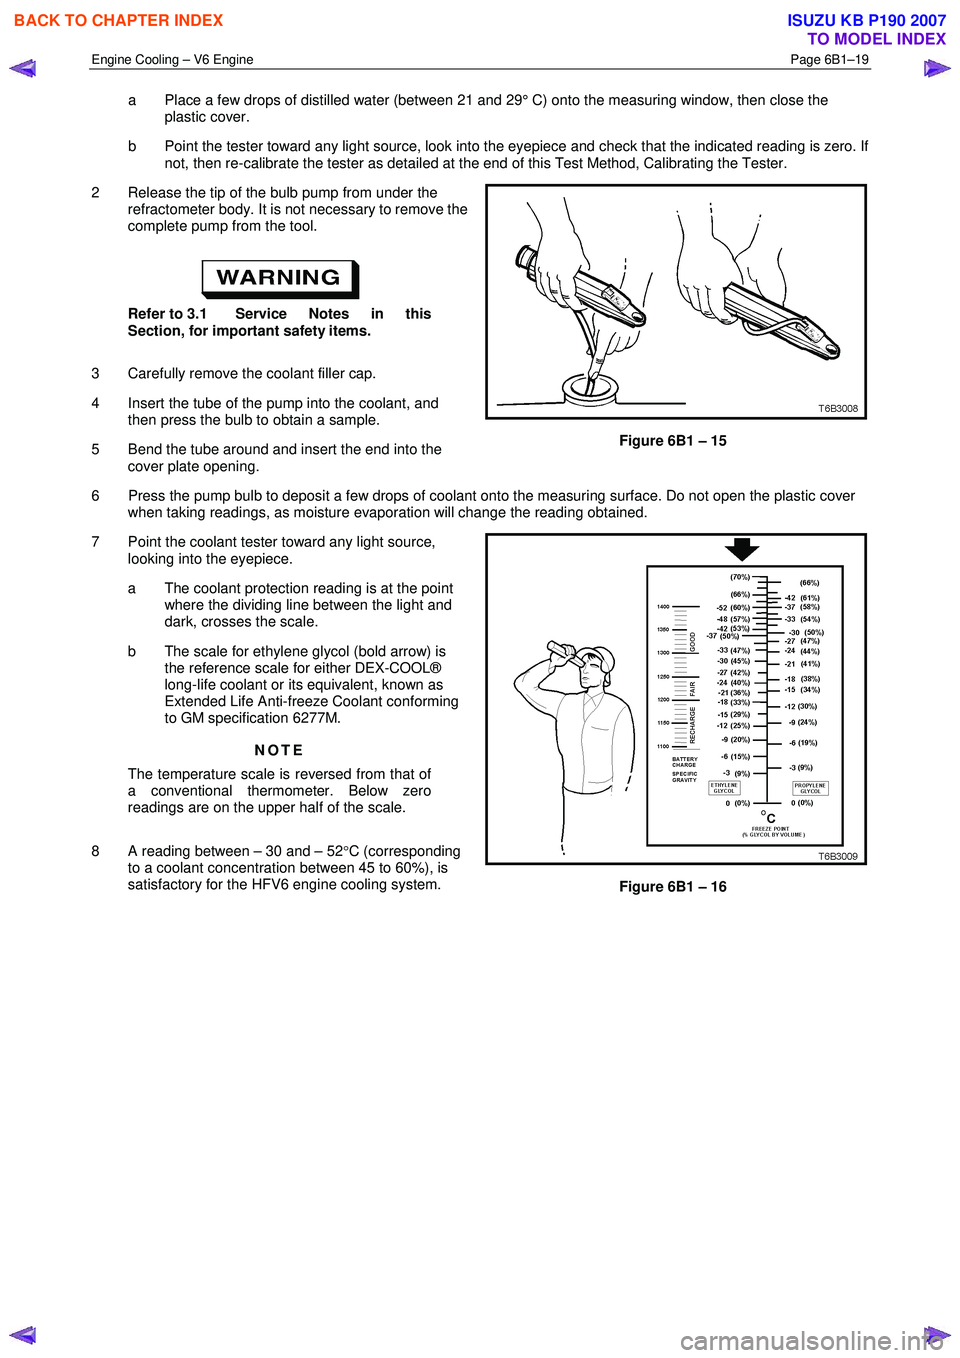
2 Release the tip of the bulb pump from under the refractometer body. It is not necessary to remove the
complete pump from the tool.
Refer to 3.1 Service Notes in this
Section, for important safety items.
3 Carefully remove the coolant filler cap.
4 Insert the tube of the pump into the coolant, and then press the bulb to obtain a sample.
5 Bend the tube around and insert the end into the cover plate opening.
Figure 6B1 – 15
6 Press the pump bulb to deposit a few drops of coolant onto the measuring surface. Do not open the plastic cover when taking readings, as moisture evaporation will change the reading obtained.
7 Point the coolant tester toward any light source, looking into the eyepiece.
a The coolant protection reading is at the point where the dividing line between the light and
dark, crosses the scale.
b The scale for ethylene glycol (bold arrow) is the reference scale for either DEX-COOL®
long-life coolant or its equivalent, known as
Extended Life Anti-freeze Coolant conforming
to GM specification 6277M.
NOTE
The temperature scale is reversed from that of
a conventional thermometer. Below zero
readings are on the upper half of the scale.
8 A reading between – 30 and – 52 °C (corresponding
to a coolant concentration between 45 to 60%), is
satisfactory for the HFV6 engine cooling system.
Figure 6B1 – 16
BACK TO CHAPTER INDEX
TO MODEL INDEX
ISUZU KB P190 2007
Page 3155 of 6020

Engine Cooling – V6 Engine Page 6B1–20
COOLANT CONCENTRATION
Litres Of Coolant To Be Added
Concentration Reading % Automatic Transmission Manual Transmission
0 4.95 5.15
5 4.46 4.62
10 3.96 4.12
15 3.47 3.61
20 2.97 3.08
25 2.48 2.57
30 1.98 2.01
35 1.48 1.54
40 0.99 1.05
45 0.50 0.52
50 0 0
NOTE
If the reading is not clear, then properly clean
and dry the measuring surface, then conduct
another test. Also ensure that there is
sufficient fluid on the measuring prism.
9 If the reading shows that the concentration level of the coolant is inadequate, refer to the Coolant
Concentration table to determine the amount of
coolant that needs to be added to the coolant
recovery reservoir.
10 Start and run the engine until normal operating temperature is reached, to allow the added coolant
to be distributed throughout the engine cooling
system.
Figure 6B1 – 17
BACK TO CHAPTER INDEX
TO MODEL INDEX
ISUZU KB P190 2007
Page 3156 of 6020
Engine Cooling – V6 Engine Page 6B1–21
Calibrating the Tester
The coolant tester calibration is checked at manufacture. If however, the calibration check detailed in Step 1 of this
method shows that the instrument is not reading correctly, then conduct the following recalibration procedure:
1 Remove the sealant covering the adjustment screw on the underneath of the tester.
2 W ith a distilled water sample on the measuring surface, carefully adjust the screw until a zero reading is obtained.
NOTE
DO NOT completely remove the screw.
3 After recalibration, reseal the screw with a small amount of silicone sealant.
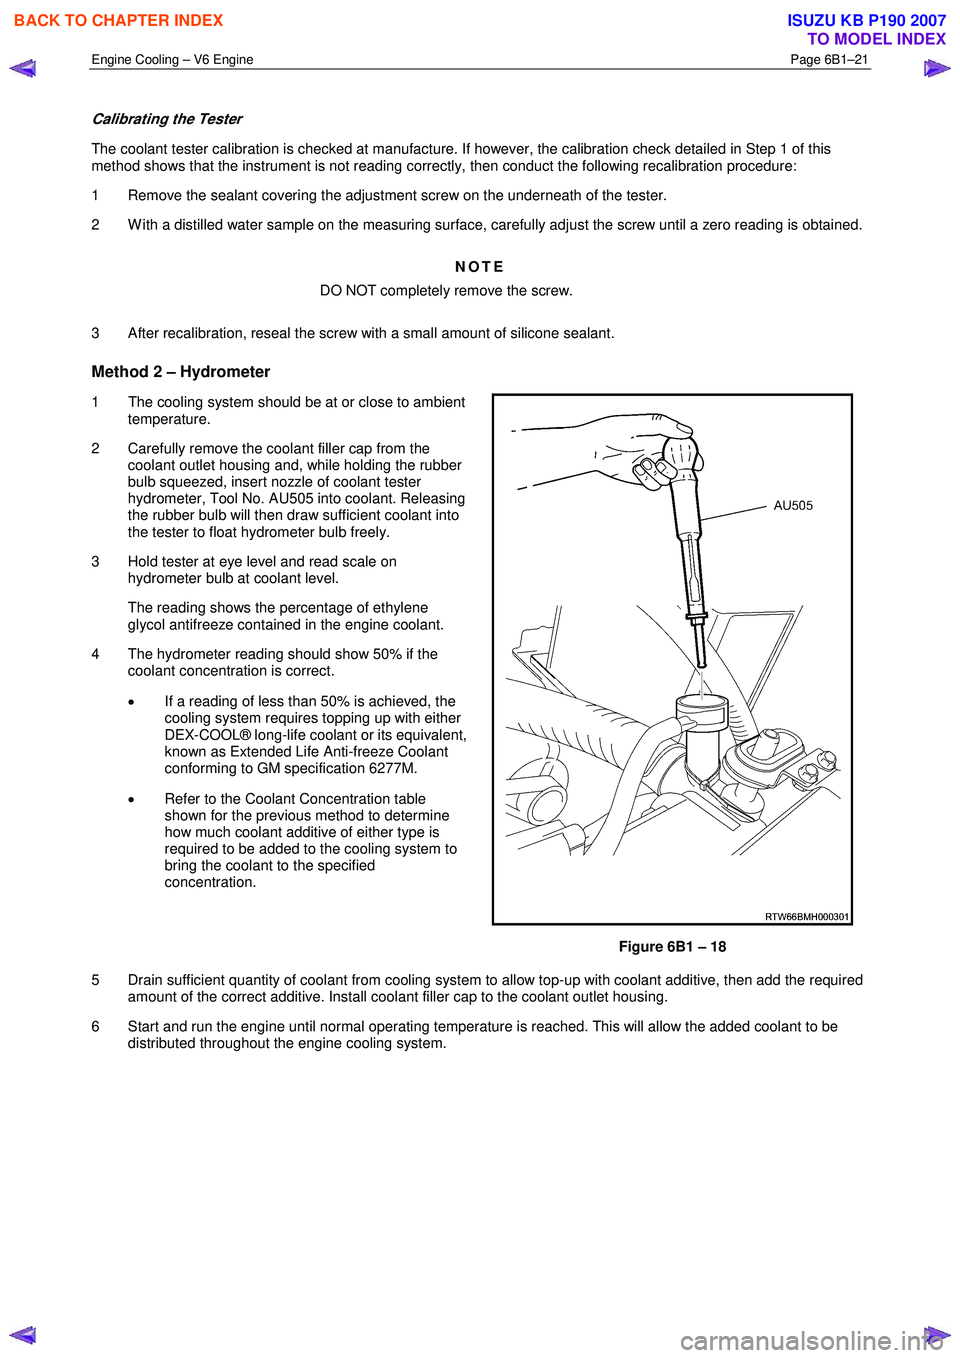
Method 2 – Hydrometer
1 The cooling system should be at or close to ambient temperature.
2 Carefully remove the coolant filler cap from the coolant outlet housing and, while holding the rubber
bulb squeezed, insert nozzle of coolant tester
hydrometer, Tool No. AU505 into coolant. Releasing
the rubber bulb will then draw sufficient coolant into
the tester to float hydrometer bulb freely.
3 Hold tester at eye level and read scale on hydrometer bulb at coolant level.
The reading shows the percentage of ethylene glycol antifreeze contained in the engine coolant.
4 The hydrometer reading should show 50% if the coolant concentration is correct.
• If a reading of less than 50% is achieved, the
cooling system requires topping up with either
DEX-COOL® long-life coolant or its equivalent,
known as Extended Life Anti-freeze Coolant
conforming to GM specification 6277M.
• Refer to the Coolant Concentration table
shown for the previous method to determine
how much coolant additive of either type is
required to be added to the cooling system to
bring the coolant to the specified
concentration.
Figure 6B1 – 18
5 Drain sufficient quantity of coolant from cooling system to allow top-up with coolant additive, then add the required amount of the correct additive. Install coolant filler cap to the coolant outlet housing.
6 Start and run the engine until normal operating temperature is reached. This will allow the added coolant to be distributed throughout the engine cooling system.
BACK TO CHAPTER INDEX
TO MODEL INDEX
ISUZU KB P190 2007
Page 3157 of 6020
Engine Cooling – V6 Engine Page 6B1–22
3.3 Draining and Filling Cooling System
Draining
Refer to 3.1 Service Notes in this Section, for
important safety items.
1 Allow engine to cool to ambient temperature (less than 50 ° C), and then remove the coolant filler cap (located near
the brake booster assembly).
Disconnection of the battery affects certain
vehicle electronic systems. Refer to 1.1
WARNING, CAUTION and NOTES, before
removing the ground lead.
2 Disconnect the battery ground lead. Refer to 6D1– 3 Battery – V6.
3 Drain the coolant from the system via the radiator drain tap on the lower RHS of the radiator below the lower hose outlet. Attach a suitable piece of rubber tubing to the tap outlet to help direct the flow of the coolant into a suitable
container (capacity at least 12 litres).
Filling
During any service operation that requires the cooling system to be partly or completely drained, the following
instructions must be followed when refilling the cooling system, to ensure that all air is bleed from system.
• Refer to 3.1 Service Notes in this Section,
for important safety items.
• Before opening the radiator bleed screw,
the cooling system must first be
completely depressurised with the engine
coolant filler cap removed.
Do not mix different types of anti-freeze or
corrosion inhibitors, as they may be
incompatible. Always check which coolant is
to be added to the particular vehicle being
serviced. If a different type has been used in
the cooling system (or is added accidentally),
flush the system with clean water. Refer to 3.4
Cleaning Cooling System in this Section.
NOTE
Ensure that the radiator drain tap located at the
bottom of right-hand side radiator tank is closed
before proceeding.
BACK TO CHAPTER INDEX
TO MODEL INDEX
ISUZU KB P190 2007
Page 3158 of 6020

Engine Cooling – V6 Engine Page 6B1–23
1 W ith the engine off, remove the coolant filler cap on
the coolant outlet housing, located at the front left-
hand side of the engine.
Figure 6B1 – 19
2 If filling a completely empty cooling system for automatic transmission models, mix 5 litres of clean
water with 5 litres of the recommended coolant or
5.2 litres of each for manual transmission models.
3 Add coolant via the engine coolant filler neck on the coolant outlet housing.
NOTE
Do not replace the coolant filler cap before
starting the engine (in step 6). Leaving the filler
cap off allows the engine to warm up without
pressurising.
4 Reconnect battery ground lead. Refer to 6D1 – 3 Battery – V6.
5 Start the engine and set the HVAC controls to: • Full hot
• Low fan
Figure 6B1 – 20
6 Run the engine at approximately 2,000 rpm to warm up the engine.
7 W ait until the radiator fan switches on.
8 W hen the radiator fan has switched on, let the engine rpm drop back to idle.
9 Turn the engine off when the radiator fan switches off.
10 Top up the coolant until full.
11 Replace the coolant filler cap.
Do not loosen or remove the radiator filler cap
when the coolant temperature is high. Steam
or boiling coolant will gush out and you may
be burnt. To open the radiator filler cap, cover
the filler cap with a thick cloth when the
coolant has cooled, release the pressure by
slowly turning the filler cap, and remove the
cap.
BACK TO CHAPTER INDEX
TO MODEL INDEX
ISUZU KB P190 2007
Page 3159 of 6020

Engine Cooling – V6 Engine Page 6B1–24
12 Open the coolant reservoir tank cap.
13 Top up the radiator coolant recovery reservoir to the MAX line.
14 Reinstall the coolant recovery reservoir cap.
NOTE
This condition only applies when the cooling
system is first being filled after a major loss of
coolant. The level of coolant in the reservoir
will then drop, once the engine is started and
normal operating temperature is reached. The
coolant level should then be maintained at the
correct level (between the MAX and MIN
Lines).
Figure 6B1 – 21
BACK TO CHAPTER INDEX
TO MODEL INDEX
ISUZU KB P190 2007