wheel ISUZU TF SERIES 2004 Workshop Manual
[x] Cancel search | Manufacturer: ISUZU, Model Year: 2004, Model line: TF SERIES, Model: ISUZU TF SERIES 2004Pages: 4264, PDF Size: 72.63 MB
Page 1757 of 4264

4JA1/4JH1 ENGINE DRIVEABILITY AND EMISSIONS 6E–385
19 Remove the CKP sensor from the flywheel housing
and check for the following conditions.
Objects sticking the CKP sensor.
Objects sticking the CKP sensor pulser.
If a problem is found, repair as necessary.
Was the problem found? —Verify repair Go to Step 20
20 Check the CKP sensor harness for the following
conditions.
Check for poor connector connection.
Check for misrouted harness.
Check for any accessory parts which may cause
electric interference.
If a problem is found, repair as necessary.
Was a problem found? —Verify repair Go to Step 21
21 Substitute a known good CKP sensor and recheck.
Was the problem solved?—Go to Step 22Go to Step 23
22 Replace the CKP sensor.
Is the action complete?—Veri fy repai r—
23 1. Using the Tech 2 and ignition “On” and engine
“Run”.
2. Monitor the following parameters in the data
display.
“Desired Injection Quantity” & “Injection Quantity”
“Desired Injection Start” & “Actual Injection Start”
Are the large gap or unstable parameter displayed
between “Desired” and “Actual”?
—Go to Step 27Go to Step 24 Step Action Value(s) Yes No
When idling or part-throttle When accelerated
HighDesired
Low
Ti m e Actu al
High
LowDesi red
Actu al
Ti m e
Page 1761 of 4264

4JA1/4JH1 ENGINE DRIVEABILITY AND EMISSIONS 6E–389
CUTS OUT, MISSES SYMPTOM
DEFINITIONS: Steady pulsation or jerking that follows
engine speed; usually more pronounced as engine load
increases.
time rpm
Step Action Value(s) Yes No
1Was the “On-Board Diagnostic (OBD) System Check”
performed?
—Go to Step 2Go to On Board
Diagnostic
(OBD) System
Check
2 1. Perform a bulletin search.
2. If a bulletin that addresses the symptom is found,
correct the condition as instructed in the bulletin.
Was a bulletin found that addresses the symptom?—Verify repair Go to Step 3
3 Was a visually/physical check performed?
—Go to Step 4Go to Visual /
physical Check
4 Is the customer using the incorrect fuel type? Diesel fuel
onlyReplace with
diesel fuel Go to Step 5
5 Visually/physically inspect for the following conditions.
Restrict air intake system. Check for a restricted air
filter element, or foreign objects blocking the air
intake system
Check for objects blocking or ex cessive deposits in
the throttle bore and on the throttle plate
Check for a condition that causes a large vacuum
leak, such as an incorrectly installed or faulty
crankcase ventilation hose.
Restrict air intake system at the turbocharger.
Check for objects blocking the turbocharger
compressor
wheel or turbine shaft sticking.
If a problem is found, repair as necessary.
Was a problem found?—Verify repair Go to Step 6
6 Check the ECM & PSG grounds to verify that they are
clean and tight. Refer to the ECM wiring diagrams.
Was a problem found?—Verify repair Go to Step 7
Page 1763 of 4264

4JA1/4JH1 ENGINE DRIVEABILITY AND EMISSIONS 6E–391
16 1. Using the Tech 2, ignition “On” and engine “Off”.
2. Monitor the “Pedal/Throttle Position” and “Idle
Switch” in the data display.
Does the Tech 2 indicate correct “Pedal/Throttle
Position” from 0% to 100% and correct “Idle Switch”
status depending on accelerator pedal operation?—Go to Step 21Go to Step 17
17 1. Using the Tech 2, ignition “On” and engine “Off”.
2. Monitor the “Pedal/Throttle Position” and “Idle
Switch” in the data display.
3. Adjust the accelerator cable or TPS within 0% to
100%.
Was the problem solved?—Verify repair Go to Step 18
18 Check the TPS harness for the following conditions.
Check for poor connector connection.
Check for misrouted harness.
Check for any accessory parts which may cause
electric interference.
If a problem is found, repair as necessary.
Was a problem found? —Verify repair Go to Step 19
19 Substitute a known good TPS and recheck.
Was the problem solved?—Go to Step 20Go to Step 31
20 Replace the TPS.
Is the action complete?—Veri fy repai r—
21 Remove the CKP sensor from the flywheel housing
and check for the following conditions.
Objects sticking the CKP sensor.
Objects sticking the CKP sensor pulser.
If a problem is found, repair as necessary.
Was the problem found? —Verify repair Go to Step 22
22 Check the CKP sensor harness for the following
conditions.
Check for poor connector connection.
Check for misrouted harness.
Check for any accessory parts which may cause
electric interference.
If a problem is found, repair as necessary.
Was a problem found? —Verify repair Go to Step 23
23 Substitute a known good CKP sensor and recheck.
Was the problem solved?—Go to Step 24Go to Step 25
24 Replace the CKP sensor.
Is the action complete?—Veri fy repai r— Step Action Value(s) Yes No
Page 1768 of 4264

6E–396 4JA1/4JH1 ENGINE DRIVEABILITY AND EMISSIONS
LACK OF POWER, SLUGGISH OR SPONGY SYMPTOM
DEFINITIONS: Engine delivers less than ex pected power. Attempting part-throttle acceleration results in little or no
increase in vehicle speed.
Step Action Value(s) Yes No
1Was the “On-Board Diagnostic (OBD) System Check”
performed?
—Go to Step 2Go to On Board
Diagnostic
(OBD) System
Check
2 1. Perform a bulletin search.
2. If a bulletin that addresses the symptom is found,
correct the condition as instructed in the bulletin.
Was a bulletin found that addresses the symptom?—Verify repair Go to Step 3
3 Was a visually/physical check performed?
—Go to Step 4Go to Visual /
physical Check
4 Is the customer using the incorrect fuel type? Diesel fuel
onlyReplace with
diesel fuel Go to Step 5
5 Visually/physically inspect for the following conditions.
Restrict air intake system. Check for a restricted air
filter element, or foreign objects blocking the air
intake system
Check for objects blocking or ex cessive deposits in
the throttle bore and on the throttle plate
Check for a condition that causes a large vacuum
leak, such as an incorrectly installed or faulty
crankcase ventilation hose.
Restrict air intake system at the turbocharger.
Check for objects blocking the turbocharger
compressor wheel or turbine shaft sticking.
If a problem is found, repair as necessary.
Was a problem found?—Verify repair Go to Step 6
6 Check the ECM & PSG grounds to verify that they are
clean and tight. Refer to the ECM wiring diagrams.
Was a problem found?—Verify repair Go to Step 7
7 1. Using the Tech 2, display the ECT sensor and IAT
sensor value.
2. Check the displayed value.
Does the Tech 2 indicate correct temperature
depending on engine condition?
If a problem is found, repair as necessary.
Was the problem found?—Verify repair Go to Step 8
8 1. Using the Tech 2, display the FT sensor value.
2. Check the displayed value.
Does the Tech 2 indicate correct temperature
depending on engine condition?
If a problem is found, repair as necessary.
Was the problem found?—Go to Step 29Go to Step 9
9 1. Using the Tech 2, ignition “On” and engine “Run”.
2. Monitor the “Mass Air Flow” in the data display.
Does the Tech 2 indicate correct “Mass Air Flow”
depending on accelerator pedal operation? —Go to Step 14Go to Step 10
Page 1775 of 4264

4JA1/4JH1 ENGINE DRIVEABILITY AND EMISSIONS 6E–403
13 1. Using the Tech 2, ignition “On” and engine “Run”.
2. Monitor the “A/C Information Switch” in the data
display.
Does the Tech 2 indicate correct “A/C Information
Switch” status depending on A/C switch position?
If a problem is found, repair as necessary.
Was the problem found?—Verify repair Go to Step 14
14 Visually/physically inspect for the following conditions.
Restrict air intake system. Check for a restricted air
filter element, or foreign objects blocking the air
intake system
Check for objects blocking or ex cessive deposits in
the throttle bore and on the throttle plate
Check for a condition that causes a large vacuum
leak, such as an incorrectly installed or faulty
crankcase ventilation hose.
Restrict air intake system at the turbocharger.
Check for objects blocking the turbocharger
compressor wheel or turbine shaft sticking.
If a problem is found, repair as necessary.
Was a problem found?—Verify repair Go to Step 15
15 1. Using the Tech 2, display the ECT sensor and IAT
sensor value.
2. Check the displayed value.
Does the Tech 2 indicate correct temperature
depending on engine condition?
If a problem is found, repair as necessary.
Was the problem found?—Verify repair Go to Step 16
16 1. Using the Tech 2, display the FT sensor value.
2. Check the displayed value.
Does the Tech 2 indicate correct temperature
depending on engine condition?
If a problem is found, repair as necessary.
Was the problem found?—Go to Step 31Go to Step 17
17 1. Using the Tech 2, ignition “On” and engine “Run”.
2. Monitor the “Mass Air Flow” in the data display.
Does the Tech 2 indicate correct “Mass Air Flow”
depending on accelerator pedal operation? —Go to Step 22Go to Step 18
18 Remove the MAF & IAT sensor assembly and check
for the following conditions.
Objects blocking at the MAF sensor element.
If a problem is found, repair as necessary.
Was the problem found?—Verify repair Go to Step 19
19 Check the MAF sensor harness for the following
conditions.
Check for poor connector connection.
Check for misrouted harness.
Check for any accessory parts which may cause
electric interference.
If a problem is found, repair as necessary.
Was a problem found? —Verify repair Go to Step 20 Step Action Value(s) Yes No
Page 1780 of 4264

6E–408 4JA1/4JH1 ENGINE DRIVEABILITY AND EMISSIONS
12 Substitute a known good MAF & IAT sensor assembly
and recheck.
Was the problem solved?—Go to Step 13Go to Step 30
13 Replace the MAF & IAT sensor assembly.
Is the action complete?—Veri fy repai r—
14 1. Using the Tech 2, ignition “On” and engine “Run”.
2. Monitor the “Glow Time Relay” in the data display.
Does the Tech 2 indicate correct “Glow Time Relay”
status depending on the time from engine “Run”?
If a problem is found, repair as necessary.
Was the problem found?—Go to Step 30Go to Step 15
15 1. Using the Tech 2, ignition “On” and engine “Run”.
2. Monitor the “Glow Time Relay” in the data display
and then, does the supply voltage correctly supply
to the glow plug?
—Go to Step 16Repair voltage
supply circuit
and verify repair
16 Check the glow plugs for continuity.
If a problem is found, repair as necessary.
Was a problem found?
—Verify repair Go to Step 17
17 Remove the CKP sensor from the flywheel housing
and check for the following conditions.
Objects sticking the CKP sensor.
Objects sticking the CKP sensor pulser.
If a problem is found, repair as necessary.
Was the problem found? —Verify repair Go to Step 18
18 Check the CKP sensor harness for the following
conditions.
Check for poor connector connection.
Check for misrouted harness.
Check for any accessory parts which may cause
electric interference.
If a problem is found, repair as necessary.
Was a problem found? —Verify repair Go to Step 19 Step Action Value(s) Yes No
Page 1785 of 4264

4JA1/4JH1 ENGINE DRIVEABILITY AND EMISSIONS 6E–413
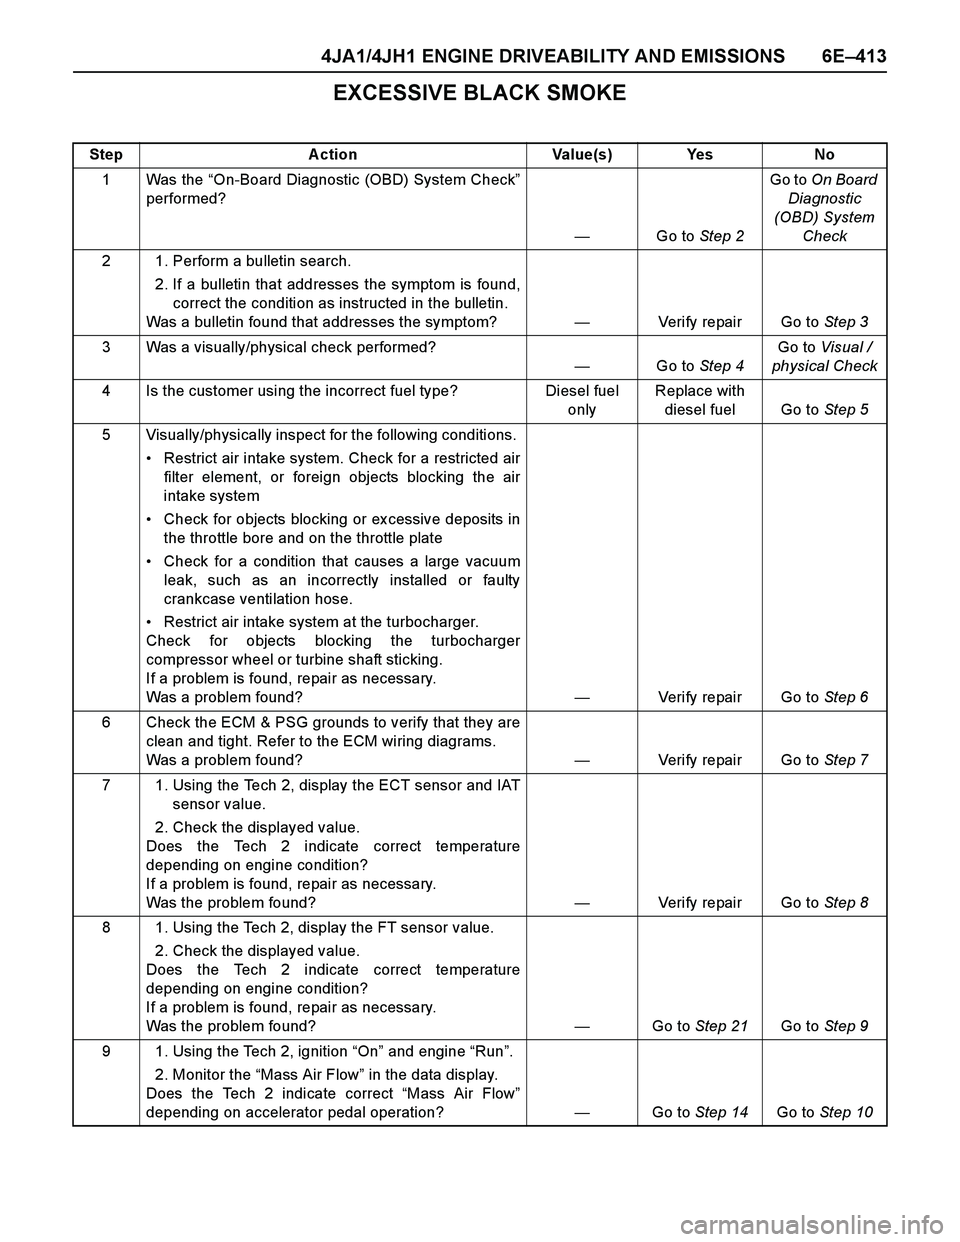
EXCESSIVE BLACK SMOKE
Step Action Value(s) Yes No
1Was the “On-Board Diagnostic (OBD) System Check”
performed?
—Go to Step 2Go to On Board
Diagnostic
(OBD) System
Check
2 1. Perform a bulletin search.
2. If a bulletin that addresses the symptom is found,
correct the condition as instructed in the bulletin.
Was a bulletin found that addresses the symptom?—Verify repair Go to Step 3
3 Was a visually/physical check performed?
—Go to Step 4Go to Visual /
physical Check
4 Is the customer using the incorrect fuel type? Diesel fuel
onlyReplace with
diesel fuel Go to Step 5
5 Visually/physically inspect for the following conditions.
Restrict air intake system. Check for a restricted air
filter element, or foreign objects blocking the air
intake system
Check for objects blocking or ex cessive deposits in
the throttle bore and on the throttle plate
Check for a condition that causes a large vacuum
leak, such as an incorrectly installed or faulty
crankcase ventilation hose.
Restrict air intake system at the turbocharger.
Check for objects blocking the turbocharger
compressor wheel or turbine shaft sticking.
If a problem is found, repair as necessary.
Was a problem found?—Verify repair Go to Step 6
6 Check the ECM & PSG grounds to verify that they are
clean and tight. Refer to the ECM wiring diagrams.
Was a problem found?—Verify repair Go to Step 7
7 1. Using the Tech 2, display the ECT sensor and IAT
sensor value.
2. Check the displayed value.
Does the Tech 2 indicate correct temperature
depending on engine condition?
If a problem is found, repair as necessary.
Was the problem found?—Verify repair Go to Step 8
8 1. Using the Tech 2, display the FT sensor value.
2. Check the displayed value.
Does the Tech 2 indicate correct temperature
depending on engine condition?
If a problem is found, repair as necessary.
Was the problem found?—Go to Step 21Go to Step 9
9 1. Using the Tech 2, ignition “On” and engine “Run”.
2. Monitor the “Mass Air Flow” in the data display.
Does the Tech 2 indicate correct “Mass Air Flow”
depending on accelerator pedal operation? —Go to Step 14Go to Step 10
Page 1810 of 4264

6F – 16 EXHAUST SYSTEM
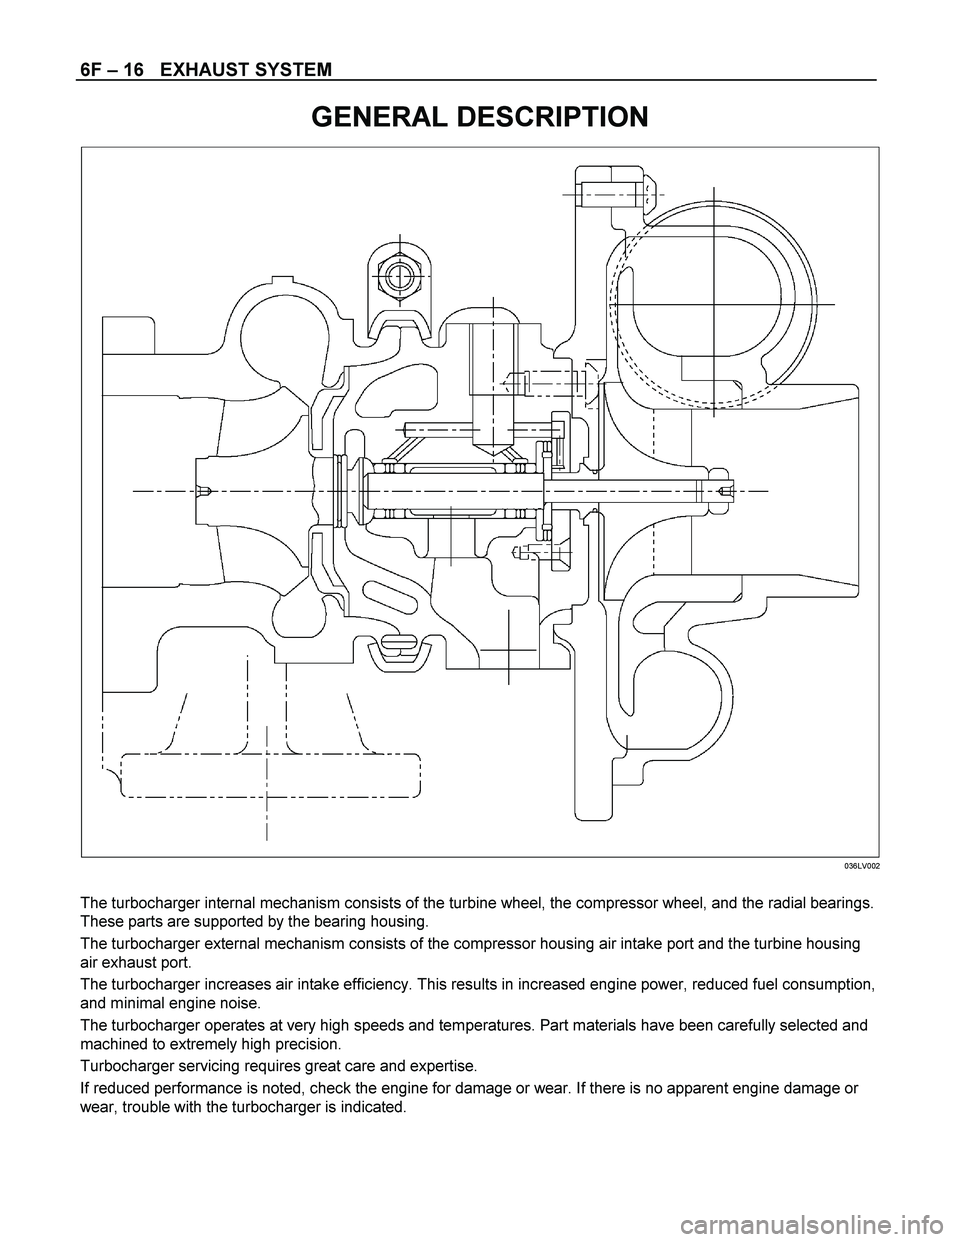
GENERAL DESCRIPTION
036LV002
The turbocharger internal mechanism consists of the turbine wheel, the compressor wheel, and the radial bearings.
These parts are supported by the bearing housing.
The turbocharger external mechanism consists of the compressor housing air intake port and the turbine housing
air exhaust port.
The turbocharger increases air intake efficiency. This results in increased engine power, reduced fuel consumption,
and minimal engine noise.
The turbocharger operates at very high speeds and temperatures. Part materials have been carefully selected and
machined to extremely high precision.
Turbocharger servicing requires great care and expertise.
If reduced performance is noted, check the engine for damage or wear. If there is no apparent engine damage or
wear, trouble with the turbocharger is indicated.
Page 1811 of 4264

EXHAUST SYSTEM 6F – 17
INSPECTION AND REPAIR
Make the necessary adjustments, repairs, and part replacements if excessive wear or damage is discovered during
inspection.
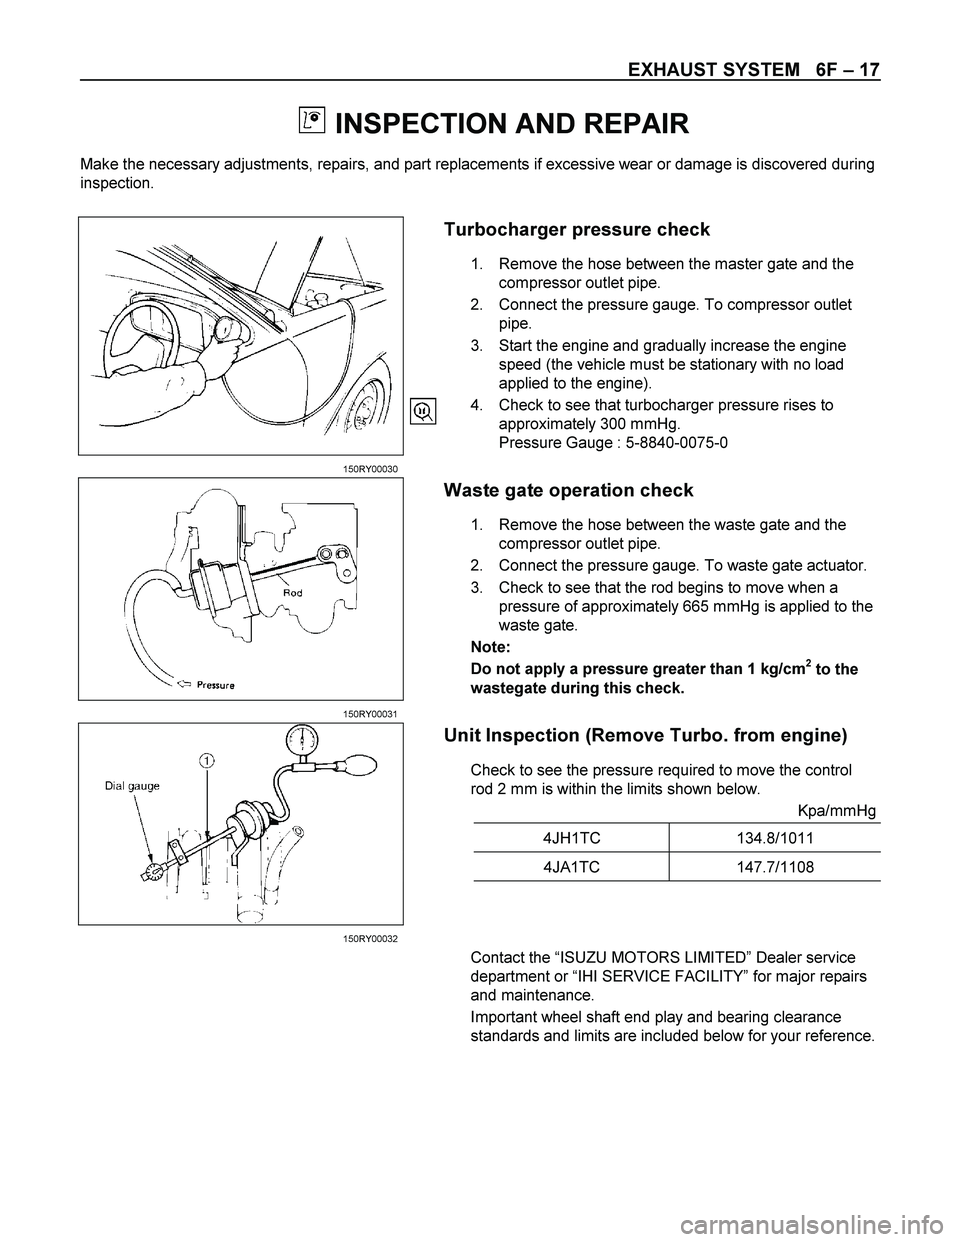
Turbocharger pressure check
1. Remove the hose between the master gate and the
compressor outlet pipe.
2. Connect the pressure gauge. To compressor outlet
pipe.
3. Start the engine and gradually increase the engine
speed (the vehicle must be stationary with no load
applied to the engine).
4. Check to see that turbocharger pressure rises to
approximately 300 mmHg.
Pressure Gauge : 5-8840-0075-0
150RY00030
Waste gate operation check
1. Remove the hose between the waste gate and the
compressor outlet pipe.
2. Connect the pressure gauge. To waste gate actuator.
3. Check to see that the rod begins to move when a
pressure of approximately 665 mmHg is applied to the
waste gate.
Note:
Do not apply a pressure greater than 1 kg/cm
2 to the
wastegate during this check.
150RY00031
Unit Inspection (Remove Turbo. from engine)
Check to see the pressure required to move the control
rod 2 mm is within the limits shown below.
Kpa/mmHg
4JH1TC 134.8/1011
4JA1TC 147.7/1108
150RY00032
Contact the “ISUZU MOTORS LIMITED” Dealer service
department or “IHI SERVICE FACILITY” for major repairs
and maintenance.
Important wheel shaft end play and bearing clearance
standards and limits are included below for your reference.
Page 1812 of 4264

6F – 18 EXHAUST SYSTEM
Wheel Shaft End Play
Use a dial indicator to measure the wheel shaft end play.
Apply a force of 1.2 kg (2.6 lb/11.8N) alternately to the
compressor wheel end and the turbine wheel end.
Wheel Shaft End Play mm (in)
Standard Limit
0.03 - 0.06
(0.001 - 0.002) 0.09 (0.004)
150RY00034
Wheel Shaft and Bearing Clearance
Use a dial indicator to measure the wheel shaft and
bearing clearance.
Wheel Shaft and Bearing Clearance mm (in)
Standard Limit
0.056 - 0.127
(0.0022 - 0.0050) 0.127 (0.0050)
150RY00036