wheel bolts ISUZU TFS SERIES 1997 User Guide
[x] Cancel search | Manufacturer: ISUZU, Model Year: 1997, Model line: TFS SERIES, Model: ISUZU TFS SERIES 1997Pages: 1600, PDF Size: 40.98 MB
Page 556 of 1600

7C-16 CLUTCH
Important Operations - Removal
1. Transmission Assembly
Refer to “MANUAL TRANSMISSION” of section 7B and 7B1
for “REMOVAL AND INSTALLATION” procedure.
2. Clutch Pressure Plate Assembly (HEC Engine Series)
3. Driven Plate Assembly (HEC Engine Series)
(1) Use the clutch pilot aligner
1 to prevent the driven plate
assembly
2 from falling free.
Clutch Pilot Aligner : 5-8840-2634-0
(2) Loosen the clutch cover bolts in the numerical order shown
in the illustration.
(3) Remove the pressure plate assembly
3 from the flywheel.
(4) Remove the driven plate from the flywheel.
3. Driven Plate Assembly (Except HEC Engine Series)
(1) Use the pilot aligner to prevent the driven plate assembly
from falling free.
Pilot aligner: 5-8525-3001-0 (J-24547)
(2) Mark the flywheel, clutch cover and pressure plate lug for
alignment when installing.
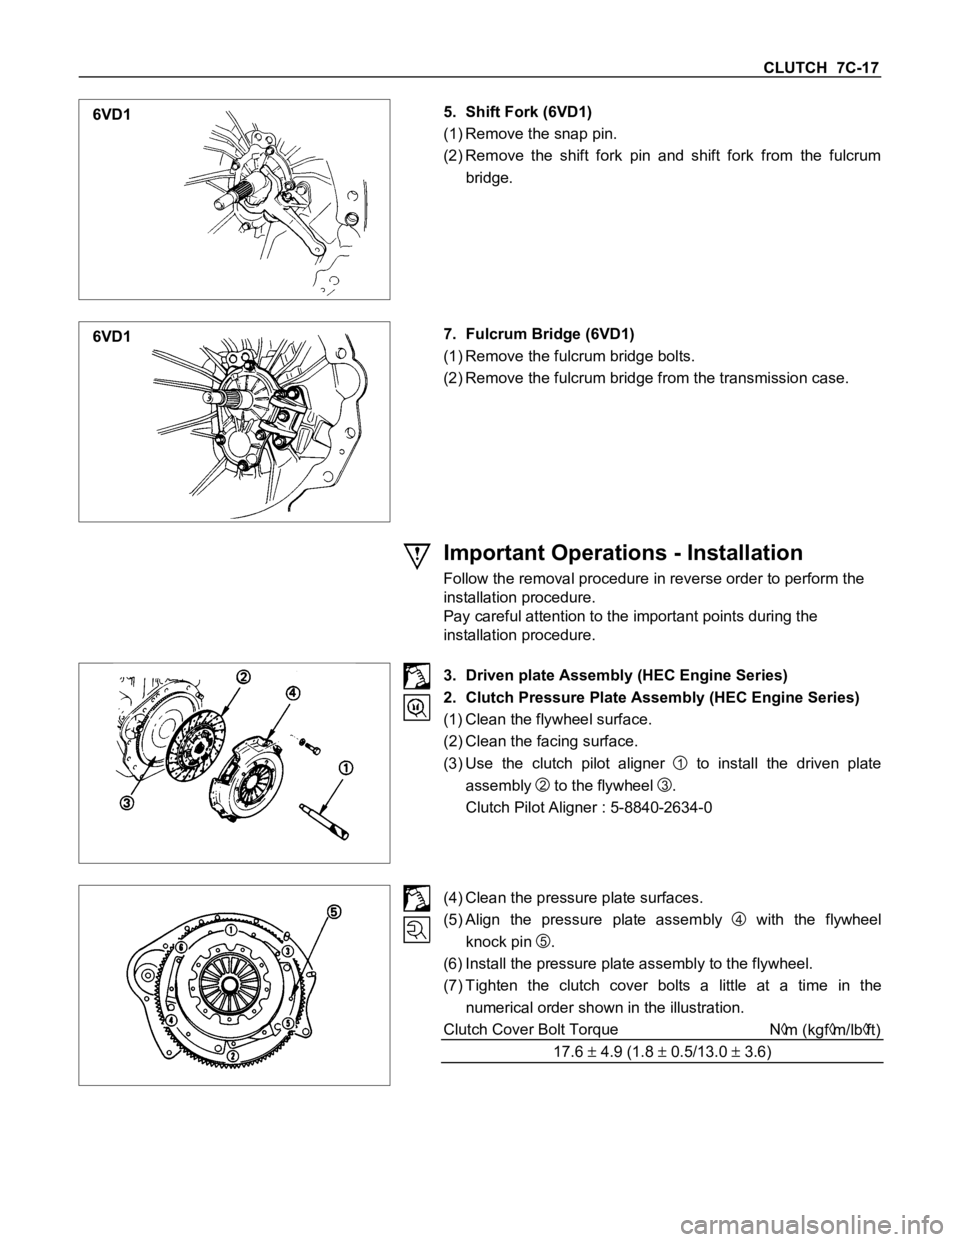
6VD14. Release Bearing (6VD1)
Remove the release bearing from the transmission case.
Page 557 of 1600

CLUTCH 7C-17
6VD15. Shift Fork (6VD1)
(1) Remove the snap pin.
(2) Remove the shift fork pin and shift fork from the fulcrum
bridge.
6VD17. Fulcrum Bridge (6VD1)
(1) Remove the fulcrum bridge bolts.
(2) Remove the fulcrum bridge from the transmission case.
Important Operations - Installation
Follow the removal procedure in reverse order to perform the
installation procedure.
Pay careful attention to the important points during the
installation procedure.
3. Driven plate Assembly (HEC Engine Series)
2. Clutch Pressure Plate Assembly (HEC Engine Series)
(1) Clean the flywheel surface.
(2) Clean the facing surface.
(3) Use the clutch pilot aligner
1 to install the driven plate
assembly
2 to the flywheel
3.
Clutch Pilot Aligner : 5-8840-2634-0
(4) Clean the pressure plate surfaces.
(5) Align the pressure plate assembly
4 with the flywheel
knock pin
5.
(6) Install the pressure plate assembly to the flywheel.
(7) Tighten the clutch cover bolts a little at a time in the
numerical order shown in the illustration.
Clutch Cover Bolt Torque N
m (kgfm/lbft)
17.6
4.9 (1.8 0.5/13.0 3.6)
Page 562 of 1600

7C-22 CLUTCH
Diaphragm Spring Finger Height
(Except 6VD1)
1. Place the appropriate spacer beneath the pressure plate.
Refer to the table below.
Spacer Thickness mm(in)
HEC, 4JG2T 8.0 (0.315)
4JA1, 4JB1T 7.8 (0.307)
2. Fully compress the pressure plate and the diaphragm
spring.
There are two ways to do this.
1) Use a bench press to press down the assembly from the
top.
2) Tighten the fixing bolts.
3. Measure the spring finger height
A from the base to the
spring tip.
Spring Finger Height mm(in)
HEC MSG 37-39
HEC MUA 39.9-41.9
4JA1 30.5-32.5 (1.20-1.28)
4JB1T 35.0-37.0 (1.38-1.46)
4JG2T 39.0-41.0 (1.53-1.61)
6VD1Diaphragm Spring Finger Height (6VD1)
1. Place a new driven plate or a 8.0 mm (0.315 in) spacer
beneath the pressure plate.
2. Fully compress the pressure plate and diaphragm spring.
There are two ways to do this.
1) Use a bench press to press down on the assembly from
the top.
2) Tighten the fixing bolts.
NOTE: (6VD1)
Pre-load on diaphragm spring finger must be 49 - 98N (5.0
- 10.0 kg / 11 - 22 lb) in direction of release, when clutch
cover assembly is bolted to the flywheel.
3. Measure the spring height from base to spring tip
A.
If the measured value exceeds the specified limit, the
pressure plate assembly must be replaced.
Spring Finger Height mm(in)
Standard
6VD1 49.9-51.9 (1.965-2.043)