air condition ISUZU TROOPER 1995 Workshop Manual
[x] Cancel search | Manufacturer: ISUZU, Model Year: 1995, Model line: TROOPER, Model: ISUZU TROOPER 1995Pages: 1928
Page 1730 of 1928
9J-106 Supplemental Restraint System
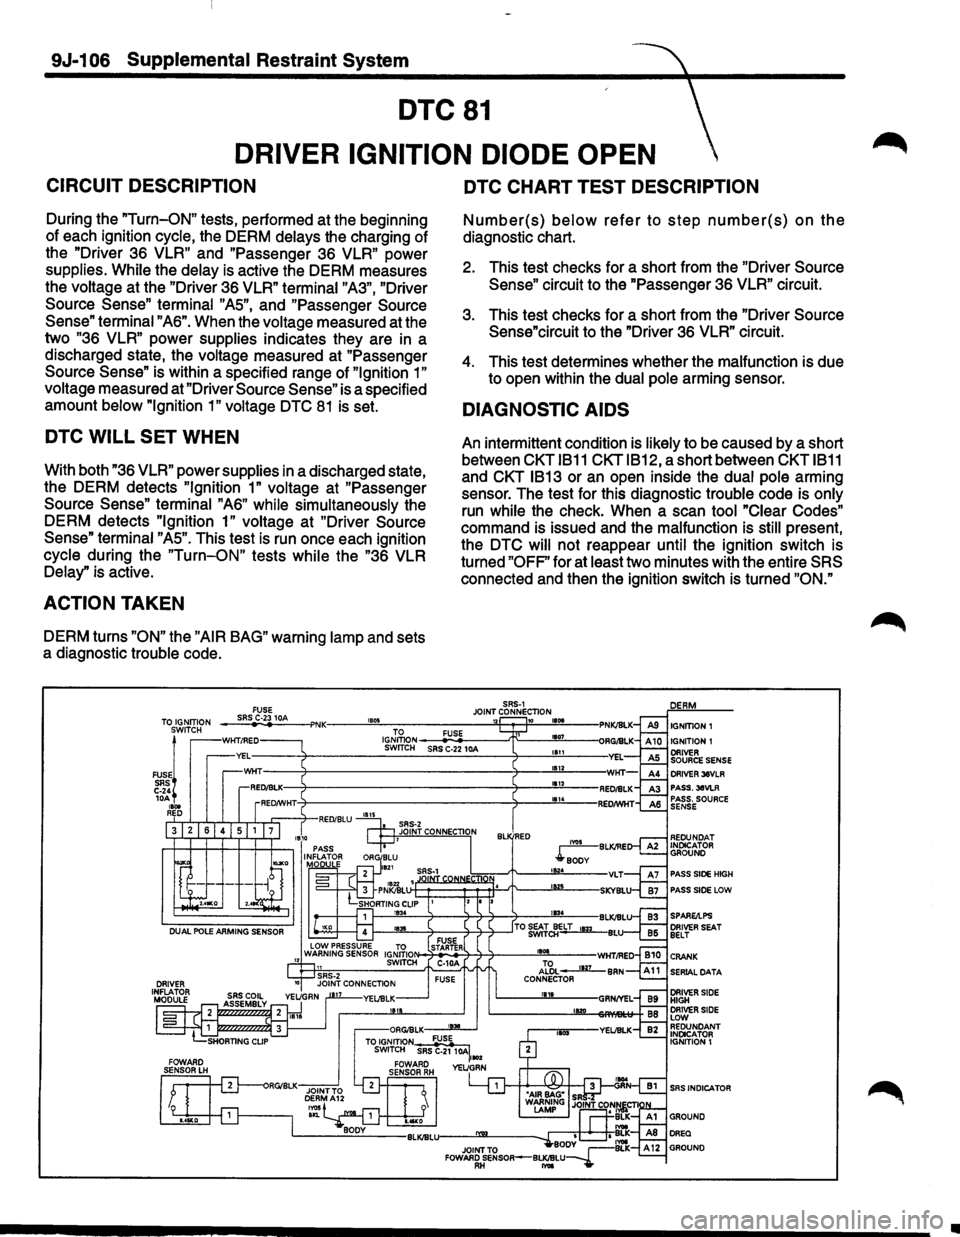
DTC81
DRIVER IGNITION DIODE OPEN
CIRCUIT DESCRIPTION
During the "Turn-ON" tests, performed at the beginning
of each ignition
cycle, the DERM delays the charging of
the "Driver
3S VLR" and "Passenger 3S VLR" power
supplies. While the delay is active the DERM measures
the
voltage at the "Driver 3S VLR" terminal "A3", "Driver
Source
Sense" terminal "AS", and "Passenger Source
Sense" terminal "AS". When the voltage measured at the
two
"3S VLR" power supplies indicates they are in a
discharged state, the
voltage measured at "Passenger
Source
Sense" is within a specified range of "Ignition 1"
voltage
measured at "Driver Source Sense" is a specified
amount
below "Ignition 1" voltage DTC 81 is set.
DTC WILL SET WHEN
With both "3S VLR" power supplies in a discharged state,
the DERM detects
"Ignition 1" voltage at "Passenger
Source
Sense" terminal "AS" while simultaneously the
DERM detects
"Ignition 1" voltage at "Driver Source
Sense" terminal "AS". This test is run once each ignition
cycle during the "Turn-ON" tests while the "3S VLR
Delay"
is active.
ACTION TAKEN
DERM turns "ON" the "AIR BAG" warning lamp and sets
a diagnostic
trouble code.
DTC CHART TEST DESCRIPTION
Number(s) below refer to step number(s) on the
diagnostic chart.
2. This test checks for a short from the "Driver Source
Sense" circuit to the "Passenger 3S VLR" circuit.
3. This test checks for a short from the "Driver Source
Sense"circuit to the "Driver
3S VLR" circuit.
4. This test determines whether the malfunction is due
to open within the
dual pole arming sensor.
DIAGNOSTIC AIDS
An intermittent condition is likely to be caused by a short
between
CKT 1811 CKTIB12, a short between CKT 1811
and CKT 1813 or an open inside the dual pole arming
sensor. The test for this diagnostic
trouble code is only
run while the check. When a scan tool "Clear Codes"
command is issued and the malfunction is still present,
the
DTC will not reappear until the ignition switch is
turned
"OFF" for at least two minutes with the entire SRS
connected and then the ignition switch is turned "ON."
SRS-1 FUSE JOINT CONNECTION TOS~~~:?N -_;:,;SR-"
IGNmON ~-=-------"T"---""'1107<----SWrTCH SRS C-22 10A 1111
1112 DRIVER 36VLR PASS.36VLR PASS. SOURCE SENSE
REOUNOAT INDICATOR GROUND
PASS SIDE HIGH
PASS SIDE LOW
SERIAL DATA
SRS INDICATOR
•
Page 1732 of 1928
9J-1 08 Supplemental Restraint System
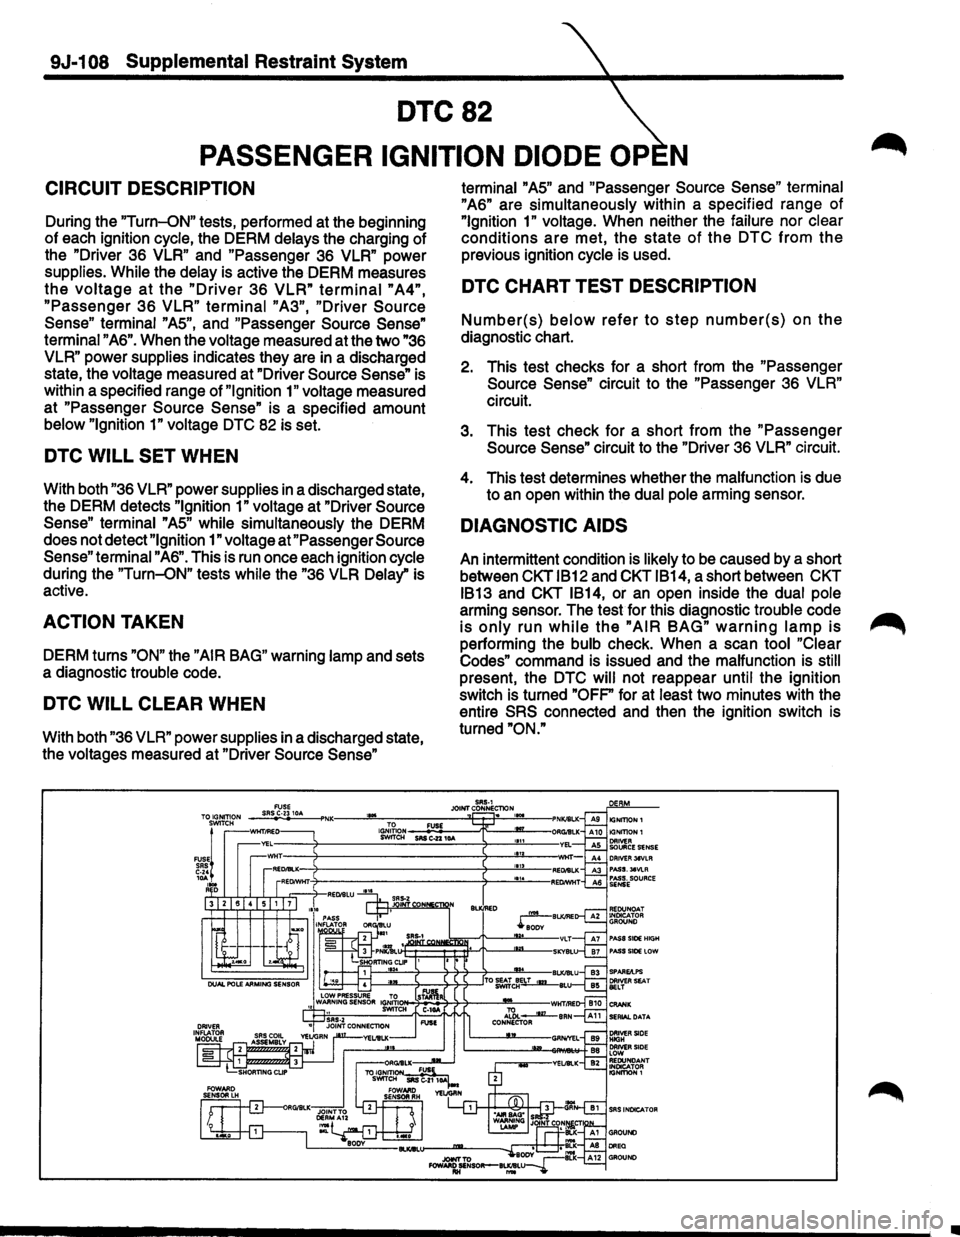
DTC82
PASSENGER IGNITION DIODE OP N
CIRCUIT DESCRIPTION
During the "Turn-ON" tests, performed at the beginning
of each ignition
cycle, the DERM delays the charging of
the "Driver 36
VLR" and "Passenger 36 VLR" power
supplies.
While the delay is active the DERM measures
the voltage at the "Driver 36 VLR" terminal "A4",
"Passenger 36 VLR" terminal "A3", "Driver Source
Sense"
terminal "AS", and "Passenger Source Sense"
terminal "A6". When the voltage measured at the two "36
VLR"
power supplies indicates they are in a discharged
state, the voltage measured at "Driver
Source Sense" is
within a specified range of
"Ignition 1" voltage measured
at "Passenger
Source Sense" is a specified amount
below "Ignition 1" voltage DTC 82 is set.
DTC WILL SET WHEN
With both "36 VLR" power supplies in a discharged state,
the DERM detects
"Ignition 1" voltage at "Driver Source
Sense" terminal
"AS" while simultaneously the DERM
does not detect
"Ignition 1" voltage at "Passenger Source
Sense"
terminal "A6". This is run once each ignition cycle
during the
"Turn-ON" tests while the "36 VLR Delay" is
active.
ACTION TAKEN
DERM turns "ON" the "AIR BAG" warning lamp and sets
a diagnostic trouble code.
DTC WILL CLEAR WHEN
With both "36 VLR" power supplies in a discharged state,
the voltages measured at "Driver
Source Sense"
'"'
terminal "AS" and "Passenger Source Sense" terminal
"A6" are simultaneously within a specified range of
"Ignition 1" voltage. When neither the failure nor clear
conditions are met, the state of the DTC from the
previous ignition cycle is used.
DTC CHART TEST DESCRIPTION
Number{s) below refer to step number{s) on the
diagnostic chart.
2. This test checks for a short from the "Passenger
Source Sense" circuit to the "Passenger 36 VLR"
circuit.
3. This test check for a short from the "Passenger
Source Sense" circuit to the "Driver 36 VLR" circuit.
4. This test determines whether the malfunction is due
to an open within the
dual pole arming sensor.
DIAGNOSTIC AIDS
An intermittent condition is likely to be caused by a short
between
CKT IB12 and CKT IB14, a short between CKT
IB13
and CKT IB14, or an open inside the dual pole
arming sensor. The test for this diagnostic trouble code
is only run while the "AIR BAG" warning lamp is
performing the bulb check. When a scan tool "Clear
Codes"
command is issued and the malfunction is still
present, the DTC will not reappear until the ignition
switch is turned
"OFP for at least two minutes with the
entire
SRS connected and then the ignition switch is
turned
"ON."
SRS-1 JOINT CONNEcnoN . lG,J;~ON _ _.::FU::OS£'---.-r:--m_-SWITCH SRS C..z2 10A
•
Page 1785 of 1928
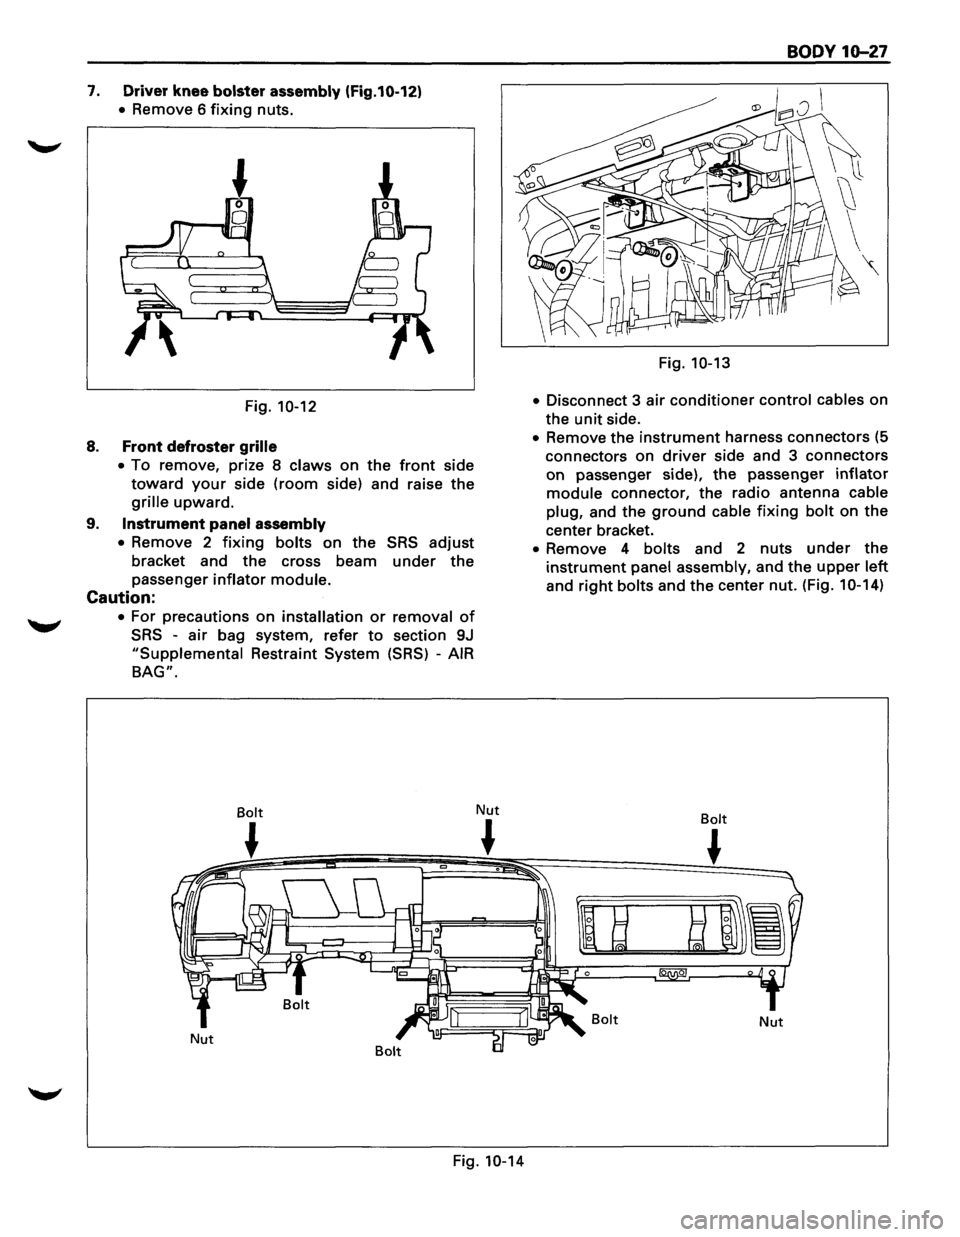
7. Driver knee bolster assembly (Fig.10-12)
• Remove 6 fixing nuts.
Fig.
10-12
8. Front defroster grille
•
To remove, prize 8 claws on the front side
toward your side (room side) and raise the
grille upward.
9. Instrument panel assembly
•
Remove 2 fixing bolts on the SRS adjust
bracket and the cross beam under the
passenger inflator module.
Caution:
• For precautions on installation or removal of
SRS -air bag system, refer to section 9J
"Supplemental Restraint System (SRS) -AIR
BAG".
Bolt
~
Nut Nut
~
Fig. 10-14
BODY 10-27
Fig. 10-13
•
Disconnect 3 air conditioner control cables on
the
unit side.
• Remove the instrument harness connectors (5
connectors on
driver side and 3 connectors
on passenger side), the passenger inflator
module connector, the radio antenna cable
plug,
and the ground cable fixing bolt on the
center bracket.
• Remove 4 bolts and 2 nuts under the
instrument panel assembly, and the upper left
and right bolts and the center nut. (Fig. 1 0-14)
Bolt
~
Bolt Nut
Page 1787 of 1928
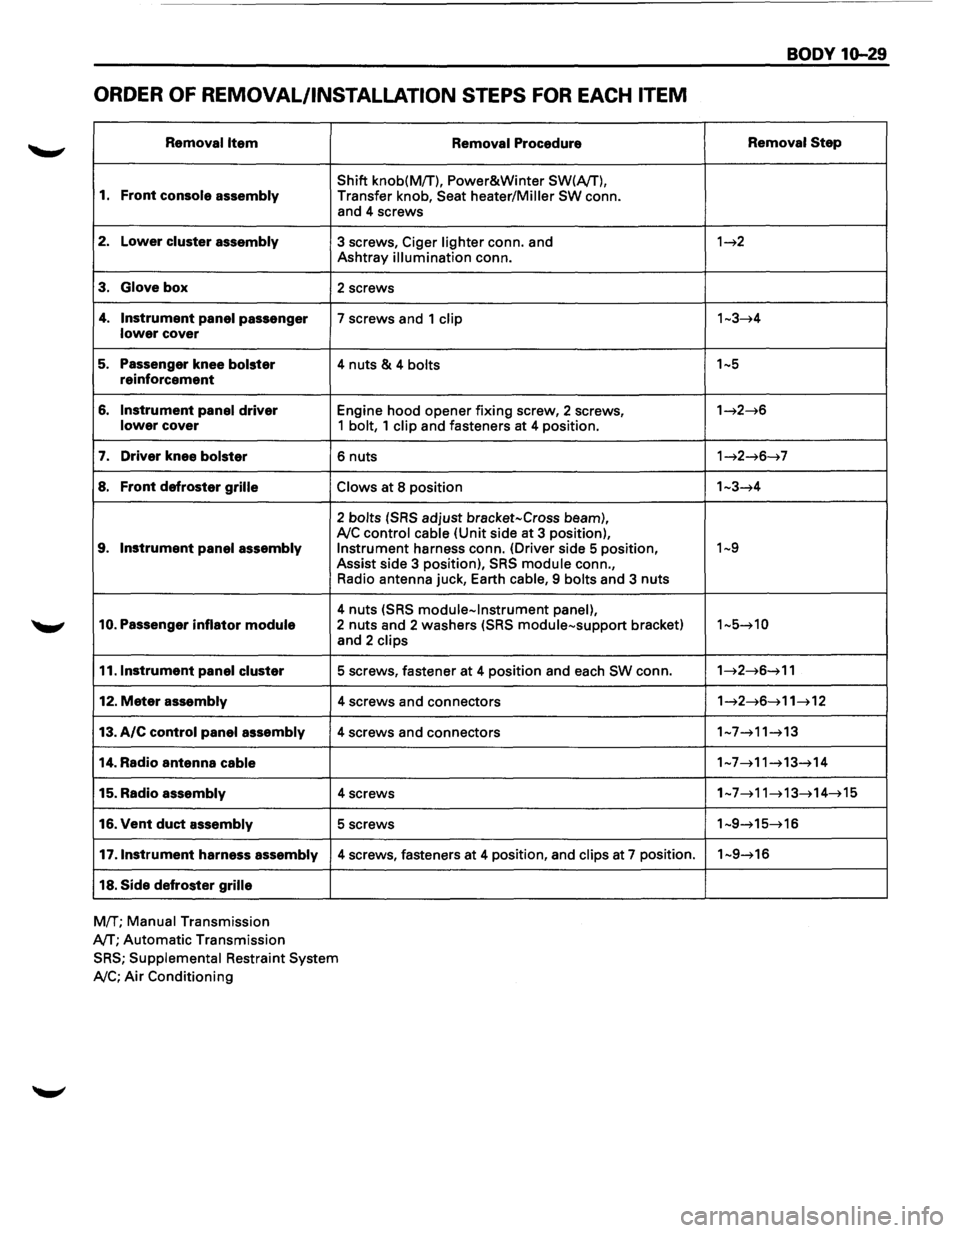
ORDER OF REMOVAL/INSTALLATION STEPS FOR EACH ITEM
Removal Item
1. Front console assembly
2. Lower cluster assembly
3. Glove box
4. Instrument panel passenger lower cover
5. Passenger knee bolster reinforcement
6. Instrument panel driver lower cover
7. Driver knee bolster
8. Front defroster grille
9. Instrument panel assembly
10. Passenger inflator module
11.1nstrument panel cluster
12. Meter assembly
13. A/C control panel assembly
14. Radio antenna cable
15. Radio assembly
16. Vent duct assembly
17 .Instrument harness assembly
18. Side defroster grille
MfT; Manual Transmission
A/T;
Automatic Transmission Removal
Procedure
Shift
knob(MfT), Power&Winter SW(A/T),
Transfer knob, Seat heater/Miller SW conn.
and 4 screws
3 screws, Ciger lighter conn. and
Ashtray illumination conn.
2 screws
7 screws and 1 clip
4 nuts & 4 bolts
Engine hood opener fixing screw, 2 screws, 1 bolt, 1 clip and fasteners at 4 position.
6 nuts
Claws at 8 position
2 bolts (SRS adjust bracket-Cross beam), A!C control cable (Unit side at 3 position), Instrument harness conn. (Driver side 5 position,
Assist side 3 position), SRS module conn.,
Radio antenna juck, Earth
cable, 9 bolts and 3 nuts
4 nuts (SRS module-Instrument panel), 2 nuts and 2 washers (SRS module-support bracket)
and 2 clips
5 screws, fastener at 4 position and each SW conn.
4 screws and connectors
4 screws and connectors
4 screws
5 screws
4 screws, fasteners at 4 position, and clips at 7 position.
SRS; Supplemental Restraint System
A!C; Air Conditioning
BODY 10-29
Removal Step
1~2
1~3~4
1~5
1~2~6
1~2~6~7
1-3~4
1~9
1-5~10
1~2~6~11
1~2~6~11~12
1-7~11~13
1-7~11~13~14
1~7~11~13~14~15
1-9~15~16
1-9~16