ISUZU TROOPER 1995 Workshop Manual
Manufacturer: ISUZU, Model Year: 1995, Model line: TROOPER, Model: ISUZU TROOPER 1995Pages: 1928
Page 801 of 1928
wcAUTION:
' • When replacing the production Engine Control
Module
(ECM) with a service ECM (controller),
it is important to transfer the broadcast
diagnostic
trouble code and production ECM
number to the service ECM label. Please do not
record on ECM cover. This will allow positive
identification
of ECM parts throughout the
service
life of the vehicle.
DRIVEABILITV AND EMISSIONS 6E2-1 05
\fCAUTION:
' • To prevent internal ECM damage, the ignition
must be
"OFF" when disconnecting or
reconnecting power
to ECM (for example;
battery cable, ECM pigtail, ECM fuse, jumper
cables etc.)
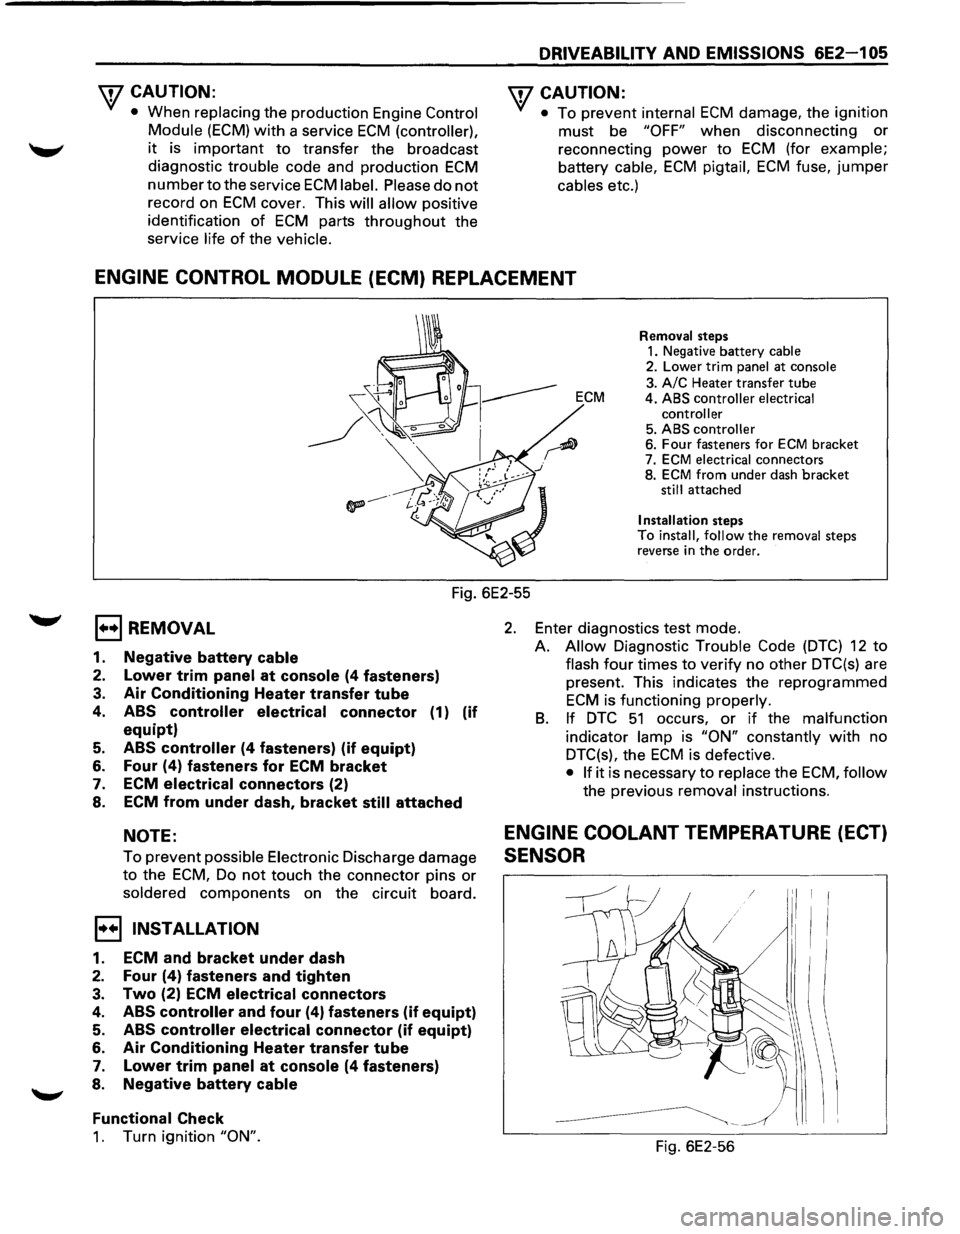
ENGINE CONTROL MODULE (ECM) REPLACEMENT
Removal steps 1. Negative battery cable 2. Lower trim panel at console
3. A/C Heater transfer tube ECM 4. ABS controller electrical
controller
5. ABS controller 6. Four fasteners for ECM bracket
7. ECM electrical connectors
8. ECM from under dash bracket still attached
Installation steps To install, follow the removal steps
reverse in the order.
Fig. 6E2-55
EJ REMOVAL
1. Negative battery cable
2. Lower trim panel at console (4 fasteners)
3. Air Conditioning Heater transfer tube
4. ABS controller electrical connector (1) (if
equipt)
5. ABS controller (4 fasteners) (if equipt)
6. Four (4) fasteners for ECM bracket
7. ECM
electrical connectors (2)
8. ECM from under dash, bracket
still attached
NOTE:
To prevent possible Electronic Discharge damage
to the ECM, Do not touch the connector pins or
soldered components on the circuit board.
I•+! INSTALLATION
1. ECM and bracket under dash
2. Four (4) fasteners and tighten
3. Two (2) ECM electrical connectors
4. ABS controller and four (4) fasteners (if equipt)
5. ABS controller electrical connector (if equipt)
6. Air Conditioning Heater transfer tube
7. Lower trim panel at console (4 fasteners)
8. Negative battery
cable
Functional
Check
1. Turn ignition "ON".
2. Enter diagnostics test mode.
A.
Allow Diagnostic Trouble Code (DTC) 12 to
flash four times to verify no other DTC(s) are
present. This indicates the reprogrammed
ECM is functioning properly.
B. If DTC 51 occurs, or if the malfunction
indicator lamp is "ON" constantly with no
DTC(s), the
ECM is defective.
• If it is necessary to replace the ECM, follow
the previous removal instructions.
ENGINE COOLANT TEMPERATURE (ECT)
SENSOR
Fig. 6E2-56
Page 802 of 1928
6E2-1 06 DRIVEABILITV AND EMISSIONS
1••1 REMOVAL
\f7 CAUTION:
Y/ Care must be taken when handling Engine
Coolant Temperature (ECT) sensor. Damage to
ECT sensor will affect proper operation of the fuel
injection system.
Preparation: • Negative battery cable.
•
Drain engine coolant system.
1. Inlet manifold assembly
• Refer to "Fuel metering system" section "6E2-
C2"
for removal procedure.
2. Electrical connector
3. ECT sensor
• Remove from rear of engine coolant transfer
tube.
I••IINSTALLATION
3. ECT sensor
• Apply sealer or equivalent to threads only.
•
Tighten the ECT sensor to the specified torque
~~~ Torque N·m (lb·ft) I 30 (22)
2. ECT sensor connector
1. Intake manifold assembly
• Refer to "Fuel metering system" section "6E2-
C2" for installation.
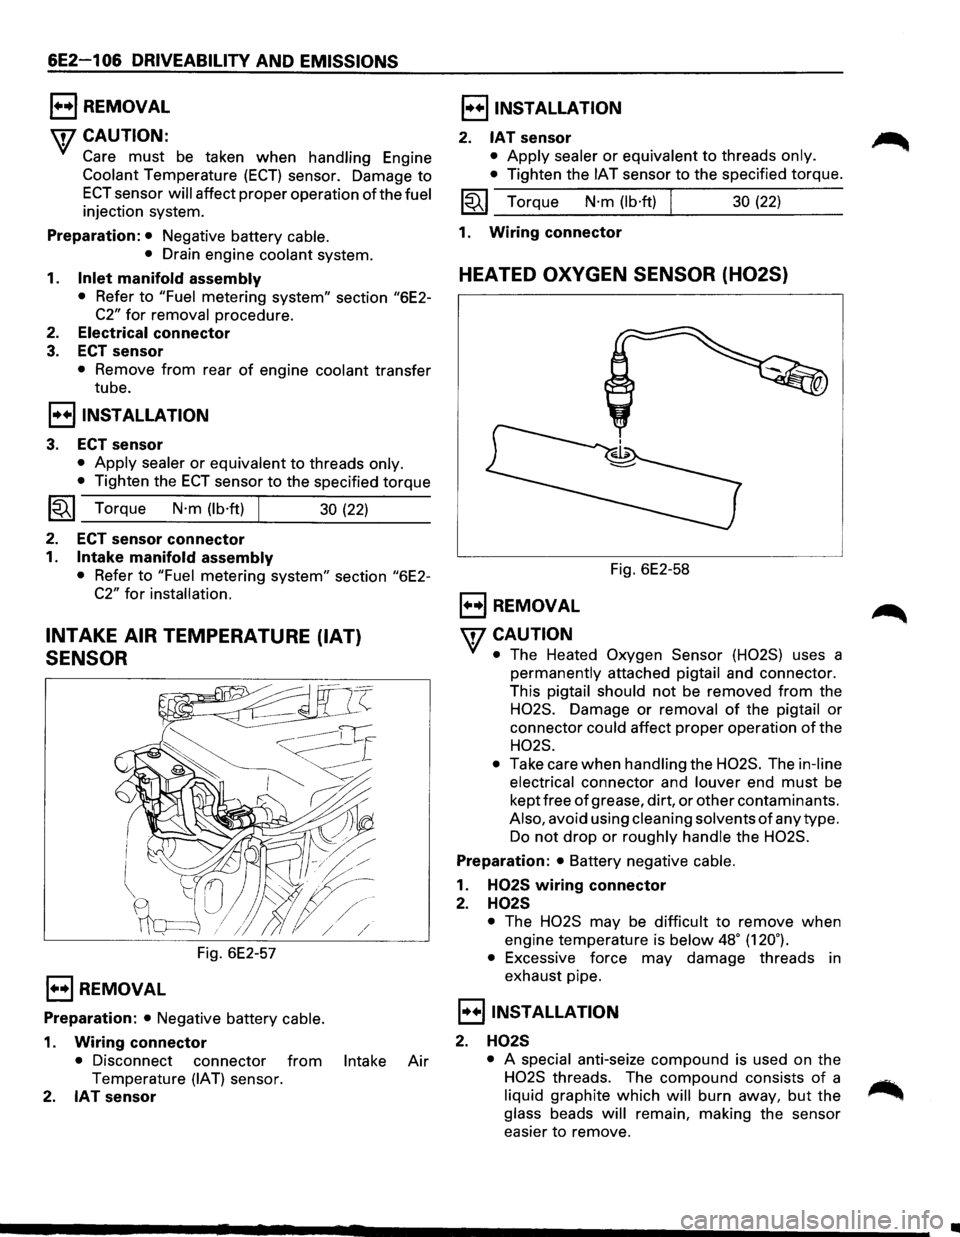
INTAKE AIR TEMPERATURE (IAT)
SENSOR
Fig. 6E2-57
1••1 REMOVAL
Preparation: • Negative battery cable.
1. Wiring connector
• Disconnect connector from Intake Air
Temperature (IAT) sensor.
2. IAT sensor
I••IINSTALLATION
2. IAT sensor
• Apply sealer or equivalent to threads only.
•
Tighten the IAT sensor to the specified torque.
~~~ Torque N·m (lb·ft) 30 (22)
1. Wiring
connector
HEATED OXYGEN SENSOR (H02S)
Fig. 6E2-58
1••1 REMOVAL
'fCAUTION
• The Heated Oxygen Sensor (H02S) uses a
permanently attached pigtail and connector.
This
pigtail should not be removed from the
H02S. Damage or removal of the pigtail or
connector
could affect proper operation of the
H02S.
•
Take care when handling the H02S. The in-line
electrical
connector and louver end must be
kept free
of grease, dirt, or other contaminants.
Also, avoid using cleaning solvents of any type.
Do not drop or roughly handle the H02S.
Preparation: • Battery negative cable.
1. H02S wiring connector
2. H02S
• The H02S may be difficult to remove when
engine temperature is
below 48• (120.).
•
Excessive force may damage threads in
exhaust pipe.
I••IINSTALLATION
2. H02S
• A special anti-seize compound is used on the
H02S threads. The compound consists of a
liquid graphite which will burn away, but the
glass beads will remain, making the sensor
easier
to remove.
•
Page 803 of 1928
New or service sensors will already have the
compound
applied to the threads. If a sensor is
removed
from an engine and iffor any reason it
is to be reinstalled, the threads must have anti
seize compound
applied before reinstallation.
•
Apply anti-seize compound or equivalent to
threads of oxygen sensor if necessary.
• Tighten the oxygen sensor to the specified
torque.
1~1 Torque N·m (lb·ft) 55 (40)
1. H02S wiring connector
THROTTLE POSITION (TP) SENSOR
Fig. 6E2-59
E) REMOVAL
Preparation: • Battery negative cable.
1. Throttle Position (TP) sensor wiring connector
2. TP sensor fixing screw
3. TP sensor
I••IINSTALLATION
3. TP sensor
2. TP sensor fixing screw
• Tighten the fixing screw to the specified torque.
~~~ Torque N·m (lb·in) I 2 (18)
• Use a "Scan tool" to check TP sensor output
voltage with throttle closed, should be under
0.85 volts. If over 0.85 volts, check for binding
throttle shaft, or TP sensor lever. If all OK,
replace TP sensor.
1.
TP sensor wiring connector
DRIVEABILITY AND EMISSIONS 6E2-1 07
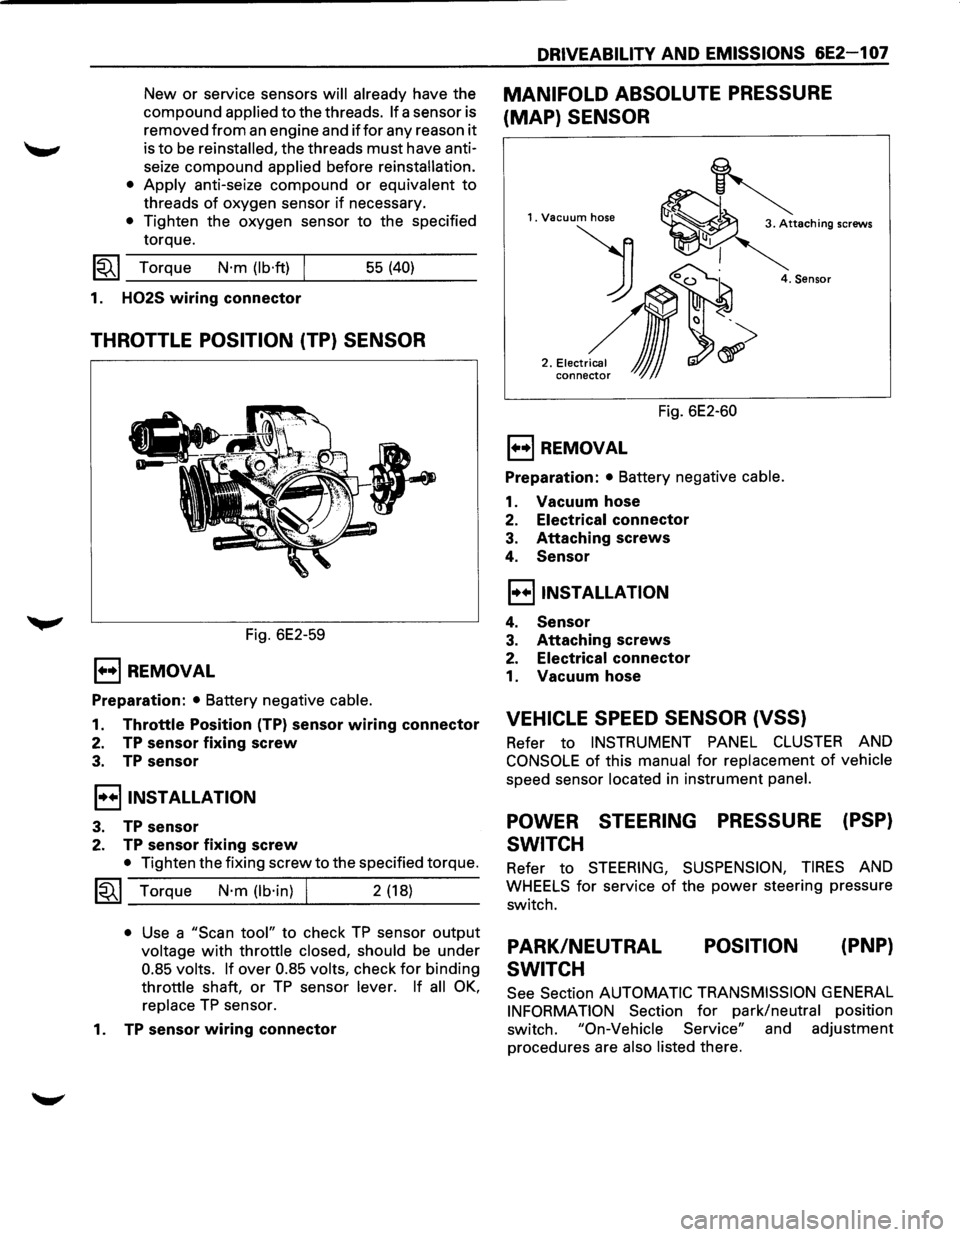
MANIFOLD ABSOLUTE PRESSURE
(MAP) SENSOR
1. Vacuum hose
) 0~
2 .• ,.~,,~,~
conne~ JJJ
4. Sensor
Fig. 6E2-60
E) REMOVAL
Preparation: • Battery negative cable.
1. Vacuum hose
2. Electrical connector
3. Attaching screws
4. Sensor
I••IINSTALLATION
4. Sensor
3. Attaching screws
2. Electrical connector
1. Vacuum hose
VEHICLE SPEED SENSOR (VSS)
Refer to INSTRUMENT PANEL CLUSTER AND
CONSOLE of this manual for replacement of vehicle
speed sensor located in instrument panel.
POWER STEERING PRESSURE (PSP)
SWITCH
Refer to STEERING, SUSPENSION, TIRES AND
WHEELS for service of the power steering pressure
switch.
PARK/NEUTRAL
SWITCH POSITION
(PNP}
See
Section AUTOMATIC TRANSMISSION GENERAL
INFORMATION Section for park/neutral position
switch.
"On-Vehicle Service" and adjustment
procedures are
also listed there.
Page 804 of 1928
6E2-1 08 DRIVEABILITV AND EMISSIONS
CHART C-1A
PARK/NEUTRAL POSITION (PNP} SWITCH DIAGNOSIS
(AUTO TRANSMISSION ONL
V}
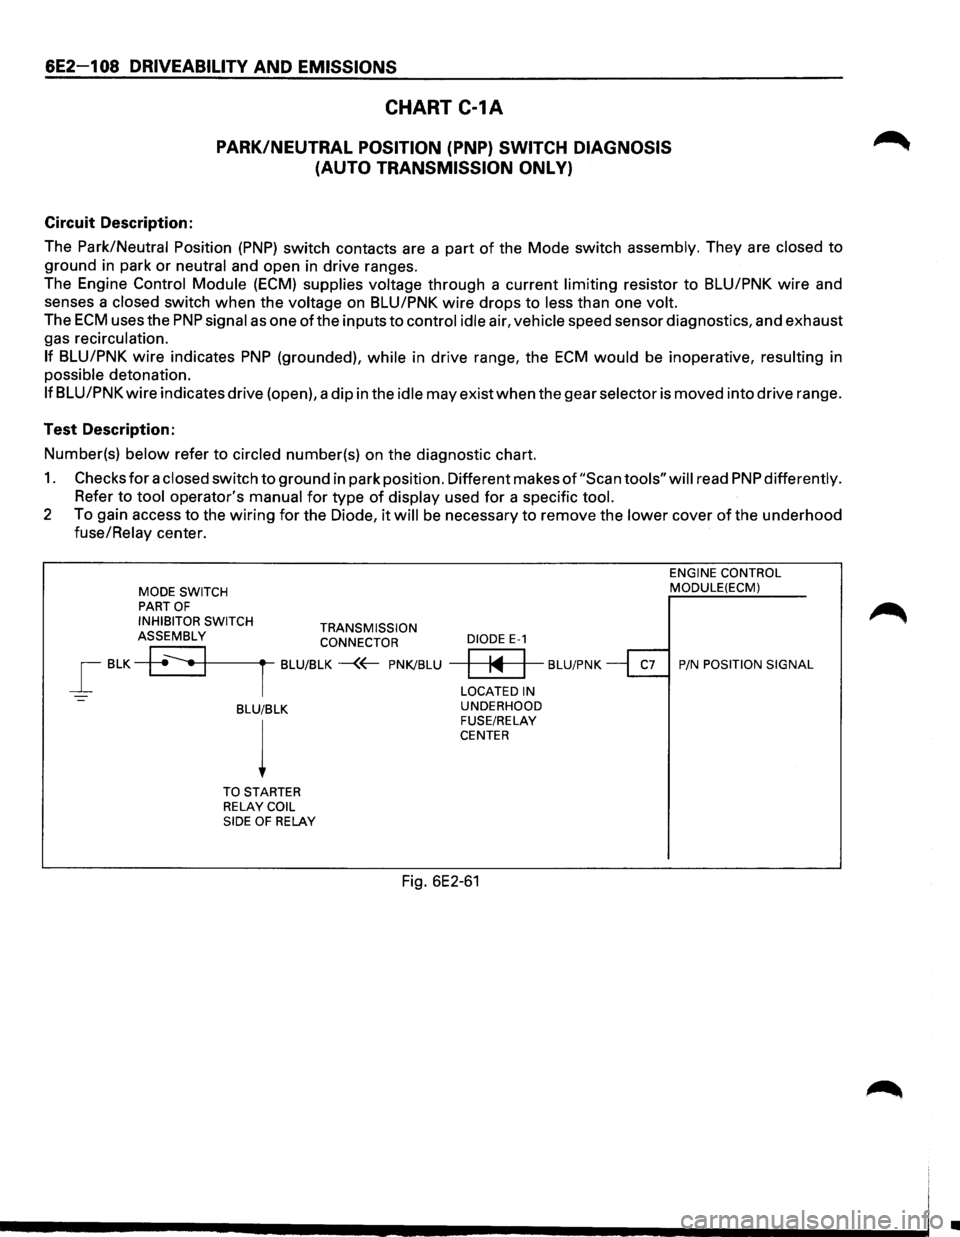
Circuit Description:
The
Park/Neutral Position (PNP) switch contacts are a part of the Mode switch assembly. They are closed to
ground in park or neutral and open in drive ranges.
The Engine
Control Module (ECM) supplies voltage through a current limiting resistor to BLU/PNK wire and
senses a
closed switch when the voltage on BLU/PNK wire drops to less than one volt.
The ECM uses the PNP signal as one ofthe inputs to control idle air, vehicle speed sensor diagnostics, and exhaust
gas recirculation.
If BLU/PNK wire indicates PNP (grounded), while in drive range, the ECM would be inoperative, resulting in
possible detonation.
If BLU/PNK wire indicates drive (open), a dip in the idle may exist when the gear selector is moved into drive range.
Test Description:
Number(s)
below refer to circled number(s) on the diagnostic chart.
1. Checks for a closed switch to ground in park position. Different makes of "Scan tools" will read PNP differently.
Refer to tool operator's manual for type of display used for a specific tool.
2 To gain access to the wiring for the Diode, it will be necessary to remove the lower cover of the underhood
fuse/Relay center.
MODE SWITCH PART OF
INHIBITOR SWITCH TRANSMISSION ASSEMBLY CONNECTOR
_[ BLK +~•+1-------rt--BLU/BLK -{~ PNK/BLU
-BLU/BLK
l
TO STARTER
RELAY COIL
SIDE OF RELAY
DIODE E-1
ENGINE CONTROL MODULE(ECM)
~ BLU/PNK ~ P/N POSITION SIGNAL
LOCATED IN
UNDERHOOD
FUSE/RELAY
CENTER
Fig. 6E2-61
Ill
Page 805 of 1928
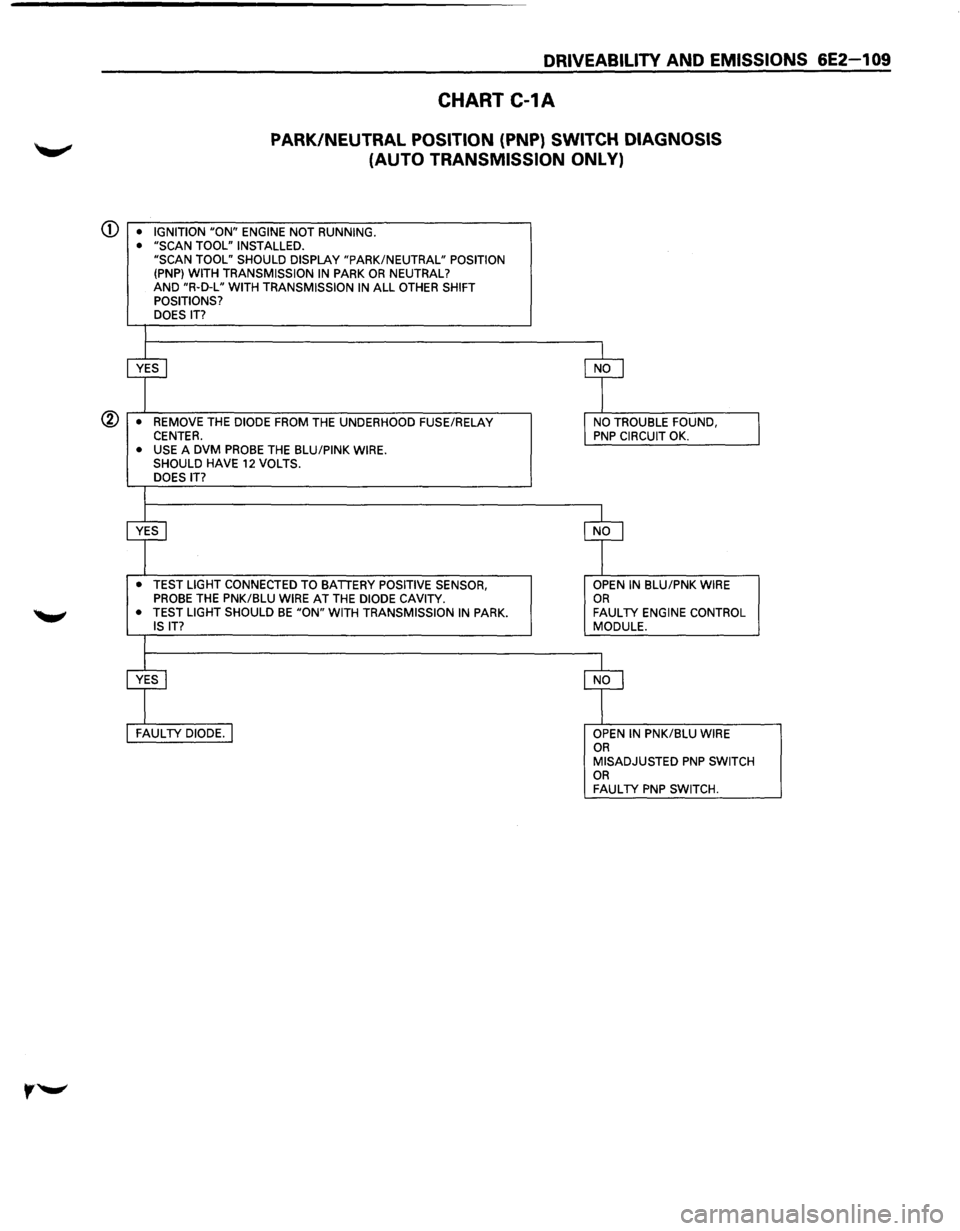
DRIVEABILITY AND EMISSIONS 6E2-1 09
CHART C-1A
PARK/NEUTRAL POSITION (PNP) SWITCH DIAGNOSIS
(AUTO TRANSMISSION ONLY)
CD • IGNITION "ON" ENGINE NOT RUNNING.
• "SCAN TOOL" INSTALLED.
"SCAN TOOL" SHOULD DISPLAY "PARK/NEUTRAL" POSITION
(PNP} WITH TRANSMISSION
IN PARK OR NEUTRAL?
AND "R·D-L" WITH TRANSMISSION IN ALL OTHER SHIFT
POSITIONS?
DOES
IT?
@ • REMOVE THE DIODE FROM THE UNDERHOOD FUSE/RELAY CENTER. • USE A DVM PROBE THE BLU/PINK WIRE.
SHOULD HAVE 12 VOLTS.
DOES IT?
• TEST LIGHT CONNECTED TO BATTERY POSITIVE SENSOR,
PROBE THE PNK/BLU WIRE AT THE DIODE CAVITY.
• TEST LIGHT SHOULD BE "ON" WITH TRANSMISSION IN PARK.
IS IT?
OPEN IN BLU/PNK WIRE OR FAULTY ENGINE CONTROL
MODULE.
OPEN
IN PNK/BLU WIRE OR MISADJUSTED PNP SWITCH OR FAULTY PNP SWITCH.
Page 806 of 1928
6E2-11 0 DRIVEABILITY AND EMISSIONS
CHART C-10
MANIFOLD ABSOLUTE PRESSURE (MAP) OUTPUT CHECK
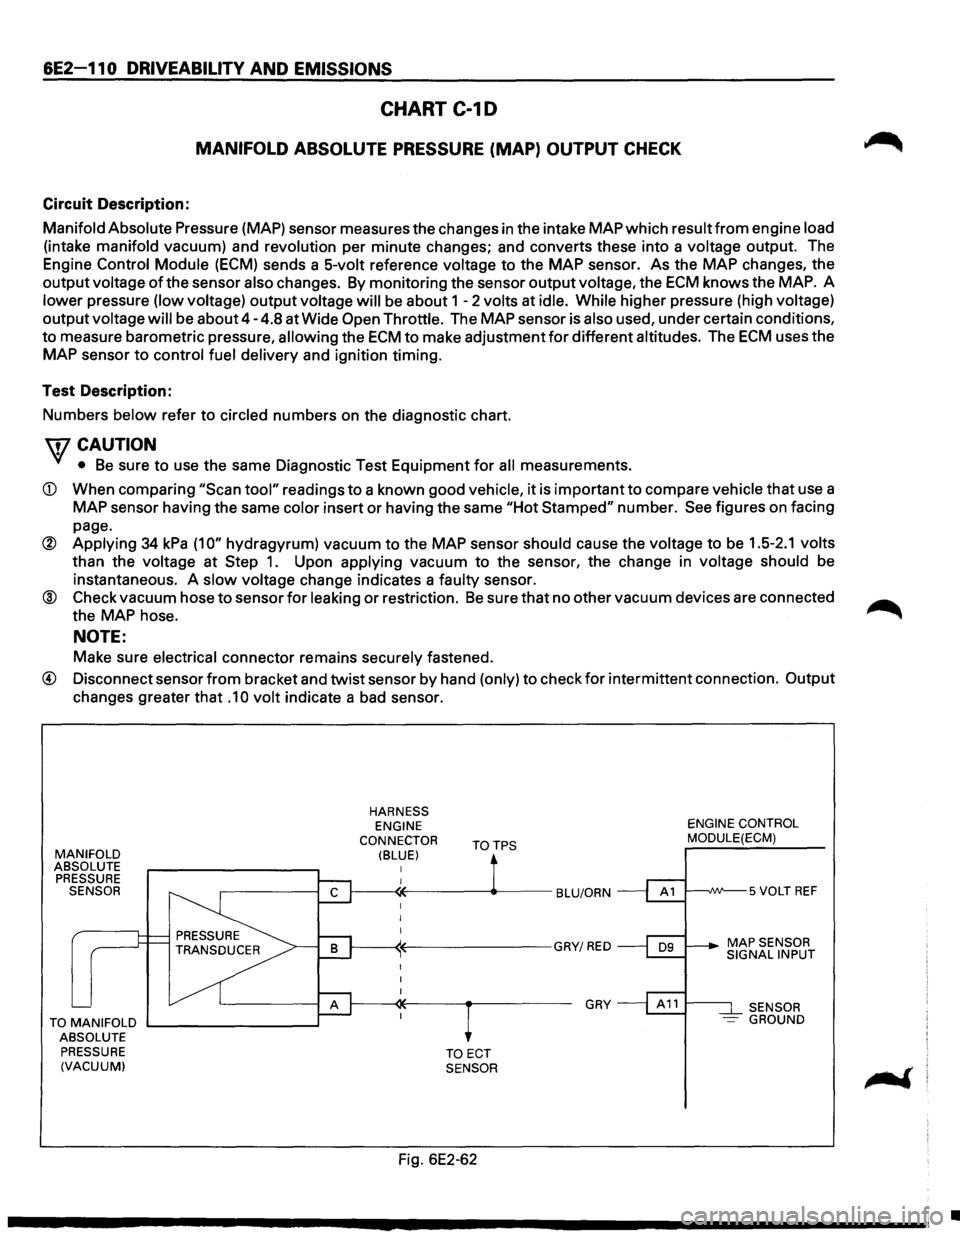
Circuit Description:
Manifold Absolute Pressure (MAP) sensor measures the changes in the intake MAP which result
from engine load
(intake manifold vacuum) and revolution per minute changes; and converts these into a voltage output. The
Engine
Control Module (ECM) sends a 5-volt reference voltage to the MAP sensor. As the MAP changes, the
output voltage of the sensor also changes. By monitoring the sensor output voltage, the ECM knows the MAP. A
lower pressure (low voltage)
output voltage will be about 1 - 2 volts at idle. While higher pressure (high voltage)
output voltage
will be about 4-4.8 at Wide Open Throttle. The MAP sensor is also used, under certain conditions,
to measure barometric pressure,
allowing the ECM to make adjustment for different altitudes. The ECM uses the
MAP sensor
to control fuel delivery and ignition timing.
Test Description:
Numbers
below refer to circled numbers on the diagnostic chart.
\fl CAUTION
'(/ • Be sure to use the same Diagnostic Test Equipment for all measurements.
CD When comparing "Scan tool" readings to a known good vehicle, it is important to compare vehicle that use a
MAP sensor having the same color insert
or having the same "Hot Stamped" number. See figures on facing
page.
® Applying 34 kPa (1 0" hydragyrum) vacuum to the MAP sensor should cause the voltage to be 1.5-2.1 volts
than the voltage at
Step 1. Upon applying vacuum to the sensor, the change in voltage should be
instantaneous. A slow voltage change indicates a faulty sensor.
® Check vacuum hose to sensor for leaking or restriction. Be sure that no other vacuum devices are connected ....-...
the MAP hose. ~
NOTE:
Make sure electrical connector remains securely fastened.
@) Disconnect sensor from bracket and twist sensor by hand (only) to check for intermittent connection. Output
changes greater that
.1 0 volt indicate a bad sensor.
MANIFOLD
ABSOLUTE PRESSURE
SENSOR
TO MANIFOLD
ABSOLUTE PRESSURE
(VACUUM)
HARNESS ENGINE
CONNECTOR
(BLUE) TOTPS
TOECT SENSOR
Fig. 6E2-62
GRY
ENGINE CONTROL
MODULE(ECM)
I---...JVV'--5 VOLT
REF
SENSOR -GROUND
•
Page 807 of 1928
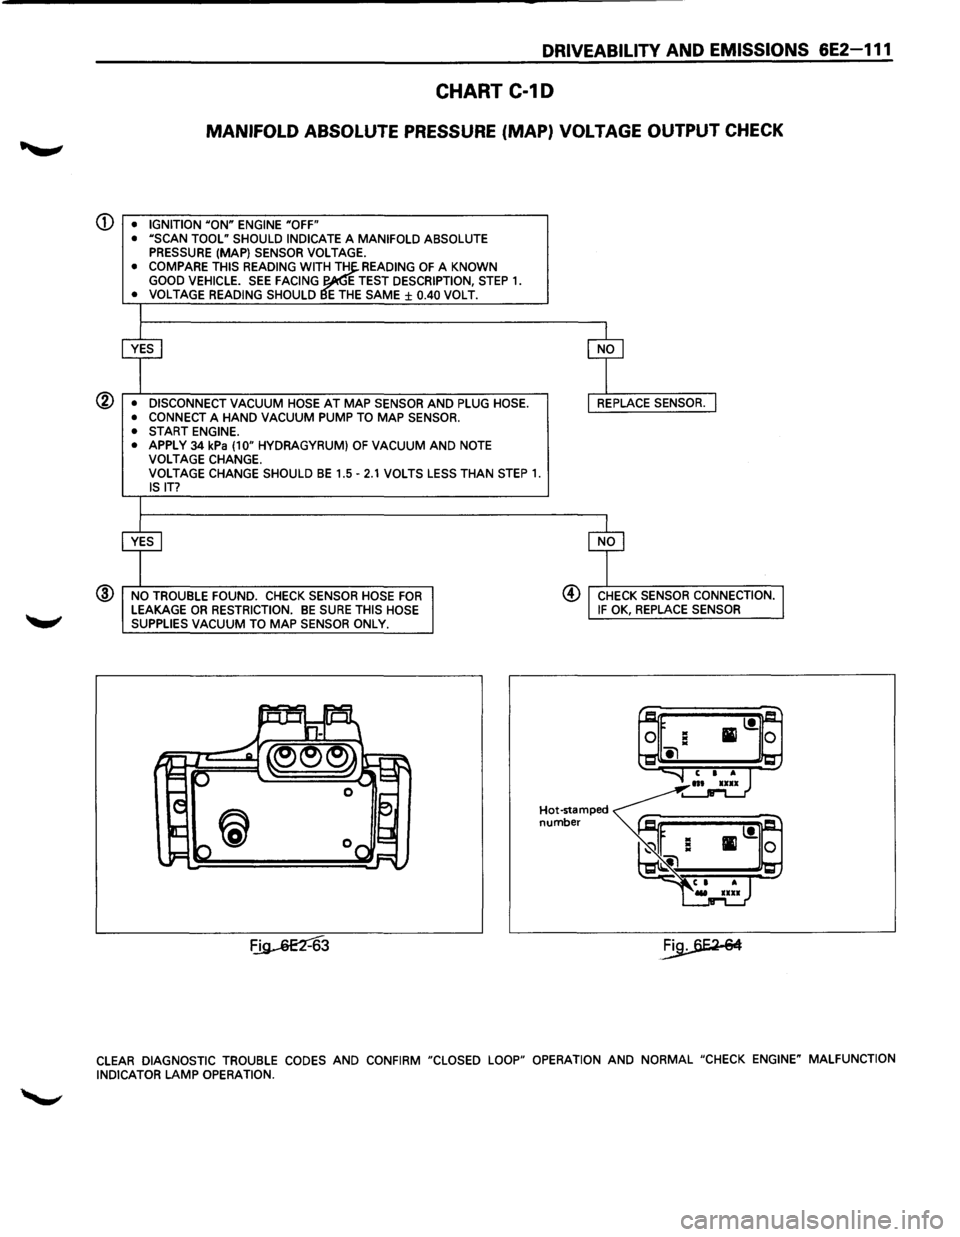
DRIVEABILITV AND EMISSIONS 6E2-111
CHART C-10
MANIFOLD ABSOLUTE PRESSURE (MAP) VOLTAGE OUTPUT CHECK
CD • IGNITION UON" ENGINE "OFF"
• uSCAN TOOL" SHOULD INDICATE A MANIFOLD ABSOLUTE
PRESSURE (MAP) SENSOR VOLTAGE. • COMPARE THIS READING WITii!TH READING OF A KNOWN
GOOD VEHICLE. SEE FACING E TEST DESCRIPTION, STEP 1. • VOLTAGE READING SHOULD E THE SAME± 0.40 VOLT.
® • DISCONNECT VACUUM HOSE AT MAP SENSOR AND PLUG HOSE.
• CONNECT A HAND VACUUM PUMP TO MAP SENSOR.
• START ENGINE.
•
APPLY 34 kPa (10" HYDRAGYRUM) OF VACUUM AND NOTE VOLTAGE CHANGE.
VOLTAGE CHANGE SHOULD BE 1.5-2.1 VOLTS LESS THAN STEP 1. IS IT?
@ NO TROUBLE FOUND. CHECK SENSOR HOSE FOR LEAKAGE OR RESTRICTION. BE SURE THIS HOSE
SUPPLIES VACUUM TO MAP SENSOR ONLY.
~3
@ CHECK SENSOR CONNECTION. IF OK, REPLACE SENSOR
Hot-stamped number
CLEAR DIAGNOSTIC TROUBLE CODES AND CONFIRM "CLOSED LOOP" OPERATION AND NORMAL "CHECK ENGINE" MALFUNCTION
INDICATOR LAMP OPERATION.
Page 808 of 1928
6E2-112 DRIVEABILITY AND EMISSIONS
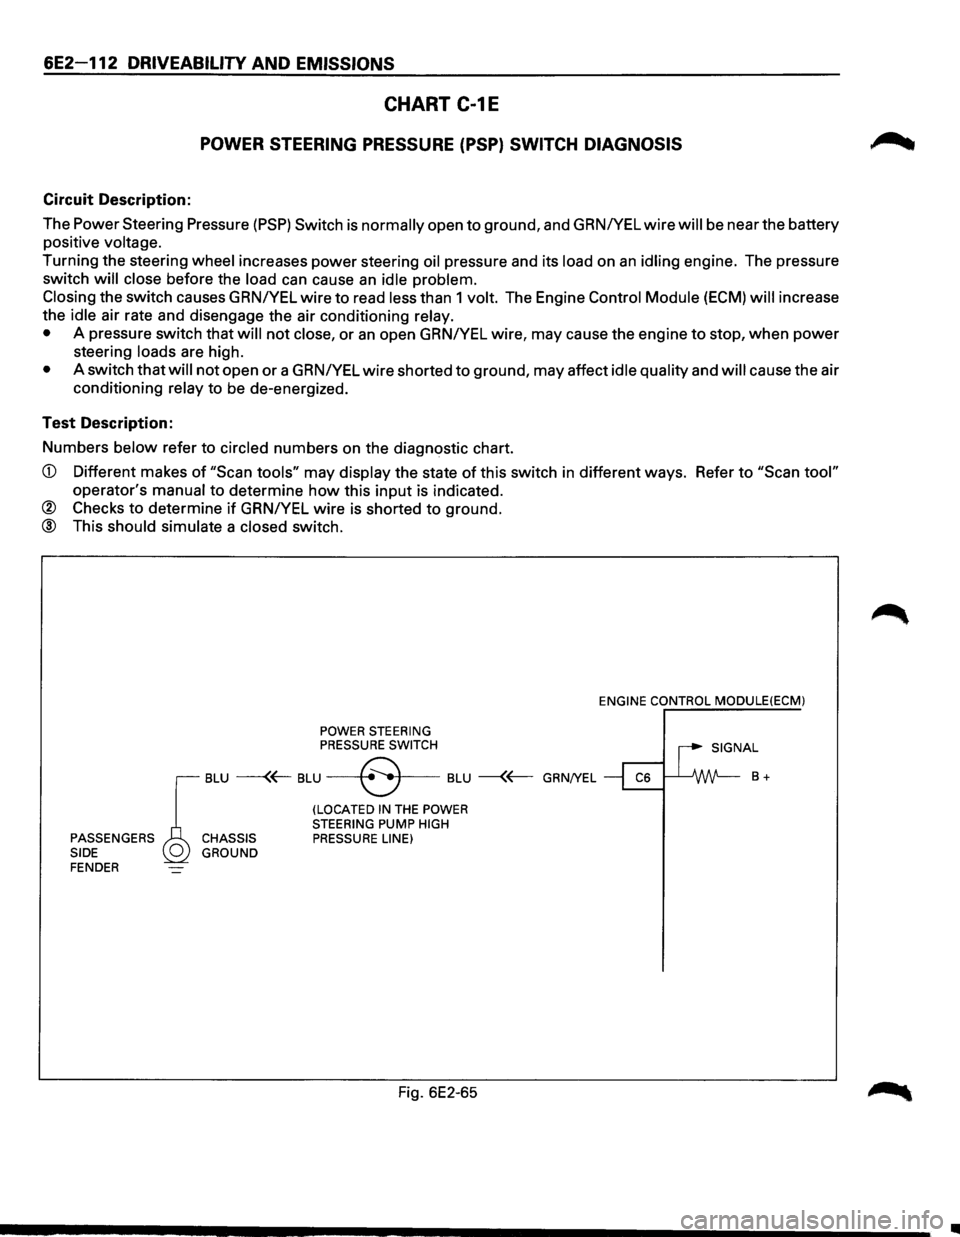
CHART C-1E
POWER STEERING PRESSURE (PSP) SWITCH DIAGNOSIS
Circuit Description:
The Power Steering Pressure
(PSP) Switch is normally open to ground, and GRNIYEL wire will be near the battery
positive
voltage.
Turning the steering wheel increases power steering oil pressure and its load on an idling engine. The pressure
switch
will close before the load can cause an idle problem.
Closing
the switch causes GRN/YEL wire to read less than 1 volt. The Engine Control Module (ECM) will increase
the
idle air rate and disengage the air conditioning relay.
•
A pressure switch that will not close, or an open GRNIYEL wire, may cause the engine to stop, when power
steering loads are high.
• A switch that will not open or a GRNIYEL wire shorted to ground, may affect idle quality and will cause the air
conditioning
relay to be de-energized.
Test Description:
Numbers
below refer to circled numbers on the diagnostic chart.
CD Different makes of "Scan tools" may display the state of this switch in different ways. Refer to "Scan tool"
operator's manual to determine how this input is indicated.
® Checks to determine if GRNIYEL wire is shorted to ground.
@ This should simulate a closed switch.
POWER STEERING PRESSURE SWITCH ENGINE
CONTROL
MODULE(ECM)
I SIGNAL
r
BLU ---(~ BLU --+8 .. •f---BLU --{~ GRN/YEL ~ ~ B +
(LOCATED IN THE POWER
STEERING PUMP HIGH PASSENGERS CHASSIS PRESSURE LINE)
SIDE GROUND
FENDER
Fig. 6E2-65
•
Page 809 of 1928
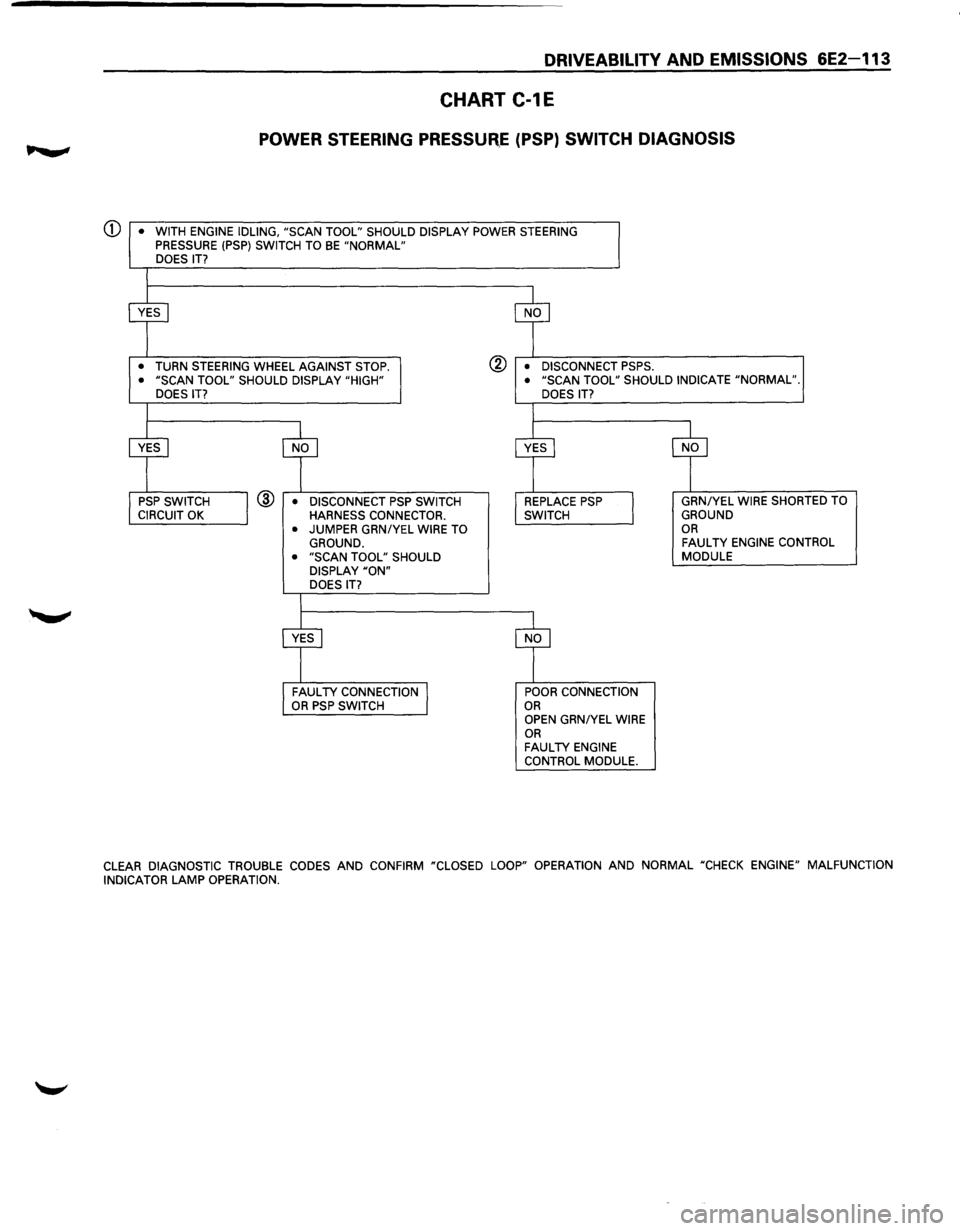
DRIVEABILITY AND EMISSIONS 6E2-113
CHART C-1E
POWER STEERING PRESSUR,.E (PSP) SWITCH DIAGNOSIS
CD • WITH ENGINE IDLING, "SCAN TOOL" SHOULD DISPLAY POWER STEERING PRESSURE (PSP) SWITCH TO BE "NORMAL" DOES IT?
•
TURN STEERING WHEEL AGAINST STOP. ® • DISCONNECT PSPS. • "SCAN TOOL" SHOULD DISPLAY "HIGH"
DOES IT? • "SCAN TOOL" SHOULD INDICATE "NORMAL".
@ • DISCONNECT PSP SWITCH HARNESS CONNECTOR.
• JUMPER GRNIYEL WIRE TO GROUND. • "SCAN TOOL" SHOULD DISPLAY "ON" DOES IT? DOES
IT?
POOR CONNECTION OR OPEN GRN/YEL WIRE OR FAULTY ENGINE
CONTROL MODULE. GRN/YEL
WIRE SHORTED TO GROUND OR FAULTY ENGINE
CONTROL MODULE
CLEAR
DIAGNOSTIC TROUBLE CODES AND CONFIRM "CLOSED LOOP" OPERATION AND NORMAL "CHECK ENGINE" MALFUNCTION
INDICATOR LAMP OPERATION.
Page 810 of 1928
6E2-114 DRIVEABILITY AND EMISSIONS
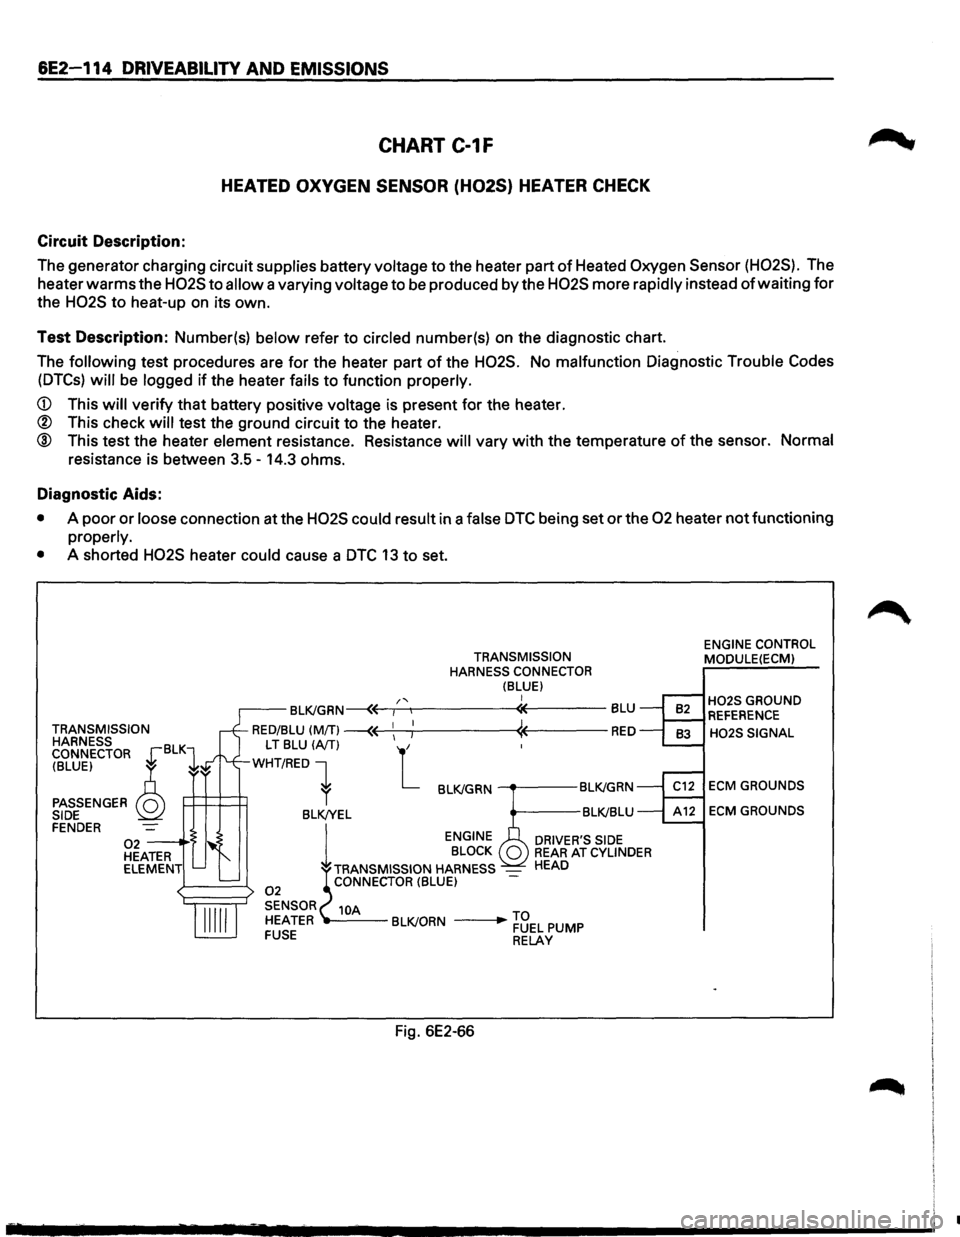
CHART C-1F
HEATED OXYGEN SENSOR (H02S} HEATER CHECK
Circuit Description:
The generator charging circuit supplies battery voltage to the heater part of Heated Oxygen Sensor (H02S). The
heater
warms the H02S to allow a varying voltage to be produced by the H02S more rapidly instead of waiting for
the H02S to heat-up on its own.
Test Description: Number(s) below refer to circled number(s) on the diagnostic chart.
The
following test procedures are for the heater part of the H02S. No malfunction Diagnostic Trouble Codes
(DTCs) will be logged if the heater fails to function properly.
CD This will verify that battery positive voltage is present for the heater.
® This check will test the ground circuit to the heater.
® This test the heater element resistance. Resistance will vary with the temperature of the sensor. Normal
resistance is between 3.5-14.3 ohms.
Diagnostic Aids:
• A poor or loose connection at the H02S could result in a false DTC being set or the 02 heater not functioning
properly.
•
A shorted H02S heater could cause a DTC 13 to set.
TRANSMISSION
HARNESS
CONNECTOR
~BLKl
(BLUE) ~ ~
PASSENGER Q SIDE FENDER 02--·'> HEATER
ELEMENT
TRANSMISSION
HARNESS CONNECTOR
(BLUE) I
Fig. 6E2-66
ENGINE CONTROL
MODULE(ECM)
H02S GROUND REFERENCE
H02S SIGNAL
ECM GROUNDS
ECM GROUNDS
•