clock JAGUAR S TYPE 2005 1.G Technical Guide Update
[x] Cancel search | Manufacturer: JAGUAR, Model Year: 2005, Model line: S TYPE, Model: JAGUAR S TYPE 2005 1.GPages: 133, PDF Size: 3.48 MB
Page 64 of 133

JAGUARS-TYPEChassis
59
D.211.248
FRONT STEERING ARM requires a Service tool to assist removal. Low-
pressure hose connections are made using
Constant Tension (CT) clamps. Pinion hydraulic
connections are orientated with the bottom
connector low pressure with the longer nut, as
current vehicles.
The PAS fluid is for PAS only; it is not to be used
for transmissions. After manual filling, the system
must be bled using a vacuum pump to remove all
the air from the system to prevent system noises.
Fluid level is checked through a sight window on
the reservoir.
Components replaceable are complete pump,
steering rack, reservoir or hose assembly.
A non-serviceable 10-micron filter is located
within the reservoir to maintain fluid cleanliness
throughout the life of the vehicle. It is essential as
with all Jaguars that the system does not become
contaminated. Cap all ports on disassembly to
prevent contamination ingress. As with current
vehicles, the fluid and reservoir must be renewed
if any major component is replaced i.e. Rack,
pump or cooler.
The road wheels should be set straight ahead and
the steering wheel locked (using service tool
F7LC-3F732-BF) when removal and assembly of
the steering gear or intermediate shaft is required.
This is necessary to prevent damage to the air bag
clock spring within the steering upper column
assembly. The intermediate shaft can only be
assembled to its mating components in one
location. Steering wheel alignment can only be
achieved by adjustment at the tie-rods. A
dimensional check of the steering rack position
may be necessary to verify rack centre.
Steering Column
The steering column assembly is completely new
and uses no parts from previous Jaguar
assemblies:
¥ Construction of the upper column assembly is
based on the use of aluminium extrusions and
castings.
¥ A two shaft lower column assembly is used.
¥ The electronically controlled steering lock, the
steering column lock module (SCLM), is a
physically separate component from the
ignition switch which is fascia mounted.
¥ The dynamic stability control (DSC) steering
wheel position sensor is fitted to the upper
column assembly.
Steering Wheel
The steering wheel consists of a magnesium
armature with a central steel insert. The steering
column and wheel insert are splined with a flat so
that the wheel can only be fitted in one position.
Any misalignment of the steering wheel is
corrected by adjusting the tie rods. The splined
fitting also has a locking taper which requires the
use of a 2 legged puller to remove the wheel.
The steering wheel incorporates the the airbag
module, horn mechanism and the optional cruise
control and audio/phone switches.
Page 92 of 133
JAGUARS-TYPEElectrical/Electronic
87
Bulb renewal
It is important that only Jaguar bulbs of the type
specified are used when renewing bulbs.
Before renewing bulbs, switch off the ignition and
light switches.
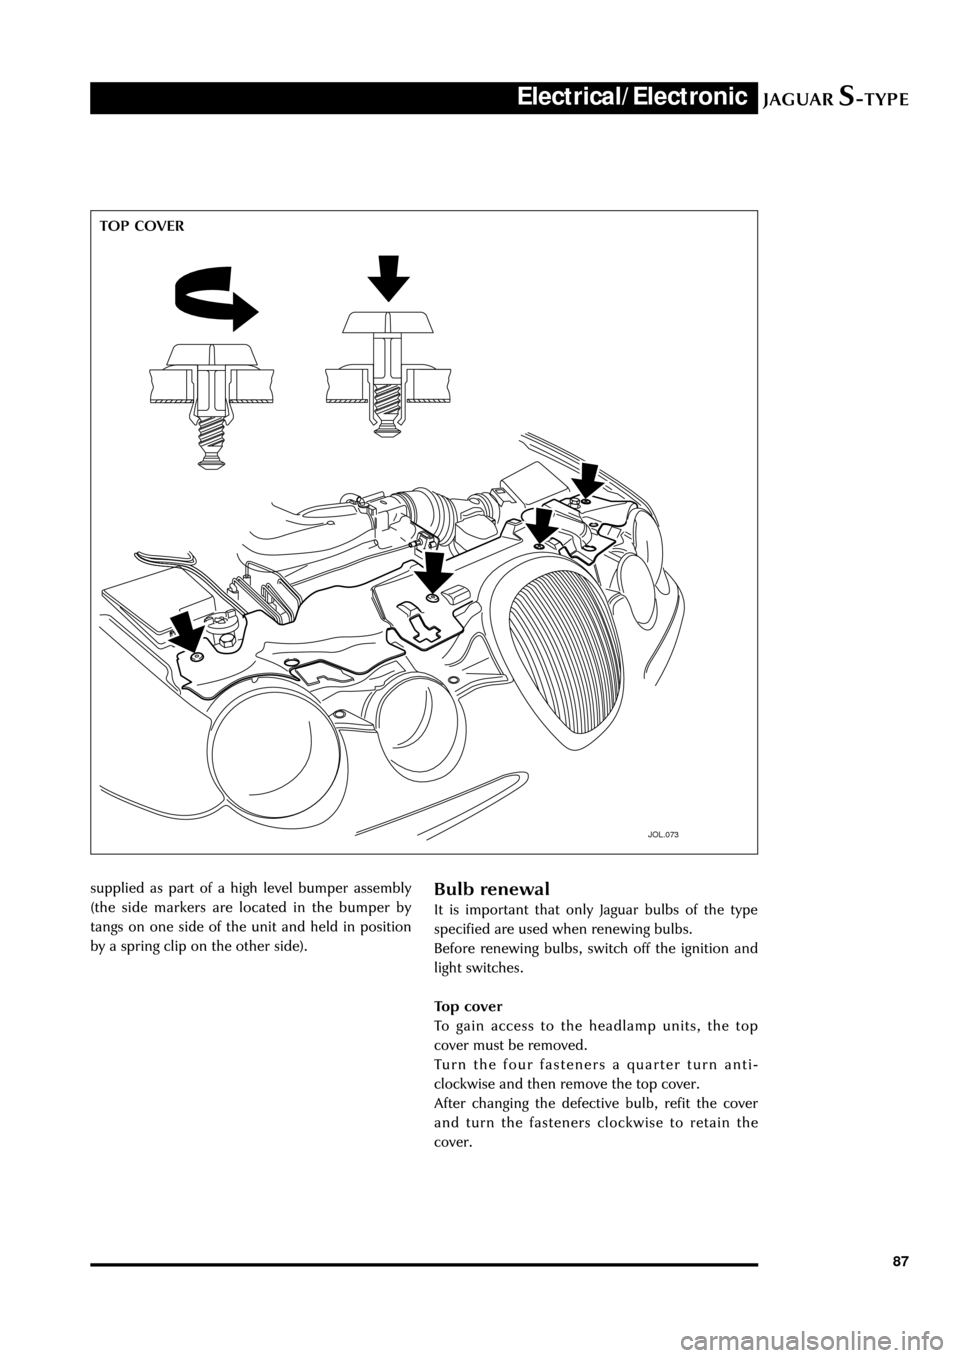
Top cover
To gain access to the headlamp units, the top
cover must be removed.
Turn the four fasteners a quarter turn anti-
clockwise and then remove the top cover.
After changing the defective bulb, refit the cover
and turn the fasteners clockwise to retain the
cover.
JOL.073
supplied as part of a high level bumper assembly
(the side markers are located in the bumper by
tangs on one side of the unit and held in position
by a spring clip on the other side).TOP COVER
Page 93 of 133
JAGUARS-TYPEElectrical/Electronic
88
JOL.074
Headlamp - Bulb Renewal
The bulbs are halogen type and will be damaged if
touched by hand or contaminated with oil or
grease. It is important to use clean gloves or cloth
when handling a bulb which is to be used again. A
contaminated bulb may be cleaned with
methylated spirit before refitting.
JOL.116
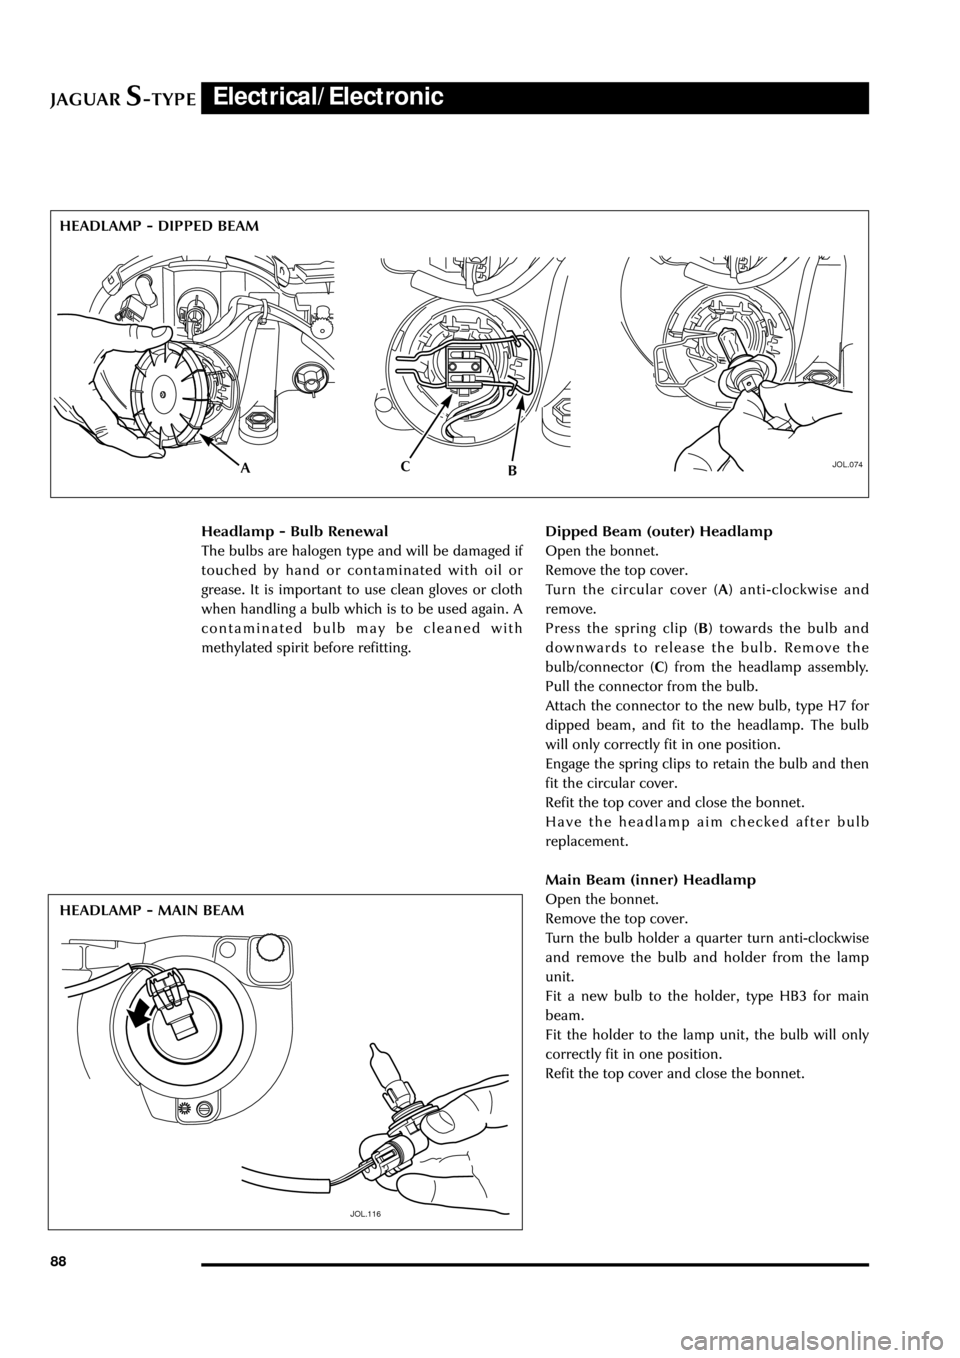
Dipped Beam (outer) Headlamp
Open the bonnet.
Remove the top cover.
Turn the circular cover (A) anti-clockwise and
remove.
Press the spring clip (B) towards the bulb and
downwards to release the bulb. Remove the
bulb/connector (C) from the headlamp assembly.
Pull the connector from the bulb.
Attach the connector to the new bulb, type H7 for
dipped beam, and fit to the headlamp. The bulb
will only correctly fit in one position.
Engage the spring clips to retain the bulb and then
fit the circular cover.
Refit the top cover and close the bonnet.
Have the headlamp aim checked after bulb
replacement.
Main Beam (inner) Headlamp
Open the bonnet.
Remove the top cover.
Turn the bulb holder a quarter turn anti-clockwise
and remove the bulb and holder from the lamp
unit.
Fit a new bulb to the holder, type HB3 for main
beam.
Fit the holder to the lamp unit, the bulb will only
correctly fit in one position.
Refit the top cover and close the bonnet. HEADLAMP - DIPPED BEAM
HEADLAMP - MAIN BEAM
ABC
Page 94 of 133
JAGUARS-TYPEElectrical/Electronic
89
JOL.078
JOL.079
D.417.108
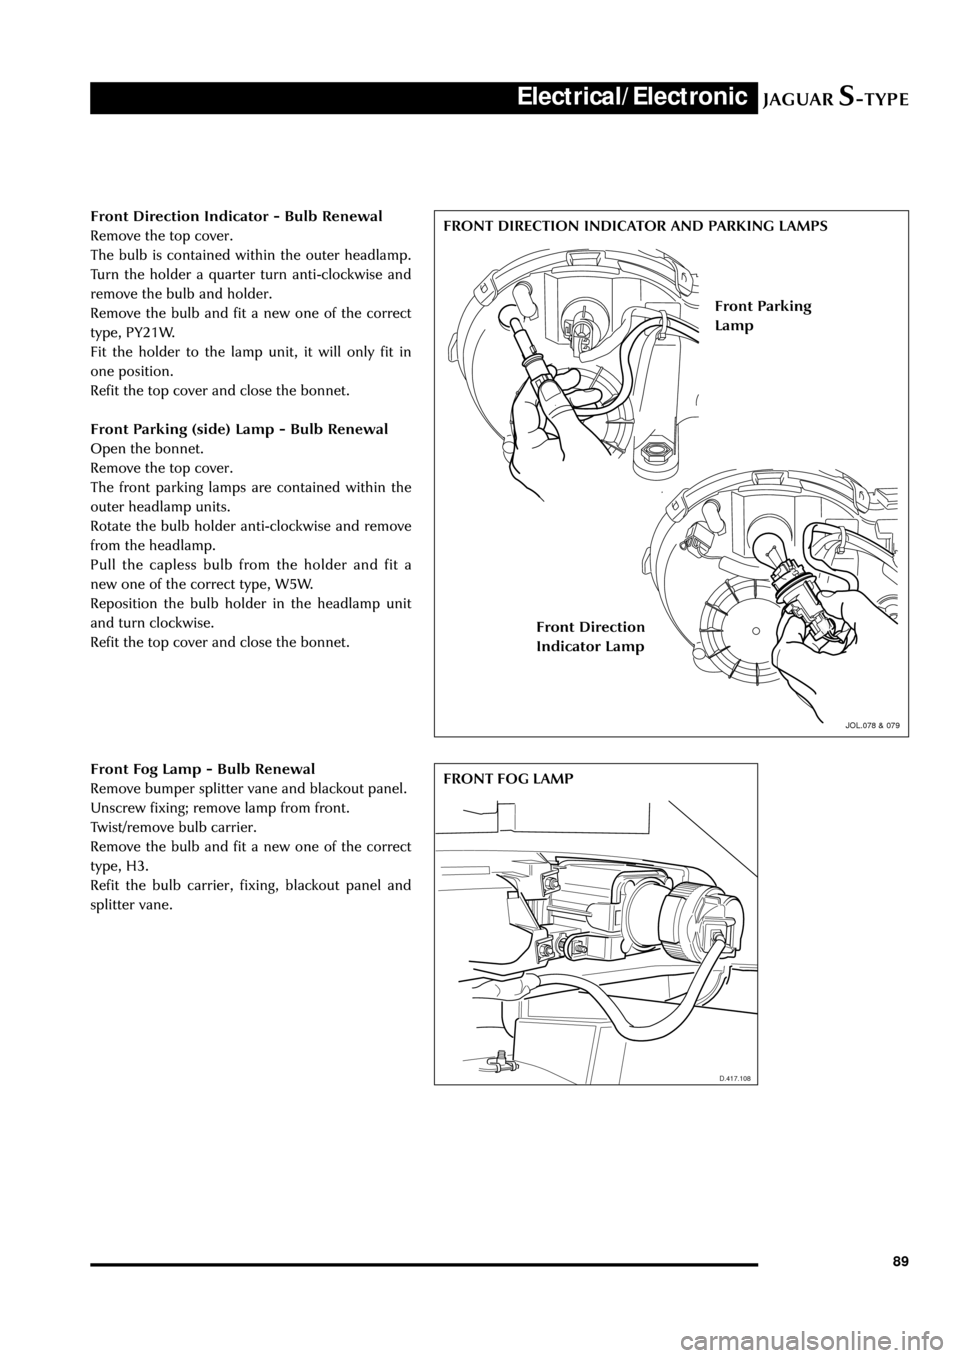
Front Direction Indicator - Bulb Renewal
Remove the top cover.
The bulb is contained within the outer headlamp.
Turn the holder a quarter turn anti-clockwise and
remove the bulb and holder.
Remove the bulb and fit a new one of the correct
type, PY21W.
Fit the holder to the lamp unit, it will only fit in
one position.
Refit the top cover and close the bonnet.
Front Parking (side) Lamp - Bulb Renewal
Open the bonnet.
Remove the top cover.
The front parking lamps are contained within the
outer headlamp units.
Rotate the bulb holder anti-clockwise and remove
from the headlamp.
Pull the capless bulb from the holder and fit a
new one of the correct type, W5W.
Reposition the bulb holder in the headlamp unit
and turn clockwise.
Refit the top cover and close the bonnet.
Front Fog Lamp - Bulb Renewal
Remove bumper splitter vane and blackout panel.
Unscrew fixing; remove lamp from front.
Twist/remove bulb carrier.
Remove the bulb and fit a new one of the correct
type, H3.
Refit the bulb carrier, fixing, blackout panel and
splitter vane.FRONT DIRECTION INDICATOR AND PARKING LAMPS
FRONT FOG LAMP
Front Parking
Lamp
Front Direction
Indicator Lamp
JOL.078 & 079
Page 95 of 133
JAGUARS-TYPEElectrical/Electronic
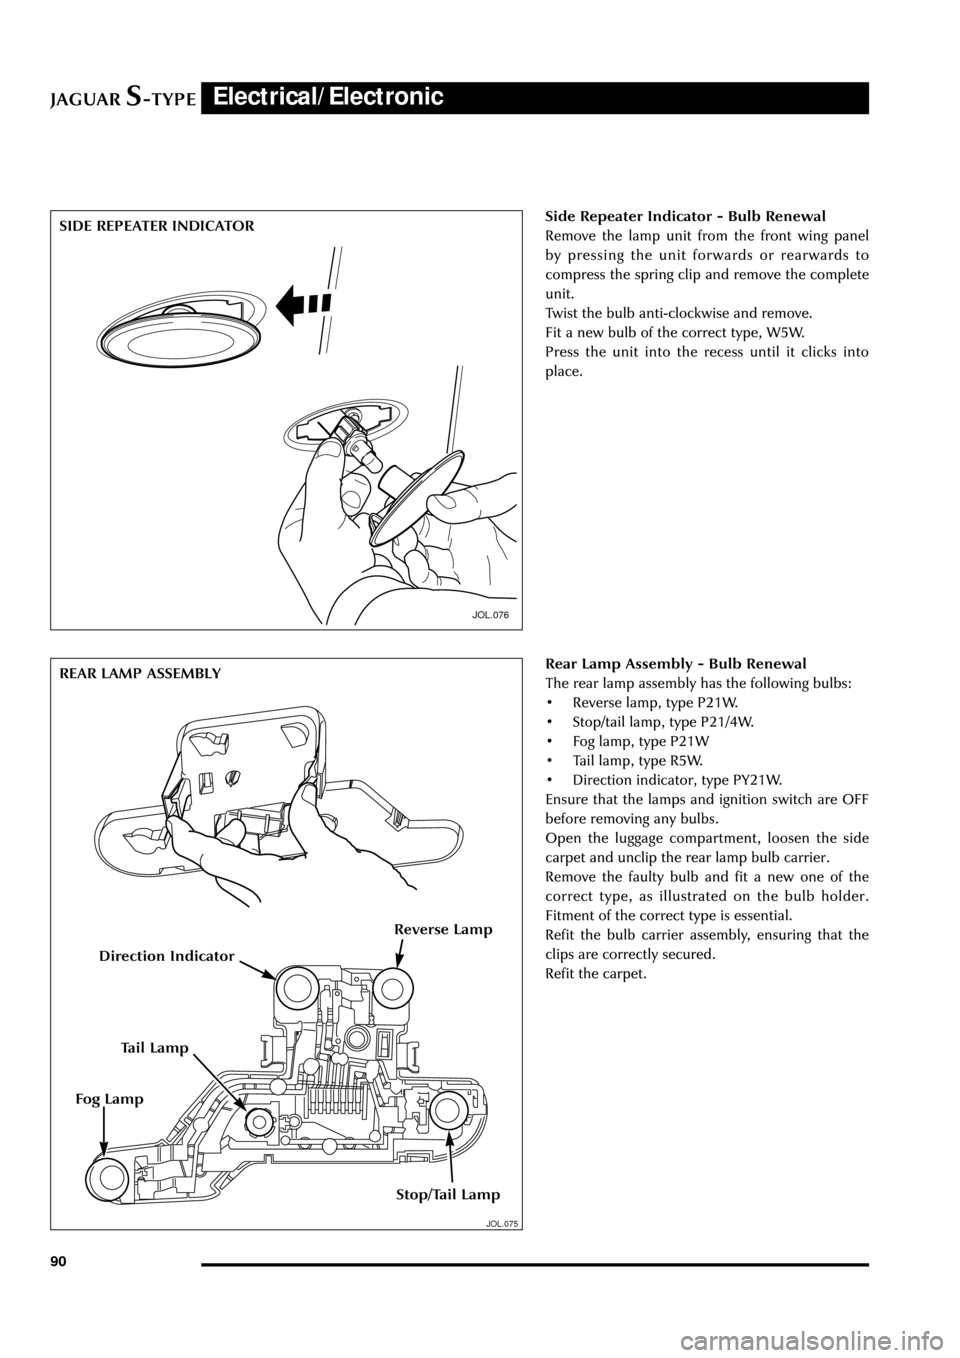
90Side Repeater Indicator - Bulb Renewal
Remove the lamp unit from the front wing panel
by pressing the unit forwards or rearwards to
compress the spring clip and remove the complete
unit.
Twist the bulb anti-clockwise and remove.
Fit a new bulb of the correct type, W5W.
Press the unit into the recess until it clicks into
place.
JOL.076
JOL.075
Rear Lamp Assembly - Bulb Renewal
The rear lamp assembly has the following bulbs:
¥ Reverse lamp, type P21W.
¥ Stop/tail lamp, type P21/4W.
¥ Fog lamp, type P21W
¥ Tail lamp, type R5W.
¥ Direction indicator, type PY21W.
Ensure that the lamps and ignition switch are OFF
before removing any bulbs.
Open the luggage compartment, loosen the side
carpet and unclip the rear lamp bulb carrier.
Remove the faulty bulb and fit a new one of the
correct type, as illustrated on the bulb holder.
Fitment of the correct type is essential.
Refit the bulb carrier assembly, ensuring that the
clips are correctly secured.
Refit the carpet. SIDE REPEATER INDICATOR
REAR LAMP ASSEMBLY
Direction Indicator
Tail Lamp
Stop/Tail Lamp
Fog Lamp
Reverse Lamp
Page 118 of 133
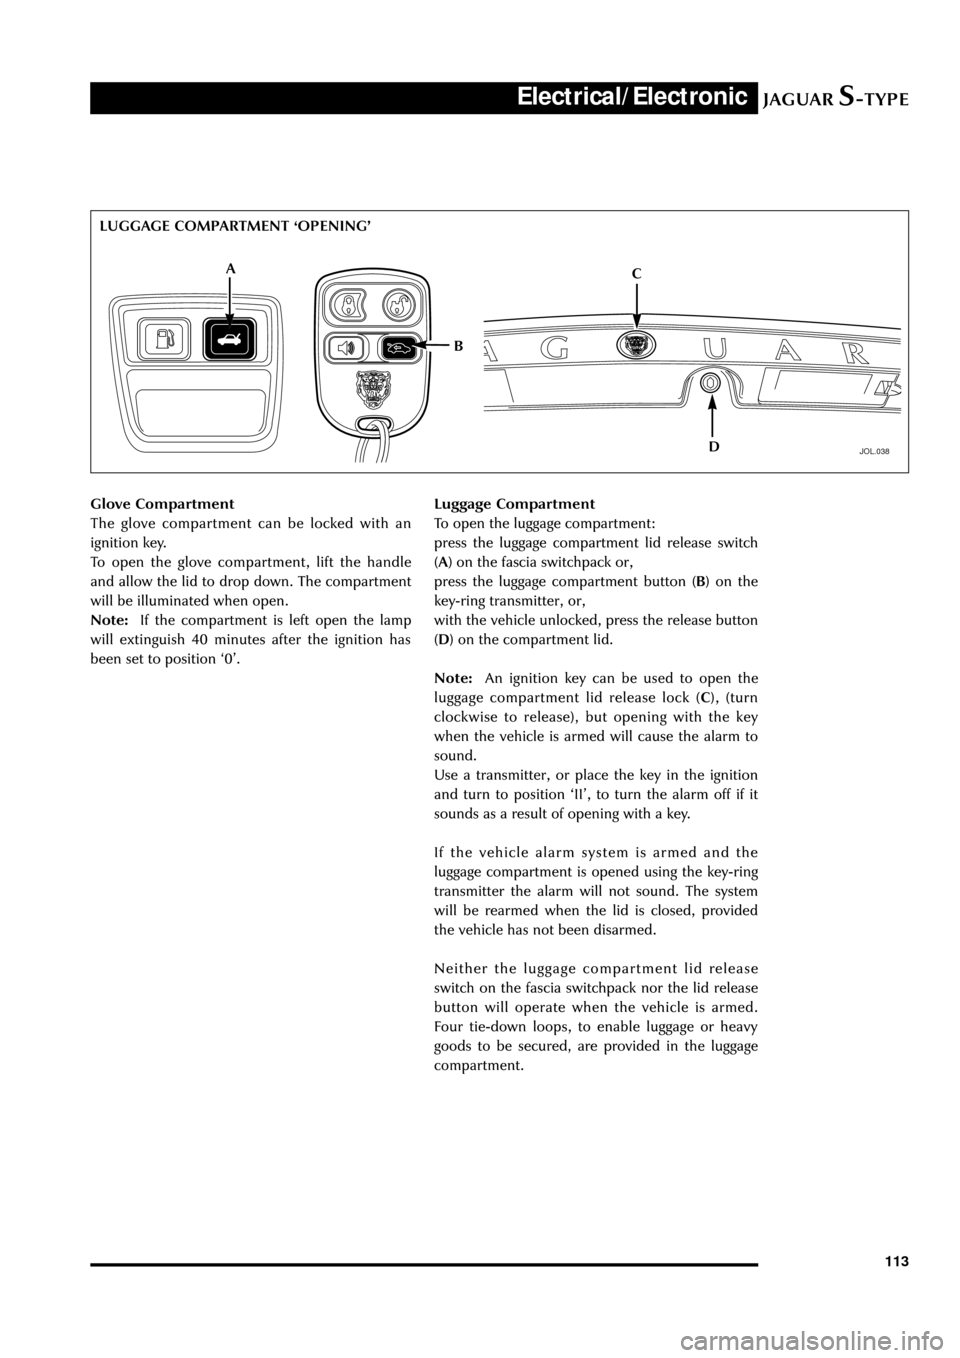
JAGUARS-TYPEElectrical/Electronic
113
JOL.038
Luggage Compartment
To open the luggage compartment:
press the luggage compartment lid release switch
(A) on the fascia switchpack or,
press the luggage compartment button (B) on the
key-ring transmitter, or,
with the vehicle unlocked, press the release button
(D) on the compartment lid.
Note:An ignition key can be used to open the
luggage compartment lid release lock (C), (turn
clockwise to release), but opening with the key
when the vehicle is armed will cause the alarm to
sound.
Use a transmitter, or place the key in the ignition
and turn to position ÔIIÕ, to turn the alarm off if it
sounds as a result of opening with a key.
If the vehicle alarm system is armed and the
luggage compartment is opened using the key-ring
transmitter the alarm will not sound. The system
will be rearmed when the lid is closed, provided
the vehicle has not been disarmed.
Neither the luggage compartment lid release
switch on the fascia switchpack nor the lid release
button will operate when the vehicle is armed.
Four tie-down loops, to enable luggage or heavy
goods to be secured, are provided in the luggage
compartment. Glove Compartment
The glove compartment can be locked with an
ignition key.
To open the glove compartment, lift the handle
and allow the lid to drop down. The compartment
will be illuminated when open.
Note:If the compartment is left open the lamp
will extinguish 40 minutes after the ignition has
been set to position Ô0Õ.LUGGAGE COMPARTMENT ÔOPENINGÕ
A
BC
D
Page 123 of 133

JAGUARS-TYPEElectrical/Electronic
118Menu
Press the menu button repeatedly to cycle through the first level menu functions; press the seek button
to enable / adjust the selected item. The extended menu features can be accessed by depressing and
holding the menu button for two seconds. Use the seek button to enable / adjust the selected item.
Some functions in the menu structure require the use of the volume control.
First Level Menu
Button Press Radio Tape CD
1. MAN - manual tune DOLBY ON / OFF SHUF - shuffle
2. AVC - automatic volume control AVC COMP - compress
3. *NEWS ON / OFF *NEWS ON / OFF AVC
4. *NEWS ON / OFF
* The NEWS enable / disable function is only available in MENU when the radio is in FM mode.
Second Level (Extended Menu)
Button Press Function
1 ADJUST CLOCK (hours) -adjust
2 ADJUST CLOCK (minutes) - adjust
3 12 / 24 HR CLOCK - adjust
4 TA LOCAL / TA DISTANT
5 ALT FREQ ON / OFF
6 RDS TIME ON / OFF
7 VOICETRAIN A (when fitted)
8 VOICETRAIN B (when fitted)
9 Vehicle identification number (VIN)
Security Code
The unit is protected by an anti-theft security code. Any power interruption will cause the display to
indicate ÔCODEÕ. At this point the unit will not operate until the correct security code has been entered.
The four digit security code is listed on the two security cards supplied with the vehicle. After three
unsuccessful attempts, the unit will not accept further entries until a delay of 30 minutes has elapsed.
Up to seven further attempts may be made, with a delay of 30 minutes between each, after which the
display will show ÔLOCKEDÕ.
If the security code is lost or the display shows ÔLOCKEDÕ the owner will need to return the vehicle to
the Dealer. The Dealer must ask for proof of ownership and the serial number of the unit before
supplying a security code given by contacting Jaguar Cars Ltd. To display the serial number, press and
hold preset buttons two and six simultaneously.
The remaining controls are similar to those in previous Jaguar audio systems. For specific operation of all
the controls refer to the ownerÕs Audio Systems Handbook.