jacking points JAGUAR X308 1998 2.G Workshop Manual
[x] Cancel search | Manufacturer: JAGUAR, Model Year: 1998, Model line: X308, Model: JAGUAR X308 1998 2.GPages: 2490, PDF Size: 69.81 MB
Page 39 of 2490
Before inspecting a component for wear or per
forming a dimensional check,
ensure that it is absolutely clean; a slight smear
of grease can conceal an incipient failure. When a component is to be checked dimensionally against figures quoted for it,
use the correct equipment (surface plates, micrometers, dial gauges etc.) in serviceable condition. The use of makeshift
equipment can be dangerous. Reject a component if its dimensio ns are outside the limits quoted, or if damage is apparent.
A part may be refitted if its critical di mension is exactly to the limit size and it is otherwise satisfactory. Use Plastigauge 12
Type PG-1 for checking bearing surface clearance, e.g. big end bearing shell to crank jour nal. Instructions for the use of
Plastigauge and a scale giving bearing clearances in steps of 0.0025 mm (0.0001 in) are supplied with the package.
Safety
Precautions
• WAR
NINGS:
WORKING ON THE FUEL SYSTEM RESULTS IN FUEL AND FUEL VAPOUR BEING PRESENT IN THE ATMOSPHERE. FUEL
VAPOUR IS EXTREMELY FLAMMABLE, HENCE GREAT CARE MUST BE TAKEN WHILST WORKING ON THE FUEL SYSTEM.
ADHERE STRICTLY TO THE FOLLOWING PRECAUTIONS:
DO
NOT SMOKE IN THE WORK AREA.
DISP
LAY 'NO SMOKING' SIGNS AROUND THE AREA.
DISCONNECT TH
E BATTERY BEFORE WORKING ON THE FUEL SYSTEM.
DO NOT CONNEC
T/DISCONNECT ELECTRICAL CIRCUITS
, USE ELECTRICAL EQUIPMENT OR OTHER TOOLS OR
ENGAGE IN WORKING PRACTICES WHICH IN ANY WAY MAY RESULT IN THE PRODUCTION OF SPARKS.
ENS
URE THAT A CO2 FIRE EXTINGUISHER IS CLOSE AT HAND.
ENS
URE THAT DRY SAND IS AVAILABLE TO SOAK UP ANY FUEL SPILLAGE.
EMP
TY FUEL USING SUITABLE FIRE PROOF EQUIPMENT IN
TO AN AUTHORIZED EXPLOSION PROOF CONTAINER.
DO NOT EMP
TY FUEL WHILE WORKING IN A WORKSHOP OR A PIT.
ENS
URE THAT WORKING AREA IS WELL VENTILATED.
ENS
URE THAT ANY WORK ON THE FUEL SYSTEM IS ON
LY CARRIED OUT BY EXPERIENCED AND WELL QUALIFIED
MAINTENANCE PERSONNEL.
ENS
URE THAT FUME EXTRACTION EQUIPMENT IS USED WHERE APPROPRIATE.
FUME EXTRACTION EQUIPMENT MUST BE IN OPERATION WHEN SOLVENTS ARE USED E.G. TRICHLOROETHANE,
WHITE SPIRIT, SBP3, METHYLENE CHLORIDE, PERCHLORETHY LENE. DO NOT SMOKE IN THE VICINITY OF VOLATILE
DEGREASING AGENTS.
General workshop practices:
Disc
onnect the grounded termin
al of the vehicle battery.
D
o not apply heat in an attempt to free seized nuts or fitt
ings; as well as causing damage to protective coatings,
there is a risk of damage from stray heat to electronic equipment and brake lines.
Keep oils and solven
ts away from naked flames and other sour
ces of ignition.
Adhere str
ictly to handling and safety inst
ructions given on containers and labels.
E
nsure that a suitab
le form of fire extinguisher is conveniently located.
Wh
en using electrical tools and equipment, inspect the power
lead for damage and check that it is properly earthed.
D
o not leave tools, equipment, spilt oil etc. around the work area.
Working beneath a vehicle:
Wh
enever possible, use a ramp or
pit in preference to jacking.
Posit
ion chocks at the wheels as we
ll as applying the parking brake.
N
ever rely on a jack alone to support a
vehicle; use axle stands, or blocks care fully placed at the jacking points, to
provide a rigid location.
Ch
eck that any lifting equipment used has adeq
uate capacity and is fully serviceable.
Working on air conditioning systems:
D
o not disconnect any pipes of the refrigeration system
unless you are trained and instructed to do so; a refrigerant
is used which can cause blindness if allowed to come into contact with the eyes.
Health Protection
P
rolonged and repeated contact with mineral oil will result in the removal of natural oils from the skin, leading to dryness,
In
spection
Page 51 of 2490
Jacking and Lifting - Jacking
Description an
d Operation
The vehicle jack and wheel chock are stored in the trunk as part of the vehicle toolkit.
Use of the vehicle jack and workshop jacks is desc ribed in the general procedures in this section.
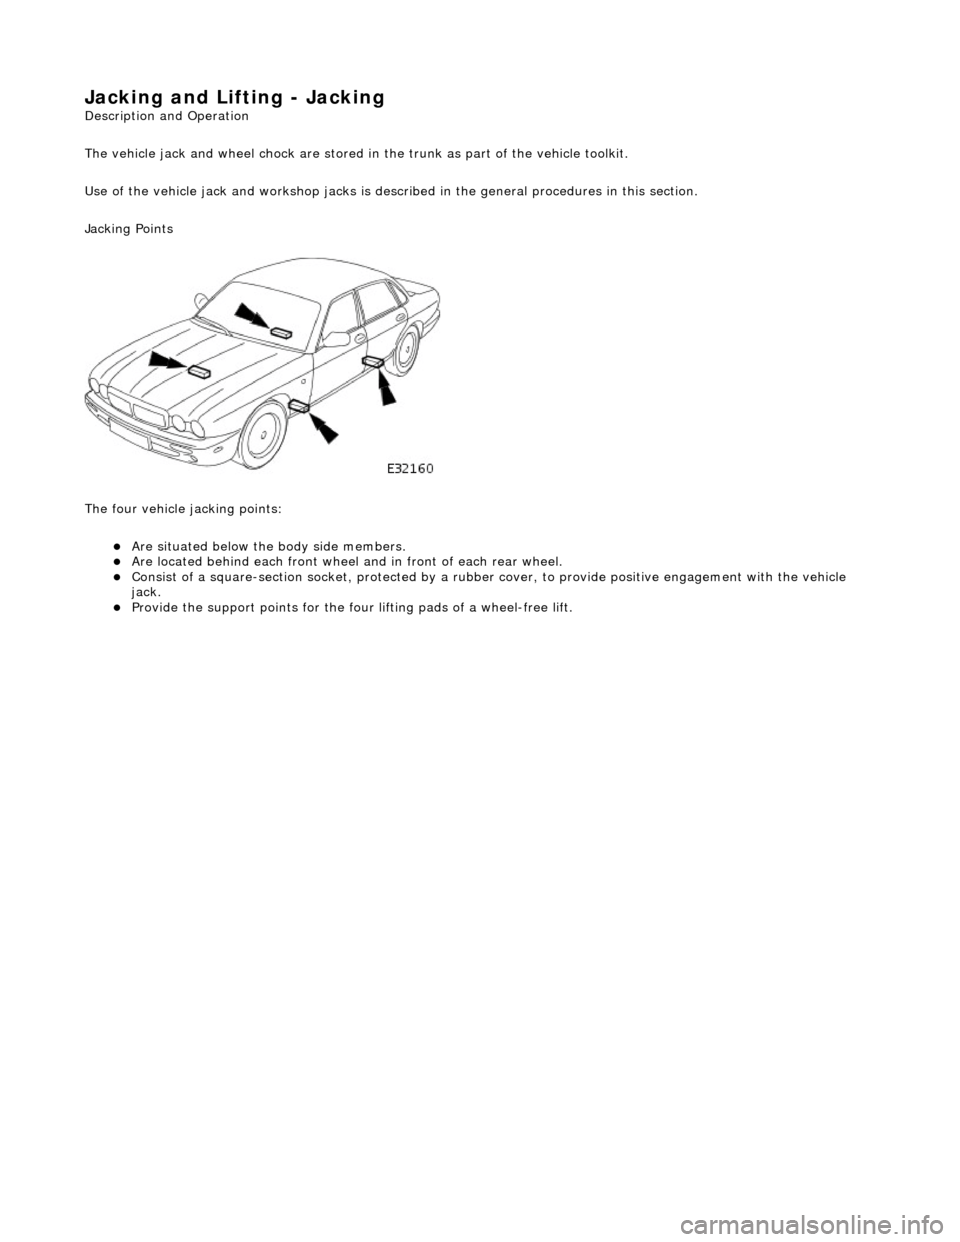
Jacking Points
The four vehicle jacking points:
Are situ
ated below the body side members.
Are l
ocated behind each front wheel
and in front of each rear wheel.
Consist
of a square-section socket, pr
otected by a rubber cover, to provide positive engagement with the vehicle
jack.
Provi
de the support points for the four
lifting pads of a wheel-free lift.
Page 53 of 2490
Jacking and Lifting - Vehicle Recovery
Description an
d Operation
• NOTE: Prior to recovery, ensure that the vehicle keys are available and the security system disarmed.
Vehicle recovery methods are:
By fl
at-bed transporter.
By rear suspended tow.
By emergency to
wing for
very short distances.
Gears
hift Interlock
The
gear selector lever can only be moved
from the Park position by turning the igni tion key to position II and depressing
the brake pedal.
To remove the key from the ignition switch, the gear select or lever must be moved to the Park position. With the key
removed, the gear selector is locked in the Park position.
The selector lever can be manually unlocked from the Park position in the event of electrical failure or when moving the
vehicle without power. Refer to the general procedure in this section.
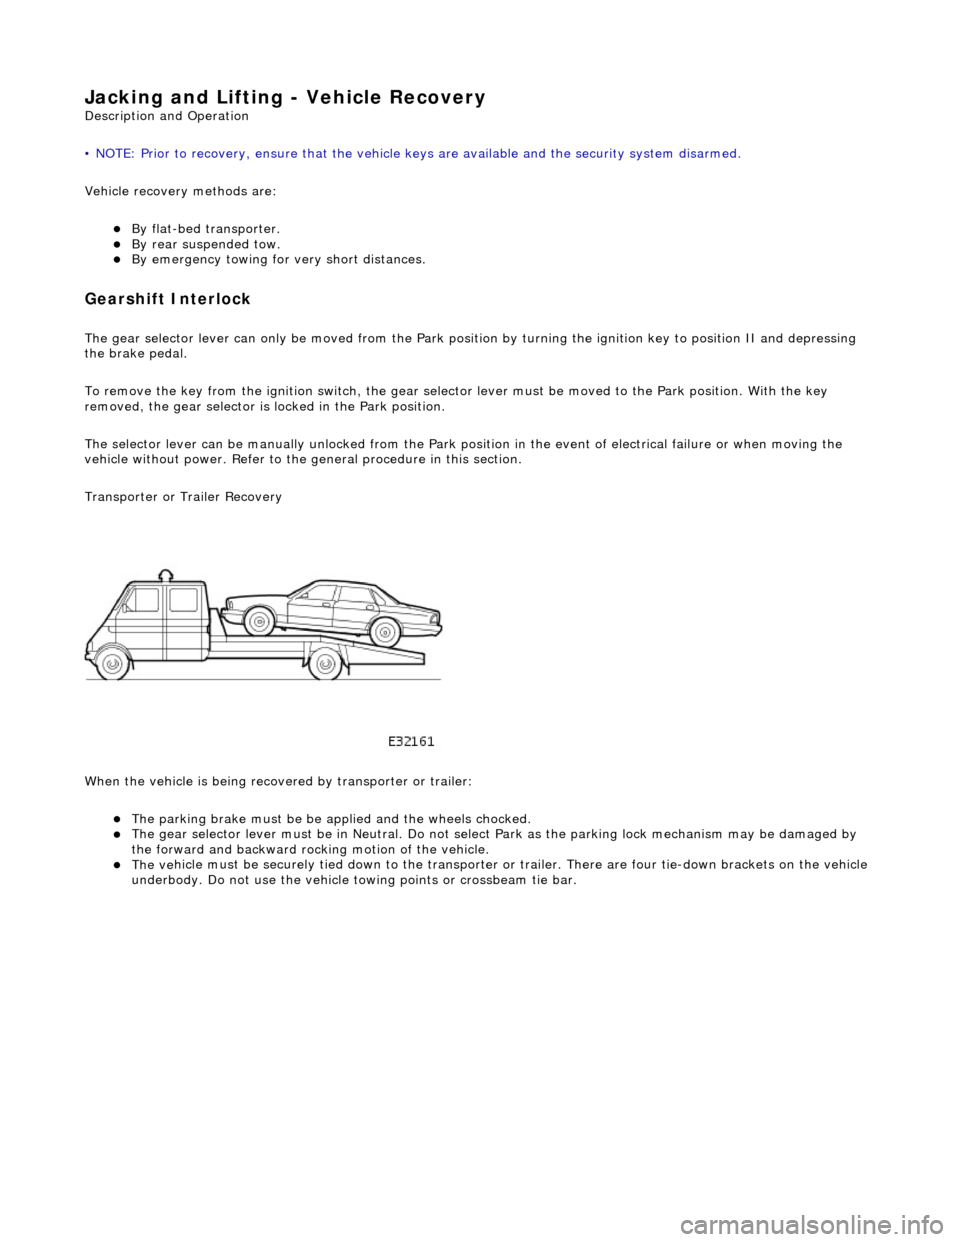
Transporter or Trailer Recovery
When the vehicle is being recove red by transporter or trailer:
The parking brake must be
be applied and the wheels chocked.
The
gear selector lever must be in Ne
utral. Do not select Park as the park ing lock mechanism may be damaged by
the forward and backward rocking motion of the vehicle.
The ve
hicle must be securely tied down to the transporter or
trailer. There are four tie-down brackets on the vehicle
underbody. Do not use the vehicle towing points or crossbeam tie bar.
Page 57 of 2490
Jacking and Lifting - Using the Workshop Jack
Gen
eral Procedures
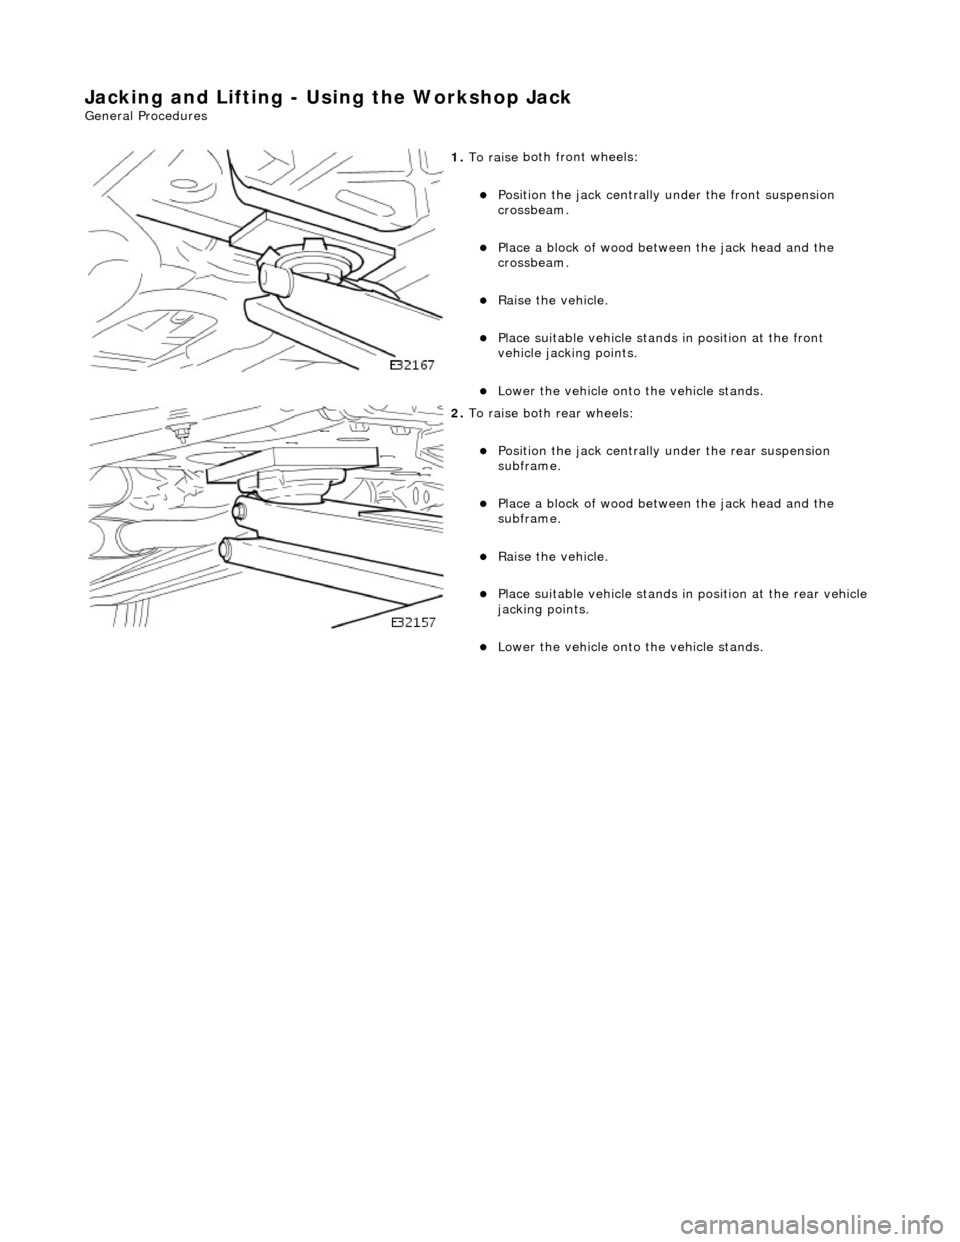
1.
To raise
both
front wheels:
P
osition the jack centrally
under the front suspension
crossbeam.
Pla
ce a block of wood between the jack head and the
crossbeam.
R
aise the vehicle.
P
lace suitable vehicle stands
in position at the front
vehicle jacking points.
Lo
wer the vehicle onto the vehicle stands.
2. To raise
both rear wheels:
P
osition the jack centrally
under the rear suspension
subframe.
Pla
ce a block of wood between the jack head and the
subframe.
R
aise the vehicle.
P
lace suitable vehicle stands in
position at the rear vehicle
jacking points.
Lo
wer the vehicle onto the vehicle stands.
Page 1672 of 2490
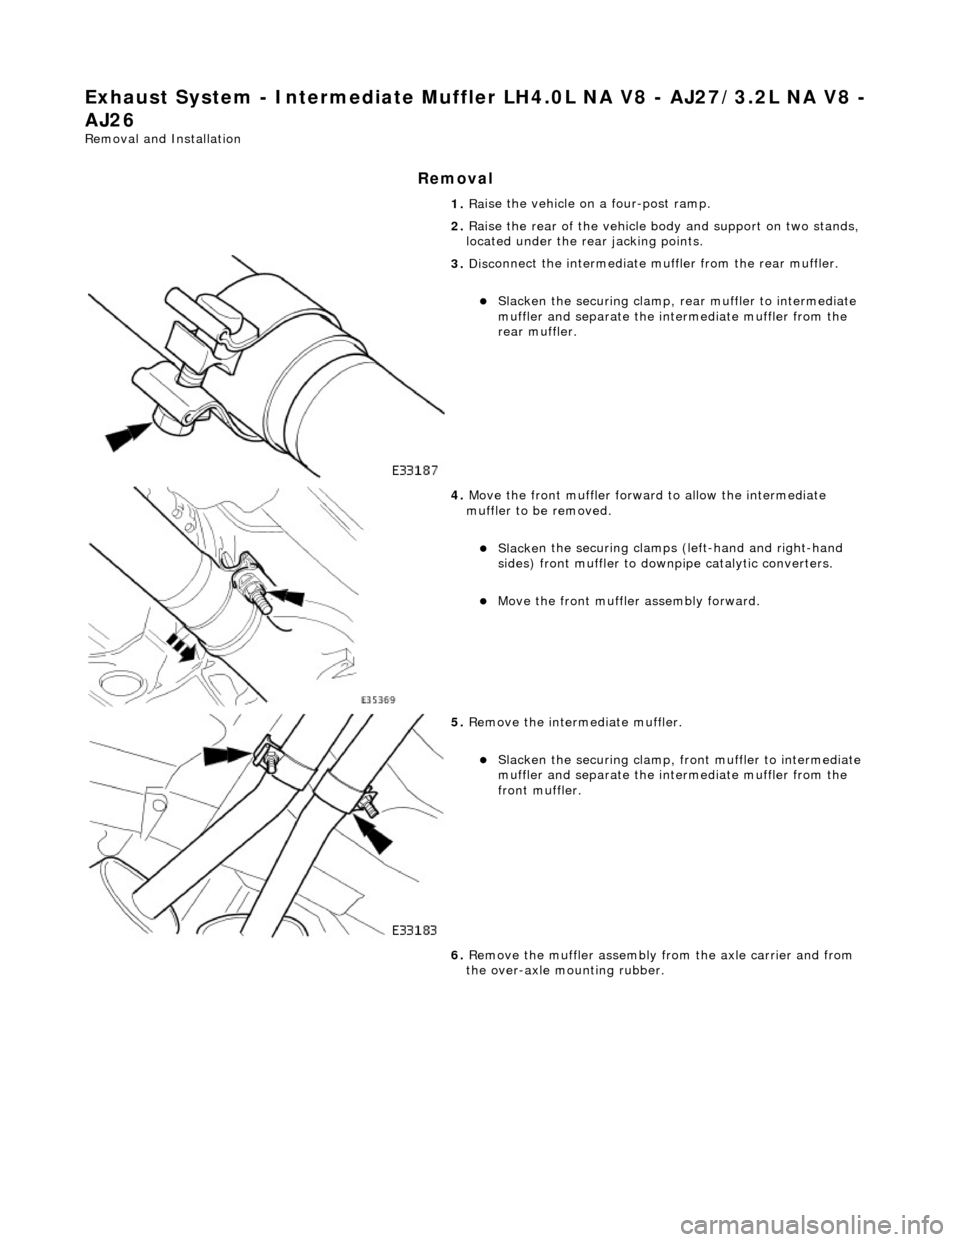
Exhaust System - Intermediate Muffler LH4.0L NA V8 - AJ27/3.2L NA V8 -
AJ26
Re mo
val and Installation
Remova
l
1.
Ra
ise the vehicle on a four-post ramp.
2. Raise the rear of the vehicle bo dy and support on two stands,
located under the re ar jacking points.
3. Disc
onnect the intermediate
muffler from the rear muffler.
Slacken the securi
ng clamp, re
ar muffler to intermediate
muffler and separate the in termediate muffler from the
rear muffler.
4. Move the front muf f
ler forwar
d to allow the intermediate
muffler to be removed.
Sl acke
n the securing clamps (left-hand and right-hand
sides) front muffler to downpipe catalytic converters.
Move the front muf f
ler
assembly forward.
5. Re
move the intermediate muffler.
Sl
acken the securi
ng clamp, front muffler to intermediate
muffler and separate the in termediate muffler from the
front muffler.
6. Remove the muffler assembly from the axle carrier and from
the over-axle mounting rubber.
Page 1674 of 2490
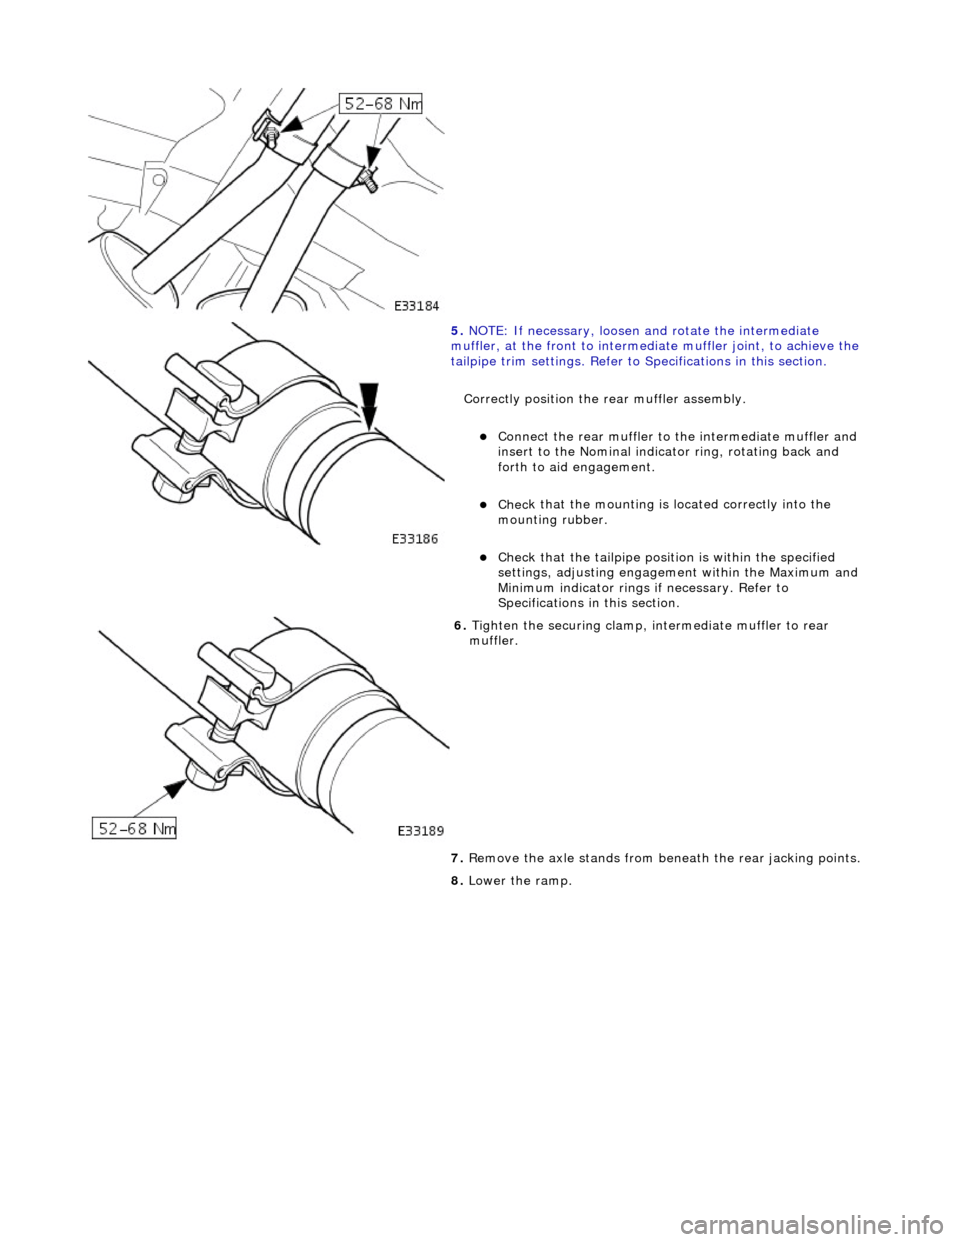
5.
NO TE
: If necessary, loosen and rotate the intermediate
muffler, at the front to intermediate muffler joint, to achieve the
tailpipe trim settings. Refer to Specifications in this section.
Correctly position the rear muffler assembly.
Connect the rear muffl
er to the intermediate muffler and
insert to the Nominal indicator ring, rotating back and
forth to aid engagement.
Chec k
that the mounting is located correctly into the
mounting rubber.
Chec k
that the tailpi
pe position is wi thin the specified
settings, adjusting engageme nt within the Maximum and
Minimum indicator rings if necessary. Refer to
Specifications in this section.
6. Tigh te
n the securing clamp, in
termediate muffler to rear
muffler.
7. Remove the axle stands from be neath the rear jacking points.
8. Lower the ramp.
Page 1675 of 2490
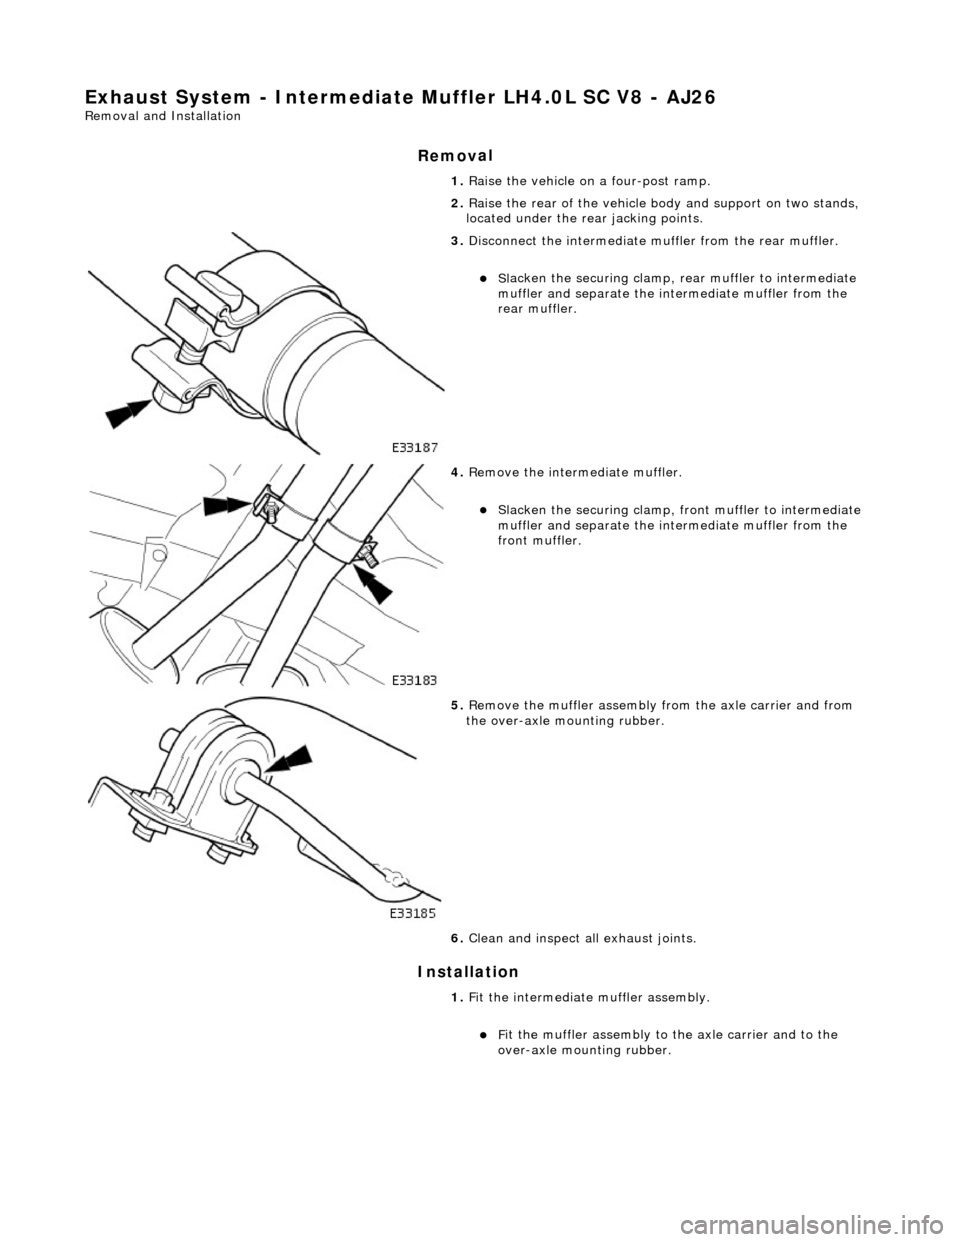
Exhaust System - Intermediate Muffler LH4
.0L SC V8 - AJ26
Re
moval and Installation
Remov
al
Installation
1. R
aise the vehicle on a four-post ramp.
2. Raise the rear of the vehicle bo dy and support on two stands,
located under the re ar jacking points.
3. Di
sconnect the intermediate
muffler from the rear muffler.
Sl
acken the securing clamp, re
ar muffler to intermediate
muffler and separate the in termediate muffler from the
rear muffler.
4. R
emove the intermediate muffler.
Sl
acken the securing clamp, front muffler to intermediate
muffler and separate the in termediate muffler from the
front muffler.
5. R
emove the muffler assembly
from the axle carrier and from
the over-axle mounting rubber.
6. Clean and inspect al l exhaust joints.
1. Fit the intermediate muffler assembly.
F
it the muffler assembly to the axle carrier and to the
over-axle mounting rubber.
Page 1677 of 2490
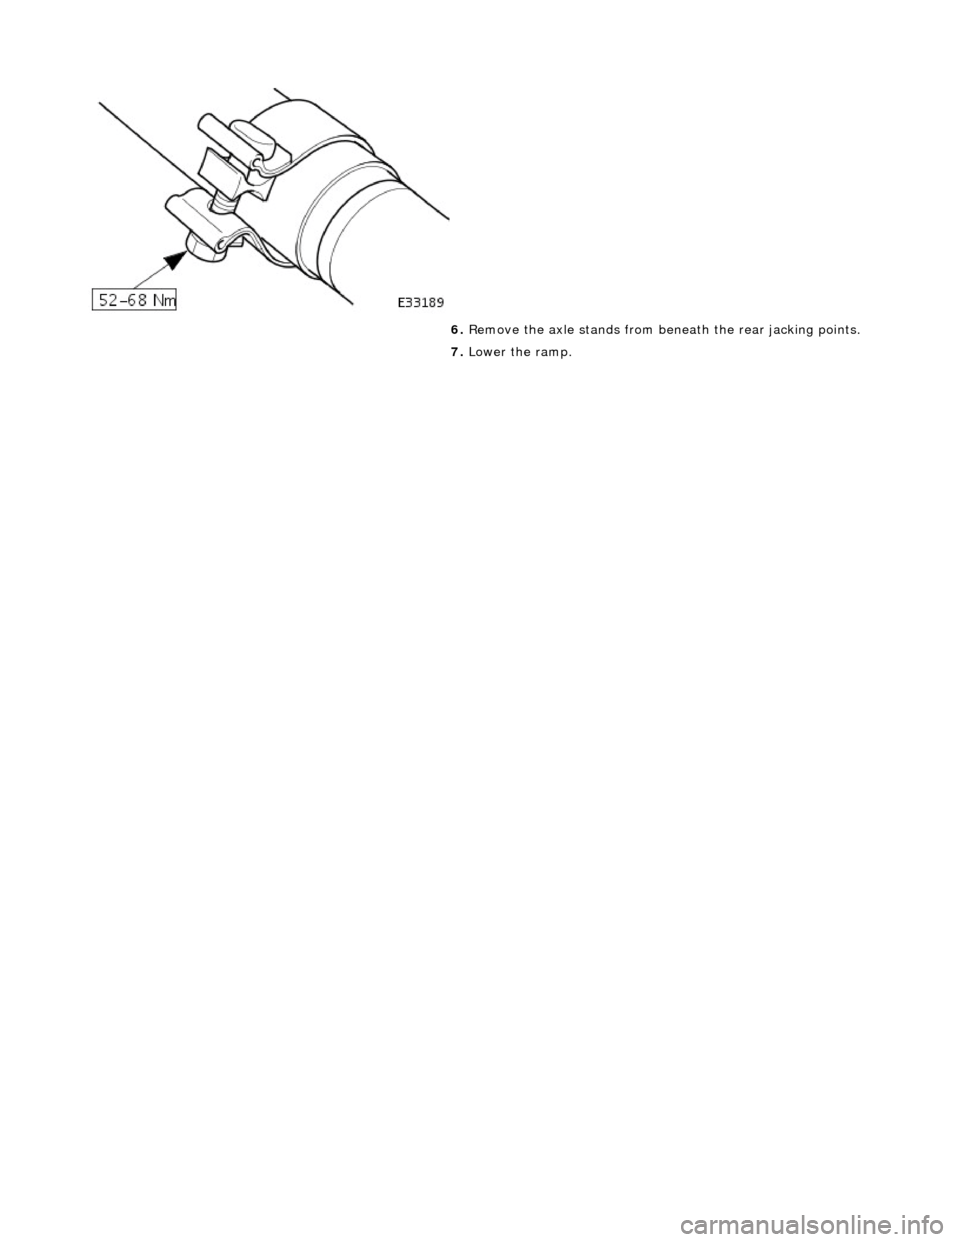
6.
R
emove the axle stands from be
neath the rear jacking points.
7. Lower the ramp.
Page 1678 of 2490
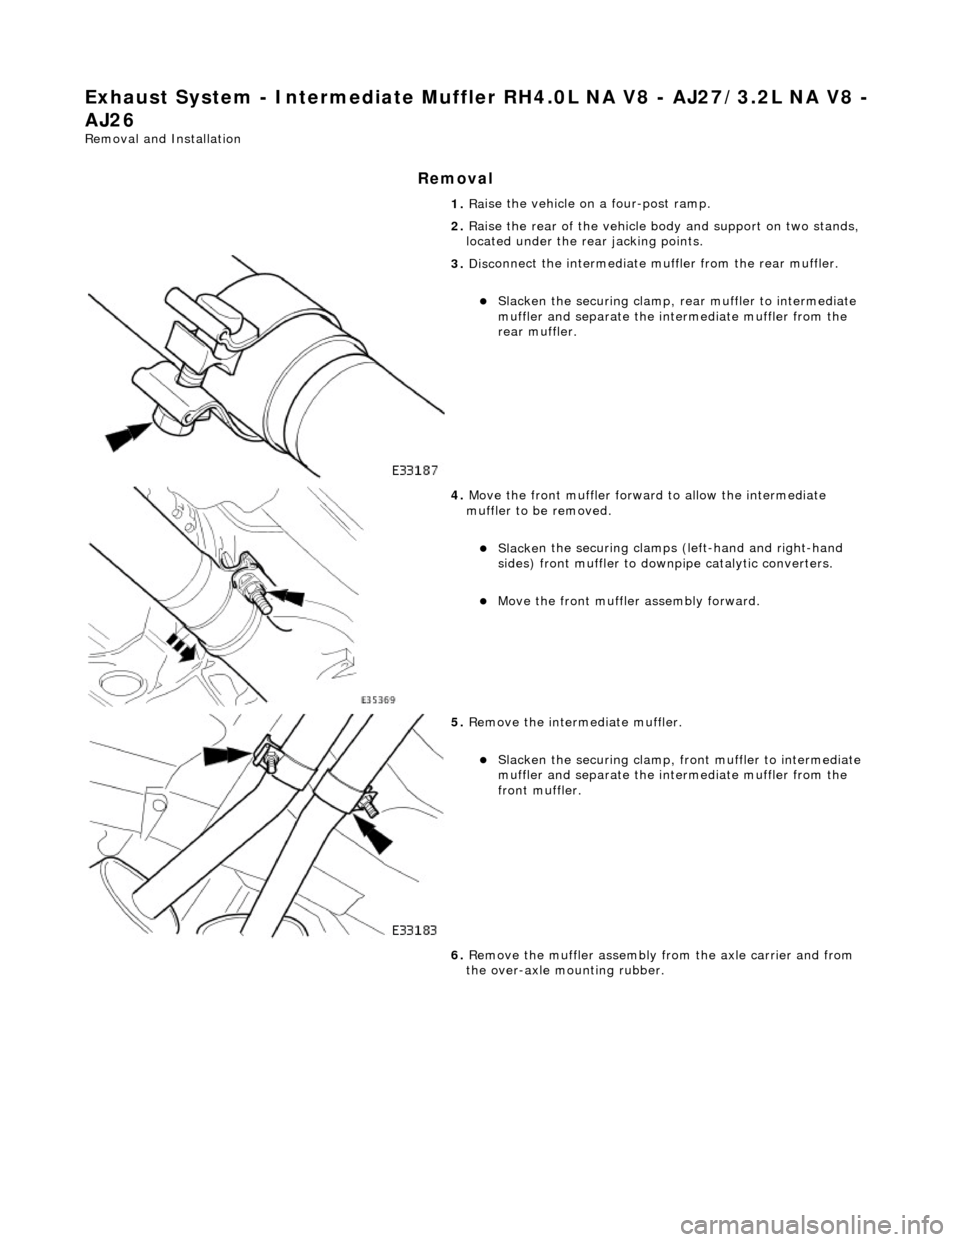
Exhaust System - Intermediate Muffler RH4.0L NA V8 - AJ27/3.2L NA V8 -
AJ26
Re mo
val and Installation
Remova
l
1.
Ra
ise the vehicle on a four-post ramp.
2. Raise the rear of the vehicle bo dy and support on two stands,
located under the re ar jacking points.
3. Disc
onnect the intermediate
muffler from the rear muffler.
Slacken the securi
ng clamp, re
ar muffler to intermediate
muffler and separate the in termediate muffler from the
rear muffler.
4. Move the front muf f
ler forwar
d to allow the intermediate
muffler to be removed.
Sl acke
n the securing clamps (left-hand and right-hand
sides) front muffler to downpipe catalytic converters.
Move the front muf f
ler
assembly forward.
5. Re
move the intermediate muffler.
Sl
acken the securi
ng clamp, front muffler to intermediate
muffler and separate the in termediate muffler from the
front muffler.
6. Remove the muffler assembly from the axle carrier and from
the over-axle mounting rubber.
Page 1680 of 2490
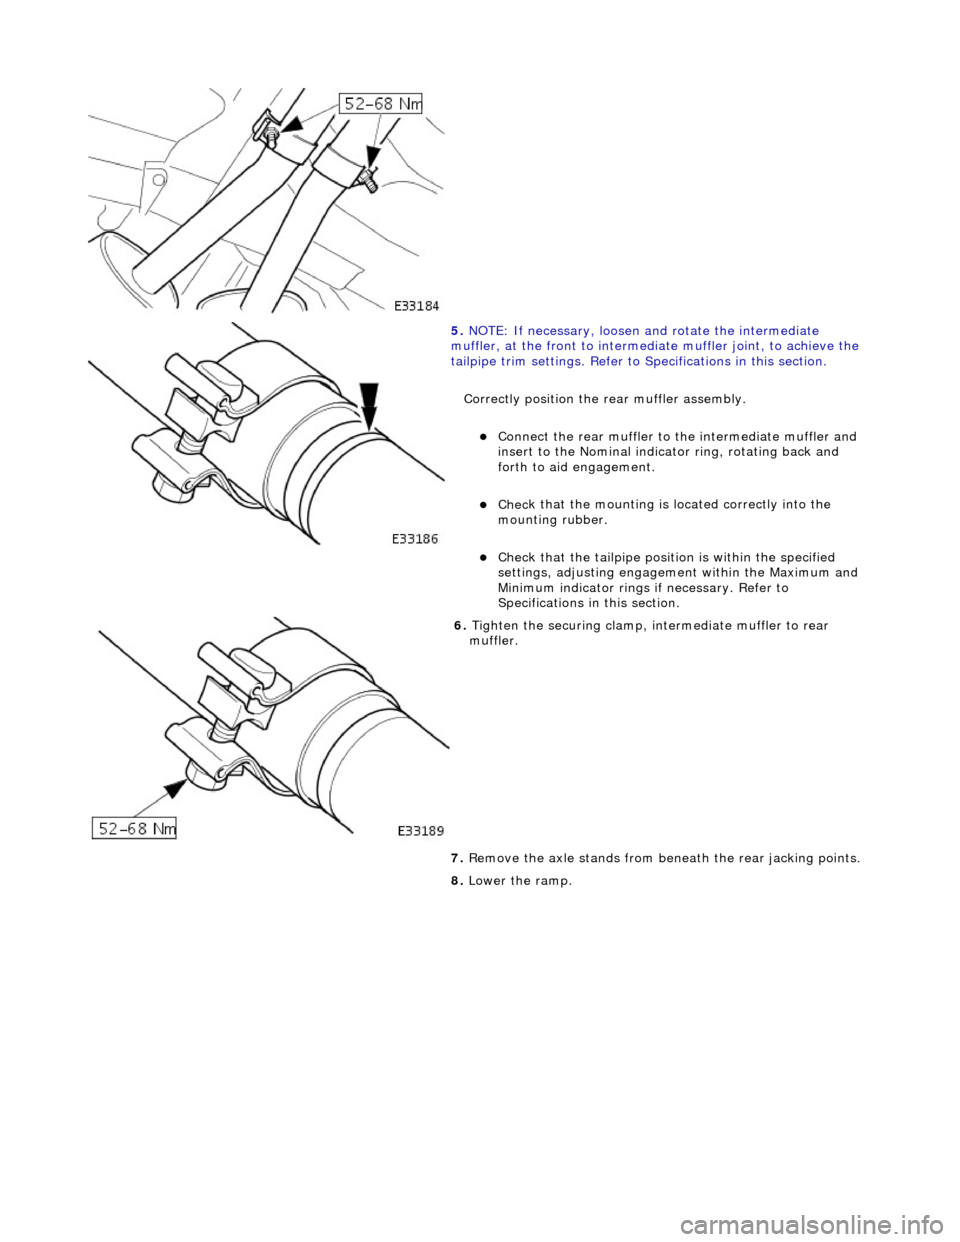
5.
NO TE
: If necessary, loosen and rotate the intermediate
muffler, at the front to intermediate muffler joint, to achieve the
tailpipe trim settings. Refer to Specifications in this section.
Correctly position the rear muffler assembly.
Connect the rear muffl
er to the intermediate muffler and
insert to the Nominal indicator ring, rotating back and
forth to aid engagement.
Chec k
that the mounting is located correctly into the
mounting rubber.
Chec k
that the tailpi
pe position is wi thin the specified
settings, adjusting engageme nt within the Maximum and
Minimum indicator rings if necessary. Refer to
Specifications in this section.
6. Tigh te
n the securing clamp, in
termediate muffler to rear
muffler.
7. Remove the axle stands from be neath the rear jacking points.
8. Lower the ramp.