JAGUAR XF 2010 1.G Owners Manual
Manufacturer: JAGUAR, Model Year: 2010, Model line: XF, Model: JAGUAR XF 2010 1.GPages: 225, PDF Size: 8 MB
Page 141 of 225
R
(FM8) SEMCON JLR OWNER GUIDE VER 1.00 EURO
LANGUAGE: english-en; MARQUE: jaguar; MODEL: XF
Navigation system
141
MOTORWAY
After selecting Motorway from the menu, enter
the motorway name or number, then select an
entrance or exit. All of the entrance or exit
junctions for the chosen motorway are
displayed.
The map showing the selected motorway and
the selected exit junction is displayed.
The destination has now been set and the route
is calculated.
POINTS OF INTEREST (POI)
After selecting Points of interest from the Nav
menu, touch Name to input the POI name, for
example Petrol to display fuel stations on the
map, or touch List for a list of POIs.
Alternatively, choose Category to see all
categories of POI and make your selection.
Use the scroll arrows to change pages.
Some POIs are sub-categorised, e.g. selecting
Community will be further divided into:
• Community Centre.
• Exhibition Centre.
• Hospital.
• Park & Recreation.
• Town Hall
Note: If entering a POI name results in too
many matches being lis ted, try entering the
town name first. If y ou do not know the name
of the POI you want, try selecting a POI
category.
Note: POI icons can only be displayed up to the
1 km (½ mile ) zoom level.
Once the POI has been selected the route is
determined. Touch Change route. to change
the route settings, or touch OK to start the
route calculation.
JAGUAR DEALER LOCATIONS
Details of Jaguar Dealers are held on the
Navigation System hard drive as a points of
interest (POI) category. Certain Dealers may be
located in areas that are not fully mapped on
the hard drive. If a route is set to one of these
Dealers, guidance may only be possible to the
nearest town centre; in this case a warning
message will be displayed.
Note: If Jaguar Dealers (or certain other
categories, such as airports) are selected, they
will be displayed across all search areas.
ENTRY BY TOWN
If a town name is entered first, the points of
interest listed will be restricted to that town.
• From the Input POI Name screen, touch
Town .
• Enter the town name required.
• Touch List to display the list of possible
towns.
• Select the town required.
The Input POI screen is displayed again.
• Enter the POI name required.
CATEGORIES AND SUB-CATEGORIES
The POI database is divided into a number of
categories. Each main category is further
divided into a number of sub-categories.
The first entry in the list of Restaurant
sub-categories, is ALL. This selects all of the
Restaurant sub-categories.
To narrow the search, touch the Town button.
This will display the alpha keyboard to allow the
desired town name to be entered.
When searching the database, only points of
interest in the current search area are included,
except for the sub-categories marked All
search areas in the POI category list.
Page 142 of 225
L
(FM8) SEMCON JLR OWNER GUIDE VER 1.00 EURO
LANGUAGE: english-en; MARQUE: jaguar; MODEL: XF
Navigation system
142
LIST SOFT KEY
The List button can be used when the
characters entered reduce the possible entries
to a small enough number.
You can also select List (when active) without
entering a POI name. All the relevant points of
interest will be displayed, e.g. in a selected
town or category.
ALL SOFTKEY
The All button shows a list of all POI
categories.
LOCAL POI SEARCH
This selects the points of interest in all
categories within 32 kilometres (20 miles) of
the vehicle.
• Touch the All Local POIs button.
RDS-TMC OVERVIEW
RDS-TMC (Radio Data System-Traffic
Message Channel) is a feature that announces
traffic hold-ups on your route as broadcast by
radio stations that transmit TMC information.
Touch the TMC button on the Navigation Menu
to access the TMC menu.
TMC events ahead on route can be displayed by
touching the Events ahead soft key. TMC can
be set to display on the map for all events, for
major events or can be switched off. During
route calculation, it can be set to avoid TMC
events along the route.
RDS-TMC DISPLAY
When a TMC signal is received the icon in the
top left of the screen will appear green. If a TMC
signal is not being received, the icon will be
shown with a bar through it.
The system will inform the driver of any
roadworks, narrow road, contraflow,
accidents, slippery road, diversion,
information, parking in formation, congestion
or other hazard.
The driver is informed of a traffic event as
follows:
• A TMC Event icon shown on the map at the
location of the event.
• Text can be displaye d showing the details
of each occurrence which can be selected
either by touching the screen icon or from
the traffic information list.
• Dynamic route guidance, which calculates
an alternative route when the system
receives the traffic event warning affecting
the route currently set in the navigation
system.
• Traffic event list shows all events sorted by
road name/ distance on your selected route
in a straight line or along your actual route.
The information rega rding the hold-up is
maintained and updated even if the vehicle
crosses into another country.
Page 143 of 225
R
(FM8) SEMCON JLR OWNER GUIDE VER 1.00 EURO
LANGUAGE: english-en; MARQUE: jaguar; MODEL: XF
Navigation system
143
RDS-TMC ICONS
Any traffic event (broadcast on TMC) in your
area, will be displayed as a warning icon on the
map and an alert may be displayed as a
message giving the road number(s) and
between which junctions the hold-up or event
occurs.
This data is stored in th e system for up to of 30
minutes.
The colour of the TMC icon changes in order to
show the type and priority of a TMC event. The
background colour of the icon returns to
normal when there is no longer an event or
hold-up, or if any re-route instructions are
calculated.
The TMC Event icons appear on the navigation
map display to indicate the location and nature
of a TMC event.
TMC Event icons will appear on the map, even
if the event does not occur on your route.
LEVEL 1 TMC EVENT ICONS
Note: Single arrow icons i ndicate that the
traffic event affects traffic travelling in the
direction of the arrow. Double arrows indicate
that both directions are affected.
LEVEL 2 TMC EVENT ICONS
Incident (Red star)
Moving Tailback Ahead (Red
arrow)
Moving Tailback Both
Carriageways (Red double arrow)
Slow Traffic Ahead (Yellow arrow)
Slow Traffic Both Carriageways
(Yellow double arrow)
Information (Yellow circle)
Incident (Yellow star)
Stationary Traffic Ahead (Red
arrow pointing on line)
Stationary Traffic Both
Carriageways (Red double arrow
pointing on line)
Other Hazard (Yellow)
Roadworks (Pink)
Narrow Road (Pink)
Contraflow (Pink)
Accidents (Pink)
Slippery Road (Yellow)
Diversion (Yellow)
Parking Information (Grey)
Information (Grey)
Congestion (Red)
Page 144 of 225
L
(FM8) SEMCON JLR OWNER GUIDE VER 1.00 EURO
LANGUAGE: english-en; MARQUE: jaguar; MODEL: XF
Navigation system
144
USING TMC
Dynamic route guidance will calculate an
alternative route to avoid a traffic event when
the system receives an event warning.The
system calculates a new route for all sections.
However, if any way points are set, the system
calculates for the next way point.If the event on
route is serious (closed road) or if the new
route is shorter than the current one and the
current one was not recalc ulated within the last
5 minutes, then a message to confirm the new
route will be displayed. This pop-up message
will be displayed for 10 minutes and if the new
route is not rejected, th en the vehicle will follow
the new route.
ORDNANCE SURVEY DATA
Please read this agreement carefully before
using the Navi gation System.
This is a licence agreement to use the
Ordnance Survey (OS) Code-Point data
incorporated in the Navigation System. By
using this Code-Point data you accept and
agree to all the term s and conditions below.
OWNERSHIP
The OS Code-Point data is licensed by
Ordnance Survey with permission of Her
Majesty’s Stationery Office. © Crown
Copyright. All rights reserved.
LICENCE GRANT
OS grants you a non-excl usive licence to use
your copy of the OS Code-Point data for your
personal use solely as pa rt of the Navigation
System. You may transfer the licence to a
subsequent purchaser of the vehicle with
which the Navigation Sy stem is supplied,
provided that the purchaser agrees to abide by
each of the terms of this licence.
LICENCE TERMS
These licence terms ar e governed by English
Law and are subject to the exclusive
jurisdiction of the English courts.
LIMITATIONS OF USE
The DATABASE is restricted for use in the
specific system for which it was created.
Except to the extent ex plicitly permitted by
mandatory applicable laws, you may not
extract or re-utilise s ubstantial parts of the
contents of the DATA BASE, not reproduce,
copy, modify, adapt, translate, disassemble,
decompile, or reverse e ngineer any portion of
the DATABASE.
LIMITATION OF LIABILITY
The price of the DATABASE does not include
any consideration for assumption of risk of
consequential, indirect or unlimited direct
damages which may aris e in connection with
your use of the DATABASE.
Accordingly, in no event shall NAVTEQ
Corporation or supplie r of the navigation
system using the DATA BASE (‘Supplier’) be
liable for any consequentia l, special, incidental
or indirect damage s, including without
limitation, loss of re venue, data, or use,
incurred by you or any th ird party arising out of
your use of the DATABASE, whether in an
action in contract or tort or based on a
warranty, even if NAVTEQ Corporation or the
Supplier has been advised of the possibility of
such damages. In any event, NAVTEQ
Corporation’s liability for direct damages is
limited to the price of your copy of the
DATABASE.
Page 145 of 225
R
(FM8) SEMCON JLR OWNER GUIDE VER 1.00 EURO
LANGUAGE: english-en; MARQUE: jaguar; MODEL: XF
Navigation system
145
THE DISCLAIMER OF WARRANTY AND
LIMITATION OF LIABILITY, SET FORTH IN
THIS AGREEMENT, DO NOT AFFECT OR
PREJUDICE YOUR STATUTORY RIGHTS
WHERE YOU HAVE ACQUIRED THE
DATABASE OTHERWISE THAN IN THE
COURSE OF A BUSINESS. Some states and
laws do not allow the exclusion of implied
warranties, so the above disclaimer may not
apply to you.
The DATABASE reflects reality as
existing before you received the
DATABASE and it comprises data and
information from government and
other sources, which may contain
errors and omissions. Accordingly,
the DATABASE may contain inaccurate
or incomplete information due to the
passage of time, changing
circumstances, and due to the nature
of the sources used. The DATABASE
does not include or reflect information
on - inter alia - neighbourhood safety;
law enforcement; emergency
assistance; construction work; road or
lane closures; vehicle or speed
restrictions; road slope or grade;
bridge height, weight or other limits;
road or traffic conditions; special
events; traffic congestion; or travel
time.NAVTEQ CORPORATION
Please read this agreement carefully before
using the Navigation System.
This is a licence agreement for your copy of the
Navigable Map Database , (the ‘DATABASE’)
originally made by NAVTEQ Corporation), used
in the Navigation Sy stem. By using this
DATABASE you accept and agree to all the
terms and conditions below.
OWNERSHIP
The DATABASE and the copyrights and
intellectual property or neighbouring rights
therein are owned by NAVTEQ Corporation or
its licensors.
LICENCE GRANT
NAVTEQ Corporation grants you a
non-exclusive licence to use your copy of the
DATABASE for your personal use or for use in
your business’ internal operations. This license
does not include the right to grant
sub-licenses.
LIMITATIONS OF USE
The DATABASE is restricted for use in the
specific system for which it was created.
Except to the extent ex plicitly permitted by
mandatory applicable laws, you may not
extract or re-utilise s ubstantial parts of the
contents of the DATA BASE, not reproduce,
copy, modify, adapt, translate, disassemble,
decompile, or reverse engineer any portion of
the DATABASE.
Page 146 of 225

L
(FM8) SEMCON JLR OWNER GUIDE VER 1.00 EURO
LANGUAGE: english-en; MARQUE: jaguar; MODEL: XF
Navigation system
146
TRANSFER
You may not transfer the DATABASE to third
parties, except together with system for which
it was created, provided that you do not retain
any copy of the DATABASE, and provided that
the transferee agrees to all terms and
conditions of this agreement.
DISCLAIMER OF WARRANTY
NAVTEQ Corporation does not warrant or make
any representations regarding, either express
or implied, regarding the use or results of the
use of the DATABASE in terms of its
correctness, accuracy, reliability, or otherwise
and expressly disclaims any implied warranties
of quality, performa nce, merchantability,
fitness for a particular purpose or
non-infringement.
NAVTEQ Corporation does not warrant that the
DATABASE is or will be error-free. No oral or
written information or advice provided by
NAVTEQ Corporation, your supplier or any
other person shall create a warranty.
LIMITATION OF LIABILITY
NAVTEQ Corporation does not warrant or make
any representations regarding, either express
or implied, regarding the use or results of the
use of the DATABASE in terms of its
correctness, accuracy, reliability, or otherwise
and expressly disclaims any implied warranties
of quality, performa nce, merchantability,
fitness for a particular purpose or
non-infringement.
NAVTEQ Corporation does not warrant that the
DATABASE is or will be error-free. No oral or
written information or advice provided by
NAVTEQ Corporation, your supplier or any
other person shall create a warranty.
GOVERNMENT END USERS
If the DATABASE is for a region of North
America and is being ac quired by or on behalf
of the United States go vernment or any other
entity seeking or appl ying rights similar to
those customarily claimed by the United States
government, the DATABASE is licensed with
‘limited rights’.
Utilization of the DATA BASE is subject to the
restrictions specified in the ‘Rights in Technical
Data and Computer Database’ clause at DFARS
252.227–7013, or the equivalent clause for
non-defence agencies. Manufacturer of the
DATABASE of North America is NAVTEQ
Corporation, 10400 W. Higgins Road, Suite
400, Rosemont, Illinois 60018, USA.
EUROPEAN DECLARATION OF
CONFORMITY
Hereby, DENSO CORPORATION
declares that this DN-NS-019 is in
compliance with the essential
requirements and other relevant
provisions of Di rective 1999/5/EC.
Page 147 of 225
R
(FM8) SEMCON JLR OWNER GUIDE VER 1.00 EURO
LANGUAGE: english-en; MARQUE: jaguar; MODEL: XF
Tyre repair kit
147
Tyre repair kitTYRE REPAIR KIT
If you are in any doubt regarding your
ability to carry out the instructions,
contact your Dealer/Authorised
Repairer before attempting the repair.
Your vehicle may not be equipped with a spare
tyre. If this is the case, in its place in the rear
underfloor storage compartment, you will find
a tyre repair kit (except where run-flat tyres are
fitted). The tyre repair ki t can be used to repair
one tyre and it is essent ial that you read the
following guide before attempting to repair a
tyre.
The tyre repair kit seal s most punctures with a
maximum diameter of 6 mm (1/4 inch).
Note: The sealant used in the tyre repair kit has
a shelf life and the expiry date is shown on the
tyre sealant bottle. Ensur e that the container is
replaced before the expiry date.
TYRE REPAIR KIT SAFETY
INFORMATION
Some tyre damage may only be
partially sealed, or may not seal at
all, depending on the amount and type
of damage. Any loss of tyre pressure
can seriously affect vehicle safety.
Do not use the tyre repair kit if the tyre
has been damaged by driving while
under-inflated.
Only use the tyre repair kit to seal
damage located within the tyre tread
area.
Do not exceed 80 km/h (50 mph) when
a repaired tyre is fitted to the vehicle.
The maximum distanc e that should be
driven when a repaired tyre is fitted, is
200 km (125 miles). When a repaired tyre is fitted, drive
with caution and avoid sudden braking
or steering manoeuvres.
Only use the tyre repair kit for the
vehicle with which it was supplied.
Do not use the tyre repair kit for any
other purpose than tyre repair.
Never leave the tyre repair kit
unattended when in use.
Only use the tyre repair kit within the
-30°C to +70°C temperature range.
Always keep children and animals at a
safe distance from the tyre repair kit
when in use.
Do not stand directly beside the
compressor when it is operating.
Check the tyre sidewall prior to
inflation. If any cracks, damage or
deformities are apparent, do not
inflate the tyre.
Watch the tyre sidewall during
inflation. If any cracks, bumps or
similar damage, or deformities
appear, switch off the compressor and
deflate the tyre.
Page 148 of 225
L
(FM8) SEMCON JLR OWNER GUIDE VER 1.00 EURO
LANGUAGE: english-en; MARQUE: jaguar; MODEL: XF
Tyre repair kit
148
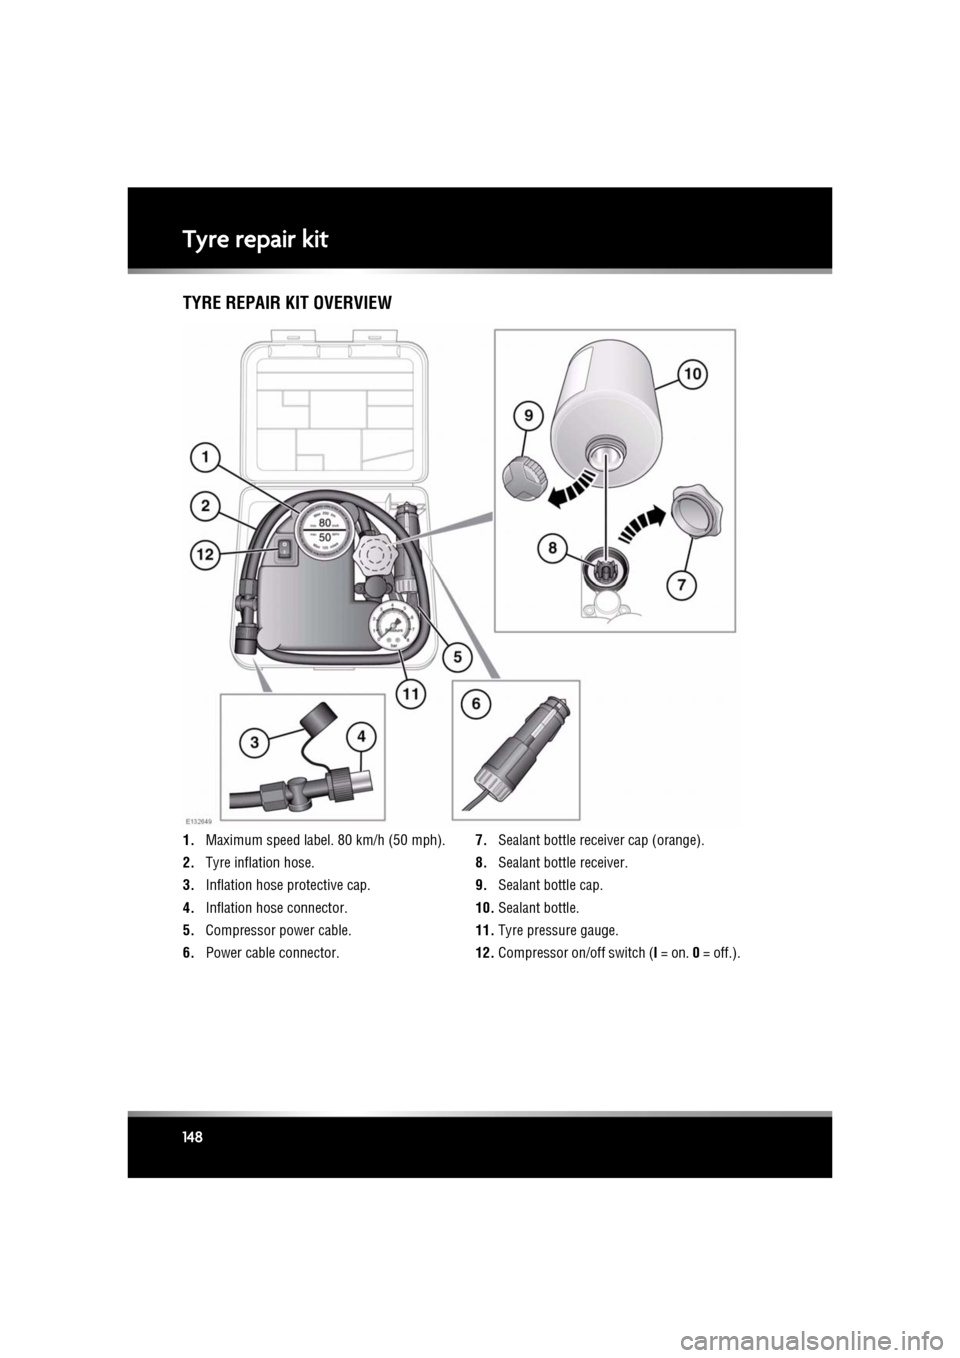
TYRE REPAIR KIT OVERVIEW
1. Maximum speed label. 80 km/h (50 mph).
2. Tyre inflation hose.
3. Inflation hose protective cap.
4. Inflation hose connector.
5. Compressor power cable.
6. Power cable connector. 7.
Sealant bottle receiver cap (orange).
8. Sealant bottle receiver.
9. Sealant bottle cap.
10. Sealant bottle.
11. Tyre pressure gauge.
12. Compressor on/off switch ( I = on. 0 = off.).
Page 149 of 225
R
(FM8) SEMCON JLR OWNER GUIDE VER 1.00 EURO
LANGUAGE: english-en; MARQUE: jaguar; MODEL: XF
Tyre repair kit
149
USING THE TYRE REPAIR KIT
Avoid skin contact with the sealant
which contains natural rubber latex.
If the tyre inflation pressure does not
reach 1.8 bar (26 psi, 180 kPa) within
seven minutes, the tyre may have
suffered excessive damage. A
temporary repair will not be possible,
and the vehicle should not be driven
until the tyre has been replaced.
Before attempting a tyre repair, ensure
that the vehicle is parked safely, as far
away from passing traffic as possible.
Ensure that the parking brake is applied
and P (Park) is selected.
Do not attempt to remove foreign
objects such as nails, screws, etc. from
the tyre.
Always run the engine when using the
compressor, unless the vehicle is in an
enclosed or poorly ventilated space, as
this may cause asphyxiation.
To prevent overheatin g, do not operate
the compressor continuously for longer
than ten minutes.
Note: All vehicle drivers and occupants should
be made aware that a temporary repair has
been made to a tyre fitt ed to the vehicle. They
should also be made aware of the special
driving conditions im posed when using a
repaired tyre.
REPAIR PROCEDURE
Check the tyre sidewall prior to
inflation. If there are any cracks,
bumps or similar damage, do not
attempt to inflate the tyre. Do not
stand directly besi de the tyre while
the compressor is pumping. Watch the
tyre sidewall. If any cracks, bumps or
similar damage appear, turn off the
compressor and let the air out by
means of the pressure relief valve. Do
not continue to use the tyre.
1. Open the tyre repair kit and peel off the
maximum speed label. Attach the label to
the facia in the driver's field of vision. Take
care not to obstruct an y of the instruments
or warning lights.
2. Uncoil the compressor power cable and
the inflation hose.
3. Unscrew the orange cap from the sealant
bottle receiver and the sealant bottle cap.
4. Screw the sealant bottle into the receiver
(clockwise) until tight.
•Screwing the bottle onto the receiver
will pierce the bottle's seal. Once the
receiver has been fitted, a ratchet
prevents it from being removed.
5. Remove the valve cap from the damaged
tyre.
6. Remove the protective cap from the
inflation hose and connect the inflation
hose to the tyre valve. Ensure that the hose
is screwed on firmly.
7. Ensure that the compressor switch is in the
off ( 0) position.
8. Insert the power cable connector into the
auxiliary power socket.
9. Unless the vehicle is in an enclosed area,
start the engine.
Page 150 of 225
L
(FM8) SEMCON JLR OWNER GUIDE VER 1.00 EURO
LANGUAGE: english-en; MARQUE: jaguar; MODEL: XF
Tyre repair kit
150
10. Set the compressor switch to the on ( I)
position.
11. Inflate the tyre to a minimum of 1.9 bar
(26 psi) and a maximum of 3.5 bar
(51 psi).
•When pumping the sealant through the
tyre valve, the pressure may rise up to
6 bar (87 psi). The pressure will drop
again after approx imately 30 seconds.
12. During the inflation, switch the
compressor off briefly, to check the tyre
pressure using the gauge mounted on the
compressor.
•It should not take longer than 7
minutes to inflate the tyre. If, after 7
minutes, the tyre ha s not yet reached
minimum pressure, the tyre should not
be used.
13. Once the tyre has been inflated, switch off
the compressor. If desired, the engine may
be turned off after the compressor has
been turned off.
14. Remove the power connector from the
auxiliary power socket.
15. Remove the inflation hose from the tyre
valve, by unscrewing it as quickly as
possible (anticlockwise).
16. Replace the inflation hose protective cap
and the tyre valve cap.
17. Ensure that the tyre repair kit (including the
bottle and receiver caps) are placed
securely in the vehicle. You will need to use
the kit to check the tyre pressure after
approximately 3 km (2 miles), so ensure
they are easily accessible.
18. Immediately drive the vehicle for
approximately 3 km (2 miles), to allow the
sealant to coat the inner surface of the tyre
and form a seal at the puncture.CHECKING THE TYRE PRESSURE
AFTER A REPAIR
When driving the vehicle, if you
experience vibrations, abnormal
steering, or noises, reduce speed
immediately. Drive with extreme
caution and reduced speed, to the first
safe place to stop the vehicle. Visually
examine the tyre and check its
pressure. If there are any signs of
damage or deformity to the tyre, or the
tyre pressure is below 1.3 bar (19
psi), do not continue driving.
Consult a tyre repair centre or your
Dealer/Authorised Repairer, for
advice concerning the replacement of
a tyre after using a tyre repair kit.
1. Drive the vehicle for 3 km (2 miles) then
stop in a safe place. Carry out a visual
examination of the tyre’s condition.
2. Make sure that the sealant container
section is in its original position.
3. Screw the inflation hos e connector firmly
onto the tyre valve.
4. Read the tyre pressure from the gauge.
5. If the pressure of the sealant filled tyre is
above 1.3 bar (19 psi) adjust the pressure
to the correct value.
6. Ensure that the compressor switch is in the
Off ( O) position and insert the power cable
connector into the au xiliary power socket.
If the vehicle is in a well ventilated area,
start the engine.
7. Switch the compressor to On ( I) and inflate
the tyre to the correct pressure.
8. To check the tyre pressure, turn off the
compressor then read the pressure from
the gauge.