JAGUAR XF 2010 1.G Owners Manual
Manufacturer: JAGUAR, Model Year: 2010, Model line: XF, Model: JAGUAR XF 2010 1.GPages: 225, PDF Size: 8 MB
Page 191 of 225

R
(FM8) SEMCON JLR OWNER GUIDE VER 1.00 EURO
LANGUAGE: english-en; MARQUE: jaguar; MODEL: XF
Fuses
191
PASSENGER COMPARTMENT FUSE BOX
Fuse No Rating
(amps) Fuse
Colour Circuit
F1 - - -
F2 - - -
F3 20A Yellow Driver’s seat adjustment.
F4 20A Yellow Driver’s seat adjustment.
F5 - - -
F6 - - -
F7 - - -
F8 20A Yellow Front passenger's seat adjustment.
F9 20A Yellow Front passenger's seat adjustment.
F10 20A Yellow Left-hand rear door controls.
F11 20A Yellow Right-hand rear door controls.
F12 - - -
F13 10A Red Steering column adjust.
F14 - - -
F15 - - -
F16 5A Tan Sunblind.
F17 - - -
F18 - - -
F19 - - -
F20 5A Tan Remote control receiver.
F21 5A Tan Foot brake.
F22 5A Tan Electric parking brake.
F23 5A Tan Driver’s seat. Audio system. Auto headlamps. Upper centre console switches.
F24 10A Red Front passenger seat. El ectric windows. Mirror adjustment.
F25 20A Yellow Driver’s heated/climate seat.
F26 15A Blue Trailer power socket. Road pricing system.
F27 20A Yellow Front passenger’s heated/climate seat.
F28 15A Blue Auxiliary power sockets.
F29 20A Yellow Keyless entry system.
Page 192 of 225

L
(FM8) SEMCON JLR OWNER GUIDE VER 1.00 EURO
LANGUAGE: english-en; MARQUE: jaguar; MODEL: XF
Fuses
192
LUGGAGE COMPARTMENT FUSE BOX
F30 10A Red Air conditioning.
F31 15A Blue Sunroof.
F32 5A Tan Starter control unit.
F33 5A Tan Diagnostic connector.
F34 5A Tan Instrument pack.
F35 15A Blue Interior lamps.
F36 10A Red Suspension system.
Fuse
No Rating
(amps) Fuse
Colour Circuit
F1 30A Green Air blower.
F2 30A Green Electric parking brake.
F3 - - -
F4 - - -
F5 - - -
F6 - - -
F7 30A Green Heated rear screen.
F8 30A Green Audio system (premium audio only).
F9 50A Red RBD link.
F10 40A Orange Rear electronic differential (e-Diff).
F11 - - -
F12 - - -
F13 - - -
F14 5A Tan Telephone.
F15 10A Red TV. DVD. DAB radio.
F16 - - -
F17 - - -
F18 - - -
F19 - - -
F20 - - -
F21 - - -
Fuse No Rating
(amps) Fuse
Colour Circuit
Page 193 of 225

R
(FM8) SEMCON JLR OWNER GUIDE VER 1.00 EURO
LANGUAGE: english-en; MARQUE: jaguar; MODEL: XF
Fuses
193
F22 - - -
F23 - - -
F24 - - -
F25 25A Clear Fuel pump.
F26 15A Blue Audio system. Po rtable audio interface.
F27 10A Red Navigation. Voice recognition. Touch screen.
F28 15A Blue Trailer power connector. Road pricing system.
F29 15A Blue Trailer connector.
F30 25A Clear Driver’s door module.
F31 25A Clear Front passenger door module.
F32 - - -
F33 5A Tan Tyre pressure monitoring system.
F34 - - -
F35 10A Red Supplementary restraint system.
F36 10A Red Pedestrian protection system.
Fuse
No
Rating
(amps) Fuse
Colour Circuit
Page 194 of 225
L
(FM8) SEMCON JLR OWNER GUIDE VER 1.00 EURO
LANGUAGE: english-en; MARQUE: jaguar; MODEL: XF
Wheel changing
194
Wheel changingWHEEL CHANGING SAFETY
Before raising the vehicl e, or changing a wheel
ensure that you read, and comply with the
following warnings.
Always find a safe place to stop, off
the highway and aw ay from traffic.
Ensure that the vehicle and jack are
both on firm level ground.
Apply the parking brake, and engage
Park (P).
Switch on the hazard warning lamps.
Ensure that the front wheels are in the
straight ahead position, and engage
the steering lock.
Disconnect trailer/ca ravan from the
vehicle.
Ensure that all passengers, and
animals, are out of the vehicle and in
a safe place away from the highway.
Place a warning triangle at a suitable
distance behind the v ehicle, facing
towards oncoming traffic.
When one rear wheel is lifted off the
ground the selection P (Park) position
will not prevent the vehicle from
moving and possibly slipping off the
jack as the park brake only operates
on the rear wheels. Use the wheel
chock when jacking the vehicle.
Always chock the wheel diagonally
opposite the wheel to be changed,
using the wheel chock supplied in the
tool kit. Chock the front of a front
wheel, or the rear of a rear wheel.
If jacking the vehicle on a slight slope
is unavoidable, place chocks on the
downhill side of the two opposite
wheels. An additional chock will be
needed. Never place anything between the jack
and the ground, or the jack and the
vehicle.
Do not attempt to raise the vehicle
unless the jack head is fully engaged
in the jacking point. Only jack the
vehicle using the approved jacking
points.
Remove the spare wheel prior to
jacking the vehicle, to avoid
destabilising the vehicle when raised.
Take care when lifting the spare
wheel, and removing the punctured
wheel. The wheels are heavy, and can
cause injuries if not handled correctly.
Do not start or run the engine while the
vehicle is support
ed only by a jack.
Do not get under a vehicle that is
supported by a jack.
Never work or allow any person to
place any part of their body beneath
the vehicle with the jack as the only
means of support - use vehicle
support stands.
Take care when loosening the wheel
nuts. The wheel brace may slip off if
not properly attached, and the wheel
nuts may release suddenly. Either
unexpected movement may cause an
injury.
After use, the tool kit should be
returned to the under floor storage
area and correctly stowed.
Always ensure replacement tyres
have the correct rating and
specifications (e.g. load index, size,
speed rating) for your vehicle.
Page 195 of 225
R
(FM8) SEMCON JLR OWNER GUIDE VER 1.00 EURO
LANGUAGE: english-en; MARQUE: jaguar; MODEL: XF
Wheel changing
195
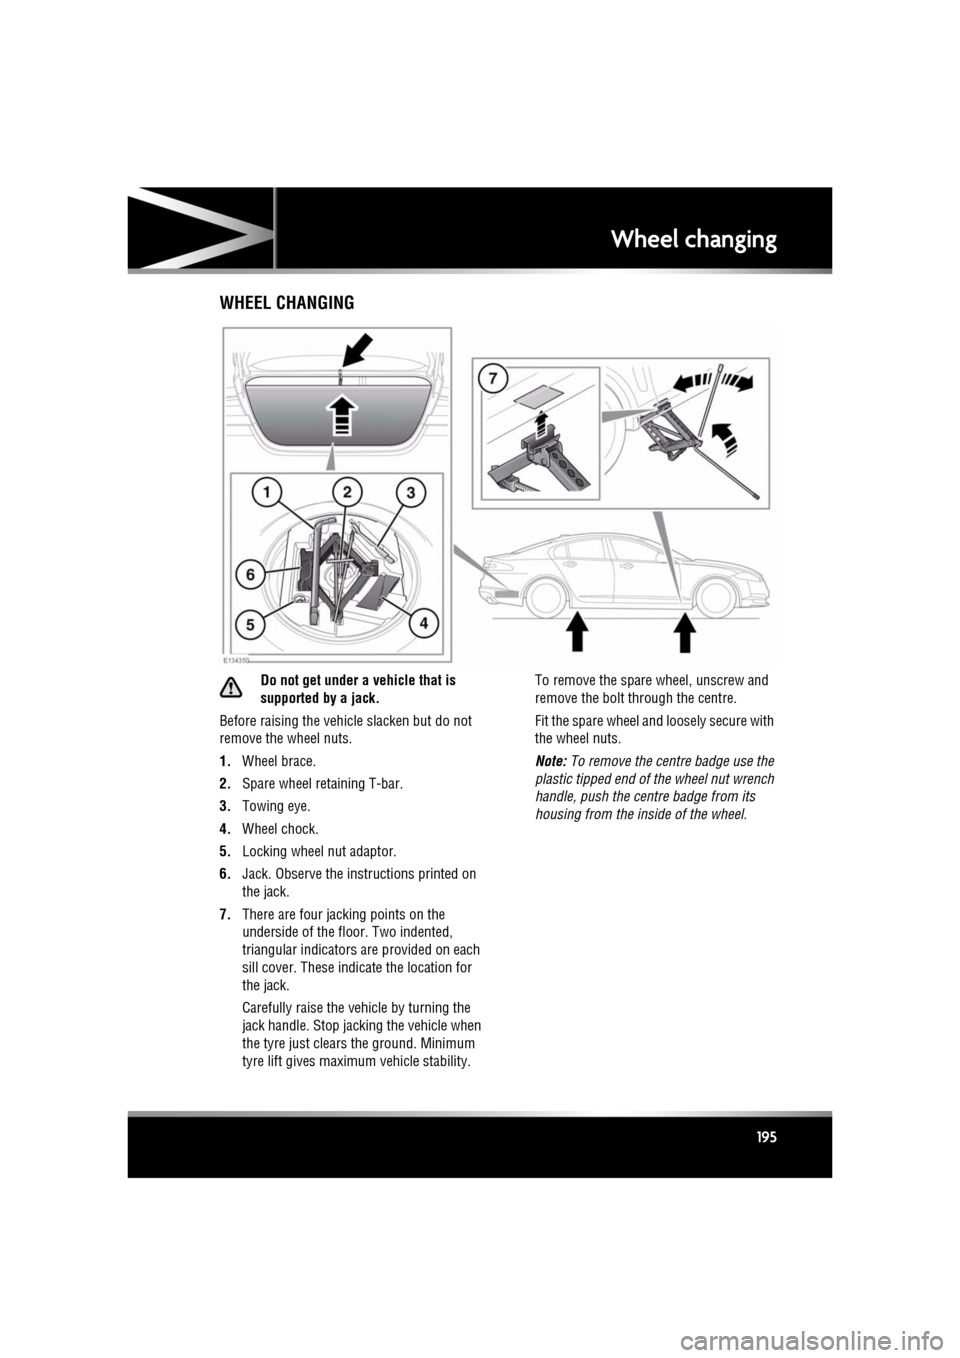
WHEEL CHANGING
Do not get under a vehicle that is
supported by a jack.
Before raising the vehi cle slacken but do not
remove the wheel nuts.
1. Wheel brace.
2. Spare wheel retaining T-bar.
3. Towing eye.
4. Wheel chock.
5. Locking wheel nut adaptor.
6. Jack. Observe the instructions printed on
the jack.
7. There are four jacking points on the
underside of the floor. Two indented,
triangular indicators are provided on each
sill cover. These indicate the location for
the jack.
Carefully raise the vehicle by turning the
jack handle. Stop jacking the vehicle when
the tyre just clears the ground. Minimum
tyre lift gives maximum vehicle stability. To remove the spare wheel, unscrew and
remove the bolt through the centre.
Fit the spare wheel and loosely secure with
the wheel nuts.
Note:
To remove the centre badge use the
plastic tipped end of the wheel nut wrench
handle, push the centre badge from its
housing from the in side of the wheel.
Page 196 of 225
L
(FM8) SEMCON JLR OWNER GUIDE VER 1.00 EURO
LANGUAGE: english-en; MARQUE: jaguar; MODEL: XF
Wheel changing
196
TEMPORARY USE SPARE WHEEL
Observe the following warnings before using
the wheel:
Always adhere to the instructions
given on the temporary use spare
wheel warning label. Failure to
comply can be dangerous.
When a temporary use spare wheel is
fitted, drive with caution and replace
with the specified wheel and tyre as
soon as possible.
Do not fit more than one temporary
use spare wheel and ty re assembly at
one time.
The temporary use spare wheel must
be inflated to 4.2 bar (60 psi, 420 kPa)
and cannot be repaired.
Temporary use spare wheel,
maximum speed is 80 km/h (50 mph).
DSC must be on when the temporary
use spare wheel is in use.
LOCKING WHEEL NUTS
Note: A code number is stam ped on the side of
the locking nut. Ensure the number is recorded
on the Security Card supplied with the
literature pack. Quot e this number if a
replacement is require d. Do not keep the
Security Card in the vehicle.
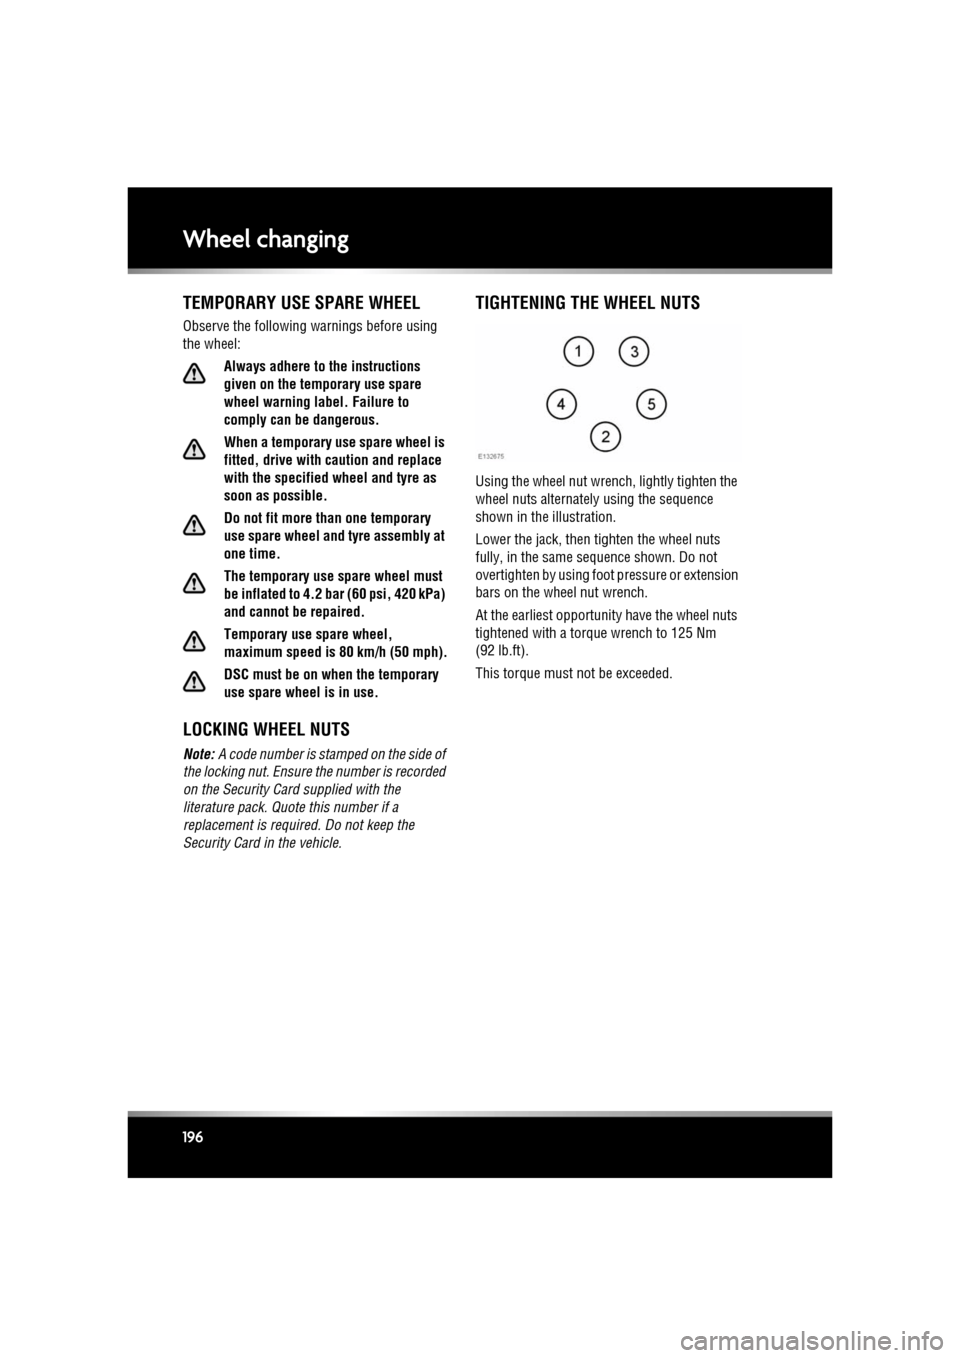
TIGHTENING THE WHEEL NUTS
Using the wheel nut wrench, lightly tighten the
wheel nuts alternately using the sequence
shown in the illustration.
Lower the jack, then tighten the wheel nuts
fully, in the same se quence shown. Do not
overtighten by using foot pressure or extension
bars on the wheel nut wrench.
At the earliest opportunity have the wheel nuts
tightened with a torque wrench to 125 Nm
(92 lb.ft).
This torque must not be exceeded.
Page 197 of 225
R
(FM8) SEMCON JLR OWNER GUIDE VER 1.00 EURO
LANGUAGE: english-en; MARQUE: jaguar; MODEL: XF
Vehicle recovery
197
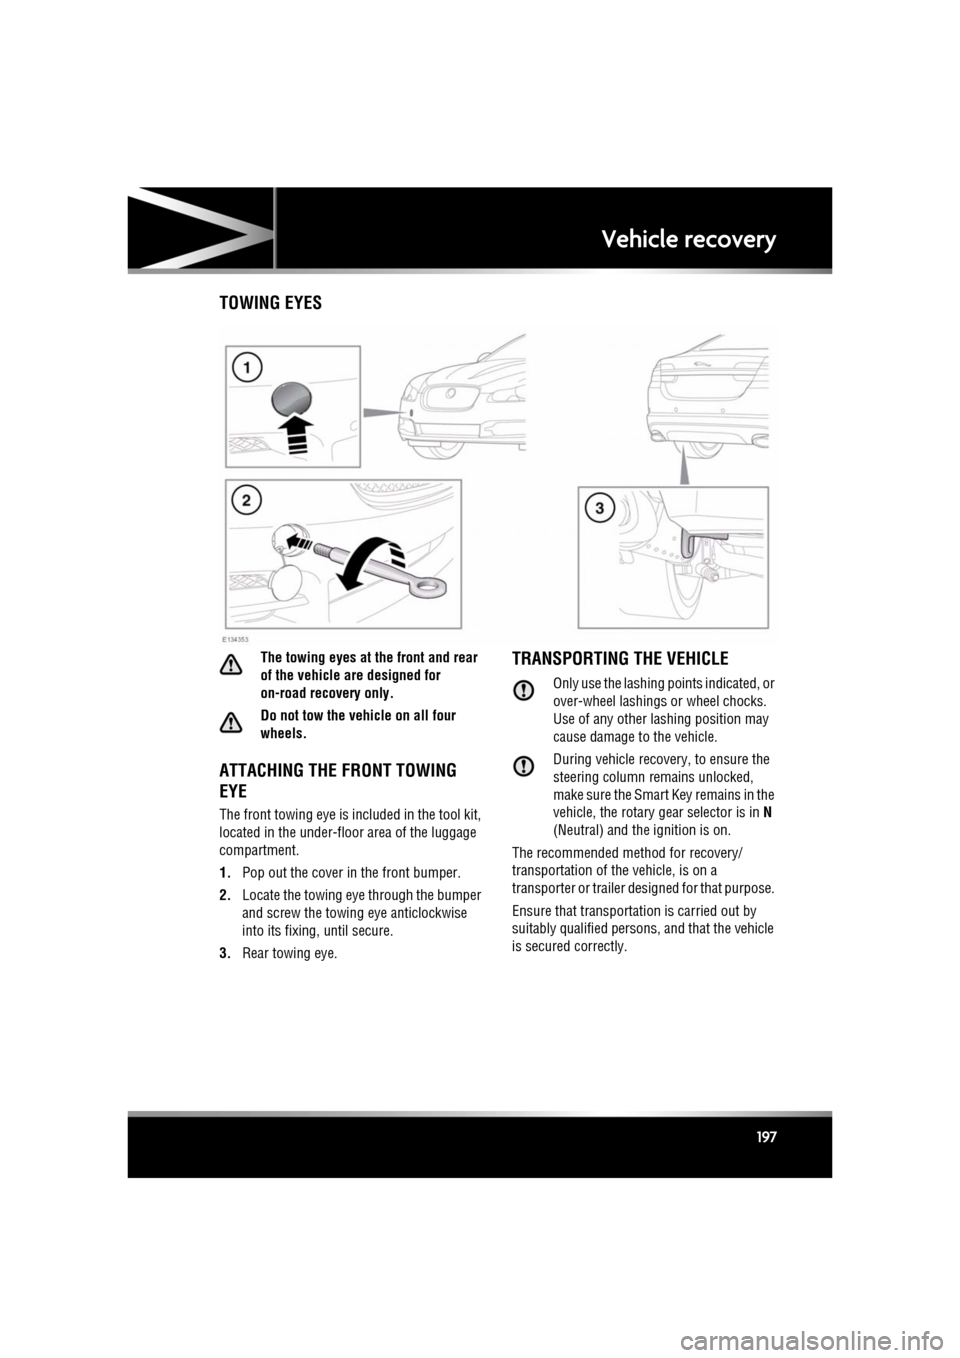
Vehicle recoveryTOWING EYES
The towing eyes at the front and rear
of the vehicle are designed for
on-road recovery only.
Do not tow the vehicle on all four
wheels.
ATTACHING THE FRONT TOWING
EYE
The front towing eye is included in the tool kit,
located in the under-floor area of the luggage
compartment.
1. Pop out the cover in the front bumper.
2. Locate the towing eye through the bumper
and screw the towing eye anticlockwise
into its fixing, until secure.
3. Rear towing eye.
TRANSPORTING THE VEHICLE
Only use the lashing points indicated, or
over-wheel lashings or wheel chocks.
Use of any other lashing position may
cause damage to the vehicle.
During vehicle recovery, to ensure the
steering column remains unlocked,
make sure the Smart Key remains in the
vehicle, the rotary gear selector is in N
(Neutral) and the ignition is on.
The recommended method for recovery/
transportation of the vehicle, is on a
transporter or trailer designed for that purpose.
Ensure that transportation is carried out by
suitably qualified persons, and that the vehicle
is secured correctly.
Page 198 of 225
L
(FM8) SEMCON JLR OWNER GUIDE VER 1.00 EURO
LANGUAGE: english-en; MARQUE: jaguar; MODEL: XF
After a collision
198
After a collisionBEFORE STARTING OR DRIVING
If the vehicle is involved in a collision
it should be checked by a Dealer/
Authorised repairer, or suitably
qualified personnel, before starting or
driving.
PEDESTRIAN PROTECTION SYSTEM
The bumper includes sensors that detect a
collision with a pedestrian and includes energy
absorbing foam and plastics in its
construction, to re duce leg injuries.
During a pedestrian co llision, the sensors
initiate a bonnet deploy ment system that
releases the bonnet hinge system and raises
the rear edge of the bonnet by approximately
130 mm (5.1 inches).
This increases the gap between the bonnet and
the components within the engine
compartment to create a cushion to mitigate
injury caused to the pedestrian.
The bonnet deployment system is active only
when the ignition is on and the vehicle is driven
between the speeds of approximately 20 km/h
(12 mph) and 45 km/h (28 mph).
AFTER DEPLOYMENT OF THE
PEDESTRIAN PROTECTION SYSTEM
Do not attempt to open the bonnet if the
pedestrian protection system has been
deployed.
The vehicle must be stopped as soon as it is
safe to do so.
The hazard warning lamp s will be activated and
can only be switched off by pressing the engine
START/STOP button to turn the engine off and
on again.
A warning message CHECK PEDESTRIAN
SYSTEM will appear on the message centre
and the vehicle should be transported to the
nearest Dealer/Author ised Repairer. The
vehicle must not be driven when the bonnet
has been deployed.
Note: If the warning message CHECK
PEDESTRIAN SYSTEM appears in the message
centre when the bonnet ha s not been deployed,
the vehicle should be taken to the nearest
Dealer/Authorised Repairer immediately. It can
be driven.
If any significant damage occurs to the front
bumper it should be inspected by a
Dealer/Authorised Repairer as soon as
possible.
Page 199 of 225
R
(FM8) SEMCON JLR OWNER GUIDE VER 1.00 EURO
LANGUAGE: english-en; MARQUE: jaguar; MODEL: XF
After a collision
199
EVENT DATA RECORDING
Event data recorders are capable of collecting
and storing data during a crash or near-crash
event. The recorded information may assist in
the investigation of such an event. The
modules may record information about both
the vehicle and the oc cupants, potentially
including such information as:
• How various systems in your vehicle were
operating.
• Whether or not the driver and passenger
seat belts were buckled.
• How far, if at all, the driver was pressing
the accelerator and/or brake pedal.
• How fast the vehicle was travelling.
• Where the driver was positioning the
steering wheel.
To access this information special equipment
must be connected directly to the recording
modules. Jaguar cars Li mited do not access
event data recorder information without
obtaining consent, unless pursuant to court
order or where required by law enforcement,
other government authorities or third parties
acting with lawful authority.
Other parties may seek to access the
information independent ly of Jaguar Cars
Limited.
Page 200 of 225
L
(FM8) SEMCON JLR OWNER GUIDE VER 1.00 EURO
LANGUAGE: english-en; MARQUE: jaguar; MODEL: XF
Vehicle identification
200
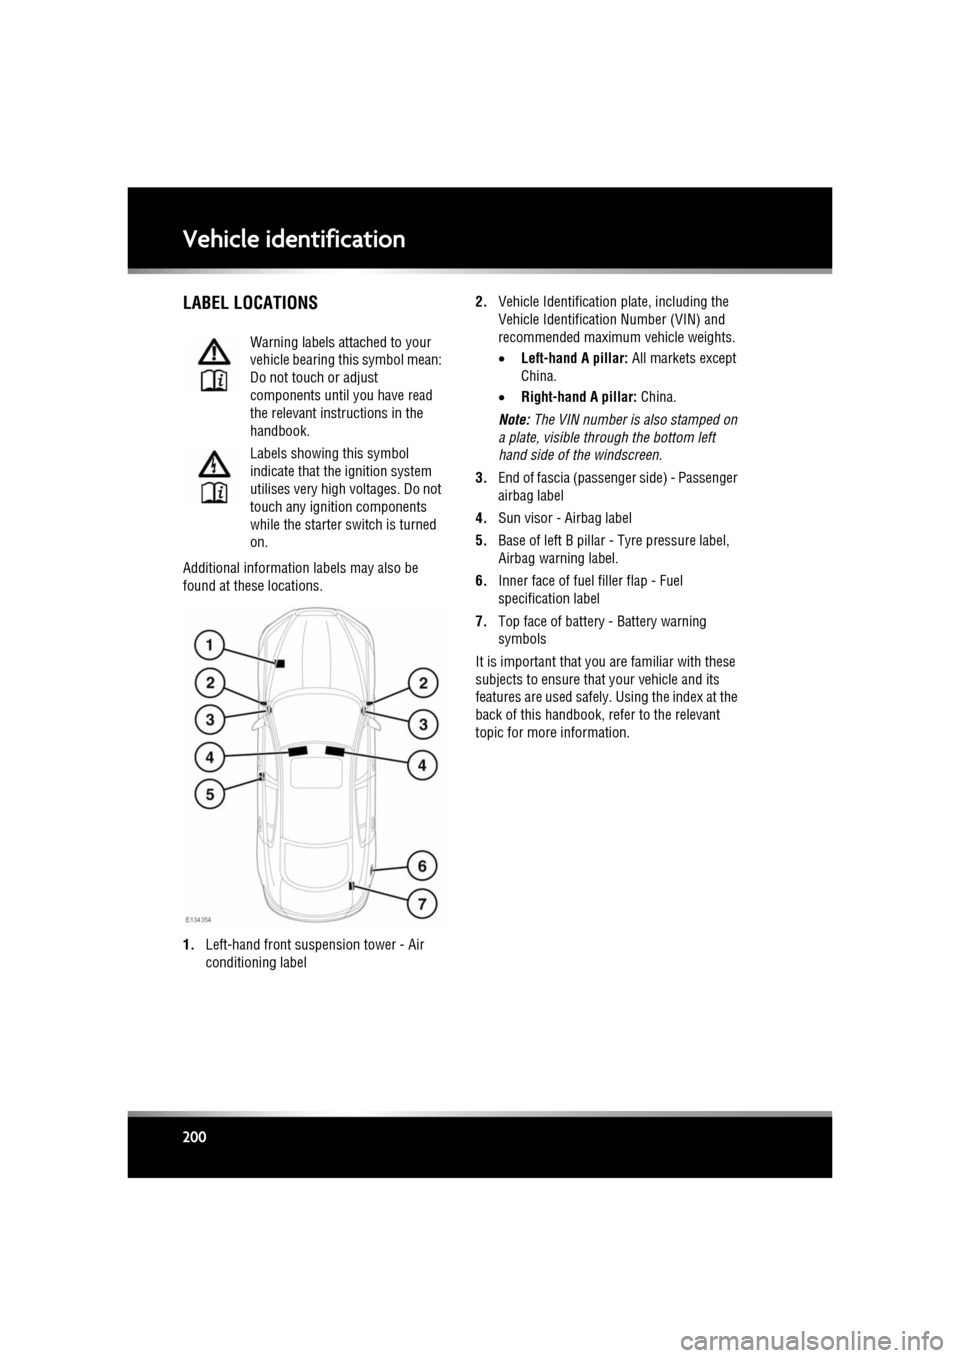
Vehicle identificationLABEL LOCATIONS
Additional information labels may also be
found at these locations.
1. Left-hand front suspension tower - Air
conditioning label 2.
Vehicle Identification plate, including the
Vehicle Identification Number (VIN) and
recommended maximum vehicle weights.
• Left-hand A pillar: All markets except
China.
• Right-hand A pillar: China.
Note: The VIN number is also stamped on
a plate, visible through the bottom left
hand side of the windscreen.
3. End of fascia (passenger side) - Passenger
airbag label
4. Sun visor - Airbag label
5. Base of left B pillar - Tyre pressure label,
Airbag warning label.
6. Inner face of fuel filler flap - Fuel
specification label
7. Top face of battery - Battery warning
symbols
It is important that you are familiar with these
subjects to ensure that your vehicle and its
features are used safely. Using the index at the
back of this handbook, re fer to the relevant
topic for more information.
Warning labels attached to your
vehicle bearing th
is symbol mean:
Do not touch or adjust
components until you have read
the relevant instructions in the
handbook.
Labels showing this symbol
indicate that the ignition system
utilises very high voltages. Do not
touch any ignition components
while the starter switch is turned
on.