dimensions JAGUAR XFR 2010 1.G Workshop Manual
[x] Cancel search | Manufacturer: JAGUAR, Model Year: 2010, Model line: XFR, Model: JAGUAR XFR 2010 1.GPages: 3039, PDF Size: 58.49 MB
Page 2707 of 3039
For instance, the crumple zones absorb the bulk of the impact energy. If any unprofessional repair techniques or
methods are used in these areas then this can pose a fundamental threat to vehicle safety.
Hidden damage
As well as looking at external indicators like flaked off paint, it is vital to check for hidden body damage or deformation
that is not visible from the outside. Large attached parts like bumpers and inner fenders often need to be removed to
allow accurate assessment of damage to underlying body parts.
Gap dimensions
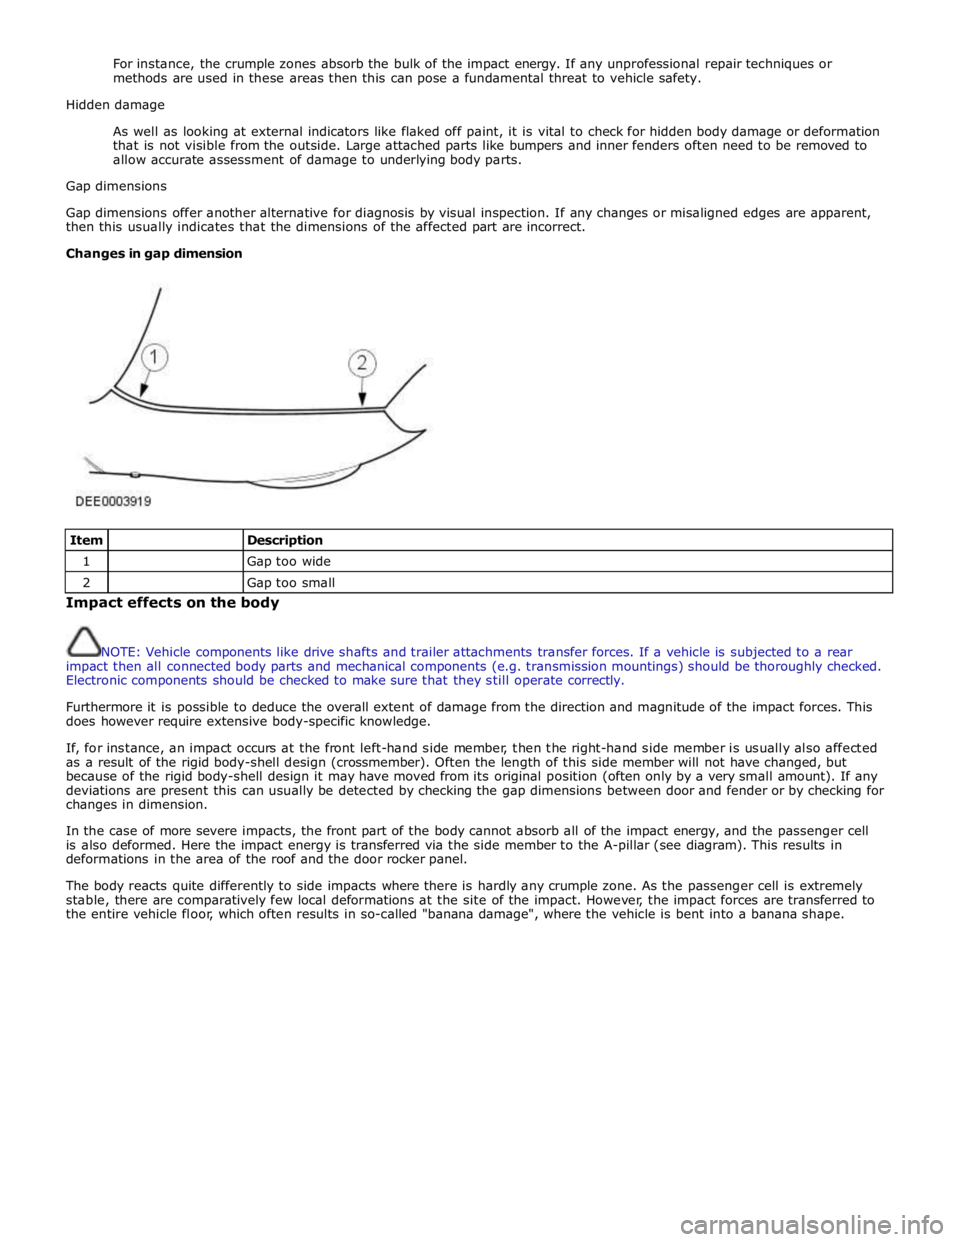
Gap dimensions offer another alternative for diagnosis by visual inspection. If any changes or misaligned edges are apparent,
then this usually indicates that the dimensions of the affected part are incorrect.
Changes in gap dimension
Item
Description 1
Gap too wide 2
Gap too small Impact effects on the body
NOTE: Vehicle components like drive shafts and trailer attachments transfer forces. If a vehicle is subjected to a rear
impact then all connected body parts and mechanical components (e.g. transmission mountings) should be thoroughly checked.
Electronic components should be checked to make sure that they still operate correctly.
Furthermore it is possible to deduce the overall extent of damage from the direction and magnitude of the impact forces. This
does however require extensive body-specific knowledge.
If, for instance, an impact occurs at the front left-hand side member, then the right-hand side member is usually also affected
as a result of the rigid body-shell design (crossmember). Often the length of this side member will not have changed, but
because of the rigid body-shell design it may have moved from its original position (often only by a very small amount). If any
deviations are present this can usually be detected by checking the gap dimensions between door and fender or by checking for
changes in dimension.
In the case of more severe impacts, the front part of the body cannot absorb all of the impact energy, and the passenger cell
is also deformed. Here the impact energy is transferred via the side member to the A-pillar (see diagram). This results in
deformations in the area of the roof and the door rocker panel.
The body reacts quite differently to side impacts where there is hardly any crumple zone. As the passenger cell is extremely
stable, there are comparatively few local deformations at the site of the impact. However, the impact forces are transferred to
the entire vehicle floor, which often results in so-called "banana damage", where the vehicle is bent into a banana shape.
Page 2708 of 3039
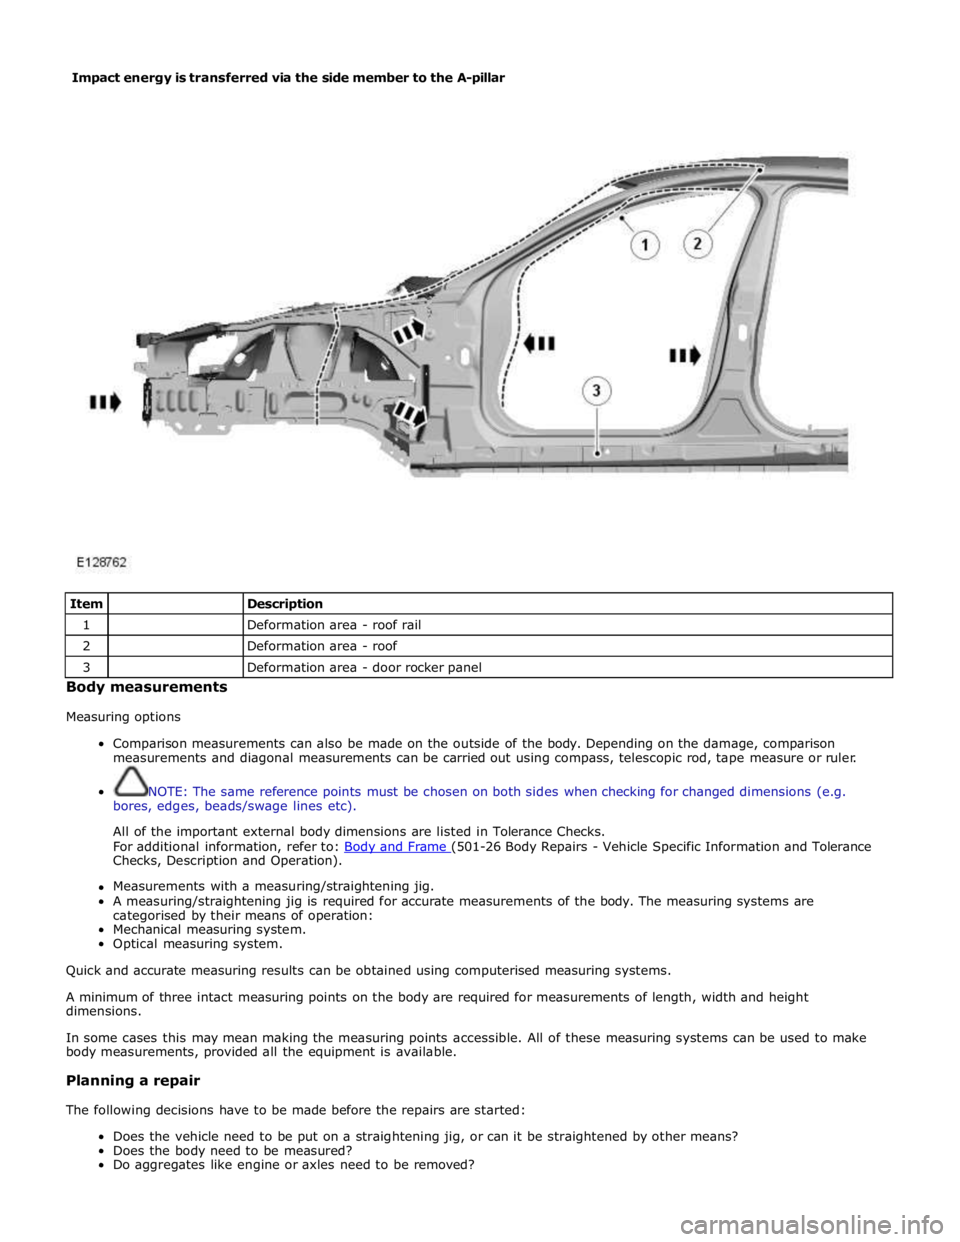
Item
Description 1
Deformation area - roof rail 2
Deformation area - roof 3
Deformation area - door rocker panel Body measurements
Measuring options
Comparison measurements can also be made on the outside of the body. Depending on the damage, comparison
measurements and diagonal measurements can be carried out using compass, telescopic rod, tape measure or ruler.
NOTE: The same reference points must be chosen on both sides when checking for changed dimensions (e.g.
bores, edges, beads/swage lines etc).
All of the important external body dimensions are listed in Tolerance Checks.
For additional information, refer to: Body and Frame (501-26 Body Repairs - Vehicle Specific Information and Tolerance Checks, Description and Operation).
Measurements with a measuring/straightening jig.
A measuring/straightening jig is required for accurate measurements of the body. The measuring systems are
categorised by their means of operation:
Mechanical measuring system.
Optical measuring system.
Quick and accurate measuring results can be obtained using computerised measuring systems.
A minimum of three intact measuring points on the body are required for measurements of length, width and height
dimensions.
In some cases this may mean making the measuring points accessible. All of these measuring systems can be used to make
body measurements, provided all the equipment is available.
Planning a repair
The following decisions have to be made before the repairs are started:
Does the vehicle need to be put on a straightening jig, or can it be straightened by other means?
Does the body need to be measured?
Do aggregates like engine or axles need to be removed? Impact energy is transferred via the side member to the A-pillar
Page 2709 of 3039
NOTE: It is preferable to repair body parts rather than to renew them, as this keeps the complete body-shell
intact.
Which body parts need to be renewed?
Which body parts can be repaired?
Obtaining spare parts
The availability of spare parts often determines how easily the body repairs can be carried out. The following procedure is
recommended:
Obtain all the data for the vehicle, including type, vehicle identification number, trim code, engine identification letters,
initial registration etc.
Establish all of the metal parts that need to be renewed.
Establish all of the attached parts that need to be renewed, including small parts like rivets, clips etc.
Straightening repairs
WARNING: The use of heat when pulling to straighten body panels, (such as side members), is not recommended.
Longitudinal pulling, (hot or cold), is also not recommended. A small amount of side to side pull is permissible, (cold).
When any type of pulling or straightening operation is performed it is important to observe for any movement in adjacent
panels.
A panel must retain its strength and integrity, if there is any doubt the panel must be renewed.
Straightening repairs are often required to restore the body to its original shape after an accident. This can be done with:
Alignment jigs.
Universal straightening and measuring jigs.
Welding jig system.
The following points must be followed to Make sure that the repairs are carried out professionally and that all the dimensions
are correct after the repairs have been carried out.
Structure:
- The repair sequence depends on the individual repair plan (taking any necessary disassembly work into
account).
- Clean the attachment areas.
- Anchor the vehicle free of stress on the relevant system.
- Support the aggregates to take strain off the body.
- Decide on at least three measuring/mounting points that are undamaged and as far apart as possible (for basic
adjustment).
- Check the dimensions of the measuring/mounting points.
Straightening:
NOTE: Check dimensions and gaps continuously during straightening.
- A body is always straightened in the opposite direction to that of the impact. Always carry out straightening
repairs with the complete body shell assembled (do not cut out any parts beforehand). Carry out the
straightening work in several stages. This prevents the risk of over stretching or of welded joints tearing out.
During the individual straightening steps, relieve tension by striking with an aluminium hammer while the part is
subjected to a tensile load (in the area of pre-determined folding points, dents, welded joins etc.).
Special features:
- Ultra high strength steel cannot be straightened due to its brittleness and must always be replaced. www.JagDocs.com
Page 2711 of 3039
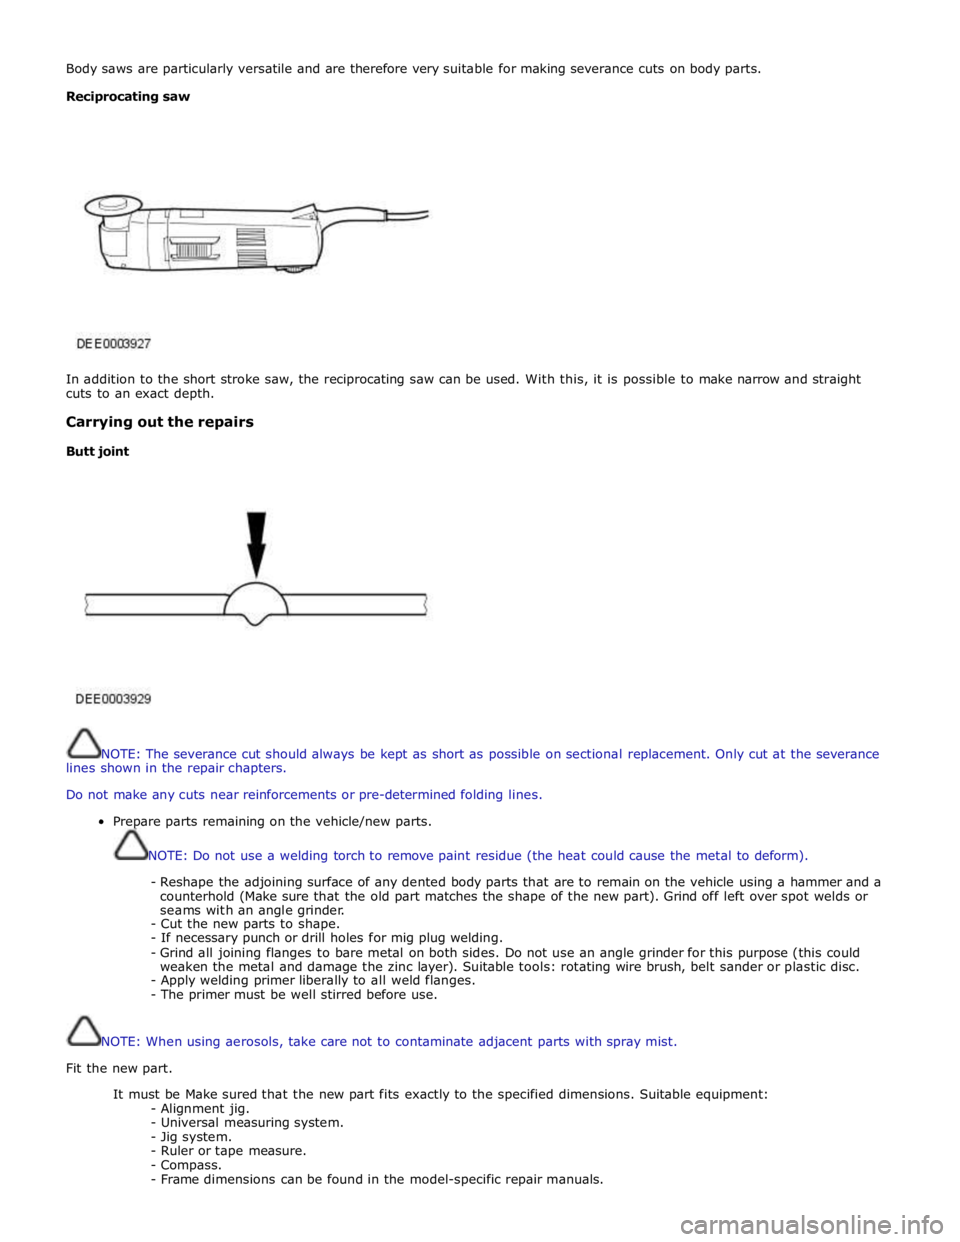
Body saws are particularly versatile and are therefore very suitable for making severance cuts on body parts.
Reciprocating saw
In addition to the short stroke saw, the reciprocating saw can be used. With this, it is possible to make narrow and straight
cuts to an exact depth.
Carrying out the repairs
Butt joint
NOTE: The severance cut should always be kept as short as possible on sectional replacement. Only cut at the severance
lines shown in the repair chapters.
Do not make any cuts near reinforcements or pre-determined folding lines.
Prepare parts remaining on the vehicle/new parts.
NOTE: Do not use a welding torch to remove paint residue (the heat could cause the metal to deform).
- Reshape the adjoining surface of any dented body parts that are to remain on the vehicle using a hammer and a
counterhold (Make sure that the old part matches the shape of the new part). Grind off left over spot welds or
seams with an angle grinder.
- Cut the new parts to shape.
- If necessary punch or drill holes for mig plug welding.
- Grind all joining flanges to bare metal on both sides. Do not use an angle grinder for this purpose (this could
weaken the metal and damage the zinc layer). Suitable tools: rotating wire brush, belt sander or plastic disc.
- Apply welding primer liberally to all weld flanges.
- The primer must be well stirred before use.
NOTE: When using aerosols, take care not to contaminate adjacent parts with spray mist.
Fit the new part.
It must be Make sured that the new part fits exactly to the specified dimensions. Suitable equipment:
- Alignment jig.
- Universal measuring system.
- Jig system.
- Ruler or tape measure.
- Compass.
- Frame dimensions can be found in the model-specific repair manuals.
Page 2737 of 3039
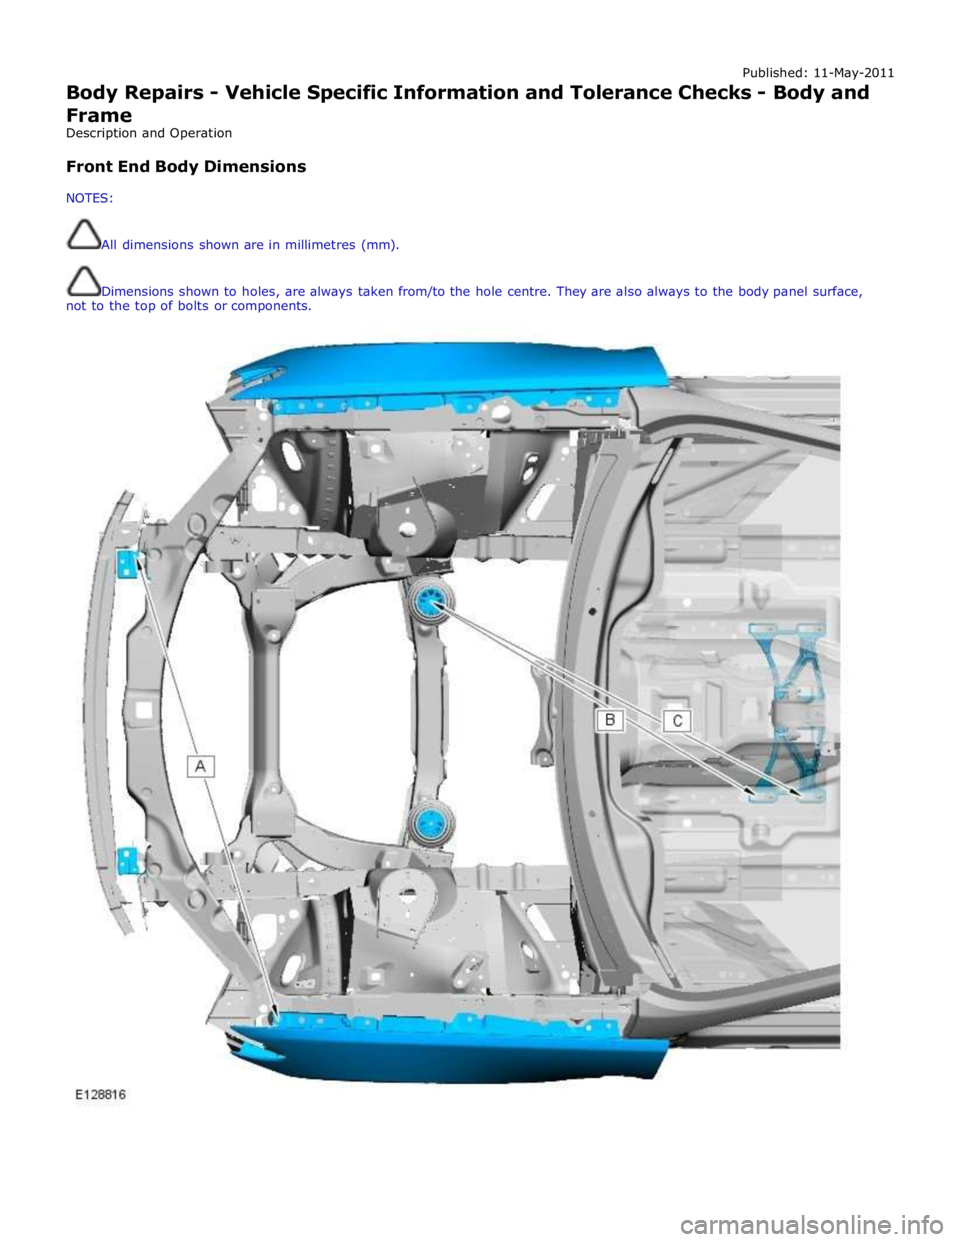
Published: 11-May-2011
Body Repairs - Vehicle Specific Information and Tolerance Checks - Body and
Frame
Description and Operation
Front End Body Dimensions
NOTES:
All dimensions shown are in millimetres (mm).
Dimensions shown to holes, are always taken from/to the hole centre. They are also always to the body panel surface,
not to the top of bolts or components.
Page 2740 of 3039
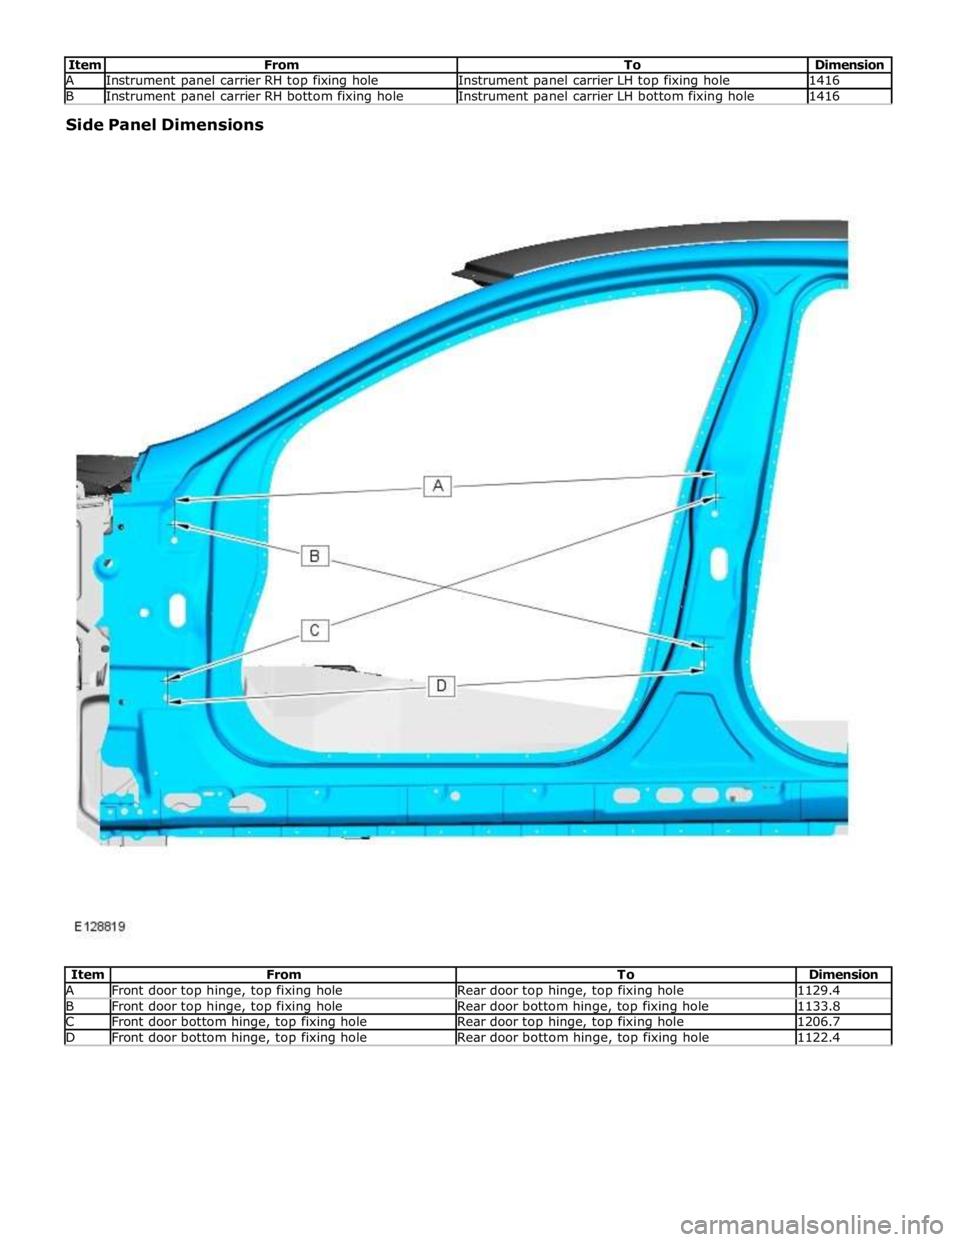
A Instrument panel carrier RH top fixing hole Instrument panel carrier LH top fixing hole 1416 B Instrument panel carrier RH bottom fixing hole Instrument panel carrier LH bottom fixing hole 1416 Side Panel Dimensions
Item From To Dimension A Front door top hinge, top fixing hole Rear door top hinge, top fixing hole 1129.4 B Front door top hinge, top fixing hole Rear door bottom hinge, top fixing hole 1133.8 C Front door bottom hinge, top fixing hole Rear door top hinge, top fixing hole 1206.7 D Front door bottom hinge, top fixing hole Rear door bottom hinge, top fixing hole 1122.4
Page 2746 of 3039
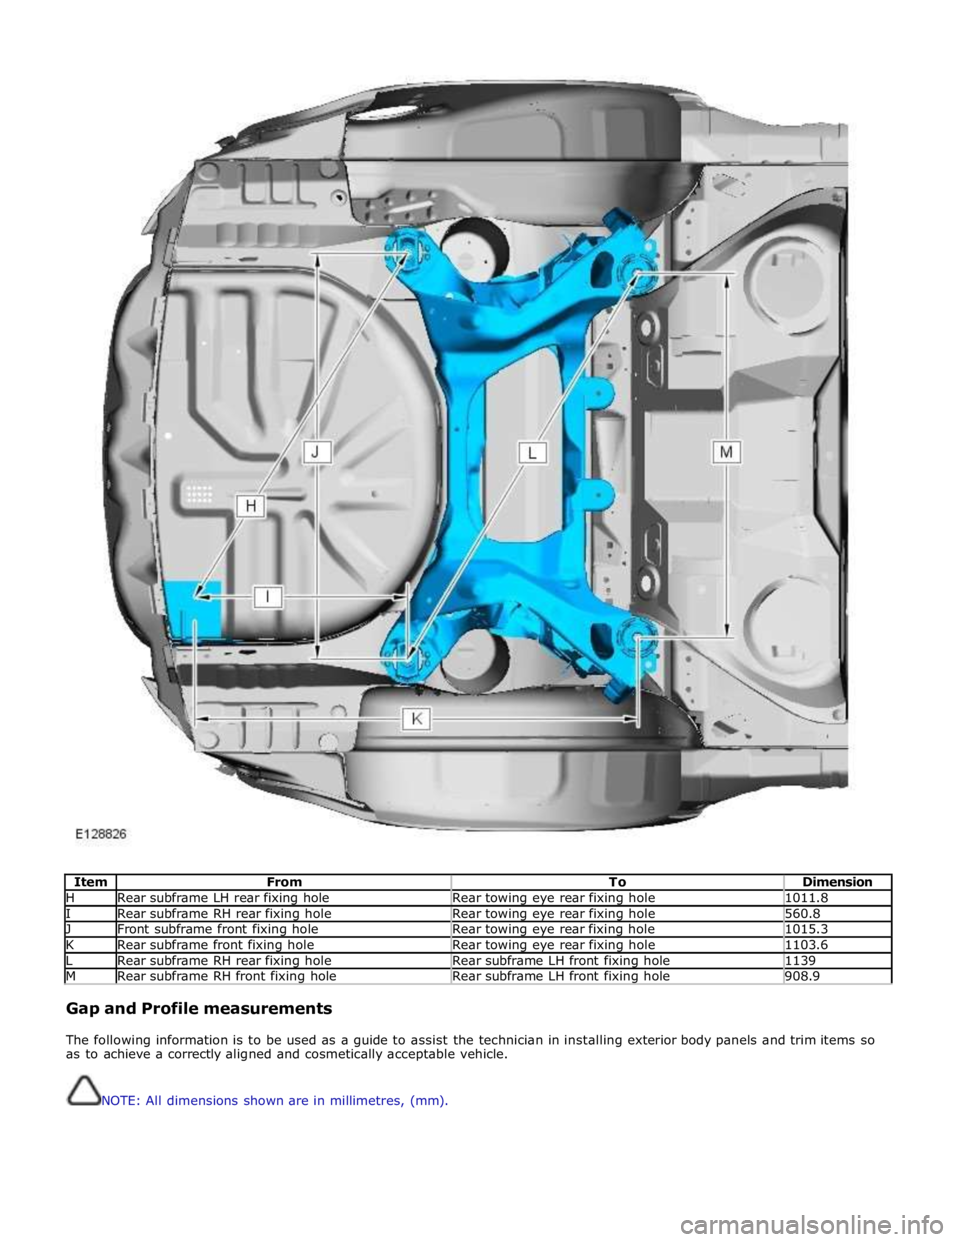
Item From To Dimension H Rear subframe LH rear fixing hole Rear towing eye rear fixing hole 1011.8 I Rear subframe RH rear fixing hole Rear towing eye rear fixing hole 560.8 J Front subframe front fixing hole Rear towing eye rear fixing hole 1015.3 K Rear subframe front fixing hole Rear towing eye rear fixing hole 1103.6 L Rear subframe RH rear fixing hole Rear subframe LH front fixing hole 1139 M Rear subframe RH front fixing hole Rear subframe LH front fixing hole 908.9
Gap and Profile measurements
The following information is to be used as a guide to assist the technician in installing exterior body panels and trim items so
as to achieve a correctly aligned and cosmetically acceptable vehicle.
NOTE: All dimensions shown are in millimetres, (mm).
Page 2958 of 3039
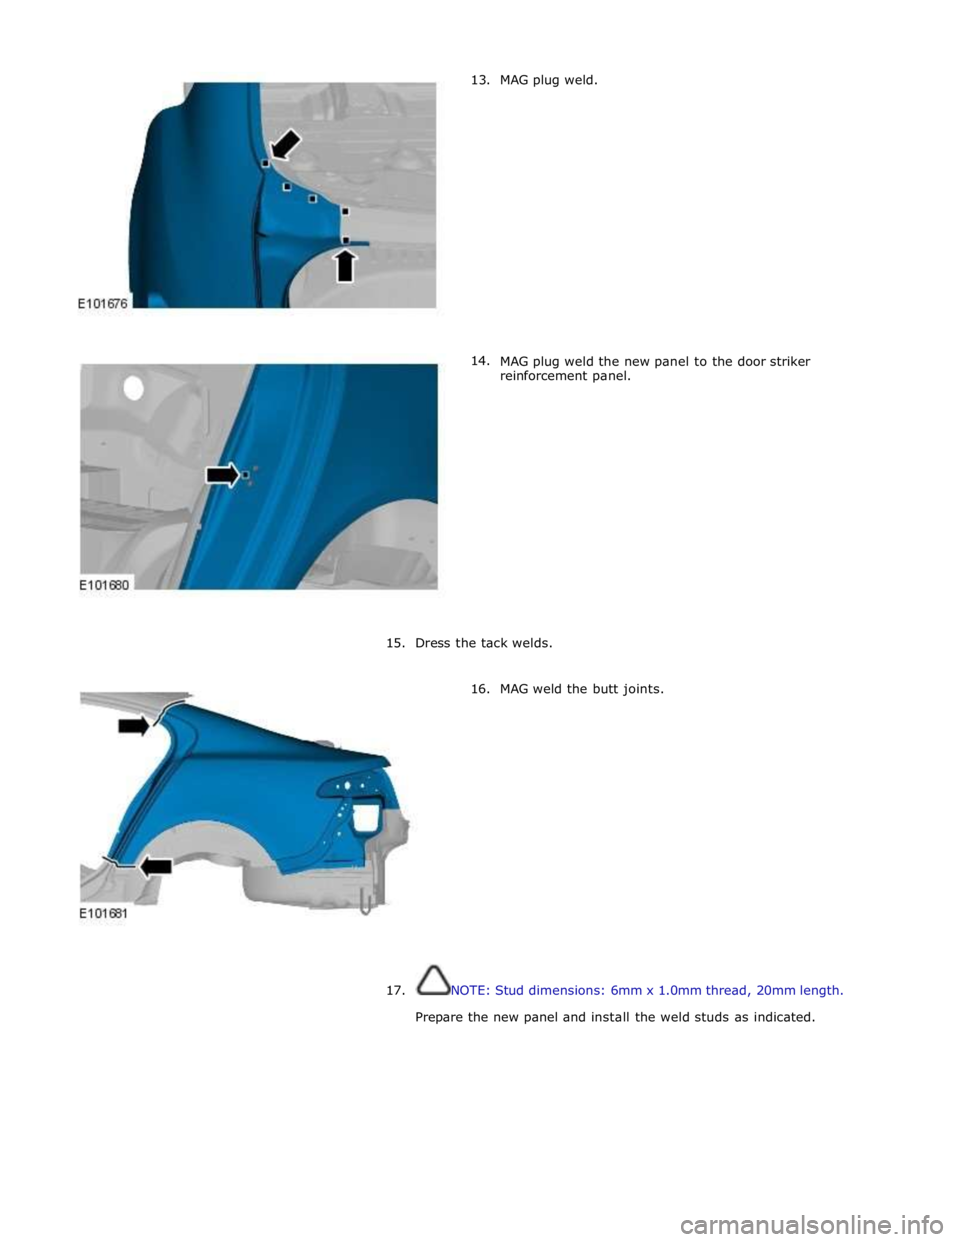
13.
14. MAG plug weld.
MAG plug weld the new panel to the door striker
reinforcement panel.
15. Dress the tack welds.
16. MAG weld the butt joints.
17.
NOTE: Stud dimensions: 6mm x 1.0mm thread, 20mm length.
Prepare the new panel and install the weld studs as indicated.
Page 3000 of 3039
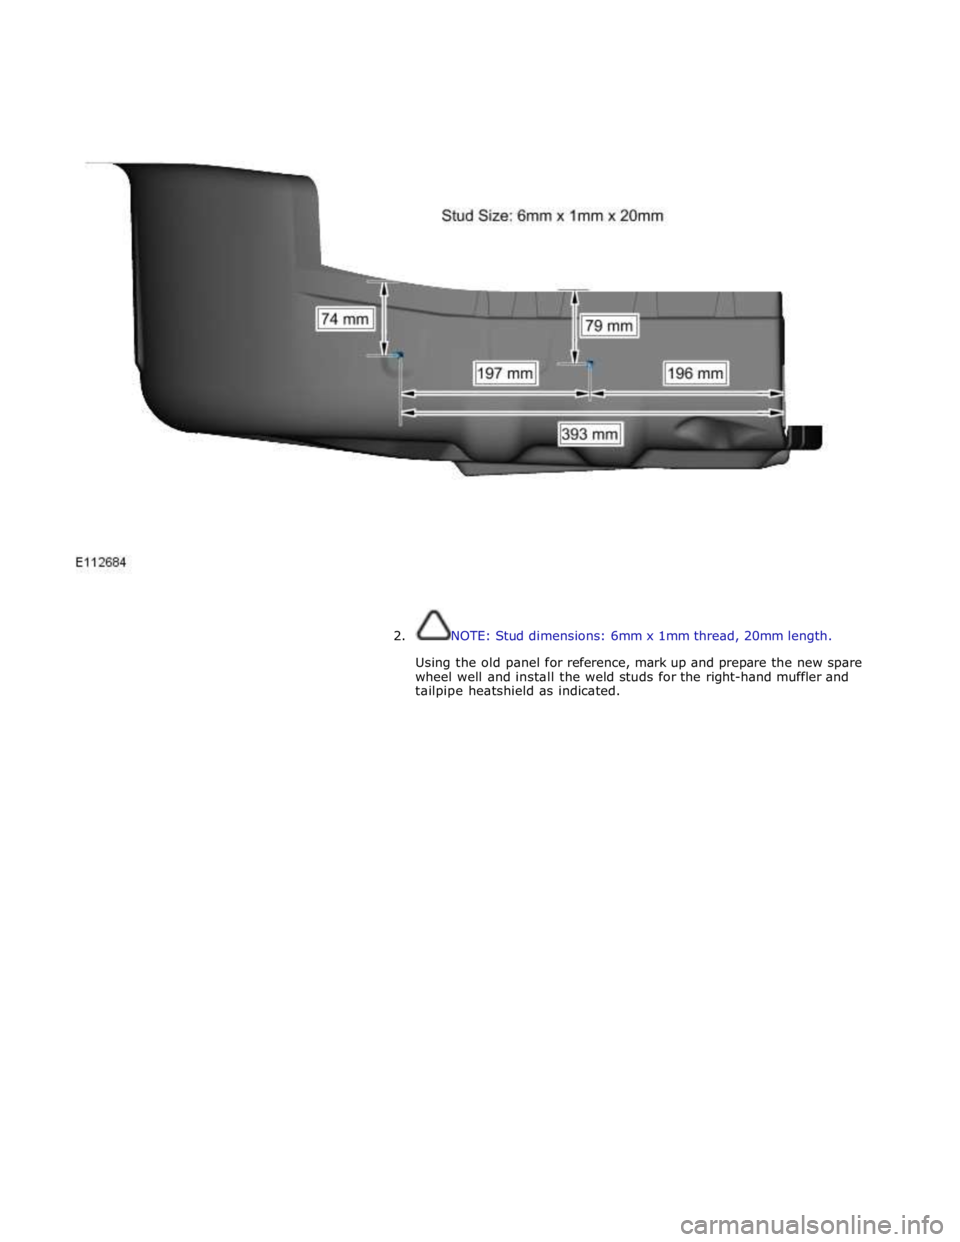
2. NOTE: Stud dimensions: 6mm x 1mm thread, 20mm length.
Using the old panel for reference, mark up and prepare the new spare
wheel well and install the weld studs for the right-hand muffler and
tailpipe heatshield as indicated.