Ett JAGUAR XJ 2004 X350 / 3.G Owner's Manual
[x] Cancel search | Manufacturer: JAGUAR, Model Year: 2004, Model line: XJ, Model: JAGUAR XJ 2004 X350 / 3.GPages: 227, PDF Size: 4.22 MB
Page 154 of 227
Roadside Emergency 6 - 3
6 Roadside Emergency
Inertia Switch
In the event of an accident, the inertia switch may trip
(depending on the severity an d type of impact), isolating
operation of the fuel pump. Once the switch has tripped it must
be reset before attempting to restart the engine.
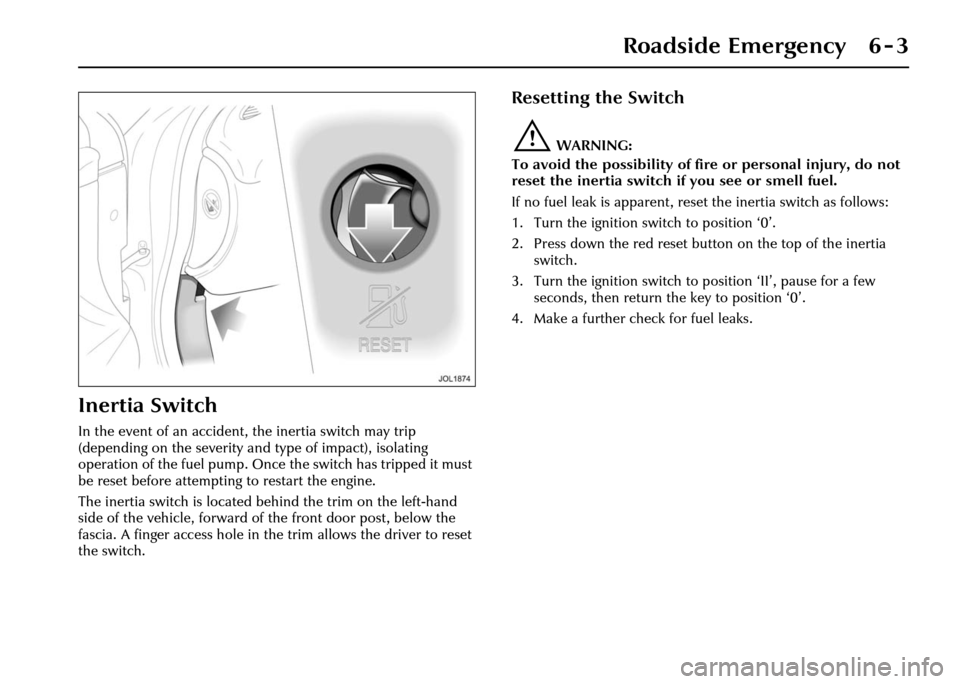
The inertia switch is located behind the trim on the left-hand
side of the vehicle, forward of the front door post, below the
fascia. A finger access hole in the trim allows the driver to reset
the switch.
Resetting the Switch
!WARNING:
To avoid the possibility of fire or personal injury, do not
reset the inertia switch if you see or smell fuel.
If no fuel leak is apparent, reset the inertia switch as follows:
1. Turn the ignition switch to position ‘0’.
2. Press down the red reset butt on on the top of the inertia
switch.
3. Turn the ignition switch to position ‘II’, pause for a few seconds, then return the key to position ‘0’.
4. Make a further check for fuel leaks.
Page 163 of 227
6 - 12 Roadside Emergency
Transporter tie-down procedure
!WARNING:
Avoid body contact with a hot
exhaust pipe when securing the
vehicle to the transporter.
IMPORTANT – Use straps over the
wheels/tyres only, to secure the vehicle to
the transporter.
Caution: Do not use the tie-down
brackets on the vehicle rear
underbody; these are for Jaguar
factory use only. In time, with the
engine switched off, the vehicle body
will drop due to settling of the air
suspension system and cause the tie-
down chains/straps to become slack if
connected to these brackets.
The towing eye is not designed for
securing the vehicle during
transportation. Vehicle failure
The removable towing eye is primarily for
emergency use when towing for SHORT
DISTANCES, e.g. removing the vehicle if it
is causing an obstruct
ion or for winching
the vehicle onto a re covery transporter.
To prevent damage to the automatic
transmission whilst the vehicle is being
towed with the rear wheels on the
ground, towing distance must be
restricted to 0.5 miles (0.8 kilometres).
Towing speed must not exceed 30 mph
(48 km/h).
Always obey towing regulations.
In certain countries the registration
number of the towing vehicle and an
‘ON TOW’ sign or warning triangle must
be displayed in a prominent position at
the rear of the vehicle being towed. When being towed, the gear selector
lever must be in neutral (position ‘N’)
with the ignition key turned to
position ‘II’ to release the steering lock
and render the indicators, horn and
brake lights operational.
!WARNING:
When the engine is not running the
steering and brakes will no longer be
power-assisted.
Therefore, be prepared for relatively
heavy steering and the need for
greatly increased brake pedal
pressure.
Page 205 of 227

7-22 Maintenance
Vehicle Care
Valet kit
A valet kit containing a selection of Car
Care products is available from the Jaguar
accessory range.
Interior Care
Brush and clean the interior regularly.
Use a vacuum cleaner where possible to
remove all dust from the interior and
trim.
Carpets
Marks or stains can be removed by gentle
scrubbing with a weak solution of soap
and warm water.
For more stubborn stains a commercially
available carpet cleaner should be used.
See your Jaguar Retailer for advice.
Headlining
Remove dust in the headlining with a
vacuum cleaner. To remove stains,
dab gently without pressing, using a
fluff-free white cloth, moistened with
Jaguar Upholstery Cleaner.
Do not use methylated spirit or solvents
as this may cause damage or
discoloration to the headlining.Leather upholstery
Dust and dirt can penetrate the pores and
creases of leather, causing surface wear
and brittleness. To prevent ingrained dirt,
inspect the seat upholstery regularly and
clean every one to two months as follows:
• Wipe the seat surfaces with a clean,
damp, non-coloured cloth, changing
frequently to a clean area of cloth.
Avoid over-wetting.
• If this is not sufficient, use a cloth which has been dampened with warm
soapy water and then wrung out;
avoid over-wetting. Use only mild
non-caustic soap.
• Use Jaguar Leather Cleaner for heavily soiled areas.
• Dry off and rub with a clean soft cloth, changing su rfaces regularly.
When staining (e.g. from clothing) or
spillages occur, clean the affected area
immediately as described above. Note:
Do not use solvents such as petrol
(gasoline), white spirit or alcohol. Do not
use detergents, furniture polish or
household cleaners. Although such
treatments may give, initially,
an impressive appearance, their use will
lead to rapid damage or deterioration of
the leather, and will not be covered by the
Manufacturer’s Warranty. Unless spillages
such as tea, coffee or ink are washed away
immediately, permanent staining may
have to be accepted.
If a valeting service is used, ensure that
the specialist firm concerned is aware of
these instructions, and they follow them
precisely.
Page 223 of 227
Index
Jaguar
– diagnostic system . . . . . . . . . . . . . . . . . . . . . . . . . . . . . . 1 - 8
– parts and accessories . . . . . . . . . . . . . . . . . . . . . . . . . . . 1 - 4
K
Key transmitter . . . . . . . . . . . . . . . . . . . . . . . . . . . . . . . . . 2 - 4
Keys . . . . . . . . . . . . . . . . . . . . . . . . . . . . . . . . . . . . . . . . . 2 - 7
– additional keys . . . . . . . . . . . . . . . . . . . . . . . . . . . . . . . . 2 - 7
– black-headed key . . . . . . . . . . . . . . . . . . . . . . . . . . . . . . 2 - 7
– green-headed valet key . . . . . . . . . . . . . . . . . . . . . . . . . 2 - 7
– integrated transmitter key . . . . . . . . . . . . . . . . . . . . . . . 2 - 7
– key number label . . . . . . . . . . . . . . . . . . . . . . . . . . . . . . 2 - 7
L
Leather upholstery – cleaning . . . . . . . . . . . . . . . . . . . . . 7 - 22
Lights
– approach lights . . . . . . . . . . . . . . . . . . . . . . . . . . . . . . 4 - 26
– autolamps . . . . . . . . . . . . . . . . . . . . . . . . . . . . . . . . . . 4 - 23
– battery saver . . . . . . . . . . . . . . . . . . . . . . . . . . . . . . . . 4 - 28
– bulb failure . . . . . . . . . . . . . . . . . . . . . . . . . . . . . . . . . 4 - 26
– daylight running lights . . . . . . . . . . . . . . . . . . . . . . . . . 4 - 24
– door guard/puddle lights . . . . . . . . . . . . . . . . . . . . . . . 4 - 26
– exit delay . . . . . . . . . . . . . . . . . . . . . . . . . . . . . . . . . . . 4 - 24
– exterior lights . . . . . . . . . . . . . . . . . . . . . . . . . . . . . . . . 4 - 23
– front fog lights . . . . . . . . . . . . . . . . . . . . . . . . . . . . . . . 4 - 25
– glove compartment . . . . . . . . . . . . . . . . . . . . . . . . . . . 4 - 26
– hazard warning . . . . . . . . . . . . . . . . . . . . . . . . . . . . . . 4 - 27
– headlight convenience . . . . . . . . . . . . . . . . . . . . . . . . . 4 - 24
– interior lighting . . . . . . . . . . . . . . . . . . . . . . . . . . . . . . 4 - 27
– luggage compartment lighting . . . . . . . . . . . . . . . . . . . 4 - 26
– rear fog lights . . . . . . . . . . . . . . . . . . . . . . . . . . . . . . . . 4 - 25Limp-home mode . . . . . . . . . . . . . . . . . . . . . . . . . . . . . . 4 - 45
Locking and unlocking
– auto-relocking . . . . . . . . . . . . . . . . . . . . . . . . . . . . . . . 2 - 11
– central locking switch . . . . . . . . . . . . . . . . . . . . . . . . . . . 2 - 9
– child safety locks . . . . . . . . . . . . . . . . . . . . . . . . . . . . . 2 - 14
– drive-away door locking . . . . . . . . . . . . . . . . . . . . . . . . . 2 - 8
– global closing . . . . . . . . . . . . . . . . . . . . . . . . . . . . . . . . 2 - 10
– smart locking . . . . . . . . . . . . . . . . . . . . . . . . . . . . . . . . . 2 - 9
– two-stage unlocking . . . . . . . . . . . . . . . . . . . . . . . . . . . 2 - 10
– valet key . . . . . . . . . . . . . . . . . . . . . . . . . . . . . . . . . . . . 2 - 14
– vehicle . . . . . . . . . . . . . . . . . . . . . . . . . . . . . . . . . . . . . . 2 - 8
Luggage compartment . . . . . . . . . . . . . . . . . . . . . . . . . . . 3 - 33
– ski hatch . . . . . . . . . . . . . . . . . . . . . . . . . . . . . . . . . . . . 3 - 34
– tie-down loops . . . . . . . . . . . . . . . . . . . . . . . . . . . . . . . 3 - 33
– underfloor access . . . . . . . . . . . . . . . . . . . . . . . . . . . . . . 6 - 4
Luggage compartment emergency release . . . . . . . . . . . . 2 - 19
M
Maintenance
– regular checks . . . . . . . . . . . . . . . . . . . . . . . . . . . . . . . . 7 - 3
Memory setting – driving positions . . . . . . . . . . . . . . . . . 3 - 31
Message centre . . . . . . . . . . . . . . . . . . . . . . . . . . . . . . . . 4 - 12
– clearing messages . . . . . . . . . . . . . . . . . . . . . . . . . . . . . 4 - 13
– illumination . . . . . . . . . . . . . . . . . . . . . . . . . . . . . . . . . 4 - 12
– language selection . . . . . . . . . . . . . . . . . . . . . . . . . . . . 4 - 12
– messages . . . . . . . . . . . . . . . . . . . . . . . . . . . . . . . . . . . 4 - 16