Park brake JAGUAR XJ 2004 X350 / 3.G Owners Manual
[x] Cancel search | Manufacturer: JAGUAR, Model Year: 2004, Model line: XJ, Model: JAGUAR XJ 2004 X350 / 3.GPages: 227, PDF Size: 4.22 MB
Page 3 of 227
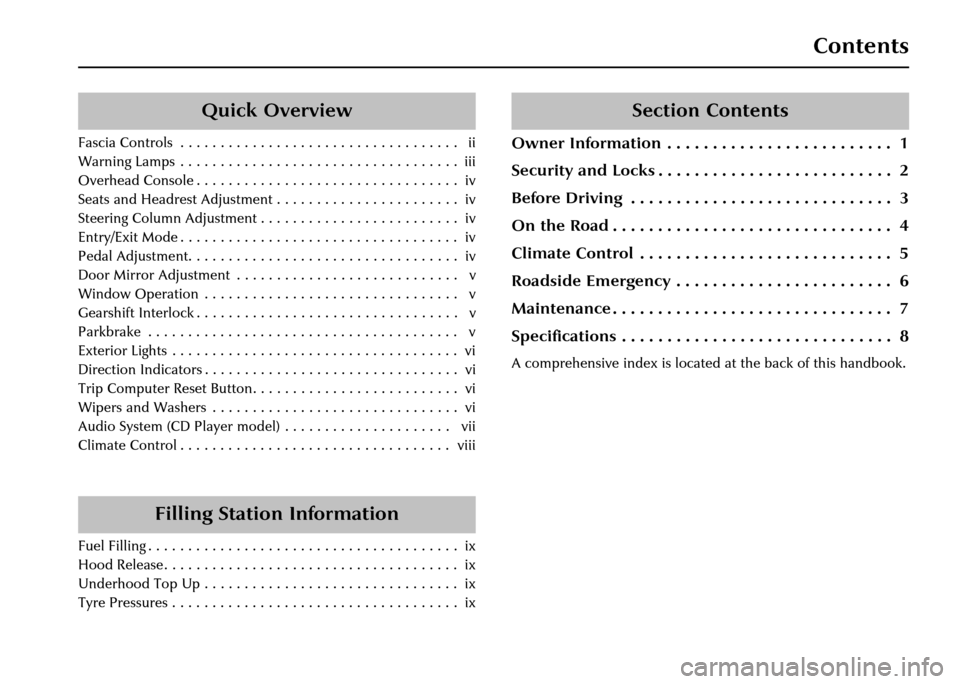
Contents
Section Contents
Owner Information . . . . . . . . . . . . . . . . . . . . . . . . . 1
Security and Locks . . . . . . . . . . . . . . . . . . . . . . . . . . 2
Before Driving . . . . . . . . . . . . . . . . . . . . . . . . . . . . . 3
On the Road . . . . . . . . . . . . . . . . . . . . . . . . . . . . . . . 4
Climate Control . . . . . . . . . . . . . . . . . . . . . . . . . . . . 5
Roadside Emergency . . . . . . . . . . . . . . . . . . . . . . . . 6
Maintenance . . . . . . . . . . . . . . . . . . . . . . . . . . . . . . . 7
Specifications . . . . . . . . . . . . . . . . . . . . . . . . . . . . . . 8
A comprehensive index is located at the back of this handbook.
Quick Overview
Fascia Controls . . . . . . . . . . . . . . . . . . . . . . . . . . . . . . . . . . . ii
Warning Lamps . . . . . . . . . . . . . . . . . . . . . . . . . . . . . . . . . . . iii
Overhead Console . . . . . . . . . . . . . . . . . . . . . . . . . . . . . . . . . iv
Seats and Headrest Adjustment . . . . . . . . . . . . . . . . . . . . . . . iv
Steering Column Adjustment . . . . . . . . . . . . . . . . . . . . . . . . . iv
Entry/Exit Mode . . . . . . . . . . . . . . . . . . . . . . . . . . . . . . . . . . . iv
Pedal Adjustment. . . . . . . . . . . . . . . . . . . . . . . . . . . . . . . . . . iv
Door Mirror Adjustment . . . . . . . . . . . . . . . . . . . . . . . . . . . . v
Window Operation . . . . . . . . . . . . . . . . . . . . . . . . . . . . . . . . v
Gearshift Interlock . . . . . . . . . . . . . . . . . . . . . . . . . . . . . . . . . v
Parkbrake . . . . . . . . . . . . . . . . . . . . . . . . . . . . . . . . . . . . . . . v
Exterior Lights . . . . . . . . . . . . . . . . . . . . . . . . . . . . . . . . . . . . vi
Direction Indicators . . . . . . . . . . . . . . . . . . . . . . . . . . . . . . . . vi
Trip Computer Reset Button. . . . . . . . . . . . . . . . . . . . . . . . . . vi
Wipers and Washers . . . . . . . . . . . . . . . . . . . . . . . . . . . . . . . vi
Audio System (CD Player model) . . . . . . . . . . . . . . . . . . . . . vii
Climate Control . . . . . . . . . . . . . . . . . . . . . . . . . . . . . . . . . . viii
Filling Station Information
Fuel Filling . . . . . . . . . . . . . . . . . . . . . . . . . . . . . . . . . . . . . . . ix
Hood Release . . . . . . . . . . . . . . . . . . . . . . . . . . . . . . . . . . . . . ix
Underhood Top Up . . . . . . . . . . . . . . . . . . . . . . . . . . . . . . . . ix
Tyre Pressures . . . . . . . . . . . . . . . . . . . . . . . . . . . . . . . . . . . . ix
Page 4 of 227
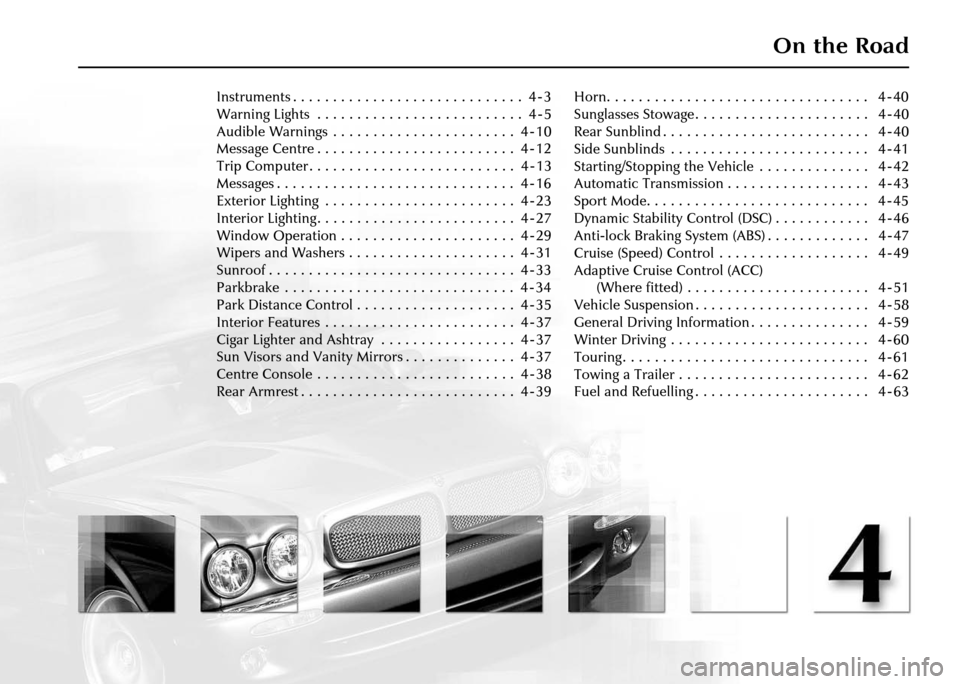
On the Road
Instruments . . . . . . . . . . . . . . . . . . . . . . . . . . . . . 4 - 3
Warning Lights . . . . . . . . . . . . . . . . . . . . . . . . . . 4 - 5
Audible Warnings . . . . . . . . . . . . . . . . . . . . . . . 4 - 10
Message Centre . . . . . . . . . . . . . . . . . . . . . . . . . 4 - 12
Trip Computer . . . . . . . . . . . . . . . . . . . . . . . . . . 4 - 13
Messages . . . . . . . . . . . . . . . . . . . . . . . . . . . . . . 4 - 16
Exterior Lighting . . . . . . . . . . . . . . . . . . . . . . . . 4 - 23
Interior Lighting. . . . . . . . . . . . . . . . . . . . . . . . . 4 - 27
Window Operation . . . . . . . . . . . . . . . . . . . . . . 4 - 29
Wipers and Washers . . . . . . . . . . . . . . . . . . . . . 4 - 31
Sunroof . . . . . . . . . . . . . . . . . . . . . . . . . . . . . . . 4 - 33
Parkbrake . . . . . . . . . . . . . . . . . . . . . . . . . . . . . 4 - 34
Park Distance Control . . . . . . . . . . . . . . . . . . . . 4 - 35
Interior Features . . . . . . . . . . . . . . . . . . . . . . . . 4 - 37
Cigar Lighter and Ashtray . . . . . . . . . . . . . . . . . 4 - 37
Sun Visors and Vanity Mirrors . . . . . . . . . . . . . . 4 - 37
Centre Console . . . . . . . . . . . . . . . . . . . . . . . . . 4 - 38
Rear Armrest . . . . . . . . . . . . . . . . . . . . . . . . . . . 4 - 39Horn. . . . . . . . . . . . . . . . . . . . . . . . . . . . . . . . . 4 - 40
Sunglasses Stowage . . . . . . . . . . . . . . . . . . . . . . 4 - 40
Rear Sunblind . . . . . . . . . . . . . . . . . . . . . . . . . . 4 - 40
Side Sunblinds . . . . . . . . . . . . . . . . . . . . . . . . . 4 - 41
Starting/Stopping the Vehicle . . . . . . . . . . . . . . 4 - 42
Automatic Transmission . . . . . . . . . . . . . . . . . . 4 - 43
Sport Mode. . . . . . . . . . . . . . . . . . . . . . . . . . . . 4 - 45
Dynamic Stability Control (DSC) . . . . . . . . . . . . 4 - 46
Anti-lock Braking System (ABS) . . . . . . . . . . . . . 4 - 47
Cruise (Speed) Control . . . . . . . . . . . . . . . . . . . 4 - 49
Adaptive Cruise Control (ACC)
(Where fitted) . . . . . . . . . . . . . . . . . . . . . . . 4 - 51
Vehicle Suspension . . . . . . . . . . . . . . . . . . . . . . 4 - 58
General Driving Information . . . . . . . . . . . . . . . 4 - 59
Winter Driving . . . . . . . . . . . . . . . . . . . . . . . . . 4 - 60
Touring . . . . . . . . . . . . . . . . . . . . . . . . . . . . . . . 4 - 61
Towing a Trailer . . . . . . . . . . . . . . . . . . . . . . . . 4 - 62
Fuel and Refuelling . . . . . . . . . . . . . . . . . . . . . . 4 - 63
Page 13 of 227
Owner Information 1 - 9
Protect the Environment
We must all play our part in protecting
the environment. Correct vehicle usage
and disposal of waste cleaning and
lubrication materials are significant steps
towards this aim.
Avoid using high engine speeds. You will
then protect your engine, reduce fuel
consumption, lower the engine noise
level and help towards reducing the
environmental burden.
Dispose of batteries, tyres, engine, brake
and coolant fluids at your local
authorised waste disposal facilities.
Window Tinting
!WARNING:
Do not have your vehicle windows
tinted with a metal oxide tinting (for
maximum heat reduction from sun
load).
Metal oxide tinting prevents the
reception of the Global Positioning
Satellite (GPS) signals by the antenna
causing the navigation system to stop
functioning.
Metal oxide tinting also prevents the
reception of the Remote Keyless Entry
(RKE) signals by the antenna, causing
reduced operation of the arming/
disarming/locking/unlocking system of the
vehicle.
A non-metal tinting should be used if you
require window tinting and if in doubt,
contact your Jaguar Retailer for advice.
Window marking
It is a worthwhile precaution to have the
vehicle registration number etched into
each window glass by a Jaguar Retailer.
Mobile/Portable
Telephones
!WARNING:
Using a mobile/portable telephone
without an exterior antenna is not
recommended when driving as the
electro-magnetic fields produced can
cause malfunctions with the vehicle
electronic systems.
Check the laws and regulations on the
use of cellular telephones in the areas
where you drive. Always obey them. Also,
give full attention to driving.
Use hands-free operation (if fitted) and
pull off the road and park before making
or answering a call, if driving conditions
so require.
Page 18 of 227
Security and Locks 2 - 3
2 Security and Locks
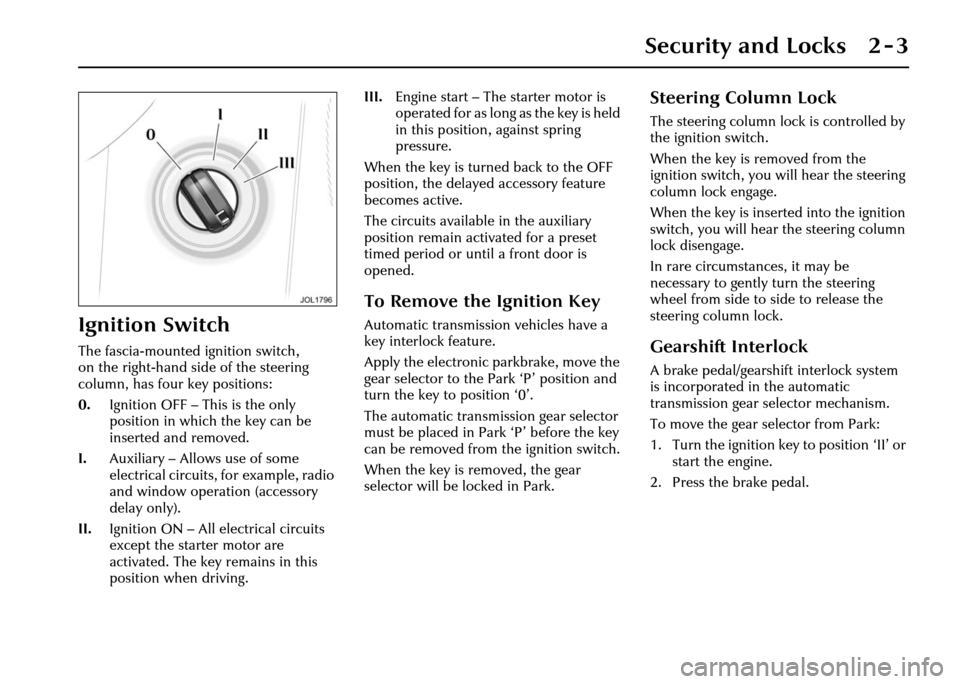
Ignition Switch
The fascia-mounted ignition switch,
on the right-hand side of the steering
column, has four key positions:
0.Ignition OFF – This is the only
position in which the key can be
inserted and removed.
I. Auxiliary – Allows use of some
electrical circuits, for example, radio
and window oper ation (accessory
delay only).
II. Ignition ON – All electrical circuits
except the starter motor are
activated. The key remains in this
position when driving. III.
Engine start – The starter motor is
operated for as long as the key is held
in this position, against spring
pressure.
When the key is turned back to the OFF
position, the delayed accessory feature
becomes active.
The circuits available in the auxiliary
position remain activated for a preset
timed period or until a front door is
opened.
To Remove the Ignition Key
Automatic transmissi on vehicles have a
key interlock feature.
Apply the electronic parkbrake, move the
gear selector to the Park ‘P’ position and
turn the key to position ‘0’.
The automatic transmis sion gear selector
must be placed in Park ‘P’ before the key
can be removed from the ignition switch.
When the key is removed, the gear
selector will be locked in Park.
Steering Column Lock
The steering column lock is controlled by
the ignition switch.
When the key is removed from the
ignition switch, you will hear the steering
column lock engage.
When the key is inserted into the ignition
switch, you will hear the steering column
lock disengage.
In rare circumstances, it may be
necessary to gently turn the steering
wheel from side to side to release the
steering column lock.
Gearshift Interlock
A brake pedal/gearshift interlock system
is incorporated in the automatic
transmission gear selector mechanism.
To move the gear selector from Park:
1. Turn the ignition key to position ‘II’ or start the engine.
2. Press the brake pedal.
Page 19 of 227
2 - 4 Security and Locks
Vehicle Security
When the vehicle is unoccupied or
unattended, you are advised to do the
following:
• Apply the electronic parkbrake and move the gear selector to the
Park ‘P’ position.
• Do not leave children or pets in the vehicle unattended.
• Do not leave luggage or valuables on display.
• Remove all keys, including remote transmitters, from the vehicle prior to
locking the doors, even when the
vehicle is in your garage.
• Close all windows, hood, luggage compartment and glove
compartment, and lock all the doors.
• Park the vehicle where it can be seen. At night, park in a well-lit area.
• It is important to keep your keys in safe places at all times. Leaving them
in conspicuous places is an invitation
for a thief to steal them and,
consequently, your vehicle or
belongings. Keep them as secure as
you would your wallet or purse, both
at home and away.
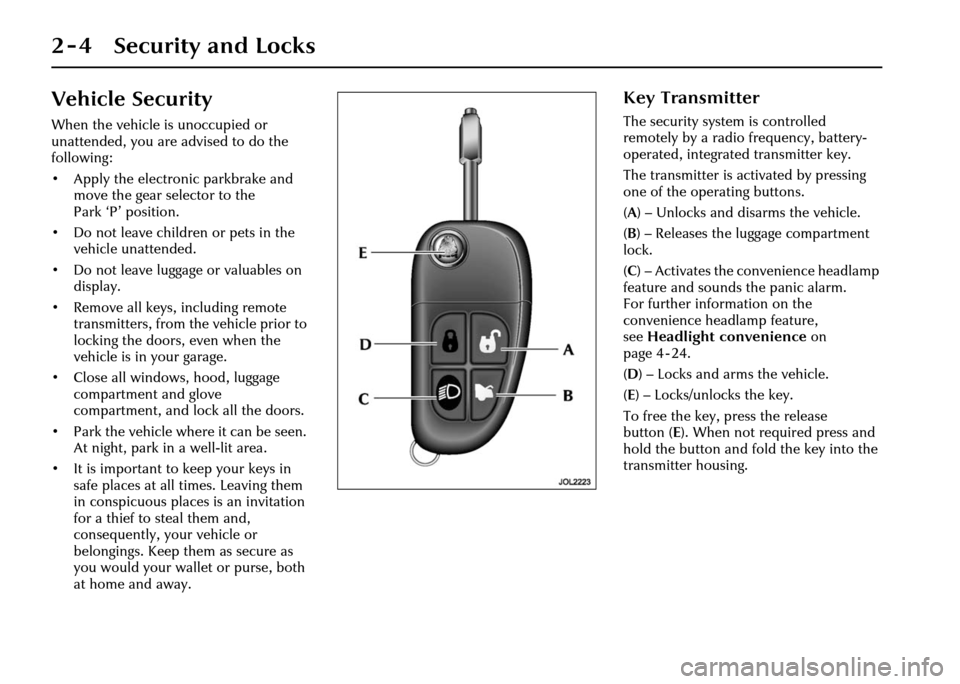
Key Transmitter
The security system is controlled
remotely by a radio frequency, battery-
operated, integrated transmitter key.
The transmitter is ac tivated by pressing
one of the operating buttons.
( A ) – Unlocks and disarms the vehicle.
( B ) – Releases the luggage compartment
lock.
( C ) – Activates the convenience headlamp
feature and sounds the panic alarm.
For further information on the
convenience headlamp feature,
see Headlight convenience on
page 4 - 24.
( D ) – Locks and arms the vehicle.
( E ) – Locks/unlocks the key.
To free the key, press the release
button ( E). When not required press and
hold the button and fold the key into the
transmitter housing.
Page 78 of 227
On the Road 4 - 7
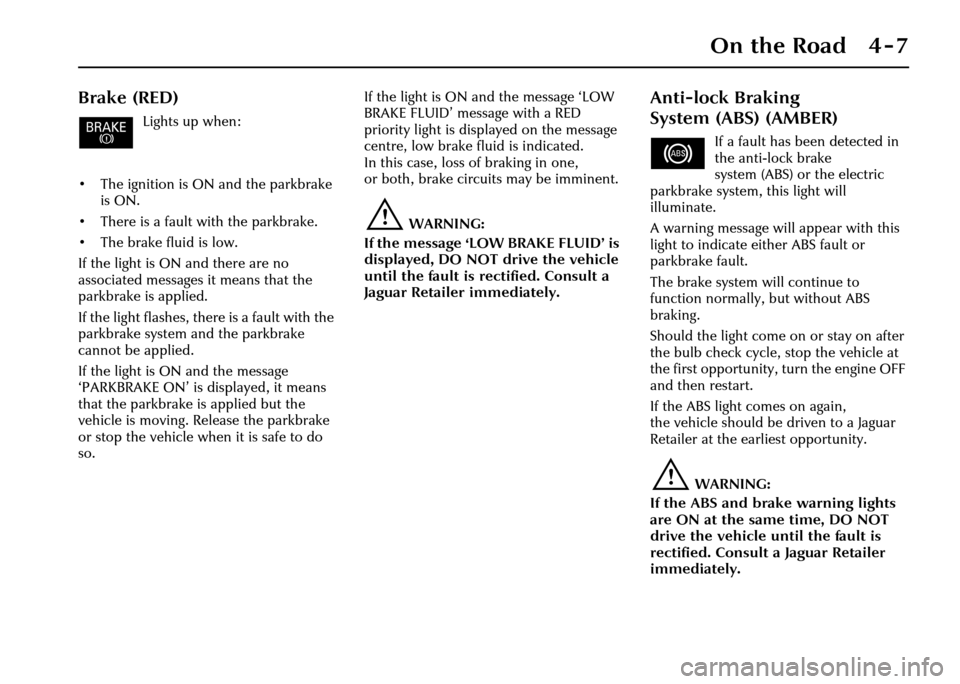
Brake (RED)
Lights up when:
• The ignition is ON and the parkbrake is ON.
• There is a fault with the parkbrake.
• The brake fluid is low.
If the light is ON and there are no
associated messages it means that the
parkbrake is applied.
If the light flashes, th ere is a fault with the
parkbrake system and the parkbrake
cannot be applied.
If the light is ON and the message
‘PARKBRAKE ON’ is displayed, it means
that the parkbrake is applied but the
vehicle is moving. Release the parkbrake
or stop the vehicle when it is safe to do
so. If the light is ON and the message ‘LOW
BRAKE FLUID’ message with a RED
priority light is displayed on the message
centre, low brake fluid is indicated.
In this case, loss of braking in one,
or both, brake circuits may be imminent.
!WARNING:
If the message ‘LOW BRAKE FLUID’ is
displayed, DO NOT drive the vehicle
until the fault is rectified. Consult a
Jaguar Retailer immediately.
Anti-lock Braking
System (ABS) (AMBER)
If a fault has been detected in
the anti-lock brake
system (ABS) or the electric
parkbrake system, this light will
illuminate.
A warning message will appear with this
light to indicate either ABS fault or
parkbrake fault.
The brake system will continue to
function normally, but without ABS
braking.
Should the light come on or stay on after
the bulb check cycle, stop the vehicle at
the first opportunity, turn the engine OFF
and then restart.
If the ABS light comes on again,
the vehicle should be driven to a Jaguar
Retailer at the earliest opportunity.
!WARNING:
If the ABS and brake warning lights
are ON at the same time, DO NOT
drive the vehicle until the fault is
rectified. Consult a Jaguar Retailer
immediately.
Page 82 of 227
On the Road 4 - 11
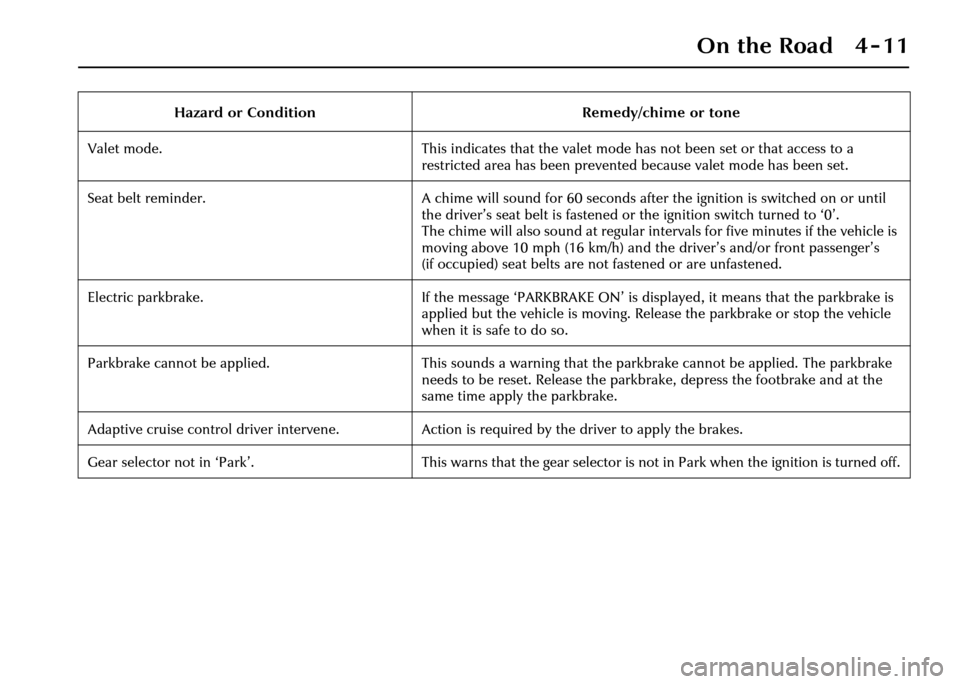
Hazard or ConditionRemedy/chime or tone
Valet mode. This indicates that the valet mode has not been set or that access to a
restricted area has been prevented because valet mode has been set.
Seat belt reminder. A chime will sound for 60 seconds after the ignition is switched on or until
the driver’s seat belt is fastened or the ignition switch turned to ‘0’.
The chime will also sound at regular intervals for five minutes if the vehicle is
moving above 10 mph (16 km/h) and the driver’s and/or front passenger’s
(if occupied) seat belts are not fastened or are unfastened.
Electric parkbrake. If the message ‘PARKBRAKE ON’ is displayed, it means that the parkbrake is
applied but the vehicle is moving. Release the parkbrake or stop the vehicle
when it is safe to do so.
Parkbrake cannot be applied. This sounds a warning that the parkbrake cannot be applied. The parkbrake
needs to be reset. Release the parkbrake, depress the footbrake and at the
same time apply the parkbrake.
Adaptive cruise control driver intervene. Action is required by the driver to apply the brakes.
Gear selector not in ‘Park’. This warns that the gear selector is not in Park when the ignition is turned off.
Page 90 of 227
On the Road 4 - 19
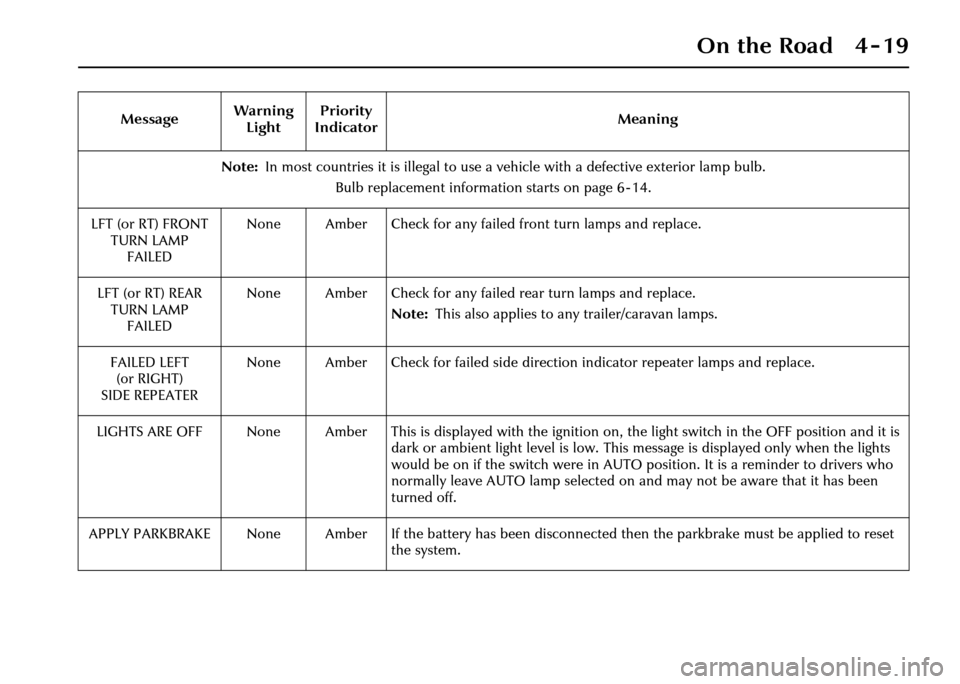
Note:In most countries it is illegal to use a ve hicle with a defective exterior lamp bulb.
Bulb replacement information starts on page 6 - 14.
LFT (or RT) FRONT TURN LAMPFAILED None Amber Check for any failed front turn lamps and replace.
LFT (or RT) REAR TURN LAMP FAILED None Amber Check for any failed rear turn lamps and replace.
Note:This also applies to any trailer/caravan lamps.
FAILED LEFT (or RIGHT)
SIDE REPEATER None Amber Check for failed side directio
n indicator repeater lamps and replace.
LIGHTS ARE OFF None Amber This is displayed with the igniti on on, the light switch in the OFF position and it is
dark or ambient light level is low. This message is displayed only when the lights
would be on if the switch were in AUTO position. It is a reminder to drivers who
normally leave AUTO lamp selected on and may not be aware that it has been
turned off.
APPLY PARKBRAKE None Amber If the battery has been discon nected then the parkbrake must be applied to reset
the system.
Message
Warning
Light Priority
Indicator Meaning
Page 91 of 227
4-20 On the Road
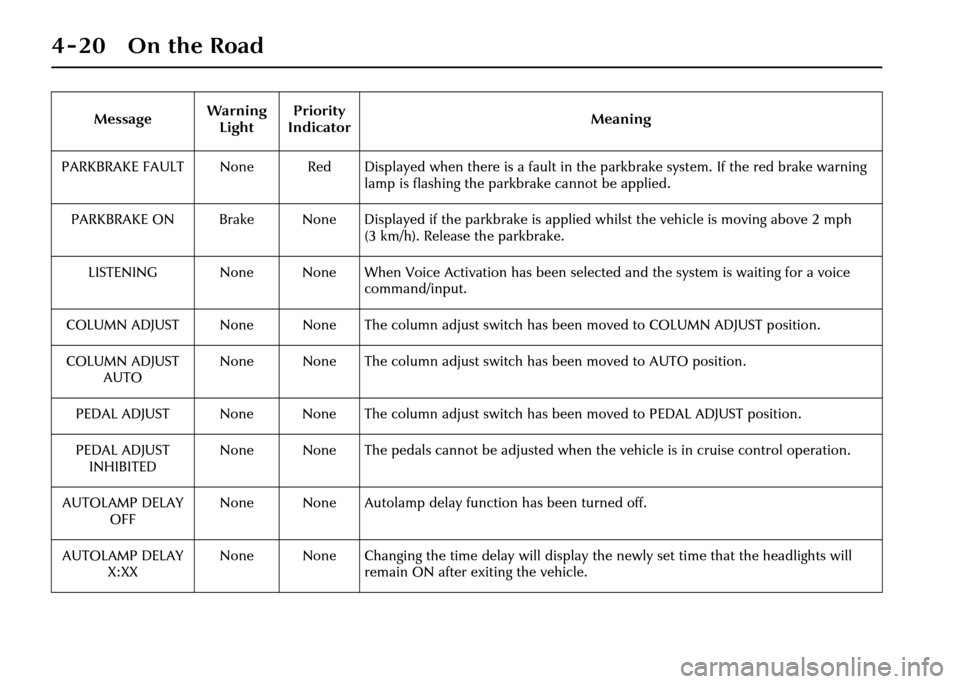
PARKBRAKE FAULT None Red Displayed when there is a fault in the parkbrake system. If the red brake warning lamp is flashing the parkbrake cannot be applied.
PARKBRAKE ON Brake None Displayed if the parkbrake is applied whil st the vehicle is moving above 2 mph
(3 km/h). Release the parkbrake.
LISTENING None None When Voice Activation has been selected and the system is waiting for a voice command/input.
COLUMN ADJUST None None The column adjust switch has been moved to COLUMN ADJUST position.
COLUMN ADJUST AUTO None None The column adjust switch
has been moved to AUTO position.
PEDAL ADJUST None None The column adjust switch has been moved to PEDAL ADJUST position.
PEDAL ADJUST INHIBITED None None The pedals cannot be adjusted when
the vehicle is in cruise control operation.
AUTOLAMP DELAY OFF None None Autolamp delay function has been turned off.
AUTOLAMP DELAY X:XX None None Changing the time delay will display
the newly set time that the headlights will
remain ON after exiting the vehicle.
Message
Warning
Light Priority
Indicator Meaning
Page 95 of 227
4-24 On the Road
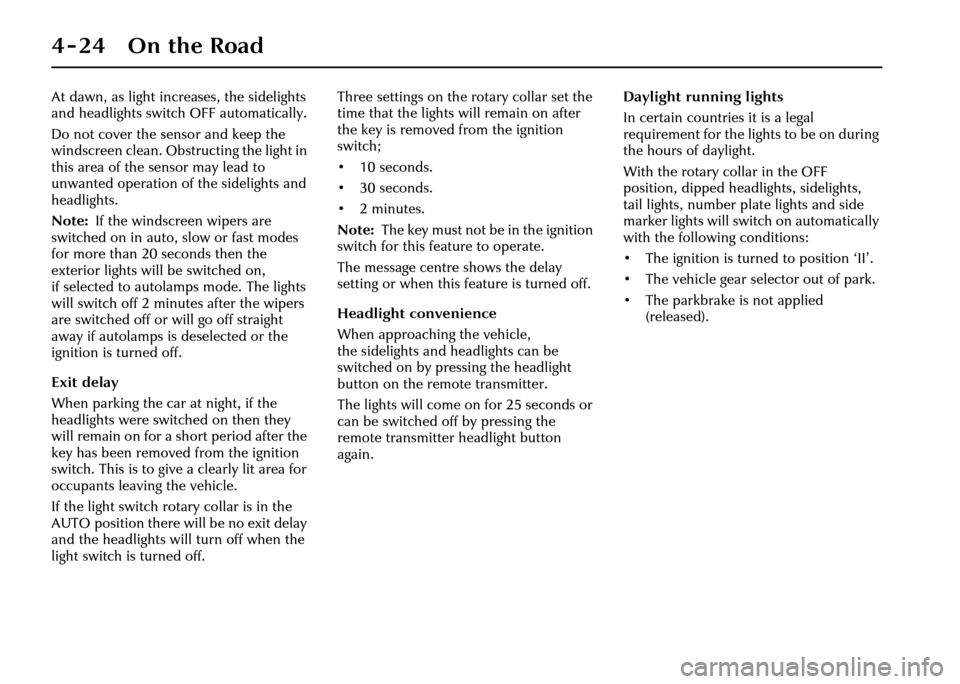
At dawn, as light increases, the sidelights
and headlights switch OFF automatically.
Do not cover the sensor and keep the
windscreen clean. Obstructing the light in
this area of the sensor may lead to
unwanted operation of the sidelights and
headlights.
Note:If the windscreen wipers are
switched on in auto, slow or fast modes
for more than 20 seconds then the
exterior lights will be switched on,
if selected to autolamps mode. The lights
will switch off 2 minutes after the wipers
are switched off or will go off straight
away if autolamps is deselected or the
ignition is turned off.
Exit delay
When parking the car at night, if the
headlights were switched on then they
will remain on for a short period after the
key has been removed from the ignition
switch. This is to give a clearly lit area for
occupants leaving the vehicle.
If the light switch rotary collar is in the
AUTO position there will be no exit delay
and the headlights will turn off when the
light switch is turned off. Three settings on the rotary collar set the
time that the lights will remain on after
the key is removed from the ignition
switch;
•10seconds.
•30seconds.
•2minutes.
Note:
The key must not be in the ignition
switch for this feature to operate.
The message centre shows the delay
setting or when this feature is turned off.
Headlight convenience
When approaching the vehicle,
the sidelights and headlights can be
switched on by pressing the headlight
button on the re mote transmitter.
The lights will come on for 25 seconds or
can be switched off by pressing the
remote transmitte r headlight button
again. Daylight running lights
In certain countries it is a legal
requirement for the lights to be on during
the hours of daylight.
With the rotary co
llar in the OFF
position, dipped headlights, sidelights,
tail lights, number plate lights and side
marker lights will switch on automatically
with the following conditions:
• The ignition is turned to position ‘II’.
• The vehicle gear se lector out of park.
• The parkbrake is not applied (released).