reset JAGUAR XJ6 1994 2.G Workshop Manual
[x] Cancel search | Manufacturer: JAGUAR, Model Year: 1994, Model line: XJ6, Model: JAGUAR XJ6 1994 2.GPages: 521, PDF Size: 17.35 MB
Page 55 of 521
€3 Cooling System (AJ16)
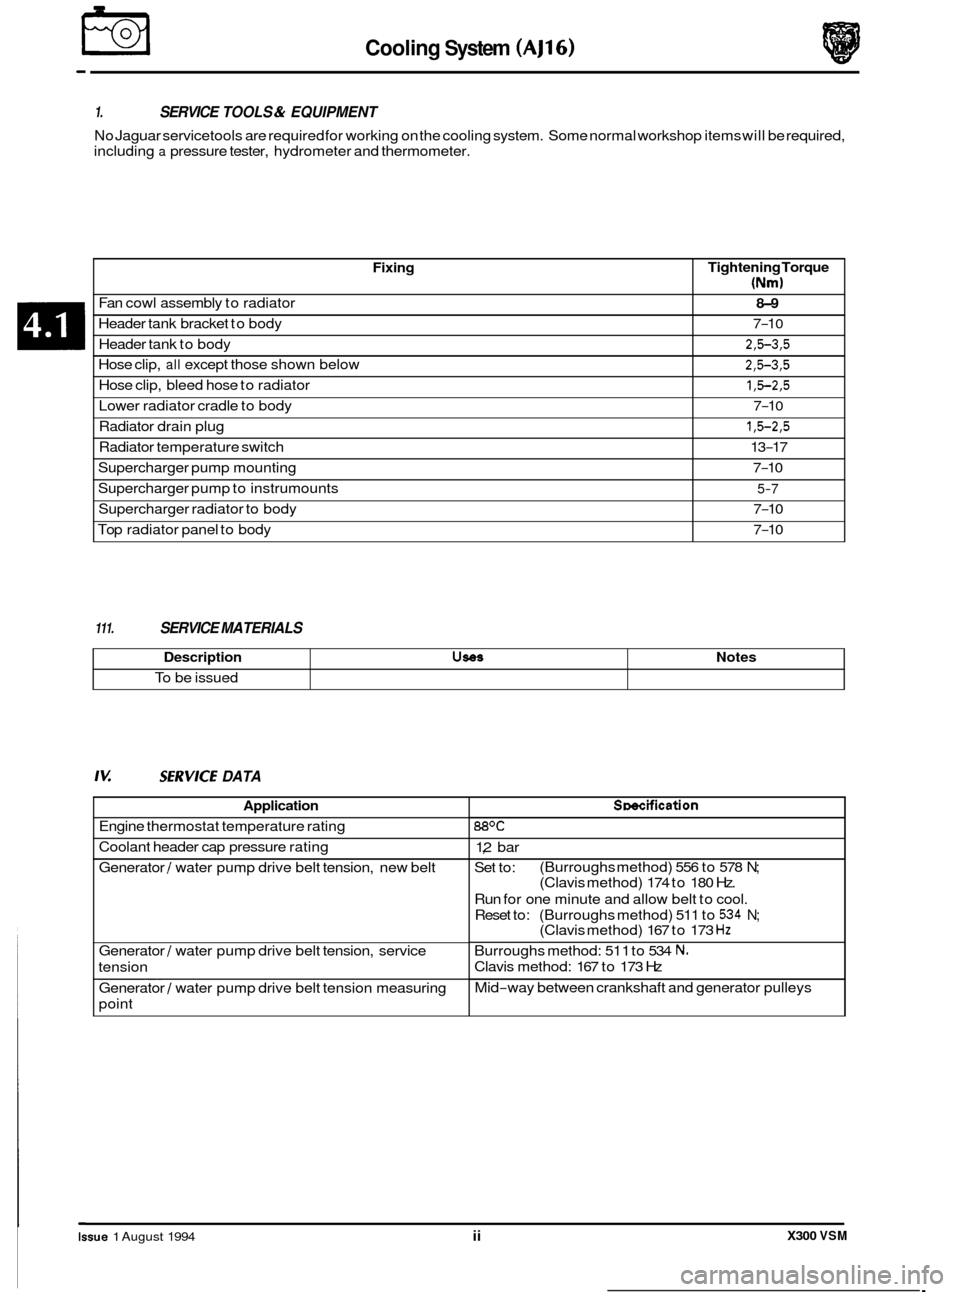
Fixing
Fan cowl assembly to radiator
Header tank bracket to body
Header tank to body
Hose clip,
all except those shown below
Hose clip, bleed hose to radiator
Radiator drain plug
Radiator temperature switch
Lower
radiator cradle to body
Supercharger pump mounting
Supercharger pump to instrumounts
Supercharger radiator to body
Top radiator panel to body
1. SERVICE TOOLS & EQUIPMENT
No Jaguar service tools are required for working on the cooling system. Some normal workshop items will be required,
including
a pressure tester, hydrometer and thermometer.
Tightening Torque
(Nm)
8-9
7-1 0
2,5-3,5
2,5-3,5
1,5-2,5
1,5-2,5
13-17
7
-1 0
7-10
5-7
7-10
7
-10
Description UseS
To be issued
111. SERVICE MATERIALS
Notes
Iv: SZRVICE DATA
Application
Engine thermostat temperature rating
Coolant header cap pressure rating
Generator
/ water pump drive belt tension, new belt
Generator
/ water pump drive belt tension, service
tension
_____ ~~ Generator / water
pump drive belt tension measuring
point
Smcification
88OC
1,2 bar
Set to:
Run for one minute and allow belt to cool.
Reset to: (Burroughs method) 511 to
534 N;
Burroughs method: 51 1 to 534 N.
Clavis method: 167 to 173 Hz
Mid
-way between crankshaft and generator pulleys
(Burroughs method)
556 to 578
N;
(Clavis method) 174 to 180 Hz.
(Clavis method) 167 to 173
Hz
0
0
0
0
X300 VSM Issue 1 August 1994 ii
Page 65 of 521
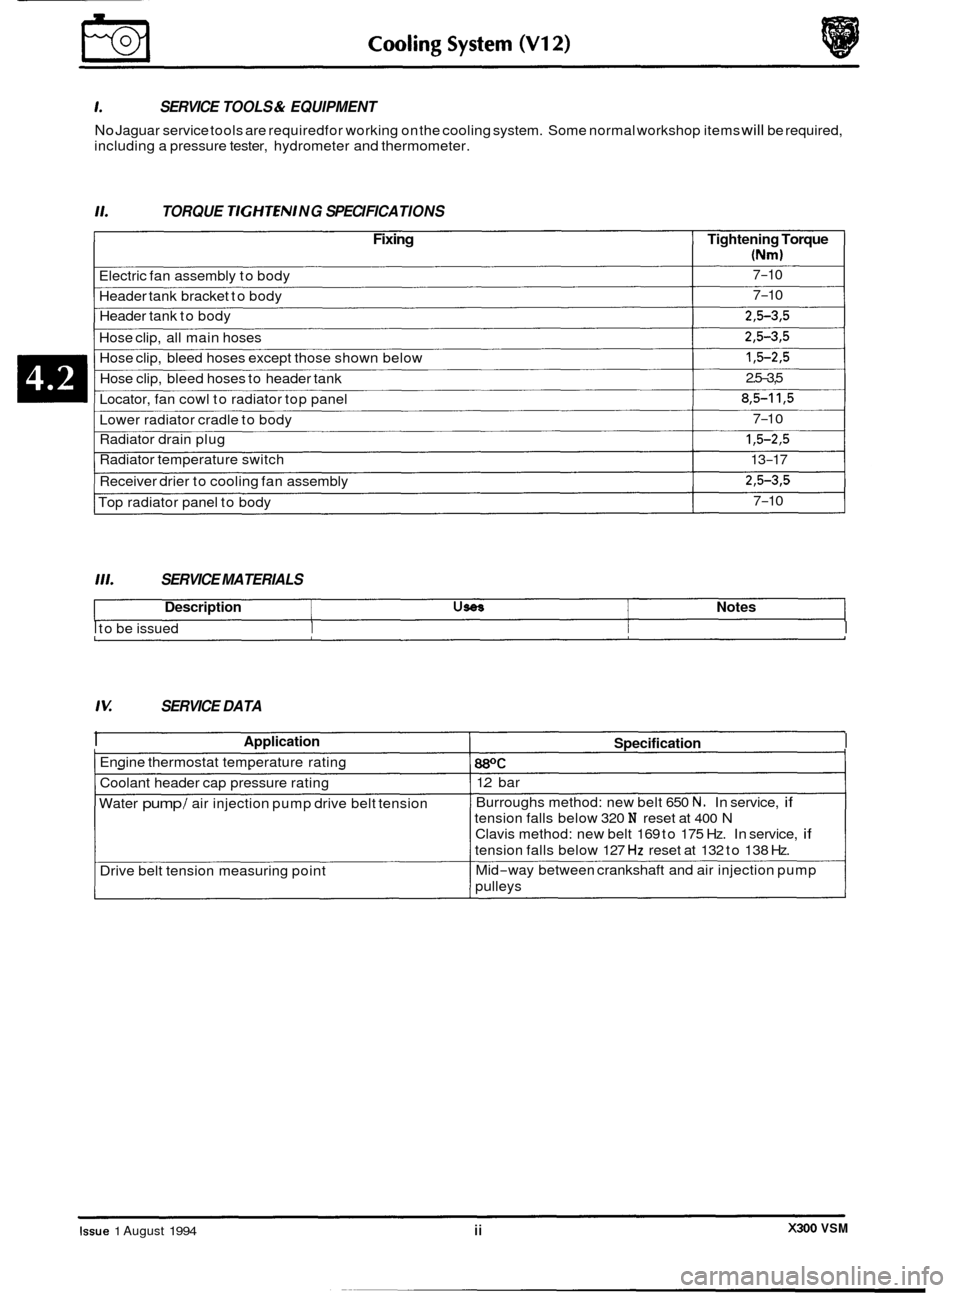
Lower radiator cradle to body
Radiator drain plug
1,5-2,5
Radiator temperature switch 13-17
Receiver drier to cooling fan assembly
Top radiator panel to body 7
-1 0
2,5-3,5
7-10
111. SERVICE
MATERIALS
Description USeS Notes
I to be issued I I I
0
SERVICE TOOLS & EQUIPMENT
No Jaguar service tools are required for working on the cooling system. Some normal workshop items will be required,
including a pressure tester, hydrometer and thermometer.
TORQUE TIGHTEN/ NG SPECI FICA TIONS
Fixing Tightening Torque
(Nm)
Electric fan assembly to body
Header tank bracket to body 7-10
7-10
Header tank to body
2,5-3,5
Hose clip, bleed hoses except those shown below 13-2.5
Hose clip, all main hoses 2,5-3,5
Hose clip, bleed hoses to header tank
Locator, fan cowl to radiator top panel 2.5-3,5
8,5-11,5
0
0
/U SERVICE
DATA
I Application
I Engine thermostat temperature rating
I Coolant header cap pressure rating
Water
pump / air injection pump drive belt tension
Drive belt tension measuring point
Specification I
88OC I
1.2 bar
Burroughs method: new belt 650
N. In service, if
tension falls below 320 N reset at 400 N
Clavis method: new belt 169 to 175 Hz. In service, if
tension falls below 127 Hz reset at 132 to 138 Hz.
Mid
-way between crankshaft and air injection pump
pulleys
X300 VSM Issue 1 August 1994 ii
Page 199 of 521
@ Steering
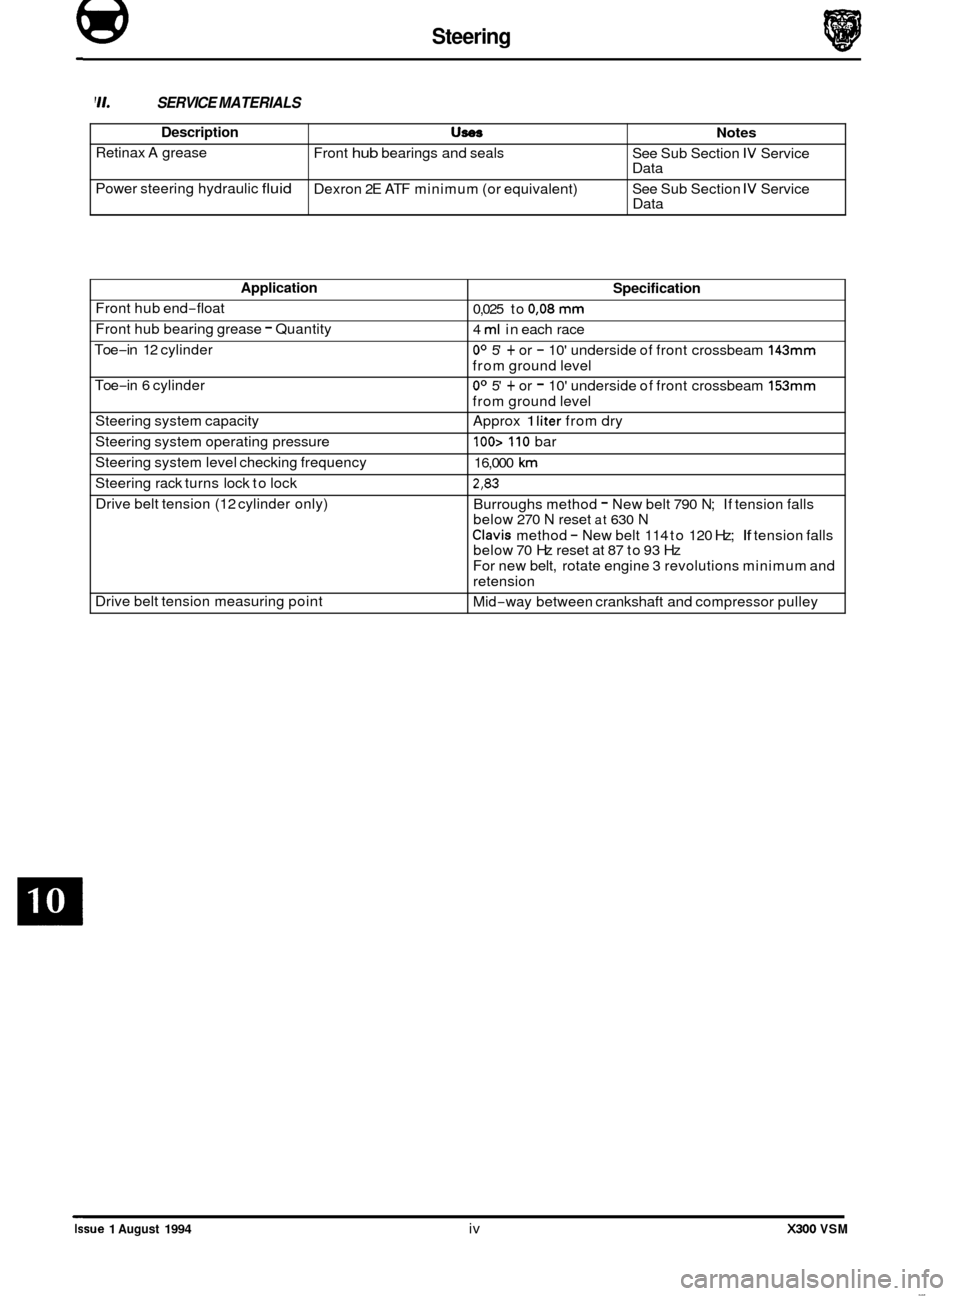
Description
Retinax A grease
Power steering hydraulic
fluid
'11. SERVICE MATERIALS
U- Notes
Front hub bearings and seals
Dexron 2E ATF minimum (or equivalent) See
Sub Section IV Service
Data
See Sub Section
IV Service
Data
Application
Front hub end-float
Front hub bearing grease
- Quantity
Toe
-in 12 cylinder
Toe
-in 6 cylinder
Steering system capacity
Steering system operating pressure
Steering system level checking frequency
Drive belt tension (12 cylinder only)
Steering
rack turns lock to lock
Drive belt tension measuring point
Specification
0,025 to 0,08 mm
4 ml in each race
Oo 5' + or - 10' underside of front crossbeam 143mm
from ground level
Oo 5' + or - 10' underside of front crossbeam 153mm
from ground level
Approx
1 liter from dry
100> 110 bar
16,000
km
2,83
Burroughs method - New belt 790 N; If tension falls
below 270 N reset at 630 N
Clavis method - New belt 114 to 120 Hz; If tension falls
below 70 Hz reset at 87 to 93 Hz
For new belt, rotate engine 3 revolutions minimum and
retension
Mid
-way between crankshaft and compressor pulley
Issue 1 August 1994 iv X300 VSM
Page 205 of 521
@ Steering
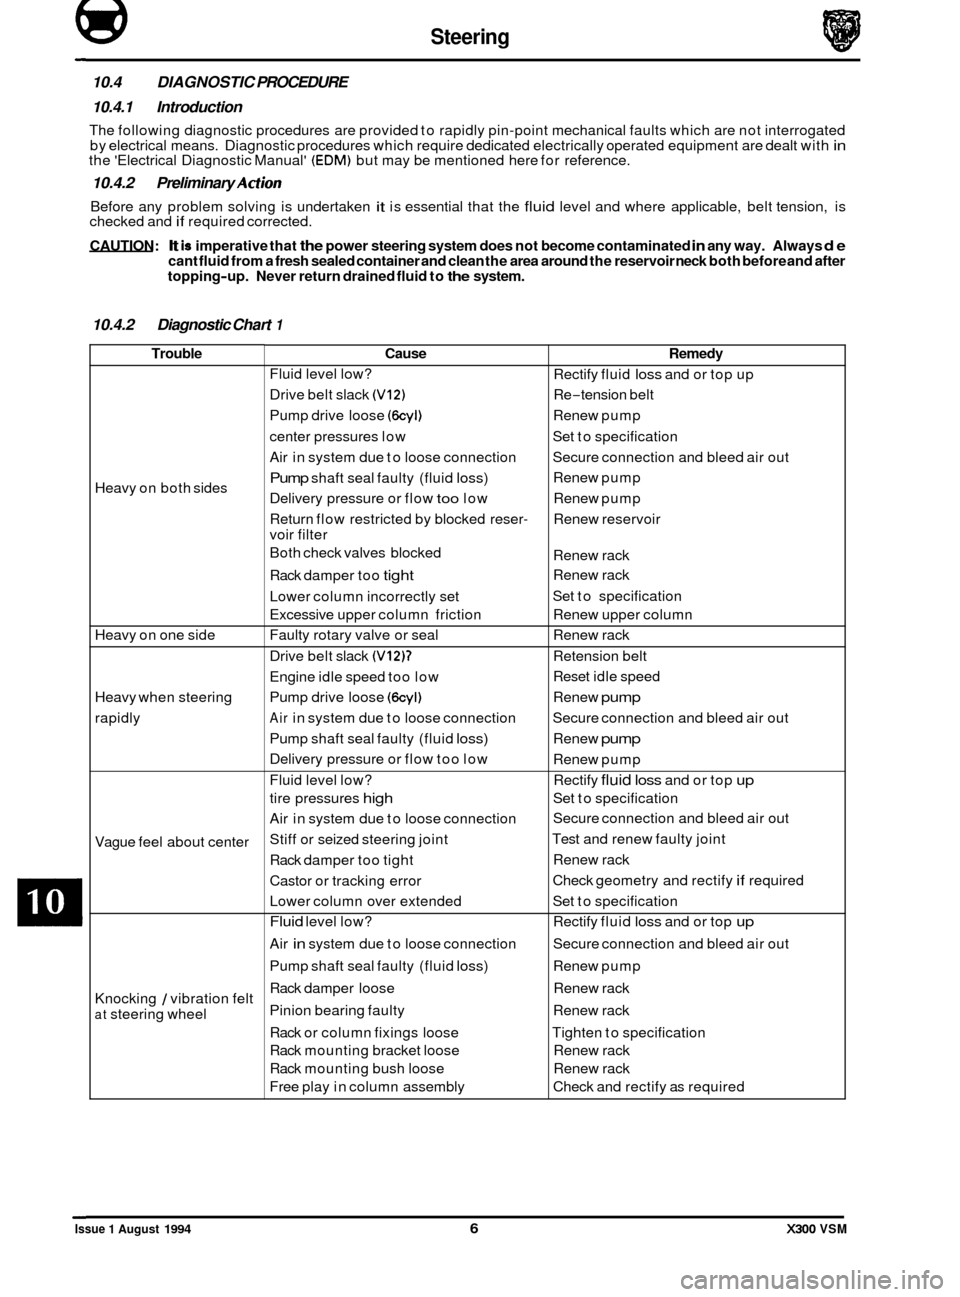
Cause
Fluid level low?
Drive belt slack
(V12)
Pump drive loose (6cyl)
center pressures low
Air in system due to loose connection
Pump shaft seal faulty (fluid loss)
Delivery pressure or flow too low
Return flow restricted by blocked reser
-
voir filter
Both check valves blocked
Rack damper too
tight
Lower column incorrectly set
Excessive upper column friction
Faulty rotary valve or seal
Drive belt slack
(VI217
Engine idle speed too low
Pump drive loose
(6cyl)
Air in system due to loose connection
Pump shaft seal faulty (fluid
loss)
Delivery pressure or flow too low
Fluid level low?
tire pressures
high
Air in system due to loose connection
Stiff or seized steering joint
Rack damper too tight
Castor or tracking error
Lower column over extended
Fluid level low?
Air
in system due to loose connection
Pump shaft seal faulty (fluid
loss)
Rack damper loose
Pinion bearing faulty
Rack or column fixings loose
Rack mounting bracket loose
Rack mounting bush loose
Free play in column assembly
10.4 DIAGNOSTIC PROCEDURE
10.4.1 Introduction
The following diagnostic procedures are provided to rapidly pin-point mechanical faults which are not interrogated
by electrical means. Diagnostic procedures which require dedicated electrically operated equipment are dealt with in the 'Electrical Diagnostic Manual' (EDM) but may be mentioned here for reference.
10.4.2 Preliminary Action
Before any problem solving is undertaken it is essential that the fluid level and where applicable, belt tension, is
checked and if required corrected.
CAUTION: It is imperative that the power steering system does not become contaminated in any way. Always de cant fluid from a fresh sealed container and clean the area around the reservoir neck both before and after
topping-up. Never return drained fluid to the system.
10.4.2 Diagnostic Chart 1
Remedy
Rectify fluid loss and or top up
Re
-tension belt
Renew pump
Set to specification
Secure connection and bleed air out
Renew pump
Renew pump
Renew reservoir
Renew rack
Renew rack
Set to specification
Renew upper column
Renew rack
Retension belt
Reset idle speed
Renew
pump
Secure connection and bleed air out
Renew
pump
Renew pump
Rectify
fluid loss and or top up
Set to specification
Secure connection and bleed air out
Test and renew faulty joint
Renew rack
Check geometry and rectify
if required
Set to specification
Rectify fluid
loss and or top up
Secure connection and bleed air out
Renew pump
Renew rack
Renew rack
Tighten to specification
Renew rack
Renew rack
Check and rectify as required
Trouble
Heavy on both sides
Heavy on one side
Heavy when steering
rapidly
Vague feel about center
Knocking
1 vibration felt
at steering wheel
0
0
0
0
Issue 1 August 1994 6 X300 VSM
Page 312 of 521
Climate Control Systems
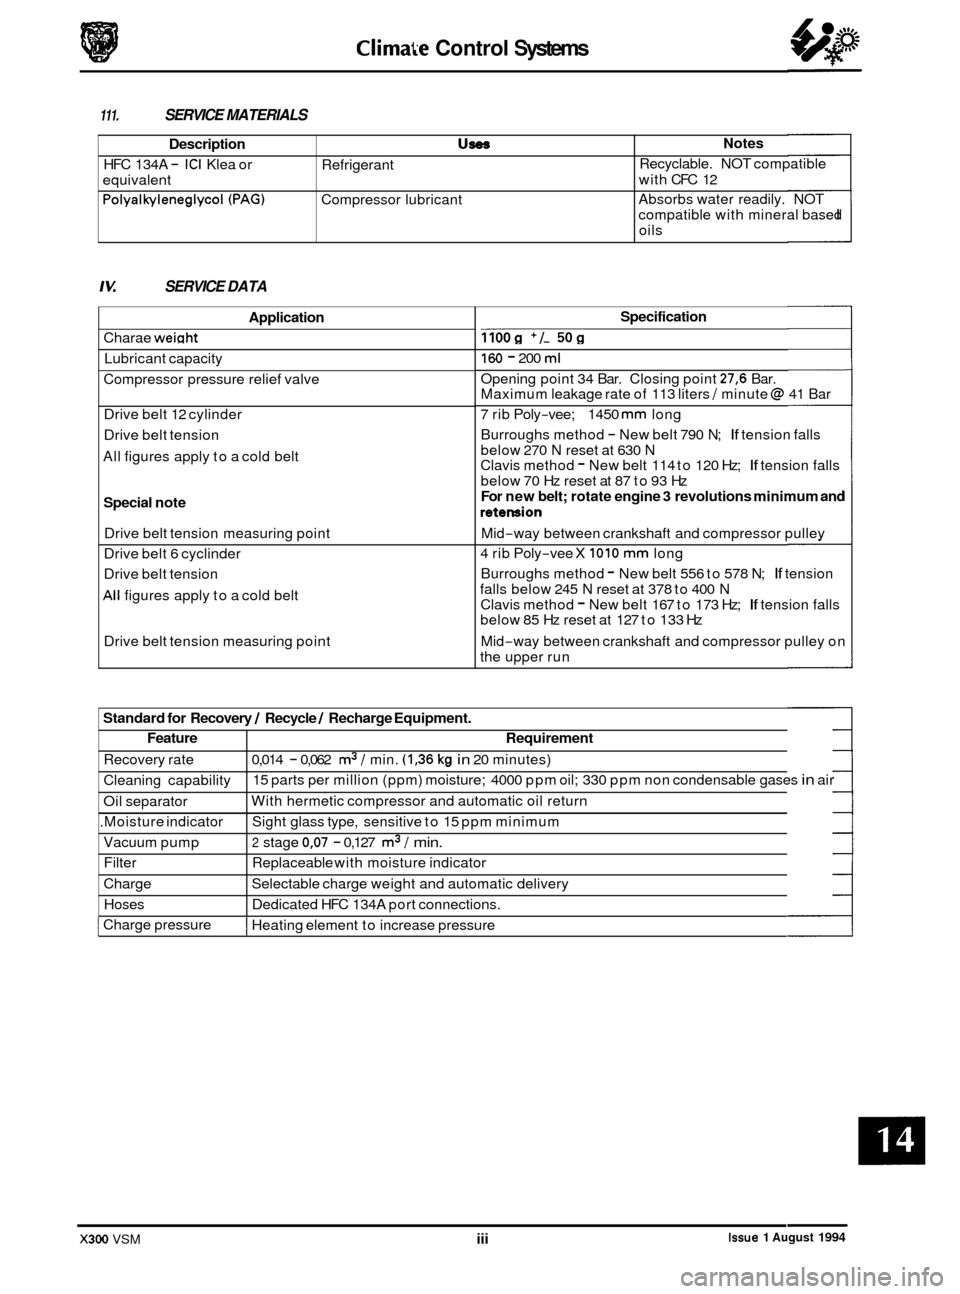
Description U-
HFC 134A - ICI Klea or
equivalent
Polyalkyleneglycol (PAG) Compressor lubricant
Refrigerant
111.
Notes
Recyclable. NOT
compatible
with CFC 12
Absorbs water readily. NOT
compatible with mineral based
oils
SERVICE MATERIALS
Standard for Recovery I Recycle 1 Recharge Equipment.
Recovery rate
Cleaning capability
Oil separator
.Moisture indicator
Vacuum pump
Filter Replaceable with moisture indicator
Charge Hoses
Feature Requirement
0,014 - 0,062 m3 / min. (1,36 kg in 20 minutes)
15 parts per million (ppm) moisture; 4000 ppm oil; 330 ppm non condensable gases
in air
With hermetic compressor and automatic oil return
Sight glass type, sensitive to 15 ppm minimum
2 stage 0,07 - 0,127 m3 I min.
Selectable charge weight and automatic delivery
Dedicated HFC 134A port connections.
Iv. SERVICE DATA
Application
Charae weight
Lubricant capacity
Compressor pressure relief valve
Drive belt 12 cylinder
Drive belt tension
All figures apply to a cold belt
Special note
Drive belt tension measuring point
Drive belt 6 cyclinder
Drive belt tension
All figures apply to a cold belt
Drive belt tension measuring point
Specification
160 - 200 ml
Opening point 34 Bar. Closing point 27,6 Bar.
Maximum leakage rate of 113 liters 1 minute @ 41 Bar
7 rib Poly
-vee; 1450 mm long
Burroughs method
- New belt 790 N; If tension falls
below 270 N reset at 630 N
Clavis method
- New belt 114 to 120 Hz; If tension falls
below 70 Hz reset at 87 to 93 Hz
For new belt; rotate engine 3 revolutions minimum and
retension
Mid-way between crankshaft and compressor pulley ~
4
rib Poly-vee X 1010 mm long
Burroughs method
- New belt 556 to 578 N; If tension
falls below 245 N reset at 378 to 400
N
Clavis method - New belt 167 to 173 Hz; If tension falls
below 85 Hz reset at 127 to 133 Hz
Mid
-way between crankshaft and compressor pulley on
the upper run
1 Charge pressure I Heating element to increase pressure
Issue 1 August 1994 X300 VSM iii
Page 345 of 521
rl Electrical
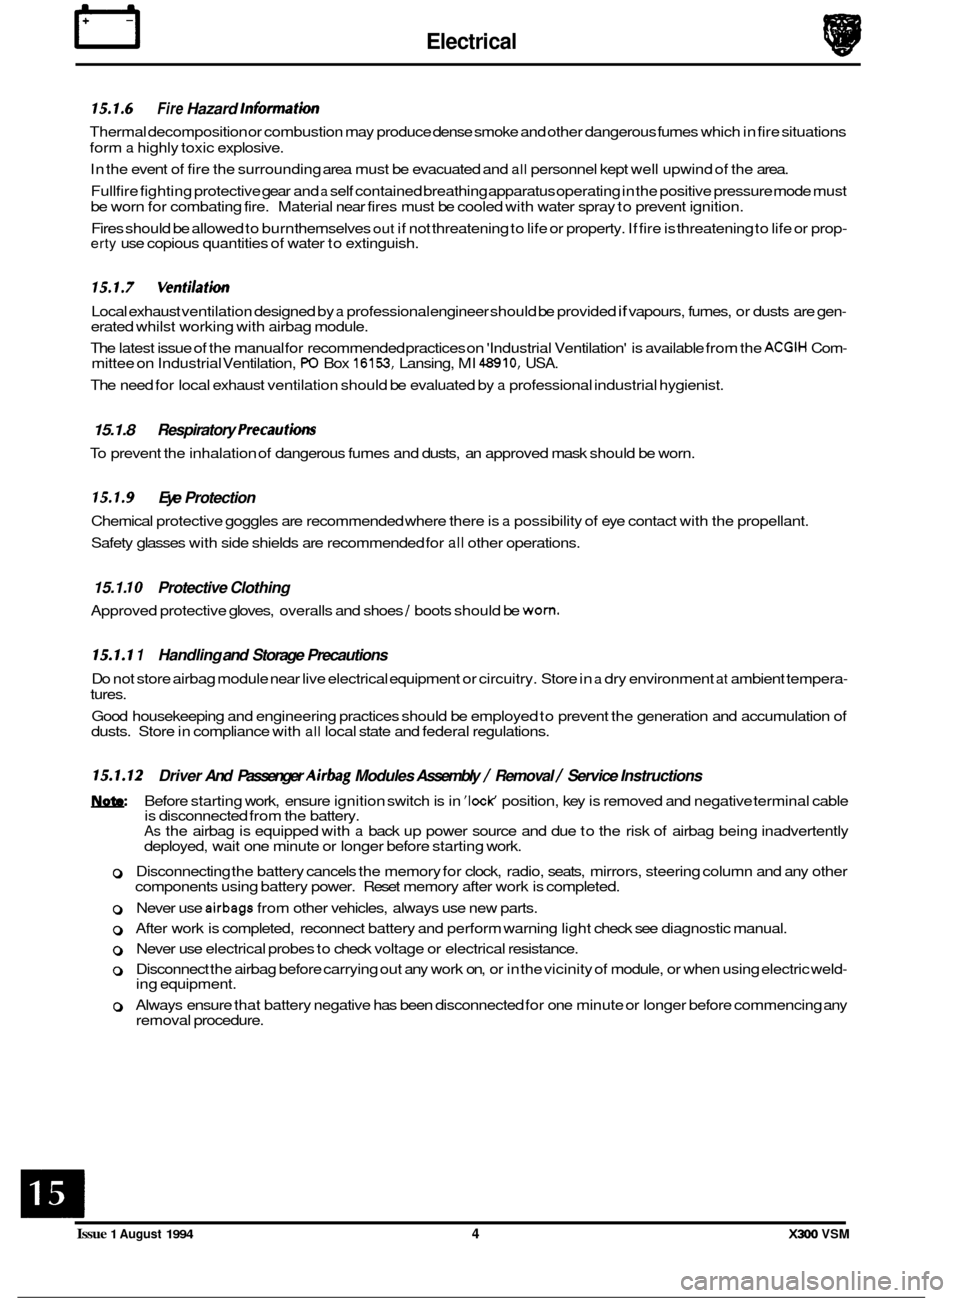
15.1.6 Fire Hazard Infonnath
Thermal decomposition or combustion may produce dense smoke and other dangerous fumes which in fire situations
form
a highly toxic explosive.
In the event of fire the surrounding area must be evacuated and
all personnel kept well upwind of the area.
Full fire fighting protective gear and
a self contained breathing apparatus operating in the positive pressure mode must
be worn for combating fire. Material near fires must be cooled with water spray to prevent ignition.
Fires should be allowed to burn themselves
out if not threatening to life or property. If fire is threatening to life or prop- erty use copious quantities of water to extinguish.
15.1.7 Ventilath
Local exhaust ventilation designed by a professional engineer should be provided if vapours, fumes, or dusts are gen- erated whilst working with airbag module.
The latest issue of the manual for recommended practices on 'Industrial Ventilation' is available from the
ACGIH Com- mittee on Industrial Ventilation, PO Box 16153, Lansing, MI 48910, USA.
The need for local exhaust ventilation should be evaluated by a professional industrial hygienist.
15.1.8 Respiratory Precauth
To prevent the inhalation of dangerous fumes and dusts, an approved mask should be worn.
15.1.9 Eye Protection
Chemical protective goggles are recommended where there is a possibility of eye contact with the propellant.
Safety glasses with side shields are recommended for
all other operations.
15.1. I0 Protective Clothing
Approved protective gloves, overalls and shoes / boots should be worn.
15.1.1 1 Handling and Storage Precautions
Do not store airbag module near live electrical equipment or circuitry. Store in a dry environment at ambient tempera-
tures.
Good housekeeping and engineering practices should be employed to prevent the generation and accumulation of
dusts. Store in compliance with
all local state and federal regulations.
15.1.12 Driver And Passenger Airbag Modules Assembly / Removal / Service Instructions
Before starting work, ensure ignition switch is in 'IocK position, key is removed and negative terminal cable
is disconnected from the battery.
As the airbag is equipped with a back up power source and due to the risk of airbag being inadvertently
deployed, wait one minute or longer before starting work.
0 Disconnecting the battery cancels the memory for clock, radio, seats, mirrors, steering column and any other
components using battery power. Reset memory after work is completed.
0 Never use airbags from other vehicles, always use new parts.
0 After work is completed, reconnect battery and perform warning light check see diagnostic manual.
0 Never use electrical probes to check voltage or electrical resistance.
0 Disconnect the airbag before carrying out any work on, or in the vicinity of module, or when using electric weld- ing equipment.
0 Always ensure that battery negative has been disconnected for one minute or longer before commencing any
removal procedure.
EB
Issue 1 August 1994 4 X300 VSM
Page 428 of 521
0
0
0
Body Systems Body Repair
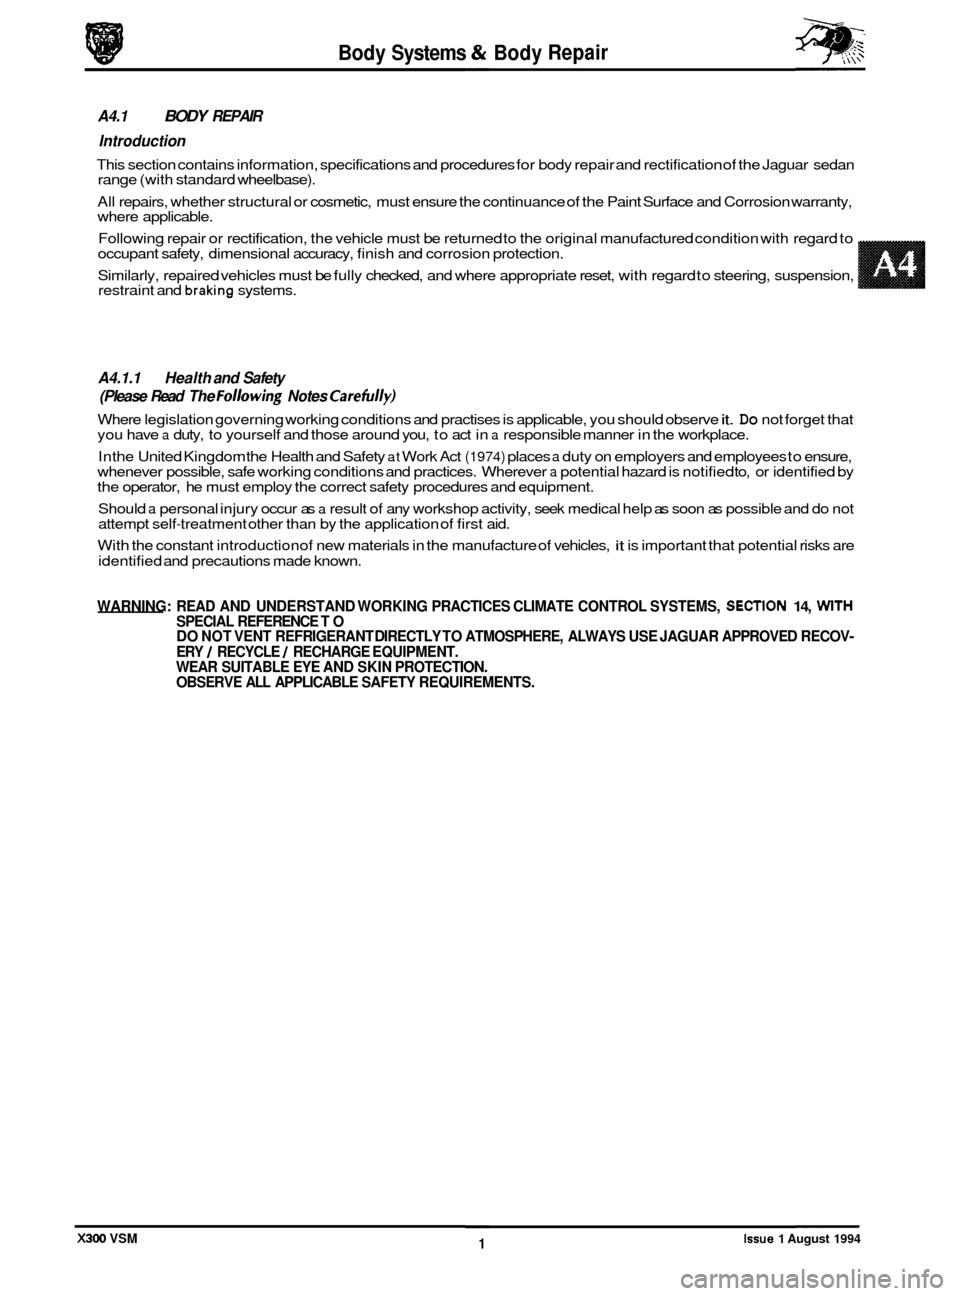
A4.1 BODY REPAIR
Introduction
This section contains information, specifications and procedures for body repair and rectification of the Jaguar sedan
range (with standard wheelbase).
All repairs, whether structural or cosmetic, must ensure the continuance of the Paint Surface and Corrosion warranty,
where applicable.
Following repair or rectification, the vehicle must be returned to the original manufactured condition with regard to
occupant safety, dimensional accuracy, finish and corrosion protection.
Similarly, repaired vehicles must be fully checked, and where appropriate reset, with regard to steering, suspension,
restraint and
braking systems.
A4.1.1 Health and Safety
(Please Read The
Fol/owing Notes Carethlly)
Where legislation governing working conditions and practises is applicable, you should observe it. Do not forget that
you have a duty, to yourself and those around you, to act in a responsible manner in the workplace.
In the United Kingdom the Health and Safety
at Work Act (1974) places a duty on employers and employees to ensure,
whenever possible, safe working conditions and practices. Wherever a potential hazard is notified to, or identified by
the operator, he must employ the correct safety procedures and equipment.
Should
a personal injury occur as a result of any workshop activity, seek medical help as soon as possible and do not
attempt self-treatment other than by the application of first aid.
With the constant introduction of new materials in the manufacture of vehicles,
it is important that potential risks are
identified and precautions made known.
WARNING: READ AND UNDERSTAND WORKING PRACTICES CLIMATE CONTROL SYSTEMS, SECTION 14, WITH SPECIAL REFERENCE TO
ERY
/ RECYCLE / RECHARGE EQUIPMENT.
WEAR SUITABLE EYE AND SKIN PROTECTION.
OBSERVE ALL APPLICABLE SAFETY REQUIREMENTS.
DO
NOT VENT REFRIGERANT DIRECTLY TO ATMOSPHERE, ALWAYS USE JAGUAR APPROVED RECOV
-
Issue 1 August 1994 1 X300 VSM
Page 470 of 521
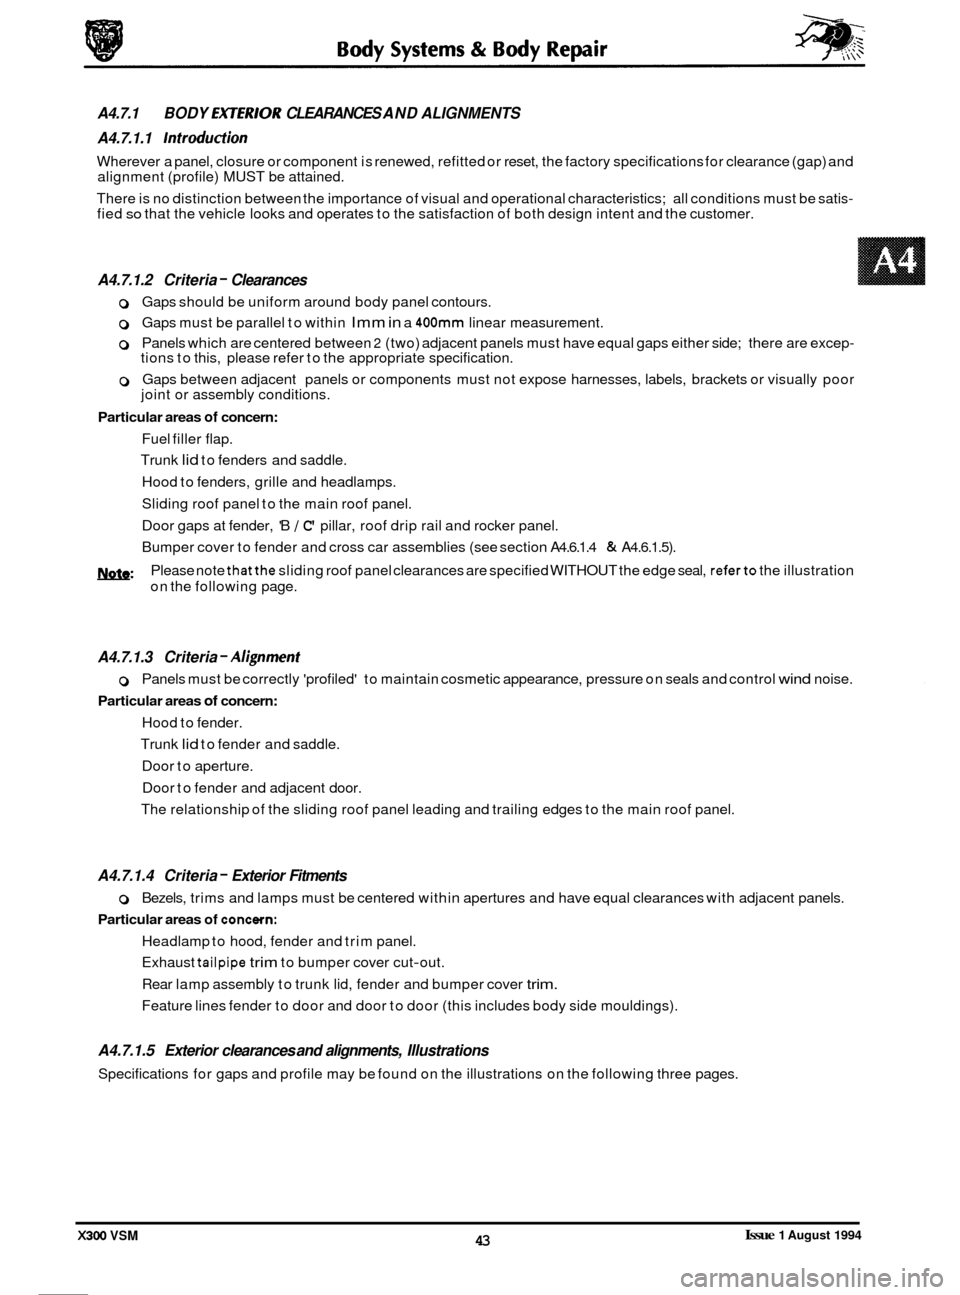
0 Gaps should be uniform around body panel contours.
0 Gaps must be parallel to within Imm in a 400mm linear measurement.
0 Panels which are centered between 2 (two) adjacent panels must have equal gaps either side; there are excep- tions to this, please refer to the appropriate specification.
0 Gaps between adjacent panels or components must not expose harnesses, labels, brackets or visually poor
joint or assembly conditions.
Particular areas of concern:
Fuel filler flap.
Trunk
lid to fenders and saddle.
Hood to fenders, grille and headlamps.
Sliding roof panel to the main roof panel.
Door gaps at fender, 'B
/ C' pillar, roof drip rail and rocker panel.
Bumper cover to fender and cross car assemblies (see section A4.6.1.4
& A4.6.1.5).
m: Please note thatthe sliding roof panel clearances are specified WITHOUT the edge seal, referto the illustration
on the following page.
A4.7.1.3 Criteria - A1;gnment
0 Panels must be correctly 'profiled' to maintain cosmetic appearance, pressure on seals and control wind noise.
Particular areas of concern:
Hood to fender.
Trunk
lid to fender and saddle.
Door to aperture.
Door to fender and adjacent door.
The relationship of the sliding roof panel leading and trailing edges to the main roof panel.
A4.7.1.4 Criteria - Exterior Fitments
Particular areas of concewn:
0 Bezels, trims and lamps must be centered within apertures and have equal clearances with adjacent panels.
Headlamp to hood, fender and trim panel.
Exhaust
tailpipe trim to bumper cover cut-out.
Rear lamp assembly to trunk lid, fender and bumper cover
trim.
Feature lines fender to door and door to door (this includes body side mouldings).
A4.7.1.5 Exterior clearances and alignments, Illustrations
Specifications for gaps and profile may be found on the illustrations on the following three pages.
A4.7.1
A4.7.1.1
Introduction
Wherever a panel, closure or component is renewed, refitted or reset, the factory specifications for clearance (gap) and
alignment (profile) MUST be attained.
There is no distinction between the importance of visual and operational characteristics; all conditions must be satis
- fied so that the vehicle looks and operates to the satisfaction of both design intent and the customer.
BODY EX7ERlOR CLEARANCES AND ALIGNMENTS
A4.7.1.2 Criteria
- Clearances
Issue 1 August 1994 43 X300 VSM