tow JAGUAR XJ6 1994 2.G Workshop Manual
[x] Cancel search | Manufacturer: JAGUAR, Model Year: 1994, Model line: XJ6, Model: JAGUAR XJ6 1994 2.GPages: 521, PDF Size: 17.35 MB
Page 30 of 521
.
e
SECTION CONTENTS
Sub-section Title
i ................ Preliminary Page ............................................
2.1 .............. Jacking And Lifting ...........................................
2.1.1 ............. Jacking And Lifting. Safety Precautions ..........................
2.1.2 ............. Jacking And Lifting. Jacking Points ..............................
2.1.3 ............. Jacking And Lifting. Wheel Free Lift .............................
2.1.4 ............. Jacking And Lifting. Workshop Jacks ............................
2.1.4.1 ........... Jacking And Lifting. Workshop Jacks. Front - One Wheel ...........
2.1.4.2 ........... Jacking And Lifting. Workshop lacks. Front - Both Wheels ..........
2.1.4.3 ........... Jacking And Lifting. Workshop Jacks. Rear - Both Wheels ...........
2.2 .............. Vehicle Recovery ............................................
2.2.1. ............ Vehicle Recovery, General .....................................
2.2.2 .............
2.2.3 ............. Vehicle Recovery, Gear-shift Interlock - Manual Override .........
2.2.4 ............. Vehicle Recovery, Transporting .................................
2.2.5 ............. Vehicle Recovery, Towing Recovery .............................
2.2.6 ............. Vehicle Recovery, Vehicles With Defective Automatic Transmission ..
2.2.7. ............ Vehicle Recovery, Suspended Towing ...........................
2.2.8. ............ Vehicle Recovery, Rear Suspended Tow ..........................
Vehicle Recovery, Gear-shift Interlock ..........................
..
..
..
..
..
..
..
..
..
..
..
..
..
..
..
..
..
..
X300 VSM i
SRO
......
......
......
......
......
......
......
......
......
......
......
......
......
......
......
......
......
......
.
......
......
......
......
......
......
......
......
......
......
......
......
......
......
......
......
......
......
......
......
......
......
......
......
......
......
......
......
......
......
......
......
......
......
......
......
. Issue 1
Page
.... i
.... i
.... 1
.... 1
.... 1
.... 2
.... 2
.... 2
.... 2
.... 3
.... 3
.... 3
.... 3
.... 4
.... 4
.... 4
.... 5
.... 5
August 1994
Page 34 of 521
2.2 VEHICLE RECOVERY
8 2.2.1 General
m: Prior to vehicle recovery, always ensure the vehicle
keys are available and the vehicle security system is
'OFF'.
The safest and preferred method of vehicle recovery is by
flat bed transporter, although a rear suspended tow may
also be used.
The front and rear towing eyes are provided for use only in
an emergency to move the vehicle
if it is causing an
obstruction, on police instructions, or, when winching the
vehicle onto a recovery transporter.
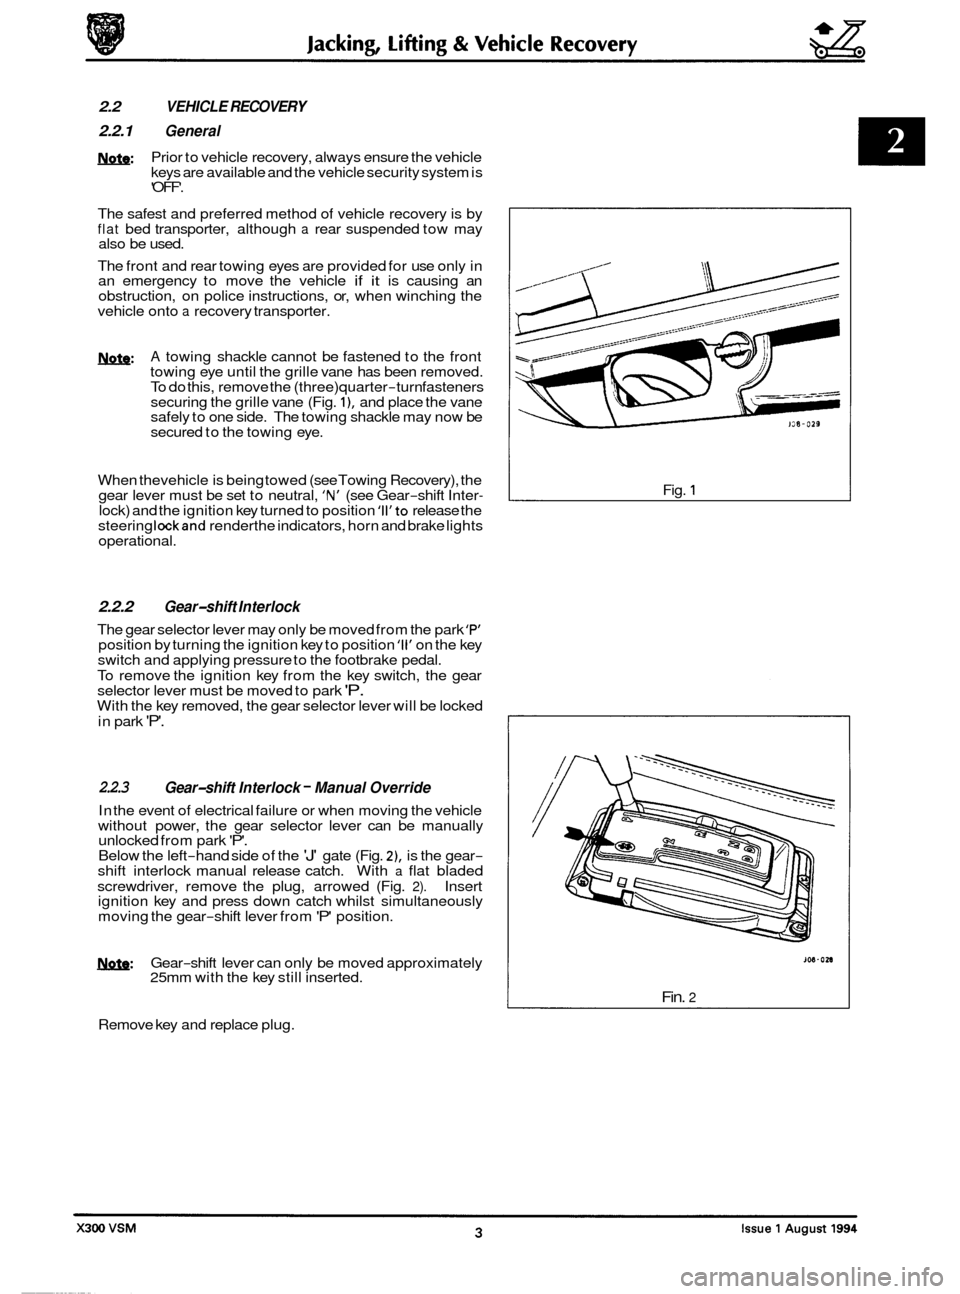
m: A towing shackle cannot be fastened to the front
towing eye until the grille vane has been removed.
To do this, remove the (three) quarter
-turn fasteners
securing the grille vane (Fig. I), and place the vane
safely to one side. The towing shackle may now be
secured to the towing eye.
0 When thevehicle is being towed (see Towing Recovery), the
gear lever must be set to neutral, 'N' (see Gear-shift Inter- lock) and the ignition key turned to position 'II'to release the
steering lockand renderthe indicators, horn and brake lights
operational.
2.2.2 Gear-shift Interlock
The gear selector lever may only be moved from the park 'F" position by turning the ignition key to position '11' on the key
switch and applying pressure to the footbrake pedal.
To remove the ignition key from the key switch, the gear
selector lever must be moved to park
'P. With the key removed, the gear selector lever will be locked
in park
'P'.
2.2.3
In the event of electrical failure or when moving the vehicle
without power, the gear selector lever can be manually
unlocked from park
'P'. Below the left-hand side of the 'J' gate (Fig. Z), is the gear- shift interlock manual release catch. With a flat bladed
screwdriver, remove the plug, arrowed (Fig. 2). Insert
ignition key and press down catch whilst simultaneously
moving the gear
-shift lever from 'P' position.
Gear-shift Interlock - Manual Override
U: Gear-shift lever can only be moved approximately
25mm with the key still inserted.
Remove key and replace plug. Fig.
1
Fin. 2
Page 35 of 521
gg Jacking, lifting & Vehicle Recovery
2.2.4 Transporting
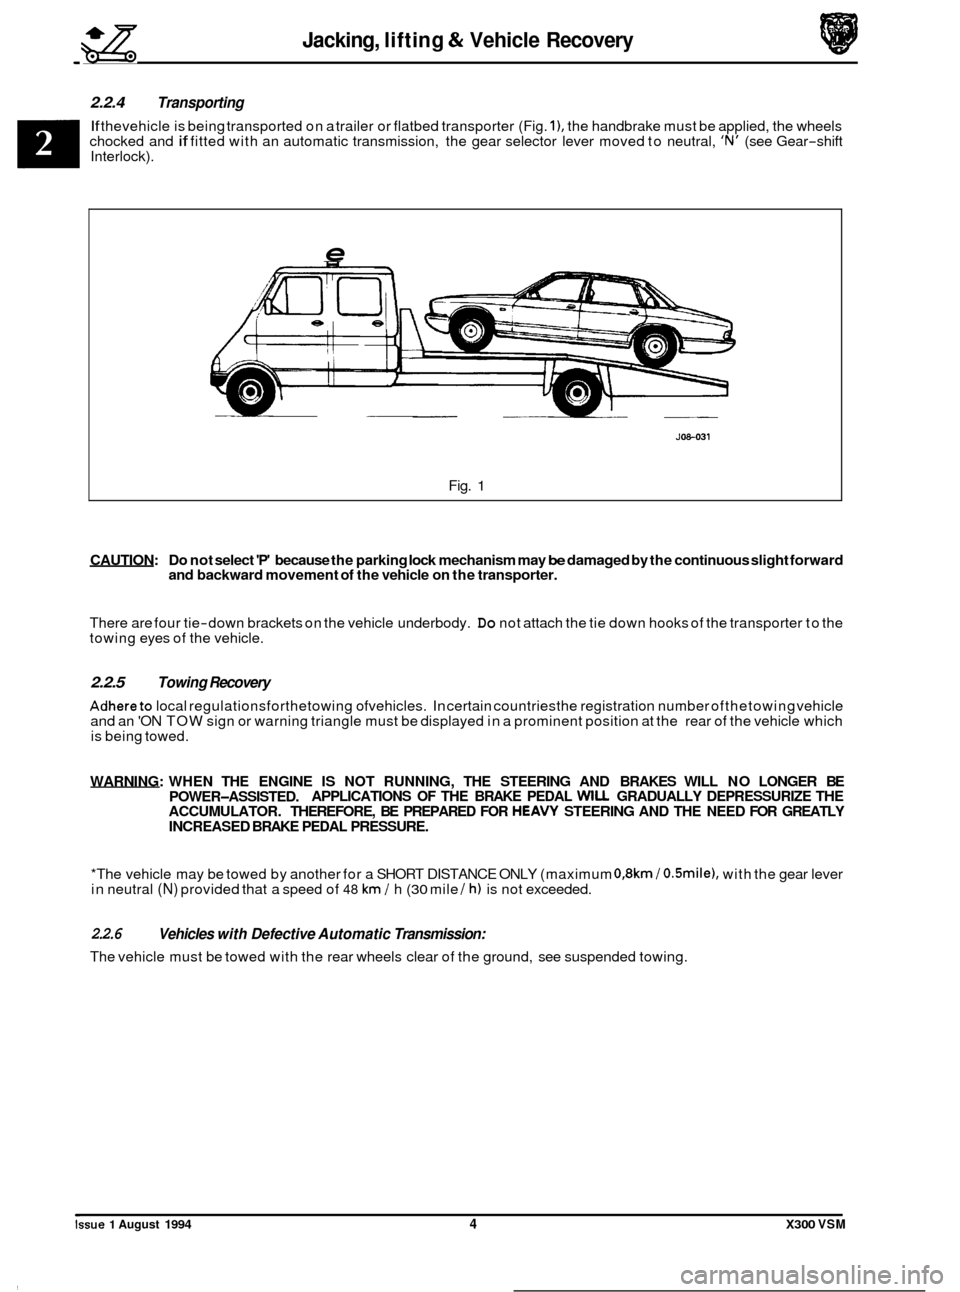
If thevehicle is being transported on a trailer or flatbed transporter (Fig. I), the handbrake must be applied, the wheels
chocked and if fitted with an automatic transmission, the gear selector lever moved to neutral, 'N' (see Gear-shift
Interlock).
e
JOS-031
Fig. 1
CAUTION: Do not select 'P' because the parking lock mechanism may be damaged by the continuous slight forward
and backward movement of the vehicle on the transporter.
There are four tie-down brackets on the vehicle underbody. Do not attach the tie down hooks of the transporter to the
towing eyes of the vehicle.
2.2.5 Towing Recovery
Adhereto local regulationsforthetowing ofvehicles. In certain countriesthe registration number ofthetowing vehicle
and an 'ON TOW sign or warning triangle must be displayed in a prominent position at the rear of the vehicle which
is being towed.
WARNING: WHEN THE ENGINE
IS NOT RUNNING, THE STEERING AND BRAKES WILL NO LONGER BE
ACCUMULATOR. THEREFORE, BE PREPARED FOR
HEAVY STEERING AND THE NEED FOR GREATLY
INCREASED BRAKE PEDAL PRESSURE.
POWER-ASSISTED.
APPLICATIONS
OF THE BRAKE PEDAL WILL GRADUALLY DEPRESSURIZE THE
*The vehicle may be towed by another for a SHORT DISTANCE ONLY (maximum
0,8km / O.Smile), with the gear lever
in neutral (N) provided that a speed of 48 km / h (30 mile / h) is not exceeded.
2.2.6
The vehicle must be towed with the rear wheels clear of the ground, see suspended towing.
Vehicles with Defective Automatic Transmission:
Issue 1 August 1994 4 X300 VSM
Page 36 of 521
Jacking, lifting & Vehicle Recovery gg
2.2.7 Suspended Towing
CAUTION: Do not tow with sling-type equipment as damage to the bodywork may result. Do not front suspend tow vehides with automatic transmission.
2.2.8 Rear Suspended Tow
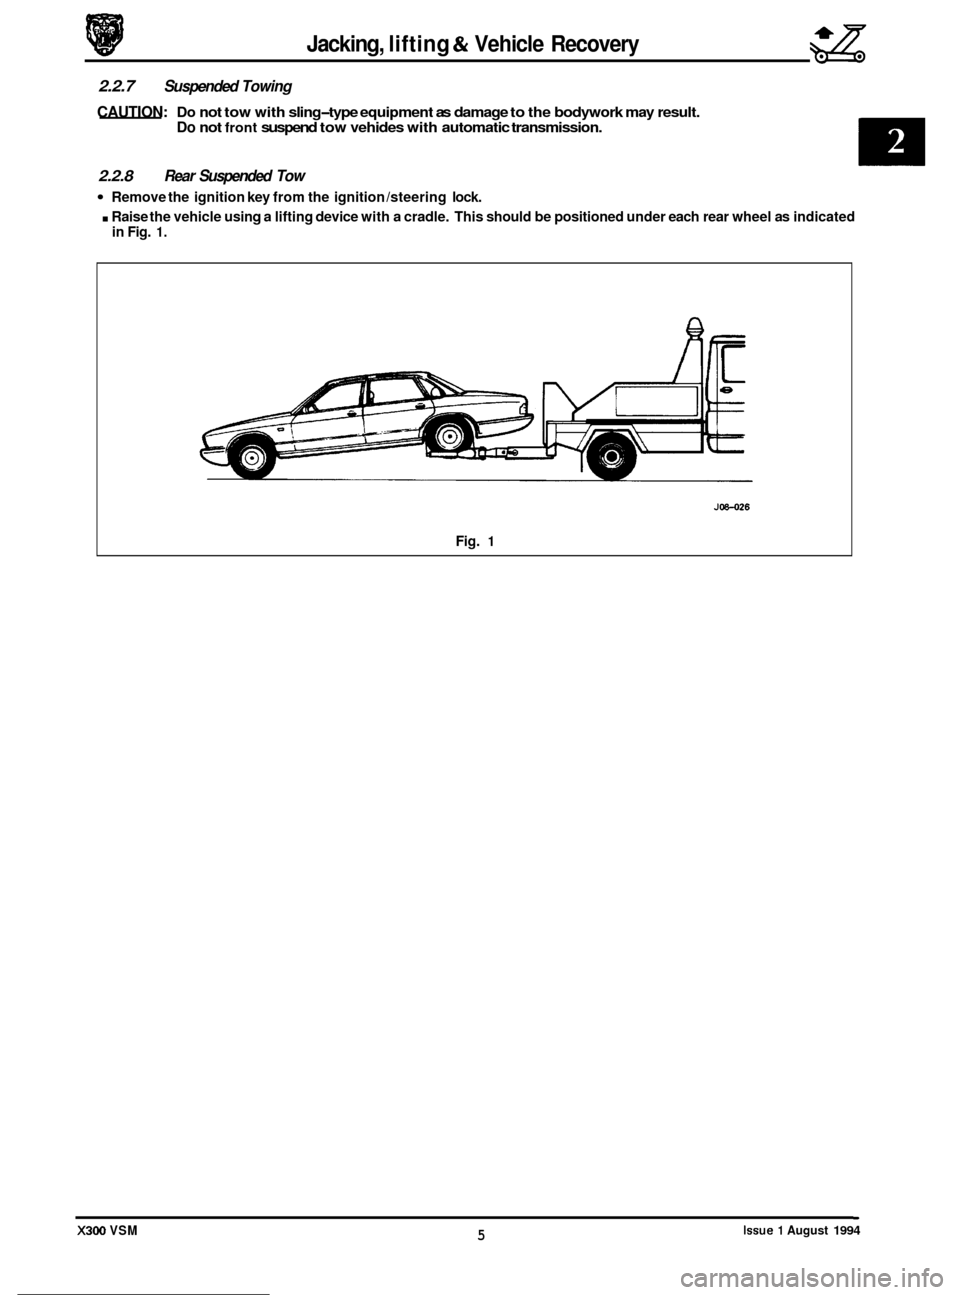
Remove the ignition key from the ignition /steering lock.
. Raise the vehicle using a lifting device with a cradle. This should be positioned under each rear wheel as indicated
in Fig. 1.
0
0
0
J08-026
Fig. 1
Issue 1 August 1994 5 X300 VSM
Page 43 of 521
Engine (AJ16)
3.1.2 ENGlNE/ TRANSMlSSlON UN/& RENEW
SRO 12.41.02/20
The engine/transmission unit on the AJ 16 normally aspirated and supercharged engined vehicles are fitted ontothree
engine mounting/bracket assemblies. The two front engine mountings for the 3.2/4.0 liter normally aspirated and the
4.0 liter supercharged engined vehicles are identical. They are fitted to the front crossmember on either side of the
engine bay. Rubber to metal
engine/transmission rear mounts used for both engine types, are secured to a support
bracket which traverses the two body underframe longitudinal members. For access to remove the engine carry out the following procedures:
WARNING: WHEN WORKING WlTHlN THE ENGINE COMPARTMENT, KEEP CLEAR OF THE RADIATOR COOLING
FANS AS THEY COULD START WITHOUT WARNING EVEN IF THE ENGINE IS NOT RUNNING.
. Remove the hood, see SRO 76.16.01, section 13
. Remove the air cleaner assembly.
. Depressurize the fuel system, see SRO 19.50.02, section 5.1.
Disconnect the battery.
. In line with the relevant SRO's and sections, remove all appropriate obstructing parts, including their fixing and
. Disconnect all mechanical and isolate all electrical linkages leading to and from the engine.
. De-gas the airconditioning system, see section 14, Charge Recovery (System depressurization).
mounting
arrangements.
CAUTION : Do not vent refrigerant directly to the atmosphere and always use Jaguar approved recovery/recycle/re- charge equipment.
. Drain the engine oil, see 3.1.3 this section.
. Drain the coolant, see SRO 26.10.01, section 4.1.
WARNING: DO NOT REMOVE THE HEADER TANK PRESSURE CAP WHILE THE ENGINE IS HOT. IF THE CAP MUST
BE REMOVED, PROTECT THE HANDS AGAINST ESCAPING STEAM AND SLOWLY TURN THE CAP ANTI- CLOCKWISE UNTILTHE EXCESS PRESSURE CAN ESCAPE. LEAVETHE CAP IN THIS POSITION UNTIL ALL
STEAM AND PRESSURE HAS ESCAPED AND THEN REMOVE THE CAP COMPLETELY.
Before lifting the complete engine/transmission unit with an engine hoist from the engine bay, ensure that two engine
lifting brackets (tool 18G. 1465) are secured equally spaced to the inlet manifold studs. The engine lifting brackets
should be positioned towards the front and the rear of the assembly. Ensure the front of the vehicle is jacked
up secure- ly on stands when removing the assembly.
e
0
0
X300 VSM Issue 1 August 1994 2
Page 49 of 521
3.2.2 ENGINE - GEARBOX/ TRANSMISSION
ASSEMBLY, RENEW
SRO 12.37.01/90
The engine /transmission unit on the V12 6.0 liter model is mounted on three engine mounting / bracket assemblies
fitted to the front crossmember on either side of the engine bay. The engine/ transmission rear mount is a mounting
bracket and spring assembly fitted and secured to body underframe longitudinal members. For access to remove the
engine carry
out the following procedures:
WARNING: WHEN WORKING WITHIN THE ENGINE COMPARTMENT, KEEP CLEAR OF THE RADIATOR COOLING
FANS AS THEY COULD START WITHOUT WARNING, EVEN IF THE ENGINE IS NOT RUNNING.
. Remove the hood, see SRO 76.16.01, section 13.
. Remove the two air cleaner assemblies, see SRO’s 19.10.01 & 19.10.02.
. Remove the engine cover, see SRO 12.29.93 (V12 Engine Service Manual).
Depressurize the fuel system, see SRO 19.50.02, section 5.1.
In line with the relevant SRO’s and sections, remove all appropriate obstructing parts, including their fixing and
. Disconnect all mechanical and isolate all electrical linkages leading to and from the engine.
. De-gas the air conditioning system, see section 14, Charge Recovery (System depressurization).
Disconnect
the battery.
mounting arrangements.
CAUTION: Do
not vent refrigerant directly to the atmosphere and always use Jaguar approved recovery/recycle/ra charge equipment.
Drain the engine oil, see 3.2.3 this section.
Drain the coolant, see SRO 26.10.01, section 4.1.
WARNING: DO NOT REMOVE THE HEADER TANK PRESSURE CAP WHILE THE ENGINE IS HOT. IF THE CAP MUST
BE REMOVED, PROTECT THE HANDS AGAINST ESCAPING STEAM AND SLOWLY TURN THE CAP ANTI- CLOCKWISE UNTIL THE EXCESS PRESSURE CAN ESCAPE. LEAVE THE CAP IN THIS POSITION UNTIL ALL
STEAM AND PRESSURE HAS ESCAPED AND THEN REMOVE THE CAP COMPLETELY.
Before
lifting the complete engine/transmission unit with an engine hoist from the engine bay, ensure that two engine
lifting brackets (tool 18G. 1465) are secured equallyspaced to the inlet manifold studs. The four engine lifting brackets
should be positioned towards the front and the rear of the assembly. Ensure the front of thevehicle is jacked
up secure- ly on stands when removing the assembly.
X300 VSM Issue 1 August 1994 2
Page 76 of 521
striker and the-fuel cap stowage magnet.
The fuel bowl, retained around the filler neck by a clip, containing a drain tube filter located over the mating drain tube,
is rubber moulded onto a steel armature and fitted to the BIW decking panel by five M5 nuts.
The fuel lid latching assembly fitted to the metal armature of the fuel bowl by an M5 nut, includes the locking pin and
the operating actuator.
The actuator operates from the central locking system driven by the security and locking control module
(SLCM).
The fuel tank, mounted across thevehicle behind the passenger compartment rear bulkhead, is held in position by two
retaining straps, tightened by two M5 fixing arrangements.
The fuel tank of AJ16 engined vehicles contains one fuel pump, supplying fuel to the normally aspirated engine and
two fuel pumps, supplyingfuel to the supercharged engine. They are regenerative turbine pumps supplied by
Nippon- Denso. Nominal operating pressure is 3 bar (3.7 bar for supercharged engine) above the manifold depression and
pump delivery is 90 litredhour minimum at 13.2 volts, 3 bar outlet pressure. The pump(s) draw a nominal current of 7 amperes at 13 volts, 3 bar outlet pressure, ambient temperatures. Built in to the pump assembly is a over-pressure
relief valve which blows at 4.5 - 8.5 bar.
Fuel is drawn by the pumps from the fuel tank and is then supplied to the fuel rail via a
70 micron filter and the fuel
feed line connected in series by fuel filter.
The amount of fuel being injected into the engine
is controlled by the fuel injectors combined with the engine control module (ECM). - Any excessive fuel flowing through the system, is returned to the fuel tankvia the fuel regulator valve mounted on the
fuel rail, the fuel return line and the check valve also located inside the tank.
The two filters prevent contaminants from entering the fuel rail and possible damage to the fuel injectors, the engine,
the pump and the underfloor filter.
The fuel pumps are switched on and off by relays controlled by the engine control module
(ECM).
The second fuel pump for the supercharged engine operates only in the higher speed range, switching on at 4000rpm and off at 3200rpm.
The fuel lines are made up of an assembly, combining steel under floor pipes and flexible conductive anti-permeation
tubing. In orderto perform speedy remove and refit operations, the underfloor steel lines are linked through the engine
bay bulkhead to the flexible tubing, leading to the fuel rail and the fuel regulator by using positive sealing, quick-fit
type connectors. The same type connectors, are used to connect the fuel feed and return line to the fuel tank.
Connectors used inside the engine bay are of different sizes tocorrespond with the difference in pipe diameter, whereas
the connectors for the feed and return lines at the fuel tank are the same size.
Except for the return line connector at the fuel tank, two release tools, one for each size of connector are required to
release all remaining connectors.
-~
Fuel, Emission Control & Engine Management (AJ16)
5.1.2 GENERAL DESCRIPTION
m: WORKING ON THE FUEL SYSTEM MAY RESULT IN FUEL AND FUEL VAPOUR BEING PRESENT IN THE
ATMOSPHERE. FUEL VAPOUR IS EXTREMELY FLAMMABLE, HENCE GREAT CARE MUST BE TAKEN WHllST WORKING ON THE FUEL SYSTEM. ADHERE STRICTLY TO THE FOLLOWING PRECAUTIONS:
DO NOT
SMOEIN THE WORK AREA.
DISPLAY 'NO SMOKING
' SIGNS AROUND THE AREA.
ENSURE THAT A
CO2 FIRE EXTINGUISHER IS CLOSE AT HAND.
ENSURE THAT DRY SAND
IS AVAILABLE TO SOAK UP ANY FUEL SPILLAGE.
EMPTY FUEL USING SUITABLE FIRE
PROOF EQUIPMENT INTO AN AUTHORIZED EXPLOSIOWROOF
CONTAINER.
DO NOT EMPTY FUEL
INTO A PIT.
ENSURE THAT WORKING AREA
IS WELL VENTILATED.
ENSURE THAT ANY WORK ON THE FUEL SYSTEM
IS ONLY CARRIED OUT BY EXPERIENCED AND WELL
QUALIFIED MAINTENANCE PERSONNEL.
The fuel filler assembly, supplied complete with serviceable lid, hinge and hinge spring, is fixed to the Body-in-White
(BIW) decking panel by two M5 nuts. Additional parts of the assembly comprise a adjustable rubber buffer, a snap-in
X300 VSM 3 Issue 1 August 1994
Page 92 of 521
striker and the fuel cap stowage magnet.
The fuel bowl, retained around the filler neck by a clip, containing a drain tube filter located
overthe mating drain tube,
is rubber moulded onto a steel armature and fitted to the BIW decking panel. by five M5 nuts.
The fuel lid latching assembly fitted to the metal armature of the fuel bowl by an M5 nut, includes the locking pin and
the operating actuator.
The actuator operates from the central locking system driven by the Security and Locking Control Module (SLCM).
The fuel tank, mounted across the vehicle behind the passenger compartment rear bulkhead, is held in position by two
retaining straps, tightened by two M5 fixing arrangements.
VI2 engined vehicles are equipped with two fuel pumps located inside the tank. They are regenerative turbine pumps
supplied by Nippon Denso. Nominal operating pressure is 3 bar above the manifold depression and pump delivery
is 90 litres/hour minimum at 13.2 volts, 3 bar outlet pressure. The pump draws a nominal current of 7 amperes at 13 volts, 3 bar outlet pressure, ambient temperatures. Built in to the pump assembly is a over-pressure relief valve which
blows at 4.5 - 8.5 bar.
Fuel is drawn by the pumps from the fuel tank and is then supplied to the fuel rail via a
70 micron filter and the fuel
feed line connected in series by fuel filter.
The amount of fuel being injected into the engine is controlled by the fuel injectors combined with the engine control
module (ECM).
Any excessive fuel flowing through the system, is returned to thefuel tankvia the fuel regulator valve mounted on the
fuel rail, the fuel return line and the check valve also located inside the tank.
The two filters prevent contaminants from entering the fuel rail and possible damage to the fuel injectors, the engine,
the pump and underfloor filter.
The second fuel pump is controlled by the engine control module
(ECM) and works of a mapped fuel map. The pumps
'switch on' time depends on the fuel requirement which is depending on the engine load.
The fuel lines are made up of an assembly, combining steel underfloor pipes and flexible conductive anti
-permeation
tubing. In order to perform speedy remove and refit operations, the underfloor steel lines are linked through the engine
bay bulkhead to theflexibletubing, leading to the fuel rail and the fuel regulator by using positive sealing, quick
fit type
connectors. The same type connectors, are used to connect the fuel feed and return line to the fuel tank.
Connectors used inside the engine bay, are of different sizes to correspond with the difference in pipe diameter, where
- as the connectors for the feed and return lines at the fuel tank are the same size.
Except for the return line connector at the fuel tank, two release tools, one for each size of connector, are required to
release all remaining connectors.
Fuel, Emission Control & Engine Management (V12)
5.2.2 GENERAL DESCRIPTION
WARNING: WORKING ON THE FUEL SYSTEM RESULTS IN FUEL AND FUEL VAPOUR BEING PRESENT IN THE AT- MOSPHERE. FUEL VAPOUR IS EXTREMELY FLAMMABLE, HENCE GREAT CARE MUST BE TAKEN WHILST
WORKING ON THE FUEL SYSTEM. ADHERE STRICTLY TO THE FOLLOWING PRECAUTIONS:
PO NOT SMOKF, IN THE WORK AREA.
DISPLAY 'NO SMOKING
' SIGNS AROUND THE AREA.
ENSURE THAT A
CO2 FIRE EXTINGUISHER IS CLOSE AT HAND.
ENSURE THAT DRY SAND
IS AVAILABLE TO SOAK UP ANY FUEL SPILLAGE.
EMPTY FUEL USING SUITABLE FIRE PROOF EQUIPMENT INTO AN AUTHORIZED EXPLOSION PROOF
CONTAINER.
DO NOT EMPTY FUEL INTO A PIT.
ENSURE THAT WORKING AREA IS WELL VENTILATED.
ENSURE THAT ANY WORK ON THE FUEL SYSTEM
IS ONLY CARRIED OUT BY EXPERIENCED AND WELL
QUALIFIED MAINTENANCE PERSONNEL.
The fuel filler assembly, supplied complete with serviceable lid, hinge and hinge spring, is fixed to the Body-in-White (BIW) decking panel by two M5 nuts. Additional parts of the assembly comprise a adjustable rubber buffer, a snap-in
X300 VSM 3 Issue 1 August 1994
Page 156 of 521
Automatic Transmission (V12 & AJl6 Supercharged) Pomrtrain
8.2.1 GENERAL DESCRIPTION
This section provides information relating to the Powertrain 4L80-E transmissions fitted to the 4,O liter supercharged
engine (4,OL SC) and to the 6,O liter engine (6,OL).
The Powertrain 4L80-E is a four-speed, high torque capacity, electronically controlled automatic transmission, which
comprises a torque converter with lock-up direct drive clutch and three planetary gear sets. Five multiple diskclutches,
one intermediate sprag clutch assembly, two roller clutch assemblies and two band assemblies provide the drive el- ements necessary for correct sequential gear engagement and operation.
The torque converter containing
a pump, a turbine (rotor), a stator assembly, and a clutch pressure disksplined to the
turbine, acts as a fluid coupling for smooth torque transmission from the engine. The converter also supplies addi- tional torque multiplication when necessary, and the torque converter clutch (TCC) pressure disk provides a mechan- ical direct drive or 'lock-up' above a certain speed in top gear for greater fuel economy.
Gearshift operations are controlled from the Transmission Control Module (TCM), which governs the electronically
controlled valve body situated within the transmission.
Three planetary gear sets provide reverse and the four forward ratios, the changing of which is fully automatic in rela
- tion to load, vehicle speed and throttle opening. The Transmission Control Module receives and integrates various ve- hicle sensor input signals, and transmits operating signals to the solenoids located in the control valve assembly.
These solenoids govern the transmission operating pressures, up-shift and down-shift gear selection patterns and
also the torque converter clutch operation by pulse width modulated control.
8.2.1.1 Gear Ranges
Selectable gear positions are: P - Park, R - Reverse, N - Neutral, D - Drive, 3, 2.
P - Park position of the shift lever provides a mechanical locking of the output shaft of the transmission, and as such,
must only be engaged when the the vehicle is stationary. In addition, and for
extra safety, the handbrake should also
be applied. It is necessary to have the ignition ON and the footbrake applied to move the shift lever from the Park
position. For ignition key removal the shift lever must be in the Park position. The engine can be started in the Park
position.
R - Reverse enables the vehicle to be operated in a rearwards direction. The engine cannot be started in the Reverse
position.
N
-Neutral position enables the engine to be started and operated without driving the vehicle. It also allows the vehicle
to be moved manually for access, ie for removal of the propeller shaft.
D
-Drive position allows the automatic selection of all four forward gear ratios during normal driving conditions for
maximum efficiency and fuel economy. On acceleration, down-shifts are obtained by depressing the accelerator pedal
or by manual selection. The engine cannot be started in this position.
3
- Manual third position allows automatic operation of the three lower gear ratios but inhibits selection of the fourth
ratio. This position is used for towing a trailer or negotiating hilly terrain when greater engine braking control is re- quired. The engine cannot be started in this position.
2 - Manual second position allows automatic operation of the two lower gear ratios but inhibits selection of the third
and fourth ratios. This position is used for heavy traffic congestion or negotiating hilly terrain when even greater en
- gine braking control is required than is provided by manual third. This ratio may be selected at any vehicle speed - even if the transmission is in third or fourth ratio, the transmission will immediately down-shift to second gear pro- vided the vehicle speed is below 137 km / h (85 mile / h). The engine cannot be started in this position.
N.g!b: With the Performance Mode switch in the NORMAL position, the vehicle will pull away in second gear. How- ever, if more than 75 per cent of throttle is applied when the vehicle speed is between zero and 13 km/ h (8 mile / h), then first gear will be selected. From 13 to 61 km/ h (8 to 38 mile/ h) first gear is obtainable by 'kick-down'.
In 'sport' mode thevehicle pulls away in first gear and the transmission operatesfully in all four forward gears.
X300 VSM 1 Issue 1 August 1994
Page 245 of 521
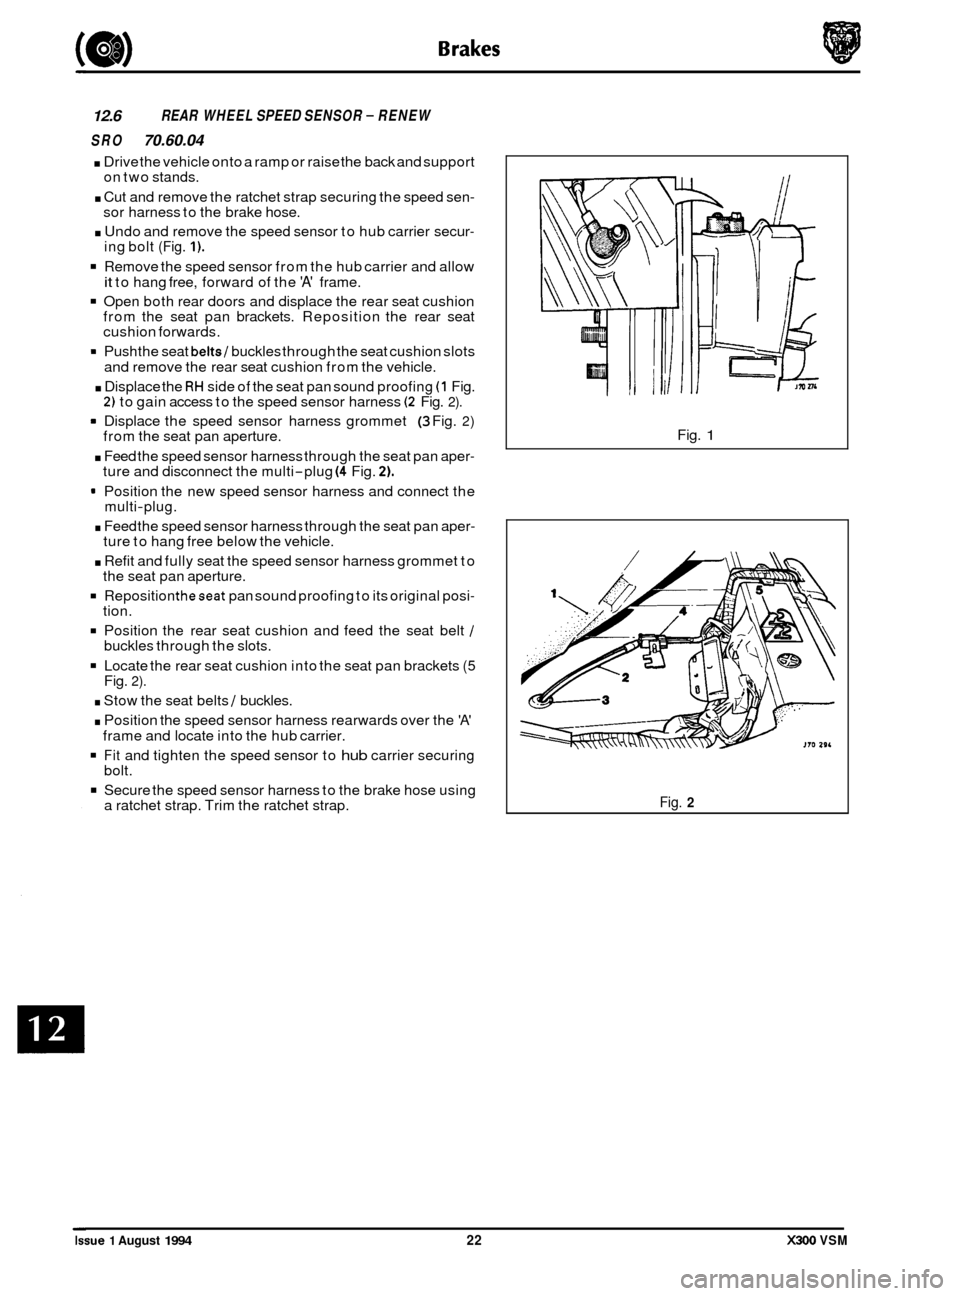
12.6 REAR WHEEL SPEED SENSOR - RENEW
SRO
70.60.04
. Drive the vehicle onto a ramp or raise the back and support
on two stands.
. Cut and remove the ratchet strap securing the speed sen- sor harness to the brake hose.
. Undo and remove the speed sensor to hub carrier secur- ing bolt (Fig. 1).
Remove the speed sensor from the hub carrier and allow
it to hang free, forward of the 'A' frame.
Open both rear doors and displace the rear seat cushion
from the seat pan brackets. Reposition the rear seat
cushion forwards.
9 Push the seat belts/ buckles through the seat cushion slots
and remove the rear seat cushion from the vehicle.
. Displace the RH side of the seat pan sound proofing (1 Fig. 2) to gain access to the speed sensor harness (2 Fig. 2).
9 Displace the speed sensor harness grommet (3 Fig. 2) from the seat pan aperture.
. Feed the speed sensor harness through the seat pan aper- ture and disconnect the multi-plug (4 Fig. 2).
9 Position the new speed sensor harness and connect the
multi-plug.
. Feed the speed sensor harness through the seat pan aper- ture to hang free below the vehicle.
. Refit and fully seat the speed sensor harness grommet to
the seat pan aperture.
Reposition theseat pan sound proofing to its original posi- tion.
Position the rear seat cushion and feed the seat belt / buckles through the slots.
Locate the rear seat cushion into the seat pan brackets (5 Fig. 2).
. Stow the seat belts / buckles.
. Position the speed sensor harness rearwards over the 'A'
Fit and tighten the speed sensor to hub carrier securing
Secure the speed sensor harness to the brake hose using
frame
and locate into the hub carrier.
bolt.
a ratchet strap. Trim the ratchet strap. Fig.
1
Fig. 2
Issue 1 August 1994 22 X300 VSM
0
0
0