Chapter 12 JAGUAR XJ6 1997 2.G User Guide
[x] Cancel search | Manufacturer: JAGUAR, Model Year: 1997, Model line: XJ6, Model: JAGUAR XJ6 1997 2.GPages: 227, PDF Size: 7.2 MB
Page 28 of 227
silencer and catalytic converter. If the
components can come in contact with the
body or suspension parts, secure the exhaust
system with new mounts.
5Check the running condition of the engine
by inspecting inside the end of the tailpipe.
The exhaust deposits here are an indication of
engine state-of-tune. If the pipe is black and
sooty or coated with white deposits, the
engine is in need of a tune-up, including a
thorough fuel system inspection.
11 Braking system - general
check and adjustment
2
Warning: The dust created by
the brake system may contain
asbestos, which is harmful to
your health. Never blow it out
with compressed air and don’t inhale any
of it. An approved filtering mask should be
worn when working on the brakes. Do not,
under any circumstances, use petroleum-
based solvents to clean brake parts. Use
brake system cleaner only! Try to use non-
asbestos replacement parts whenever
possible.
Note: For detailed photographs of the brake
system, refer to Chapter 9.
1In addition to the specified intervals, the
brakes should be inspected every time the
wheels are removed or whenever a defect is
suspected. Any of the following symptoms
could indicate a potential brake system
defect: The vehicle pulls to one side when the
brake pedal is depressed; the brakes make
squealing or dragging noises when applied;
brake pedal travel is excessive; the pedal
pulsates; brake fluid leaks, usually onto the
inside of the tyre or wheel.
2The disc brakes have built-in electrical wear
indicators which cause a warning lamp to
illuminate on the instrument panel when
they’re worn to the renewal point. When the
warning light comes on, replace the pads
immediately or expensive damage to the
discs can result.
3Loosen the wheel nuts.
4Raise the vehicle and place it securely on
axle stands.
5Remove the wheels.
Disc brakes
6There are two pads (an outer and an inner)
in each caliper. The pads are visible through
inspection holes in each caliper (see Haynes
Hint).
7Check the pad thickness by looking at each
end of the caliper and through the inspection
hole in the caliper body. If the lining material is
less than the thickness listed in this Chapter’s
Specifications, replace the pads. Note:Keep
in mind that the lining material is riveted or
bonded to a metal backing plate and the metal
portion is not included in this measurement.8If it is difficult to determine the exact
thickness of the remaining pad material by the
above method, or if you are at all concerned
about the condition of the pads, remove the
caliper(s), then remove the pads from the
calipers for further inspection (see Chapter 9).
9Once the pads are removed from the
calipers, clean them with brake cleaner and
re-measure them with a ruler or a vernier
caliper.
10Measure the disc thickness with a
micrometer to make sure that it still has
service life remaining. If any disc is thinner
than the specified minimum thickness,
replace it (refer to Chapter 9). Even if the disc
has service life remaining, check its condition.
Look for scoring, gouging and burned spots. If
these conditions exist, remove the disc and
have it resurfaced (see Chapter 9).
11Before refitting the wheels, check all
brake lines and hoses for damage, wear,
deformation, cracks, corrosion, leakage,
bends and twists, particularly in the vicinity of
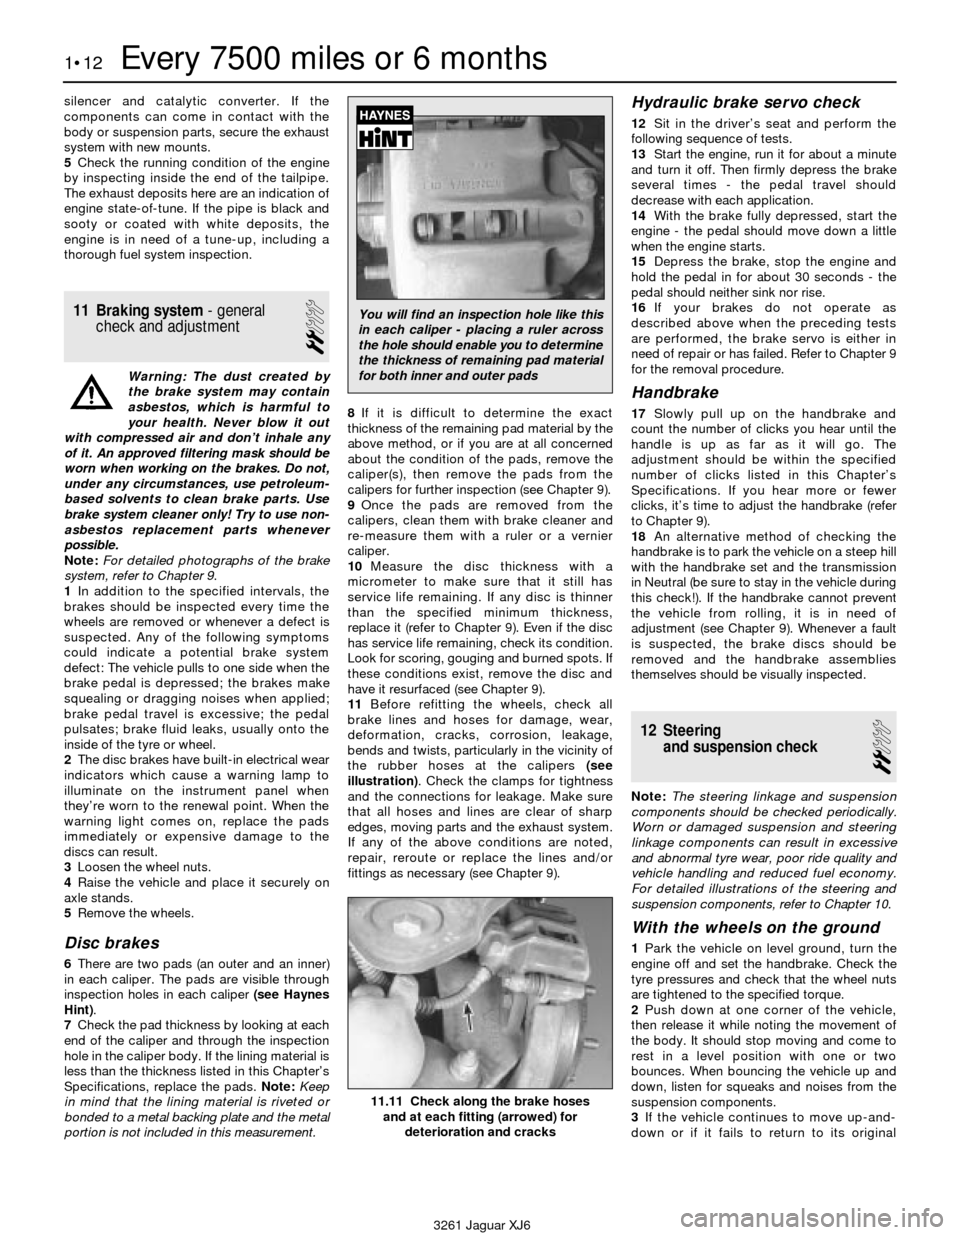
the rubber hoses at the calipers (see
illustration). Check the clamps for tightness
and the connections for leakage. Make sure
that all hoses and lines are clear of sharp
edges, moving parts and the exhaust system.
If any of the above conditions are noted,
repair, reroute or replace the lines and/or
fittings as necessary (see Chapter 9).
Hydraulic brake servo check
12Sit in the driver’s seat and perform the
following sequence of tests.
13Start the engine, run it for about a minute
and turn it off. Then firmly depress the brake
several times - the pedal travel should
decrease with each application.
14With the brake fully depressed, start the
engine - the pedal should move down a little
when the engine starts.
15Depress the brake, stop the engine and
hold the pedal in for about 30 seconds - the
pedal should neither sink nor rise.
16If your brakes do not operate as
described above when the preceding tests
are performed, the brake servo is either in
need of repair or has failed. Refer to Chapter 9
for the removal procedure.
Handbrake
17Slowly pull up on the handbrake and
count the number of clicks you hear until the
handle is up as far as it will go. The
adjustment should be within the specified
number of clicks listed in this Chapter’s
Specifications. If you hear more or fewer
clicks, it’s time to adjust the handbrake (refer
to Chapter 9).
18An alternative method of checking the
handbrake is to park the vehicle on a steep hill
with the handbrake set and the transmission
in Neutral (be sure to stay in the vehicle during
this check!). If the handbrake cannot prevent
the vehicle from rolling, it is in need of
adjustment (see Chapter 9). Whenever a fault
is suspected, the brake discs should be
removed and the handbrake assemblies
themselves should be visually inspected.
12 Steering
and suspension check
2
Note: The steering linkage and suspension
components should be checked periodically.
Worn or damaged suspension and steering
linkage components can result in excessive
and abnormal tyre wear, poor ride quality and
vehicle handling and reduced fuel economy.
For detailed illustrations of the steering and
suspension components, refer to Chapter 10.
With the wheels on the ground
1Park the vehicle on level ground, turn the
engine off and set the handbrake. Check the
tyre pressures and check that the wheel nuts
are tightened to the specified torque.
2Push down at one corner of the vehicle,
then release it while noting the movement of
the body. It should stop moving and come to
rest in a level position with one or two
bounces. When bouncing the vehicle up and
down, listen for squeaks and noises from the
suspension components.
3If the vehicle continues to move up-and-
down or if it fails to return to its original
1•12Every 7500 miles or 6 months
11.11 Check along the brake hoses
and at each fitting (arrowed) for
deterioration and cracks
3261 Jaguar XJ6
You will find an inspection hole like this
in each caliper - placing a ruler across
the hole should enable you to determine
the thickness of remaining pad material
for both inner and outer pads
Page 29 of 227
position, a worn or weak shock absorber is
probably the reason.
4Repeat the above check at each of the
three remaining corners of the vehicle.
Under the vehicle
5Raise the vehicle with a trolley jack and
support it securely on axle stands. See
“Jacking and towing”for proper jacking
points.
6Check the shock absorbers for evidence of
fluid leakage. Make sure that any fluid noted is
from the shocks and not from any other
source. Also check the rubber mounts at each
end for deterioration If the shock absorbers
fail any of the tests above replace the shocks
as a set.
7Check the tyres for irregular wear patterns
and proper inflation. See “Weekly checks”for
information regarding tyre wear.
8Inspect the universal joint between the
steering shaft and the steering gear housing.
Check the steering gear housing for grease
leakage. Make sure that the dust seals and
boots are not damaged and that the boot
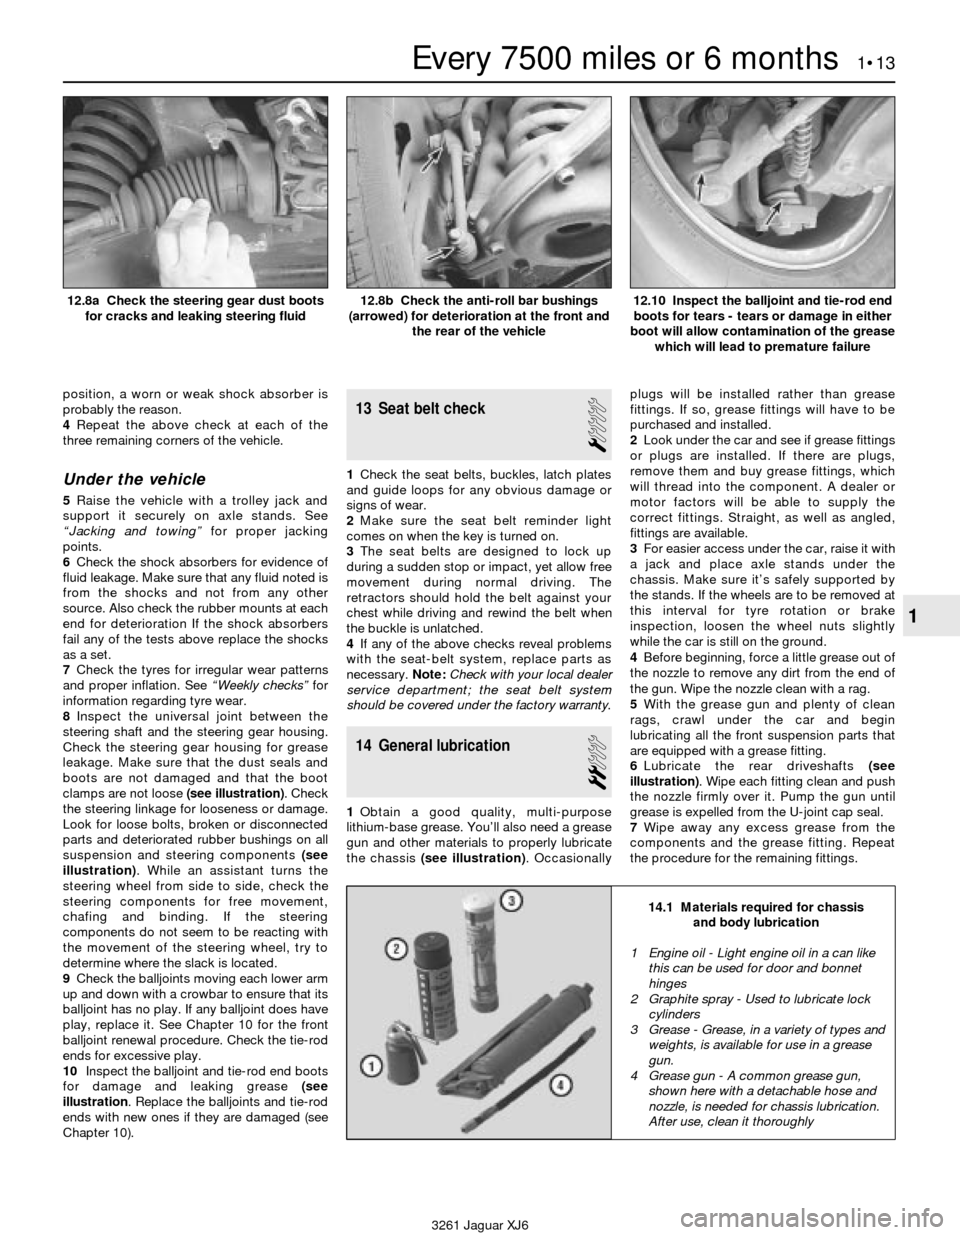
clamps are not loose (see illustration). Check
the steering linkage for looseness or damage.
Look for loose bolts, broken or disconnected
parts and deteriorated rubber bushings on all
suspension and steering components (see
illustration). While an assistant turns the
steering wheel from side to side, check the
steering components for free movement,
chafing and binding. If the steering
components do not seem to be reacting with
the movement of the steering wheel, try to
determine where the slack is located.
9Check the balljoints moving each lower arm
up and down with a crowbar to ensure that its
balljoint has no play. If any balljoint does have
play, replace it. See Chapter 10 for the front
balljoint renewal procedure. Check the tie-rod
ends for excessive play.
10Inspect the balljoint and tie-rod end boots
for damage and leaking grease (see
illustration. Replace the balljoints and tie-rod
ends with new ones if they are damaged (see
Chapter 10).
13 Seat belt check
1
1Check the seat belts, buckles, latch plates
and guide loops for any obvious damage or
signs of wear.
2Make sure the seat belt reminder light
comes on when the key is turned on.
3The seat belts are designed to lock up
during a sudden stop or impact, yet allow free
movement during normal driving. The
retractors should hold the belt against your
chest while driving and rewind the belt when
the buckle is unlatched.
4If any of the above checks reveal problems
with the seat-belt system, replace parts as
necessary.Note:Check with your local dealer
service department; the seat belt system
should be covered under the factory warranty.
14 General lubrication
2
1Obtain a good quality, multi-purpose
lithium-base grease. You’ll also need a grease
gun and other materials to properly lubricate
the chassis (see illustration). Occasionallyplugs will be installed rather than grease
fittings. If so, grease fittings will have to be
purchased and installed.
2Look under the car and see if grease fittings
or plugs are installed. If there are plugs,
remove them and buy grease fittings, which
will thread into the component. A dealer or
motor factors will be able to supply the
correct fittings. Straight, as well as angled,
fittings are available.
3For easier access under the car, raise it with
a jack and place axle stands under the
chassis. Make sure it’s safely supported by
the stands. If the wheels are to be removed at
this interval for tyre rotation or brake
inspection, loosen the wheel nuts slightly
while the car is still on the ground.
4Before beginning, force a little grease out of
the nozzle to remove any dirt from the end of
the gun. Wipe the nozzle clean with a rag.
5With the grease gun and plenty of clean
rags, crawl under the car and begin
lubricating all the front suspension parts that
are equipped with a grease fitting.
6Lubricate the rear driveshafts (see
illustration). Wipe each fitting clean and push
the nozzle firmly over it. Pump the gun until
grease is expelled from the U-joint cap seal.
7Wipe away any excess grease from the
components and the grease fitting. Repeat
the procedure for the remaining fittings.
Every 7500 miles or 6 months 1•13
1
14.1 Materials required for chassis
and body lubrication
3261 Jaguar XJ6 12.8a Check the steering gear dust boots
for cracks and leaking steering fluid
12.8b Check the anti-roll bar bushings
(arrowed) for deterioration at the front and
the rear of the vehicle12.10 Inspect the balljoint and tie-rod end
boots for tears - tears or damage in either
boot will allow contamination of the grease
which will lead to premature failure
1 Engine oil - Light engine oil in a can like
this can be used for door and bonnet
hinges
2 Graphite spray - Used to lubricate lock
cylinders
3 Grease - Grease, in a variety of types and
weights, is available for use in a grease
gun.
4 Grease gun - A common grease gun,
shown here with a detachable hose and
nozzle, is needed for chassis lubrication.
After use, clean it thoroughly
Page 30 of 227
16 Spark plug renewal
2
Refer to Section 4, renewing the plugs
regardless of their apparent condition.
17 Air cleaner element renewal
1
1The air filter is located inside a housing at
the left side of the engine compartment. To
remove the air filter, release the four spring
clips that secure the two halves of the air
cleaner housing together, then lift the cover
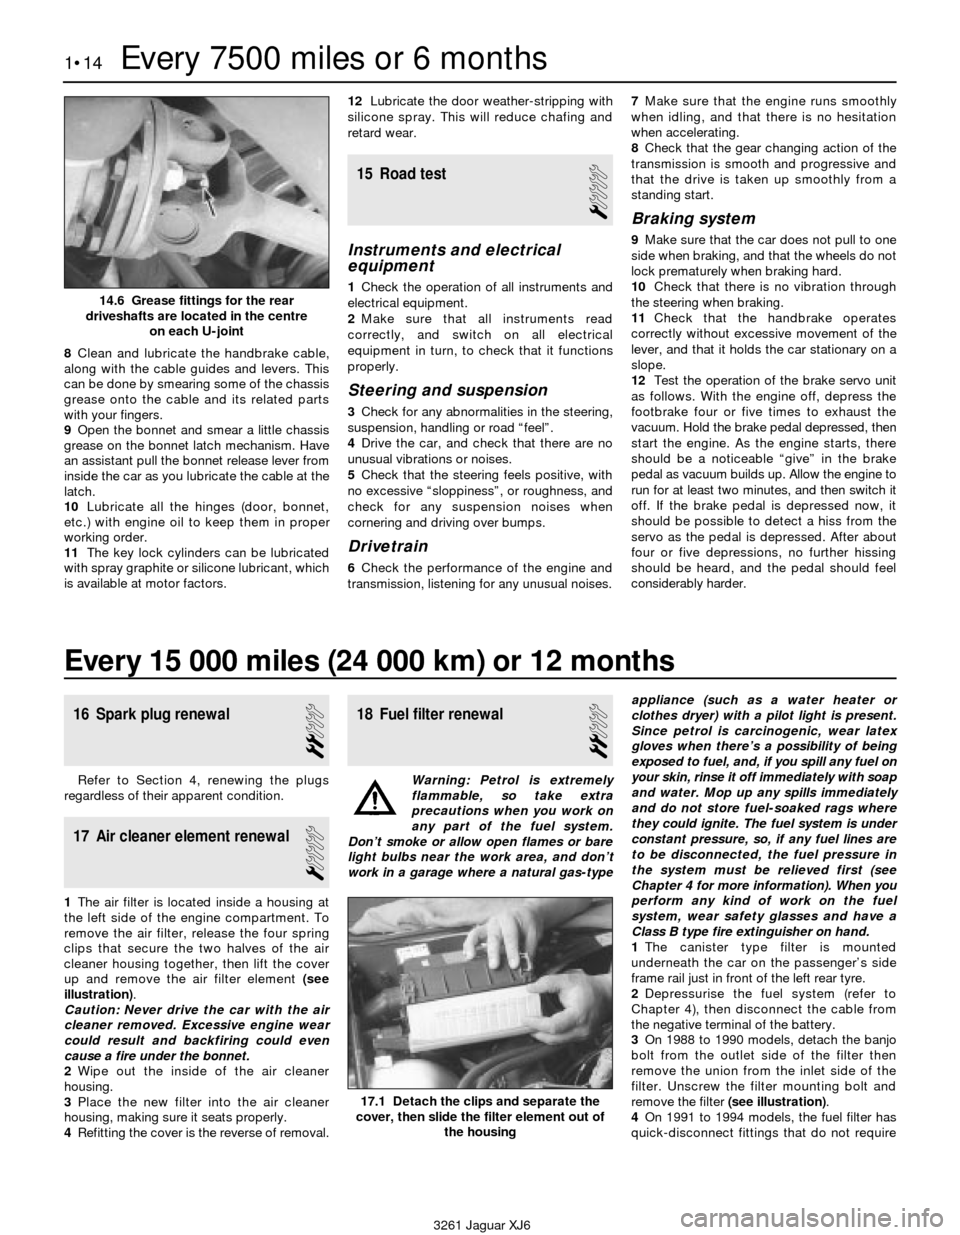
up and remove the air filter element (see
illustration).
Caution: Never drive the car with the air
cleaner removed. Excessive engine wear
could result and backfiring could even
cause a fire under the bonnet.
2Wipe out the inside of the air cleaner
housing.
3Place the new filter into the air cleaner
housing, making sure it seats properly.
4Refitting the cover is the reverse of removal.
18 Fuel filter renewal
2
Warning: Petrol is extremely
flammable, so take extra
precautions when you work on
any part of the fuel system.
Don’t smoke or allow open flames or bare
light bulbs near the work area, and don’t
work in a garage where a natural gas-typeappliance (such as a water heater or
clothes dryer) with a pilot light is present.
Since petrol is carcinogenic, wear latex
gloves when there’s a possibility of being
exposed to fuel, and, if you spill any fuel on
your skin, rinse it off immediately with soap
and water. Mop up any spills immediately
and do not store fuel-soaked rags where
they could ignite. The fuel system is under
constant pressure, so, if any fuel lines are
to be disconnected, the fuel pressure in
the system must be relieved first (see
Chapter 4 for more information). When you
perform any kind of work on the fuel
system, wear safety glasses and have a
Class B type fire extinguisher on hand.
1The canister type filter is mounted
underneath the car on the passenger’s side
frame rail just in front of the left rear tyre.
2Depressurise the fuel system (refer to
Chapter 4), then disconnect the cable from
the negative terminal of the battery.
3On 1988 to 1990 models, detach the banjo
bolt from the outlet side of the filter then
remove the union from the inlet side of the
filter. Unscrew the filter mounting bolt and
remove the filter (see illustration).
4On 1991 to 1994 models, the fuel filter has
quick-disconnect fittings that do not require 8Clean and lubricate the handbrake cable,
along with the cable guides and levers. This
can be done by smearing some of the chassis
grease onto the cable and its related parts
with your fingers.
9Open the bonnet and smear a little chassis
grease on the bonnet latch mechanism. Have
an assistant pull the bonnet release lever from
inside the car as you lubricate the cable at the
latch.
10Lubricate all the hinges (door, bonnet,
etc.) with engine oil to keep them in proper
working order.
11The key lock cylinders can be lubricated
with spray graphite or silicone lubricant, which
is available at motor factors.12Lubricate the door weather-stripping with
silicone spray. This will reduce chafing and
retard wear.
15 Road test
1
Instruments and electrical
equipment
1Check the operation of all instruments and
electrical equipment.
2Make sure that all instruments read
correctly, and switch on all electrical
equipment in turn, to check that it functions
properly.
Steering and suspension
3Check for any abnormalities in the steering,
suspension, handling or road “feel”.
4Drive the car, and check that there are no
unusual vibrations or noises.
5Check that the steering feels positive, with
no excessive “sloppiness”, or roughness, and
check for any suspension noises when
cornering and driving over bumps.
Drivetrain
6Check the performance of the engine and
transmission, listening for any unusual noises.7Make sure that the engine runs smoothly
when idling, and that there is no hesitation
when accelerating.
8Check that the gear changing action of the
transmission is smooth and progressive and
that the drive is taken up smoothly from a
standing start.
Braking system
9Make sure that the car does not pull to one
side when braking, and that the wheels do not
lock prematurely when braking hard.
10Check that there is no vibration through
the steering when braking.
11Check that the handbrake operates
correctly without excessive movement of the
lever, and that it holds the car stationary on a
slope.
12Test the operation of the brake servo unit
as follows. With the engine off, depress the
footbrake four or five times to exhaust the
vacuum. Hold the brake pedal depressed, then
start the engine. As the engine starts, there
should be a noticeable “give” in the brake
pedal as vacuum builds up. Allow the engine to
run for at least two minutes, and then switch it
off. If the brake pedal is depressed now, it
should be possible to detect a hiss from the
servo as the pedal is depressed. After about
four or five depressions, no further hissing
should be heard, and the pedal should feel
considerably harder.
1•14Every 7500 miles or 6 months
17.1 Detach the clips and separate the
cover, then slide the filter element out of
the housing
3261 Jaguar XJ6
14.6 Grease fittings for the rear
driveshafts are located in the centre
on each U-joint
Every 15 000 miles (24 000 km) or 12 months
Page 31 of 227
hand tools to remove. Simply slide back the
locking collars and remove the inlet and outlet
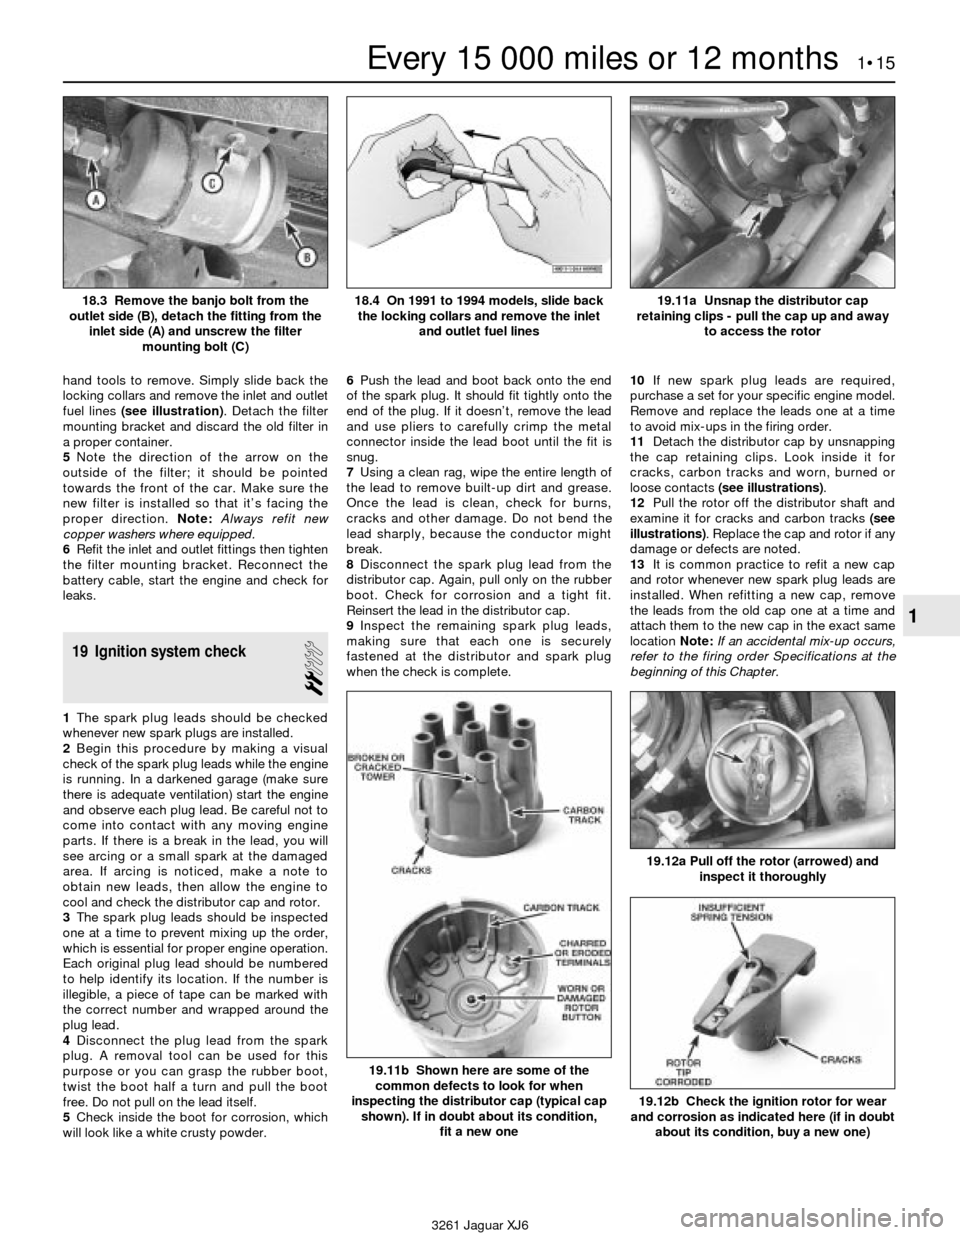
fuel lines (see illustration). Detach the filter
mounting bracket and discard the old filter in
a proper container.
5Note the direction of the arrow on the
outside of the filter; it should be pointed
towards the front of the car. Make sure the
new filter is installed so that it’s facing the
proper direction. Note:Always refit new
copper washers where equipped.
6Refit the inlet and outlet fittings then tighten
the filter mounting bracket. Reconnect the
battery cable, start the engine and check for
leaks.
19 Ignition system check
2
1The spark plug leads should be checked
whenever new spark plugs are installed.
2Begin this procedure by making a visual
check of the spark plug leads while the engine
is running. In a darkened garage (make sure
there is adequate ventilation) start the engine
and observe each plug lead. Be careful not to
come into contact with any moving engine
parts. If there is a break in the lead, you will
see arcing or a small spark at the damaged
area. If arcing is noticed, make a note to
obtain new leads, then allow the engine to
cool and check the distributor cap and rotor.
3The spark plug leads should be inspected
one at a time to prevent mixing up the order,
which is essential for proper engine operation.
Each original plug lead should be numbered
to help identify its location. If the number is
illegible, a piece of tape can be marked with
the correct number and wrapped around the
plug lead.
4Disconnect the plug lead from the spark
plug. A removal tool can be used for this
purpose or you can grasp the rubber boot,
twist the boot half a turn and pull the boot
free. Do not pull on the lead itself.
5Check inside the boot for corrosion, which
will look like a white crusty powder.6Push the lead and boot back onto the end
of the spark plug. It should fit tightly onto the
end of the plug. If it doesn’t, remove the lead
and use pliers to carefully crimp the metal
connector inside the lead boot until the fit is
snug.
7Using a clean rag, wipe the entire length of
the lead to remove built-up dirt and grease.
Once the lead is clean, check for burns,
cracks and other damage. Do not bend the
lead sharply, because the conductor might
break.
8Disconnect the spark plug lead from the
distributor cap. Again, pull only on the rubber
boot. Check for corrosion and a tight fit.
Reinsert the lead in the distributor cap.
9Inspect the remaining spark plug leads,
making sure that each one is securely
fastened at the distributor and spark plug
when the check is complete.10If new spark plug leads are required,
purchase a set for your specific engine model.
Remove and replace the leads one at a time
to avoid mix-ups in the firing order.
11Detach the distributor cap by unsnapping
the cap retaining clips. Look inside it for
cracks, carbon tracks and worn, burned or
loose contacts (see illustrations).
12Pull the rotor off the distributor shaft and
examine it for cracks and carbon tracks (see
illustrations). Replace the cap and rotor if any
damage or defects are noted.
13It is common practice to refit a new cap
and rotor whenever new spark plug leads are
installed. When refitting a new cap, remove
the leads from the old cap one at a time and
attach them to the new cap in the exact same
location Note:If an accidental mix-up occurs,
refer to the firing order Specifications at the
beginning of this Chapter.
Every 15 000 miles or 12 months 1•15
1
19.11a Unsnap the distributor cap
retaining clips - pull the cap up and away
to access the rotor
19.11b Shown here are some of the
common defects to look for when
inspecting the distributor cap (typical cap
shown). If in doubt about its condition,
fit a new one
19.12a Pull off the rotor (arrowed) and
inspect it thoroughly
19.12b Check the ignition rotor for wear
and corrosion as indicated here (if in doubt
about its condition, buy a new one)
3261 Jaguar XJ6 18.3 Remove the banjo bolt from the
outlet side (B), detach the fitting from the
inlet side (A) and unscrew the filter
mounting bolt (C)
18.4 On 1991 to 1994 models, slide back
the locking collars and remove the inlet
and outlet fuel lines
Page 32 of 227
20 Crankcase ventilation
system check
1
Refer to Chapter 6.
21 Drivebelt check and renewal
2
Check
1The drivebelts, or V-belts as they are
sometimes called, are located at the front of
the engine and play an important role in the
overall operation of the vehicle and its
components. Due to their function and
material make-up, the belts are prone to
failure after a period of time and should be
inspected and adjusted periodically to prevent
major engine damage.
2The number of belts used on a particular
vehicle depends on the accessories installed.
The main belt transmits power from the
crankshaft to the water pump, alternator and
the power steering pump. The second belt
transmits power from the crankshaft to the air
conditioning compressor.
3With the engine off, open the bonnet and
locate the drivebelts. With a flashlight, check
each belt for separation of the adhesive
rubber on both sides of the core, core
separation from the belt side, a severed core,
separation of the ribs from the adhesive
rubber, cracking or separation of the ribs, and
torn or worn ribs or cracks in the inner ridges
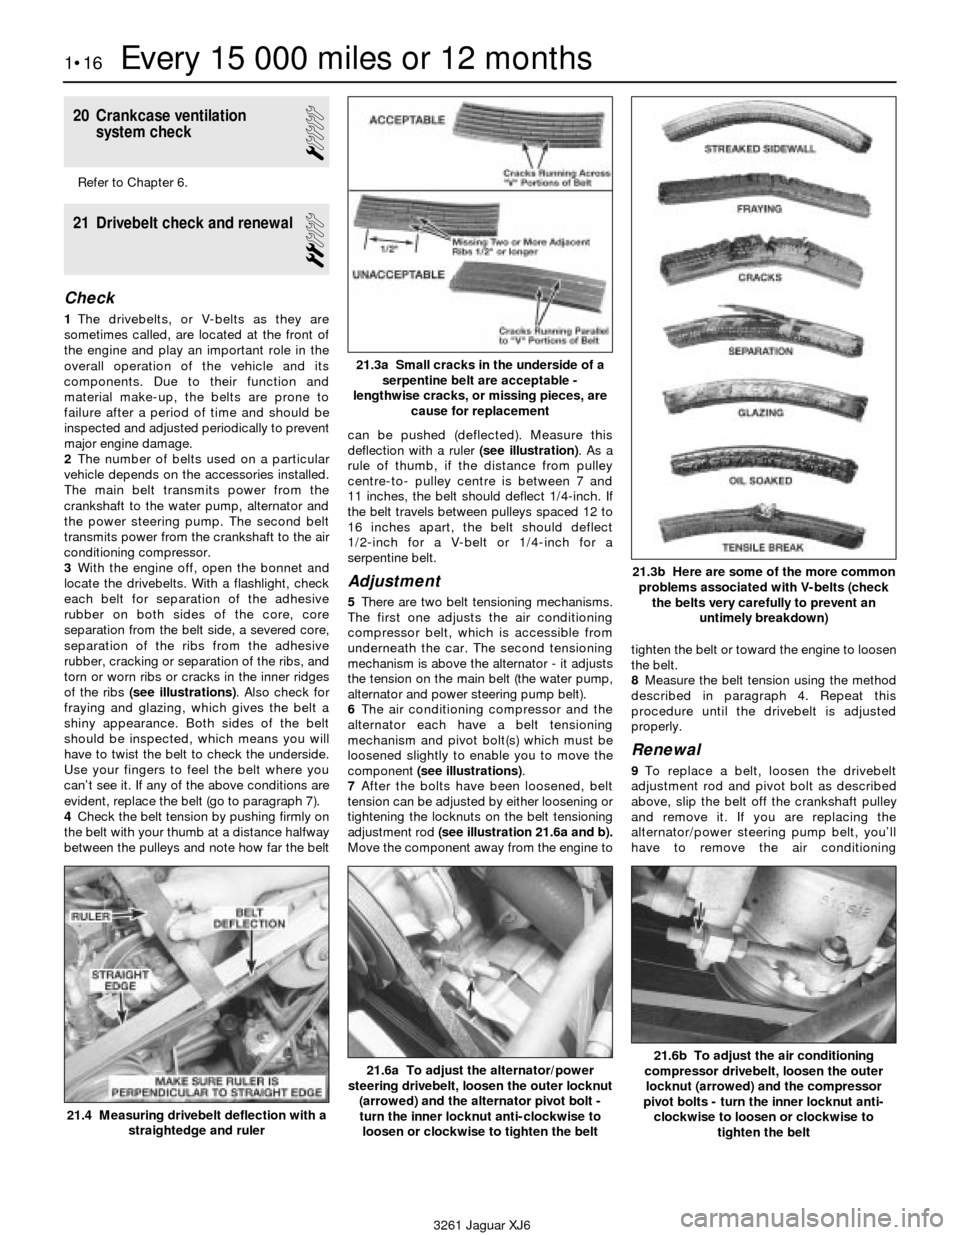
of the ribs (see illustrations). Also check for
fraying and glazing, which gives the belt a
shiny appearance. Both sides of the belt
should be inspected, which means you will
have to twist the belt to check the underside.
Use your fingers to feel the belt where you
can’t see it. If any of the above conditions are
evident, replace the belt (go to paragraph 7).
4Check the belt tension by pushing firmly on
the belt with your thumb at a distance halfway
between the pulleys and note how far the beltcan be pushed (deflected). Measure this
deflection with a ruler (see illustration). As a
rule of thumb, if the distance from pulley
centre-to- pulley centre is between 7 and
11 inches, the belt should deflect 1/4-inch. If
the belt travels between pulleys spaced 12 to
16 inches apart, the belt should deflect
1/2-inch for a V-belt or 1/4-inch for a
serpentine belt.
Adjustment
5There are two belt tensioning mechanisms.
The first one adjusts the air conditioning
compressor belt, which is accessible from
underneath the car. The second tensioning
mechanism is above the alternator - it adjusts
the tension on the main belt (the water pump,
alternator and power steering pump belt).
6The air conditioning compressor and the
alternator each have a belt tensioning
mechanism and pivot bolt(s) which must be
loosened slightly to enable you to move the
component (see illustrations).
7After the bolts have been loosened, belt
tension can be adjusted by either loosening or
tightening the locknuts on the belt tensioning
adjustment rod (see illustration 21.6a and b).
Move the component away from the engine totighten the belt or toward the engine to loosen
the belt.
8Measure the belt tension using the method
described in paragraph 4. Repeat this
procedure until the drivebelt is adjusted
properly.
Renewal
9To replace a belt, loosen the drivebelt
adjustment rod and pivot bolt as described
above, slip the belt off the crankshaft pulley
and remove it. If you are replacing the
alternator/power steering pump belt, you’ll
have to remove the air conditioning
1•16Every 15 000 miles or 12 months
21.3a Small cracks in the underside of a
serpentine belt are acceptable -
lengthwise cracks, or missing pieces, are
cause for replacement
21.3b Here are some of the more common
problems associated with V-belts (check
the belts very carefully to prevent an
untimely breakdown)
21.4 Measuring drivebelt deflection with a
straightedge and ruler
21.6a To adjust the alternator/power
steering drivebelt, loosen the outer locknut
(arrowed) and the alternator pivot bolt -
turn the inner locknut anti-clockwise to
loosen or clockwise to tighten the belt21.6b To adjust the air conditioning
compressor drivebelt, loosen the outer
locknut (arrowed) and the compressor
pivot bolts - turn the inner locknut anti-
clockwise to loosen or clockwise to
tighten the belt
3261 Jaguar XJ6
Page 33 of 227
compressor belt first because of the way they
are arranged on the crankshaft pulley.
Because of this and because belts tend to
wear out more or less together, it is a good
idea to replace both belts at the same time.
Mark each belt and its appropriate pulley
groove so the new belts can be installed in
their proper positions.
10Take the old belts to the parts store in
order to make a direct comparison for length,
width and design.
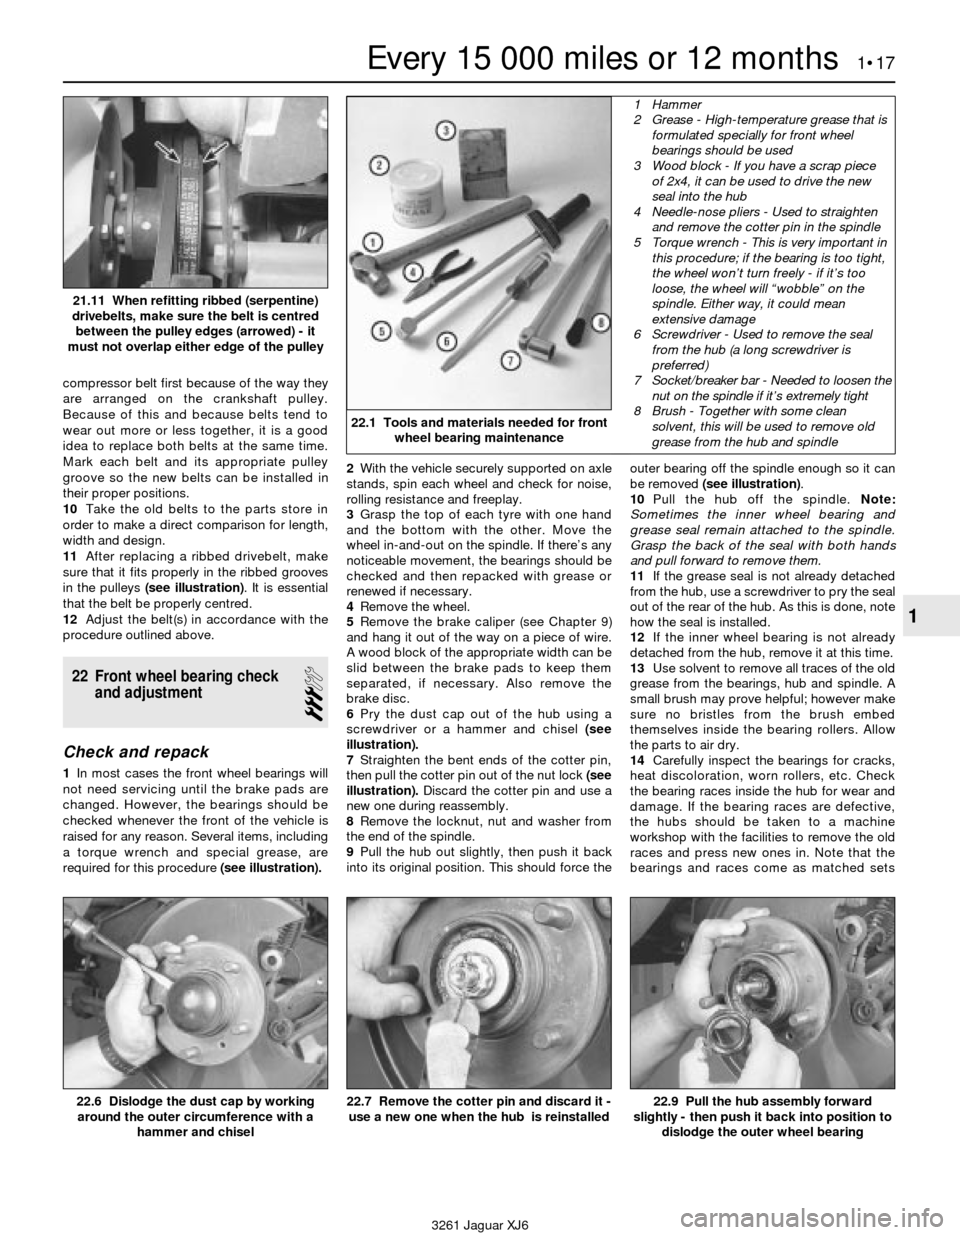
11After replacing a ribbed drivebelt, make
sure that it fits properly in the ribbed grooves
in the pulleys (see illustration). It is essential
that the belt be properly centred.
12Adjust the belt(s) in accordance with the
procedure outlined above.
22 Front wheel bearing check
and adjustment
3
Check and repack
1In most cases the front wheel bearings will
not need servicing until the brake pads are
changed. However, the bearings should be
checked whenever the front of the vehicle is
raised for any reason. Several items, including
a torque wrench and special grease, are
required for this procedure (see illustration).2With the vehicle securely supported on axle
stands, spin each wheel and check for noise,
rolling resistance and freeplay.
3Grasp the top of each tyre with one hand
and the bottom with the other. Move the
wheel in-and-out on the spindle. If there’s any
noticeable movement, the bearings should be
checked and then repacked with grease or
renewed if necessary.
4Remove the wheel.
5Remove the brake caliper (see Chapter 9)
and hang it out of the way on a piece of wire.
A wood block of the appropriate width can be
slid between the brake pads to keep them
separated, if necessary. Also remove the
brake disc.
6Pry the dust cap out of the hub using a
screwdriver or a hammer and chisel (see
illustration).
7Straighten the bent ends of the cotter pin,
then pull the cotter pin out of the nut lock (see
illustration).Discard the cotter pin and use a
new one during reassembly.
8Remove the locknut, nut and washer from
the end of the spindle.
9Pull the hub out slightly, then push it back
into its original position. This should force theouter bearing off the spindle enough so it can
be removed (see illustration).
10Pull the hub off the spindle. Note:
Sometimes the inner wheel bearing and
grease seal remain attached to the spindle.
Grasp the back of the seal with both hands
and pull forward to remove them.
11If the grease seal is not already detached
from the hub, use a screwdriver to pry the seal
out of the rear of the hub. As this is done, note
how the seal is installed.
12If the inner wheel bearing is not already
detached from the hub, remove it at this time.
13Use solvent to remove all traces of the old
grease from the bearings, hub and spindle. A
small brush may prove helpful; however make
sure no bristles from the brush embed
themselves inside the bearing rollers. Allow
the parts to air dry.
14Carefully inspect the bearings for cracks,
heat discoloration, worn rollers, etc. Check
the bearing races inside the hub for wear and
damage. If the bearing races are defective,
the hubs should be taken to a machine
workshop with the facilities to remove the old
races and press new ones in. Note that the
bearings and races come as matched sets
Every 15 000 miles or 12 months 1•17
1
22.1 Tools and materials needed for front
wheel bearing maintenance
1 Hammer
2 Grease - High-temperature grease that is
formulated specially for front wheel
bearings should be used
3 Wood block - If you have a scrap piece
of 2x4, it can be used to drive the new
seal into the hub
4 Needle-nose pliers - Used to straighten
and remove the cotter pin in the spindle
5 Torque wrench - This is very important in
this procedure; if the bearing is too tight,
the wheel won’t turn freely - if it’s too
loose, the wheel will “wobble” on the
spindle. Either way, it could mean
extensive damage
6 Screwdriver - Used to remove the seal
from the hub (a long screwdriver is
preferred)
7 Socket/breaker bar - Needed to loosen the
nut on the spindle if it’s extremely tight
8 Brush - Together with some clean
solvent, this will be used to remove old
grease from the hub and spindle
22.6 Dislodge the dust cap by working
around the outer circumference with a
hammer and chisel
22.7 Remove the cotter pin and discard it -
use a new one when the hub is reinstalled22.9 Pull the hub assembly forward
slightly - then push it back into position to
dislodge the outer wheel bearing
3261 Jaguar XJ6 21.11 When refitting ribbed (serpentine)
drivebelts, make sure the belt is centred
between the pulley edges (arrowed) - it
must not overlap either edge of the pulley
Page 34 of 227
and old bearings should never be installed on
new races.
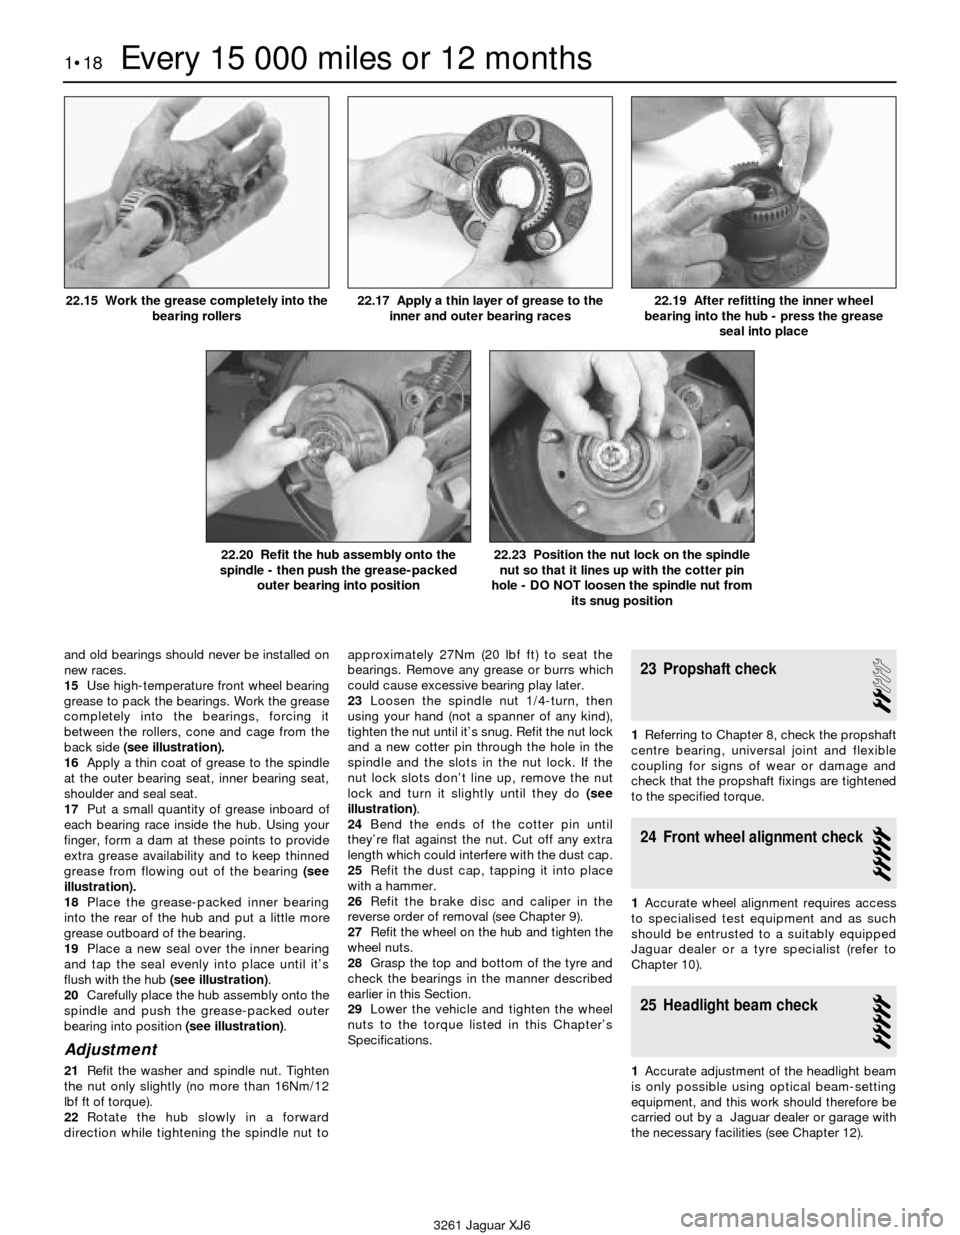
15Use high-temperature front wheel bearing
grease to pack the bearings. Work the grease
completely into the bearings, forcing it
between the rollers, cone and cage from the
back side (see illustration).
16Apply a thin coat of grease to the spindle
at the outer bearing seat, inner bearing seat,
shoulder and seal seat.
17Put a small quantity of grease inboard of
each bearing race inside the hub. Using your
finger, form a dam at these points to provide
extra grease availability and to keep thinned
grease from flowing out of the bearing (see
illustration).
18Place the grease-packed inner bearing
into the rear of the hub and put a little more
grease outboard of the bearing.
19Place a new seal over the inner bearing
and tap the seal evenly into place until it’s
flush with the hub (see illustration).
20Carefully place the hub assembly onto the
spindle and push the grease-packed outer
bearing into position (see illustration).
Adjustment
21Refit the washer and spindle nut. Tighten
the nut only slightly (no more than 16Nm/12
lbf ft of torque).
22Rotate the hub slowly in a forward
direction while tightening the spindle nut toapproximately 27Nm (20 lbf ft) to seat the
bearings. Remove any grease or burrs which
could cause excessive bearing play later.
23Loosen the spindle nut 1/4-turn, then
using your hand (not a spanner of any kind),
tighten the nut until it’s snug. Refit the nut lock
and a new cotter pin through the hole in the
spindle and the slots in the nut lock. If the
nut lock slots don’t line up, remove the nut
lock and turn it slightly until they do (see
illustration).
24Bend the ends of the cotter pin until
they’re flat against the nut. Cut off any extra
length which could interfere with the dust cap.
25Refit the dust cap, tapping it into place
with a hammer.
26Refit the brake disc and caliper in the
reverse order of removal (see Chapter 9).
27Refit the wheel on the hub and tighten the
wheel nuts.
28Grasp the top and bottom of the tyre and
check the bearings in the manner described
earlier in this Section.
29Lower the vehicle and tighten the wheel
nuts to the torque listed in this Chapter’s
Specifications.
23 Propshaft check
2
1Referring to Chapter 8, check the propshaft
centre bearing, universal joint and flexible
coupling for signs of wear or damage and
check that the propshaft fixings are tightened
to the specified torque.
24 Front wheel alignment check
5
1Accurate wheel alignment requires access
to specialised test equipment and as such
should be entrusted to a suitably equipped
Jaguar dealer or a tyre specialist (refer to
Chapter 10).
25 Headlight beam check
5
1Accurate adjustment of the headlight beam
is only possible using optical beam-setting
equipment, and this work should therefore be
carried out by a Jaguar dealer or garage with
the necessary facilities (see Chapter 12).
1•18Every 15 000 miles or 12 months
22.15 Work the grease completely into the
bearing rollers22.17 Apply a thin layer of grease to the
inner and outer bearing races22.19 After refitting the inner wheel
bearing into the hub - press the grease
seal into place
22.20 Refit the hub assembly onto the
spindle - then push the grease-packed
outer bearing into position22.23 Position the nut lock on the spindle
nut so that it lines up with the cotter pin
hole - DO NOT loosen the spindle nut from
its snug position
3261 Jaguar XJ6
Page 35 of 227
26 Automatic transmission fluid
and filter renewal
2
1At the specified time intervals, the
transmission fluid should be drained and
renewed. Since the fluid will remain hot long
after driving, perform this procedure only after
the engine has cooled down completely.
2Before beginning work, purchase the
specified transmission fluid and a new filter.
3Other tools necessary for this job include
axle stands to support the vehicle in a raised
position, a drain pan capable of holding at
least eight pints, newspapers and clean rags.4Raise the vehicle and support it securely on
axle stands.
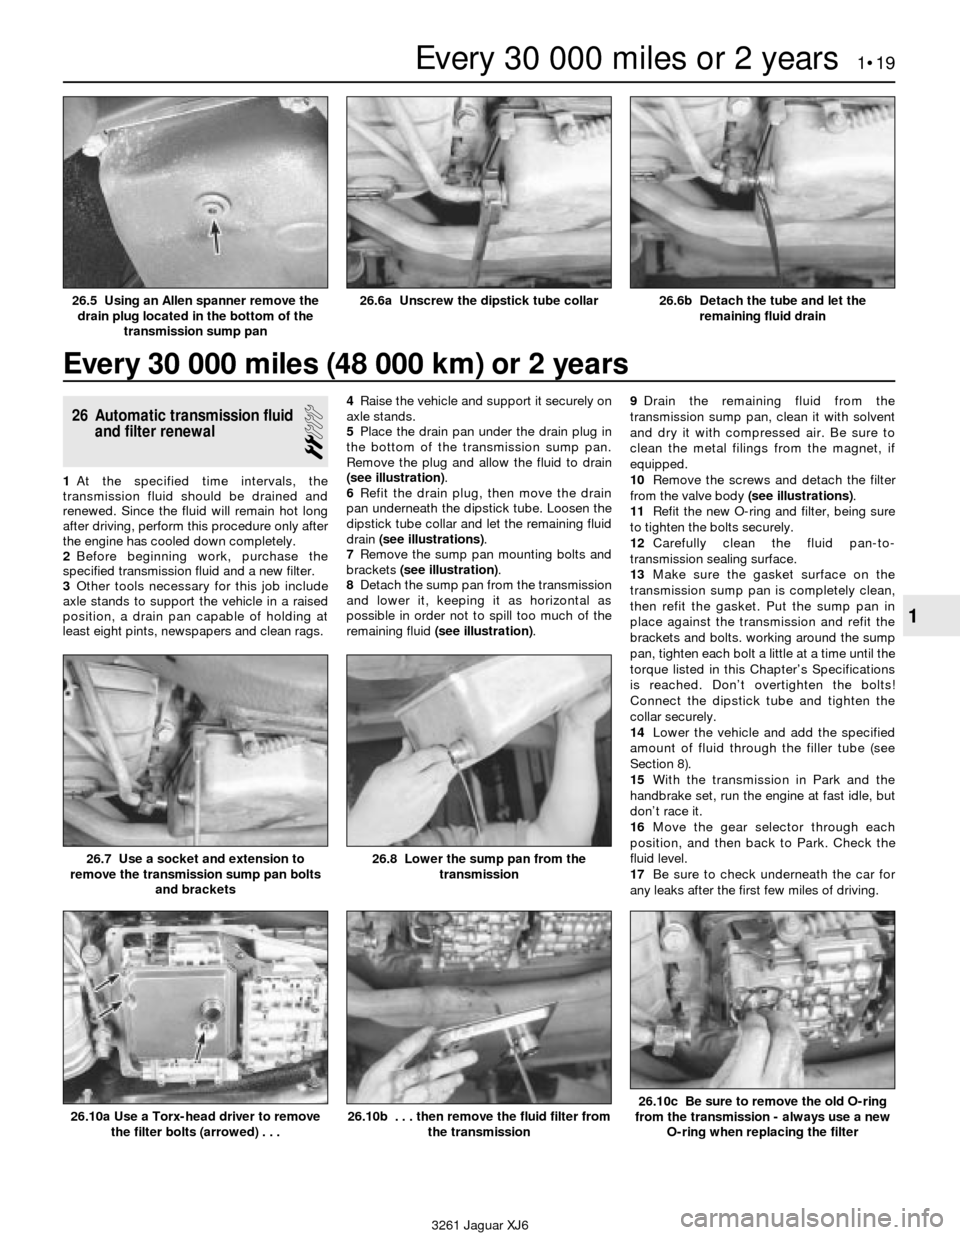
5Place the drain pan under the drain plug in
the bottom of the transmission sump pan.
Remove the plug and allow the fluid to drain
(see illustration).
6Refit the drain plug, then move the drain
pan underneath the dipstick tube. Loosen the
dipstick tube collar and let the remaining fluid
drain (see illustrations).
7Remove the sump pan mounting bolts and
brackets (see illustration).
8Detach the sump pan from the transmission
and lower it, keeping it as horizontal as
possible in order not to spill too much of the
remaining fluid (see illustration).9Drain the remaining fluid from the
transmission sump pan, clean it with solvent
and dry it with compressed air. Be sure to
clean the metal filings from the magnet, if
equipped.
10Remove the screws and detach the filter
from the valve body (see illustrations).
11Refit the new O-ring and filter, being sure
to tighten the bolts securely.
12Carefully clean the fluid pan-to-
transmission sealing surface.
13Make sure the gasket surface on the
transmission sump pan is completely clean,
then refit the gasket. Put the sump pan in
place against the transmission and refit the
brackets and bolts. working around the sump
pan, tighten each bolt a little at a time until the
torque listed in this Chapter’s Specifications
is reached. Don’t overtighten the bolts!
Connect the dipstick tube and tighten the
collar securely.
14Lower the vehicle and add the specified
amount of fluid through the filler tube (see
Section 8).
15With the transmission in Park and the
handbrake set, run the engine at fast idle, but
don’t race it.
16Move the gear selector through each
position, and then back to Park. Check the
fluid level.
17Be sure to check underneath the car for
any leaks after the first few miles of driving.
Every 30 000 miles (48 000 km) or 2 years
Every 30 000 miles or 2 years 1•19
1
26.6a Unscrew the dipstick tube collar26.6b Detach the tube and let the
remaining fluid drain
26.7 Use a socket and extension to
remove the transmission sump pan bolts
and brackets26.8 Lower the sump pan from the
transmission
26.10a Use a Torx-head driver to remove
the filter bolts (arrowed) . . .
3261 Jaguar XJ6
26.5 Using an Allen spanner remove the
drain plug located in the bottom of the
transmission sump pan
26.10b . . . then remove the fluid filter from
the transmission26.10c Be sure to remove the old O-ring
from the transmission - always use a new
O-ring when replacing the filter
Page 36 of 227
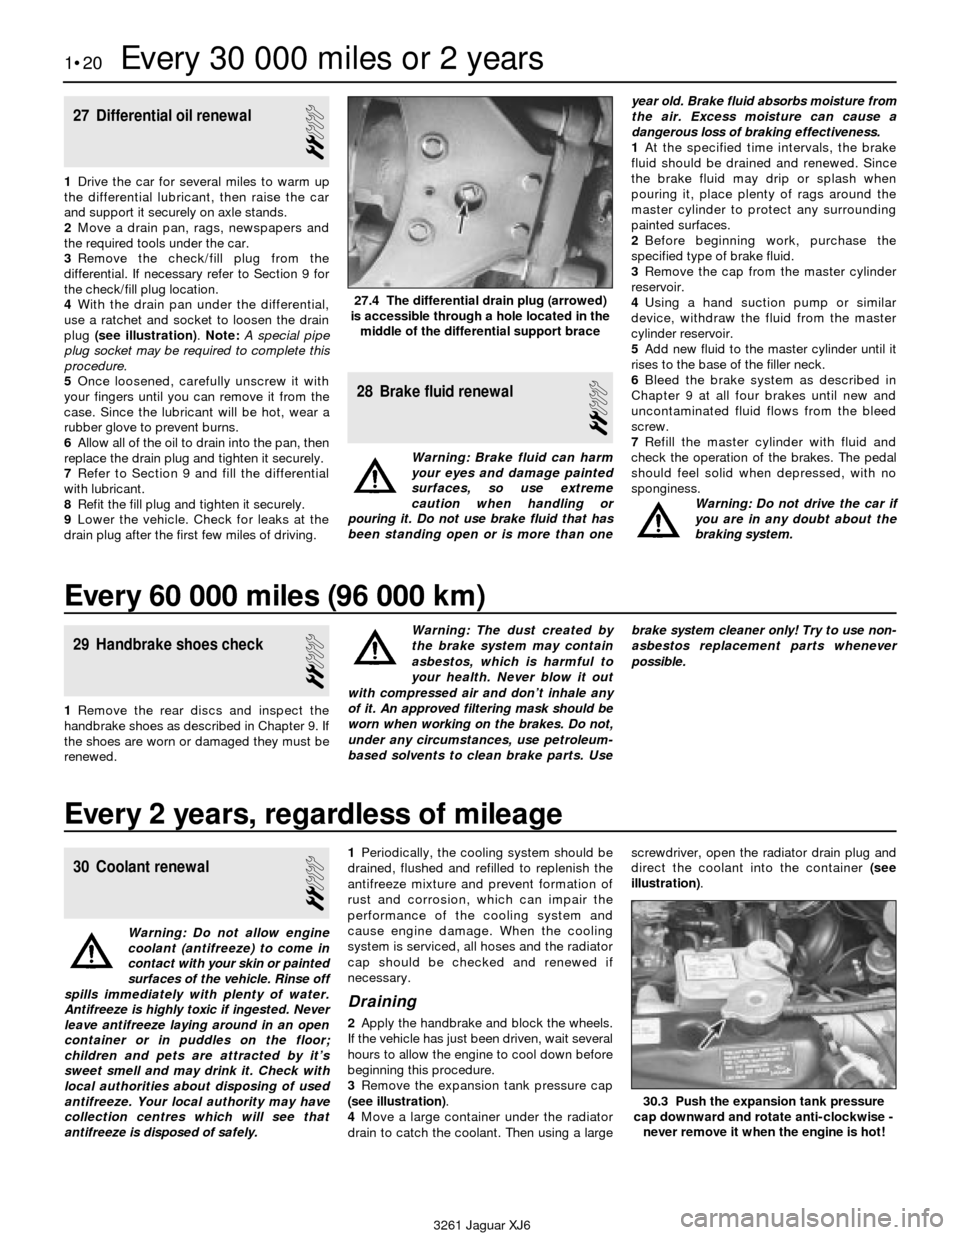
30 Coolant renewal
2
Warning: Do not allow engine
coolant (antifreeze) to come in
contact with your skin or painted
surfaces of the vehicle. Rinse off
spills immediately with plenty of water.
Antifreeze is highly toxic if ingested. Never
leave antifreeze laying around in an open
container or in puddles on the floor;
children and pets are attracted by it’s
sweet smell and may drink it. Check with
local authorities about disposing of used
antifreeze. Your local authority may have
collection centres which will see that
antifreeze is disposed of safely.1Periodically, the cooling system should be
drained, flushed and refilled to replenish the
antifreeze mixture and prevent formation of
rust and corrosion, which can impair the
performance of the cooling system and
cause engine damage. When the cooling
system is serviced, all hoses and the radiator
cap should be checked and renewed if
necessary.
Draining
2Apply the handbrake and block the wheels.
If the vehicle has just been driven, wait several
hours to allow the engine to cool down before
beginning this procedure.
3Remove the expansion tank pressure cap
(see illustration).
4Move a large container under the radiator
drain to catch the coolant. Then using a largescrewdriver, open the radiator drain plug and
direct the coolant into the container (see
illustration).
27 Differential oil renewal
2
1Drive the car for several miles to warm up
the differential lubricant, then raise the car
and support it securely on axle stands.
2Move a drain pan, rags, newspapers and
the required tools under the car.
3Remove the check/fill plug from the
differential. If necessary refer to Section 9 for
the check/fill plug location.
4With the drain pan under the differential,
use a ratchet and socket to loosen the drain
plug (see illustration). Note:A special pipe
plug socket may be required to complete this
procedure.
5Once loosened, carefully unscrew it with
your fingers until you can remove it from the
case. Since the lubricant will be hot, wear a
rubber glove to prevent burns.
6Allow all of the oil to drain into the pan, then
replace the drain plug and tighten it securely.
7Refer to Section 9 and fill the differential
with lubricant.
8Refit the fill plug and tighten it securely.
9Lower the vehicle. Check for leaks at the
drain plug after the first few miles of driving.
28 Brake fluid renewal
2
Warning: Brake fluid can harm
your eyes and damage painted
surfaces, so use extreme
caution when handling or
pouring it. Do not use brake fluid that has
been standing open or is more than oneyear old. Brake fluid absorbs moisture from
the air. Excess moisture can cause a
dangerous loss of braking effectiveness.
1At the specified time intervals, the brake
fluid should be drained and renewed. Since
the brake fluid may drip or splash when
pouring it, place plenty of rags around the
master cylinder to protect any surrounding
painted surfaces.
2Before beginning work, purchase the
specified type of brake fluid.
3Remove the cap from the master cylinder
reservoir.
4Using a hand suction pump or similar
device, withdraw the fluid from the master
cylinder reservoir.
5Add new fluid to the master cylinder until it
rises to the base of the filler neck.
6Bleed the brake system as described in
Chapter 9 at all four brakes until new and
uncontaminated fluid flows from the bleed
screw.
7Refill the master cylinder with fluid and
check the operation of the brakes. The pedal
should feel solid when depressed, with no
sponginess.
Warning: Do not drive the car if
you are in any doubt about the
braking system.
1•20Every 30 000 miles or 2 years
27.4 The differential drain plug (arrowed)
is accessible through a hole located in the
middle of the differential support brace
30.3 Push the expansion tank pressure
cap downward and rotate anti-clockwise -
never remove it when the engine is hot!
3261 Jaguar XJ6
Every 60 000 miles (96 000 km)
29 Handbrake shoes check
2
1Remove the rear discs and inspect the
handbrake shoes as described in Chapter 9. If
the shoes are worn or damaged they must be
renewed.Warning: The dust created by
the brake system may contain
asbestos, which is harmful to
your health. Never blow it out
with compressed air and don’t inhale any
of it. An approved filtering mask should be
worn when working on the brakes. Do not,
under any circumstances, use petroleum-
based solvents to clean brake parts. Usebrake system cleaner only! Try to use non-
asbestos replacement parts whenever
possible.
Every 2 years, regardless of mileage
Page 37 of 227
5After the coolant stops flowing out of the
radiator, move the container under the engine
block drain plug. Remove the plug and let the
coolant in the block to drain (see illustration).
6While the coolant is draining from the
engine block, check the condition of the
radiator hoses, heater hoses and clamps
(refer to Section 7 if necessary).
7Replace any damaged clamps or hoses
(see Chapter 3).
Flushing
8Once the system is completely drained,
flush the radiator with fresh water from agarden hose until water runs clear at the drain.
The flushing action of the water will remove
sediments from the radiator but will not
remove more serious rust and scale from the
engine and cooling tube surfaces.
9These deposits can be removed by using
proprietary chemical cleaners. It should be
stressed, however, that these should only
need to be used if the system has been
neglected. Follow the procedure outlined in
their manufacturer’s instructions. If the
radiator is severely corroded, damaged or
leaking, it should be removed (see Chapter 3)
and taken to a radiator repair workshop.10On 1988 and 1989 models remove the
overflow hose from the coolant recovery
reservoir. Drain the reservoir and flush it with
clean water, then reconnect the hose (see
Chapter 3).
Refilling
11Close and tighten the radiator drain. Refit
and tighten the engine block drain plugs.
12Make sure the heater temperature control
is in the maximum heat position.
13Slowly refill the expansion tank with a
mixture of antifreeze and water until the
coolant reaches the base of the filler neck.
14Leave the expansion tank pressure cap
off and run the engine in a well-ventilated area
until the thermostat opens (coolant will begin
flowing through the radiator and the upper
radiator hose will become hot). Race the
engine two or three times under no load.
15Turn the engine off and let it cool. Add
more coolant mixture to bring the level back
up to the base of the filler neck.
16Squeeze the upper radiator hose to expel
air, then add more coolant mixture if
necessary. Refit the expansion tank pressure
cap.
17Start the engine, allow it to reach normal
operating temperature and check for leaks.
Every 2 years 1•21
1
3261 Jaguar XJ6
30.4 The radiator drain fitting (arrowed)
located at the bottom of the radiator30.5 The block drain plug (arrowed) is
located on the right side of the block