JAGUAR XJ6 1997 2.G Service Manual
[x] Cancel search | Manufacturer: JAGUAR, Model Year: 1997, Model line: XJ6, Model: JAGUAR XJ6 1997 2.GPages: 227, PDF Size: 7.2 MB
Page 41 of 227
8Tighten the screws to the torque listed in
this Chapter’s Specifications in three or four
equal steps.
9Refit the remaining components, start the
engine and check for oil leaks.
5 Intake manifold-
removal and refitting
2
Removal
1Disconnect the negative cable from the
battery.
Caution: If the stereo in your vehicle is
equipped with an anti-theft system, make
sure you have the correct activation code
before disconnecting the battery.
2Refer to Chapter 4 to remove the
accelerator and cruise-control linkage, safely
relieve the fuel system pressure, and
disconnect the fuel supply lines.
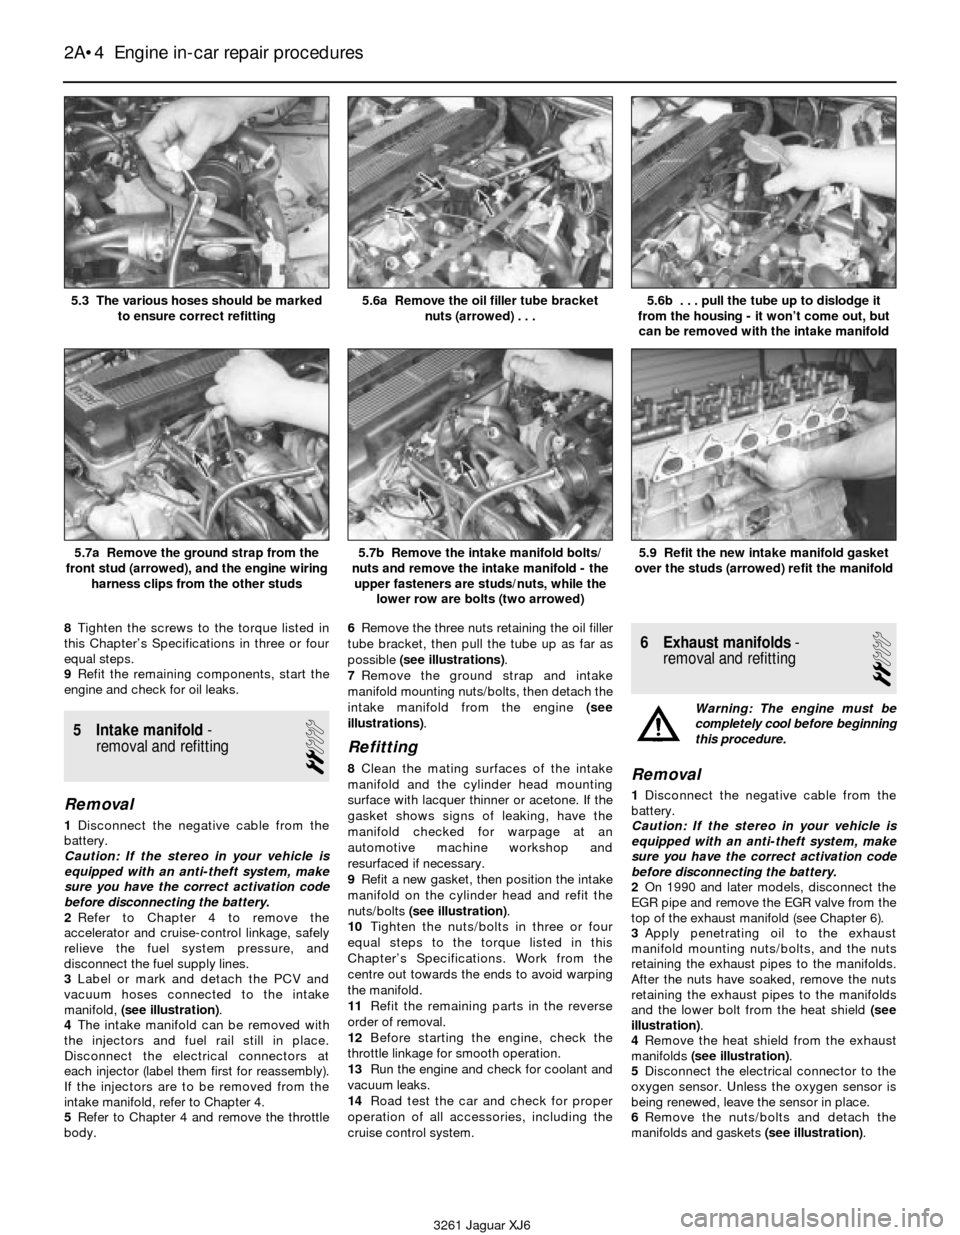
3Label or mark and detach the PCV and
vacuum hoses connected to the intake
manifold, (see illustration).
4The intake manifold can be removed with
the injectors and fuel rail still in place.
Disconnect the electrical connectors at
each injector (label them first for reassembly).
If the injectors are to be removed from the
intake manifold, refer to Chapter 4.
5Refer to Chapter 4 and remove the throttle
body.6Remove the three nuts retaining the oil filler
tube bracket, then pull the tube up as far as
possible (see illustrations).
7Remove the ground strap and intake
manifold mounting nuts/bolts, then detach the
intake manifold from the engine (see
illustrations).
Refitting
8Clean the mating surfaces of the intake
manifold and the cylinder head mounting
surface with lacquer thinner or acetone. If the
gasket shows signs of leaking, have the
manifold checked for warpage at an
automotive machine workshop and
resurfaced if necessary.
9Refit a new gasket, then position the intake
manifold on the cylinder head and refit the
nuts/bolts (see illustration).
10Tighten the nuts/bolts in three or four
equal steps to the torque listed in this
Chapter’s Specifications. Work from the
centre out towards the ends to avoid warping
the manifold.
11Refit the remaining parts in the reverse
order of removal.
12Before starting the engine, check the
throttle linkage for smooth operation.
13Run the engine and check for coolant and
vacuum leaks.
14Road test the car and check for proper
operation of all accessories, including the
cruise control system.
6 Exhaust manifolds-
removal and refitting
2
Warning: The engine must be
completely cool before beginning
this procedure.
Removal
1Disconnect the negative cable from the
battery.
Caution: If the stereo in your vehicle is
equipped with an anti-theft system, make
sure you have the correct activation code
before disconnecting the battery.
2On 1990 and later models, disconnect the
EGR pipe and remove the EGR valve from the
top of the exhaust manifold (see Chapter 6).
3Apply penetrating oil to the exhaust
manifold mounting nuts/bolts, and the nuts
retaining the exhaust pipes to the manifolds.
After the nuts have soaked, remove the nuts
retaining the exhaust pipes to the manifolds
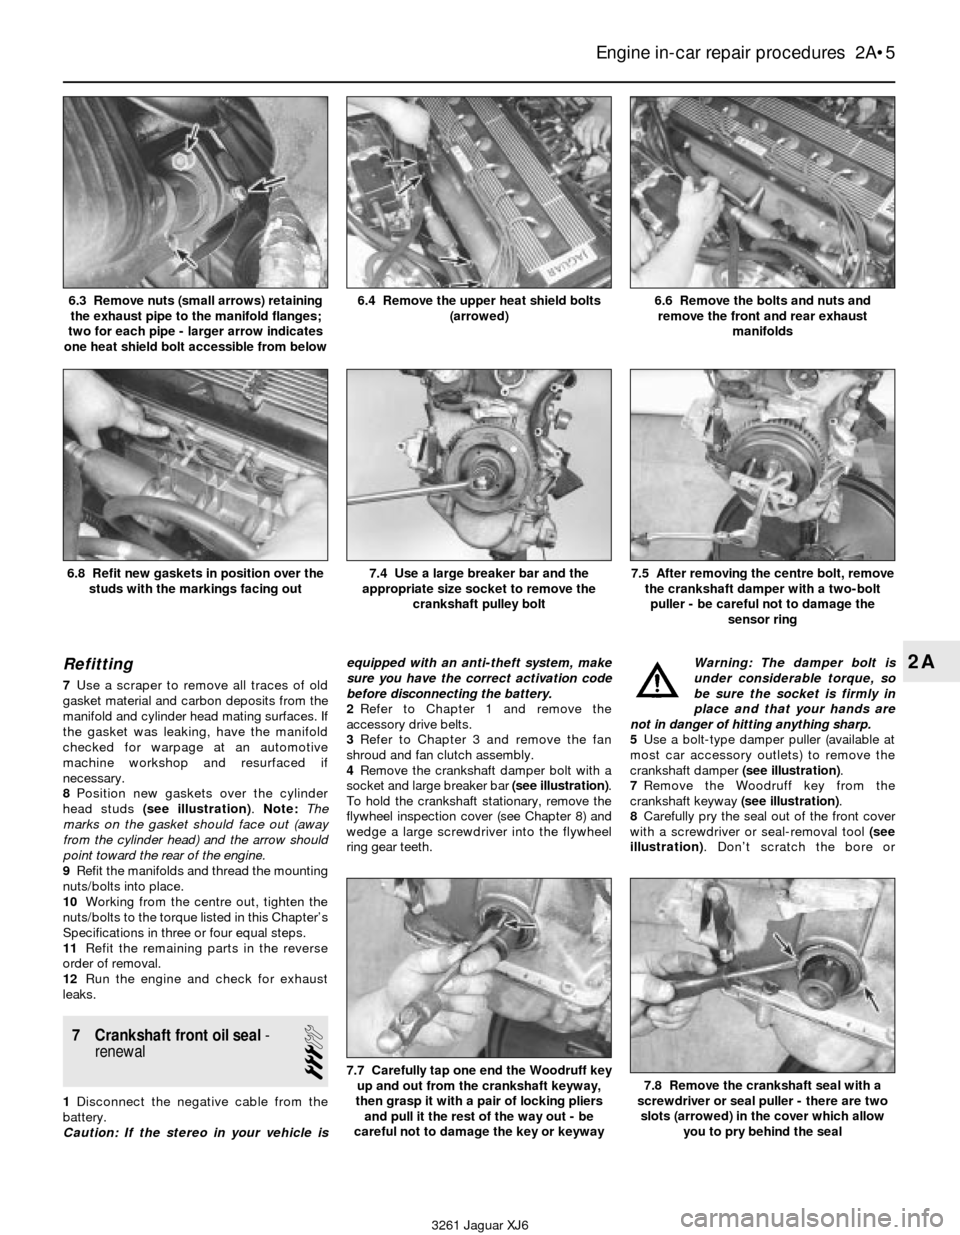
and the lower bolt from the heat shield (see
illustration).
4Remove the heat shield from the exhaust
manifolds(see illustration).
5Disconnect the electrical connector to the
oxygen sensor. Unless the oxygen sensor is
being renewed, leave the sensor in place.
6Remove the nuts/bolts and detach the
manifolds and gaskets (see illustration).
2A•4 Engine in-car repair procedures
5.3 The various hoses should be marked
to ensure correct refitting5.6a Remove the oil filler tube bracket
nuts (arrowed) . . .5.6b . . . pull the tube up to dislodge it
from the housing - it won’t come out, but
can be removed with the intake manifold
5.7a Remove the ground strap from the
front stud (arrowed), and the engine wiring
harness clips from the other studs5.7b Remove the intake manifold bolts/
nuts and remove the intake manifold - the
upper fasteners are studs/nuts, while the
lower row are bolts (two arrowed)5.9 Refit the new intake manifold gasket
over the studs (arrowed) refit the manifold
3261 Jaguar XJ6
Page 42 of 227
Refitting
7Use a scraper to remove all traces of old
gasket material and carbon deposits from the
manifold and cylinder head mating surfaces. If
the gasket was leaking, have the manifold
checked for warpage at an automotive
machine workshop and resurfaced if
necessary.
8Position new gaskets over the cylinder
head studs (see illustration). Note:The
marks on the gasket should face out (away
from the cylinder head) and the arrow should
point toward the rear of the engine.
9Refit the manifolds and thread the mounting
nuts/bolts into place.
10Working from the centre out, tighten the
nuts/bolts to the torque listed in this Chapter’s
Specifications in three or four equal steps.
11Refit the remaining parts in the reverse
order of removal.
12Run the engine and check for exhaust
leaks.
7 Crankshaft front oil seal-
renewal
3
1Disconnect the negative cable from the
battery.
Caution: If the stereo in your vehicle isequipped with an anti-theft system, make
sure you have the correct activation code
before disconnecting the battery.
2Refer to Chapter 1 and remove the
accessory drive belts.
3Refer to Chapter 3 and remove the fan
shroud and fan clutch assembly.
4Remove the crankshaft damper bolt with a
socket and large breaker bar (see illustration).
To hold the crankshaft stationary, remove the
flywheel inspection cover (see Chapter 8) and
wedge a large screwdriver into the flywheel
ring gear teeth. Warning: The damper bolt is
under considerable torque, so
be sure the socket is firmly in
place and that your hands are
not in danger of hitting anything sharp.
5Use a bolt-type damper puller (available at
most car accessory outlets) to remove the
crankshaft damper (see illustration).
7Remove the Woodruff key from the
crankshaft keyway (see illustration).
8Carefully pry the seal out of the front cover
with a screwdriver or seal-removal tool(see
illustration). Don’t scratch the bore or
Engine in-car repair procedures 2A•5
2A
6.3 Remove nuts (small arrows) retaining
the exhaust pipe to the manifold flanges;
two for each pipe - larger arrow indicates
one heat shield bolt accessible from below6.4 Remove the upper heat shield bolts
(arrowed)6.6 Remove the bolts and nuts and
remove the front and rear exhaust
manifolds
6.8 Refit new gaskets in position over the
studs with the markings facing out
7.7 Carefully tap one end the Woodruff key
up and out from the crankshaft keyway,
then grasp it with a pair of locking pliers
and pull it the rest of the way out - be
careful not to damage the key or keyway7.8 Remove the crankshaft seal with a
screwdriver or seal puller - there are two
slots (arrowed) in the cover which allow
you to pry behind the seal
7.4 Use a large breaker bar and the
appropriate size socket to remove the
crankshaft pulley bolt7.5 After removing the centre bolt, remove
the crankshaft damper with a two-bolt
puller - be careful not to damage the
sensor ring
3261 Jaguar XJ6
Page 43 of 227
damage the crankshaft in the process (if the
crankshaft is damaged, the new seal will end
up leaking).
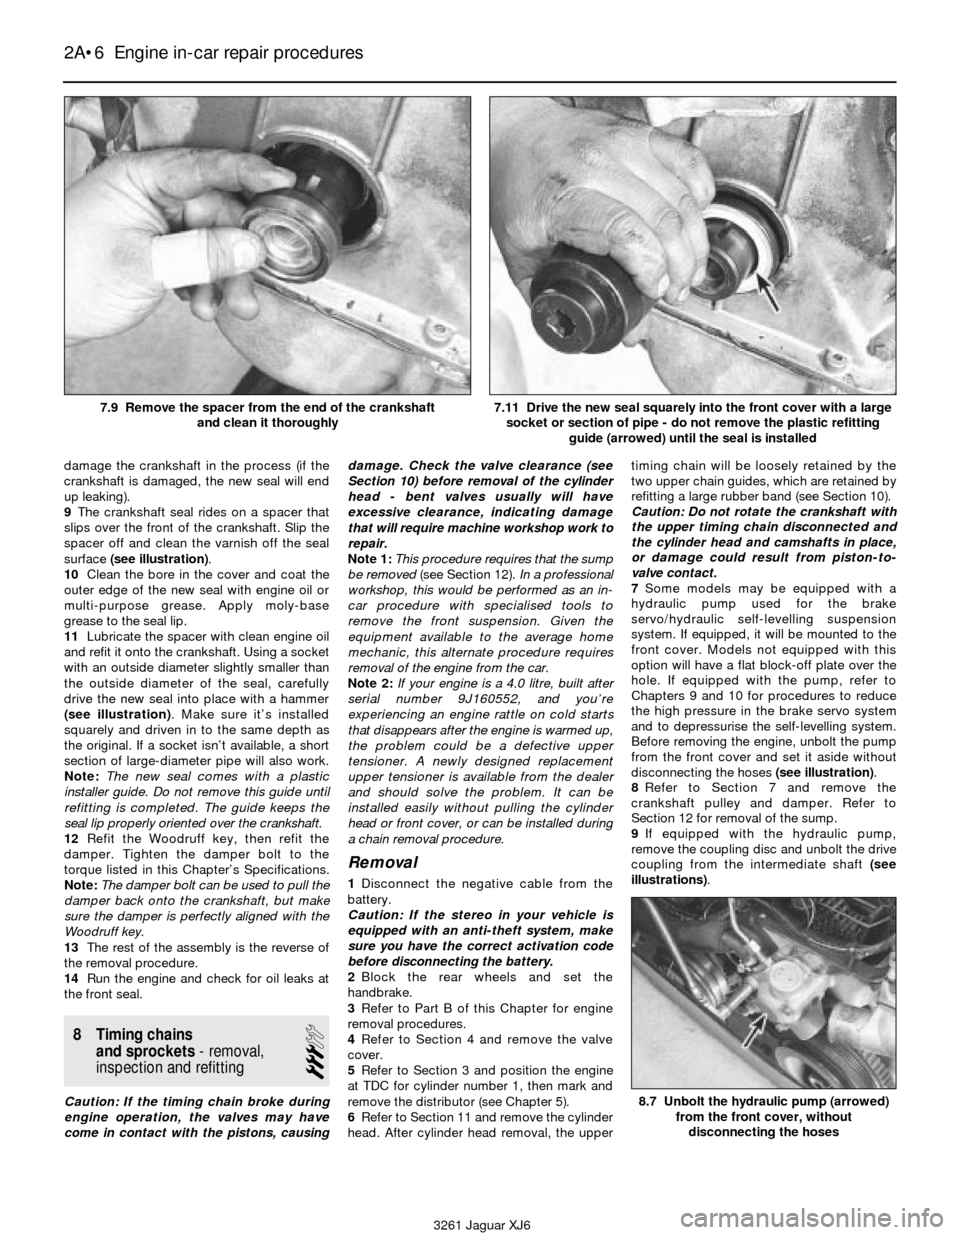
9The crankshaft seal rides on a spacer that
slips over the front of the crankshaft. Slip the
spacer off and clean the varnish off the seal
surface (see illustration).
10Clean the bore in the cover and coat the
outer edge of the new seal with engine oil or
multi-purpose grease. Apply moly-base
grease to the seal lip.
11Lubricate the spacer with clean engine oil
and refit it onto the crankshaft. Using a socket
with an outside diameter slightly smaller than
the outside diameter of the seal, carefully
drive the new seal into place with a hammer
(see illustration). Make sure it’s installed
squarely and driven in to the same depth as
the original. If a socket isn’t available, a short
section of large-diameter pipe will also work.
Note:The new seal comes with a plastic
installer guide. Do not remove this guide until
refitting is completed. The guide keeps the
seal lip properly oriented over the crankshaft.
12Refit the Woodruff key, then refit the
damper. Tighten the damper bolt to the
torque listed in this Chapter’s Specifications.
Note:The damper bolt can be used to pull the
damper back onto the crankshaft, but make
sure the damper is perfectly aligned with the
Woodruff key.
13The rest of the assembly is the reverse of
the removal procedure.
14Run the engine and check for oil leaks at
the front seal.
8 Timing chains
and sprockets- removal,
inspection and refitting
3
Caution: If the timing chain broke during
engine operation, the valves may have
come in contact with the pistons, causingdamage. Check the valve clearance (see
Section 10) before removal of the cylinder
head - bent valves usually will have
excessive clearance, indicating damage
that will require machine workshop work to
repair.
Note 1:This procedure requires that the sump
be removed (see Section 12).In a professional
workshop, this would be performed as an in-
car procedure with specialised tools to
remove the front suspension. Given the
equipment available to the average home
mechanic, this alternate procedure requires
removal of the engine from the car.
Note 2:If your engine is a 4.0 litre, built after
serial number 9J160552, and you’re
experiencing an engine rattle on cold starts
that disappears after the engine is warmed up,
the problem could be a defective upper
tensioner. A newly designed replacement
upper tensioner is available from the dealer
and should solve the problem. It can be
installed easily without pulling the cylinder
head or front cover, or can be installed during
a chain removal procedure.
Removal
1Disconnect the negative cable from the
battery.
Caution: If the stereo in your vehicle is
equipped with an anti-theft system, make
sure you have the correct activation code
before disconnecting the battery.
2Block the rear wheels and set the
handbrake.
3Refer to Part B of this Chapter for engine
removal procedures.
4Refer to Section 4 and remove the valve
cover.
5Refer to Section 3 and position the engine
at TDC for cylinder number 1, then mark and
remove the distributor (see Chapter 5).
6Refer to Section 11 and remove the cylinder
head. After cylinder head removal, the uppertiming chain will be loosely retained by the
two upper chain guides, which are retained by
refitting a large rubber band (see Section 10).
Caution: Do not rotate the crankshaft with
the upper timing chain disconnected and
the cylinder head and camshafts in place,
or damage could result from piston-to-
valve contact.
7Some models may be equipped with a
hydraulic pump used for the brake
servo/hydraulic self-levelling suspension
system. If equipped, it will be mounted to the
front cover. Models not equipped with this
option will have a flat block-off plate over the
hole. If equipped with the pump, refer to
Chapters 9 and 10 for procedures to reduce
the high pressure in the brake servo system
and to depressurise the self-levelling system.
Before removing the engine, unbolt the pump
from the front cover and set it aside without
disconnecting the hoses (see illustration).
8Refer to Section 7 and remove the
crankshaft pulley and damper. Refer to
Section 12 for removal of the sump.
9If equipped with the hydraulic pump,
remove the coupling disc and unbolt the drive
coupling from the intermediate shaft (see
illustrations).
2A•6 Engine in-car repair procedures
8.7 Unbolt the hydraulic pump (arrowed)
from the front cover, without
disconnecting the hoses
3261 Jaguar XJ6 7.9 Remove the spacer from the end of the crankshaft
and clean it thoroughly
7.11 Drive the new seal squarely into the front cover with a large
socket or section of pipe - do not remove the plastic refitting
guide (arrowed) until the seal is installed
Page 44 of 227

10Remove the front cover-to-engine block
bolts (see illustration). Note:Two of the front
cover bolts are water pump assembly bolts.
Refer to Chapter 3 for water pump removal,
although only the two bolts that attach to the
engine block need be removed.
11Release the rubber band from the upper
tensioners and remove the upper timing chain
(see illustration).
12Remove the upper chain guides (see
illustration).
13Unbolt and remove the lower timing chain
tensioner (see illustration).
14Refer to Section 13 for removal of the oil
pump sprocket and drive chain.
15Remove the lower timing chain from theintermediate sprocket, auxiliary shaft sprocket
and the crankshaft sprocket (see illustration).
16Before proceeding any further, apply
timing marks on the crankshaft and the engine
block, allowing you to locate TDC position
without the crankshaft pulley in place (see
illustration).
Inspection
17Examine the sprockets for signs of wear
or damage. Renew the timing chain if obvious
wear or damage is noted or if it is the least bit
questionable. Note:If there is wear or damage
noticed in any of the sprockets or chains, the
entire set must be renewed, i.e. new chains
and new sprockets.18Correct any problems which contributed
to chain failure prior to refitting of a new chain.
19Check the chain guides for grooves, chips
or wear in the contact surface. Clean and
inspect the upper and lower tensioners.
Refitting
20Remove all dirt, oil and grease from the
timing chain area at the front of the engine.
21Recheck the crankshaft timing marks to
be sure they are properly aligned (see
illustration 8.16).
22Refit the lower timing chain on the
crankshaft, intermediate-shaft and auxiliary-
shaft sprockets. The chain should be
lubricated with engine oil.
Engine in-car repair procedures 2A•7
2A
8.9a Pull the hydraulic pump coupling disc
(arrowed) off the drive coupling . . .8.9b . . . and unbolt the drive coupling
(arrowed) from the intermediate shaft
8.10 Remove the front cover-to-engine
block and the sump-to-cover bolts
(arrowed)
8.11 Remove the upper timing chain from
the intermediate sprocket (arrowed)8.12 Unbolt and remove the upper chain
guide (right arrow) and the upper chain
tensioner guide (left arrow)
8.13 Remove the two bolts and remove
the lower timing chain tensioner (arrowed)
3261 Jaguar XJ6 8.15 Remove the lower timing chain from
the intermediate sprocket (A), the auxiliary
shaft sprocket (B) and the crankshaft
sprocket (C)
8.16 Apply paint marks on the crankshaft,
crankshaft sprocket and the engine block
(arrowed) to indicate TDC position
Page 45 of 227

23Clean and lubricate the lower tensioner.
Fill the lower tensioner oil reservoir with engine
oil and refit it on the engine block, aligning the
notch in the tensioner with the lug on the back
of the guide (see illustrations). This should
remove all slack from the lower timing chain. If
not, push the lower tensioner guide back and
forth a few times to prime the tensioner.
24Refit the upper chain tensioner guide and
mounting bracket to the engine block.
Caution: Before fully tightening the
mounting bracket to the engine block,
make sure the mount and chain guide are
clear of the lower chain, auxiliary sprocket
and intermediate sprocket. If necessary,
position the mount for clearance before
tightening the mounting bolts.
25Refit the oil pump drive chain and
sprocket to the crankshaft (see Section 13).
26Refit the upper chain fixed guide to the
engine block and place the upper timing chain
over the intermediate sprocket and auxiliary
shaft sprocket, draping the excess chain over
the top of the fixed guide. Lubricate the chain
and sprockets with clean engine oil.27Gather the loose portion of the upper
timing chain and place it between the upper
guides. Use a large rubber band to hold the
two guides snugly around the chain (see
Section 11).
28If necessary, renew the intermediate shaft
seal (see illustrations).
29Apply a thin coat of RTV sealant to the
engine side of the front cover and RTV sealant
to the oil-pan mating surface (bottom of the
front cover), then refit the front cover. Note:
Make sure the top surface of the cover aligns
with the top surface of the engine block, by
checking with a straightedge(see illustration).
30Refer to Section 11 for refitting of the
cylinder head and Section 10 for refitting of
the camshafts and connection of the upper
timing chain to the two camshaft sprockets.
31The remainder of the refitting is the
reverse of the removal procedure. If your car
is equipped with the hydraulic/self-levelling
suspension, refit the drive coupling and
coupling disc to the intermediate shaft (see
illustrations 8.9a and 8.9b). Coat the
mounting surface of the pump with RTVsealant and make sure the tang on the pump
aligns with the slot in the intermediate shaft
before bolting the pump to the front cover.
Refer to Section 7 for refitting of the
crankshaft spacer, damper and puller.
Caution: DO NOT start the engine until
you’re absolutely certain that the timing
chains are installed correctly. Serious and
costly engine damage could occur if the
chains are installed wrong.
32Run the engine and check for proper
operation.
9 Auxiliary shaft- renewal
3
Caution: If the stereo in your vehicle is
equipped with an anti-theft system, make
sure you have the correct activation code
before disconnecting the battery.
1Refer to Chapter 10 and remove the power
steering pump, without disconnecting the
hoses. Remove the plastic power steering
pump drive coupling disc.
2A•8 Engine in-car repair procedures
8.28a Drill a small hole in the intermediate
shaft seal, thread a sheet metal screw into
it and use a small slide-hammer pull the
seal out of the cover8.28b Drive the new seal in with a seal-
driver or socket, to the same depth as the
original seal8.29 Bolt the front cover on hand tight, use
a straightedge to make sure the cover’s
top surface is level with the top of the
engine block, then tighten the cover bolts
3261 Jaguar XJ6 8.23a Add oil to the reservoir in the lower tensioner . . .
8.23b . . . and refit the tensioner against the guide -
after it’s installed, push the tensioner guide back and forth
a few times to prime the tensioner
Page 46 of 227

2Refer to Section 8 and remove the front
cover and upper and lower timing chains.
3Remove the power steering drive coupling
from the auxiliary shaft (see illustration).
4Use a small drill to drill holes in the oil seal,
then use a slide-hammer puller to remove the
seal from the rear of the auxiliary shaft
housing (see illustration).
Caution: Drill straight and carefully to avoid
damaging the auxiliary shaft.
5Use a pair of snap-ring pliers to remove the
snap ring from the rear of the auxiliary shaft
(see illustration).
6Pull the auxiliary shaft out toward the front
of the engine.
7Remove the three internal hex-head bolts
and the auxiliary shaft housing.
8Examine the surface of the auxiliary shaft,
it’s sprocket, and the distributor drive-gear. If
there is noticeable wear or damage, replace
the auxiliary shaft assembly with a new one
(see illustration).
9If the auxiliary shaft housing has been
removed, clean it, scrape away the old gasket
material from the housing and the engine
block and refit the housing with a new gasket
(see illustration).
10Clean the auxiliary shaft, lubricate it with
engine oil and refit it through the front of the
block, then refit the washer (see illustration).
Refit the snap-ring(refer to illustration 9.4).11The new oil seal for the rear of the auxiliary
shaft comes with a plastic refitting sleeve that
keeps the seal lip from folding back during
refitting. Keep this sleeve in place until the seal
is fully installed. Tap the new seal into the
housing with a hammer and appropriate-size
socket until the seal is flush, then remove the
plastic sleeve (see illustration).
12The remainder of the refitting is the
reverse of removal. Note:When refitting the
distributor (see Chapter 5), use a new O-ring
to prevent oil leaks at the distributor.
13Run the engine and check for oil leaks at
the power steering pump-to-housing interface.10 Camshafts and valve lifters-
removal, inspection and
refitting
4
Removal
Note:The renewal of the camshafts requires
the use of several special tools. Read through
the procedure and acquire the special tools,
or their equivalent, before beginning work.
1Remove the valve cover (see Section 4).
2Refer to Section 3 and position the engine
at TDC for number 1 cylinder.
3Refer to Chapter 5 and remove the
distributor cap and set it aside along with the
spark plug leads. Mark the positions of the
distributor body and rotor.
4Using a feeler gauge, measure and record
the clearance between the intake and exhaust
camshaft lobes and the lifters for cylinder
number 1 (see illustration). Rotate the
crankshaft until the next cylinder in the firing
order is at TDC and check and record the
valve clearance for that cylinder. Following the
firing order, check and record the valve
clearance for the remaining valves with the
appropriate cylinder at TDC.
5Return the engine to TDC for cylinder
number 1. Using the special tool (Jaguar tool
no. 18G 1433), check the position of each
Engine in-car repair procedures 2A•9
2A
9.3 Use a screwdriver to hold the drive
coupling (arrowed) stationary while
removing the bolt9.4 Remove the auxiliary shaft seal with a
small slide-hammer puller9.5 Use snap-ring pliers to remove the
snap ring (arrowed) from the shaft - note
the three internal hex-head bolts retaining
the housing to the engine block
9.8 Inspect these areas of the auxiliary
shaft for wear
A Oil seal surface
B Bearing journalC Sprocket
D Distributor drive9.9 Refit the auxiliary shaft rear housing
with a new gasket, aligning the oil slot
(arrowed) with the housing
3261 Jaguar XJ6
9.10 Refit the washer before replacing the
snap-ring
9.11 Tap the seal squarely into the bore
with a socket until the seal is flush
with the housing, then remove the
plastic fitting sleeve
Page 47 of 227
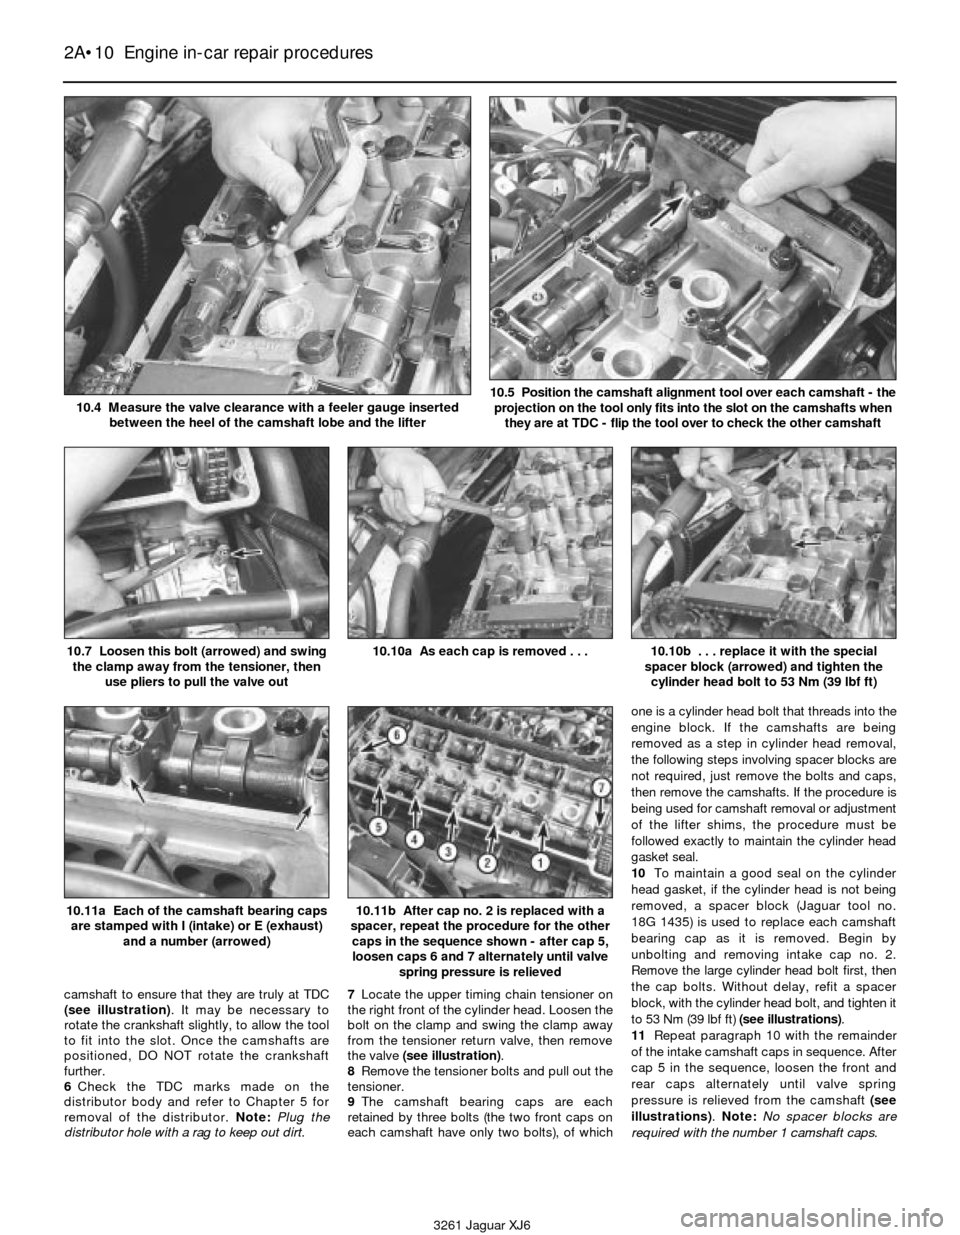
camshaft to ensure that they are truly at TDC
(see illustration). It may be necessary to
rotate the crankshaft slightly, to allow the tool
to fit into the slot. Once the camshafts are
positioned, DO NOT rotate the crankshaft
further.
6Check the TDC marks made on the
distributor body and refer to Chapter 5 for
removal of the distributor. Note:Plug the
distributor hole with a rag to keep out dirt.7Locate the upper timing chain tensioner on
the right front of the cylinder head. Loosen the
bolt on the clamp and swing the clamp away
from the tensioner return valve, then remove
the valve (see illustration).
8Remove the tensioner bolts and pull out the
tensioner.
9The camshaft bearing caps are each
retained by three bolts (the two front caps on
each camshaft have only two bolts), of whichone is a cylinder head bolt that threads into the
engine block. If the camshafts are being
removed as a step in cylinder head removal,
the following steps involving spacer blocks are
not required, just remove the bolts and caps,
then remove the camshafts. If the procedure is
being used for camshaft removal or adjustment
of the lifter shims, the procedure must be
followed exactly to maintain the cylinder head
gasket seal.
10To maintain a good seal on the cylinder
head gasket, if the cylinder head is not being
removed, a spacer block (Jaguar tool no.
18G 1435) is used to replace each camshaft
bearing cap as it is removed. Begin by
unbolting and removing intake cap no. 2.
Remove the large cylinder head bolt first, then
the cap bolts. Without delay, refit a spacer
block, with the cylinder head bolt, and tighten it
to 53 Nm (39 lbf ft) (see illustrations).
11Repeat paragraph 10 with the remainder
of the intake camshaft caps in sequence. After
cap 5 in the sequence, loosen the front and
rear caps alternately until valve spring
pressure is relieved from the camshaft (see
illustrations). Note:No spacer blocks are
required with the number 1 camshaft caps.
2A•10 Engine in-car repair procedures
10.7 Loosen this bolt (arrowed) and swing
the clamp away from the tensioner, then
use pliers to pull the valve out10.10a As each cap is removed . . .10.10b . . . replace it with the special
spacer block (arrowed) and tighten the
cylinder head bolt to 53 Nm (39 lbf ft)
3261 Jaguar XJ6 10.4 Measure the valve clearance with a feeler gauge inserted
between the heel of the camshaft lobe and the lifter
10.5 Position the camshaft alignment tool over each camshaft - the
projection on the tool only fits into the slot on the camshafts when
they are at TDC - flip the tool over to check the other camshaft
10.11a Each of the camshaft bearing caps
are stamped with I (intake) or E (exhaust)
and a number (arrowed)10.11b After cap no. 2 is replaced with a
spacer, repeat the procedure for the other
caps in the sequence shown - after cap 5,
loosen caps 6 and 7 alternately until valve
spring pressure is relieved
Page 48 of 227

12Remove the four bolts in each camshaft
inner sprocket (see illustration). The bolts are
secured by sheetmetal “washer” plates. Bend
down the locking tabs with a hammer and
screwdriver tip to remove the bolts.
Caution: Stuff rags below the sprockets
while removing the bolts to prevent a bolt
from falling down into the front cover.
13Remove the two bolts retaining the upper
chain guide to the cylinder head (see
illustration).
14Pull the inner sprockets from each
camshaft (see illustration). Each camshaft
sprocket is comprised of an inner and outer,
each with a set of fine splines that lock them
together. The outer sprockets, with the teeth,
can rotate on the camshafts until the inner
sprocket bolts are tightened.
15Pull the outer sprockets from the
camshafts and allow the chain slacken.
16At this point the camshafts can be
carefully lifted straight up and off the cylinder
head. Take care not to nick any of the lobes or
journals during removal.
17Use a magnet to remove the lifters,
keeping them in order in a divided, numbered
box (see illustration). They must be returned
to their original location if reusing the original
camshafts!
18Removing the lifters exposes the
adjusting shims, sitting in a pocket in eachvalve spring retainer (see illustration). Keep
the shims with their matching lifters. Measure
the thickness of each shim with a micrometer
and record the measurements.
Inspection
19After the camshaft has been removed
from the engine, cleaned with solvent and
dried, inspect the bearing journals for uneven
wear, pitting and evidence of seizure. If the
journals are damaged, the bearing surfaces in
the cylinder head and caps may be damaged
as well, requiring renewal of the cylinder head.
20Measure the bearing journals with a
micrometer to determine if they are excessivelyworn or out-of-round (see illustration).
Compare the measurements to Specifications.
21Check the camshaft lobes for heat
discolouration, score marks, chipped areas,
pitting and uneven wear. Measure the lobe
heights with a micrometer and record the
measurements (see illustrations). If there is
variance of more than 0.005-inch, the
camshaft and lifters must be renewed. If the
lobes are in good condition, the camshaft can
be reused.
22Inspect the top, bottom and side surfaces
of the lifters for wear, grooving or scoring. If
the lifters are damaged, the camshaft and its
lifters must be renewed as a set.
Engine in-car repair procedures 2A•11
2A
10.13 Remove the two bolts and the upper
timing chain guide (arrowed)10.14 Pull the inner sprocket from the
outer sprocket of each camshaft
10.17 A magnet can be used to remove
the lifters (arrowed)10.18 The valve adjustment shims
(arrowed) fit into a pocket in the valve
spring retainer - use a magnet to remove
the shims and keep them with their
respective lifters10.20 Measure the bearing journals with a
micrometer to check diameter - measure
at several places around the journal to
check for taper or out-of-round
3261 Jaguar XJ6 10.12 Bend back the locking tabs
(arrowed) and remove the camshaft
sprocket bolts
10.21a Measure the camshaft lobe at its
greatest dimension . . .10.21b . . . and subtract the camshaft lobe
diameter at its smallest dimension to
obtain the lobe lift
Page 49 of 227
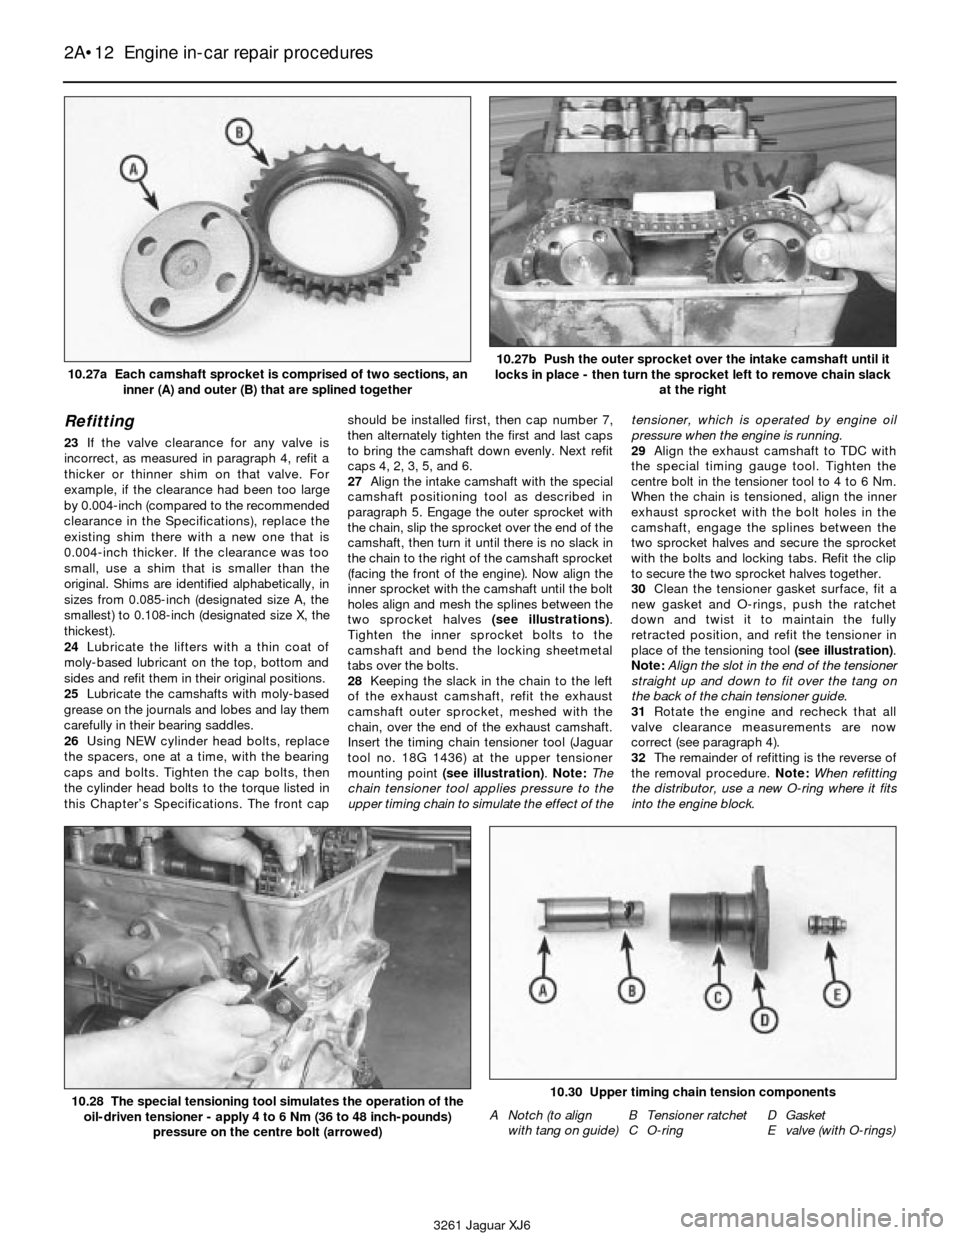
Refitting
23If the valve clearance for any valve is
incorrect, as measured in paragraph 4, refit a
thicker or thinner shim on that valve. For
example, if the clearance had been too large
by 0.004-inch (compared to the recommended
clearance in the Specifications), replace the
existing shim there with a new one that is
0.004-inch thicker. If the clearance was too
small, use a shim that is smaller than the
original. Shims are identified alphabetically, in
sizes from 0.085-inch (designated size A, the
smallest) to 0.108-inch (designated size X, the
thickest).
24Lubricate the lifters with a thin coat of
moly-based lubricant on the top, bottom and
sides and refit them in their original positions.
25Lubricate the camshafts with moly-based
grease on the journals and lobes and lay them
carefully in their bearing saddles.
26Using NEW cylinder head bolts, replace
the spacers, one at a time, with the bearing
caps and bolts. Tighten the cap bolts, then
the cylinder head bolts to the torque listed in
this Chapter’s Specifications. The front capshould be installed first, then cap number 7,
then alternately tighten the first and last caps
to bring the camshaft down evenly. Next refit
caps 4, 2, 3, 5, and 6.
27Align the intake camshaft with the special
camshaft positioning tool as described in
paragraph 5. Engage the outer sprocket with
the chain, slip the sprocket over the end of the
camshaft, then turn it until there is no slack in
the chain to the right of the camshaft sprocket
(facing the front of the engine). Now align the
inner sprocket with the camshaft until the bolt
holes align and mesh the splines between the
two sprocket halves (see illustrations).
Tighten the inner sprocket bolts to the
camshaft and bend the locking sheetmetal
tabs over the bolts.
28Keeping the slack in the chain to the left
of the exhaust camshaft, refit the exhaust
camshaft outer sprocket, meshed with the
chain, over the end of the exhaust camshaft.
Insert the timing chain tensioner tool (Jaguar
tool no. 18G 1436) at the upper tensioner
mounting point (see illustration). Note:The
chain tensioner tool applies pressure to the
upper timing chain to simulate the effect of thetensioner, which is operated by engine oil
pressure when the engine is running.
29Align the exhaust camshaft to TDC with
the special timing gauge tool. Tighten the
centre bolt in the tensioner tool to 4 to 6 Nm.
When the chain is tensioned, align the inner
exhaust sprocket with the bolt holes in the
camshaft, engage the splines between the
two sprocket halves and secure the sprocket
with the bolts and locking tabs. Refit the clip
to secure the two sprocket halves together.
30Clean the tensioner gasket surface, fit a
new gasket and O-rings, push the ratchet
down and twist it to maintain the fully
retracted position, and refit the tensioner in
place of the tensioning tool (see illustration).
Note:Align the slot in the end of the tensioner
straight up and down to fit over the tang on
the back of the chain tensioner guide.
31Rotate the engine and recheck that all
valve clearance measurements are now
correct (see paragraph 4).
32The remainder of refitting is the reverse of
the removal procedure. Note:When refitting
the distributor, use a new O-ring where it fits
into the engine block.
2A•12 Engine in-car repair procedures
3261 Jaguar XJ6 10.27a Each camshaft sprocket is comprised of two sections, an
inner (A) and outer (B) that are splined together
10.27b Push the outer sprocket over the intake camshaft until it
locks in place - then turn the sprocket left to remove chain slack
at the right
10.28 The special tensioning tool simulates the operation of the
oil-driven tensioner - apply 4 to 6 Nm (36 to 48 inch-pounds)
pressure on the centre bolt (arrowed)10.30 Upper timing chain tension components
A Notch (to align
with tang on guide)B Tensioner ratchet
C O-ringD Gasket
E valve (with O-rings)
Page 50 of 227
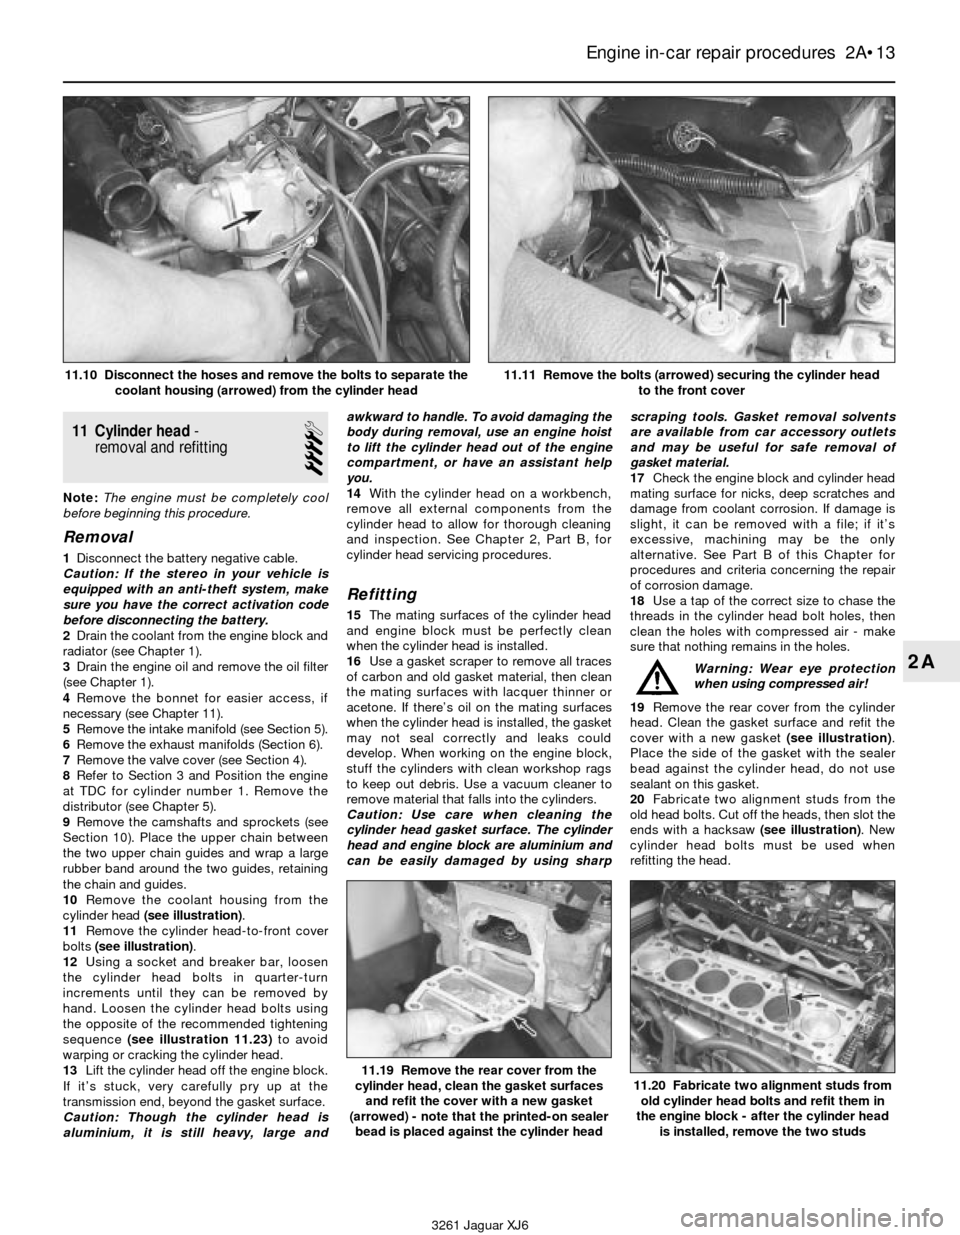
11 Cylinder head-
removal and refitting
4
Note:The engine must be completely cool
before beginning this procedure.
Removal
1Disconnect the battery negative cable.
Caution: If the stereo in your vehicle is
equipped with an anti-theft system, make
sure you have the correct activation code
before disconnecting the battery.
2Drain the coolant from the engine block and
radiator (see Chapter 1).
3Drain the engine oil and remove the oil filter
(see Chapter 1).
4Remove the bonnet for easier access, if
necessary (see Chapter 11).
5Remove the intake manifold (see Section 5).
6Remove the exhaust manifolds (Section 6).
7Remove the valve cover (see Section 4).
8Refer to Section 3 and Position the engine
at TDC for cylinder number 1. Remove the
distributor (see Chapter 5).
9Remove the camshafts and sprockets (see
Section 10). Place the upper chain between
the two upper chain guides and wrap a large
rubber band around the two guides, retaining
the chain and guides.
10Remove the coolant housing from the
cylinder head (see illustration).
11Remove the cylinder head-to-front cover
bolts (see illustration).
12Using a socket and breaker bar, loosen
the cylinder head bolts in quarter-turn
increments until they can be removed by
hand. Loosen the cylinder head bolts using
the opposite of the recommended tightening
sequence (see illustration 11.23)to avoid
warping or cracking the cylinder head.
13Lift the cylinder head off the engine block.
If it’s stuck, very carefully pry up at the
transmission end, beyond the gasket surface.
Caution: Though the cylinder head is
aluminium, it is still heavy, large andawkward to handle. To avoid damaging the
body during removal, use an engine hoist
to lift the cylinder head out of the engine
compartment, or have an assistant help
you.
14With the cylinder head on a workbench,
remove all external components from the
cylinder head to allow for thorough cleaning
and inspection. See Chapter 2, Part B, for
cylinder head servicing procedures.
Refitting
15The mating surfaces of the cylinder head
and engine block must be perfectly clean
when the cylinder head is installed.
16Use a gasket scraper to remove all traces
of carbon and old gasket material, then clean
the mating surfaces with lacquer thinner or
acetone. If there’s oil on the mating surfaces
when the cylinder head is installed, the gasket
may not seal correctly and leaks could
develop. When working on the engine block,
stuff the cylinders with clean workshop rags
to keep out debris. Use a vacuum cleaner to
remove material that falls into the cylinders.
Caution: Use care when cleaning the
cylinder head gasket surface. The cylinder
head and engine block are aluminium and
can be easily damaged by using sharpscraping tools. Gasket removal solvents
are available from car accessory outlets
and may be useful for safe removal of
gasket material.
17Check the engine block and cylinder head
mating surface for nicks, deep scratches and
damage from coolant corrosion. If damage is
slight, it can be removed with a file; if it’s
excessive, machining may be the only
alternative. See Part B of this Chapter for
procedures and criteria concerning the repair
of corrosion damage.
18Use a tap of the correct size to chase the
threads in the cylinder head bolt holes, then
clean the holes with compressed air - make
sure that nothing remains in the holes.
Warning: Wear eye protection
when using compressed air!
19Remove the rear cover from the cylinder
head. Clean the gasket surface and refit the
cover with a new gasket (see illustration).
Place the side of the gasket with the sealer
bead against the cylinder head, do not use
sealant on this gasket.
20Fabricate two alignment studs from the
old head bolts. Cut off the heads, then slot the
ends with a hacksaw (see illustration). New
cylinder head bolts must be used when
refitting the head.
Engine in-car repair procedures 2A•13
2A
11.19 Remove the rear cover from the
cylinder head, clean the gasket surfaces
and refit the cover with a new gasket
(arrowed) - note that the printed-on sealer
bead is placed against the cylinder head11.20 Fabricate two alignment studs from
old cylinder head bolts and refit them in
the engine block - after the cylinder head
is installed, remove the two studs
3261 Jaguar XJ6 11.10 Disconnect the hoses and remove the bolts to separate the
coolant housing (arrowed) from the cylinder head
11.11 Remove the bolts (arrowed) securing the cylinder head
to the front cover