ECO mode JAGUAR XJ6 1997 2.G Workshop Manual
[x] Cancel search | Manufacturer: JAGUAR, Model Year: 1997, Model line: XJ6, Model: JAGUAR XJ6 1997 2.GPages: 227, PDF Size: 7.2 MB
Page 1 of 227

3261 Jaguar XJ6
Models covered
Jaguar XJ6 models with 3.2 litre (3239 cc), 3.6 litre (3590 cc) & 4.0 litre (3980 cc)
six-cylinder in-line dohc petrol engines and automatic transmission
Covers most features of Daimler 3.6 and 4.0 litre models
Does not cover 2.9 litre (2919 cc) sohc engine or manual transmission
Does not cover XJR models or revised Jaguar/Daimler model ranges introduced September 1994
Jaguar XJ6
Service and Repair Manual
Mike Stubblefield
© Haynes Publishing 1997
A book in the Haynes Service and Repair Manual Series
All rights reserved. No part of this book may be reproduced or transmitted
in any form or by any means, electronic or mechanical, including
photocopying, recording or by any information storage or retrieval system,
without permission in writing from the copyright holder.
ISBN1 85960 261 4
British Library Cataloguing in Publication Data
A catalogue record for this book is available from the British Library.Printed by J H Haynes & Co. Ltd, Sparkford, Nr Yeovil,
Somerset BA22 7JJ
Haynes Publishing
Sparkford, Nr Yeovil, Somerset BA22 7JJ, England
Haynes North America, Inc
861 Lawrence Drive, Newbury Park, California 91320, USA
Editions Haynes S.A.
147/149, rue Saint Honoré, 75001 PARIS, France
Haynes Publishing Nordiska AB
Fyrisborgsgatan 5, 754 50 Uppsala, SverigeABCDE
FGHIJ
KLMNO
PQRST
1 2 3
(3261-248-11AA1)
Page 8 of 227
3261 Jaguar XJ6
0•8Roadside repairs
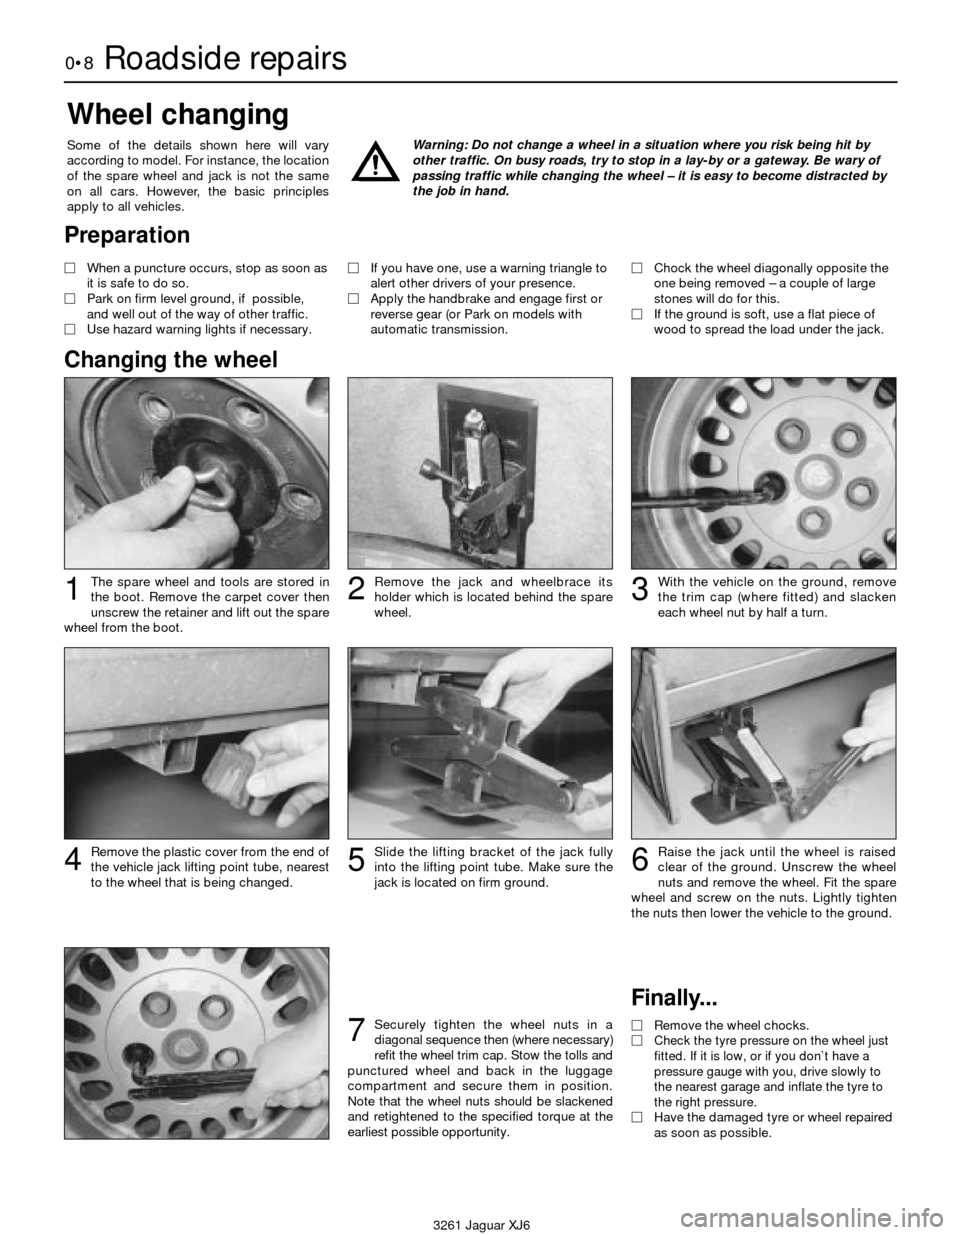
The spare wheel and tools are stored in
the boot. Remove the carpet cover then
unscrew the retainer and lift out the spare
wheel from the boot.
Wheel changing
Some of the details shown here will vary
according to model. For instance, the location
of the spare wheel and jack is not the same
on all cars. However, the basic principles
apply to all vehicles.Warning: Do not change a wheel in a situation where you risk being hit by
other traffic. On busy roads, try to stop in a lay-by or a gateway. Be wary of
passing traffic while changing the wheel – it is easy to become distracted by
the job in hand.
Finally...
MRemove the wheel chocks.
MCheck the tyre pressure on the wheel just
fitted. If it is low, or if you don’t have a
pressure gauge with you, drive slowly to
the nearest garage and inflate the tyre to
the right pressure.
MHave the damaged tyre or wheel repaired
as soon as possible.
Remove the plastic cover from the end of
the vehicle jack lifting point tube, nearest
to the wheel that is being changed.Slide the lifting bracket of the jack fully
into the lifting point tube. Make sure the
jack is located on firm ground.Raise the jack until the wheel is raised
clear of the ground. Unscrew the wheel
nuts and remove the wheel. Fit the spare
wheel and screw on the nuts. Lightly tighten
the nuts then lower the vehicle to the ground.
With the vehicle on the ground, remove
the trim cap (where fitted) and slacken
each wheel nut by half a turn.Remove the jack and wheelbrace its
holder which is located behind the spare
wheel.123
4
Securely tighten the wheel nuts in a
diagonal sequence then (where necessary)
refit the wheel trim cap. Stow the tolls and
punctured wheel and back in the luggage
compartment and secure them in position.
Note that the wheel nuts should be slackened
and retightened to the specified torque at the
earliest possible opportunity.7
56
Preparation
MWhen a puncture occurs, stop as soon as
it is safe to do so.
MPark on firm level ground, if possible,
and well out of the way of other traffic.
MUse hazard warning lights if necessary. MIf you have one, use a warning triangle to
alert other drivers of your presence.
MApply the handbrake and engage first or
reverse gear (or Park on models with
automatic transmission.MChock the wheel diagonally opposite the
one being removed – a couple of large
stones will do for this.
MIf the ground is soft, use a flat piece of
wood to spread the load under the jack.
Changing the wheel
Page 9 of 227
3261 Jaguar XJ6
Roadside repairs0•9
When all else fails, you may find yourself
having to get a tow home – or of course you
may be helping somebody else. Long-distance
recovery should only be done by a garage or
breakdown service. For shorter distances, DIY
towing using another car is easy enough, but
observe the following points:
MUse a proper tow-rope – they are not
expensive. The vehicle being towed must
display an ‘ON TOW’ sign in its rear window.
MAlways turn the ignition key to the ‘on’
position when the vehicle is being towed, so
that the steering lock is released, and that the
direction indicator and brake lights will work.
MOnly attach the tow-rope to the towing
eyes provided. On some models with energy-
absorbing bumpers there are no front towing
eyes; on these vehicles the tow-rope shouldbe attached around the rear arm of the lower
control arm so that the rope passes on the
inside of the coil spring.
MBefore being towed, release the handbrake
and select neutral on the transmission.
MNote that greater-than-usual pedal
pressure will be required to operate the
brakes, since the vacuum servo unit is only
operational with the engine running.
MOn models with power steering, greater-
than-usual steering effort will also be required.
MThe driver of the car being towed must
keep the tow-rope taut at all times to avoid
snatching.
MMake sure that both drivers know the route
before setting off.
MOnly drive at moderate speeds and keep
the distance towed to a minimum. Drivesmoothly and allow plenty of time for slowing
down at junctions.
MOn models with automatic transmission,
special precautions apply. If in doubt, do not
tow, or transmission damage may result.
Caution: On models with automatic
transmission, if the vehicle is to be towed
with its rear wheels on the ground, and
extra 1.7 litres of fluid should be added to
the transmission, prior to towing (this extra
fluid must be drained before driving the
vehicle). Even with the extra fluid added to
the transmission, do not tow the vehicle at
speeds in excess of 30 mph (50 kmh) or for
a distance of greater than 15 miles (25 km).
If towing speed/distance are to exceed
these limits, then the vehicle must be
towed with its rear wheels off the ground.
Towing
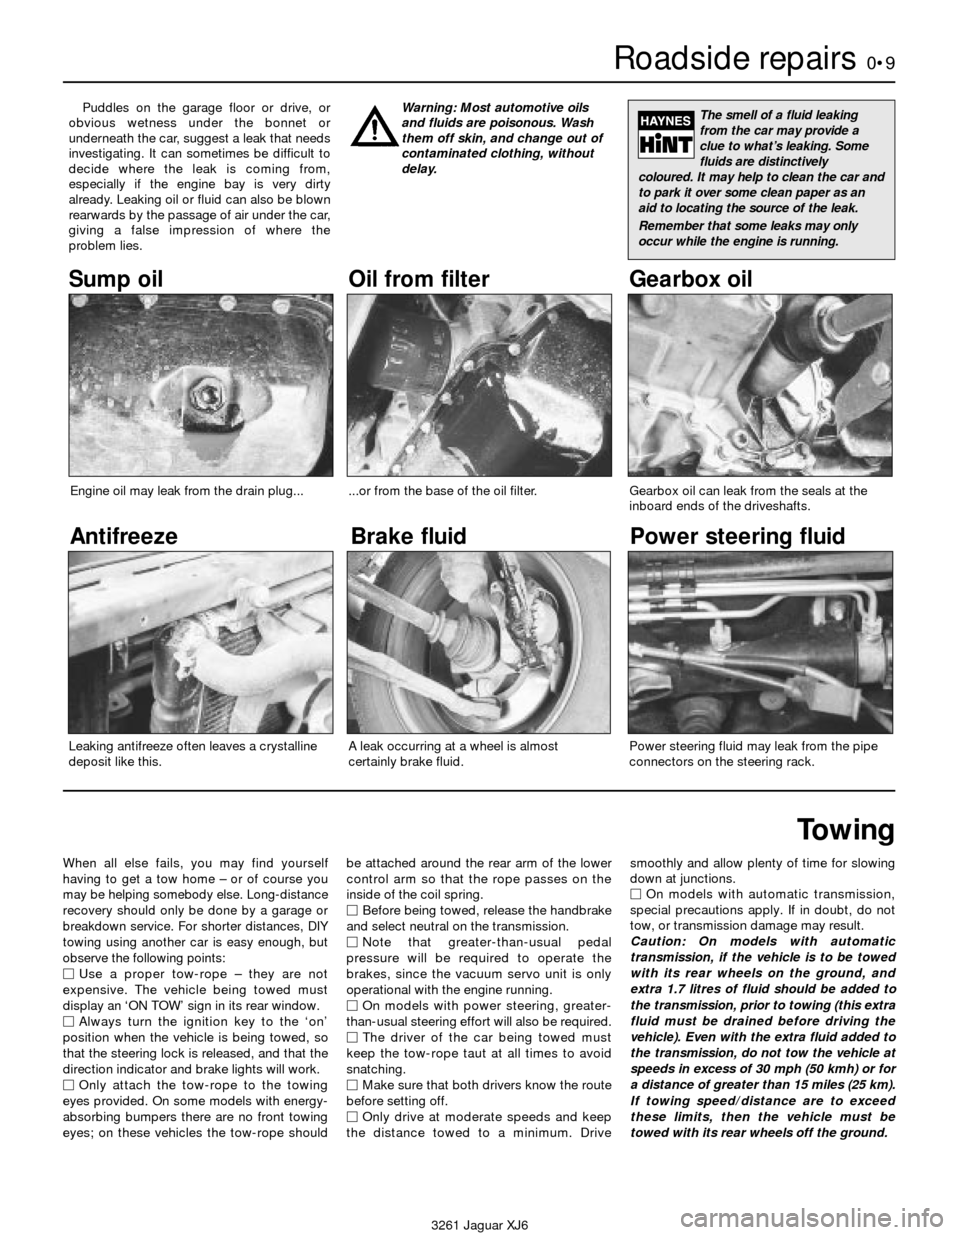
Puddles on the garage floor or drive, or
obvious wetness under the bonnet or
underneath the car, suggest a leak that needs
investigating. It can sometimes be difficult to
decide where the leak is coming from,
especially if the engine bay is very dirty
already. Leaking oil or fluid can also be blown
rearwards by the passage of air under the car,
giving a false impression of where the
problem lies.Warning: Most automotive oils
and fluids are poisonous. Wash
them off skin, and change out of
contaminated clothing, without
delay.The smell of a fluid leaking
from the car may provide a
clue to what’s leaking. Some
fluids are distinctively
coloured. It may help to clean the car and
to park it over some clean paper as an
aid to locating the source of the leak.
Remember that some leaks may only
occur while the engine is running.
Sump oil Gearbox oil
Brake fluid
Power steering fluid
Oil from filter
Antifreeze
Engine oil may leak from the drain plug......or from the base of the oil filter.
Leaking antifreeze often leaves a crystalline
deposit like this.Gearbox oil can leak from the seals at the
inboard ends of the driveshafts.
A leak occurring at a wheel is almost
certainly brake fluid.Power steering fluid may leak from the pipe
connectors on the steering rack.
Page 11 of 227
3261 Jaguar XJ6
Weekly checks0•11
Engine oil level
Before you start
4Make sure that your car is on level ground.
4Check the oil level before the car is driven,
or at least 5 minutes after the engine has been
switched off.
The correct oilModern engines place great demands on their
oil. It is very important that the correct oil for
your car is used (See “Lubricants, fluids and
tyre pressures”).
Car care
l If you have to add oil frequently, you should
check whether you have any oil leaks. Place
some clean paper under the car overnight,
and check for stains in the morning. If there
are no leaks, the engine may be burning oil
(see “Fault finding”).
lAlways maintain the level between the
upper and lower dipstick marks (see photo 3).
If the level is too low severe engine damage
may occur. Oil seal failure may result if the
engine is overfilled by adding too much oil.
If the oil level is checked
immediately after driving the
vehicle, some of the oil will
remain in the upper engine
components, resulting in an inaccurate
reading on the dipstick!
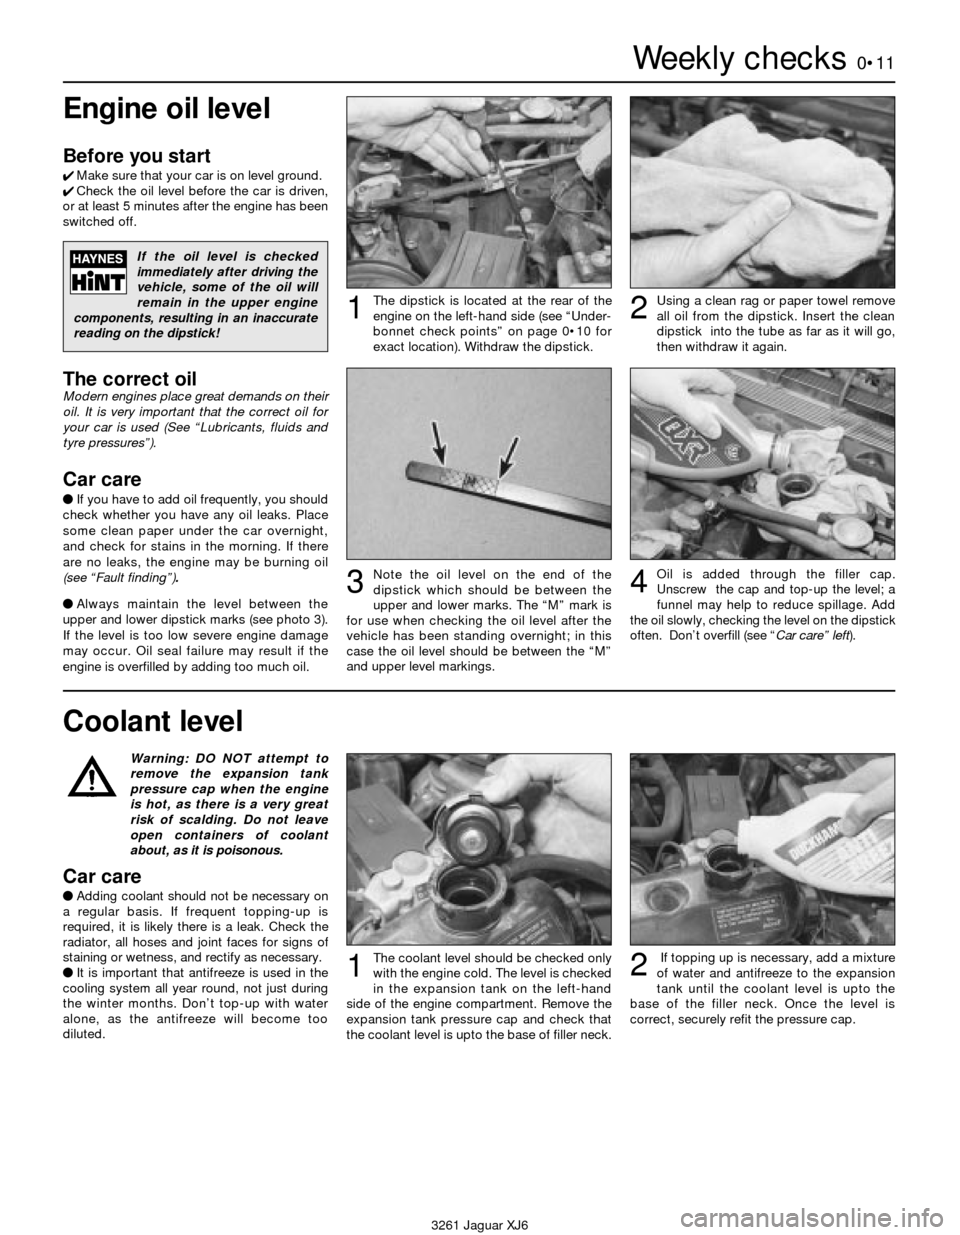
The dipstick is located at the rear of the
engine on the left-hand side (see “Under-
bonnet check points” on page 0•10 for
exact location). Withdraw the dipstick.Using a clean rag or paper towel remove
all oil from the dipstick. Insert the clean
dipstick into the tube as far as it will go,
then withdraw it again.
Note the oil level on the end of the
dipstick which should be between the
upper and lower marks. The “M” mark is
for use when checking the oil level after the
vehicle has been standing overnight; in this
case the oil level should be between the “M”
and upper level markings.Oil is added through the filler cap.
Unscrew the cap and top-up the level; a
funnel may help to reduce spillage. Add
the oil slowly, checking the level on the dipstick
often. Don’t overfill (see “Car care” left).
12
34
Warning: DO NOT attempt to
remove the expansion tank
pressure cap when the engine
is hot, as there is a very great
risk of scalding. Do not leave
open containers of coolant
about, as it is poisonous.
Car care
lAdding coolant should not be necessary on
a regular basis. If frequent topping-up is
required, it is likely there is a leak. Check the
radiator, all hoses and joint faces for signs of
staining or wetness, and rectify as necessary.
lIt is important that antifreeze is used in the
cooling system all year round, not just during
the winter months. Don’t top-up with water
alone, as the antifreeze will become too
diluted.
Coolant level
The coolant level should be checked only
with the engine cold. The level is checked
in the expansion tank on the left-hand
side of the engine compartment. Remove the
expansion tank pressure cap and check that
the coolant level is upto the base of filler neck.If topping up is necessary, add a mixture
of water and antifreeze to the expansion
tank until the coolant level is upto the
base of the filler neck. Once the level is
correct, securely refit the pressure cap.12
Page 14 of 227
3261 Jaguar XJ6
0•14Weekly checks
Tyre condition and pressure
It is very important that tyres are in good
condition, and at the correct pressure - having
a tyre failure at any speed is highly dangerous.
Tyre wear is influenced by driving style - harsh
braking and acceleration, or fast cornering,
will all produce more rapid tyre wear. As a
general rule, the front tyres wear out faster
than the rears. Interchanging the tyres from
front to rear ("rotating" the tyres) may result in
more even wear. However, if this is
completely effective, you may have the
expense of replacing all four tyres at once!
Remove any nails or stones embedded in the
tread before they penetrate the tyre to cause
deflation. If removal of a nail does reveal thatthe tyre has been punctured, refit the nail so
that its point of penetration is marked. Then
immediately change the wheel, and have the
tyre repaired by a tyre dealer.
Regularly check the tyres for damage in the
form of cuts or bulges, especially in the
sidewalls. Periodically remove the wheels,
and clean any dirt or mud from the inside and
outside surfaces. Examine the wheel rims for
signs of rusting, corrosion or other damage.
Light alloy wheels are easily damaged by
"kerbing" whilst parking; steel wheels may
also become dented or buckled. A new wheel
is very often the only way to overcome severe
damage.New tyres should be balanced when they are
fitted, but it may become necessary to re-
balance them as they wear, or if the balance
weights fitted to the wheel rim should fall off.
Unbalanced tyres will wear more quickly, as
will the steering and suspension components.
Wheel imbalance is normally signified by
vibration, particularly at a certain speed
(typically around 50 mph). If this vibration is
felt only through the steering, then it is likely
that just the front wheels need balancing. If,
however, the vibration is felt through the
whole car, the rear wheels could be out of
balance. Wheel balancing should be carried
out by a tyre dealer or garage.
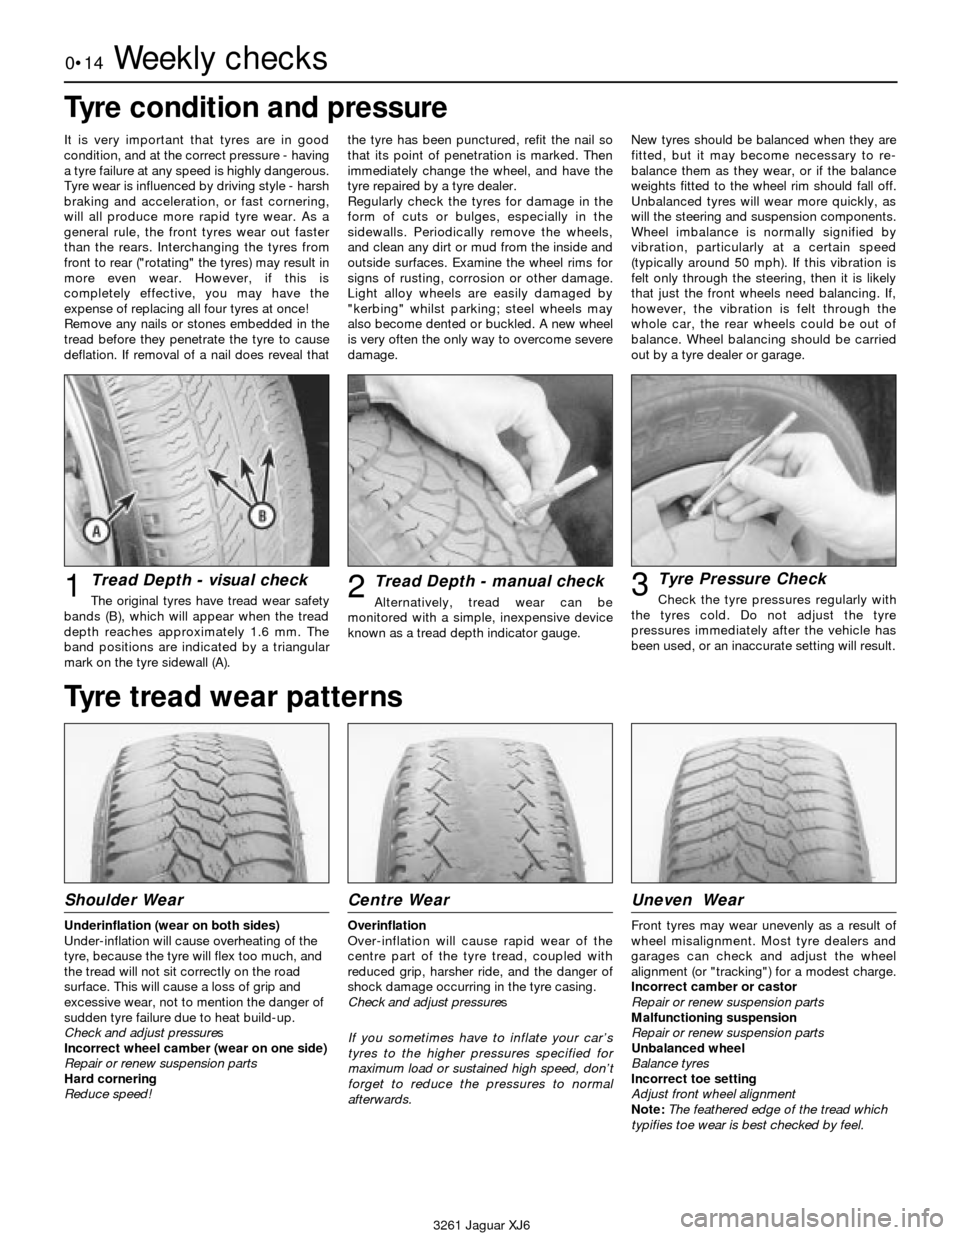
Tread Depth - visual check
The original tyres have tread wear safety
bands (B), which will appear when the tread
depth reaches approximately 1.6 mm. The
band positions are indicated by a triangular
mark on the tyre sidewall (A).1Tread Depth - manual check
Alternatively, tread wear can be
monitored with a simple, inexpensive device
known as a tread depth indicator gauge.2Tyre Pressure Check
Check the tyre pressures regularly with
the tyres cold. Do not adjust the tyre
pressures immediately after the vehicle has
been used, or an inaccurate setting will result.3
Tyre tread wear patterns
Shoulder Wear
Underinflation (wear on both sides)
Under-inflation will cause overheating of the
tyre, because the tyre will flex too much, and
the tread will not sit correctly on the road
surface. This will cause a loss of grip and
excessive wear, not to mention the danger of
sudden tyre failure due to heat build-up.
Check and adjust pressures
Incorrect wheel camber (wear on one side)
Repair or renew suspension parts
Hard cornering
Reduce speed!
Centre Wear
Overinflation
Over-inflation will cause rapid wear of the
centre part of the tyre tread, coupled with
reduced grip, harsher ride, and the danger of
shock damage occurring in the tyre casing.
Check and adjust pressures
If you sometimes have to inflate your car’s
tyres to the higher pressures specified for
maximum load or sustained high speed, don’t
forget to reduce the pressures to normal
afterwards.
Uneven Wear
Front tyres may wear unevenly as a result of
wheel misalignment. Most tyre dealers and
garages can check and adjust the wheel
alignment (or "tracking") for a modest charge.
Incorrect camber or castor
Repair or renew suspension parts
Malfunctioning suspension
Repair or renew suspension parts
Unbalanced wheel
Balance tyres
Incorrect toe setting
Adjust front wheel alignment
Note: The feathered edge of the tread which
typifies toe wear is best checked by feel.
Page 16 of 227
0•16Lubricants, fluids and tyre pressures
3261 Jaguar XJ6
Lubricants and fluids
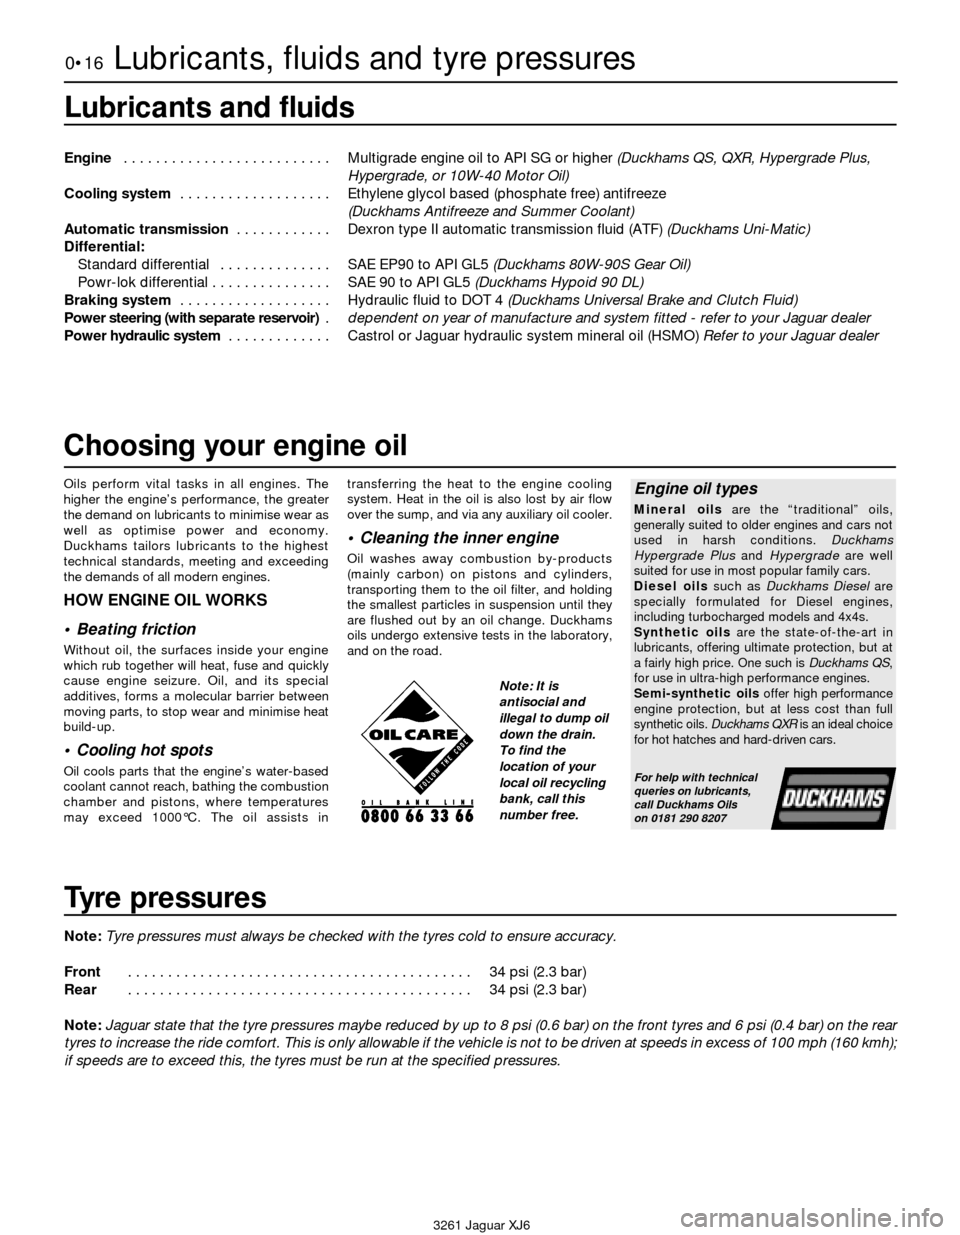
Engine . . . . . . . . . . . . . . . . . . . . . . . . . . Multigrade engine oil to API SG or higher (Duckhams QS, QXR, Hypergrade Plus,
Hypergrade, or 10W-40 Motor Oil)
Cooling system . . . . . . . . . . . . . . . . . . . Ethylene glycol based (phosphate free) antifreeze
(Duckhams Antifreeze and Summer Coolant)
Automatic transmission . . . . . . . . . . . . Dexron type II automatic transmission fluid (ATF) (Duckhams Uni-Matic)
Differential:
Standard differential . . . . . . . . . . . . . . SAE EP90 to API GL5 (Duckhams 80W-90S Gear Oil)
Powr-lok differential . . . . . . . . . . . . . . . SAE 90 to API GL5 (Duckhams Hypoid 90 DL)
Braking system . . . . . . . . . . . . . . . . . . . Hydraulic fluid to DOT 4 (Duckhams Universal Brake and Clutch Fluid)
Power steering (with separate reservoir) .dependent on year of manufacture and system fitted - refer to your Jaguar dealer
Power hydraulic system . . . . . . . . . . . . . Castrol or Jaguar hydraulic system mineral oil (HSMO) Refer to your Jaguar dealer
Tyre pressures
Note:Tyre pressures must always be checked with the tyres cold to ensure accuracy.
Front . . . . . . . . . . . . . . . . . . . . . . . . . . . . . . . . . . . . . . . . . . . 34 psi (2.3 bar)
Rear . . . . . . . . . . . . . . . . . . . . . . . . . . . . . . . . . . . . . . . . . . . 34 psi (2.3 bar)
Note:Jaguar state that the tyre pressures maybe reduced by up to 8 psi (0.6 bar) on the front tyres and 6 psi (0.4 bar) on the rear
tyres to increase the ride comfort. This is only allowable if the vehicle is not to be driven at speeds in excess of 100 mph (160 kmh);
if speeds are to exceed this, the tyres must be run at the specified pressures.
Oils perform vital tasks in all engines. The
higher the engine’s performance, the greater
the demand on lubricants to minimise wear as
well as optimise power and economy.
Duckhams tailors lubricants to the highest
technical standards, meeting and exceeding
the demands of all modern engines.
HOW ENGINE OIL WORKS
• Beating friction
Without oil, the surfaces inside your engine
which rub together will heat, fuse and quickly
cause engine seizure. Oil, and its special
additives, forms a molecular barrier between
moving parts, to stop wear and minimise heat
build-up.
• Cooling hot spots
Oil cools parts that the engine’s water-based
coolant cannot reach, bathing the combustion
chamber and pistons, where temperatures
may exceed 1000°C. The oil assists intransferring the heat to the engine cooling
system. Heat in the oil is also lost by air flow
over the sump, and via any auxiliary oil cooler.
• Cleaning the inner engine
Oil washes away combustion by-products
(mainly carbon) on pistons and cylinders,
transporting them to the oil filter, and holding
the smallest particles in suspension until they
are flushed out by an oil change. Duckhams
oils undergo extensive tests in the laboratory,
and on the road.
Engine oil types
Mineral oilsare the “traditional” oils,
generally suited to older engines and cars not
used in harsh conditions. Duckhams
Hypergrade Plus and Hypergradeare well
suited for use in most popular family cars.
Diesel oilssuch as Duckhams Dieselare
specially formulated for Diesel engines,
including turbocharged models and 4x4s.
Synthetic oilsare the state-of-the-art in
lubricants, offering ultimate protection, but at
a fairly high price. One such is Duckhams QS,
for use in ultra-high performance engines.
Semi-synthetic oilsoffer high performance
engine protection, but at less cost than full
synthetic oils. Duckhams QXRis an ideal choice
for hot hatches and hard-driven cars.
For help with technical
queries on lubricants,
call Duckhams Oils
on 0181 290 8207
Choosing your engine oil
Note: It is
antisocial and
illegal to dump oil
down the drain.
To find the
location of your
local oil recycling
bank, call this
number free.
Page 18 of 227
Lubricants and fluids
Refer to “Weekly checks”
Capacities
Engine oil
Including oil filter . . . . . . . . . . . . . . . . . . . . . . . . . . . . . . . . . . . . . . . . . . . 8.0 litres
Cooling system
All models (approximate):
From dry . . . . . . . . . . . . . . . . . . . . . . . . . . . . . . . . . . . . . . . . . . . . . . . 12.8 litres
Drain and refill . . . . . . . . . . . . . . . . . . . . . . . . . . . . . . . . . . . . . . . . . . . 9.2 litres
Transmission
Automatic transmission (approximate):
From dry:
3.2 litre model . . . . . . . . . . . . . . . . . . . . . . . . . . . . . . . . . . . . . . . . . 7.4 litres
3.6 and 4.0 litre models . . . . . . . . . . . . . . . . . . . . . . . . . . . . . . . . . 8.0 litres
Drain and refill . . . . . . . . . . . . . . . . . . . . . . . . . . . . . . . . . . . . . . . . . . . 3.0 litres
Differential
All models (approximate) . . . . . . . . . . . . . . . . . . . . . . . . . . . . . . . . . . . . 2.1 litres
Cooling system
Antifreeze mixture:
50% antifreeze . . . . . . . . . . . . . . . . . . . . . . . . . . . . . . . . . . . . . . . . . . Protection down to -37°C (5°F)
55% antifreeze . . . . . . . . . . . . . . . . . . . . . . . . . . . . . . . . . . . . . . . . . . Protection down to -45°C (-22°F)
Note:Refer to antifreeze manufacturer for latest recommendations.
Ignition system
Spark plugs:
Type:
3.2 litre model . . . . . . . . . . . . . . . . . . . . . . . . . . . . . . . . . . . . . . . . . RC12YCC
3.6 and 4.0 litre models . . . . . . . . . . . . . . . . . . . . . . . . . . . . . . . . . RC9YCC
Electrode gap . . . . . . . . . . . . . . . . . . . . . . . . . . . . . . . . . . . . . . . . . . . 0.9 mm
*The spark plug gap quoted is that recommended by Champion
for their specified plug listed above. If spark plugs of any other type
are to be fitted, refer to their manufacturer’s recommendations.
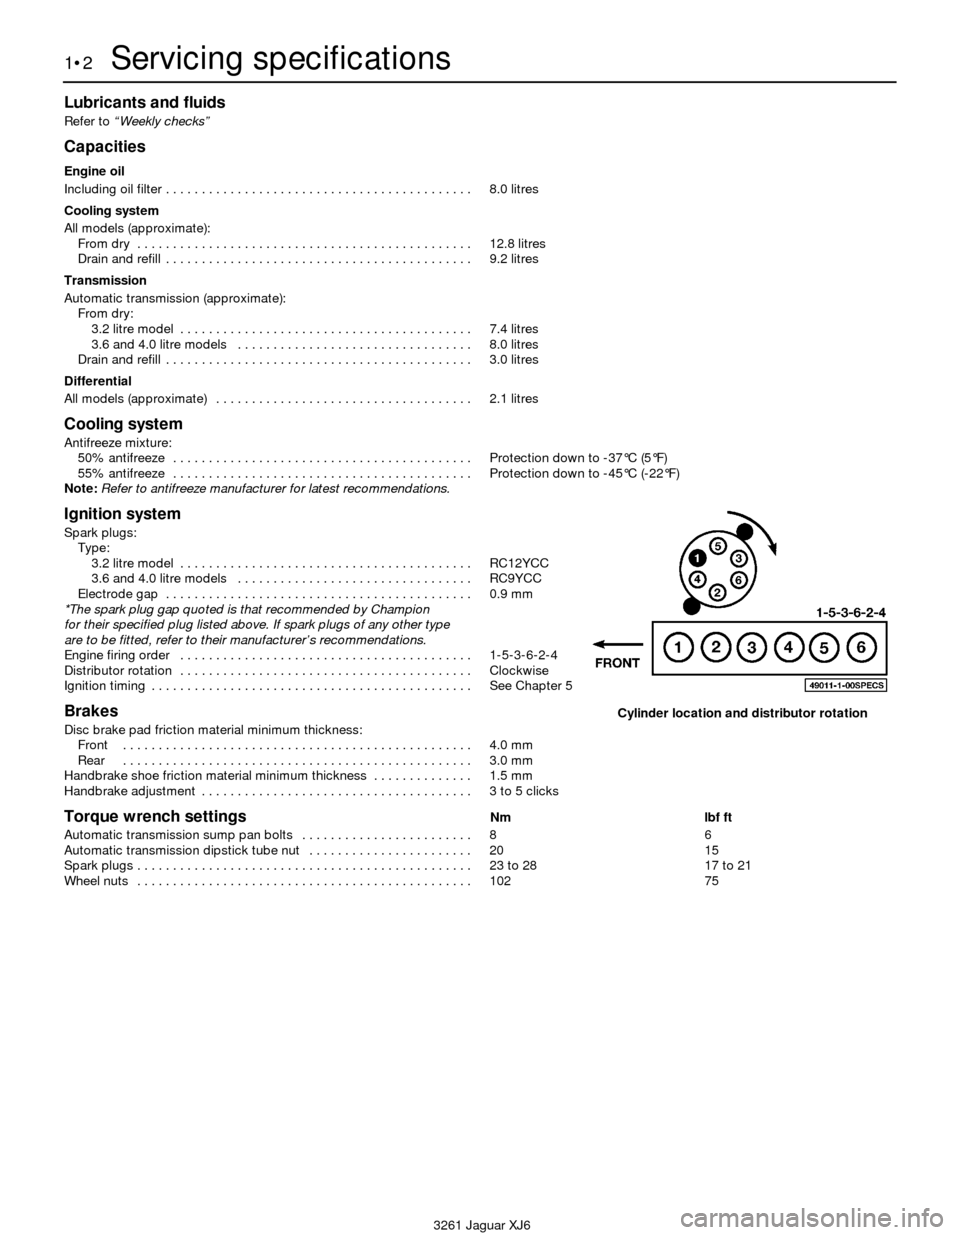
Engine firing order . . . . . . . . . . . . . . . . . . . . . . . . . . . . . . . . . . . . . . . . . 1-5-3-6-2-4
Distributor rotation . . . . . . . . . . . . . . . . . . . . . . . . . . . . . . . . . . . . . . . . . Clockwise
Ignition timing . . . . . . . . . . . . . . . . . . . . . . . . . . . . . . . . . . . . . . . . . . . . . See Chapter 5
Brakes
Disc brake pad friction material minimum thickness:
Front . . . . . . . . . . . . . . . . . . . . . . . . . . . . . . . . . . . . . . . . . . . . . . . . . 4.0 mm
Rear . . . . . . . . . . . . . . . . . . . . . . . . . . . . . . . . . . . . . . . . . . . . . . . . . 3.0 mm
Handbrake shoe friction material minimum thickness . . . . . . . . . . . . . . 1.5 mm
Handbrake adjustment . . . . . . . . . . . . . . . . . . . . . . . . . . . . . . . . . . . . . . 3 to 5 clicks
Torque wrench settingsNm lbf ft
Automatic transmission sump pan bolts . . . . . . . . . . . . . . . . . . . . . . . . 8 6
Automatic transmission dipstick tube nut . . . . . . . . . . . . . . . . . . . . . . . 20 15
Spark plugs . . . . . . . . . . . . . . . . . . . . . . . . . . . . . . . . . . . . . . . . . . . . . . . 23 to 28 17 to 21
Wheel nuts . . . . . . . . . . . . . . . . . . . . . . . . . . . . . . . . . . . . . . . . . . . . . . . 102 75
1•2Servicing specifications
3261 Jaguar XJ6
Cylinder location and distributor rotation
Page 24 of 227
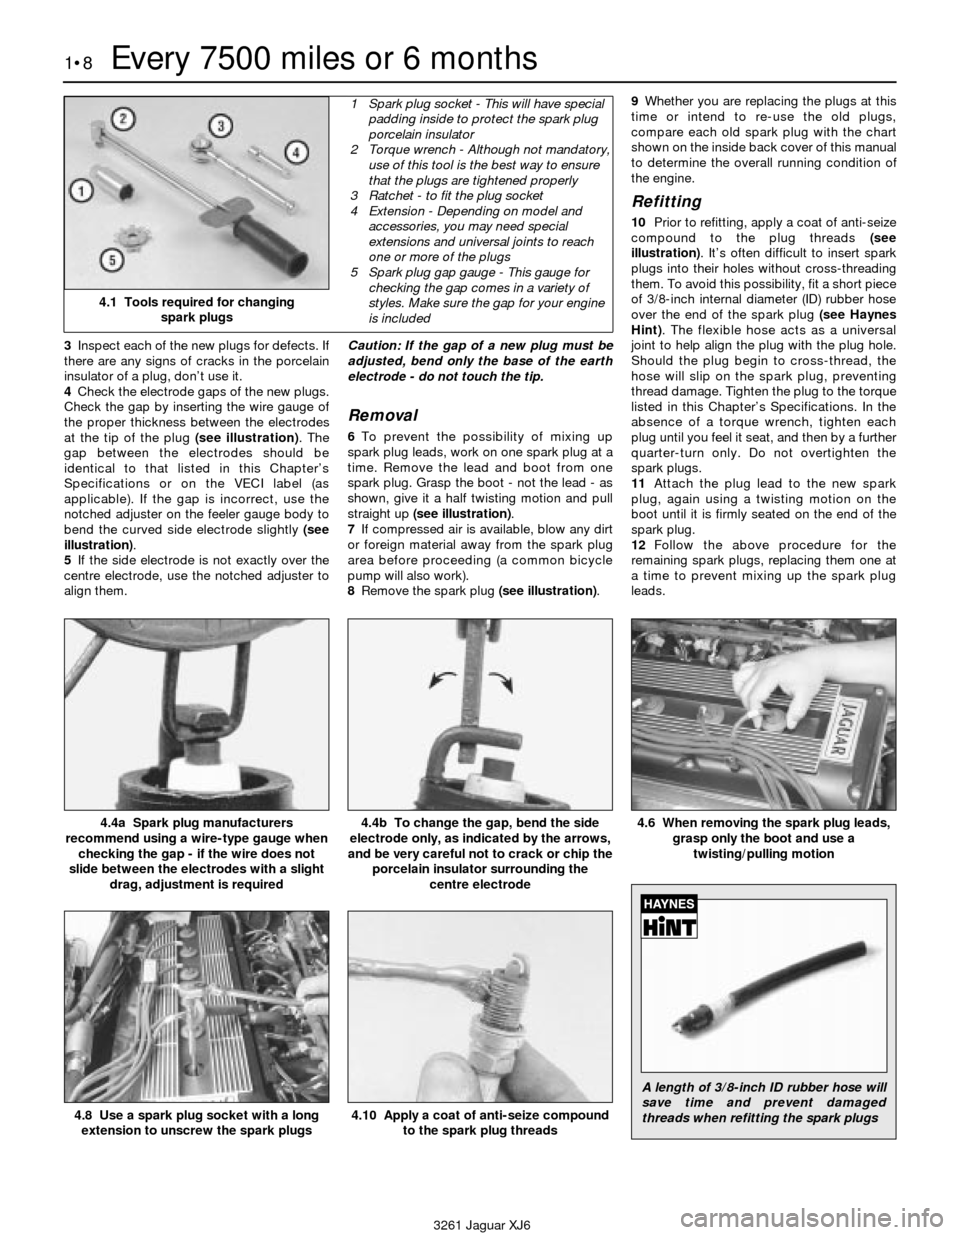
3Inspect each of the new plugs for defects. If
there are any signs of cracks in the porcelain
insulator of a plug, don’t use it.
4Check the electrode gaps of the new plugs.
Check the gap by inserting the wire gauge of
the proper thickness between the electrodes
at the tip of the plug (see illustration). The
gap between the electrodes should be
identical to that listed in this Chapter’s
Specifications or on the VECI label (as
applicable). If the gap is incorrect, use the
notched adjuster on the feeler gauge body to
bend the curved side electrode slightly (see
illustration).
5If the side electrode is not exactly over the
centre electrode, use the notched adjuster to
align them.Caution: If the gap of a new plug must be
adjusted, bend only the base of the earth
electrode - do not touch the tip.
Removal
6To prevent the possibility of mixing up
spark plug leads, work on one spark plug at a
time. Remove the lead and boot from one
spark plug. Grasp the boot - not the lead - as
shown, give it a half twisting motion and pull
straight up (see illustration).
7If compressed air is available, blow any dirt
or foreign material away from the spark plug
area before proceeding (a common bicycle
pump will also work).
8Remove the spark plug (see illustration).9Whether you are replacing the plugs at this
time or intend to re-use the old plugs,
compare each old spark plug with the chart
shown on the inside back cover of this manual
to determine the overall running condition of
the engine.
Refitting
10Prior to refitting, apply a coat of anti-seize
compound to the plug threads (see
illustration). It’s often difficult to insert spark
plugs into their holes without cross-threading
them. To avoid this possibility, fit a short piece
of 3/8-inch internal diameter (ID) rubber hose
over the end of the spark plug (see Haynes
Hint). The flexible hose acts as a universal
joint to help align the plug with the plug hole.
Should the plug begin to cross-thread, the
hose will slip on the spark plug, preventing
thread damage. Tighten the plug to the torque
listed in this Chapter’s Specifications. In the
absence of a torque wrench, tighten each
plug until you feel it seat, and then by a further
quarter-turn only. Do not overtighten the
spark plugs.
11Attach the plug lead to the new spark
plug, again using a twisting motion on the
boot until it is firmly seated on the end of the
spark plug.
12Follow the above procedure for the
remaining spark plugs, replacing them one at
a time to prevent mixing up the spark plug
leads.
1•8Every 7500 miles or 6 months
4.4a Spark plug manufacturers
recommend using a wire-type gauge when
checking the gap - if the wire does not
slide between the electrodes with a slight
drag, adjustment is required4.4b To change the gap, bend the side
electrode only, as indicated by the arrows,
and be very careful not to crack or chip the
porcelain insulator surrounding the
centre electrode4.6 When removing the spark plug leads,
grasp only the boot and use a
twisting/pulling motion
4.8 Use a spark plug socket with a long
extension to unscrew the spark plugs
3261 Jaguar XJ6
4.1 Tools required for changing
spark plugs
1 Spark plug socket - This will have special
padding inside to protect the spark plug
porcelain insulator
2 Torque wrench - Although not mandatory,
use of this tool is the best way to ensure
that the plugs are tightened properly
3 Ratchet - to fit the plug socket
4 Extension - Depending on model and
accessories, you may need special
extensions and universal joints to reach
one or more of the plugs
5 Spark plug gap gauge - This gauge for
checking the gap comes in a variety of
styles. Make sure the gap for your engine
is included
4.10 Apply a coat of anti-seize compound
to the spark plug threads
A length of 3/8-inch ID rubber hose will
save time and prevent damaged
threads when refitting the spark plugs
Page 31 of 227
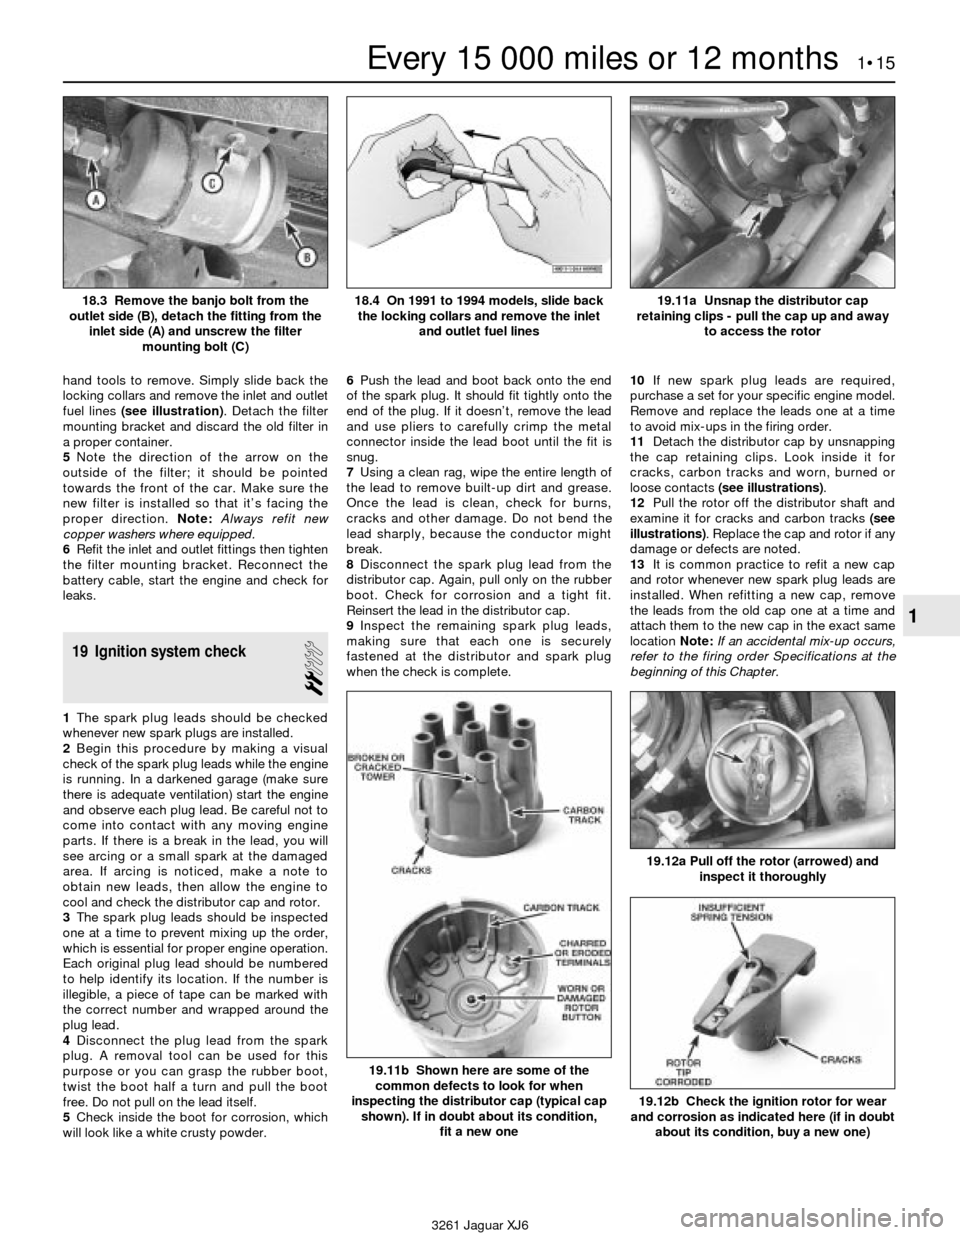
hand tools to remove. Simply slide back the
locking collars and remove the inlet and outlet
fuel lines (see illustration). Detach the filter
mounting bracket and discard the old filter in
a proper container.
5Note the direction of the arrow on the
outside of the filter; it should be pointed
towards the front of the car. Make sure the
new filter is installed so that it’s facing the
proper direction. Note:Always refit new
copper washers where equipped.
6Refit the inlet and outlet fittings then tighten
the filter mounting bracket. Reconnect the
battery cable, start the engine and check for
leaks.
19 Ignition system check
2
1The spark plug leads should be checked
whenever new spark plugs are installed.
2Begin this procedure by making a visual
check of the spark plug leads while the engine
is running. In a darkened garage (make sure
there is adequate ventilation) start the engine
and observe each plug lead. Be careful not to
come into contact with any moving engine
parts. If there is a break in the lead, you will
see arcing or a small spark at the damaged
area. If arcing is noticed, make a note to
obtain new leads, then allow the engine to
cool and check the distributor cap and rotor.
3The spark plug leads should be inspected
one at a time to prevent mixing up the order,
which is essential for proper engine operation.
Each original plug lead should be numbered
to help identify its location. If the number is
illegible, a piece of tape can be marked with
the correct number and wrapped around the
plug lead.
4Disconnect the plug lead from the spark
plug. A removal tool can be used for this
purpose or you can grasp the rubber boot,
twist the boot half a turn and pull the boot
free. Do not pull on the lead itself.
5Check inside the boot for corrosion, which
will look like a white crusty powder.6Push the lead and boot back onto the end
of the spark plug. It should fit tightly onto the
end of the plug. If it doesn’t, remove the lead
and use pliers to carefully crimp the metal
connector inside the lead boot until the fit is
snug.
7Using a clean rag, wipe the entire length of
the lead to remove built-up dirt and grease.
Once the lead is clean, check for burns,
cracks and other damage. Do not bend the
lead sharply, because the conductor might
break.
8Disconnect the spark plug lead from the
distributor cap. Again, pull only on the rubber
boot. Check for corrosion and a tight fit.
Reinsert the lead in the distributor cap.
9Inspect the remaining spark plug leads,
making sure that each one is securely
fastened at the distributor and spark plug
when the check is complete.10If new spark plug leads are required,
purchase a set for your specific engine model.
Remove and replace the leads one at a time
to avoid mix-ups in the firing order.
11Detach the distributor cap by unsnapping
the cap retaining clips. Look inside it for
cracks, carbon tracks and worn, burned or
loose contacts (see illustrations).
12Pull the rotor off the distributor shaft and
examine it for cracks and carbon tracks (see
illustrations). Replace the cap and rotor if any
damage or defects are noted.
13It is common practice to refit a new cap
and rotor whenever new spark plug leads are
installed. When refitting a new cap, remove
the leads from the old cap one at a time and
attach them to the new cap in the exact same
location Note:If an accidental mix-up occurs,
refer to the firing order Specifications at the
beginning of this Chapter.
Every 15 000 miles or 12 months 1•15
1
19.11a Unsnap the distributor cap
retaining clips - pull the cap up and away
to access the rotor
19.11b Shown here are some of the
common defects to look for when
inspecting the distributor cap (typical cap
shown). If in doubt about its condition,
fit a new one
19.12a Pull off the rotor (arrowed) and
inspect it thoroughly
19.12b Check the ignition rotor for wear
and corrosion as indicated here (if in doubt
about its condition, buy a new one)
3261 Jaguar XJ6 18.3 Remove the banjo bolt from the
outlet side (B), detach the fitting from the
inlet side (A) and unscrew the filter
mounting bolt (C)
18.4 On 1991 to 1994 models, slide back
the locking collars and remove the inlet
and outlet fuel lines
Page 37 of 227
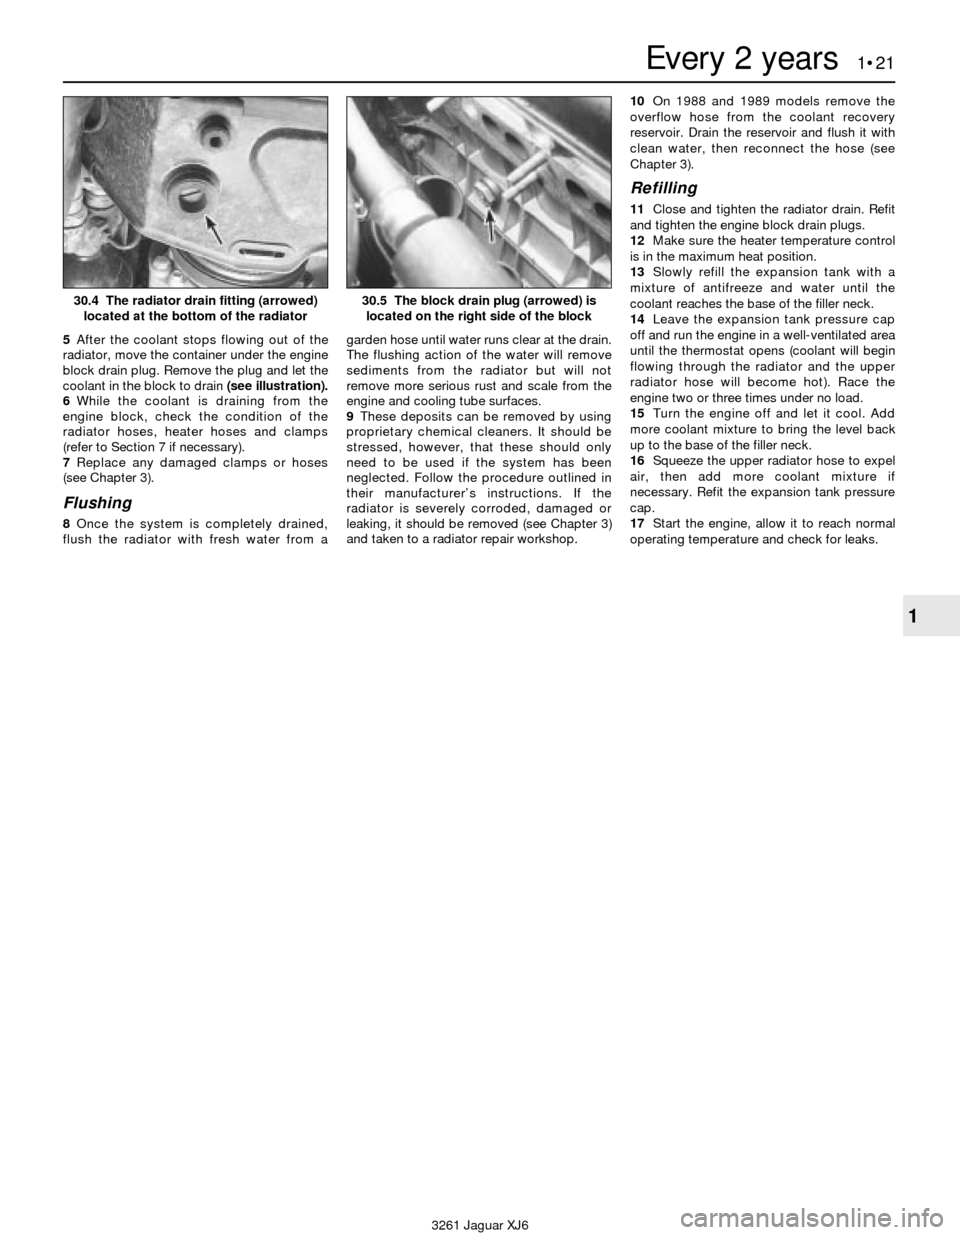
5After the coolant stops flowing out of the
radiator, move the container under the engine
block drain plug. Remove the plug and let the
coolant in the block to drain (see illustration).
6While the coolant is draining from the
engine block, check the condition of the
radiator hoses, heater hoses and clamps
(refer to Section 7 if necessary).
7Replace any damaged clamps or hoses
(see Chapter 3).
Flushing
8Once the system is completely drained,
flush the radiator with fresh water from agarden hose until water runs clear at the drain.
The flushing action of the water will remove
sediments from the radiator but will not
remove more serious rust and scale from the
engine and cooling tube surfaces.
9These deposits can be removed by using
proprietary chemical cleaners. It should be
stressed, however, that these should only
need to be used if the system has been
neglected. Follow the procedure outlined in
their manufacturer’s instructions. If the
radiator is severely corroded, damaged or
leaking, it should be removed (see Chapter 3)
and taken to a radiator repair workshop.10On 1988 and 1989 models remove the
overflow hose from the coolant recovery
reservoir. Drain the reservoir and flush it with
clean water, then reconnect the hose (see
Chapter 3).
Refilling
11Close and tighten the radiator drain. Refit
and tighten the engine block drain plugs.
12Make sure the heater temperature control
is in the maximum heat position.
13Slowly refill the expansion tank with a
mixture of antifreeze and water until the
coolant reaches the base of the filler neck.
14Leave the expansion tank pressure cap
off and run the engine in a well-ventilated area
until the thermostat opens (coolant will begin
flowing through the radiator and the upper
radiator hose will become hot). Race the
engine two or three times under no load.
15Turn the engine off and let it cool. Add
more coolant mixture to bring the level back
up to the base of the filler neck.
16Squeeze the upper radiator hose to expel
air, then add more coolant mixture if
necessary. Refit the expansion tank pressure
cap.
17Start the engine, allow it to reach normal
operating temperature and check for leaks.
Every 2 years 1•21
1
3261 Jaguar XJ6
30.4 The radiator drain fitting (arrowed)
located at the bottom of the radiator30.5 The block drain plug (arrowed) is
located on the right side of the block