jump start JAGUAR XJ6 1997 2.G Workshop Manual
[x] Cancel search | Manufacturer: JAGUAR, Model Year: 1997, Model line: XJ6, Model: JAGUAR XJ6 1997 2.GPages: 227, PDF Size: 7.2 MB
Page 2 of 227

3261 Jaguar XJ6
LIVING WITH YOUR JAGUAR XJ6
IntroductionPage 0•4
Notes for UK readersPage 0•4
Safety first!Page 0•5
Roadside repairs
IntroductionPage 0•6
If your car won’t startPage 0•6
Jump startingPage 0•7
Wheel changingPage 0•8
Identifying leaksPage 0•9
TowingPage 0•9
Weekly checks
IntroductionPage 0•10
Underbonnet check points Page 0•10
Engine oil levelPage 0•11
Coolant levelPage 0•11
Brake fluid levelPage 0•12
Screen washer fluid level Page 0•12
Power steering fluid level Page 0•13
Wiper bladesPage 0•13
Tyre condition and pressure Page 0•14
BatteryPage 0•15
Bulbs and fusesPage 0•15
Lubricants, fluids and tyre pressuresPage 0•16
MAINTENANCE
Routine maintenance and servicingPage 1•1
Servicing specificationsPage 1•2
Maintenance schedulePage 1•3
Maintenance procedures Page 1•6
Contents
Page 6 of 227
3261 Jaguar XJ6
0•6Roadside repairs
The following pages are intended to help in dealing with
common roadside emergencies and breakdowns. You will find
more detailed fault finding information at the back of the
manual, and repair information in the main chapters.
If your car won’t start
and the starter motor
doesn’t turn
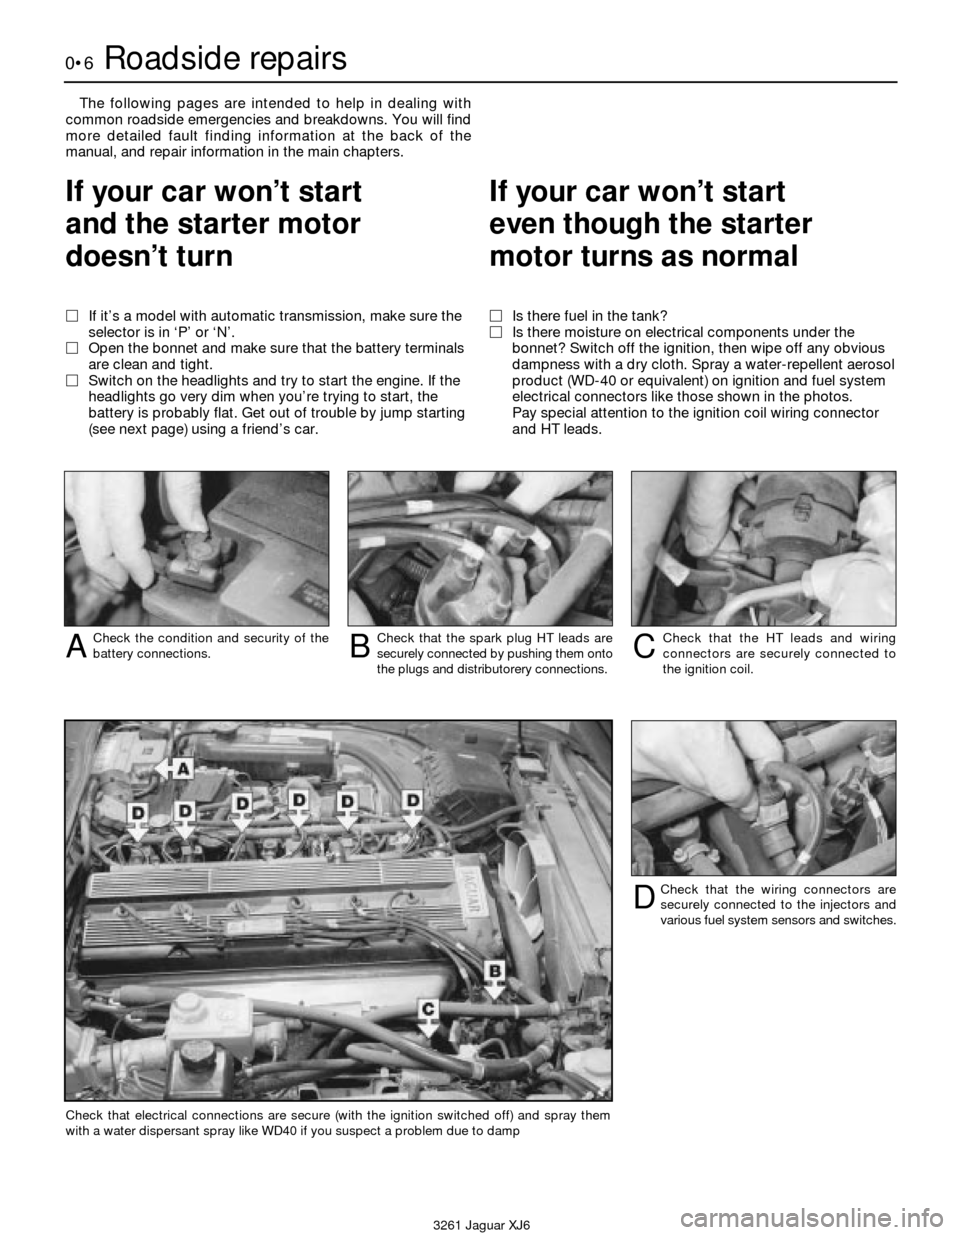
MIf it’s a model with automatic transmission, make sure the
selector is in ‘P’ or ‘N’.
MOpen the bonnet and make sure that the battery terminals
are clean and tight.
MSwitch on the headlights and try to start the engine. If the
headlights go very dim when you’re trying to start, the
battery is probably flat. Get out of trouble by jump starting
(see next page) using a friend’s car.
If your car won’t start
even though the starter
motor turns as normal
MIs there fuel in the tank?
MIs there moisture on electrical components under the
bonnet? Switch off the ignition, then wipe off any obvious
dampness with a dry cloth. Spray a water-repellent aerosol
product (WD-40 or equivalent) on ignition and fuel system
electrical connectors like those shown in the photos.
Pay special attention to the ignition coil wiring connector
and HT leads.
Check the condition and security of the
battery connections.ACheck that the spark plug HT leads are
securely connected by pushing them onto
the plugs and distributorery connections.BCheck that the HT leads and wiring
connectors are securely connected to
the ignition coil.C
Check that the wiring connectors are
securely connected to the injectors and
various fuel system sensors and switches.D
Check that electrical connections are secure (with the ignition switched off) and spray them
with a water dispersant spray like WD40 if you suspect a problem due to damp
Page 7 of 227
3261 Jaguar XJ6
Roadside repairs0•7
When jump-starting a car using a
booster battery, observe the following
precautions:
4Before connecting the booster
battery, make sure that the ignition
is switched off.
4Ensure that all electrical equipment
(lights, heater, wipers, etc) is
switched off.
4Take note of any special precautions
printed on the battery case.4Make sure that the booster battery
is the same voltage as the
discharged one in the vehicle.
4If the battery is being jump-started
from the battery in another vehicle,
the two vehicles MUST NOT TOUCH
each other.
4Make sure that the transmission is in
neutral (or PARK, in the case of
automatic transmission).
Jump starting will get you
out of trouble, but you must
correct whatever made the
battery go flat in the first
place. There are three possibilities:
1) The battery has been drained by
repeated attempts to start, or by
leaving the lights on.
2) The charging system is not working
properly (alternator drivebelt slack or
broken, alternator wiring fault or
alternator itself faulty).
3) The battery itself is at fault (electrolyte
low, or battery worn out).
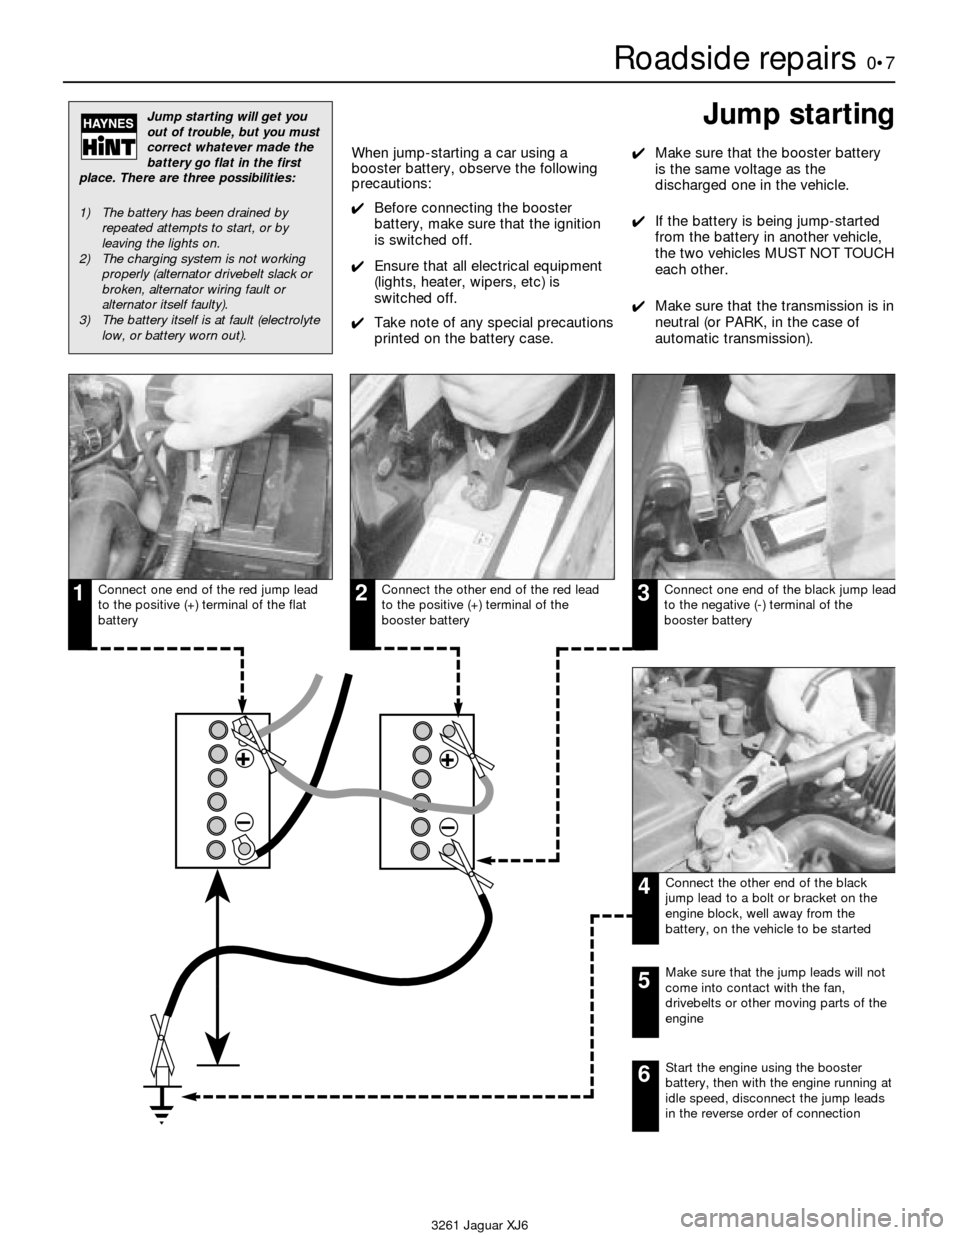
Connect one end of the red jump lead
to the positive (+) terminal of the flat
batteryConnect the other end of the red lead
to the positive (+) terminal of the
booster batteryConnect one end of the black jump lead
to the negative (-) terminal of the
booster battery
Connect the other end of the black
jump lead to a bolt or bracket on the
engine block, well away from the
battery, on the vehicle to be started
123
4
Make sure that the jump leads will not
come into contact with the fan,
drivebelts or other moving parts of the
engine5
Start the engine using the booster
battery, then with the engine running at
idle speed, disconnect the jump leads
in the reverse order of connection6
Jump starting
Page 15 of 227
3261 Jaguar XJ6
Weekly checks0•15
Battery
Caution:Before carrying out any work on the
vehicle battery, read the precautions given in
"Safety first" at the start of this manual.
4Make sure that the battery tray is in good
condition, and that the clamp is tight.
Corrosion on the tray, retaining clamp and the
battery itself can be removed with a solution
of water and baking soda. Thoroughly rinse all
cleaned areas with water. Any metal parts
damaged by corrosion should be covered
with a zinc-based primer, then painted.
4Periodically (approximately every three
months), check the charge condition of the
battery as described in Chapter 5.
4If the battery is flat, and you need to jump
start your vehicle, see Roadside Repairs.
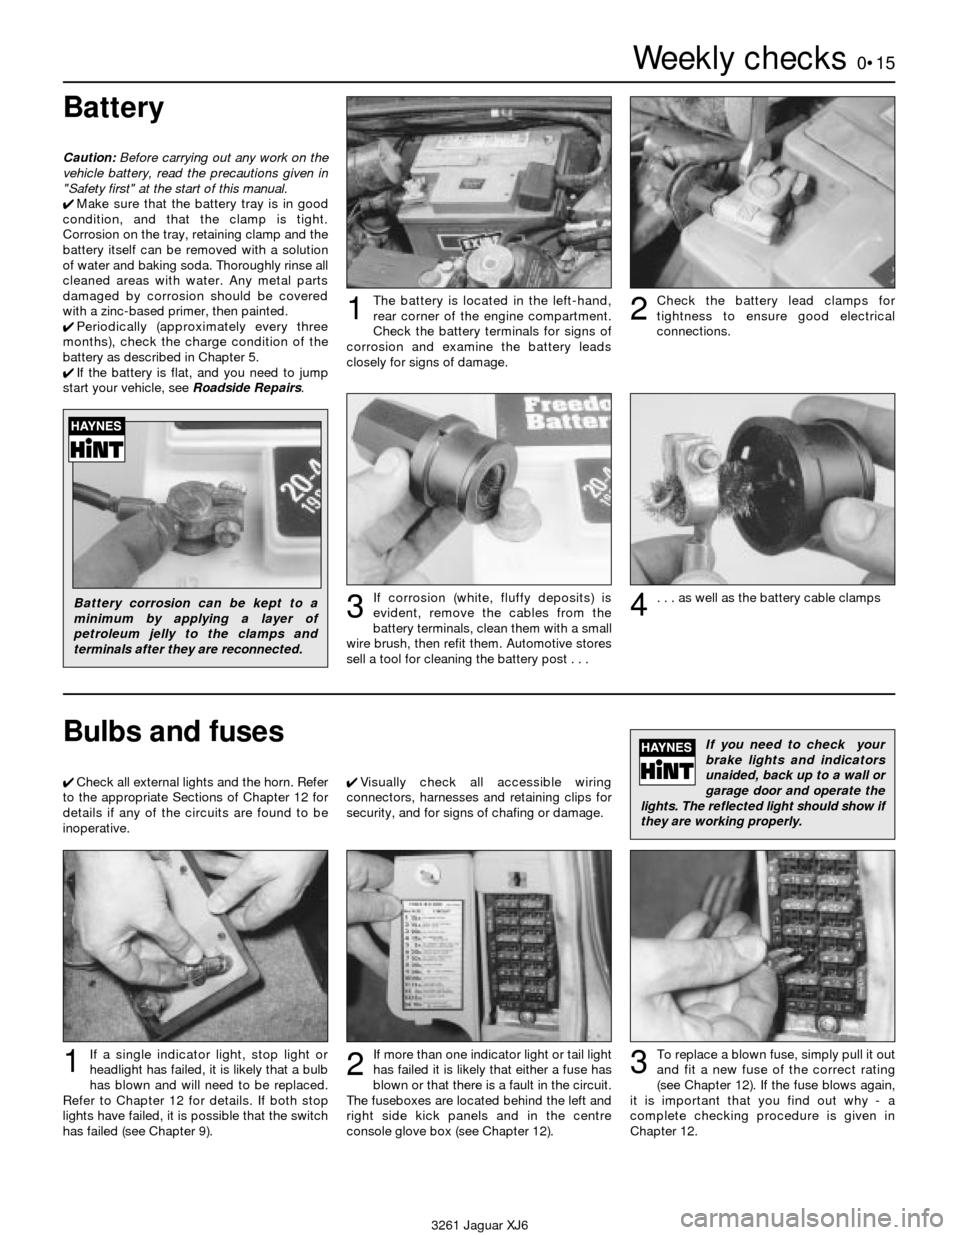
The battery is located in the left-hand,
rear corner of the engine compartment.
Check the battery terminals for signs of
corrosion and examine the battery leads
closely for signs of damage.1Check the battery lead clamps for
tightness to ensure good electrical
connections.2
Battery corrosion can be kept to a
minimum by applying a layer of
petroleum jelly to the clamps and
terminals after they are reconnected.If corrosion (white, fluffy deposits) is
evident, remove the cables from the
battery terminals, clean them with a small
wire brush, then refit them. Automotive stores
sell a tool for cleaning the battery post . . .3. . . as well as the battery cable clamps4
Bulbs and fuses
4Check all external lights and the horn. Refer
to the appropriate Sections of Chapter 12 for
details if any of the circuits are found to be
inoperative.4Visually check all accessible wiring
connectors, harnesses and retaining clips for
security, and for signs of chafing or damage.
If you need to check your
brake lights and indicators
unaided, back up to a wall or
garage door and operate the
lights. The reflected light should show if
they are working properly.
If a single indicator light, stop light or
headlight has failed, it is likely that a bulb
has blown and will need to be replaced.
Refer to Chapter 12 for details. If both stop
lights have failed, it is possible that the switch
has failed (see Chapter 9).If more than one indicator light or tail light
has failed it is likely that either a fuse has
blown or that there is a fault in the circuit.
The fuseboxes are located behind the left and
right side kick panels and in the centre
console glove box (see Chapter 12).
2
To replace a blown fuse, simply pull it out
and fit a new fuse of the correct rating
(see Chapter 12). If the fuse blows again,
it is important that you find out why - a
complete checking procedure is given in
Chapter 12.31
Page 26 of 227
never ingest it. Wear protective safety glasses
when working near the battery. Keep children
away from the battery.
5Note the external condition of the battery. If
the positive terminal and cable clamp on your
vehicle’s battery is equipped with a rubber
protector, make sure it isn’t torn or damaged.
It should completely cover the terminal. Look
for any corroded or loose connections, cracks
in the case or cover or loose hold-down
clamps. Also check the entire length of each
cable for cracks and frayed conductors.
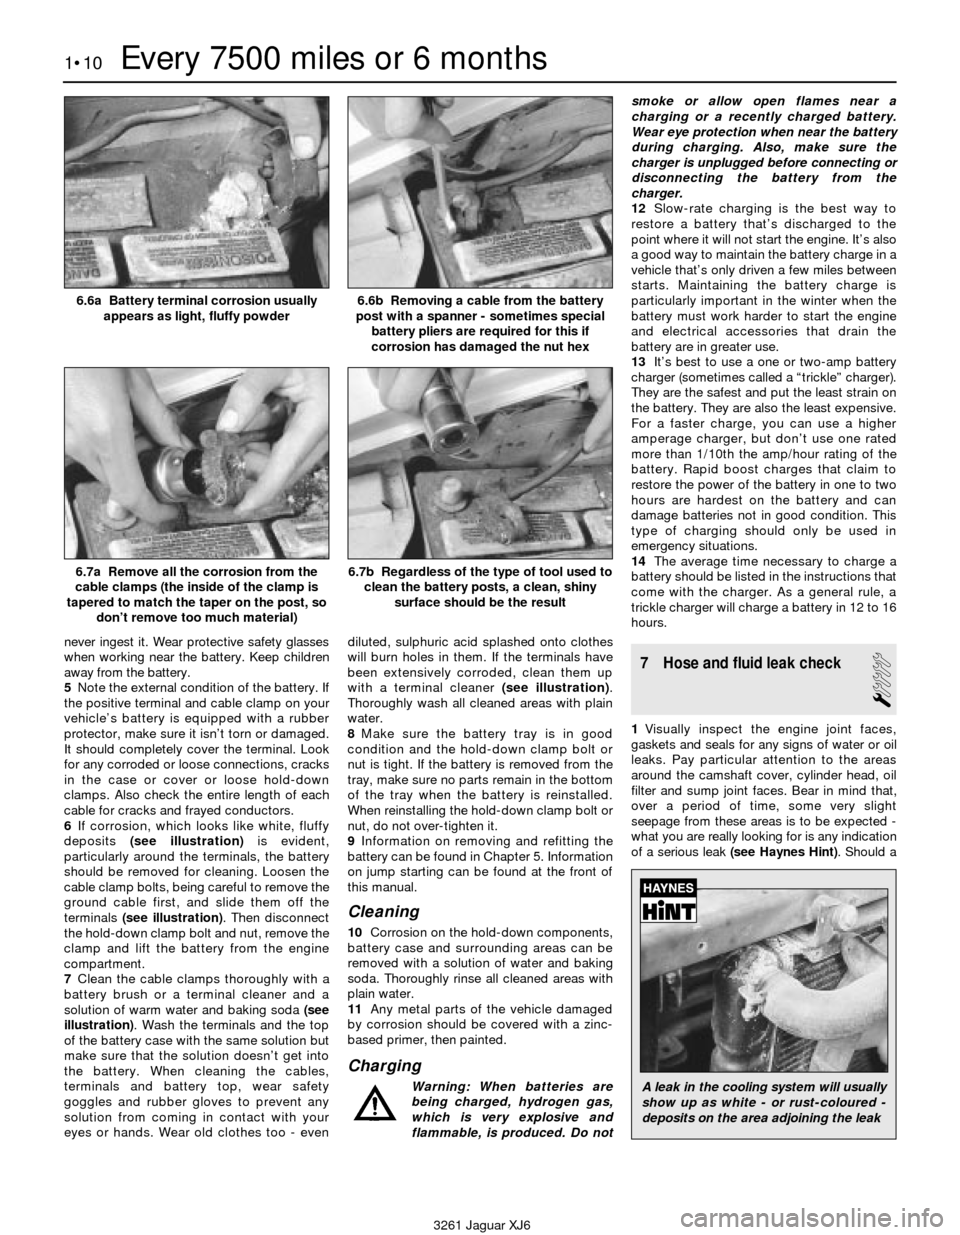
6If corrosion, which looks like white, fluffy
deposits (see illustration)is evident,
particularly around the terminals, the battery
should be removed for cleaning. Loosen the
cable clamp bolts, being careful to remove the
ground cable first, and slide them off the
terminals (see illustration). Then disconnect
the hold-down clamp bolt and nut, remove the
clamp and lift the battery from the engine
compartment.
7Clean the cable clamps thoroughly with a
battery brush or a terminal cleaner and a
solution of warm water and baking soda (see
illustration). Wash the terminals and the top
of the battery case with the same solution but
make sure that the solution doesn’t get into
the battery. When cleaning the cables,
terminals and battery top, wear safety
goggles and rubber gloves to prevent any
solution from coming in contact with your
eyes or hands. Wear old clothes too - evendiluted, sulphuric acid splashed onto clothes
will burn holes in them. If the terminals have
been extensively corroded, clean them up
with a terminal cleaner (see illustration).
Thoroughly wash all cleaned areas with plain
water.
8Make sure the battery tray is in good
condition and the hold-down clamp bolt or
nut is tight. If the battery is removed from the
tray, make sure no parts remain in the bottom
of the tray when the battery is reinstalled.
When reinstalling the hold-down clamp bolt or
nut, do not over-tighten it.
9Information on removing and refitting the
battery can be found in Chapter 5. Information
on jump starting can be found at the front of
this manual.
Cleaning
10Corrosion on the hold-down components,
battery case and surrounding areas can be
removed with a solution of water and baking
soda. Thoroughly rinse all cleaned areas with
plain water.
11Any metal parts of the vehicle damaged
by corrosion should be covered with a zinc-
based primer, then painted.
Charging
Warning: When batteries are
being charged, hydrogen gas,
which is very explosive and
flammable, is produced. Do notsmoke or allow open flames near a
charging or a recently charged battery.
Wear eye protection when near the battery
during charging. Also, make sure the
charger is unplugged before connecting or
disconnecting the battery from the
charger.
12Slow-rate charging is the best way to
restore a battery that’s discharged to the
point where it will not start the engine. It’s also
a good way to maintain the battery charge in a
vehicle that’s only driven a few miles between
starts. Maintaining the battery charge is
particularly important in the winter when the
battery must work harder to start the engine
and electrical accessories that drain the
battery are in greater use.
13It’s best to use a one or two-amp battery
charger (sometimes called a “trickle” charger).
They are the safest and put the least strain on
the battery. They are also the least expensive.
For a faster charge, you can use a higher
amperage charger, but don’t use one rated
more than 1/10th the amp/hour rating of the
battery. Rapid boost charges that claim to
restore the power of the battery in one to two
hours are hardest on the battery and can
damage batteries not in good condition. This
type of charging should only be used in
emergency situations.
14The average time necessary to charge a
battery should be listed in the instructions that
come with the charger. As a general rule, a
trickle charger will charge a battery in 12 to 16
hours.
7 Hose and fluid leak check
1
1Visually inspect the engine joint faces,
gaskets and seals for any signs of water or oil
leaks. Pay particular attention to the areas
around the camshaft cover, cylinder head, oil
filter and sump joint faces. Bear in mind that,
over a period of time, some very slight
seepage from these areas is to be expected -
what you are really looking for is any indication
of a serious leak (see Haynes Hint). Should a
1•10Every 7500 miles or 6 months
6.6a Battery terminal corrosion usually
appears as light, fluffy powder6.6b Removing a cable from the battery
post with a spanner - sometimes special
battery pliers are required for this if
corrosion has damaged the nut hex
6.7a Remove all the corrosion from the
cable clamps (the inside of the clamp is
tapered to match the taper on the post, so
don’t remove too much material)6.7b Regardless of the type of tool used to
clean the battery posts, a clean, shiny
surface should be the result
3261 Jaguar XJ6
A leak in the cooling system will usually
show up as white - or rust-coloured -
deposits on the area adjoining the leak
Page 39 of 227
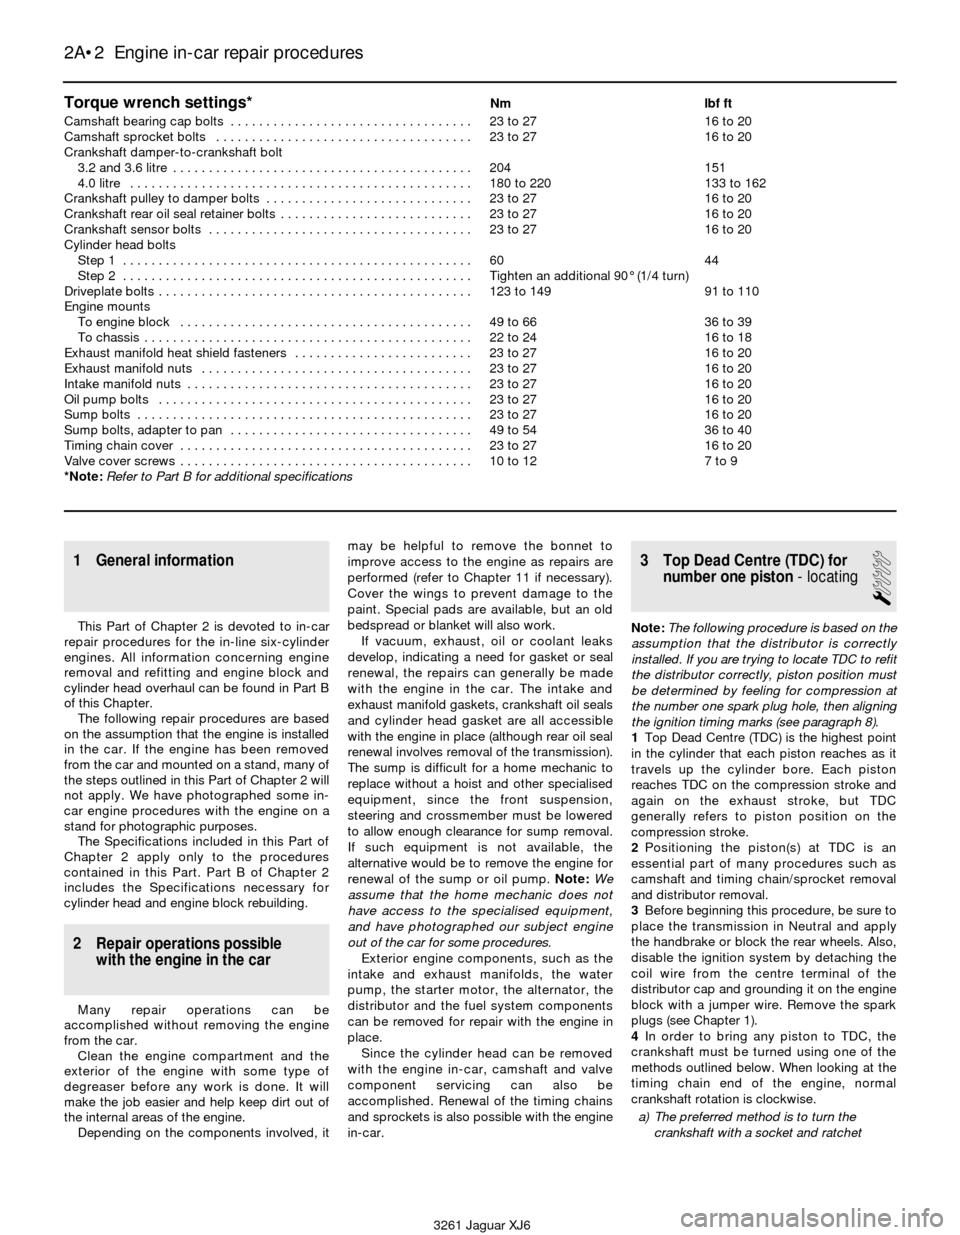
Torque wrench settings*Nm lbf ft
Camshaft bearing cap bolts . . . . . . . . . . . . . . . . . . . . . . . . . . . . . . . . . . 23 to 27 16 to 20
Camshaft sprocket bolts . . . . . . . . . . . . . . . . . . . . . . . . . . . . . . . . . . . . 23 to 27 16 to 20
Crankshaft damper-to-crankshaft bolt
3.2 and 3.6 litre . . . . . . . . . . . . . . . . . . . . . . . . . . . . . . . . . . . . . . . . . . 204 151
4.0 litre . . . . . . . . . . . . . . . . . . . . . . . . . . . . . . . . . . . . . . . . . . . . . . . . 180 to 220 133 to 162
Crankshaft pulley to damper bolts . . . . . . . . . . . . . . . . . . . . . . . . . . . . . 23 to 27 16 to 20
Crankshaft rear oil seal retainer bolts . . . . . . . . . . . . . . . . . . . . . . . . . . . 23 to 27 16 to 20
Crankshaft sensor bolts . . . . . . . . . . . . . . . . . . . . . . . . . . . . . . . . . . . . . 23 to 27 16 to 20
Cylinder head bolts
Step 1 . . . . . . . . . . . . . . . . . . . . . . . . . . . . . . . . . . . . . . . . . . . . . . . . . 60 44
Step 2 . . . . . . . . . . . . . . . . . . . . . . . . . . . . . . . . . . . . . . . . . . . . . . . . . Tighten an additional 90° (1/4 turn)
Driveplate bolts . . . . . . . . . . . . . . . . . . . . . . . . . . . . . . . . . . . . . . . . . . . . 123 to 149 91 to 110
Engine mounts
To engine block . . . . . . . . . . . . . . . . . . . . . . . . . . . . . . . . . . . . . . . . . 49 to 66 36 to 39
To chassis . . . . . . . . . . . . . . . . . . . . . . . . . . . . . . . . . . . . . . . . . . . . . . 22 to 24 16 to 18
Exhaust manifold heat shield fasteners . . . . . . . . . . . . . . . . . . . . . . . . . 23 to 27 16 to 20
Exhaust manifold nuts . . . . . . . . . . . . . . . . . . . . . . . . . . . . . . . . . . . . . . 23 to 27 16 to 20
Intake manifold nuts . . . . . . . . . . . . . . . . . . . . . . . . . . . . . . . . . . . . . . . . 23 to 27 16 to 20
Oil pump bolts . . . . . . . . . . . . . . . . . . . . . . . . . . . . . . . . . . . . . . . . . . . . 23 to 27 16 to 20
Sump bolts . . . . . . . . . . . . . . . . . . . . . . . . . . . . . . . . . . . . . . . . . . . . . . . 23 to 27 16 to 20
Sump bolts, adapter to pan . . . . . . . . . . . . . . . . . . . . . . . . . . . . . . . . . . 49 to 54 36 to 40
Timing chain cover . . . . . . . . . . . . . . . . . . . . . . . . . . . . . . . . . . . . . . . . . 23 to 27 16 to 20
Valve cover screws . . . . . . . . . . . . . . . . . . . . . . . . . . . . . . . . . . . . . . . . . 10 to 12 7 to 9
*Note:Refer to Part B for additional specifications
2A•2 Engine in-car repair procedures
3261 Jaguar XJ6
1 General information
This Part of Chapter 2 is devoted to in-car
repair procedures for the in-line six-cylinder
engines. All information concerning engine
removal and refitting and engine block and
cylinder head overhaul can be found in Part B
of this Chapter.
The following repair procedures are based
on the assumption that the engine is installed
in the car. If the engine has been removed
from the car and mounted on a stand, many of
the steps outlined in this Part of Chapter 2 will
not apply. We have photographed some in-
car engine procedures with the engine on a
stand for photographic purposes.
The Specifications included in this Part of
Chapter 2 apply only to the procedures
contained in this Part. Part B of Chapter 2
includes the Specifications necessary for
cylinder head and engine block rebuilding.
2 Repair operations possible
with the engine in the car
Many repair operations can be
accomplished without removing the engine
from the car.
Clean the engine compartment and the
exterior of the engine with some type of
degreaser before any work is done. It will
make the job easier and help keep dirt out of
the internal areas of the engine.
Depending on the components involved, itmay be helpful to remove the bonnet to
improve access to the engine as repairs are
performed (refer to Chapter 11 if necessary).
Cover the wings to prevent damage to the
paint. Special pads are available, but an old
bedspread or blanket will also work.
If vacuum, exhaust, oil or coolant leaks
develop, indicating a need for gasket or seal
renewal, the repairs can generally be made
with the engine in the car. The intake and
exhaust manifold gaskets, crankshaft oil seals
and cylinder head gasket are all accessible
with the engine in place (although rear oil seal
renewal involves removal of the transmission).
The sump is difficult for a home mechanic to
replace without a hoist and other specialised
equipment, since the front suspension,
steering and crossmember must be lowered
to allow enough clearance for sump removal.
If such equipment is not available, the
alternative would be to remove the engine for
renewal of the sump or oil pump. Note:We
assume that the home mechanic does not
have access to the specialised equipment,
and have photographed our subject engine
out of the car for some procedures.
Exterior engine components, such as the
intake and exhaust manifolds, the water
pump, the starter motor, the alternator, the
distributor and the fuel system components
can be removed for repair with the engine in
place.
Since the cylinder head can be removed
with the engine in-car, camshaft and valve
component servicing can also be
accomplished. Renewal of the timing chains
and sprockets is also possible with the engine
in-car.
3 Top Dead Centre (TDC) for
number one piston- locating
1
Note:The following procedure is based on the
assumption that the distributor is correctly
installed. If you are trying to locate TDC to refit
the distributor correctly, piston position must
be determined by feeling for compression at
the number one spark plug hole, then aligning
the ignition timing marks (see paragraph 8).
1Top Dead Centre (TDC) is the highest point
in the cylinder that each piston reaches as it
travels up the cylinder bore. Each piston
reaches TDC on the compression stroke and
again on the exhaust stroke, but TDC
generally refers to piston position on the
compression stroke.
2Positioning the piston(s) at TDC is an
essential part of many procedures such as
camshaft and timing chain/sprocket removal
and distributor removal.
3Before beginning this procedure, be sure to
place the transmission in Neutral and apply
the handbrake or block the rear wheels. Also,
disable the ignition system by detaching the
coil wire from the centre terminal of the
distributor cap and grounding it on the engine
block with a jumper wire. Remove the spark
plugs (see Chapter 1).
4In order to bring any piston to TDC, the
crankshaft must be turned using one of the
methods outlined below. When looking at the
timing chain end of the engine, normal
crankshaft rotation is clockwise.
a) The preferred method is to turn the
crankshaft with a socket and ratchet
Page 40 of 227
attached to the bolt threaded into the
front of the crankshaft. Apply pressure on
the bolt in a clockwise direction only.
Never turn the bolt anti-clockwise.
b) A remote starter switch, which may save
some time, can also be used. Follow the
instructions included with the switch.
Once the piston is close to TDC, use a
socket and ratchet as described in the
previous paragraph.
c) If an assistant is available to turn the
ignition switch to the Start position in
short bursts, you can get the piston close
to TDC without a remote starter switch.
Make sure your assistant is out of the car,
away from the ignition switch, then use a
socket and ratchet as described in
Paragraph a) to complete the procedure.
5Note the position of the terminal for the
number one spark plug lead on the distributor
cap. If the terminal isn’t marked, follow the
plug lead from the number one cylinder spark
plug to the cap.
6Use a felt-tip pen or chalk to make a mark
on the distributor body directly under the
number one terminal (see Chapter 5).
7Detach the cap from the distributor and set
it aside (see Chapter 1 if necessary).
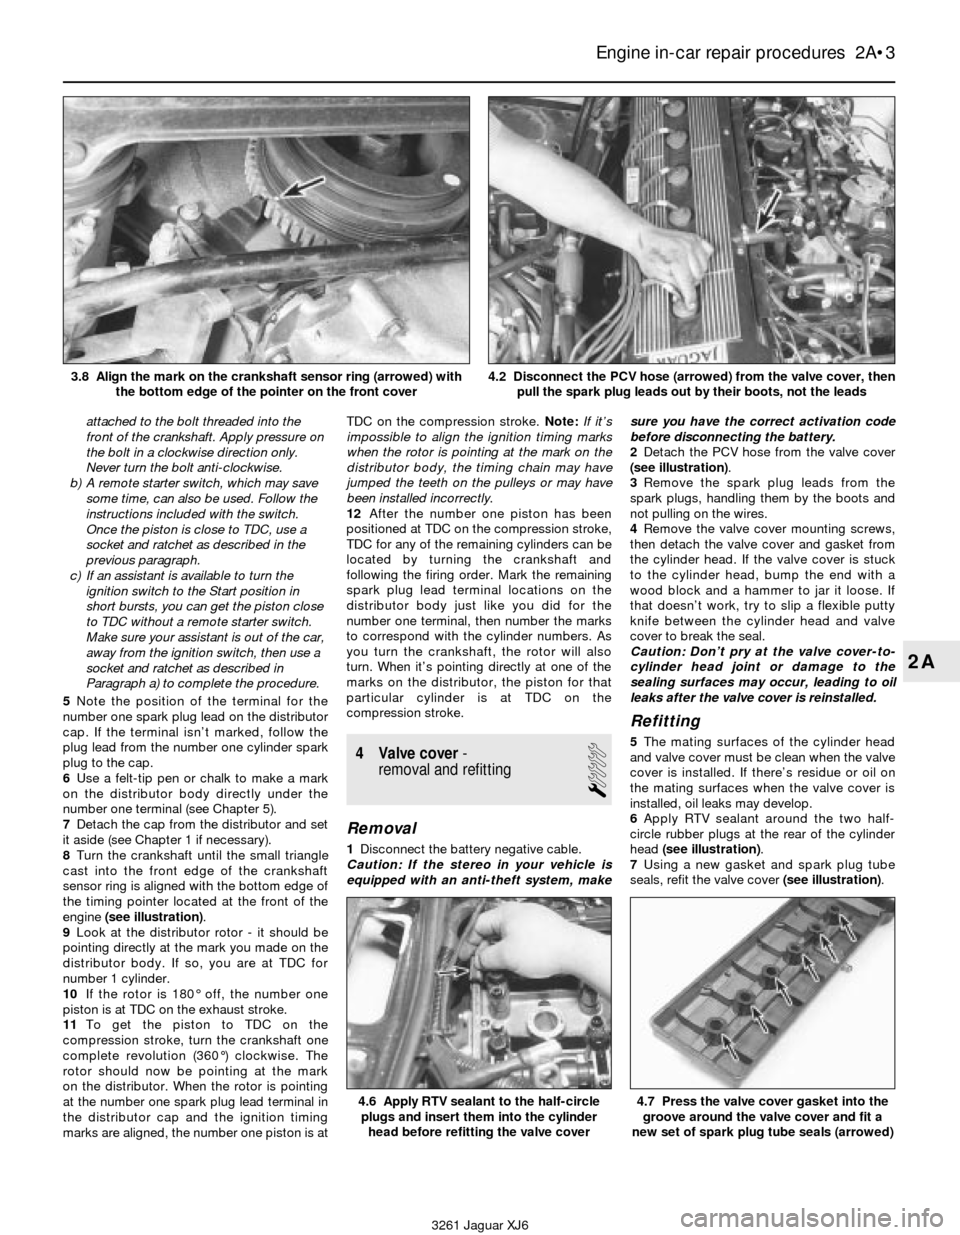
8Turn the crankshaft until the small triangle
cast into the front edge of the crankshaft
sensor ring is aligned with the bottom edge of
the timing pointer located at the front of the
engine(see illustration).
9Look at the distributor rotor - it should be
pointing directly at the mark you made on the
distributor body. If so, you are at TDC for
number 1 cylinder.
10If the rotor is 180° off, the number one
piston is at TDC on the exhaust stroke.
11To get the piston to TDC on the
compression stroke, turn the crankshaft one
complete revolution (360°) clockwise. The
rotor should now be pointing at the mark
on the distributor. When the rotor is pointing
at the number one spark plug lead terminal in
the distributor cap and the ignition timing
marks are aligned, the number one piston is atTDC on the compression stroke. Note:If it’s
impossible to align the ignition timing marks
when the rotor is pointing at the mark on the
distributor body, the timing chain may have
jumped the teeth on the pulleys or may have
been installed incorrectly.
12After the number one piston has been
positioned at TDC on the compression stroke,
TDC for any of the remaining cylinders can be
located by turning the crankshaft and
following the firing order. Mark the remaining
spark plug lead terminal locations on the
distributor body just like you did for the
number one terminal, then number the marks
to correspond with the cylinder numbers. As
you turn the crankshaft, the rotor will also
turn. When it’s pointing directly at one of the
marks on the distributor, the piston for that
particular cylinder is at TDC on the
compression stroke.
4 Valve cover-
removal and refitting
1
Removal
1Disconnect the battery negative cable.
Caution: If the stereo in your vehicle is
equipped with an anti-theft system, makesure you have the correct activation code
before disconnecting the battery.
2Detach the PCV hose from the valve cover
(see illustration).
3Remove the spark plug leads from the
spark plugs, handling them by the boots and
not pulling on the wires.
4Remove the valve cover mounting screws,
then detach the valve cover and gasket from
the cylinder head. If the valve cover is stuck
to the cylinder head, bump the end with a
wood block and a hammer to jar it loose. If
that doesn’t work, try to slip a flexible putty
knife between the cylinder head and valve
cover to break the seal.
Caution: Don’t pry at the valve cover-to-
cylinder head joint or damage to the
sealing surfaces may occur, leading to oil
leaks after the valve cover is reinstalled.
Refitting
5The mating surfaces of the cylinder head
and valve cover must be clean when the valve
cover is installed. If there’s residue or oil on
the mating surfaces when the valve cover is
installed, oil leaks may develop.
6Apply RTV sealant around the two half-
circle rubber plugs at the rear of the cylinder
head (see illustration).
7Using a new gasket and spark plug tube
seals, refit the valve cover (see illustration).
Engine in-car repair procedures 2A•3
2A
4.6 Apply RTV sealant to the half-circle
plugs and insert them into the cylinder
head before refitting the valve cover4.7 Press the valve cover gasket into the
groove around the valve cover and fit a
new set of spark plug tube seals (arrowed)
3261 Jaguar XJ6 3.8 Align the mark on the crankshaft sensor ring (arrowed) with
the bottom edge of the pointer on the front cover
4.2 Disconnect the PCV hose (arrowed) from the valve cover, then
pull the spark plug leads out by their boots, not the leads
Page 58 of 227
rebuilt engine or short block, some rebuilders
will not warranty their engines unless the
radiator has been professionally flushed. Also,
we don’t recommend overhauling the oil
pump - always refit a new one when an engine
is rebuilt.
Before beginning the engine overhaul, read
through the entire procedure to familiarise
yourself with the scope and requirements of
the job. Overhauling an engine isn’t difficult,
but it is time-consuming. Plan on the vehicle
being tied up for a minimum of two weeks,
especially if parts must be taken to an
automotive machine workshop for repair or
reconditioning. Check on availability of parts
and make sure that any necessary special
tools and equipment are obtained in advance.
Most work can be done with typical hand
tools, although a number of precision
measuring tools are required for inspecting
parts to determine if they must be renewed.
Often an automotive machine workshop will
handle the inspection of parts and offer
advice concerning reconditioning and
renewal. Note:Always wait until the engine
has been completely dismantled and all
components, especially the engine block,
have been inspected before deciding what
service and repair operations must be
performed by an automotive machine
workshop. Since the engine block’s condition
will be the major factor to consider when
determining whether to overhaul the original
engine or buy a rebuilt one, never purchase
parts or have machine work done on other
components until the engine block has been
thoroughly inspected. As a general rule, time
is the primary cost of an overhaul, so it
doesn’t pay to refit worn or substandard
parts.
If it turns out that a number of major
components are beyond reconditioning, it
may be cost effective to buy a factory-rebuilt
engine from a Jaguar dealership.
As a final note, to ensure maximum life and
minimum trouble from a rebuilt engine,
everything must be assembled with care in a
spotlessly-clean environment.
3 Vacuum gauge
diagnostic checks
2
A vacuum gauge provides valuable
information about what is going on in the
engine at a low cost. You can check for worn
rings or cylinder walls, leaking cylinder head or
intake manifold gaskets, incorrect carburettor
adjustments, restricted exhaust, stuck or
burned valves, weak valve springs, improper
ignition or valve timing and ignition problems.
Unfortunately, vacuum gauge readings are
easy to misinterpret, so they should be used
with other tests to confirm the diagnosis.
Both the absolute readings and the rate of
needle movement are important for accurate
interpretation. Most gauges measure vacuumin inches of mercury (in-Hg). As vacuum
increases (or atmospheric pressure decreases),
the reading will decrease. Also, for every
1000 foot increase in elevation above sea level;
the gauge readings will decrease about one
inch of mercury.
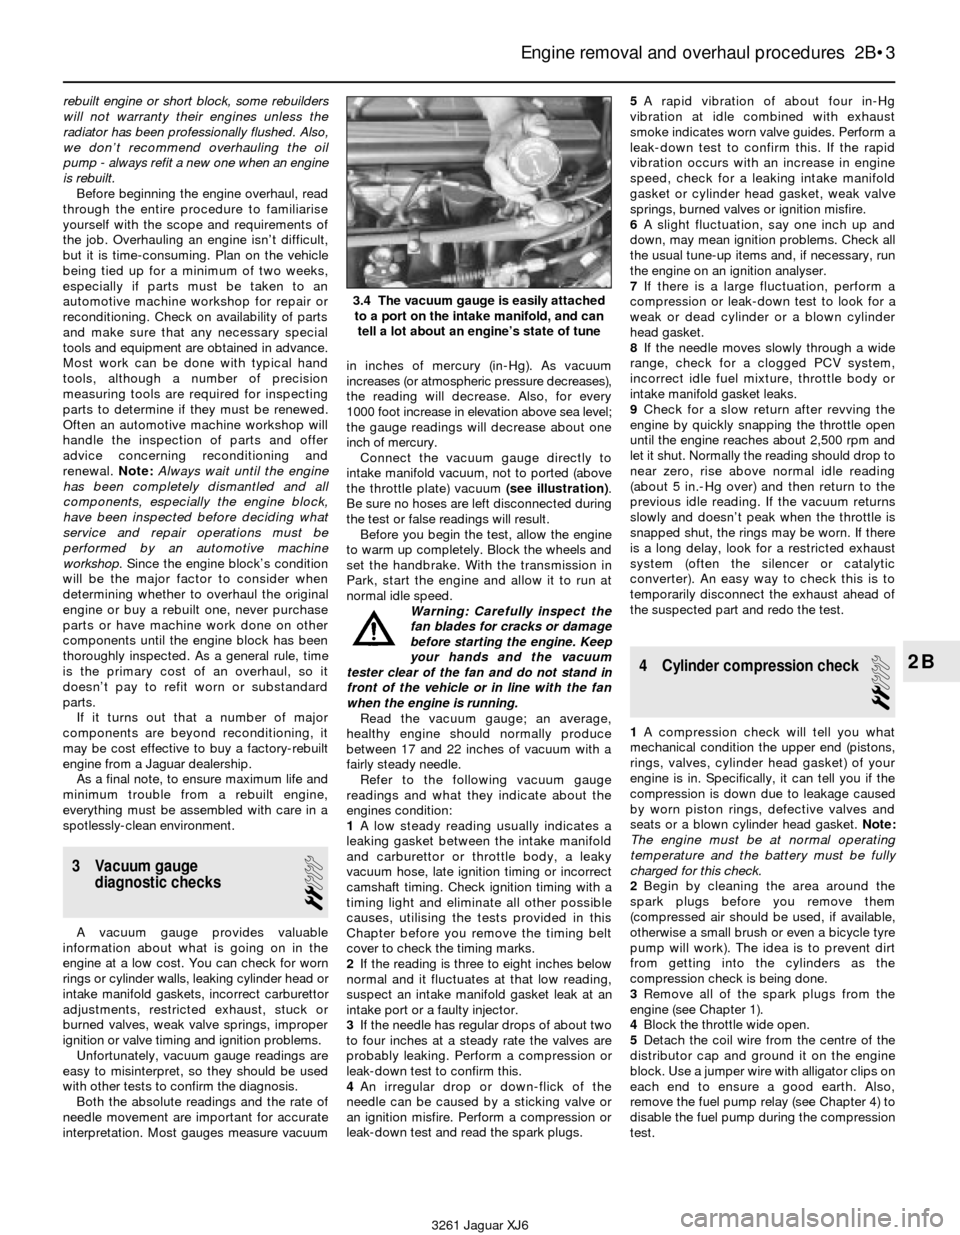
Connect the vacuum gauge directly to
intake manifold vacuum, not to ported (above
the throttle plate) vacuum (see illustration).
Be sure no hoses are left disconnected during
the test or false readings will result.
Before you begin the test, allow the engine
to warm up completely. Block the wheels and
set the handbrake. With the transmission in
Park, start the engine and allow it to run at
normal idle speed.
Warning: Carefully inspect the
fan blades for cracks or damage
before starting the engine. Keep
your hands and the vacuum
tester clear of the fan and do not stand in
front of the vehicle or in line with the fan
when the engine is running.
Read the vacuum gauge; an average,
healthy engine should normally produce
between 17 and 22 inches of vacuum with a
fairly steady needle.
Refer to the following vacuum gauge
readings and what they indicate about the
engines condition:
1A low steady reading usually indicates a
leaking gasket between the intake manifold
and carburettor or throttle body, a leaky
vacuum hose, late ignition timing or incorrect
camshaft timing. Check ignition timing with a
timing light and eliminate all other possible
causes, utilising the tests provided in this
Chapter before you remove the timing belt
cover to check the timing marks.
2If the reading is three to eight inches below
normal and it fluctuates at that low reading,
suspect an intake manifold gasket leak at an
intake port or a faulty injector.
3If the needle has regular drops of about two
to four inches at a steady rate the valves are
probably leaking. Perform a compression or
leak-down test to confirm this.
4An irregular drop or down-flick of the
needle can be caused by a sticking valve or
an ignition misfire. Perform a compression or
leak-down test and read the spark plugs.5A rapid vibration of about four in-Hg
vibration at idle combined with exhaust
smoke indicates worn valve guides. Perform a
leak-down test to confirm this. If the rapid
vibration occurs with an increase in engine
speed, check for a leaking intake manifold
gasket or cylinder head gasket, weak valve
springs, burned valves or ignition misfire.
6A slight fluctuation, say one inch up and
down, may mean ignition problems. Check all
the usual tune-up items and, if necessary, run
the engine on an ignition analyser.
7If there is a large fluctuation, perform a
compression or leak-down test to look for a
weak or dead cylinder or a blown cylinder
head gasket.
8If the needle moves slowly through a wide
range, check for a clogged PCV system,
incorrect idle fuel mixture, throttle body or
intake manifold gasket leaks.
9Check for a slow return after revving the
engine by quickly snapping the throttle open
until the engine reaches about 2,500 rpm and
let it shut. Normally the reading should drop to
near zero, rise above normal idle reading
(about 5 in.-Hg over) and then return to the
previous idle reading. If the vacuum returns
slowly and doesn’t peak when the throttle is
snapped shut, the rings may be worn. If there
is a long delay, look for a restricted exhaust
system (often the silencer or catalytic
converter). An easy way to check this is to
temporarily disconnect the exhaust ahead of
the suspected part and redo the test.
4 Cylinder compression check
2
1A compression check will tell you what
mechanical condition the upper end (pistons,
rings, valves, cylinder head gasket) of your
engine is in. Specifically, it can tell you if the
compression is down due to leakage caused
by worn piston rings, defective valves and
seats or a blown cylinder head gasket. Note:
The engine must be at normal operating
temperature and the battery must be fully
charged for this check.
2Begin by cleaning the area around the
spark plugs before you remove them
(compressed air should be used, if available,
otherwise a small brush or even a bicycle tyre
pump will work). The idea is to prevent dirt
from getting into the cylinders as the
compression check is being done.
3Remove all of the spark plugs from the
engine (see Chapter 1).
4Block the throttle wide open.
5Detach the coil wire from the centre of the
distributor cap and ground it on the engine
block. Use a jumper wire with alligator clips on
each end to ensure a good earth. Also,
remove the fuel pump relay (see Chapter 4) to
disable the fuel pump during the compression
test.
Engine removal and overhaul procedures 2B•3
2B
3.4 The vacuum gauge is easily attached
to a port on the intake manifold, and can
tell a lot about an engine’s state of tune
3261 Jaguar XJ6
Page 77 of 227

13Refitting is the reverse of removal. Tighten
the fan clutch-to-fan blade bolts and the fan
assembly-to-drive hub nut to the torque listed
in this Chapter’s Specifications.
Electric fans
Check
Warning: Keep your hands or
clothing away from the fan
blades at all times.
14On 1988 through 1992 models, a single
electric fan is mounted in front of the radiator,
controlled by a thermostatic switch. Access to
the fan is with the grille removed. The 1993
and 1994 models have a fan shroud assembly
that includes two electric fans, and a “twin”
thermostatic switch, with the assembly
mounted on the engine side of the radiator.
15If the electric fan does not come on at any
time, bypass the thermostatic switch by
disconnecting the electrical connector at the
switch and connecting the two pins with a
jumper wire (see illustration). If the fan now
operates, renew the thermostatic switch. If the
fan doesn’t operate, the problem is either the
fan relay or the fan motor. On 1993 and 1994
models with twin electric fans, jumpering one
set of connections in the plug from the switch
should make both fans operate at slow speed
(fans in series) and jumpering the other two
should run both fans at higher speed (fans in
parallel). In normal operation, the fans operate
at the higher-speed only when the air
conditioning is on, or when coolant
temperature exceeds 212° F. When the
coolant cools down to below 200° F, the fans
revert to the normal speed.
16To renew a defective thermostatic switch,
allow the vehicle to cool off and drain the
coolant (see Chapter 1). Remove the switch
from the radiator and refit the new switch.
Connect the electrical connector and test
again for proper fan operation.17To test an inoperative fan motor (one that
doesn’t come on when the engine gets hot or
when the air conditioner is on), first check the
fuses and/or fusible links (see Chapter 12).
Then disconnect the electrical connector at
the motor (refer to Chapter 11 for removal of
the grille for access on front-mounted-fan
models) and use fused jumper wires to
connect the fan directly to the battery and to
chassis ground (see illustration). If the fan
still does not work, renew the fan motor.
Warning: Do not allow the test
clips to contact each other or
any metallic part of the vehicle.
18If the motor tested OK in the previous test
but is still inoperative, then the fault lies in the
relay, fuse, or wiring. The fan relay can be
tested for continuity (see Chapter 12).
Renewal
19Disconnect the negative battery cable.
Caution: If the stereo in your vehicle is
equipped with an anti-theft system, make
sure you have the correct activation code
before disconnecting the battery.20Access the 1988 through 1992 single
electric fan with the grille removed (see
Chapter 11 for grille removal). Disconnect the
electrical connector and remove the bolts
holding the fan assembly to the body (see
illustration).
21On 1993 and 1994 models, remove the
two bolts holding the fan shroud to the top of
the radiator and lift the shroud/fans assembly
from the vehicle.
22If the fan on 1988 to 1992 models must be
renewed, renew the fan, motor and shroud as
a unit. The fan is separate from the shroud on
later models.
23Refitting is the reverse of removal. If the
thermostatic switch was renewed, refill the
cooling system.5 Radiator, expansion tank
and coolant reservoir-
removal and refitting
3
Warning: Do not start this
procedure until the engine is
completely cool.
Radiator
Removal
1Disconnect the negative battery cable.
Caution: If the stereo in your vehicle is
equipped with an anti-theft system, make
sure you have the correct activation code
before disconnecting the battery.
2Drain the coolant into a container (see
Chapter 1).
3Remove both the upper and lower radiator
hoses, and the small expansion tank hose from
the top left of the radiator (see illustration).
4Remove the cooling fan and shroud (see
Section 4).
3•4 Cooling, heating and air conditioning systems
4.20 Disconnect the fan’s electrical
connector (large arrow) and remove the
bolts (small arrows) on single-fan models -
grille is removed here
3261 Jaguar XJ6 4.15 Disconnect the electrical connector (A) from the
thermostatic switch (B) in the radiator and bypass it with a
jumper wire (C) - the fan should operate now with the ignition on
4.17 Disconnect the fan wiring connector and connect jumper
wires from there directly to the positive and negative terminals of
the battery - the purple wire’s terminal should receive the battery
power and the black wire’s terminal should be earthed
Page 80 of 227
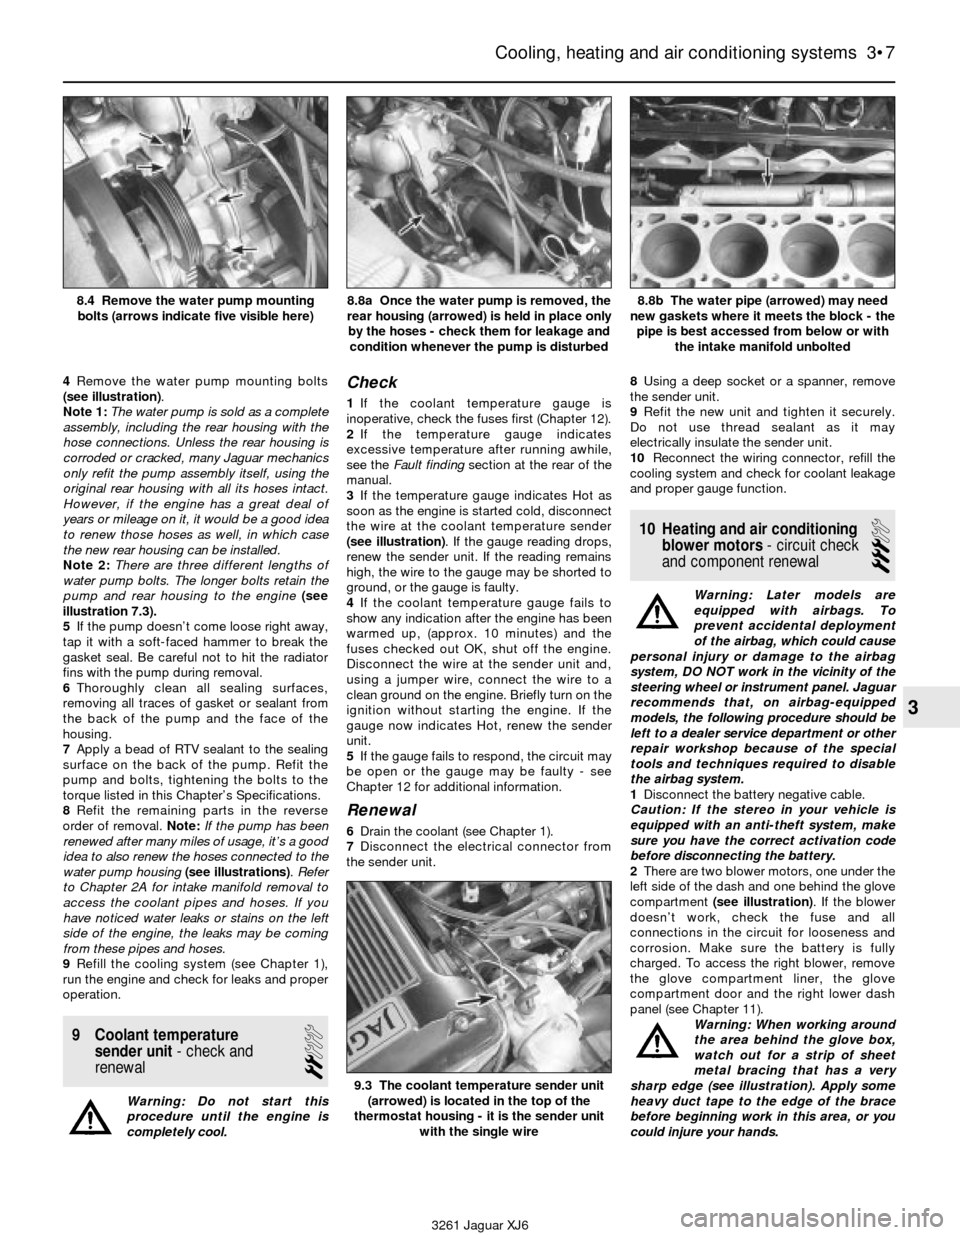
4Remove the water pump mounting bolts
(see illustration).
Note 1:The water pump is sold as a complete
assembly, including the rear housing with the
hose connections. Unless the rear housing is
corroded or cracked, many Jaguar mechanics
only refit the pump assembly itself, using the
original rear housing with all its hoses intact.
However, if the engine has a great deal of
years or mileage on it, it would be a good idea
to renew those hoses as well, in which case
the new rear housing can be installed.
Note 2:There are three different lengths of
water pump bolts. The longer bolts retain the
pump and rear housing to the engine(see
illustration 7.3).
5If the pump doesn’t come loose right away,
tap it with a soft-faced hammer to break the
gasket seal. Be careful not to hit the radiator
fins with the pump during removal.
6Thoroughly clean all sealing surfaces,
removing all traces of gasket or sealant from
the back of the pump and the face of the
housing.
7Apply a bead of RTV sealant to the sealing
surface on the back of the pump. Refit the
pump and bolts, tightening the bolts to the
torque listed in this Chapter’s Specifications.
8Refit the remaining parts in the reverse
order of removal. Note:If the pump has been
renewed after many miles of usage, it’s a good
idea to also renew the hoses connected to the
water pump housing(see illustrations). Refer
to Chapter 2A for intake manifold removal to
access the coolant pipes and hoses. If you
have noticed water leaks or stains on the left
side of the engine, the leaks may be coming
from these pipes and hoses.
9Refill the cooling system (see Chapter 1),
run the engine and check for leaks and proper
operation.
9 Coolant temperature
sender unit- check and
renewal
2
Warning: Do not start this
procedure until the engine is
completely cool.
Check
1If the coolant temperature gauge is
inoperative, check the fuses first (Chapter 12).
2If the temperature gauge indicates
excessive temperature after running awhile,
see the Fault finding section at the rear of the
manual.
3If the temperature gauge indicates Hot as
soon as the engine is started cold, disconnect
the wire at the coolant temperature sender
(see illustration). If the gauge reading drops,
renew the sender unit. If the reading remains
high, the wire to the gauge may be shorted to
ground, or the gauge is faulty.
4If the coolant temperature gauge fails to
show any indication after the engine has been
warmed up, (approx. 10 minutes) and the
fuses checked out OK, shut off the engine.
Disconnect the wire at the sender unit and,
using a jumper wire, connect the wire to a
clean ground on the engine. Briefly turn on the
ignition without starting the engine. If the
gauge now indicates Hot, renew the sender
unit.
5If the gauge fails to respond, the circuit may
be open or the gauge may be faulty - see
Chapter 12 for additional information.
Renewal
6Drain the coolant (see Chapter 1).
7Disconnect the electrical connector from
the sender unit.8Using a deep socket or a spanner, remove
the sender unit.
9Refit the new unit and tighten it securely.
Do not use thread sealant as it may
electrically insulate the sender unit.
10Reconnect the wiring connector, refill the
cooling system and check for coolant leakage
and proper gauge function.
10 Heating and air conditioning
blower motors- circuit check
and component renewal
3
Warning: Later models are
equipped with airbags. To
prevent accidental deployment
of the airbag, which could cause
personal injury or damage to the airbag
system, DO NOT work in the vicinity of the
steering wheel or instrument panel. Jaguar
recommends that, on airbag-equipped
models, the following procedure should be
left to a dealer service department or other
repair workshop because of the special
tools and techniques required to disable
the airbag system.
1Disconnect the battery negative cable.
Caution: If the stereo in your vehicle is
equipped with an anti-theft system, make
sure you have the correct activation code
before disconnecting the battery.
2There are two blower motors, one under the
left side of the dash and one behind the glove
compartment (see illustration). If the blower
doesn’t work, check the fuse and all
connections in the circuit for looseness and
corrosion. Make sure the battery is fully
charged. To access the right blower, remove
the glove compartment liner, the glove
compartment door and the right lower dash
panel (see Chapter 11).
Warning: When working around
the area behind the glove box,
watch out for a strip of sheet
metal bracing that has a very
sharp edge (see illustration). Apply some
heavy duct tape to the edge of the brace
before beginning work in this area, or you
could injure your hands.
Cooling, heating and air conditioning systems 3•7
3
8.4 Remove the water pump mounting
bolts (arrows indicate five visible here)8.8a Once the water pump is removed, the
rear housing (arrowed) is held in place only
by the hoses - check them for leakage and
condition whenever the pump is disturbed8.8b The water pipe (arrowed) may need
new gaskets where it meets the block - the
pipe is best accessed from below or with
the intake manifold unbolted
9.3 The coolant temperature sender unit
(arrowed) is located in the top of the
thermostat housing - it is the sender unit
with the single wire
3261 Jaguar XJ6