lug pattern JAGUAR XJ6 1997 2.G Workshop Manual
[x] Cancel search | Manufacturer: JAGUAR, Model Year: 1997, Model line: XJ6, Model: JAGUAR XJ6 1997 2.GPages: 227, PDF Size: 7.2 MB
Page 29 of 227

position, a worn or weak shock absorber is
probably the reason.
4Repeat the above check at each of the
three remaining corners of the vehicle.
Under the vehicle
5Raise the vehicle with a trolley jack and
support it securely on axle stands. See
“Jacking and towing”for proper jacking
points.
6Check the shock absorbers for evidence of
fluid leakage. Make sure that any fluid noted is
from the shocks and not from any other
source. Also check the rubber mounts at each
end for deterioration If the shock absorbers
fail any of the tests above replace the shocks
as a set.
7Check the tyres for irregular wear patterns
and proper inflation. See “Weekly checks”for
information regarding tyre wear.
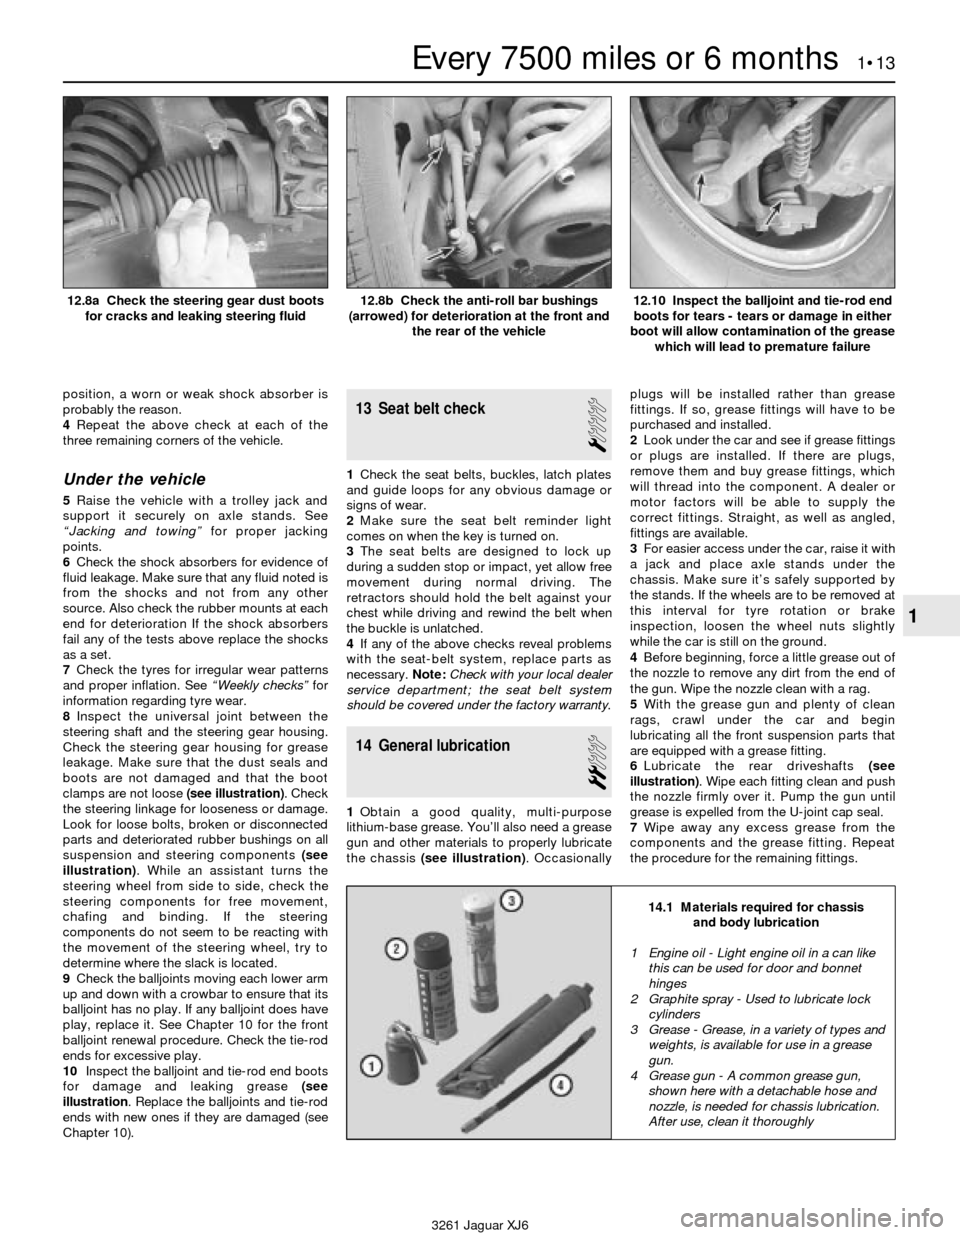
8Inspect the universal joint between the
steering shaft and the steering gear housing.
Check the steering gear housing for grease
leakage. Make sure that the dust seals and
boots are not damaged and that the boot
clamps are not loose (see illustration). Check
the steering linkage for looseness or damage.
Look for loose bolts, broken or disconnected
parts and deteriorated rubber bushings on all
suspension and steering components (see
illustration). While an assistant turns the
steering wheel from side to side, check the
steering components for free movement,
chafing and binding. If the steering
components do not seem to be reacting with
the movement of the steering wheel, try to
determine where the slack is located.
9Check the balljoints moving each lower arm
up and down with a crowbar to ensure that its
balljoint has no play. If any balljoint does have
play, replace it. See Chapter 10 for the front
balljoint renewal procedure. Check the tie-rod
ends for excessive play.
10Inspect the balljoint and tie-rod end boots
for damage and leaking grease (see
illustration. Replace the balljoints and tie-rod
ends with new ones if they are damaged (see
Chapter 10).
13 Seat belt check
1
1Check the seat belts, buckles, latch plates
and guide loops for any obvious damage or
signs of wear.
2Make sure the seat belt reminder light
comes on when the key is turned on.
3The seat belts are designed to lock up
during a sudden stop or impact, yet allow free
movement during normal driving. The
retractors should hold the belt against your
chest while driving and rewind the belt when
the buckle is unlatched.
4If any of the above checks reveal problems
with the seat-belt system, replace parts as
necessary.Note:Check with your local dealer
service department; the seat belt system
should be covered under the factory warranty.
14 General lubrication
2
1Obtain a good quality, multi-purpose
lithium-base grease. You’ll also need a grease
gun and other materials to properly lubricate
the chassis (see illustration). Occasionallyplugs will be installed rather than grease
fittings. If so, grease fittings will have to be
purchased and installed.
2Look under the car and see if grease fittings
or plugs are installed. If there are plugs,
remove them and buy grease fittings, which
will thread into the component. A dealer or
motor factors will be able to supply the
correct fittings. Straight, as well as angled,
fittings are available.
3For easier access under the car, raise it with
a jack and place axle stands under the
chassis. Make sure it’s safely supported by
the stands. If the wheels are to be removed at
this interval for tyre rotation or brake
inspection, loosen the wheel nuts slightly
while the car is still on the ground.
4Before beginning, force a little grease out of
the nozzle to remove any dirt from the end of
the gun. Wipe the nozzle clean with a rag.
5With the grease gun and plenty of clean
rags, crawl under the car and begin
lubricating all the front suspension parts that
are equipped with a grease fitting.
6Lubricate the rear driveshafts (see
illustration). Wipe each fitting clean and push
the nozzle firmly over it. Pump the gun until
grease is expelled from the U-joint cap seal.
7Wipe away any excess grease from the
components and the grease fitting. Repeat
the procedure for the remaining fittings.
Every 7500 miles or 6 months 1•13
1
14.1 Materials required for chassis
and body lubrication
3261 Jaguar XJ6 12.8a Check the steering gear dust boots
for cracks and leaking steering fluid
12.8b Check the anti-roll bar bushings
(arrowed) for deterioration at the front and
the rear of the vehicle12.10 Inspect the balljoint and tie-rod end
boots for tears - tears or damage in either
boot will allow contamination of the grease
which will lead to premature failure
1 Engine oil - Light engine oil in a can like
this can be used for door and bonnet
hinges
2 Graphite spray - Used to lubricate lock
cylinders
3 Grease - Grease, in a variety of types and
weights, is available for use in a grease
gun.
4 Grease gun - A common grease gun,
shown here with a detachable hose and
nozzle, is needed for chassis lubrication.
After use, clean it thoroughly
Page 125 of 227

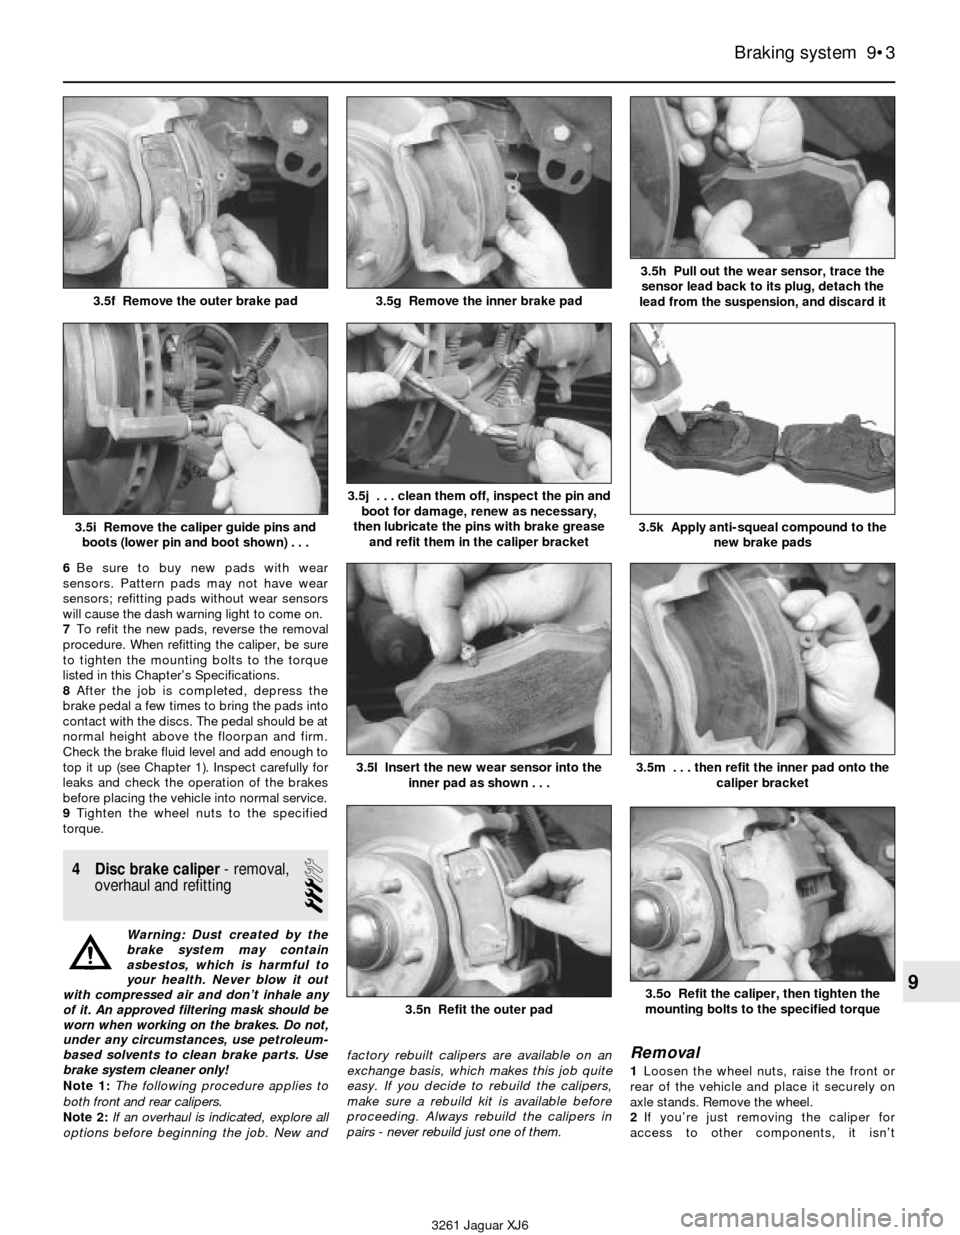
6Be sure to buy new pads with wear
sensors. Pattern pads may not have wear
sensors; refitting pads without wear sensors
will cause the dash warning light to come on.
7To refit the new pads, reverse the removal
procedure. When refitting the caliper, be sure
to tighten the mounting bolts to the torque
listed in this Chapter’s Specifications.
8After the job is completed, depress the
brake pedal a few times to bring the pads into
contact with the discs. The pedal should be at
normal height above the floorpan and firm.
Check the brake fluid level and add enough to
top it up (see Chapter 1). Inspect carefully for
leaks and check the operation of the brakes
before placing the vehicle into normal service.
9Tighten the wheel nuts to the specified
torque.
4 Disc brake caliper- removal,
overhaul and refitting
3
Warning: Dust created by the
brake system may contain
asbestos, which is harmful to
your health. Never blow it out
with compressed air and don’t inhale any
of it. An approved filtering mask should be
worn when working on the brakes. Do not,
under any circumstances, use petroleum-
based solvents to clean brake parts. Use
brake system cleaner only!
Note 1:The following procedure applies to
both front and rear calipers.
Note 2:If an overhaul is indicated, explore all
options before beginning the job. New andfactory rebuilt calipers are available on an
exchange basis, which makes this job quite
easy. If you decide to rebuild the calipers,
make sure a rebuild kit is available before
proceeding. Always rebuild the calipers in
pairs - never rebuild just one of them.
Removal
1Loosen the wheel nuts, raise the front or
rear of the vehicle and place it securely on
axle stands. Remove the wheel.
2If you’re just removing the caliper for
access to other components, it isn’t
Braking system 9•3
9
3.5f Remove the outer brake pad3.5g Remove the inner brake pad
3.5h Pull out the wear sensor, trace the
sensor lead back to its plug, detach the
lead from the suspension, and discard it
3.5i Remove the caliper guide pins and
boots (lower pin and boot shown) . . .
3.5j . . . clean them off, inspect the pin and
boot for damage, renew as necessary,
then lubricate the pins with brake grease
and refit them in the caliper bracket
3.5k Apply anti-squeal compound to the
new brake pads
3261 Jaguar XJ6
3.5l Insert the new wear sensor into the
inner pad as shown . . .
3.5n Refit the outer pad
3.5m . . . then refit the inner pad onto the
caliper bracket
3.5o Refit the caliper, then tighten the
mounting bolts to the specified torque