oil change JEEP CHEROKEE 1995 Service Repair Manual
[x] Cancel search | Manufacturer: JEEP, Model Year: 1995, Model line: CHEROKEE, Model: JEEP CHEROKEE 1995Pages: 2198, PDF Size: 82.83 MB
Page 5 of 2198
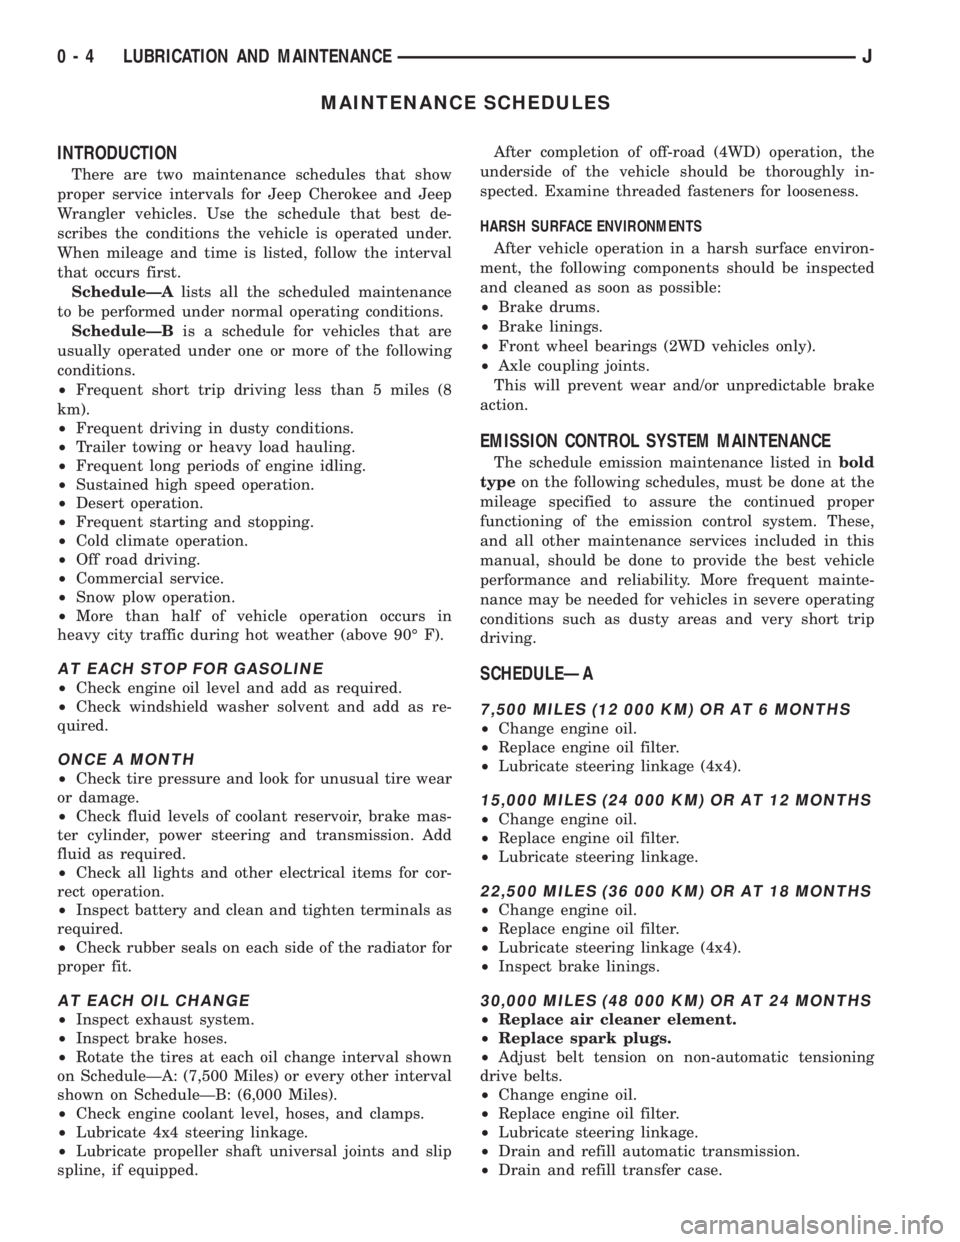
MAINTENANCE SCHEDULES
INTRODUCTION
There are two maintenance schedules that show
proper service intervals for Jeep Cherokee and Jeep
Wrangler vehicles. Use the schedule that best de-
scribes the conditions the vehicle is operated under.
When mileage and time is listed, follow the interval
that occurs first.
ScheduleÐAlists all the scheduled maintenance
to be performed under normal operating conditions.
ScheduleÐBis a schedule for vehicles that are
usually operated under one or more of the following
conditions.
²Frequent short trip driving less than 5 miles (8
km).
²Frequent driving in dusty conditions.
²Trailer towing or heavy load hauling.
²Frequent long periods of engine idling.
²Sustained high speed operation.
²Desert operation.
²Frequent starting and stopping.
²Cold climate operation.
²Off road driving.
²Commercial service.
²Snow plow operation.
²More than half of vehicle operation occurs in
heavy city traffic during hot weather (above 90É F).
AT EACH STOP FOR GASOLINE
²Check engine oil level and add as required.
²Check windshield washer solvent and add as re-
quired.
ONCE A MONTH
²Check tire pressure and look for unusual tire wear
or damage.
²Check fluid levels of coolant reservoir, brake mas-
ter cylinder, power steering and transmission. Add
fluid as required.
²Check all lights and other electrical items for cor-
rect operation.
²Inspect battery and clean and tighten terminals as
required.
²Check rubber seals on each side of the radiator for
proper fit.
AT EACH OIL CHANGE
²Inspect exhaust system.
²Inspect brake hoses.
²Rotate the tires at each oil change interval shown
on ScheduleÐA: (7,500 Miles) or every other interval
shown on ScheduleÐB: (6,000 Miles).
²Check engine coolant level, hoses, and clamps.
²Lubricate 4x4 steering linkage.
²Lubricate propeller shaft universal joints and slip
spline, if equipped.After completion of off-road (4WD) operation, the
underside of the vehicle should be thoroughly in-
spected. Examine threaded fasteners for looseness.
HARSH SURFACE ENVIRONMENTS
After vehicle operation in a harsh surface environ-
ment, the following components should be inspected
and cleaned as soon as possible:
²Brake drums.
²Brake linings.
²Front wheel bearings (2WD vehicles only).
²Axle coupling joints.
This will prevent wear and/or unpredictable brake
action.
EMISSION CONTROL SYSTEM MAINTENANCE
The schedule emission maintenance listed inbold
typeon the following schedules, must be done at the
mileage specified to assure the continued proper
functioning of the emission control system. These,
and all other maintenance services included in this
manual, should be done to provide the best vehicle
performance and reliability. More frequent mainte-
nance may be needed for vehicles in severe operating
conditions such as dusty areas and very short trip
driving.
SCHEDULEÐA
7,500 MILES (12 000 KM) OR AT 6 MONTHS
²Change engine oil.
²Replace engine oil filter.
²Lubricate steering linkage (4x4).
15,000 MILES (24 000 KM) OR AT 12 MONTHS
²Change engine oil.
²Replace engine oil filter.
²Lubricate steering linkage.
22,500 MILES (36 000 KM) OR AT 18 MONTHS
²Change engine oil.
²Replace engine oil filter.
²Lubricate steering linkage (4x4).
²Inspect brake linings.
30,000 MILES (48 000 KM) OR AT 24 MONTHS
²Replace air cleaner element.
²Replace spark plugs.
²Adjust belt tension on non-automatic tensioning
drive belts.
²Change engine oil.
²Replace engine oil filter.
²Lubricate steering linkage.
²Drain and refill automatic transmission.
²Drain and refill transfer case.
0 - 4 LUBRICATION AND MAINTENANCEJ
Page 6 of 2198
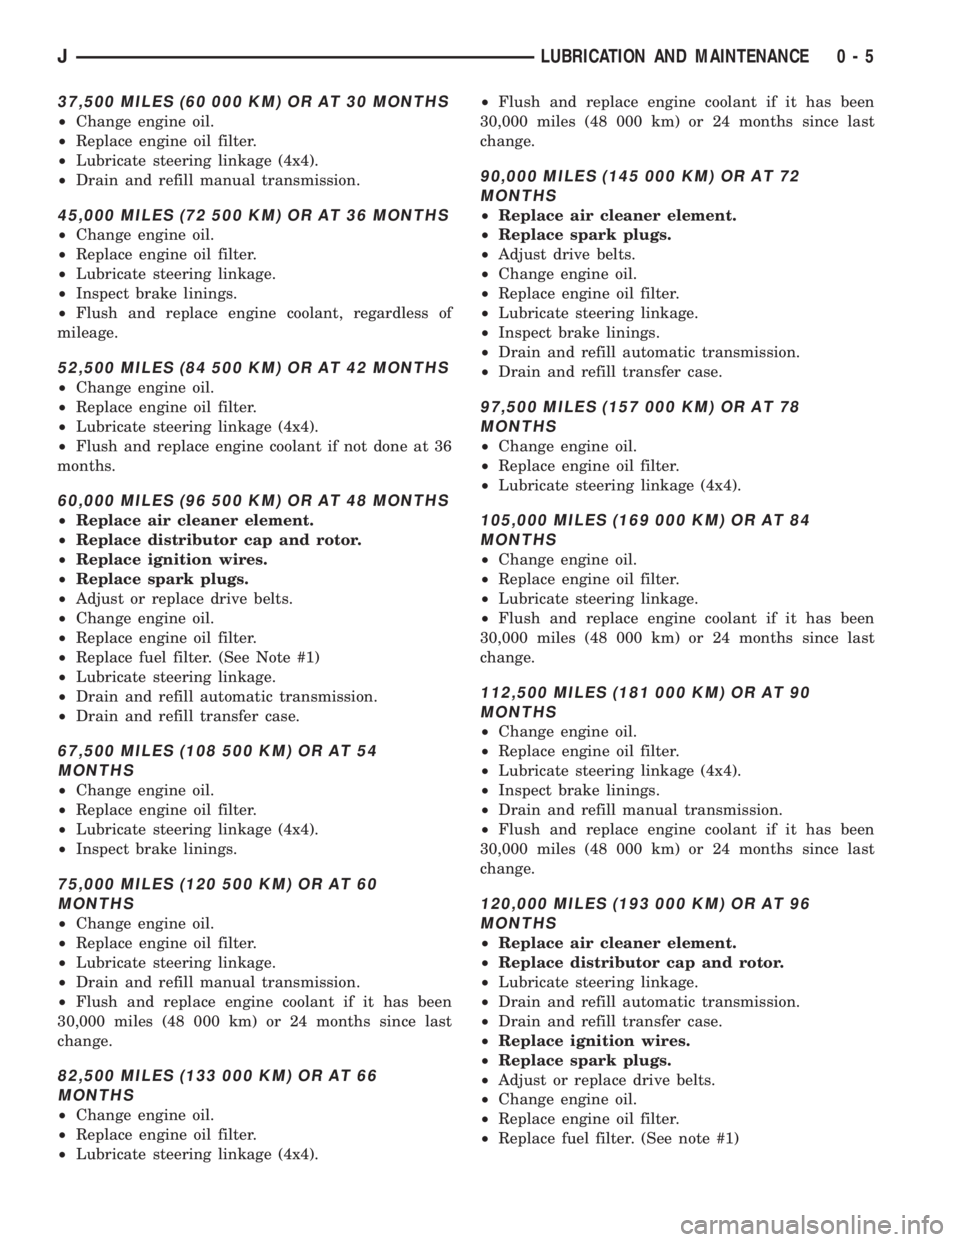
37,500 MILES (60 000 KM) OR AT 30 MONTHS
²Change engine oil.
²Replace engine oil filter.
²Lubricate steering linkage (4x4).
²Drain and refill manual transmission.
45,000 MILES (72 500 KM) OR AT 36 MONTHS
²Change engine oil.
²Replace engine oil filter.
²Lubricate steering linkage.
²Inspect brake linings.
²Flush and replace engine coolant, regardless of
mileage.
52,500 MILES (84 500 KM) OR AT 42 MONTHS
²Change engine oil.
²Replace engine oil filter.
²Lubricate steering linkage (4x4).
²Flush and replace engine coolant if not done at 36
months.
60,000 MILES (96 500 KM) OR AT 48 MONTHS
²Replace air cleaner element.
²Replace distributor cap and rotor.
²Replace ignition wires.
²Replace spark plugs.
²Adjust or replace drive belts.
²Change engine oil.
²Replace engine oil filter.
²Replace fuel filter. (See Note #1)
²Lubricate steering linkage.
²Drain and refill automatic transmission.
²Drain and refill transfer case.
67,500 MILES (108 500 KM) OR AT 54
MONTHS
²Change engine oil.
²Replace engine oil filter.
²Lubricate steering linkage (4x4).
²Inspect brake linings.
75,000 MILES (120 500 KM) OR AT 60
MONTHS
²Change engine oil.
²Replace engine oil filter.
²Lubricate steering linkage.
²Drain and refill manual transmission.
²Flush and replace engine coolant if it has been
30,000 miles (48 000 km) or 24 months since last
change.
82,500 MILES (133 000 KM) OR AT 66
MONTHS
²Change engine oil.
²Replace engine oil filter.
²Lubricate steering linkage (4x4).²Flush and replace engine coolant if it has been
30,000 miles (48 000 km) or 24 months since last
change.
90,000 MILES (145 000 KM) OR AT 72
MONTHS
²Replace air cleaner element.
²Replace spark plugs.
²Adjust drive belts.
²Change engine oil.
²Replace engine oil filter.
²Lubricate steering linkage.
²Inspect brake linings.
²Drain and refill automatic transmission.
²Drain and refill transfer case.
97,500 MILES (157 000 KM) OR AT 78
MONTHS
²Change engine oil.
²Replace engine oil filter.
²Lubricate steering linkage (4x4).
105,000 MILES (169 000 KM) OR AT 84
MONTHS
²Change engine oil.
²Replace engine oil filter.
²Lubricate steering linkage.
²Flush and replace engine coolant if it has been
30,000 miles (48 000 km) or 24 months since last
change.
112,500 MILES (181 000 KM) OR AT 90
MONTHS
²Change engine oil.
²Replace engine oil filter.
²Lubricate steering linkage (4x4).
²Inspect brake linings.
²Drain and refill manual transmission.
²Flush and replace engine coolant if it has been
30,000 miles (48 000 km) or 24 months since last
change.
120,000 MILES (193 000 KM) OR AT 96
MONTHS
²Replace air cleaner element.
²Replace distributor cap and rotor.
²Lubricate steering linkage.
²Drain and refill automatic transmission.
²Drain and refill transfer case.
²Replace ignition wires.
²Replace spark plugs.
²Adjust or replace drive belts.
²Change engine oil.
²Replace engine oil filter.
²Replace fuel filter. (See note #1)
JLUBRICATION AND MAINTENANCE 0 - 5
Page 7 of 2198
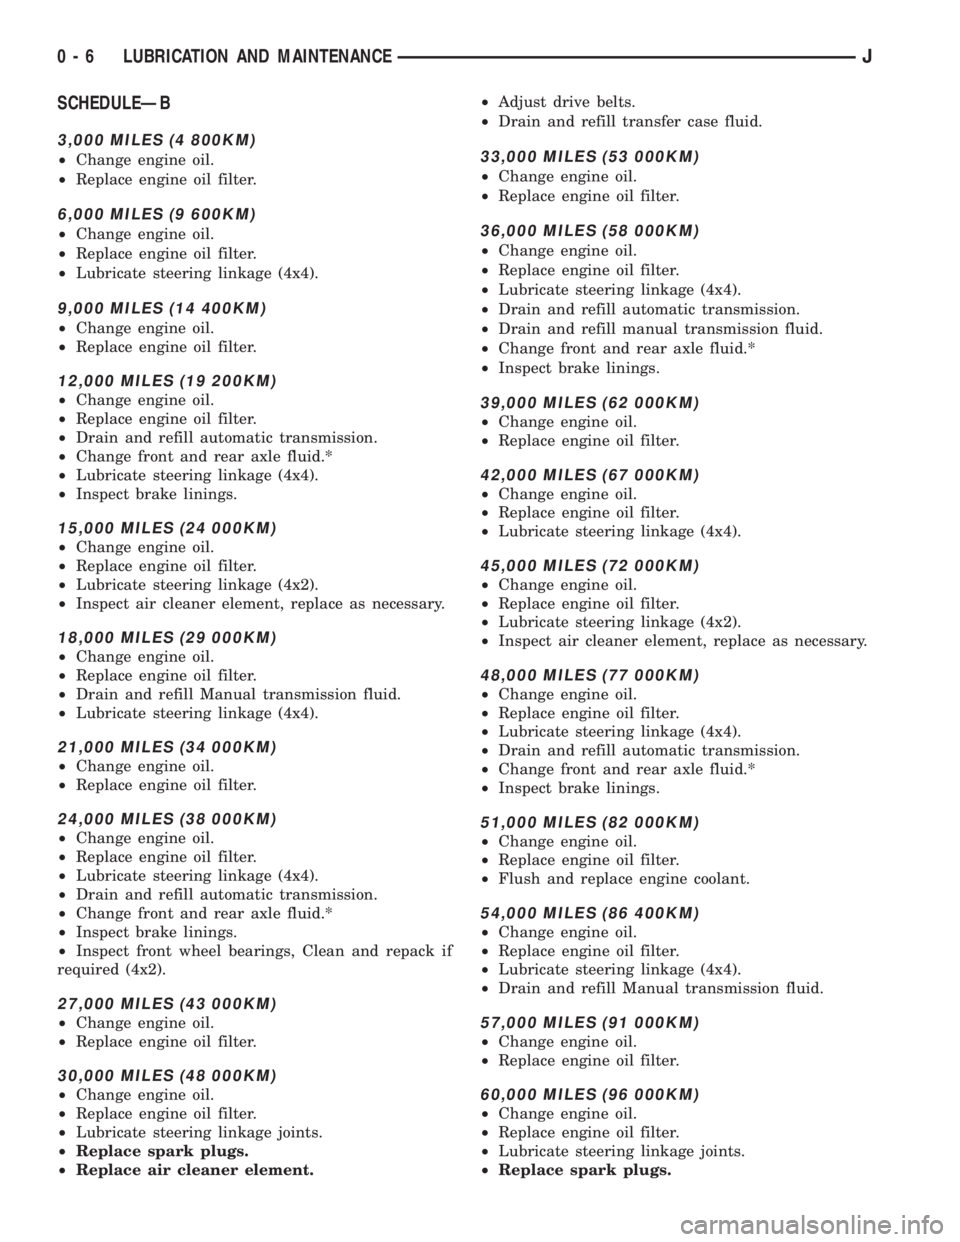
SCHEDULEÐB
3,000 MILES (4 800KM)
²Change engine oil.
²Replace engine oil filter.
6,000 MILES (9 600KM)
²Change engine oil.
²Replace engine oil filter.
²Lubricate steering linkage (4x4).
9,000 MILES (14 400KM)
²Change engine oil.
²Replace engine oil filter.
12,000 MILES (19 200KM)
²Change engine oil.
²Replace engine oil filter.
²Drain and refill automatic transmission.
²Change front and rear axle fluid.*
²Lubricate steering linkage (4x4).
²Inspect brake linings.
15,000 MILES (24 000KM)
²Change engine oil.
²Replace engine oil filter.
²Lubricate steering linkage (4x2).
²Inspect air cleaner element, replace as necessary.
18,000 MILES (29 000KM)
²Change engine oil.
²Replace engine oil filter.
²Drain and refill Manual transmission fluid.
²Lubricate steering linkage (4x4).
21,000 MILES (34 000KM)
²Change engine oil.
²Replace engine oil filter.
24,000 MILES (38 000KM)
²Change engine oil.
²Replace engine oil filter.
²Lubricate steering linkage (4x4).
²Drain and refill automatic transmission.
²Change front and rear axle fluid.*
²Inspect brake linings.
²Inspect front wheel bearings, Clean and repack if
required (4x2).
27,000 MILES (43 000KM)
²Change engine oil.
²Replace engine oil filter.
30,000 MILES (48 000KM)
²Change engine oil.
²Replace engine oil filter.
²Lubricate steering linkage joints.
²Replace spark plugs.
²Replace air cleaner element.²Adjust drive belts.
²Drain and refill transfer case fluid.
33,000 MILES (53 000KM)
²Change engine oil.
²Replace engine oil filter.
36,000 MILES (58 000KM)
²Change engine oil.
²Replace engine oil filter.
²Lubricate steering linkage (4x4).
²Drain and refill automatic transmission.
²Drain and refill manual transmission fluid.
²Change front and rear axle fluid.*
²Inspect brake linings.
39,000 MILES (62 000KM)
²Change engine oil.
²Replace engine oil filter.
42,000 MILES (67 000KM)
²Change engine oil.
²Replace engine oil filter.
²Lubricate steering linkage (4x4).
45,000 MILES (72 000KM)
²Change engine oil.
²Replace engine oil filter.
²Lubricate steering linkage (4x2).
²Inspect air cleaner element, replace as necessary.
48,000 MILES (77 000KM)
²Change engine oil.
²Replace engine oil filter.
²Lubricate steering linkage (4x4).
²Drain and refill automatic transmission.
²Change front and rear axle fluid.*
²Inspect brake linings.
51,000 MILES (82 000KM)
²Change engine oil.
²Replace engine oil filter.
²Flush and replace engine coolant.
54,000 MILES (86 400KM)
²Change engine oil.
²Replace engine oil filter.
²Lubricate steering linkage (4x4).
²Drain and refill Manual transmission fluid.
57,000 MILES (91 000KM)
²Change engine oil.
²Replace engine oil filter.
60,000 MILES (96 000KM)
²Change engine oil.
²Replace engine oil filter.
²Lubricate steering linkage joints.
²Replace spark plugs.
0 - 6 LUBRICATION AND MAINTENANCEJ
Page 8 of 2198
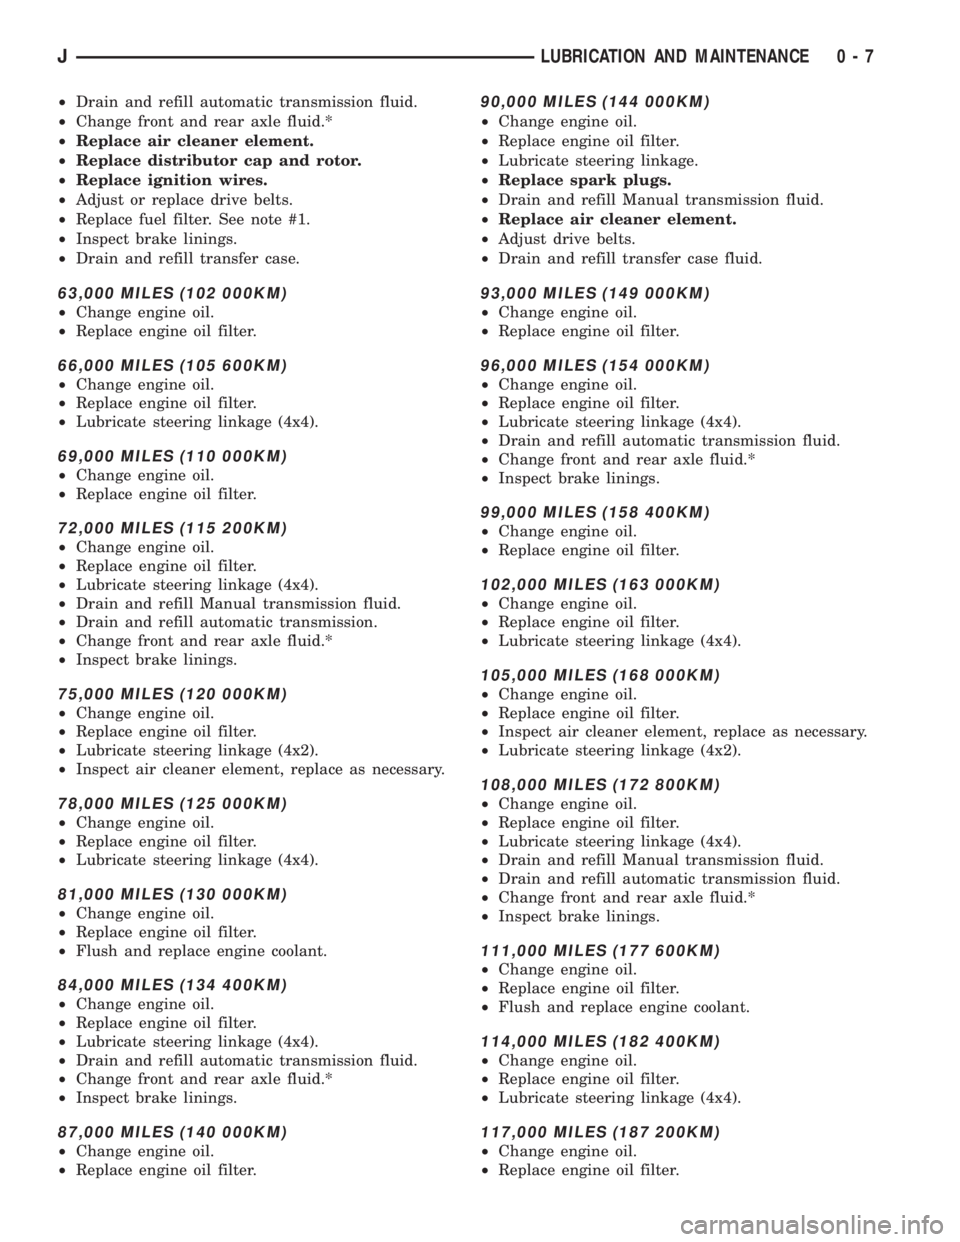
²Drain and refill automatic transmission fluid.
²Change front and rear axle fluid.*
²Replace air cleaner element.
²Replace distributor cap and rotor.
²Replace ignition wires.
²Adjust or replace drive belts.
²Replace fuel filter. See note #1.
²Inspect brake linings.
²Drain and refill transfer case.
63,000 MILES (102 000KM)
²Change engine oil.
²Replace engine oil filter.
66,000 MILES (105 600KM)
²Change engine oil.
²Replace engine oil filter.
²Lubricate steering linkage (4x4).
69,000 MILES (110 000KM)
²Change engine oil.
²Replace engine oil filter.
72,000 MILES (115 200KM)
²Change engine oil.
²Replace engine oil filter.
²Lubricate steering linkage (4x4).
²Drain and refill Manual transmission fluid.
²Drain and refill automatic transmission.
²Change front and rear axle fluid.*
²Inspect brake linings.
75,000 MILES (120 000KM)
²Change engine oil.
²Replace engine oil filter.
²Lubricate steering linkage (4x2).
²Inspect air cleaner element, replace as necessary.
78,000 MILES (125 000KM)
²Change engine oil.
²Replace engine oil filter.
²Lubricate steering linkage (4x4).
81,000 MILES (130 000KM)
²Change engine oil.
²Replace engine oil filter.
²Flush and replace engine coolant.
84,000 MILES (134 400KM)
²Change engine oil.
²Replace engine oil filter.
²Lubricate steering linkage (4x4).
²Drain and refill automatic transmission fluid.
²Change front and rear axle fluid.*
²Inspect brake linings.
87,000 MILES (140 000KM)
²Change engine oil.
²Replace engine oil filter.
90,000 MILES (144 000KM)
²Change engine oil.
²Replace engine oil filter.
²Lubricate steering linkage.
²Replace spark plugs.
²Drain and refill Manual transmission fluid.
²Replace air cleaner element.
²Adjust drive belts.
²Drain and refill transfer case fluid.
93,000 MILES (149 000KM)
²Change engine oil.
²Replace engine oil filter.
96,000 MILES (154 000KM)
²Change engine oil.
²Replace engine oil filter.
²Lubricate steering linkage (4x4).
²Drain and refill automatic transmission fluid.
²Change front and rear axle fluid.*
²Inspect brake linings.
99,000 MILES (158 400KM)
²Change engine oil.
²Replace engine oil filter.
102,000 MILES (163 000KM)
²Change engine oil.
²Replace engine oil filter.
²Lubricate steering linkage (4x4).
105,000 MILES (168 000KM)
²Change engine oil.
²Replace engine oil filter.
²Inspect air cleaner element, replace as necessary.
²Lubricate steering linkage (4x2).
108,000 MILES (172 800KM)
²Change engine oil.
²Replace engine oil filter.
²Lubricate steering linkage (4x4).
²Drain and refill Manual transmission fluid.
²Drain and refill automatic transmission fluid.
²Change front and rear axle fluid.*
²Inspect brake linings.
111,000 MILES (177 600KM)
²Change engine oil.
²Replace engine oil filter.
²Flush and replace engine coolant.
114,000 MILES (182 400KM)
²Change engine oil.
²Replace engine oil filter.
²Lubricate steering linkage (4x4).
117,000 MILES (187 200KM)
²Change engine oil.
²Replace engine oil filter.
JLUBRICATION AND MAINTENANCE 0 - 7
Page 9 of 2198
120,000 MILES (192 000KM)
²Change engine oil.
²Replace engine oil filter.
²Lubricate steering linkage.
²Replace spark plugs.
²Drain and refill automatic transmission fluid.
²Change front and rear axle fluid.*
²Inspect brake linings.
²Replace air cleaner element.
²Replace distributor cap and rotor.
²Replace ignition wires.
²Adjust or replace drive belts.
²Replace fuel filter. See note #1.²Drain and refill transfer case fluid.
NOTE 1:Not required for California vehicles, rec-
ommended for proper vehicle performance.
* Off-highway operation, trailer towing, taxi, limou-
sine, bus, snow plowing, or other types of commercial
service or prolonged operation with heavy loading,
especially in hot weather, require front and rear axle
service indicated witha*inScheduleÐB. Perform
these services if you usually operate your vehicle un-
der these conditions.
Inspection and service should also be performed
anytime a malfunction is observed or suspected.
0 - 8 LUBRICATION AND MAINTENANCEJ
Page 16 of 2198
ENGINE MAINTENANCE
INDEX
page page
Accessory Drive Belt....................... 21
Air Cleaner Element....................... 18
Air-Conditioner Compressor.................. 21
Battery................................. 20
Crankcase Ventilation System................ 19
Emission Control System................... 20
Engine Break-In.......................... 15
Engine Cooling System..................... 18
Engine Oil.............................. 15Engine Oil Change and Filter Replacement...... 16
Engine Oil Filter.......................... 17
Engine Supports.......................... 21
Exhaust System.......................... 21
Fuel Filter............................... 19
Fuel Usage StatementÐGas Engines.......... 19
Ignition Cables, Distributor Cap and Rotor....... 20
Rubber and Plastic Component Inspection....... 20
Spark Plugs............................. 20
ENGINE BREAK-IN
CAUTION: Wide open throttle operation in low
gears, before engine break-in period is complete,
can damage engine.
After first starting a new engine, allow it to idle for
15 seconds before shifting into a drive gear. Also:
²Drive the vehicle at varying speeds less than 88
km/h (55 mph) for the first 480 km (300 miles).
²Avoid fast acceleration and sudden stops.
²Do not drive at full-throttle for extended periods of
time.
²Do not drive at constant speeds.
²Do not idle the engine excessively.
A special break-in engine oil is not required. The
original engine oil installed is a high quality, energy
conserving lubricant. Special break-in oils are not
recommended. These oils could interfere with the
normal piston ring seating process.
New engines tend to consume more fuel and oil un-
til after the break-in period has ended.
ENGINE OIL
WARNING: NEW OR USED ENGINE OIL CAN BE IR-
RITATING TO THE SKIN. AVOID PROLONGED OR
REPEATED SKIN CONTACT WITH ENGINE OIL.
CONTAMINANTS IN USED ENGINE OIL, CAUSED BY
INTERNAL COMBUSTION, CAN BE HAZARDOUS TO
YOUR HEALTH. THOROUGHLY WASH EXPOSED
SKIN WITH SOAP AND WATER.
DO NOT WASH SKIN WITH GASOLINE, DIESEL
FUEL, THINNER, OR SOLVENTS, HEALTH PROB-
LEMS CAN RESULT.
DO NOT POLLUTE, DISPOSE OF USED ENGINE
OIL PROPERLY. CONTACT YOUR DEALER OR GOV-
ERNMENT AGENCY FOR LOCATION OF COLLEC-
TION CENTER IN YOUR AREA.
ENGINE OIL SPECIFICATION
CAUTION: Do not use non-detergent or straight
mineral oil when adding or changing crankcase lu-
bricant. Engine failure can result.
API SERVICE GRADE CERTIFIED
Use an engine oil that is API Service Grade Certi-
fied or an oil that conforms to the API Service Grade
SH or SH/CD. MOPAR provides engine oils that con-
form to all of these service grades.
SAE VISCOSITY
An SAE viscosity grade is used to specify the vis-
cosity grade of engine oil. SAE 30 specifies a single
viscosity engine oil. Engine oils also have multiple
viscosities. These are specified with a dual SAE vis-
cosity grade which indicates the cold-to-hot tempera-
ture viscosity range. Select an engine oil that is best
suited to your particular temperature range and vari-
ation (Fig.1).
ENERGY CONSERVING OIL
An Energy Conserving type oil is recommeded for
gasoline engines. They are designated as either EN-
ERGY CONSERVING or ENERGY CONSERVING
II.
Fig. 1 Temperature/Engine Oil Viscosity
JLUBRICATION AND MAINTENANCE 0 - 15
Page 17 of 2198
CONTAINER IDENTIFICATION
Standard engine oil identification notations have
been adopted to aid in the proper selection of engine
oil. The identifying notations are located on the label
of engine oil plastic bottles and the top of engine oil
cans (Fig. 2).
ENGINE OIL ADDITIVES
In some instances, such as infrequent operation,
short trip driving, and during break-in after a major
overhaul, addition of special materials containing an-
ti-rust and anti-scuff additives are beneficial. A suit-
able product for this purpose is MOPAR Engine Oil
Supplement.
OIL LEVEL INDICATOR (DIPSTICK)
The engine oil level indicator (Dipstick) is located
at the right rear of both 2.5L engines and 4.0L en-
gines (Fig. 3).
CRANKCASE OIL LEVEL INSPECTION
CAUTION: Do not overfill crankcase with engine oil,
oil foaming and oil pressure loss can result.
Inspect engine oil level approximately every 800 ki-
lometers (500 miles). Unless the engine has exhibited
loss of oil pressure, run the engine for about five
minutes before checking oil level. Checking engine oil
level on a cold engine is not accurate.
To ensure proper lubrication of an engine, the en-
gine oil must be maintained at an acceptable level.
The acceptable levels are indicated between the ADD
and SAFE marks on the engine oil dipstick (Fig. 4
and 5).
(1) Position vehicle on level surface.
(2) With engine OFF, allow approximately ten min-
utes for oil to settle to bottom of crankcase, remove
engine oil dipstick.
(3) Wipe dipstick clean.
(4) Install dipstick and verify it is seated in the
tube.
(5) Remove dipstick, with handle held above the
tip, take oil level reading (Figs.4 and 5).
(6) Add oil only if level is below the ADD mark on
dipstick.
ENGINE OIL CHANGE AND FILTER REPLACEMENT
ENGINE OIL CHANGE
Change engine oil at mileage and time intervals
described in Maintenance Schedules.
TO CHANGE ENGINE OIL
Run engine until achieving normal operating tem-
perature.
(1) Position the vehicle on a level surface and turn
engine off.
(2) Hoist and support vehicle on safety stands. Re-
fer to Hoisting and Jacking Recommendations in this
group.
Fig. 2 API Certification Mark
Fig. 3 Engine Oil Dipstick LocationÐTypical
Fig. 4 Engine Oil DipstickÐ2.5L Engine
0 - 16 LUBRICATION AND MAINTENANCEJ
Page 23 of 2198
DRIVETRAIN
INDEX
page page
Automatic Transmission.................... 23
Clutch and Brake Pedal Bushings............. 22
Clutch Master Cylinder..................... 22
Drive Shafts............................. 26Front and Rear Axles...................... 24
Manual Transmission...................... 22
Rubber and Plastic Hoses/Tubing............. 26
Transfer Case (4WD Vehicles)................ 24
CLUTCH AND BRAKE PEDAL BUSHINGS
If the clutch and brake pedal mechanism squeaks,
the pivot bushings should be lubricated. Use Mopar
Multi-Purpose Lubricant, or an equivalent. Refer to
Group 5, Brakes for location of bushings.
CLUTCH MASTER CYLINDER
LEVEL INSPECTION
WARNING: DO NOT ALLOW PETROLEUM OR WA-
TER BASE LIQUIDS TO CONTAMINATE CLUTCH
FLUID, SEAL DAMAGE AND CLUTCH FAILURE CAN
RESULT.
The clutch reservoir level should be inspected when
other underhood service is performed. (Fig. 1)
The fluid level is determined by its height in rela-
tion to the level indicator ring (Fig. 2) located inside
the reservoir. Add fluid until the height is level with
the indicator ring.
FLUID SPECIFICATION
Use Mopar, Brake And Hydraulic Clutch Fluid or
equivalent. Use only brake fluid conforming to DOT
3, Federal, Department of Transportation specifica-
tion. To avoid fluid contamination, use fluid from a
properly sealed container.CAUTION: Never use reclaimed brake fluid or fluid
from an unsealed container. In addition, do not use
fluid from a container that has been opened and al-
lowed to stand for an extended length of time.
Moisture in the air can be absorbed by the fluid,
which causes dilution with loss of effectiveness.
MANUAL TRANSMISSION
The manual transmission should be inspected for
oil leaks and proper oil level when other under vehi-
cle service is performed.
LUBRICANT SPECIFICATION
When it becomes necessary to add to or change the
lube oil in a Jeep manual transmission, use SAE
75W-90, API Quality Grade GL-5 gear lubricant.
LUBRICANT LEVEL
The fill-hole plug for all manual transmissions is
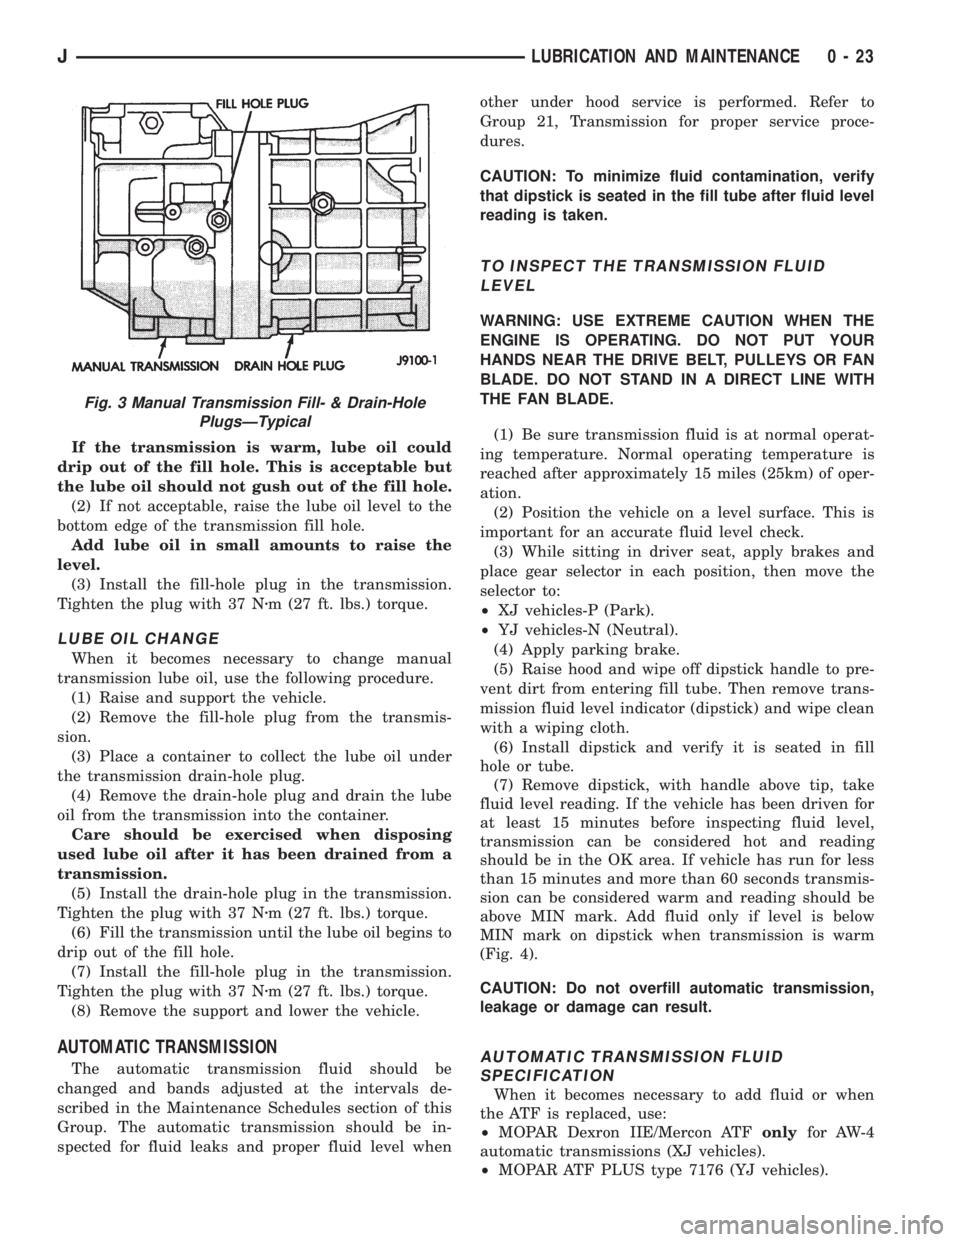
located on the right side of the case (Fig. 3). Deter-
mine the lubricant level according to the following
procedure.
(1) Remove the fill-hole plug (Fig. 3) from the
transmission. The lube oil should be level with the
bottom edge of the fill hole. The level can be slightly
below the bottom edge of the fill hole if the lube oil is
cold.
Fig. 1 Clutch Reservoir LocationÐTypical
Fig. 2 Hydraulic Clutch Fluid LevelÐTypical
0 - 22 LUBRICATION AND MAINTENANCEJ
Page 24 of 2198
If the transmission is warm, lube oil could
drip out of the fill hole. This is acceptable but
the lube oil should not gush out of the fill hole.
(2) If not acceptable, raise the lube oil level to the
bottom edge of the transmission fill hole.
Add lube oil in small amounts to raise the
level.
(3) Install the fill-hole plug in the transmission.
Tighten the plug with 37 Nzm (27 ft. lbs.) torque.
LUBE OIL CHANGE
When it becomes necessary to change manual
transmission lube oil, use the following procedure.
(1) Raise and support the vehicle.
(2) Remove the fill-hole plug from the transmis-
sion.
(3) Place a container to collect the lube oil under
the transmission drain-hole plug.
(4) Remove the drain-hole plug and drain the lube
oil from the transmission into the container.
Care should be exercised when disposing
used lube oil after it has been drained from a
transmission.
(5) Install the drain-hole plug in the transmission.
Tighten the plug with 37 Nzm (27 ft. lbs.) torque.
(6) Fill the transmission until the lube oil begins to
drip out of the fill hole.
(7) Install the fill-hole plug in the transmission.
Tighten the plug with 37 Nzm (27 ft. lbs.) torque.
(8) Remove the support and lower the vehicle.
AUTOMATIC TRANSMISSION
The automatic transmission fluid should be
changed and bands adjusted at the intervals de-
scribed in the Maintenance Schedules section of this
Group. The automatic transmission should be in-
spected for fluid leaks and proper fluid level whenother under hood service is performed. Refer to
Group 21, Transmission for proper service proce-
dures.
CAUTION: To minimize fluid contamination, verify
that dipstick is seated in the fill tube after fluid level
reading is taken.
TO INSPECT THE TRANSMISSION FLUID
LEVEL
WARNING: USE EXTREME CAUTION WHEN THE
ENGINE IS OPERATING. DO NOT PUT YOUR
HANDS NEAR THE DRIVE BELT, PULLEYS OR FAN
BLADE. DO NOT STAND IN A DIRECT LINE WITH
THE FAN BLADE.
(1) Be sure transmission fluid is at normal operat-
ing temperature. Normal operating temperature is
reached after approximately 15 miles (25km) of oper-
ation.
(2) Position the vehicle on a level surface. This is
important for an accurate fluid level check.
(3) While sitting in driver seat, apply brakes and
place gear selector in each position, then move the
selector to:
²XJ vehicles-P (Park).
²YJ vehicles-N (Neutral).
(4) Apply parking brake.
(5) Raise hood and wipe off dipstick handle to pre-
vent dirt from entering fill tube. Then remove trans-
mission fluid level indicator (dipstick) and wipe clean
with a wiping cloth.
(6) Install dipstick and verify it is seated in fill
hole or tube.
(7) Remove dipstick, with handle above tip, take
fluid level reading. If the vehicle has been driven for
at least 15 minutes before inspecting fluid level,
transmission can be considered hot and reading
should be in the OK area. If vehicle has run for less
than 15 minutes and more than 60 seconds transmis-
sion can be considered warm and reading should be
above MIN mark. Add fluid only if level is below
MIN mark on dipstick when transmission is warm
(Fig. 4).
CAUTION: Do not overfill automatic transmission,
leakage or damage can result.
AUTOMATIC TRANSMISSION FLUID
SPECIFICATION
When it becomes necessary to add fluid or when
the ATF is replaced, use:
²MOPAR Dexron IIE/Mercon ATFonlyfor AW-4
automatic transmissions (XJ vehicles).
²MOPAR ATF PLUS type 7176 (YJ vehicles).
Fig. 3 Manual Transmission Fill- & Drain-Hole
PlugsÐTypical
JLUBRICATION AND MAINTENANCE 0 - 23
Page 26 of 2198
LUBRICANT LEVEL
Determine the axle differential housing lubricant
level according to the following procedure.
(1) Raise and support the vehicle.
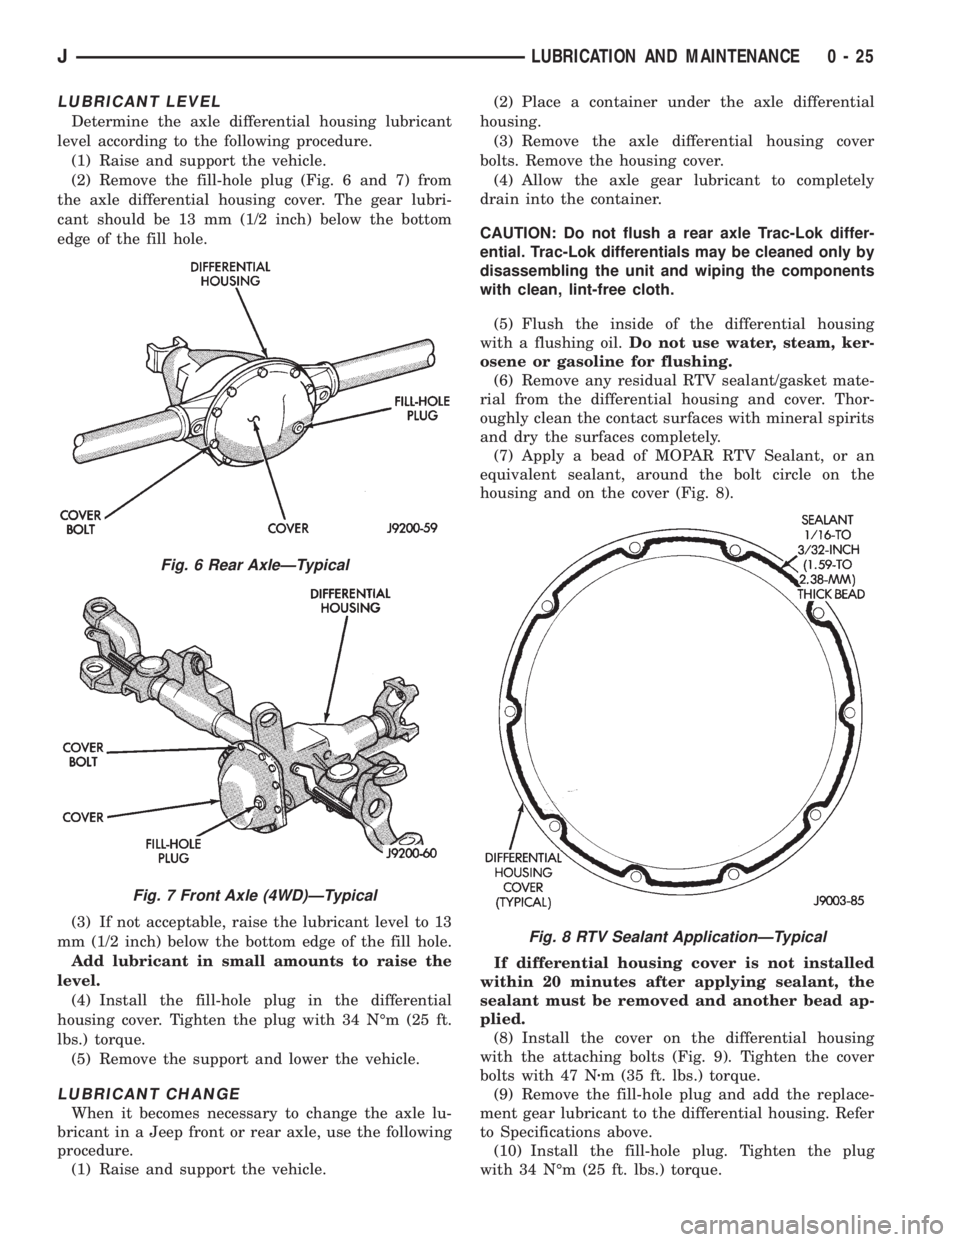
(2) Remove the fill-hole plug (Fig. 6 and 7) from
the axle differential housing cover. The gear lubri-
cant should be 13 mm (1/2 inch) below the bottom
edge of the fill hole.
(3) If not acceptable, raise the lubricant level to 13
mm (1/2 inch) below the bottom edge of the fill hole.
Add lubricant in small amounts to raise the
level.
(4) Install the fill-hole plug in the differential
housing cover. Tighten the plug with 34 NÉm (25 ft.
lbs.) torque.
(5) Remove the support and lower the vehicle.
LUBRICANT CHANGE
When it becomes necessary to change the axle lu-
bricant in a Jeep front or rear axle, use the following
procedure.
(1) Raise and support the vehicle.(2) Place a container under the axle differential
housing.
(3) Remove the axle differential housing cover
bolts. Remove the housing cover.
(4) Allow the axle gear lubricant to completely
drain into the container.
CAUTION: Do not flush a rear axle Trac-Lok differ-
ential. Trac-Lok differentials may be cleaned only by
disassembling the unit and wiping the components
with clean, lint-free cloth.
(5) Flush the inside of the differential housing
with a flushing oil.Do not use water, steam, ker-
osene or gasoline for flushing.
(6) Remove any residual RTV sealant/gasket mate-
rial from the differential housing and cover. Thor-
oughly clean the contact surfaces with mineral spirits
and dry the surfaces completely.
(7) Apply a bead of MOPAR RTV Sealant, or an
equivalent sealant, around the bolt circle on the
housing and on the cover (Fig. 8).
If differential housing cover is not installed
within 20 minutes after applying sealant, the
sealant must be removed and another bead ap-
plied.
(8) Install the cover on the differential housing
with the attaching bolts (Fig. 9). Tighten the cover
bolts with 47 Nzm (35 ft. lbs.) torque.
(9) Remove the fill-hole plug and add the replace-
ment gear lubricant to the differential housing. Refer
to Specifications above.
(10) Install the fill-hole plug. Tighten the plug
with 34 NÉm (25 ft. lbs.) torque.
Fig. 6 Rear AxleÐTypical
Fig. 7 Front Axle (4WD)ÐTypical
Fig. 8 RTV Sealant ApplicationÐTypical
JLUBRICATION AND MAINTENANCE 0 - 25