fog light JEEP CHEROKEE 2014 KL / 5.G User Guide
[x] Cancel search | Manufacturer: JEEP, Model Year: 2014, Model line: CHEROKEE, Model: JEEP CHEROKEE 2014 KL / 5.GPages: 204, PDF Size: 3.84 MB
Page 11 of 204
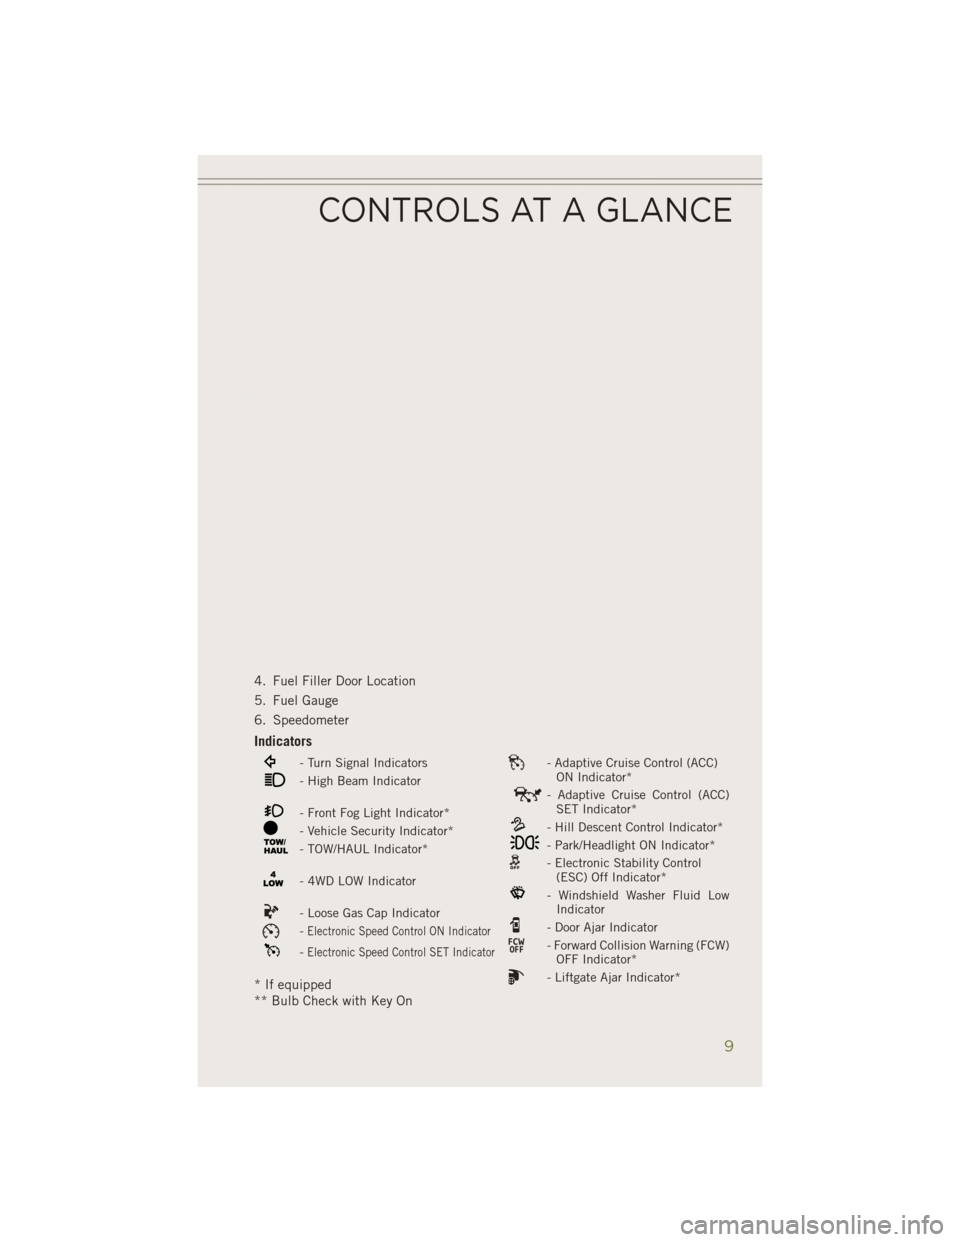
4. Fuel Filler Door Location
5. Fuel Gauge
6. Speedometer
Indicators
- Turn Signal Indicators- Adaptive Cruise Control (ACC)ON Indicator*
- High Beam Indicator- Adaptive Cruise Control (ACC)SET Indicator*
- Front Fog Light Indicator*- Hill Descent Control Indicator*- Vehicle Security Indicator*- Park/Headlight ON Indicator*- TOW/HAUL Indicator*- Electronic Stability Control(ESC) Off Indicator*
- 4WD LOW Indicator- Windshield Washer Fluid LowIndicator
- Loose Gas Cap Indicator- Door Ajar Indicator-Electronic Speed Control ON Indicator- Forward Collision Warning (FCW)OFF Indicator*-Electronic Speed Control SET Indicator
- Liftgate Ajar Indicator** If equipped
** Bulb Check with Key On
CONTROLS AT A GLANCE
9
Page 34 of 204
HEADLIGHT SWITCH
Automatic Headlights/Parking
Lights/Headlights
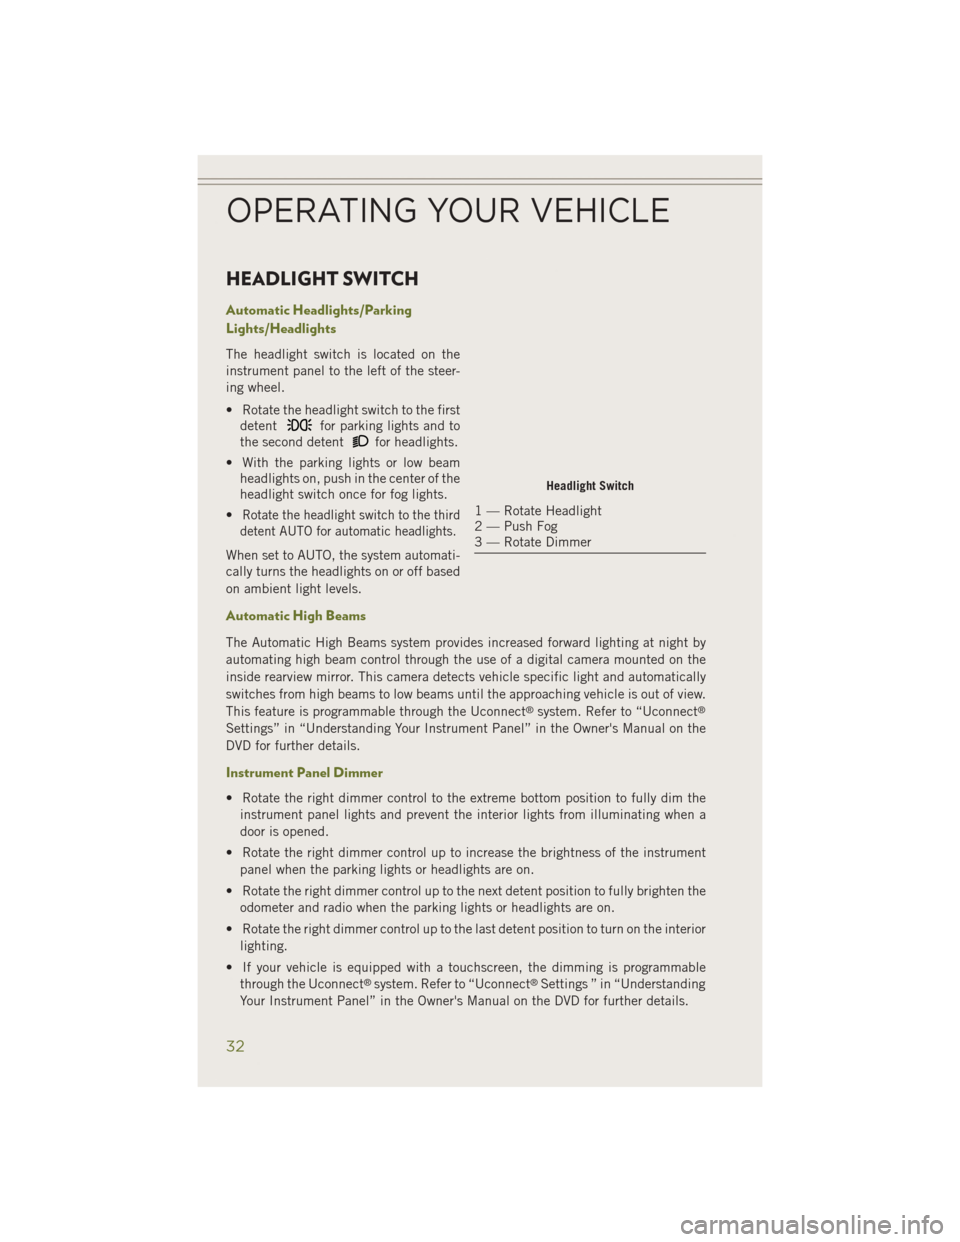
The headlight switch is located on the
instrument panel to the left of the steer-
ing wheel.
• Rotate the headlight switch to the firstdetent
for parking lights and to
the second detent
for headlights.
• With the parking lights or low beam headlights on, push in the center of the
headlight switch once for fog lights.
•
Rotate the headlight switch to the third
detent AUTO for automatic headlights.
When set to AUTO, the system automati-
cally turns the headlights on or off based
on ambient light levels.
Automatic High Beams
The Automatic High Beams system provides increased forward lighting at night by
automating high beam control through the use of a digital camera mounted on the
inside rearview mirror. This camera detects vehicle specific light and automatically
switches from high beams to low beams until the approaching vehicle is out of view.
This feature is programmable through the Uconnect
®system. Refer to “Uconnect®
Settings” in “Understanding Your Instrument Panel” in the Owner's Manual on the
DVD for further details.
Instrument Panel Dimmer
• Rotate the right dimmer control to the extreme bottom position to fully dim the
instrument panel lights and prevent the interior lights from illuminating when a
door is opened.
• Rotate the right dimmer control up to increase the brightness of the instrument panel when the parking lights or headlights are on.
• Rotate the right dimmer control up to the next detent position to fully brighten the odometer and radio when the parking lights or headlights are on.
• Rotate the right dimmer control up to the last detent position to turn on the interior lighting.
• If your vehicle is equipped with a touchscreen, the dimming is programmable through the Uconnect
®system. Refer to “Uconnect®Settings ” in “Understanding
Your Instrument Panel” in the Owner's Manual on the DVD for further details.
Headlight Switch
1 — Rotate Headlight
2 — Push Fog
3 — Rotate Dimmer
OPERATING YOUR VEHICLE
32
Page 47 of 204
Air Recirculation
• Use Recirculation for maximum A/C operation.
• For window defogging, turn the Recirculation button off.
• If the Recirculation button is pushed while in the AUTO mode, the indicator lightmay flash three times to indicate the cabin air is being controlled automatically.
Heated Mirrors
The mirrors are heated to melt frost or ice. This feature is activated whenever you turn
on the rear window defroster.
ELECTRIC PARK BRAKE
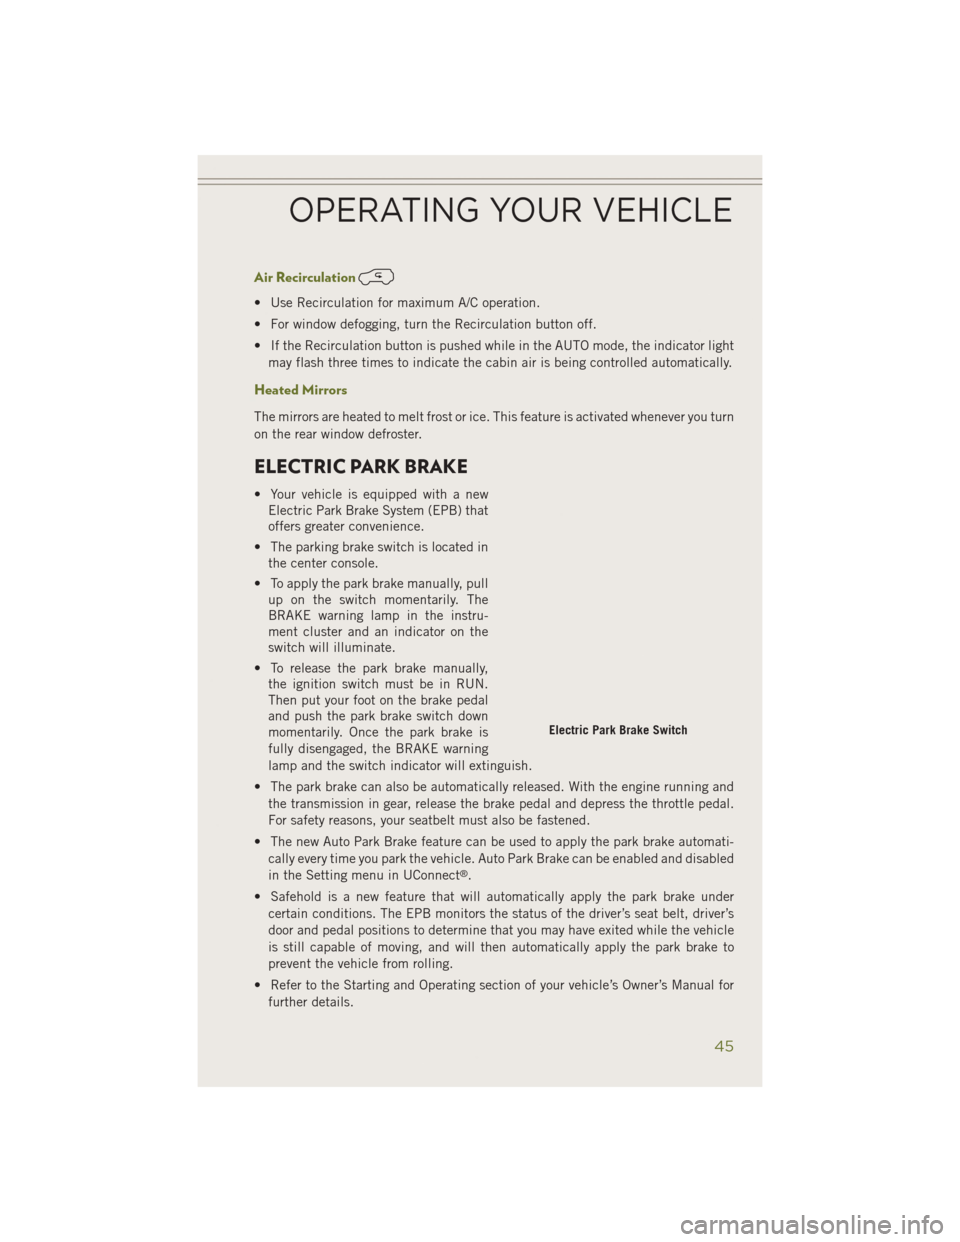
• Your vehicle is equipped with a newElectric Park Brake System (EPB) that
offers greater convenience.
• The parking brake switch is located in the center console.
• To apply the park brake manually, pull up on the switch momentarily. The
BRAKE warning lamp in the instru-
ment cluster and an indicator on the
switch will illuminate.
• To release the park brake manually, the ignition switch must be in RUN.
Then put your foot on the brake pedal
and push the park brake switch down
momentarily. Once the park brake is
fully disengaged, the BRAKE warning
lamp and the switch indicator will extinguish.
• The park brake can also be automatically released. With the engine running and the transmission in gear, release the brake pedal and depress the throttle pedal.
For safety reasons, your seatbelt must also be fastened.
• The new Auto Park Brake feature can be used to apply the park brake automati- cally every time you park the vehicle. Auto Park Brake can be enabled and disabled
in the Setting menu in UConnect
®.
• Safehold is a new feature that will automatically apply the park brake under certain conditions. The EPB monitors the status of the driver’s seat belt, driver’s
door and pedal positions to determine that you may have exited while the vehicle
is still capable of moving, and will then automatically apply the park brake to
prevent the vehicle from rolling.
• Refer to the Starting and Operating section of your vehicle’s Owner’s Manual for further details.
Electric Park Brake Switch
OPERATING YOUR VEHICLE
45
Page 150 of 204
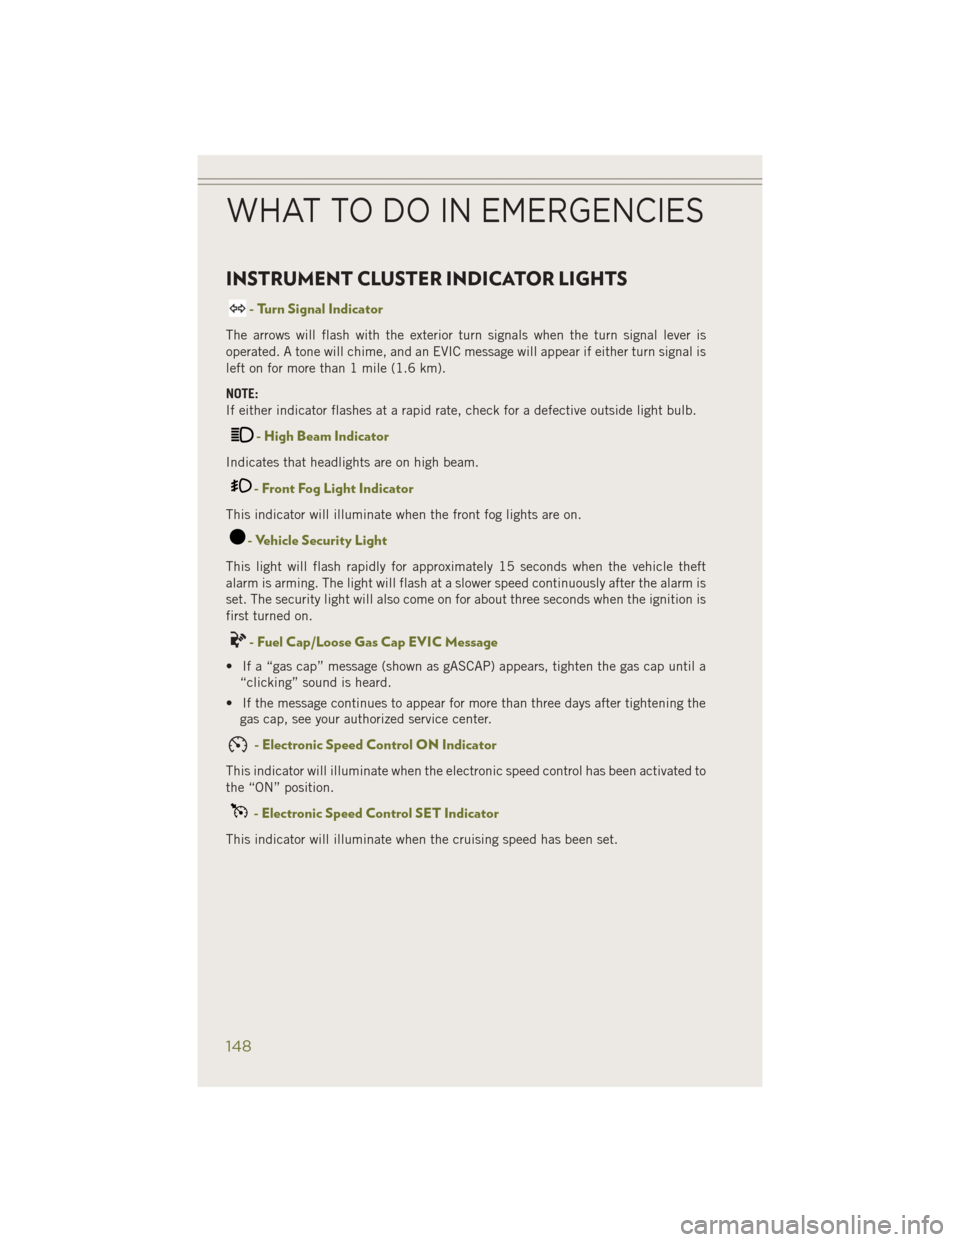
INSTRUMENT CLUSTER INDICATOR LIGHTS
- Turn Signal Indicator
The arrows will flash with the exterior turn signals when the turn signal lever is
operated. A tone will chime, and an EVIC message will appear if either turn signal is
left on for more than 1 mile (1.6 km).
NOTE:
If either indicator flashes at a rapid rate, check for a defective outside light bulb.
- High Beam Indicator
Indicates that headlights are on high beam.
- Front Fog Light Indicator
This indicator will illuminate when the front fog lights are on.
- Vehicle Security Light
This light will flash rapidly for approximately 15 seconds when the vehicle theft
alarm is arming. The light will flash at a slower speed continuously after the alarm is
set. The security light will also come on for about three seconds when the ignition is
first turned on.
- Fuel Cap/Loose Gas Cap EVIC Message
• If a “gas cap” message (shown as gASCAP) appears, tighten the gas cap until a“clicking” sound is heard.
• If the message continues to appear for more than three days after tightening the gas cap, see your authorized service center.
- Electronic Speed Control ON Indicator
This indicator will illuminate when the electronic speed control has been activated to
the “ON” position.
- Electronic Speed Control SET Indicator
This indicator will illuminate when the cruising speed has been set.
WHAT TO DO IN EMERGENCIES
148
Page 183 of 204
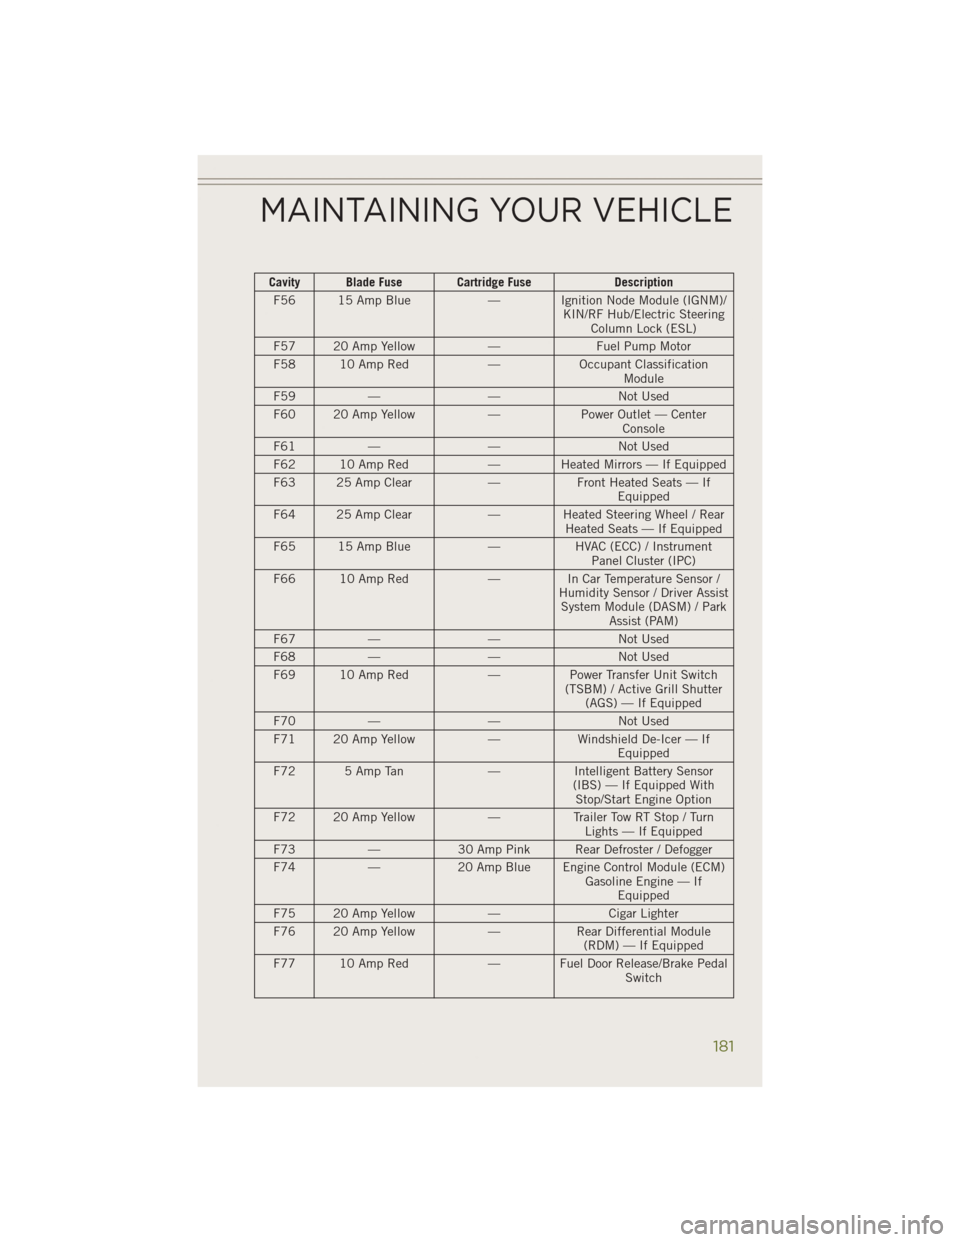
Cavity Blade Fuse Cartridge FuseDescription
F56 15 Amp Blue — Ignition Node Module (IGNM)/
KIN/RF Hub/Electric SteeringColumn Lock (ESL)
F57 20 Amp Yellow —Fuel Pump Motor
F58 10 Amp Red —Occupant Classification
Module
F59 — — Not Used
F60 20 Amp Yellow —Power Outlet — Center
Console
F61 — — Not Used
F62 10 Amp Red — Heated Mirrors — If Equipped
F63 25 Amp Clear —Front Heated Seats — If
Equipped
F64 25 Amp Clear —Heated Steering Wheel / Rear
Heated Seats — If Equipped
F65 15 Amp Blue —HVAC (ECC) / Instrument
Panel Cluster (IPC)
F66 10 Amp Red —In Car Temperature Sensor /
Humidity Sensor / Driver Assist System Module (DASM) / Park Assist (PAM)
F67 — — Not Used
F68 — — Not Used
F69 10 Amp Red —Power Transfer Unit Switch
(TSBM) / Active Grill Shutter (AGS) — If Equipped
F70 — — Not Used
F71 20 Amp Yellow —Windshield De-Icer — If
Equipped
F72 5 Amp Tan —Intelligent Battery Sensor
(IBS) — If Equipped With Stop/Start Engine Option
F72 20 Amp Yellow —Trailer Tow RT Stop / Turn
Lights — If Equipped
F73 —30 Amp Pink Rear Defroster / Defogger
F74 —20 Amp Blue Engine Control Module (ECM)
Gasoline Engine — IfEquipped
F75 20 Amp Yellow —Cigar Lighter
F76 20 Amp Yellow —Rear Differential Module
(RDM) — If Equipped
F77 10 Amp Red — Fuel Door Release/Brake Pedal
Switch
MAINTAINING YOUR VEHICLE
181
Page 185 of 204
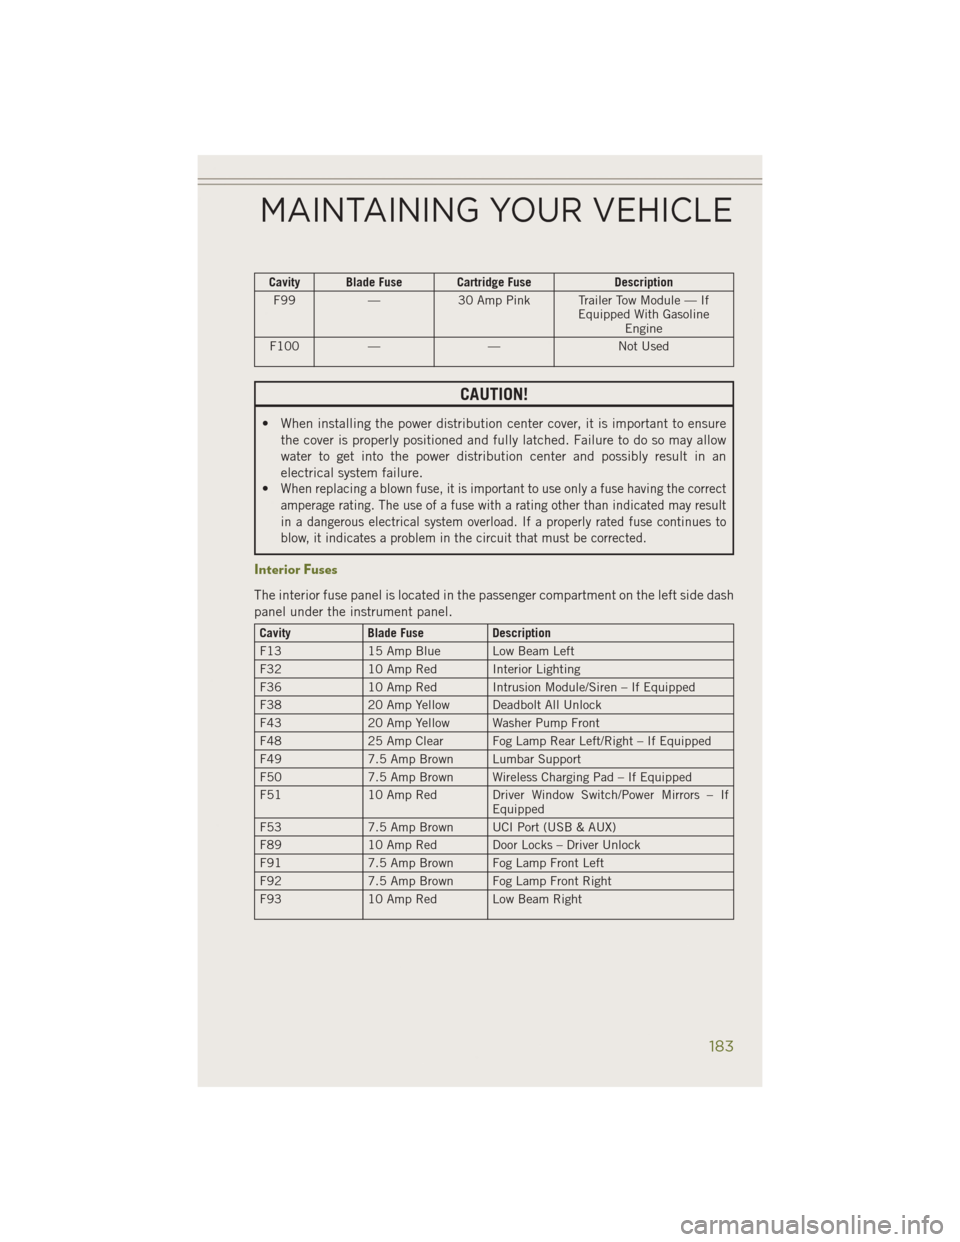
Cavity Blade Fuse Cartridge FuseDescription
F99 —30 Amp Pink Trailer Tow Module — If
Equipped With GasolineEngine
F100 — — Not Used
CAUTION!
• When installing the power distribution center cover, it is important to ensure
the cover is properly positioned and fully latched. Failure to do so may allow
water to get into the power distribution center and possibly result in an
electrical system failure.
•
When replacing a blown fuse, it is important to use only a fuse having the correct
amperage rating. The use of a fuse with a rating other than indicated may result
in a dangerous electrical system overload. If a properly rated fuse continues to
blow, it indicates a problem in the circuit that must be corrected.
Interior Fuses
The interior fuse panel is located in the passenger compartment on the left side dash
panel under the instrument panel.
Cavity Blade Fuse Description
F13 15 Amp Blue Low Beam Left
F32 10 Amp Red Interior Lighting
F36 10 Amp Red Intrusion Module/Siren – If Equipped
F38 20 Amp Yellow Deadbolt All Unlock
F43 20 Amp Yellow Washer Pump Front
F48 25 Amp Clear Fog Lamp Rear Left/Right – If Equipped
F49 7.5 Amp Brown Lumbar Support
F50 7.5 Amp Brown Wireless Charging Pad – If Equipped
F51 10 Amp Red Driver Window Switch/Power Mirrors – If
Equipped
F53 7.5 Amp Brown UCI Port (USB & AUX)
F89 10 Amp Red Door Locks – Driver Unlock
F91 7.5 Amp Brown Fog Lamp Front Left
F92 7.5 Amp Brown Fog Lamp Front Right
F93 10 Amp Red Low Beam Right
MAINTAINING YOUR VEHICLE
183
Page 193 of 204
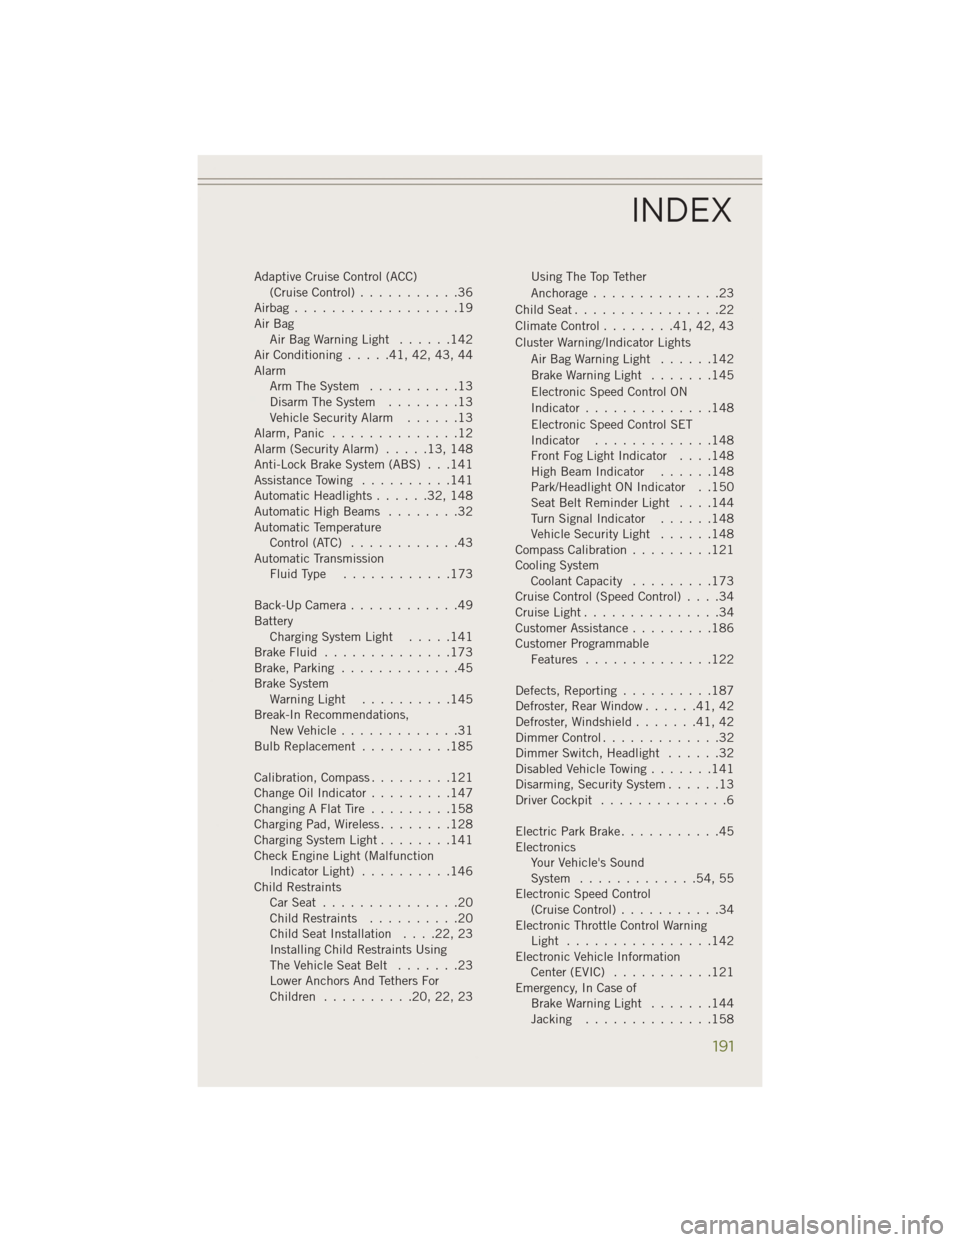
Adaptive Cruise Control (ACC)(Cruise Control) ...........36
Airbag..................19
Air Bag AirBagWarningLight ......142
Air Conditioning .....41,42,43,44
Alarm Arm The System ..........13
Disarm The System ........13
Vehicle Security Alarm ......13
Alarm,Panic ..............12
Alarm (Security Alarm) .....13,148
Anti-Lock Brake System (ABS) . . .141
Assistance Towing ..........141
Automatic Headlights ......32,148
Automatic High Beams ........32
Automatic Temperature Control (ATC) ............43
Automatic Transmission FluidType ............173
Back-Up Camera ............49
Battery Charging System Light .....141
Brake Fluid ..............173
Brake, Parking .............45
Brake System WarningLight ..........145
Break-In Recommendations, New Vehicle .............31
BulbReplacement ..........185
Calibration,Compass.........121
ChangeOilIndicator.........147
ChangingAFlatTire .........158
Charging Pad, Wireless ........128
Charging System Light ........141
Check Engine Light (Malfunction Indicator Light) ..........146
Child Restraints CarSeat ...............20
Child Restraints ..........20
ChildSeatInstallation ....22,23
Installing Child Restraints Using
The Vehicle Seat Belt .......23
Lower Anchors And Tethers For
Children ..........20,22,23 Using The Top Tether
Anchorage
..............23
ChildSeat................22
Climate Control ........41,42,43
Cluster Warning/Indicator Lights AirBagWarningLight ......142
Brake Warning Light .......145
Electronic Speed Control ON
Indicator ..............148
Electronic Speed Control SET
Indicator .............148
Front Fog Light Indicator ....148
High Beam Indicator ......148
Park/Headlight ON Indicator . .150
Seat Belt Reminder Light ....144
Turn Signal Indicator ......148
Vehicle Security Light ......148
Compass Calibration .........121
Cooling System Coolant Capacity .........173
Cruise Control (Speed Control) ....34
CruiseLight...............34
Customer Assistance .........186
Customer Programmable Features ..............122
Defects, Reporting ..........187
Defroster, Rear Window ......41,42
Defroster, Windshield .......41,42
DimmerControl.............32
Dimmer Switch, Headlight ......32
Disabled Vehicle Towing .......141
Disarming, Security System ......
13
Driver Cockpit ..............6
Electric Park Brake ...........45
Electronics Your Vehicle's Sound
System .............54,55
Electronic Speed Control (Cruise Control) ...........34
Electronic Throttle Control Warning Light ................142
Electronic Vehicle Information Center (EVIC) ...........121
Emergency, In Case of Brake Warning Light .......144
Jacking ..............158
INDEX
191
Page 194 of 204
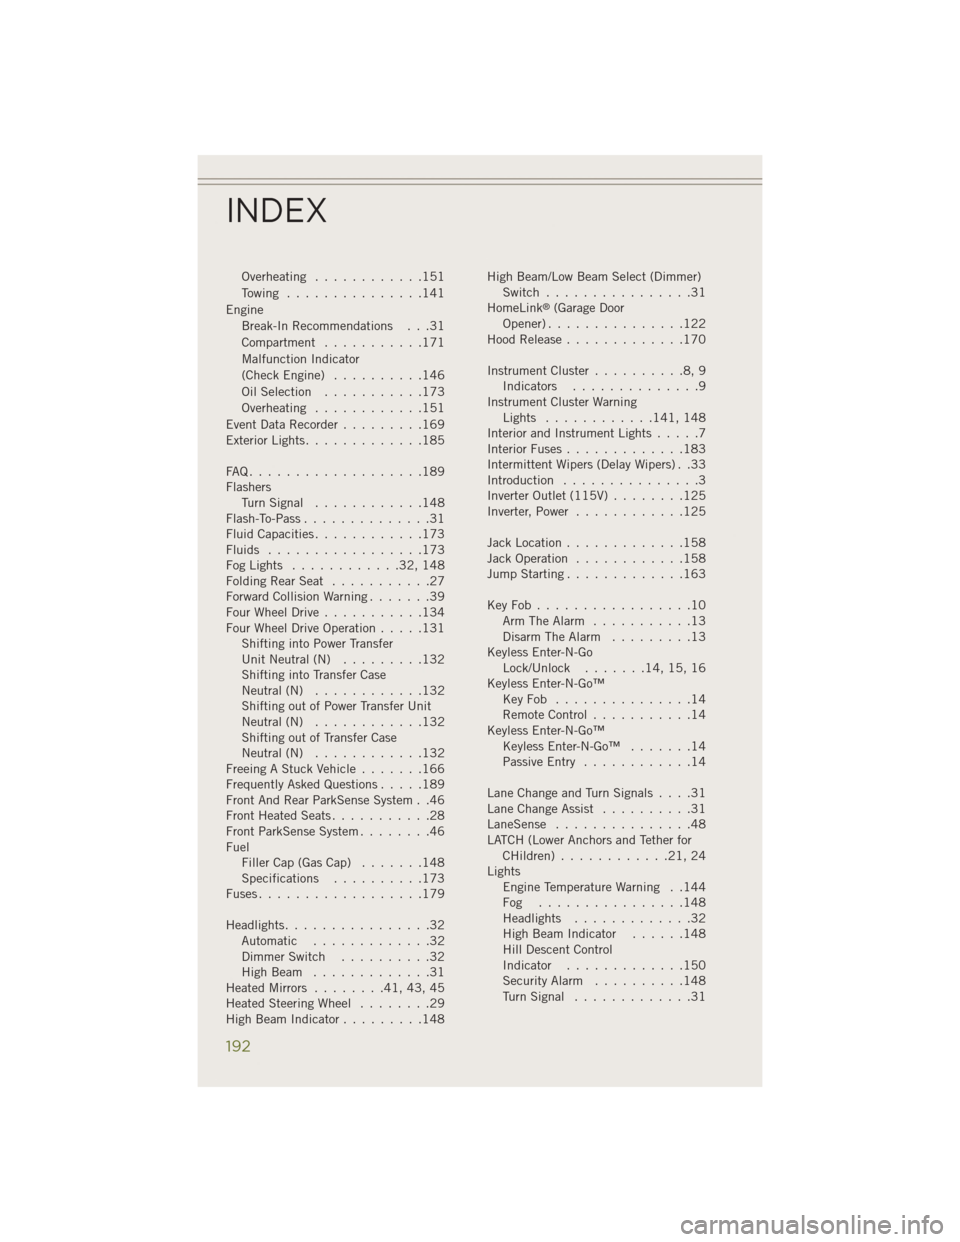
Overheating............151
Towing ...............141
Engine Break-In Recommendations . . .31
Compartment ...........171
Malfunction Indicator
(CheckEngine) ..........146
OilSelection ...........173
Overheating ............151
Event Data Recorder .........169
Exterior Lights .............185
FAQ...................189
Flashers TurnSignal ............148
Flash-To-Pass ..............31
Fluid Capacities ............173
Fluids .................173
FogLights ............32,148
FoldingRearSeat ...........27
Forward Collision Warning .......39
Four Wheel Drive ...........134
Four Wheel Drive Operation .....131
Shifting into Power Transfer
Unit Neutral (N) .........132
Shifting into Transfer Case
Neutral (N) ............132
Shifting out of Power Transfer Unit
Neutral (N) ............132
Shifting out of Transfer Case
Neutral (N) ............132
Freeing A Stuck Vehicle .......166
Frequently Asked Questions .....189
Front And Rear ParkSense System . .46
Front Heated Seats ...........28
Front ParkSense System ........46
Fuel Filler Cap (Gas Cap) .......148
Specifications ..........173
Fuses..................179
Headlights ................32
Automatic .............32
Dimmer Switch ..........32
HighBeam .............31
Heated Mirrors ........41,43,45
Heated Steering Wheel ........29
High Beam Indicator .........148 High Beam/Low Beam Select (Dimmer)
Switch ................31
HomeLink
®(Garage Door
Opener)...............122
Hood Release .............170
Instrument Cluster ..........8,9
Indicators ..............9
Instrument Cluster Warning Lights ............ 141, 148
Interior and Instrument Lights .....7
Interior Fuses .............183
Intermittent Wipers (Delay Wipers) . .33
Introduction ...............3
Inverter Outlet (115V) ........125
Inverter, Power ............125
Jack Location .............158
Jack Operation ............158
Jump Starting .............163
KeyFob.................10 Arm The Alarm ...........13
Disarm The Alarm .........13
Keyless Enter-N-Go Lock/Unlock .......14,15,16
Keyless Enter-N-Go™ KeyFob ...............14
Remote Control ...........14
Keyless Enter-N-Go™ Keyless Enter-N-Go™ .......14
Passive Entry ............14
LaneChangeandTurnSignals....31
Lane Change Assist ..........31
LaneSense ...............48
LATCH (Lower Anchors and Tether for CHildren)............21,24
Lights Engine Temperature Warning . .144
Fog ................148
Headlights .............32
High Beam Indicator ......148
Hill Descent Control
Indicator .............150
Security Alarm ..........148
TurnSignal .............31
INDEX
192