fuel cap JEEP CHEROKEE 2015 KL / 5.G User Guide
[x] Cancel search | Manufacturer: JEEP, Model Year: 2015, Model line: CHEROKEE, Model: JEEP CHEROKEE 2015 KL / 5.GPages: 772, PDF Size: 18.21 MB
Page 591 of 772
NOTE:When removing the fuel filler cap, lay the cap
tether in the hook, located on the fuel filler door rein-
forcement.
1. Press the fuel filler door release switch (located on the
driver ’s side door trim).
2. Open the fuel filler door, and remove the fuel filler
cap.
NOTE:
•In certain cold conditions, ice may prevent the fuel
door from opening. If this occurs, lightly push on the
fuel door to break the ice buildup and re-release the
fuel door using the inside release button. Do not pry
on the door.
•When the fuel nozzle “clicks” or shuts off, the fuel tank
is full.
•Tighten the gas cap about one quarter turn until you
hear one click. This is an indication that the cap is
properly tightened.
•If the gas cap is not tightened properly, the MIL will
come on. Be sure the gas cap is tightened every time
the vehicle is refueled.
CAUTION!
•Damage to the fuel system or emission control
system could result from using an improper fuel
cap (gas cap). A poorly fitting cap could let impu-
rities into the fuel system. Also, a poorly fitting
aftermarket cap can cause the “Malfunction Indi-
cator Light (MIL)” to illuminate, due to fuel vapors
escaping from the system.
•A poorly fitting gas cap may cause the MIL to turn
on.
(Continued)
5
STARTING AND OPERATING 589
Page 592 of 772
CAUTION!(Continued)
•To avoid fuel spillage and overfilling, do not “top
off” the fuel tank after filling.
WARNING!
•Never have any smoking materials lit in or near the
vehicle when the gas cap is removed or the tank is
being filled.
•Never add fuel when the engine is running. This is
in violation of most state and federal fire regula-
tions and may cause the MIL to turn on.
•A fire may result if gasoline is pumped into a
portable container that is inside of a vehicle. You
could be burned. Always place gas containers on
the ground while filling.
Emergency Fuel Filler Door Release
If you are unable to open the fuel filler door, use the fuel
filler door emergency release.
1. Open the liftgate.
2. Remove access door located on interior trim panel for
release cable with the tip of your key.
3. Grab the release cable tether and pull up to release the
fuel filler door.
Loose Fuel Filler Cap Message
If the vehicle diagnostic system determines that the fuel
filler cap is loose, improperly installed, or damaged, a
“CHECK GASCAP” message will be displayed in the
Electronic Vehicle Information Center (EVIC) or Driver
Information Display (DID). Refer to “Electronic Vehicle
Information (EVIC) or#Driver Information Display
(DID)” in “Understanding Your Instrument Panel” for
further information. Tighten the fuel filler cap until a
590 STARTING AND OPERATING
Page 593 of 772
“clicking” sound is heard. This is an indication that the
fuel filler cap is properly tightened. Refer to “Onboard
Diagnostic System” in “Maintaining Your Vehicle” for
further information.
VEHICLE LOADING
Certification Label
As required by National Highway Traffic Safety Admin-
istration regulations, your vehicle has a certification label
affixed to the driver’s side door or pillar.
This label contains the month and year of manufacture,
Gross Vehicle Weight Rating (GVWR), Gross Axle Weight
Rating (GAWR) front and rear, and Vehicle Identification
Number (VIN). A Month-Day-Hour (MDH) number is
included on this label and indicates the Month, Day and
Hour of manufacture. The bar code that appears on the
bottom of the label is your VIN.
Gross Vehicle Weight Rating (GVWR)
The GVWR is the total permissible weight of your vehicle
including driver, passengers, vehicle, options and cargo.
The label also specifies maximum capacities of front and
rear axle systems (GAWR). Total load must be limited so
GVWR and front and rear GAWR are not exceeded.
Payload
The payload of a vehicle is defined as the allowable load
weight a truck can carry, including the weight of the
driver, all passengers, options and cargo.
Gross Axle Weight Rating (GAWR)
The GAWR is the maximum permissible load on the front
and rear axles. The load must be distributed in the cargo
area so that the GAWR of each axle is not exceeded.
Each axle GAWR is determined by the components in the
system with the lowest load carrying capacity (axle,
springs, tires or wheels). Heavier axles or suspension
5
STARTING AND OPERATING 591
Page 594 of 772

components sometimes specified by purchasers for in-
creased durability does not necessarily increase the vehi-
cle’s GVWR.
Tire Size
The tire size on the Vehicle Certification Label represents
the actual tire size on your vehicle. Replacement tires
must be equal to the load capacity of this tire size.
Rim Size
This is the rim size that is appropriate for the tire size
listed.
Inflation Pressure
This is the cold tire inflation pressure for your vehicle for
all loading conditions up to full GAWR.
Curb Weight
The curb weight of a vehicle is defined as the total weight
of the vehicle with all fluids, including vehicle fuel, at full
capacity conditions, and with no occupants or cargo
loaded into the vehicle. The front and rear curb weight
values are determined by weighing your vehicle on a
commercial scale before any occupants or cargo are
added.
Loading
The actual total weight and the weight of the front and
rear of your vehicle at the ground can best be determined
by weighing it when it is loaded and ready for operation.
The entire vehicle should first be weighed on a commer-
cial scale to insure that the GVWR has not been exceeded.
The weight on the front and rear of the vehicle should
then be determined separately to be sure that the load is
properly distributed over the front and rear axle. Weigh-
ing the vehicle may show that the GAWR of either the
front or rear axles has been exceeded but the total load is
within the specified GVWR. If so, weight must be shifted
from front to rear or rear to front as appropriate until the
592 STARTING AND OPERATING
Page 655 of 772
MAINTAINING YOUR VEHICLE
CONTENTS
!ENGINE COMPARTMENT — 2.4L..........655
!ENGINE COMPARTMENT — 3.2L..........656
!ONBOARD DIAGNOSTIC SYSTEM — OBD II . .657
▫Loose Fuel Filler Cap Message............657
!EMISSIONS INSPECTION AND MAINTENANCE
PROGRAMS..........................658
!REPLACEMENT PARTS..................659
!DEALER SERVICE......................659
!MAINTENANCE PROCEDURES...........660
▫Engine Oil..........................661
▫Engine Oil Filter......................664
▫Engine Air Cleaner Filter................664
▫Accessory Drive Belt Inspection...........668
▫Maintenance-Free Battery...............669
▫Air Conditioner Maintenance.............670
▫Body Lubrication.....................675
▫Windshield Wiper Blades...............676
▫Adding Washer Fluid..................683
▫Exhaust System......................684
▫Cooling System......................686
7
Page 659 of 772
ONBOARD DIAGNOSTIC SYSTEM — OBD II
Your vehicle is equipped with a sophisticated onboard
diagnostic system called OBD II. This system monitors
the performance of the emissions, engine, and automatic
transmission control systems. When these systems are
operating properly, your vehicle will provide excellent
performance and fuel economy, as well as engine emis-
sions well within current government regulations.
If any of these systems require service, the OBD II system
will turn on the “Malfunction Indicator Light (MIL).” It
will also store diagnostic codes and other information to
assist your service technician in making repairs. Al-
though your vehicle will usually be drivable and not
need towing, see your authorized dealer for service as
soon as possible.
CAUTION!
•Prolonged driving with the MIL on could cause
further damage to the emission control system. It
could also affect fuel economy and driveability.
The vehicle must be serviced before any emissions
tests can be performed.
•If the MIL is flashing while the engine is running,
severe catalytic converter damage and power loss
will soon occur. Immediate service is required.
Loose Fuel Filler Cap Message
If the vehicle diagnostic system determines that the fuel
filler cap is loose, improperly installed, or damaged, a
“CHECK GASCAP” message will be displayed in the
Electronic Vehicle Information Center (EVIC) or Driver
Information Display (DID). Refer to “Electronic Vehicle
Information (EVIC) or#Driver Information Display
(DID)” in “Understanding Your Instrument Panel” for
7
MAINTAINING YOUR VEHICLE 657
Page 660 of 772
further information. Tighten the fuel filler cap until a
“clicking” sound is heard. This is an indication that the
fuel filler cap is properly tightened. Refer to “Onboard
Diagnostic System” in “Maintaining Your Vehicle” for
further information.
EMISSIONS INSPECTION AND MAINTENANCE
PROGRAMS
In some localities, it may be a legal requirement to pass
an inspection of your vehicle’s emissions control system.
Failure to pass could prevent vehicle registration.
For states that require an Inspection and Mainte-
nance (I/M), this check verifies the “Malfunction
Indicator Light (MIL)” is functioning and is not
on when the engine is running, and that the OBD II
system is ready for testing.
Normally, the OBD II system will be ready. The OBD II
system maynotbe ready if your vehicle was recently
serviced, recently had a dead battery or a battery replace-
ment. If the OBD II system should be determined not
ready for the I/M test, your vehicle may fail the test.
Your vehicle has a simple ignition actuated test, which
you can use prior to going to the test station. To check if
your vehicle’s OBD II system is ready, you must do the
following:
1. Cycle the ignition switch to the ON position, but do
not crank or start the engine.
NOTE:If you crank or start the engine, you will have to
start this test over.
2. As soon as you cycle the ignition switch to the ON
position, you will see the MIL symbol come on as part
of a normal bulb check.
658 MAINTAINING YOUR VEHICLE
Page 665 of 772
Engine Oil Viscosity (SAE Grade) — 2.4L Engine
MOPAR® SAE 0W-20 engine oil or equivalent Pennzoil®
or Shell Helix® is recommended for all operating tem-
peratures. This engine oil improves low temperature
starting and vehicle fuel economy. Your engine oil filler
cap also states the recommended engine oil viscosity
grade for your engine.
Lubricants which do not have both the engine oil certi-
fication mark and the correct SAE viscosity grade num-
ber should not be used.
Engine Oil Viscosity (SAE Grade) — 3.2L Engine
MOPAR® SAE 5W-20 engine oil or equivalent Pennzoil®
or Shell Helix® is recommended for all operating tem-
peratures. This engine oil improves low temperature
starting and vehicle fuel economy. The engine oil filler
cap also shows the recommended engine oil viscosity for
your engine. For information on engine oil filler cap
location, refer to “Engine Compartment” in “Maintaining
Your Vehicle” for further information.
Lubricants which do not have both the engine oil certi-
fication mark and the correct SAE viscosity grade num-
ber should not be used.
Synthetic Engine Oils
You may use synthetic engine oils provided the recom-
mended oil quality requirements are met, and the recom-
mended maintenance intervals for oil and filter changes
are followed.
Materials Added To Engine Oil
The manufacturer strongly recommends against the ad-
dition of any additives (other than leak detection dyes) to
the engine oil. Engine oil is an engineered product and its
performance may be impaired by supplemental addi-
tives.
7
MAINTAINING YOUR VEHICLE 663
Page 729 of 772
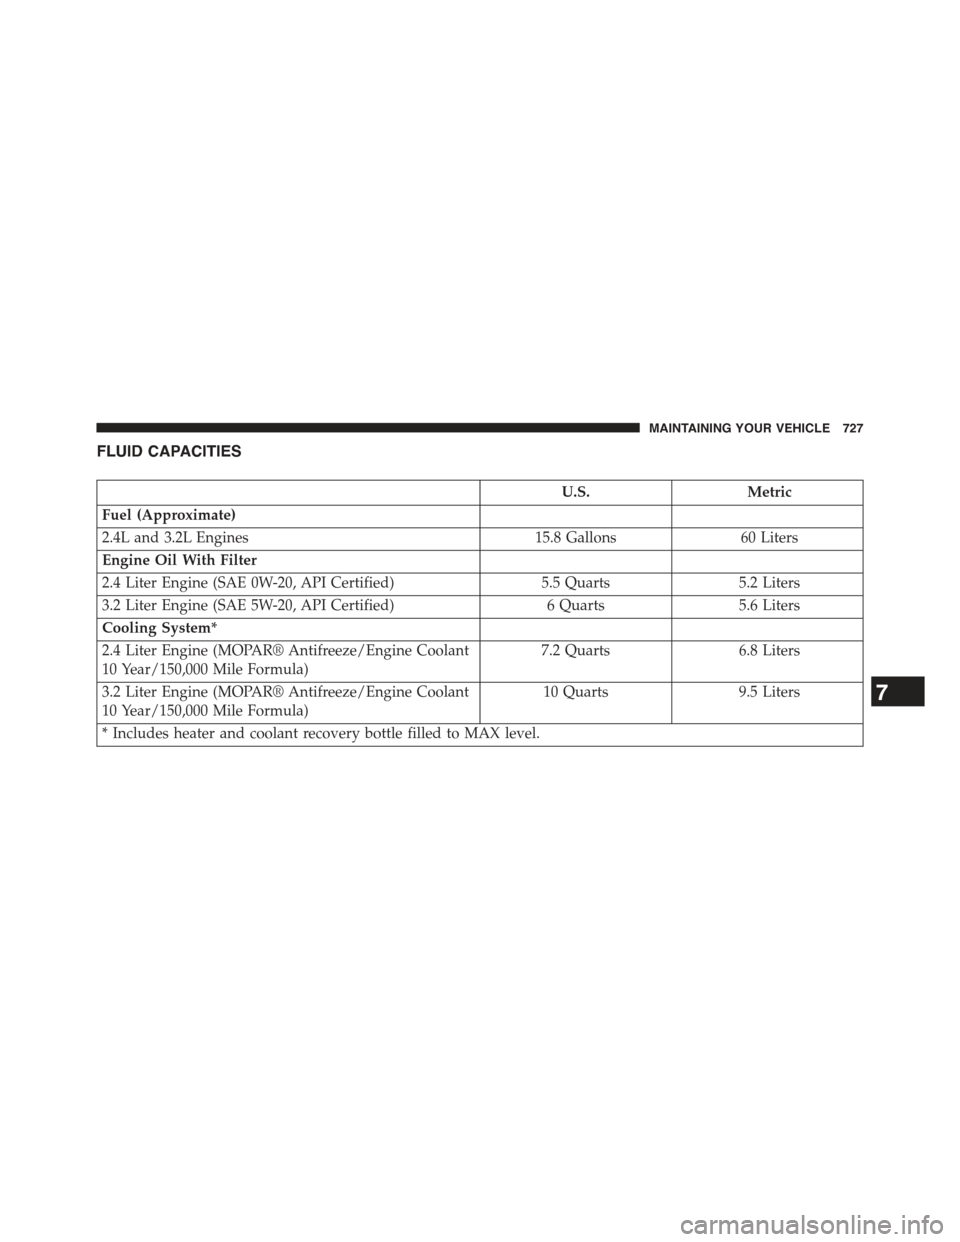
FLUID CAPACITIES
U.S.Metric
Fuel (Approximate)
2.4L and 3.2L Engines15.8 Gallons60 Liters
Engine Oil With Filter
2.4 Liter Engine (SAE 0W-20, API Certified)5.5 Quarts5.2 Liters
3.2 Liter Engine (SAE 5W-20, API Certified)6 Quarts5.6 Liters
Cooling System*
2.4 Liter Engine (MOPAR® Antifreeze/Engine Coolant
10 Year/150,000 Mile Formula)
7.2 Quarts6.8 Liters
3.2 Liter Engine (MOPAR® Antifreeze/Engine Coolant
10 Year/150,000 Mile Formula)
10 Quarts9.5 Liters
* Includes heater and coolant recovery bottle filled to MAX level.
7
MAINTAINING YOUR VEHICLE 727
Page 730 of 772
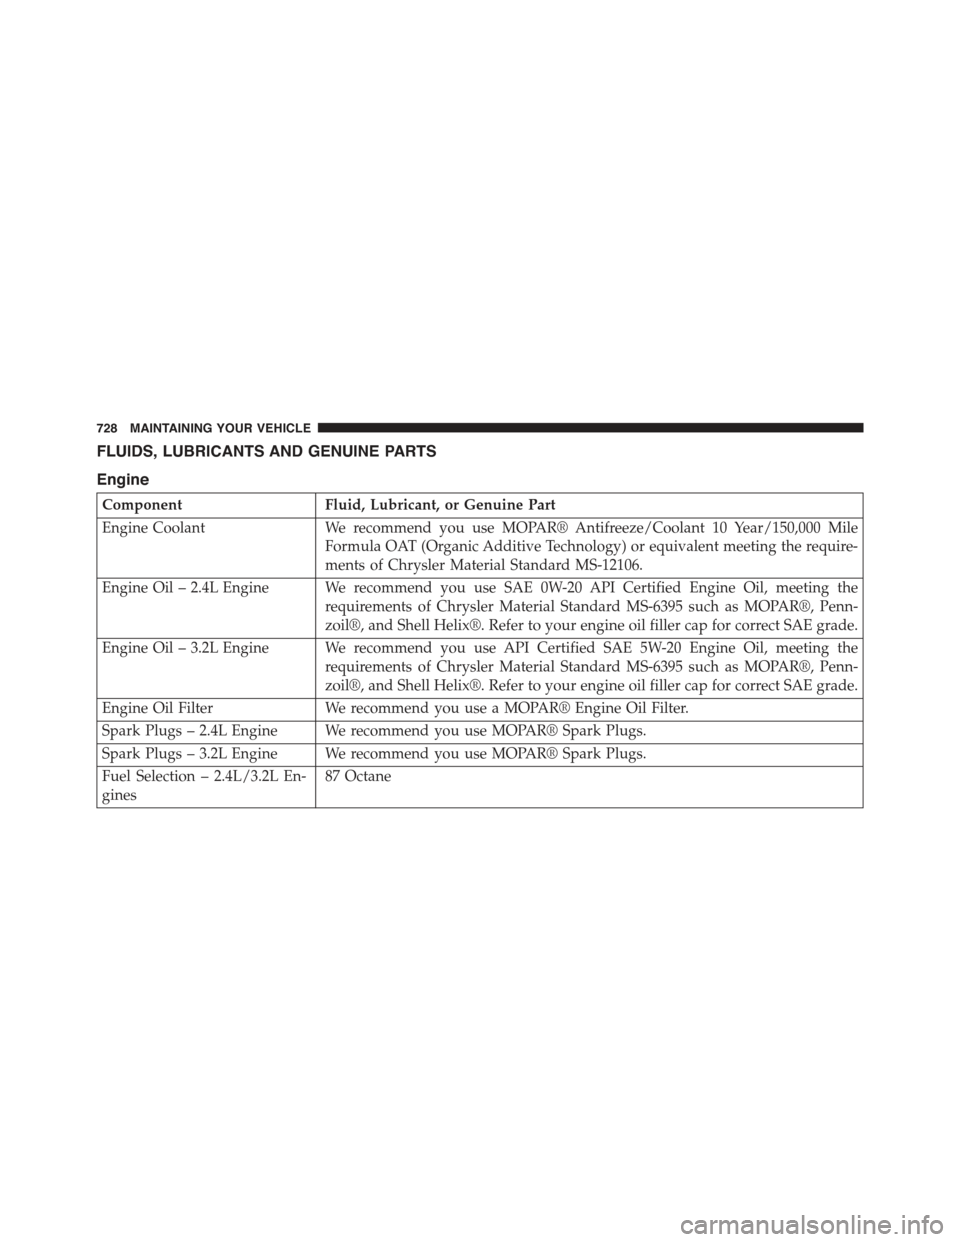
FLUIDS, LUBRICANTS AND GENUINE PARTS
Engine
ComponentFluid, Lubricant, or Genuine Part
Engine CoolantWe recommend you use MOPAR® Antifreeze/Coolant 10 Year/150,000 Mile
Formula OAT (Organic Additive Technology) or equivalent meeting the require-
ments of Chrysler Material Standard MS-12106.
Engine Oil – 2.4L Engine We recommend you use SAE 0W-20 API Certified Engine Oil, meeting the
requirements of Chrysler Material Standard MS-6395 such as MOPAR®, Penn-
zoil®, and Shell Helix®. Refer to your engine oil filler cap for correct SAE grade.
Engine Oil – 3.2L Engine We recommend you use API Certified SAE 5W-20 Engine Oil, meeting the
requirements of Chrysler Material Standard MS-6395 such as MOPAR®, Penn-
zoil®, and Shell Helix®. Refer to your engine oil filler cap for correct SAE grade.
Engine Oil FilterWe recommend you use a MOPAR® Engine Oil Filter.
Spark Plugs – 2.4L Engine We recommend you use MOPAR® Spark Plugs.
Spark Plugs – 3.2L Engine We recommend you use MOPAR® Spark Plugs.
Fuel Selection – 2.4L/3.2L En-
gines
87 Octane
728 MAINTAINING YOUR VEHICLE