JEEP CHEROKEE 2015 KL / 5.G Owner's Manual
Manufacturer: JEEP, Model Year: 2015, Model line: CHEROKEE, Model: JEEP CHEROKEE 2015 KL / 5.GPages: 244, PDF Size: 30.6 MB
Page 11 of 244
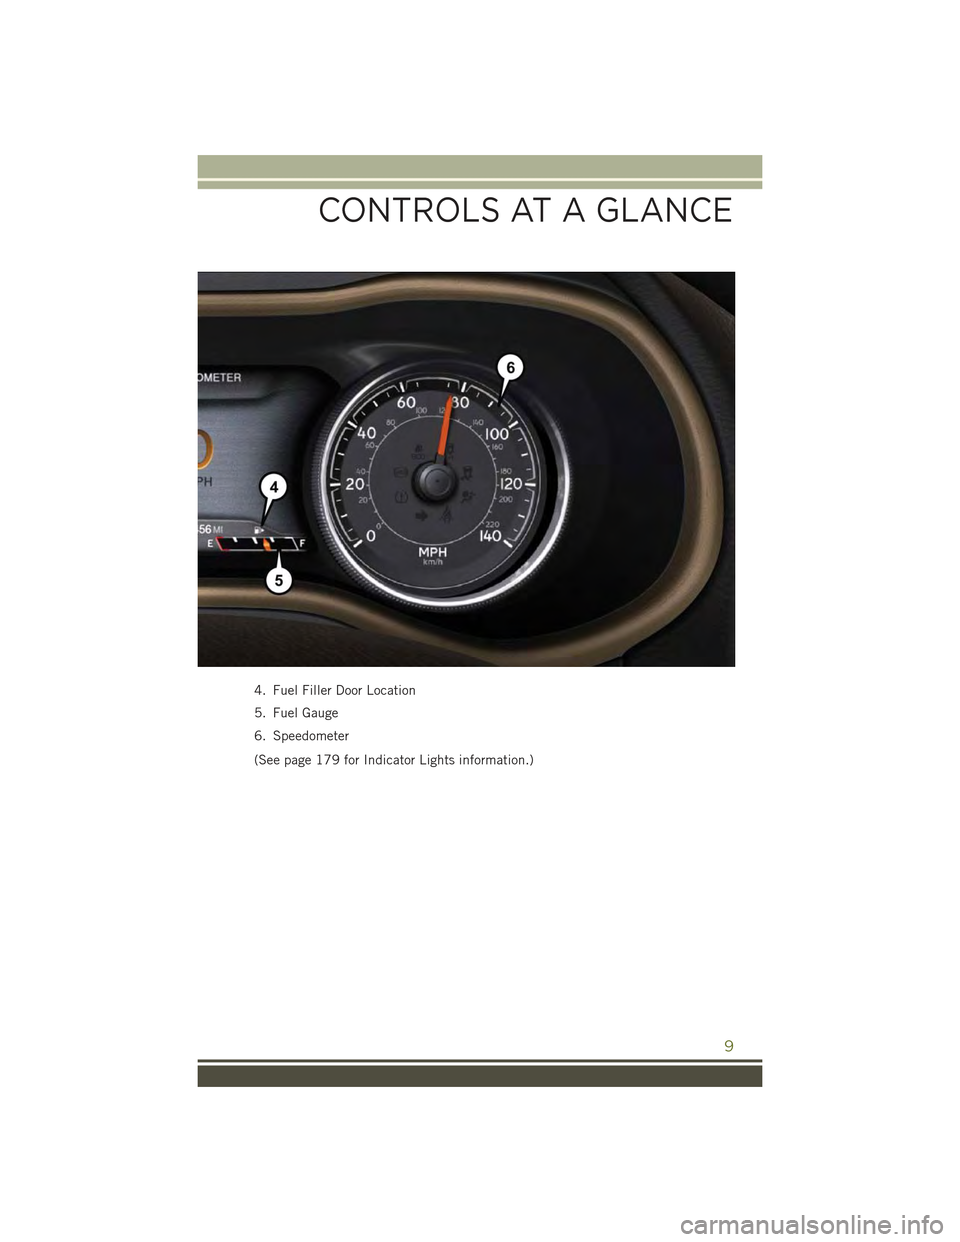
4. Fuel Filler Door Location
5. Fuel Gauge
6. Speedometer
(See page 179 for Indicator Lights information.)
CONTROLS AT A GLANCE
9
Page 12 of 244
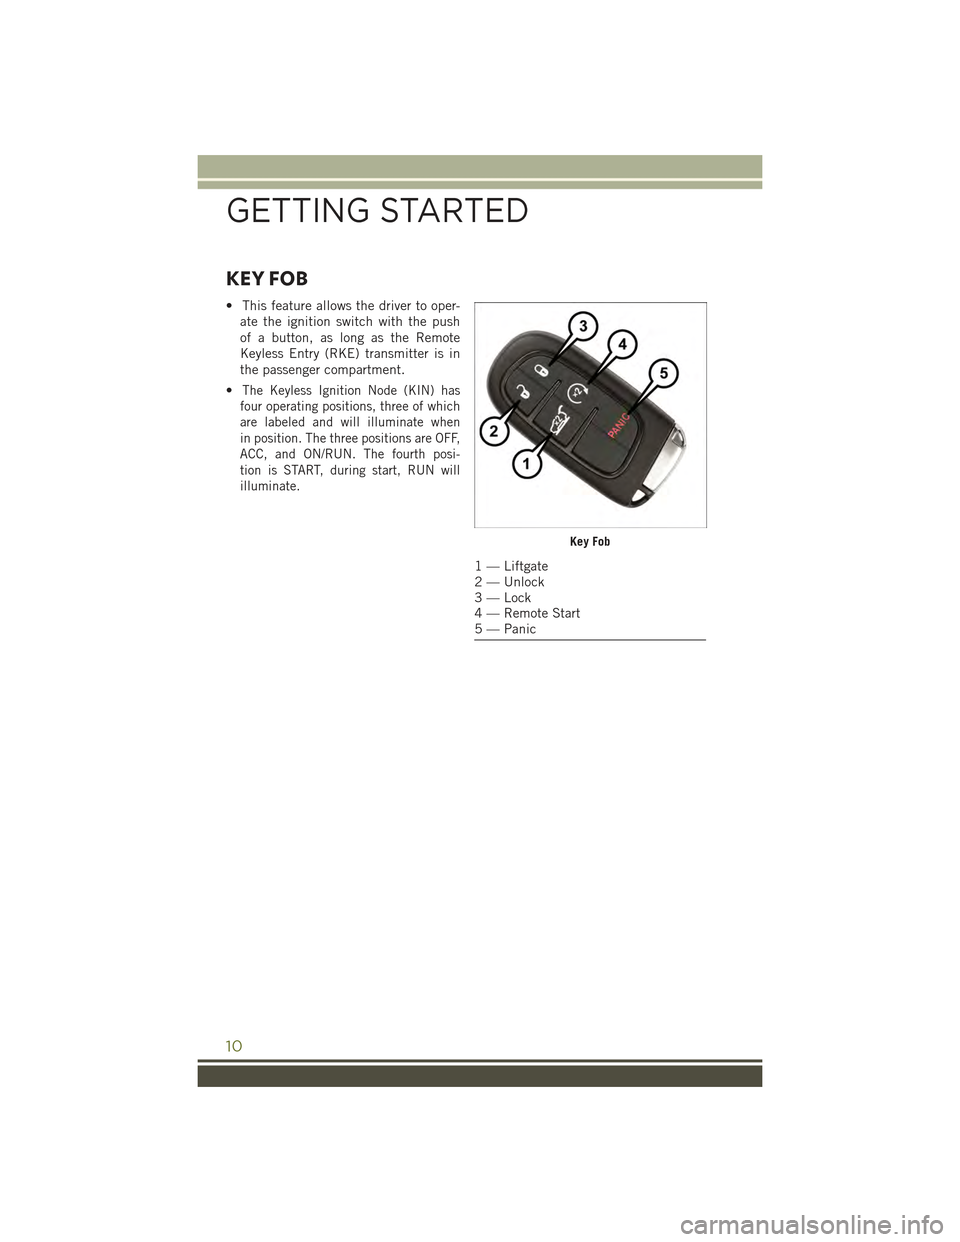
KEY FOB
• This feature allows the driver to oper-
ate the ignition switch with the push
of a button, as long as the Remote
Keyless Entry (RKE) transmitter is in
the passenger compartment.
•The Keyless Ignition Node (KIN) has
four operating positions, three of which
are labeled and will illuminate when
in position. The three positions are OFF,
ACC, and ON/RUN. The fourth posi-
tion is START, during start, RUN will
illuminate.
Key Fob
1 — Liftgate2 — Unlock3 — Lock4 — Remote Start5 — Panic
GETTING STARTED
10
Page 13 of 244
NOTE:
In case the ignition switch does not change with the push of a button, the RKE
transmitter (Key Fob) may have a low or dead battery. In this situation a back up
method can be used to operate the ignition switch. Put the nose side (side opposite
of the emergency key) of the Key Fob against the ENGINE START/STOP button and
push to operate the ignition switch.
• The Ignition Node Module (IGNM) op-
erates similar to an ignition switch. It
has four operating positions, three with
detents and one that is spring-loaded.
The detent positions are OFF, ACC, and
ON/RUN. The START position is a
spring-loaded momentary contact po-
sition. When released from the START
position, the switch automatically re-
turns to the ON/RUN position.
Locking And Unlocking The Doors/Liftgate
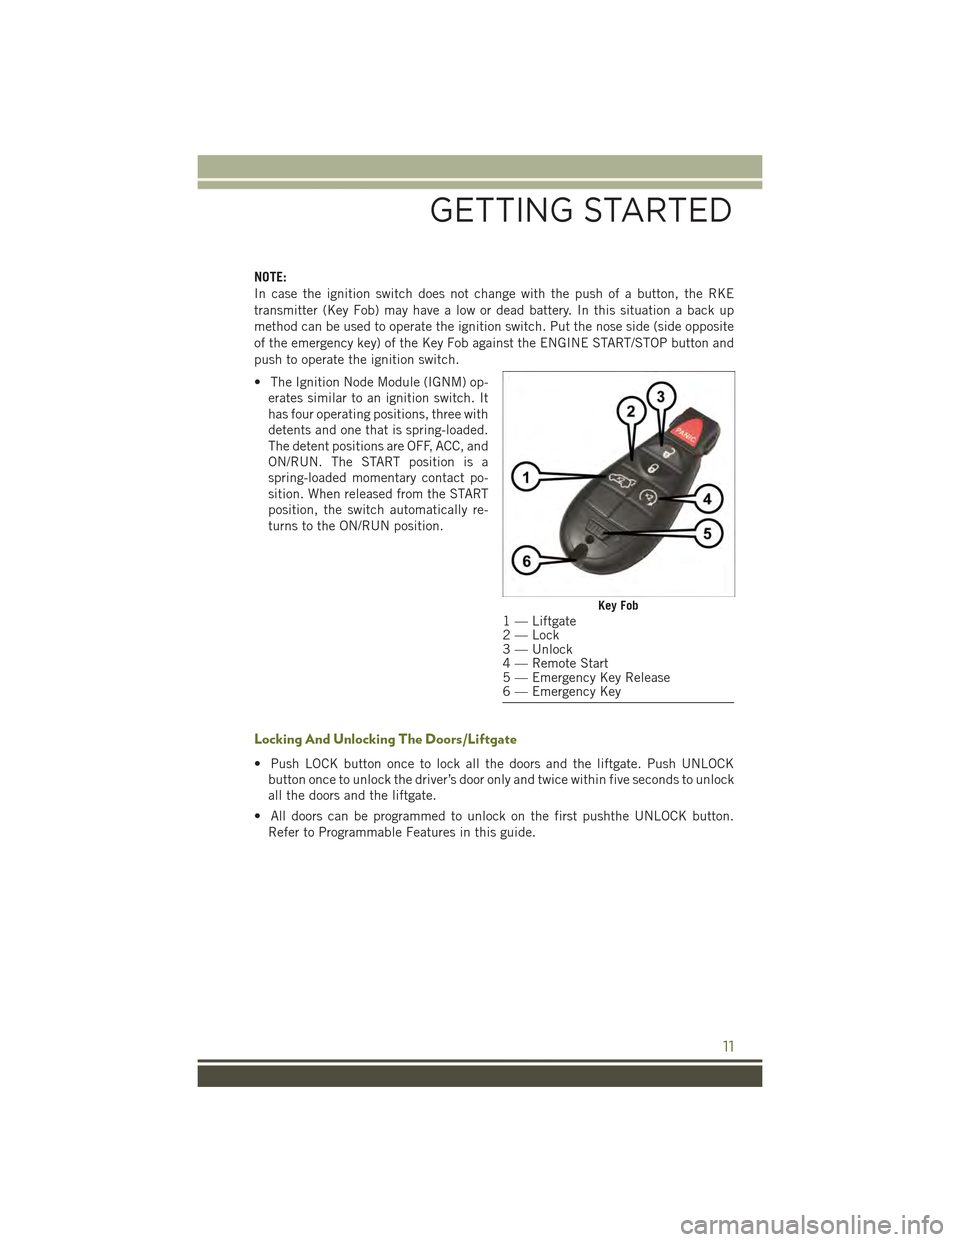
• Push LOCK button once to lock all the doors and the liftgate. Push UNLOCK
button once to unlock the driver’s door only and twice within five seconds to unlock
all the doors and the liftgate.
• All doors can be programmed to unlock on the first pushthe UNLOCK button.
Refer to Programmable Features in this guide.
Key Fob1 — Liftgate2 — Lock3 — Unlock4 — Remote Start5 — Emergency Key Release6 — Emergency Key
GETTING STARTED
11
Page 14 of 244
Panic Alarm
• Push PANIC button once to turn the panic alarm on.
• Wait approximately three seconds and push button a second time to turn the panic
alarm off.
WARNING!
• When leaving the vehicle, always remove the Key Fob from the ignition and lock
your vehicle.
• Never leave children alone in a vehicle, or with access to an unlocked vehicle.
Allowing children to be in a vehicle unattended is dangerous for a number of
reasons. A child or others could be seriously or fatally injured. Children should
be warned not to touch the parking brake, brake pedal or the transmission gear
selector.
• Do not leave the Key Fob in or near the vehicle (or in a location accessible to
children), and do not leave the ignition of a vehicle equipped with Keyless
Enter-N-Go™ in the ACC or ON/RUN mode. A child could operate power
windows, other controls, or move the vehicle.
REMOTE START
• Push REMOTE START buttonx2on the Key Fob twice within five seconds.
Pushing the REMOTE START button a third time shuts the engine off.
• To drive the vehicle, push UNLOCK button, insert the key in the ignition and turn
to the ON/RUN position.
• With remote start, the engine will only run for 15 minutes (timeout) unless the
ignition key is placed in the ON/RUN position.
• The vehicle must be started with the key after two consecutive timeouts.
WARNING!
• Do not start or run an engine in a closed garage or confined area. Exhaust gas
contains Carbon Monoxide (CO) which is odorless and colorless. Carbon
Monoxide is poisonous and can cause serious injury or death when inhaled.
• Keep Key Fob transmitters away from children. Operation of the Remote Start
System, windows, door locks or other controls could cause serious injury or
death.
Remote Start Windshield Wiper De–icer Activation — If Equipped
When Remote Start is active and the outside ambient temperature is less than 40° F
(4.4° C), the wiper De-Icer will be enabled. On exiting remote start resume previous
operation except, if the De-Icer is active, the De-Icer timer and operation will continue.
GETTING STARTED
12
Page 15 of 244
VEHICLE SECURITY ALARM
The Vehicle Security Alarm monitors the vehicle doors for unauthorized entry and the
Keyless Enter-N-Go™ START/STOP button for unauthorized operation. While the
Vehicle Security Alarm is armed, interior switches for door locks and decklid release
are disabled. If something triggers the alarm, the Vehicle Security Alarm will provide
the following audible and visible signals: the horn will pulse, the park lamps and/or
turn signals will flash, and the Vehicle Security Light in the instrument cluster will
flash.
To A r m :
• Lock the door using either the power door lock switch (one door must be open) or
the LOCK button on the Remote Keyless Entry (RKE) transmitter (doors can be
open or closed), and close all doors.
The Vehicle Security Light in the instrument cluster will flash for 16 seconds. This
shows that the Vehicle Security Alarm is arming. During this period, if a door is
opened, the ignition is cycled to ON/RUN, or the power door locks are unlocked in any
manner, the Vehicle Security Alarm will automatically disarm.
NOTE:
• The Vehicle Security Alarm will not arm if you lock the doors with the manual door
lock plungers.
• Once armed, the Vehicle Security Alarm disables the unlock switch on the driver
door trim panel and passenger door trim panel.
To D i s a r m T h e S y s t e m :
• Push the Key Fob UNLOCK button or cycle the ignition to the ON/RUN position.
The Vehicle Security Alarm is designed to protect your vehicle; however, you can
create conditions where the Vehicle Security Alarm will give you a false alarm. If one
of the previously described arming sequences has occurred, the Vehicle Security
Alarm will arm regardless of whether you are in the vehicle or not. If you remain in the
vehicle and open a door, the alarm will sound. If this occurs, disarm the Vehicle
Security Alarm.
If the Vehicle Security Alarm is armed and the battery becomes disconnected the
Vehicle Security Alarm will remain armed when the battery is reconnected. The
exterior lights will flash, and the horn will sound. If this occurs, disarm the Vehicle
Security Alarm.
KEYLESS ENTER-N-GO™
The Keyless Enter-N-Go™ system is an enhancement to the vehicle’s Remote
Keyless Entry (RKE) feature. This feature allows you to lock and unlock the vehicle's
door(s) and liftgate without having to push the Key Fob lock or unlock buttons, as well
as starting and stopping the vehicle with the push of a button.
GETTING STARTED
13
Page 16 of 244
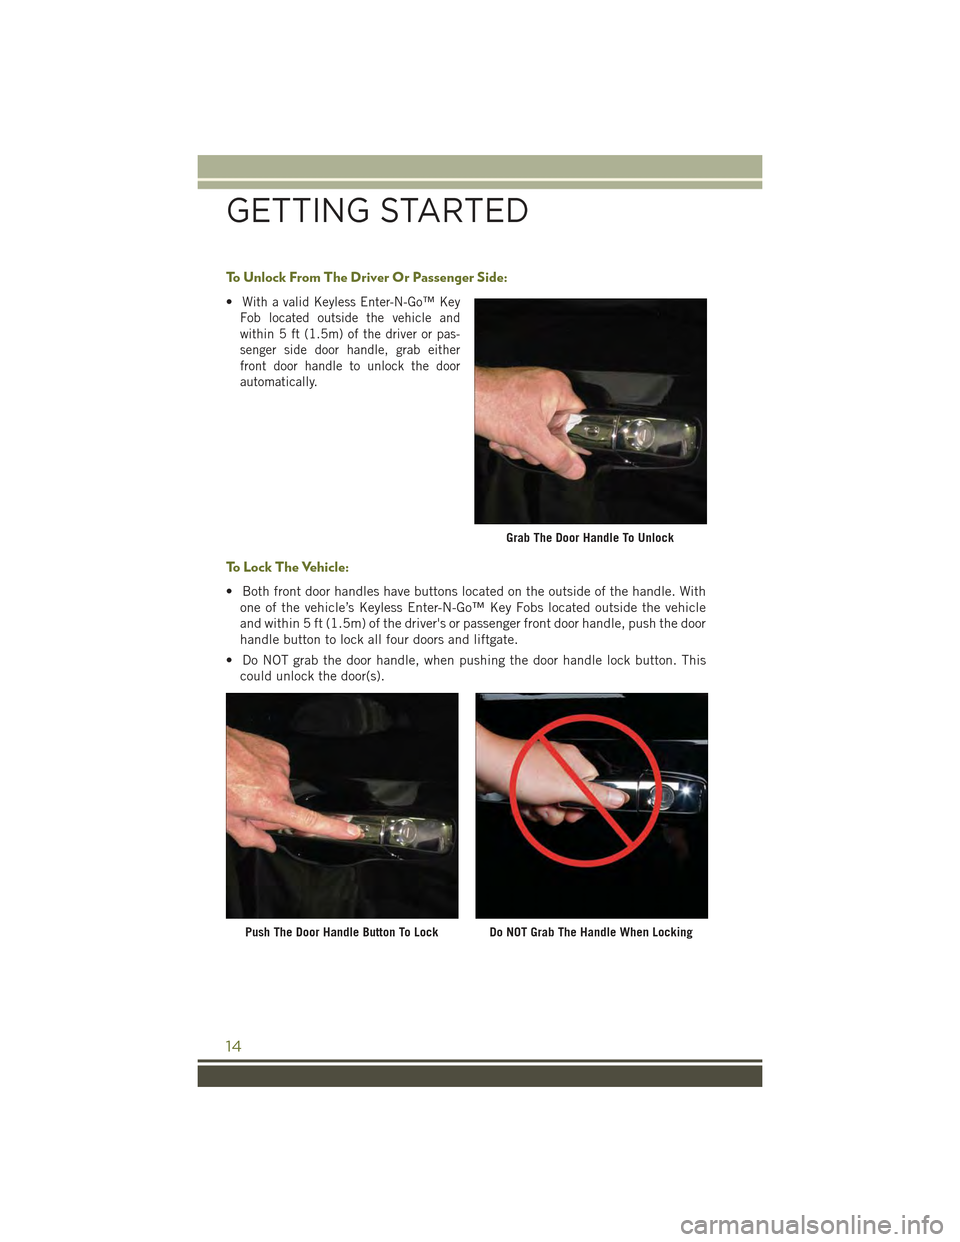
To U n l o c k F r o m T h e D r i v e r O r P a s s e n g e r S i d e :
•With a valid Keyless Enter-N-Go™ Key
Fob located outside the vehicle and
within 5 ft (1.5m) of the driver or pas-
senger side door handle, grab either
front door handle to unlock the door
automatically.
To Lock The Vehicle:
• Both front door handles have buttons located on the outside of the handle. With
one of the vehicle’s Keyless Enter-N-Go™ Key Fobs located outside the vehicle
and within 5 ft (1.5m) of the driver's or passenger front door handle, push the door
handle button to lock all four doors and liftgate.
• Do NOT grab the door handle, when pushing the door handle lock button. This
could unlock the door(s).
Grab The Door Handle To Unlock
Push The Door Handle Button To LockDo NOT Grab The Handle When Locking
GETTING STARTED
14
Page 17 of 244
NOTE:
• If “Unlock All Doors 1st Press” is programmed all doors will unlock when you grab
hold of the front driver's door handle. To select between “Unlock Driver Door 1st
Press” and “Unlock All Doors 1st Press”, refer to the “Uconnect®Settings” in your
vehicle’s Owner's Manual on the DVD or “Programmable Features” in this guide for
further information.
• If “Unlock All Doors 1st Press” is programmed all doors and liftgate will unlock
when you push the liftgate button. If “Unlock Driver Door 1st Press” is pro-
grammed only the liftgate will unlock when you push the liftgate button. To select
between “Unlock Driver Door 1st Press” and “Unlock All Doors 1st Press”, refer to
the “Uconnect®Settings” in your vehicle's Owner's Manual on the DVD or
“Programmable Features” in this guide for further information.
• If a Key Fob is detected in the vehicle when locking the vehicle using the power
door lock switch, the doors and liftgate will unlock and the horn will chirp three
times. On the third attempt, your Key Fob can be locked inside the vehicle.
• After pushing the Keyless Enter-N-Go™ LOCK button, you must wait two seconds
before you can lock or unlock the vehicle using the door handle. This is done to
allow you to check if the vehicle is locked by pulling the door handle, without the
vehicle reacting and unlocking.
Lock Or Unlock The Liftgate
• To Lock The Liftgate — With a valid Passive Entry RKE transmitter within 5 ft
(1.5 m) of the liftgate, push passive entry lock button located to the right of
electronic liftgate handle.
• To Unlock/Enter The Liftgate — The liftgate passive entry unlock feature is built
into the electronic liftgate handle. With a valid passive entry RKE transmitter
within 5 ft (1.5 m) of the liftgate, push electronic release switch to open the
liftgate.
NOTE:
Refer to your Owner's Manual on the DVD for further information.
GETTING STARTED
15
Page 18 of 244
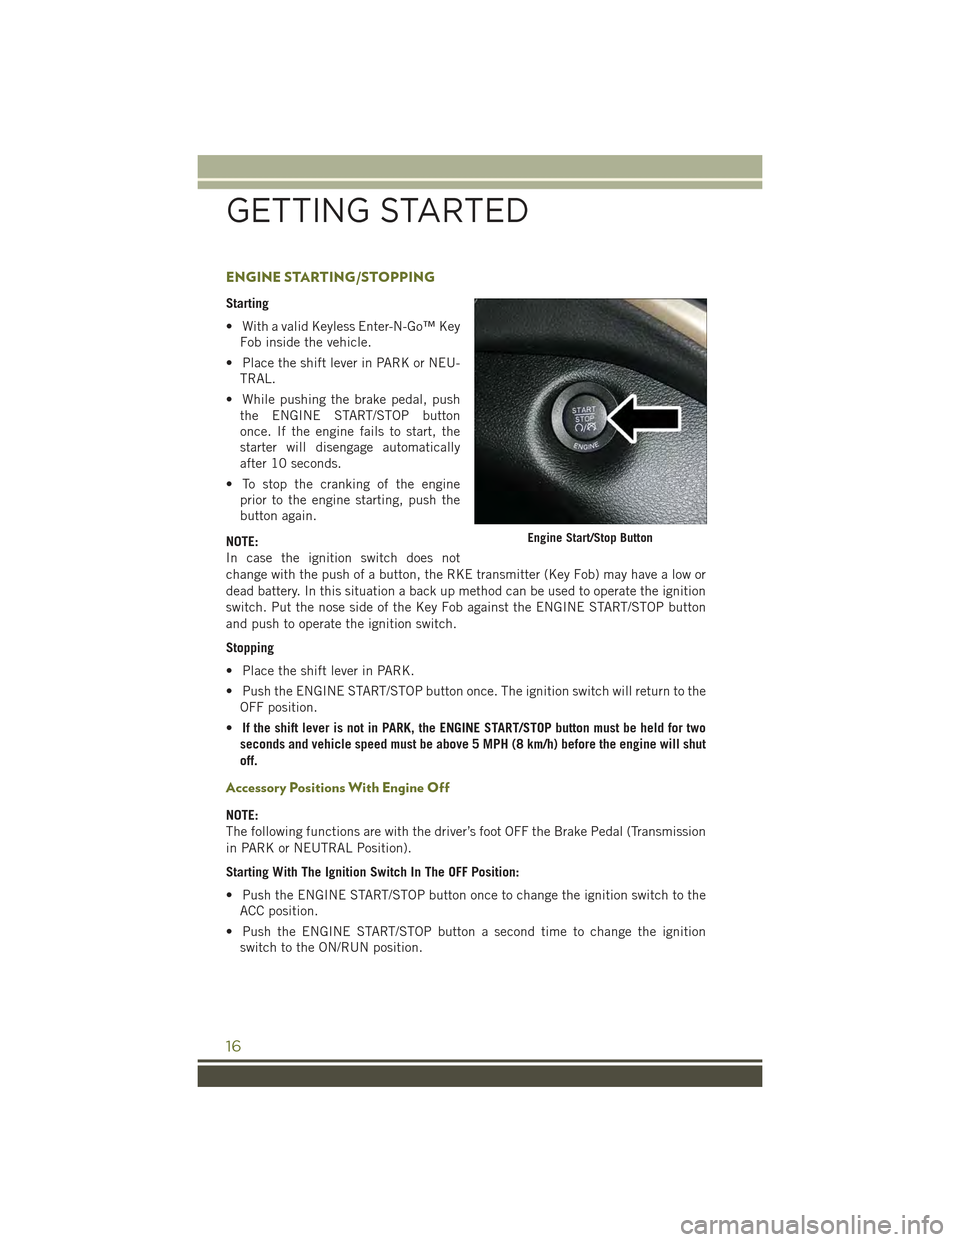
ENGINE STARTING/STOPPING
Starting
• With a valid Keyless Enter-N-Go™ Key
Fob inside the vehicle.
• Place the shift lever in PARK or NEU-
TRAL.
• While pushing the brake pedal, push
the ENGINE START/STOP button
once. If the engine fails to start, the
starter will disengage automatically
after 10 seconds.
• To stop the cranking of the engine
prior to the engine starting, push the
button again.
NOTE:
In case the ignition switch does not
change with the push of a button, the RKE transmitter (Key Fob) may have a low or
dead battery. In this situation a back up method can be used to operate the ignition
switch. Put the nose side of the Key Fob against the ENGINE START/STOP button
and push to operate the ignition switch.
Stopping
• Place the shift lever in PARK.
• Push the ENGINE START/STOP button once. The ignition switch will return to the
OFF position.
•If the shift lever is not in PARK, the ENGINE START/STOP button must be held for two
seconds and vehicle speed must be above 5 MPH (8 km/h) before the engine will shut
off.
Accessory Positions With Engine Off
NOTE:
The following functions are with the driver’s foot OFF the Brake Pedal (Transmission
in PARK or NEUTRAL Position).
Starting With The Ignition Switch In The OFF Position:
• Push the ENGINE START/STOP button once to change the ignition switch to the
ACC position.
• Push the ENGINE START/STOP button a second time to change the ignition
switch to the ON/RUN position.
Engine Start/Stop Button
GETTING STARTED
16
Page 19 of 244
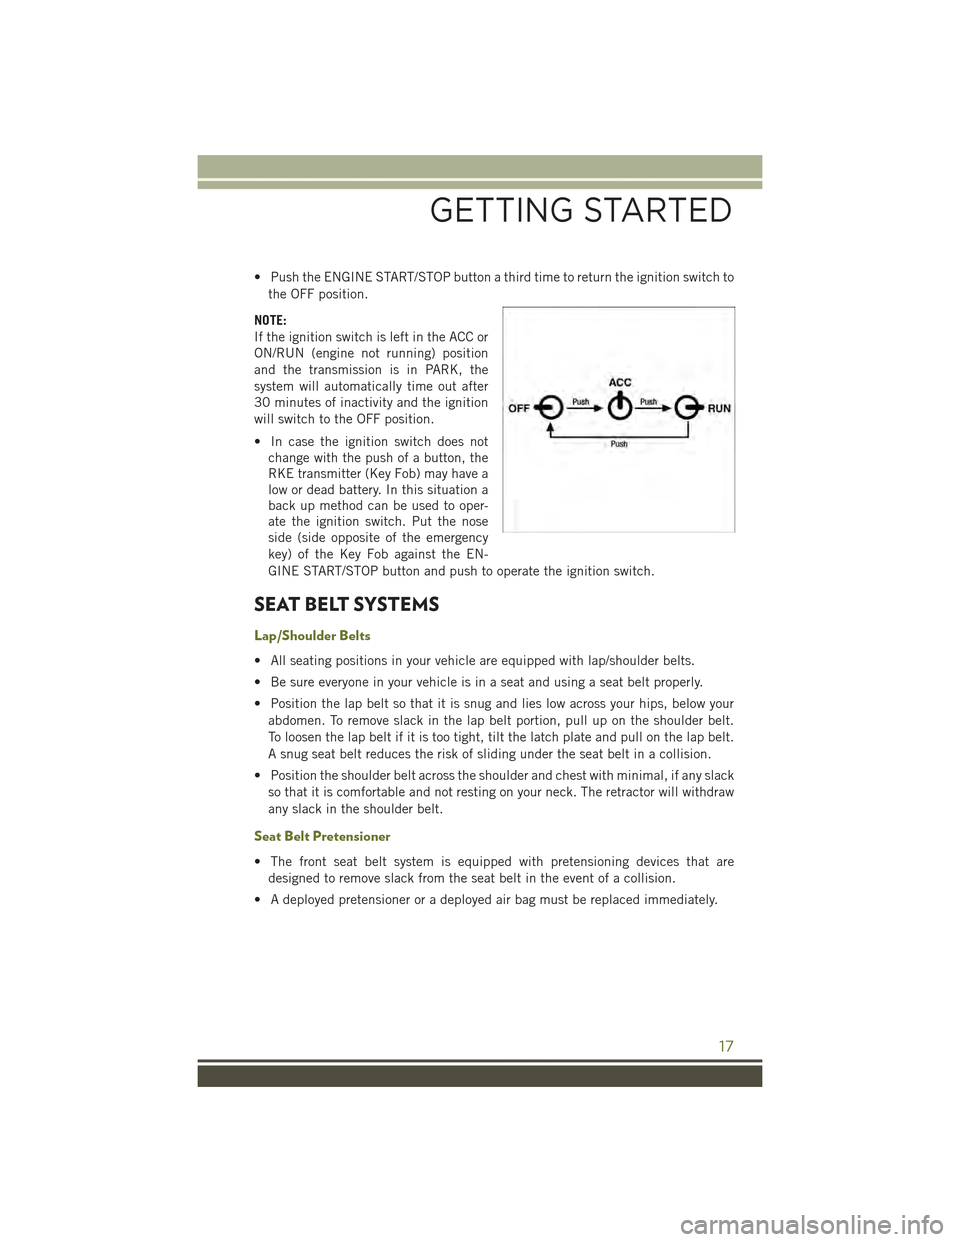
• Push the ENGINE START/STOP button a third time to return the ignition switch to
the OFF position.
NOTE:
If the ignition switch is left in the ACC or
ON/RUN (engine not running) position
and the transmission is in PARK, the
system will automatically time out after
30 minutes of inactivity and the ignition
will switch to the OFF position.
• In case the ignition switch does not
change with the push of a button, the
RKE transmitter (Key Fob) may have a
low or dead battery. In this situation a
back up method can be used to oper-
ate the ignition switch. Put the nose
side (side opposite of the emergency
key) of the Key Fob against the EN-
GINE START/STOP button and push to operate the ignition switch.
SEAT BELT SYSTEMS
Lap/Shoulder Belts
• All seating positions in your vehicle are equipped with lap/shoulder belts.
• Be sure everyone in your vehicle is in a seat and using a seat belt properly.
• Position the lap belt so that it is snug and lies low across your hips, below your
abdomen. To remove slack in the lap belt portion, pull up on the shoulder belt.
To loosen the lap belt if it is too tight, tilt the latch plate and pull on the lap belt.
A snug seat belt reduces the risk of sliding under the seat belt in a collision.
• Position the shoulder belt across the shoulder and chest with minimal, if any slack
so that it is comfortable and not resting on your neck. The retractor will withdraw
any slack in the shoulder belt.
Seat Belt Pretensioner
• The front seat belt system is equipped with pretensioning devices that are
designed to remove slack from the seat belt in the event of a collision.
• A deployed pretensioner or a deployed air bag must be replaced immediately.
GETTING STARTED
17
Page 20 of 244
SUPPLEMENTAL RESTRAINT SYSTEM (SRS) —
AIR BAGS
Air Bag System Components
Your vehicle may be equipped with the following air bag system components:
• Occupant Restraint Controller (ORC)
• Air Bag Warning Light
• Steering Wheel and Column
• Instrument Panel
• Knee Impact Bolsters
• Advanced Front Air Bags
• Supplemental Side Air Bags
• Supplemental Knee Air Bags
• Front and Side Impact Sensors
• Seat Belt Pretenioners
• Seat Belt Buckle Switch
• Seat Track Position Sensors
• Occupant Classification System
Advanced Front Air Bags
• This vehicle has Advanced Front Air Bags for both the driver and front passenger
as a supplement to the seat belt restraint systems. The Advanced Front Air Bags
will not deploy in every type of collision.
• Advanced Front Air Bags are designed to provide additional protection by
supplementing the seat belts. Advanced Front Air Bags are not expected to reduce
the risk of injury in rear, side, or rollover collisions.
• The Advanced Front Air Bags will not deploy in all frontal collisions, including
some that may produce substantial vehicle damage — for example, some pole
collisions, truck underrides, and angle offset collisions.
• On the other hand, depending on the type and location of impact, Advanced Front
Air Bags may deploy in crashes with little vehicle front-end damage but that
produce a severe initial deceleration.
• Because air bag sensors measure vehicle deceleration over time, vehicle speed
and damage by themselves are not good indicators of whether or not an air bag
should have deployed.
• Seat belts are necessary for your protection in all collisions, and also are needed
to help keep you in position, away from an inflating air bag.
GETTING STARTED
18