display JEEP CHEROKEE 2015 KL / 5.G Owner's Manual
[x] Cancel search | Manufacturer: JEEP, Model Year: 2015, Model line: CHEROKEE, Model: JEEP CHEROKEE 2015 KL / 5.GPages: 244, PDF Size: 30.6 MB
Page 63 of 244
PARKSENSE®
ParkSense® Front And Rear Park Assist
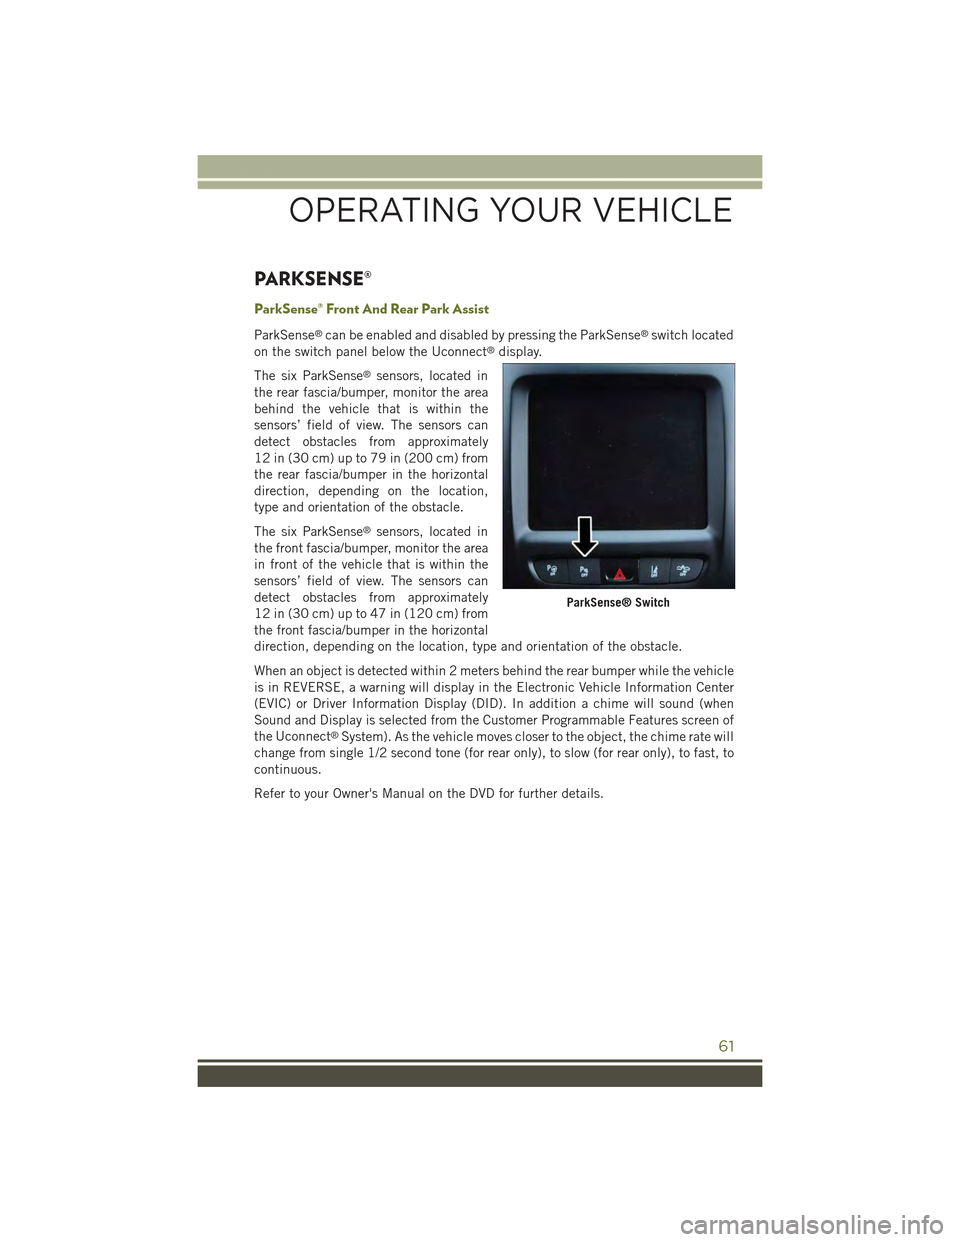
ParkSense®can be enabled and disabled by pressing the ParkSense®switch located
on the switch panel below the Uconnect®display.
The six ParkSense®sensors, located in
the rear fascia/bumper, monitor the area
behind the vehicle that is within the
sensors’ field of view. The sensors can
detect obstacles from approximately
12 in (30 cm) up to 79 in (200 cm) from
the rear fascia/bumper in the horizontal
direction, depending on the location,
type and orientation of the obstacle.
The six ParkSense®sensors, located in
the front fascia/bumper, monitor the area
in front of the vehicle that is within the
sensors’ field of view. The sensors can
detect obstacles from approximately
12 in (30 cm) up to 47 in (120 cm) from
the front fascia/bumper in the horizontal
direction, depending on the location, type and orientation of the obstacle.
When an object is detected within 2 meters behind the rear bumper while the vehicle
is in REVERSE, a warning will display in the Electronic Vehicle Information Center
(EVIC) or Driver Information Display (DID). In addition a chime will sound (when
Sound and Display is selected from the Customer Programmable Features screen of
the Uconnect®System). As the vehicle moves closer to the object, the chime rate will
change from single 1/2 second tone (for rear only), to slow (for rear only), to fast, to
continuous.
Refer to your Owner's Manual on the DVD for further details.
ParkSense® Switch
OPERATING YOUR VEHICLE
61
Page 64 of 244
ParkSense® Active Park Assist
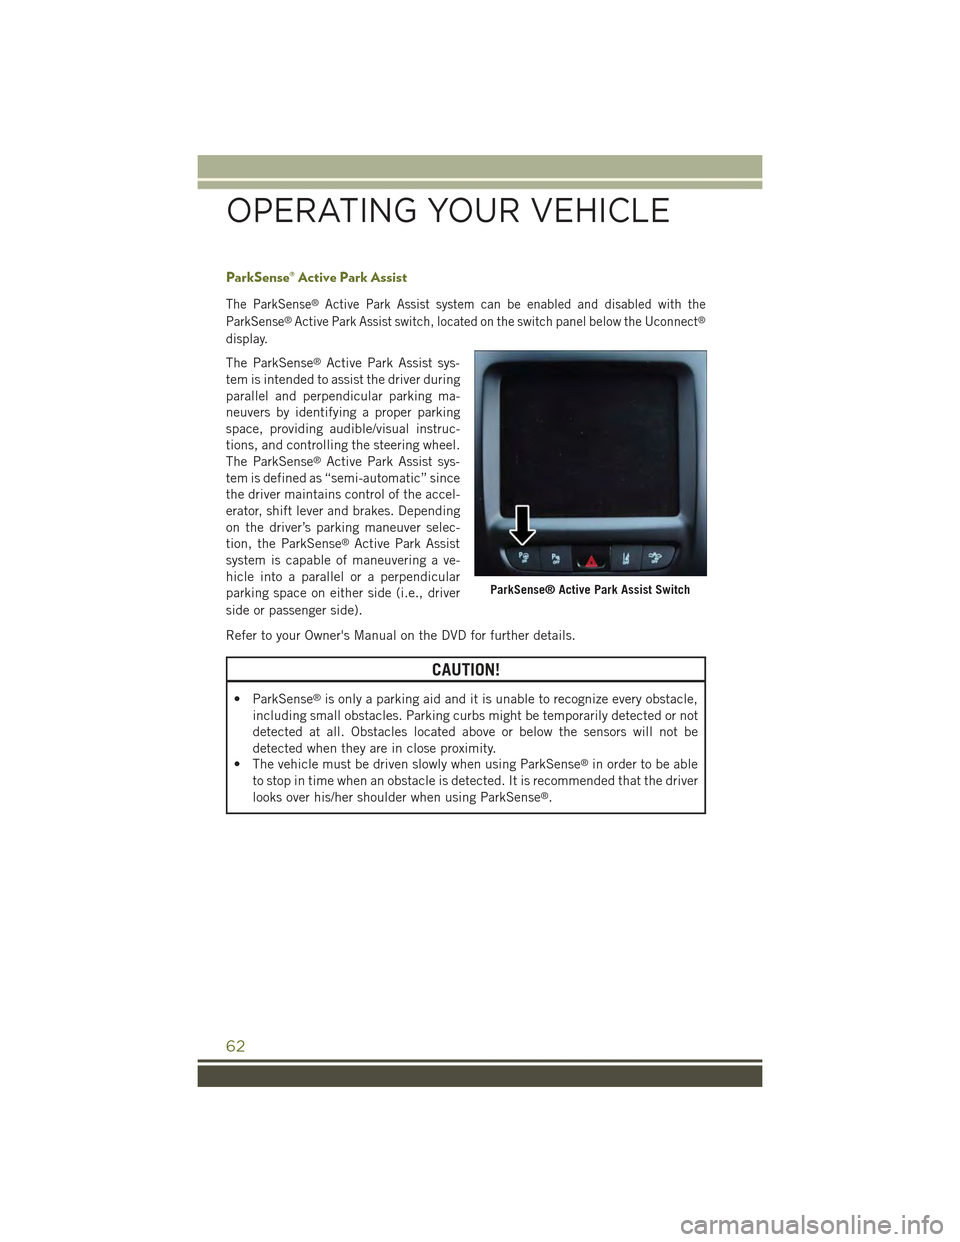
The ParkSense®Active Park Assist system can be enabled and disabled with the
ParkSense®Active Park Assist switch, located on the switch panel below the Uconnect®
display.
The ParkSense®Active Park Assist sys-
tem is intended to assist the driver during
parallel and perpendicular parking ma-
neuvers by identifying a proper parking
space, providing audible/visual instruc-
tions, and controlling the steering wheel.
The ParkSense®Active Park Assist sys-
tem is defined as “semi-automatic” since
the driver maintains control of the accel-
erator, shift lever and brakes. Depending
on the driver’s parking maneuver selec-
tion, the ParkSense®Active Park Assist
system is capable of maneuvering a ve-
hicle into a parallel or a perpendicular
parking space on either side (i.e., driver
side or passenger side).
Refer to your Owner's Manual on the DVD for further details.
CAUTION!
• ParkSense®is only a parking aid and it is unable to recognize every obstacle,
including small obstacles. Parking curbs might be temporarily detected or not
detected at all. Obstacles located above or below the sensors will not be
detected when they are in close proximity.
• The vehicle must be driven slowly when using ParkSense®in order to be able
to stop in time when an obstacle is detected. It is recommended that the driver
looks over his/her shoulder when using ParkSense®.
ParkSense® Active Park Assist Switch
OPERATING YOUR VEHICLE
62
Page 65 of 244
WARNING!
• Drivers must be careful when backing up even when using ParkSense®. Always
check carefully behind your vehicle, look behind you, and be sure to check for
pedestrians, animals, other vehicles, obstructions, and blind spots before
backing up. You are responsible for safety and must continue to pay attention
to your surroundings. Failure to do so can result in serious injury or death.
• Before using ParkSense®, it is strongly recommended that the ball mount and
hitch ball assembly is disconnected from the vehicle when the vehicle is not
used for towing. Failure to do so can result in injury or damage to vehicles or
obstacles because the hitch ball will be much closer to the obstacle than the
rear fascia when the loudspeaker sounds the continuous tone. Also, the sensors
could detect the ball mount and hitch ball assembly, depending on its size and
shape, giving a false indication that an obstacle is behind the vehicle.
PARKVIEW® REAR BACK-UP CAMERA
You can see an on-screen image of the rear of your vehicle whenever the shift lever is
put into REVERSE. The ParkView®Rear Back-Up Camera image will be displayed on
the radio display screen, located on the center stack of the instrument panel.
If the radio display screen appears foggy, clean the camera lens located on the rear
of the vehicle above the rear license plate.
Refer to your Owner's Manual on the DVD for further details.
WARNING!
Drivers must be careful when backing up; even when using the ParkView®Rear
Back-Up Camera. Always check carefully behind your vehicle, and be sure to
check for pedestrians, animals, other vehicles, obstructions, or blind spots before
backing up. You must continue to pay attention while backing up. Failure to do so
can result in serious injury or death.
OPERATING YOUR VEHICLE
63
Page 72 of 244
IDENTIFYING YOUR RADIO
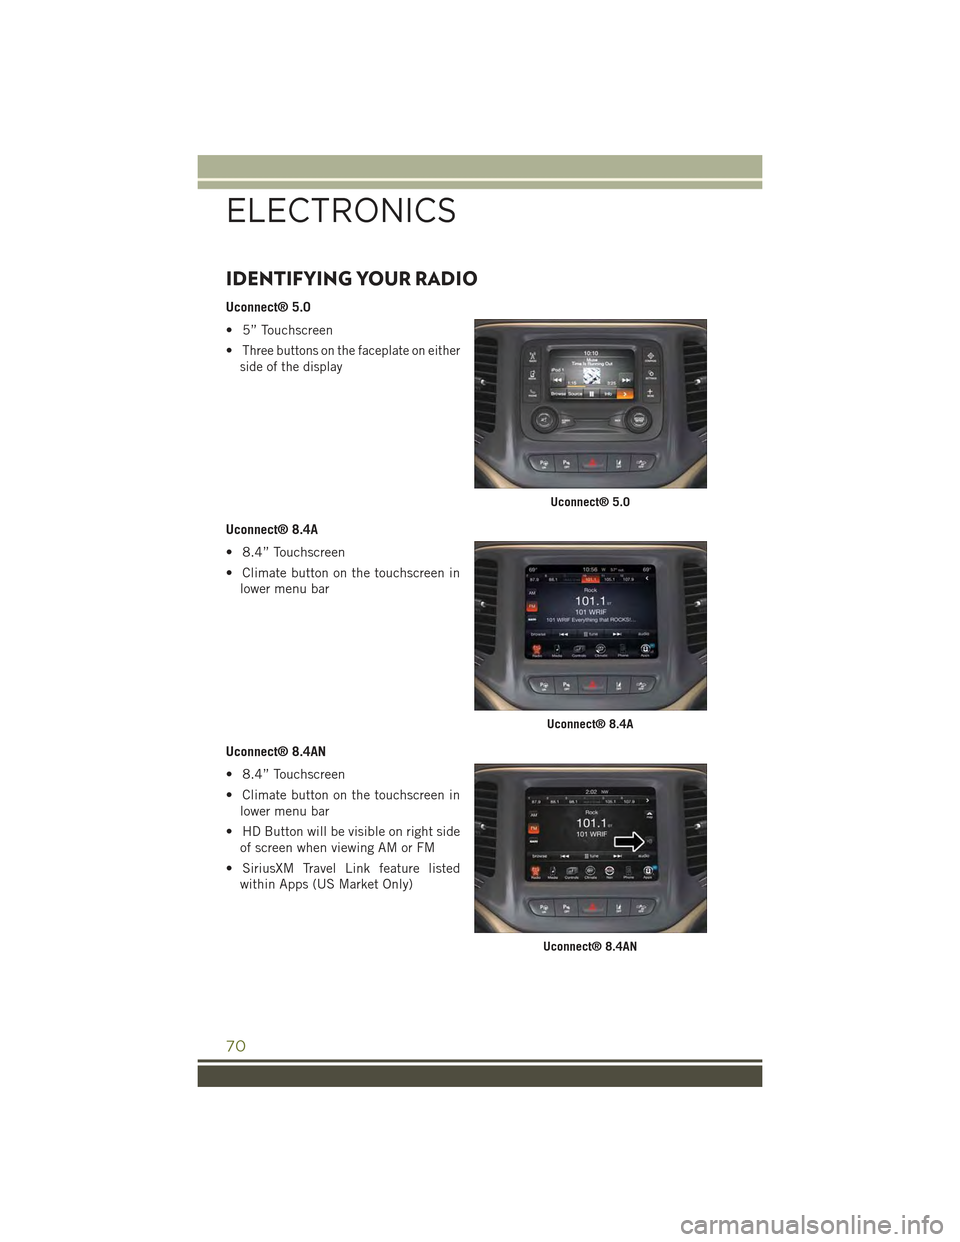
Uconnect® 5.0
• 5” Touchscreen
•Three buttons on the faceplate on either
side of the display
Uconnect® 8.4A
• 8.4” Touchscreen
• Climate button on the touchscreen in
lower menu bar
Uconnect® 8.4AN
• 8.4” Touchscreen
• Climate button on the touchscreen in
lower menu bar
• HD Button will be visible on right side
of screen when viewing AM or FM
• SiriusXM Travel Link feature listed
within Apps (US Market Only)
Uconnect® 5.0
Uconnect® 8.4A
Uconnect® 8.4AN
ELECTRONICS
70
Page 74 of 244
Features And Packages
• After the trial period, you can subscribe to continue your service by visit-
ing the Uconnect®Store located within the Mopar Owner Connect website
(moparownerconnect.com). If you need assistance, U.S. residents can call
Uconnect®Care at 855-792-4241.
• For the latest information on packages and pricing information: U.S. residents
visit DriveUconnect.com. Canadian residents visit DriveUconnect.ca.
Uconnect® Access Registration (Uconnect® 8.4A And 8.4AN Only,
U.S. 48 Contiguous States, Alaska And Hawaii)
To unlock the full potential of Uconnect®Access in your vehicle, you first need to
register with Uconnect®Access.
1. From the parked vehicle with the radio touchscreen powered on, select the
“Apps” button located near the bottom right-hand corner of the radio touch-
screen.
NOTE:
Should you require assistance anytime during the registration process, simply call
Uconnect®Care at 1-855-792-4241.
2. Press “Start” on the reminder screen or select “Uconnect Registration” under the
“All Apps” or “Favorites Apps” tab on the Apps list.
3. The Uconnect®Access Registration App will open and display step-by-step
instructions to start your registration.
4. Enter your email address into the radio touchscreen.
5. A message will display on the touchscreen indicating your email submission was
accepted. In a few minutes, you will receive an email which will allow you to
register your vehicle for Uconnect®Access. You should open this email and begin
your Uconnect®Access registration within 72 hours.
6. Check for an email from Uconnect®Access that contains your personalized
registration link. If you don't see it, check your spam or junk mail folder. Open the
email and click on the link to continue registering.
NOTE:
For security reasons, this link is valid for 72 hours from the time you’ve submitted
your email address into the radio touchscreen. If the link has expired, simply re-enter
your email address into the Uconnect®Registration App on the radio touchscreen
to receive another link. The secured registration link will take you through the
Uconnect®Access registration process step by step.
ELECTRONICS
72
Page 76 of 244
Aha™ by HARMAN (www.aharadio.com)
• Enter your email address and password for Aha™, or create a new Aha™ account.
• You can link your Facebook, Twitter or Slacker accounts on the Aha™ website.
iHeartRadio (www.iHeartRadio.com)
• Enter your email address and password for iHeartRadio, or create a new iHeart-
Radio account.
• Select “Activate” to continue,
• Select “Close” to complete activation.
Pandora® (www.pandora.com)
• Enter your Pandora®username/email address and password, then click “Save.”
• Create a new Pandora®account.
Slacker Radio (www.slacker.com)
• Enter your Slacker username/email address and password, then click “Save.”
• Create a new Slacker Radio account.
Invite family and friends to use the Via Mobile Apps in your vehicle by setting up their
own Via Mobile profile.
Purchasing Apps And Wifi (Uconnect® 8.4A And 8.4AN Only,
U.S. 48 Contiguous States, Alaska And Hawaii)
Packages and WiFi can be purchased from the Uconnect®Store within your vehicle,
and online at Mopar Owner Connect. You must first register and set up a Uconnect®
Access Payment account.
Purchasing Packages And WiFi From Your Vehicle
1. With the vehicle parked and the radio powered on, press the “Apps” button on the
touchscreen.
2. To launch the Uconnect®Store, press "All Apps" or “Favorite Apps” and then
press “Uconnect®Store."
3. From the Uconnect®Store, select the WiFi Hotspot service you wish to purchase
or renew your subscription.
4. This will launch the selected App into purchase mode along with providing
additional information. The purchase process begins when you press the “Buy”
button on the touchscreen.
5. The Uconnect®Store will display a “Purchase Overview” message confirming the
financial details for the App you are about to purchase. Press the “Purchase” key
to continue.
ELECTRONICS
74
Page 81 of 244
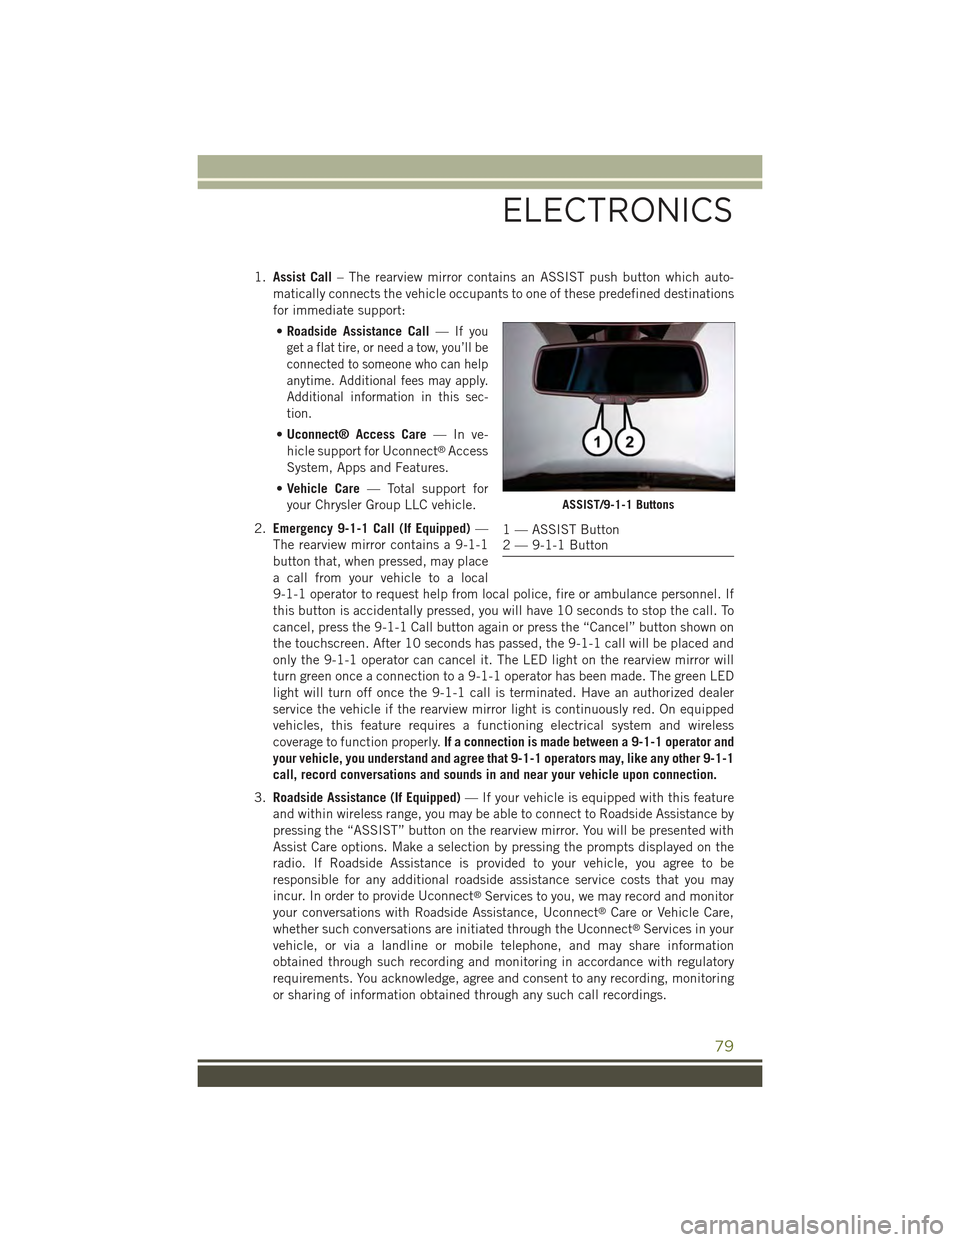
1.Assist Call– The rearview mirror contains an ASSIST push button which auto-
matically connects the vehicle occupants to one of these predefined destinations
for immediate support:
•Roadside Assistance Call—If you
get a flat tire, or need a tow, you’ll be
connected to someone who can help
anytime. Additional fees may apply.
Additional information in this sec-
tion.
•Uconnect® Access Care—Inve-
hicle support for Uconnect®Access
System, Apps and Features.
•Vehicle Care— Total support for
your Chrysler Group LLC vehicle.
2.Emergency 9-1-1 Call (If Equipped)—
The rearview mirror contains a 9-1-1
button that, when pressed, may place
a call from your vehicle to a local
9-1-1 operator to request help from local police, fire or ambulance personnel. If
this button is accidentally pressed, you will have 10 seconds to stop the call. To
cancel, press the 9-1-1 Call button again or press the “Cancel” button shown on
the touchscreen. After 10 seconds has passed, the 9-1-1 call will be placed and
only the 9-1-1 operator can cancel it. The LED light on the rearview mirror will
turn green once a connection to a 9-1-1 operator has been made. The green LED
light will turn off once the 9-1-1 call is terminated. Have an authorized dealer
service the vehicle if the rearview mirror light is continuously red. On equipped
vehicles, this feature requires a functioning electrical system and wireless
coverage to function properly.If a connection is made between a 9-1-1 operator and
your vehicle, you understand and agree that 9-1-1 operators may, like any other 9-1-1
call, record conversations and sounds in and near your vehicle upon connection.
3.Roadside Assistance (If Equipped)— If your vehicle is equipped with this feature
and within wireless range, you may be able to connect to Roadside Assistance by
pressing the “ASSIST” button on the rearview mirror. You will be presented with
Assist Care options. Make a selection by pressing the prompts displayed on the
radio. If Roadside Assistance is provided to your vehicle, you agree to be
responsible for any additional roadside assistance service costs that you may
incur. In order to provide Uconnect®Services to you, we may record and monitor
your conversations with Roadside Assistance, Uconnect®Care or Vehicle Care,
whether such conversations are initiated through the Uconnect®Services in your
vehicle, or via a landline or mobile telephone, and may share information
obtained through such recording and monitoring in accordance with regulatory
requirements. You acknowledge, agree and consent to any recording, monitoring
or sharing of information obtained through any such call recordings.
ASSIST/9-1-1 Buttons
1 — ASSIST Button2 — 9-1-1 Button
ELECTRONICS
79
Page 89 of 244
Via Mobile apps can also be launched through Voice Recognition by pressing the
VR button on the steering wheel and stating “launch” and then the name of the app.
For example, you can say “launch Aha Via Mobile.”
NOTE:
For detailed information on how to use Via Mobile apps visit the Mopar Owner
Connect website (moparownerconnect.com) and login using the username and
password you set up when registering for Uconnect®Access.
A message will be displayed to remind you that Via Mobile apps utilize the data plan
on your connected smartphone to provide content. Many smartphones have a limit to
how much data they can utilize before incurring additional charges. The amount of
data being used varies by smartphone device, cellular service provider and specific
app. Check your mobile phone service plan for more details.* Press “OK” to continue
or the “X” to exit.
(*Additional smartphone data usage charges may apply.)
Via Mobile Apps — If Equipped
•Aha™ by HARMAN— Aha™ by HARMAN makes it easy to instantly access your
favorite Web content on the go. Choose from over 40,000+ stations spanning
internet radio, personalized music, news, entertainment, hotels, weather, audio-
books, Facebook®, Twitter®, and more.
•iHeartRadio— iHeartRadio provides instant access to more than 1,500 live radio
stations from across the country and allows listeners to create custom music
stations inspired by their favorite artists or songs.
•Pandora®— Pandora®gives people the music and comedy they love anytime,
anywhere. Personalized stations launch instantly, with the input of a favorite artist,
track, comedian, or genre.
•Slacker Radio— Enjoy millions of songs and hundreds of handcrafted stations.
NOTE:
For detailed information on how to use Via Mobile apps visit the Mopar Owner
Connect website (moparownerconnect.com) and log in using the username and
password you set up when registering for Uconnect®Access.
ELECTRONICS
87
Page 91 of 244
Clock Setting
To start the clock setting procedure:
1. Push the MORE button on the faceplate. Next press the “Settings” button on the
touchscreen and then press the “Clock and Date” button on the touchscreen.
2. Press the “Set Time & Format” button on the touchscreen.
3. Press the “Up” or “Down” arrows to adjust the hours or minutes, next select the
“AM” or “PM” button on the touchscreen. You can also select 12hr or 24hr
format by pressing the desired button on the touchscreen.
4. Once the time is set press the “Done” button on the touchscreen to exit the time
screen.
NOTE:
In the Clock Setting Menu you can also select Display Clock. Display Clock turns the
clock display in the status bar on or off.
Equalizer, Balance And Fade
1. Push the MORE button on the faceplate, then press the “Settings” button on the
touchscreen.
2. Then scroll down and press the “Audio” button on the touchscreen to get to the
Audio menu.
3. The Audio Menu shows the following options for you to customize your audio
settings.
Equalizer
• Press the “Equalizer” button on the touchscreen to adjust the Bass, Mid and
Treble. Use the “+” or “–” button on the touchscreen to adjust the equalizer to your
desired settings. Press the “back arrow” button on the touchscreen when done.
Balance/Fade
• Press the “Balance/Fade” button on the touchscreen to adjust the sound from the
speakers. Use the “arrow” button on the touchscreen to adjust the sound level
from the front and rear or right and left side speakers. Press the Center “C” button
on the touchscreen to reset the balance and fade to the factory setting. Press the
“back arrow” button on the touchscreen when done.
Speed Adjustable
• Press the “Speed Adjusted Volume” button on the touchscreen to select between
OFF, 1, 2 or 3. This will decrease the radio volume relative to a decrease in vehicle
speed. Press the “back arrow” button on the touchscreen when done.
Loudness
• Press the “Loudness” button on the touchscreen to select the Loudness feature.
When this feature is activated it improves sound quality at lower volumes. Press
the “back arrow” button on the touchscreen when done.
ELECTRONICS
89
Page 92 of 244
Radio Operation
Seek Up/Seek Down
• Press to seek through radio stations in AM, FM or SXM bands.
• Hold either button to bypass stations without stopping.
Store Radio Presets
When you are receiving a station that you wish to commit into memory, press and hold
the desired numbered button on the touchscreen for more that two seconds or until
you hear a confirmation beep.
The Radio stores up to 12 presets in each of the Radio modes. Four presets are visible
at the top of the radio screen. Pressing the “All” button on the touchscreen on the
radio home screen will display all of the preset stations for that mode.
SiriusXM Premier Over 160 channels
Get every channel available on your satellite radio, and enjoy all you want, all in one
place. Hear commercial-free music plus sports, news, talk and entertainment. Get all
the premium programming, including Howard Stern, every NFL game, Oprah Radio®,
every MLB®and NHL®game, every NASCAR®race, Martha Stewart and more. And
get 20+ extra channels, including SiriusXM Latino, offering 20 channels of commer-
cial free music, news, talk, comedy, sports and more dedicated to Spanish language
programming.
• To access SiriusXM™ Satellite Radio, push the “RADIO” button on the faceplate
and then the “SXM” button on the touchscreen.
• SiriusXM services require subscriptions, sold separately after the 12-month trial
included with the new vehicle purchase.If you decide to continue your service at the
end of your trial subscription, the plan you choose will automatically renew and bill at
then-current rates until you call SiriusXM at 1-866-635-2349 for U.S. residents and
1-888-539-7474 for Canadian residents to cancel. See SiriusXM Customer Agreement
for complete terms at www.siriusxm.com for U.S. residents and www.siriusxm.ca for
Canadian residents.All fees and programming subject to change. Our satellite
service is available only to those at least 18 and older in the 48 contiguous USA
and D.C. Our Sirius satellite service is also available in PR (with coverage
limitations). Our Internet radio service is available throughout our satellite service
area and in AK and HI. © 2014 Sirius XM Radio Inc. Sirius, XM and all related
marks and logos are trademarks of Sirius XM Radio Inc.
ELECTRONICS
90