display JEEP CHEROKEE 2015 KL / 5.G Service Manual
[x] Cancel search | Manufacturer: JEEP, Model Year: 2015, Model line: CHEROKEE, Model: JEEP CHEROKEE 2015 KL / 5.GPages: 244, PDF Size: 30.6 MB
Page 153 of 244
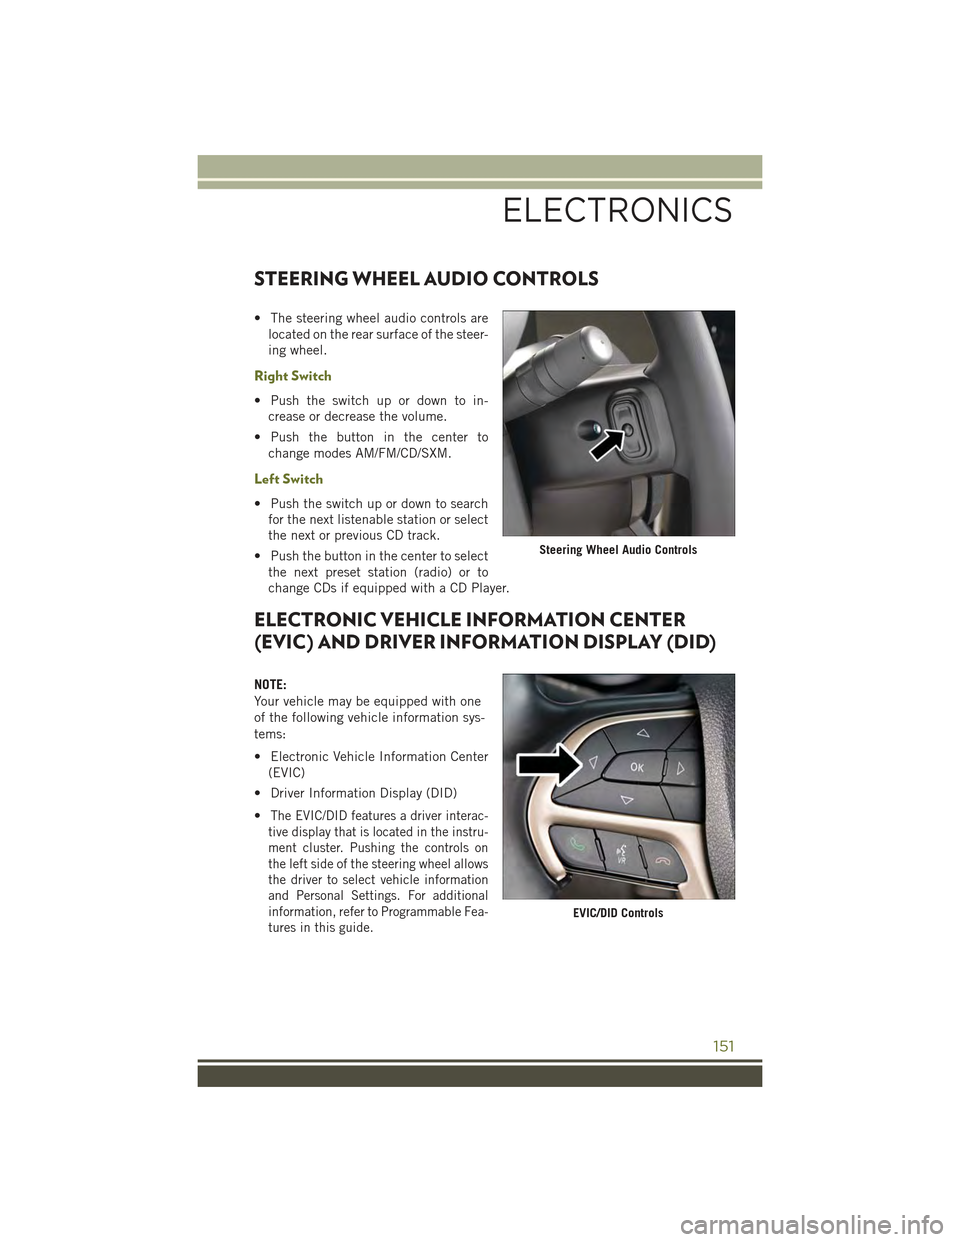
STEERING WHEEL AUDIO CONTROLS
• The steering wheel audio controls are
located on the rear surface of the steer-
ing wheel.
Right Switch
• Push the switch up or down to in-
crease or decrease the volume.
• Push the button in the center to
change modes AM/FM/CD/SXM.
Left Switch
• Push the switch up or down to search
for the next listenable station or select
the next or previous CD track.
• Push the button in the center to select
the next preset station (radio) or to
change CDs if equipped with a CD Player.
ELECTRONIC VEHICLE INFORMATION CENTER
(EVIC) AND DRIVER INFORMATION DISPLAY (DID)
NOTE:
Your vehicle may be equipped with one
of the following vehicle information sys-
tems:
• Electronic Vehicle Information Center
(EVIC)
• Driver Information Display (DID)
•The EVIC/DID features a driver interac-
tive display that is located in the instru-
ment cluster. Pushing the controls on
the left side of the steering wheel allows
the driver to select vehicle information
and Personal Settings. For additional
information, refer to Programmable Fea-
tures in this guide.
Steering Wheel Audio Controls
EVIC/DID Controls
ELECTRONICS
151
Page 154 of 244
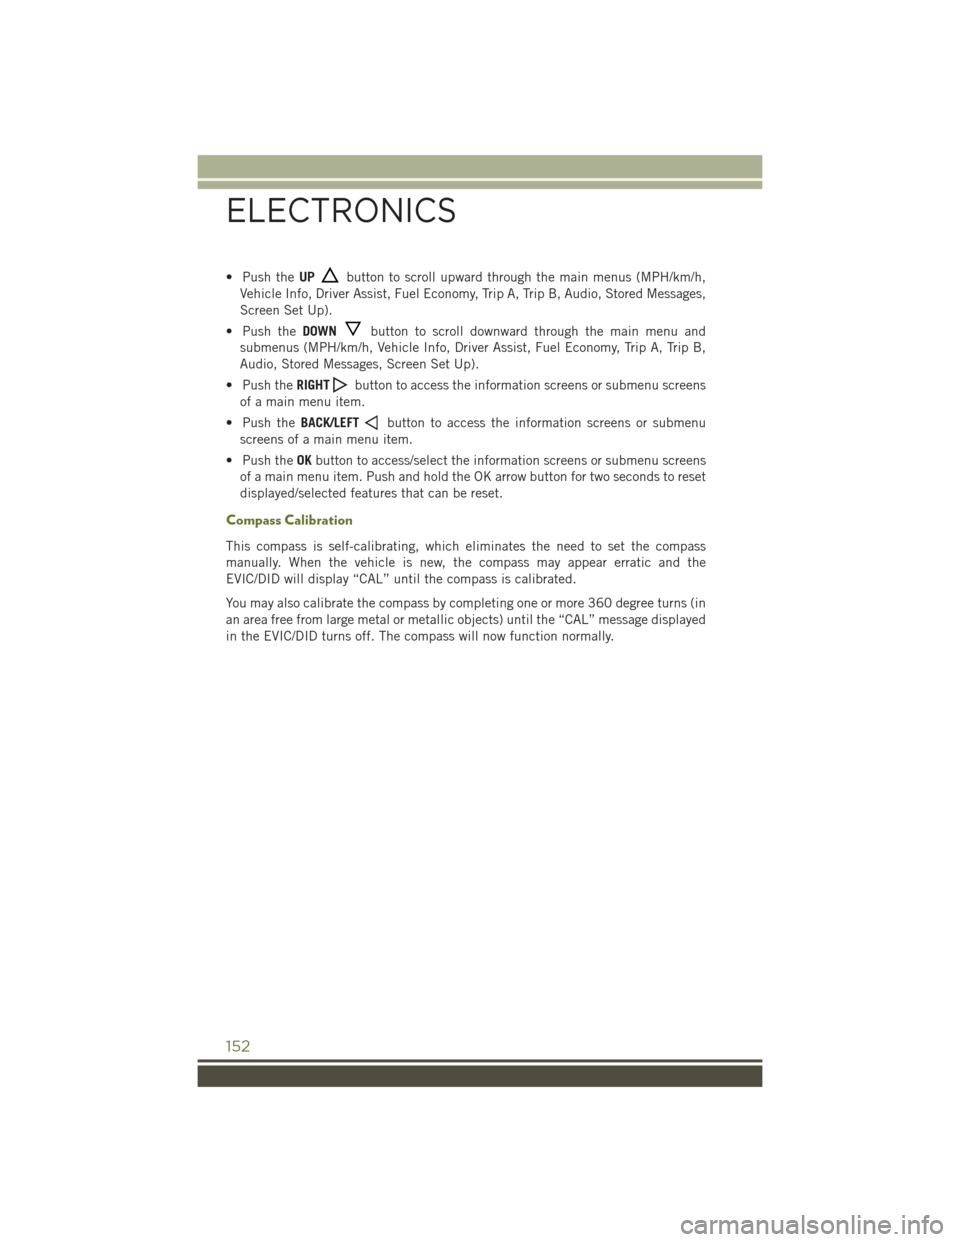
• Push theUPbutton to scroll upward through the main menus (MPH/km/h,
Vehicle Info, Driver Assist, Fuel Economy, Trip A, Trip B, Audio, Stored Messages,
Screen Set Up).
• Push theDOWNbutton to scroll downward through the main menu and
submenus (MPH/km/h, Vehicle Info, Driver Assist, Fuel Economy, Trip A, Trip B,
Audio, Stored Messages, Screen Set Up).
• Push theRIGHTbutton to access the information screens or submenu screens
of a main menu item.
• Push theBACK/LEFTbutton to access the information screens or submenu
screens of a main menu item.
• Push theOKbutton to access/select the information screens or submenu screens
of a main menu item. Push and hold the OK arrow button for two seconds to reset
displayed/selected features that can be reset.
Compass Calibration
This compass is self-calibrating, which eliminates the need to set the compass
manually. When the vehicle is new, the compass may appear erratic and the
EVIC/DID will display “CAL” until the compass is calibrated.
You may also calibrate the compass by completing one or more 360 degree turns (in
an area free from large metal or metallic objects) until the “CAL” message displayed
in the EVIC/DID turns off. The compass will now function normally.
ELECTRONICS
152
Page 155 of 244
PROGRAMMABLE FEATURES
Uconnect® Customer Programmable Features
The Uconnect®system allows you to access Customer Programmable feature
settings such as Display, Clock, Safety & Driving Assistance, Lights, Doors & Locks,
Auto-On Comfort & Remote Start, Engine Off Operation, Compass Settings, Audio,
Trailer Brake, Phone/Bluetooth®, SiriusXM Setup and System Information through
buttons on the touchscreen.
• Press the SETTINGS button (Uconnect®5.0), or press the “Apps” button
(Uconnect®8.4) located near the bottom of the touchscreen, then press the
“Settings” button on the touchscreen to access the Settings screen. When making
a selection, scroll up or down until the preferred setting is highlighted, then press
and release the preferred setting until a check-mark appears next to the setting,
showing that setting has been selected. The following feature settings are
available:
• Display• Doors & Locks
• Safety & Driving Assistance• Engine Off Options
• Auto-On Comfort & Remote Start • Audio
• Phone/Bluetooth®• SiriusXM Setup
• Lights• Trailer Brake
• Compass (Uconnect®5.0)• System Information
• Units• Voice
• Clock
NOTE:
Depending on the vehicles options, feature settings may vary.
ELECTRONICS
153
Page 165 of 244
Shifting Procedures
4X4 HI To 4X4 LOW
• With the vehicle at speeds of 0 to 3 mph (0 to 5 km/h), the ignition switch in the
ON position or the engine running, shift the transmission into NEUTRAL, and
press the “4WD LOW” button once. The “4WD LOW” indicator light in the
instrument cluster will begin to flash and remain on solid when the shift is
complete.
NOTE:
If shift conditions/interlocks are not met a message will flash from the Electronic
Vehicle Information Center (EVIC)/Driver Information Display (DID) with instructions
on how to complete the requested shift. Refer to “Electronic Vehicle Information
Center (EVIC)/Driver Information Display (DID)” in “Understanding Your Instrument
Panel” on the DVD for further information.
4X4 LOW To 4X4 HI
• With the vehicle at speeds of 0 to 3 mph (0 to 5 km/h), the ignition switch in the
ON position or the engine running, shift the transmission into NEUTRAL, and
press the “4WD LOW” button once. The “4WD LOW” indicator light in the
instrument cluster will flash and go out when the shift is complete.
NOTE:
If shift conditions/interlocks are not met a message will flash from the Electronic
Vehicle Information Center (EVIC)/Driver Information Display (DID) with instructions
on how to complete the requested shift. Refer to “Electronic Vehicle Information
Center (EVIC)/Driver Information Display (DID)” in “Understanding Your Instrument
Panel” on the DVD for further information.
NEUTRAL Shift Procedure
1. Bring the vehicle to a complete stop and shift the transmission to PARK.
2. Turn the engine OFF.
3. Turn the ignition switch to the ON/RUN position, but do not start the engine.
4. Press and hold the brake pedal.
5. Shift the transmission into NEUTRAL.
6. Using a ballpoint pen or similar object, press and hold the recessed Power
Transfer Unit NEUTRAL (N) button (located by the selector switch) for four
seconds. The light behind the NEUTRAL (N) symbol will blink, indicating shift in
progress. The light will stop blinking (stay on solid) when the shift to NEUTRAL
(N) is complete.
7. After the shift is completed and the NEUTRAL light stays on, release the
NEUTRAL (N) button.
8. Start the engine.
9. Shift the transmission into REVERSE.
OFF-ROAD CAPABILITIES
163
Page 167 of 244
• Shifting into or out of Rear E-Locker is possible with the vehicle completely
stopped; however, difficulty may occur due to the mating clutch teeth not being
properly aligned. Several attempts may be required for clutch teeth alignment and
shift completion to occur. The preferred method is for the vehicle to be rolling,
below 15 MPH (24 km/h), while including right and left steering maneuvers to
allow for the clutch teeth to align.
• The Rear E-Locker System must be disengaged prior to taking the vehicle out of
4X4 LOW range. If 4X4 LOW shift conditions/interlocks are not met, a message will
flash from the Electronic Vehicle Information Center (EVIC)/Driver Information
Display with instructions on how to complete the requested shift.
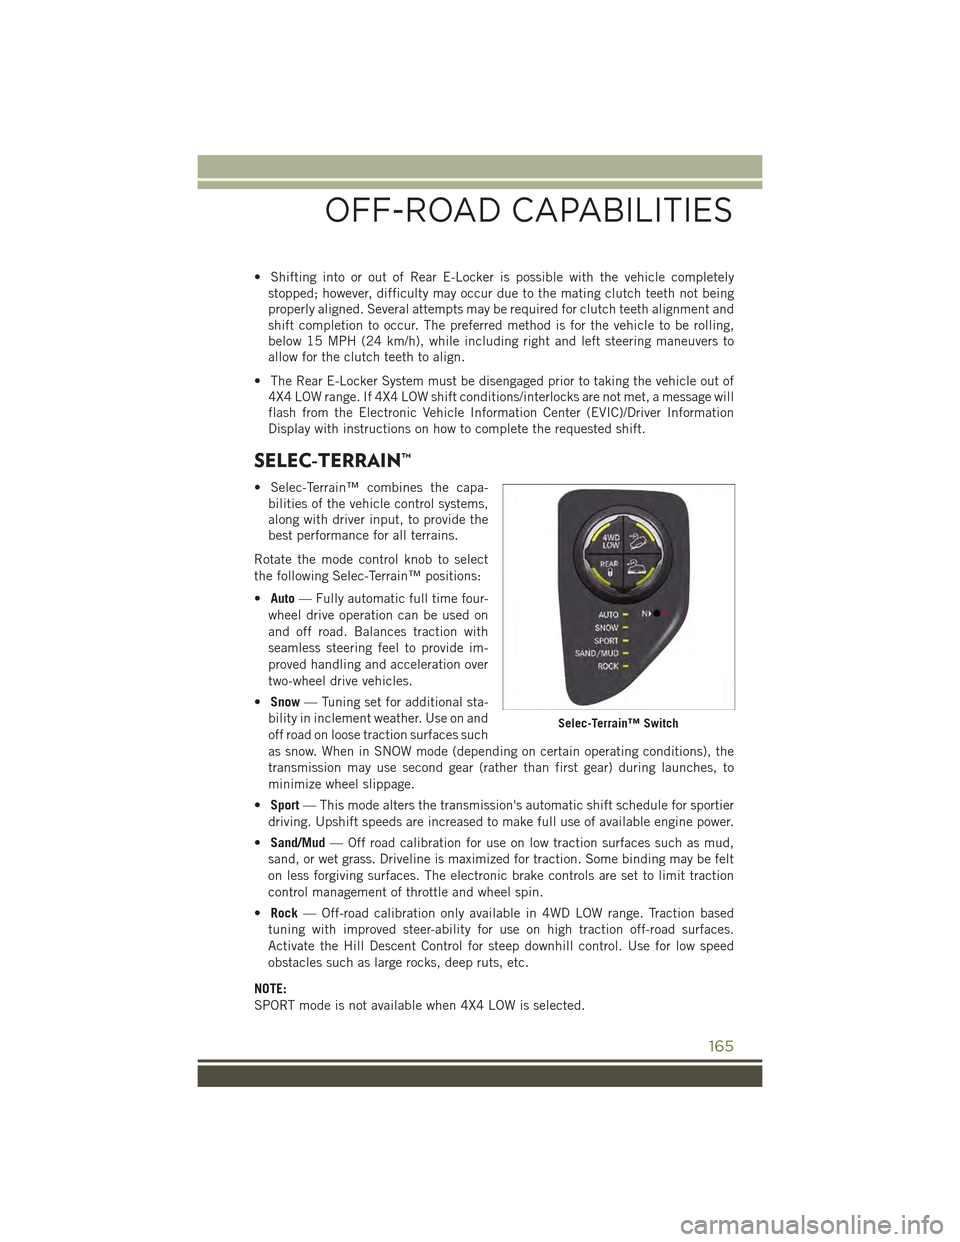
SELEC-TERRAIN™
• Selec-Terrain™ combines the capa-
bilities of the vehicle control systems,
along with driver input, to provide the
best performance for all terrains.
Rotate the mode control knob to select
the following Selec-Terrain™ positions:
•Auto— Fully automatic full time four-
wheel drive operation can be used on
and off road. Balances traction with
seamless steering feel to provide im-
proved handling and acceleration over
two-wheel drive vehicles.
•Snow— Tuning set for additional sta-
bility in inclement weather. Use on and
off road on loose traction surfaces such
as snow. When in SNOW mode (depending on certain operating conditions), the
transmission may use second gear (rather than first gear) during launches, to
minimize wheel slippage.
•Sport— This mode alters the transmission's automatic shift schedule for sportier
driving. Upshift speeds are increased to make full use of available engine power.
•Sand/Mud— Off road calibration for use on low traction surfaces such as mud,
sand, or wet grass. Driveline is maximized for traction. Some binding may be felt
on less forgiving surfaces. The electronic brake controls are set to limit traction
control management of throttle and wheel spin.
•Rock— Off-road calibration only available in 4WD LOW range. Traction based
tuning with improved steer-ability for use on high traction off-road surfaces.
Activate the Hill Descent Control for steep downhill control. Use for low speed
obstacles such as large rocks, deep ruts, etc.
NOTE:
SPORT mode is not available when 4X4 LOW is selected.
Selec-Terrain™ Switch
OFF-ROAD CAPABILITIES
165
Page 180 of 244
CAUTION!
Prolonged driving with the Malfunction Indicator Light (MIL) on could cause
damage to the engine control system. It also could affect fuel economy and
driveability. If the MIL is flashing, severe catalytic converter damage and power
loss will soon occur. Immediate service is required.
WARNING!
A malfunctioning catalytic converter, as referenced above, can reach higher
temperatures than in normal operating conditions. This can cause a fire if you
drive slowly or park over flammable substances such as dry plants, wood,
cardboard, etc. This could result in death or serious injury to the driver, occupants
or others.
– SERV (Service) 4WD Indicator Light
If the light stays on or comes on during driving, it means that the 4WD system is not
functioning properly and that service is required. We recommend you drive to the
nearest service center and have the vehicle serviced immediately.
-ElectronicStabilityControl(ESC)Activation/MalfunctionIndicatorLight
• If this indicator light flashes during acceleration, apply as little throttle as
possible. While driving, ease up on the accelerator. Adapt your speed and driving
to the prevailing road conditions. To improve the vehicle's traction when starting
off in deep snow, sand or gravel, it may be desirable to switch the ESC system off.
Oil Life Reset
• Your vehicle is equipped with an engine oil change indicator system. The “Oil
Change Due” message will flash in the EVIC display for approximately 10 seconds
after a single chime has sounded, to indicate the next scheduled oil change
interval. The engine oil change indicator system is duty cycle based, which means
the engine oil change interval may fluctuate, dependent upon your personal
driving style.
• Unless reset, this message will continue to display each time you turn the ignition
switch to the ON/RUN position or cycle the ignition to the ON/RUN position if
equipped with Keyless Enter-N-Go™. To turn off the message temporarily, push
and release the MENU button. To reset the oil change indicator system (after
performing the scheduled maintenance) refer to the following procedure:
Vehicles Equipped With Passive Entry
Without pushing the brake pedal, push the ENGINE START/STOP button and cycle
the ignition to the ON/RUN position (Do not start the engine.)
1. Push theOKbutton to enter the EVIC menu screen.
WHAT TO DO IN EMERGENCIES
178
Page 183 of 244
-AdaptiveCruseControl(ACC)SETIndicator
• When ACC is set, the set speed will continue to display in the lower right hand
corner of the cluster.
• The ACC screen will display once again if any ACC activity occurs, which may
include any of the following:
• Distance Setting Change
• System Cancel
• Driver Override
• System Off
• ACC Proximity Warning
• ACC Unavailable Warning
• The EVIC will return to the last display selected after five seconds of no ACC
display activity.
• For further information on Adaptive Cruse Control (ACC) SET operation and proper
use, refer to “Speed Control ” in “Operating Your Vehicle”.
NOTE:
Adaptive Cruise Control (ACC) increases the driving convenience provided by cruise
control while traveling on highways and major roadways. However, it is not a safety
system and not designed to prevent collisions.
- Hill Descent Control Indicator — If Equipped
This indicator will illuminate when Hill Descent Control (HDC) has been selected
using the Hill Descent Control Switch.
- Park/Headlight ON Indicator
This indicator will illuminate when the park lights or headlights are turned on.
- Electronic Stability Control (ESC) OFF Indicator Light
This light indicates the Electronic Stability Control (ESC) is off.
- Windshield Washer Fluid Low Indicator
This indicator will illuminate when the windshield washer fluid is low.
- Door Ajar Indicator
This indicator will illuminate when a door(s) is left ajar and not fully closed.
- Forward Collision Warning (FCW) OFF Indicator
NOTE:
• The default status of FCW is “On”, this allows the system to warn you of a possible
collision with the vehicle in front of you.
• The forward collision button is located on the switch panel below the Uconnect®
display.
WHAT TO DO IN EMERGENCIES
181
Page 210 of 244
MAINTENANCE PROCEDURES
For information on the maintenance procedures for your vehicle, please refer to
“Maintenance Procedures” in “Maintaining Your Vehicle” in your Owner’s Manual or
applicable supplement on the DVD for further details.
MAINTENANCE SCHEDULE
Your vehicle is equipped with an automatic oil change indicator system. The oil
change indicator system will remind you that it is time to take your vehicle in for
scheduled maintenance.
Based on engine operation conditions, the oil change indicator message will
illuminate. This means that service is required for your vehicle. Operating conditions
such as frequent short-trips, trailer tow, extremely hot or cold ambient temperatures
will influence when the “Oil Change Required” message is displayed. Severe
Operating Conditions can cause the change oil message to illuminate as early as
3,500 miles (5,600 km) since last reset. Have your vehicle serviced as soon as
possible, within the next 500 miles (805 km).
Your authorized dealer will reset the oil change indicator message after completing
the scheduled oil change. If a scheduled oil change is performed by someone other
than your authorized dealer, the message can be reset by referring to the steps
described under “Instrument Cluster Warning Lights” in “What To Do In Emergen-
cies” in this guide or “Electronic Vehicle Information Center (EVIC)” or “Driver
Information Display (DID)” in “Understanding Your Instrument Panel” in your
Owners Manual on the DVD for further information.
NOTE:
Under no circumstances should oil change intervals exceed 10,000 miles
(16,000 km) or twelve months, whichever comes first.
MAINTAINING YOUR VEHICLE
208