transmission JEEP CHEROKEE 2015 KL / 5.G Owner's Manual
[x] Cancel search | Manufacturer: JEEP, Model Year: 2015, Model line: CHEROKEE, Model: JEEP CHEROKEE 2015 KL / 5.GPages: 244, PDF Size: 30.6 MB
Page 184 of 244
• To turn the FCW system OFF, press the forward collision button once to turn the
system OFF (led turns on).
• For further information on Forward Collision Warning (FCW) operation and proper
use, refer to “Speed Control ” in “Operating Your Vehicle”.
- Liftgate Ajar Indicator — If Equipped
This indicator will illuminate when the liftgate is left ajar and not fully closed.
IF YOUR ENGINE OVERHEATS
In any of the following situations, you can reduce the potential for overheating by
taking the appropriate action:
• On the highways — slow down.
• In city traffic — while stopped, shift the transmission to NEUTRAL, but do not
increase engine idle speed.
NOTE:
There are steps that you can take to slow down an impending overheat condition:
• If your air conditioner (A/C) is on, turn it off. The A/C system adds heat to the
engine cooling system and turning the A/C off can help remove this heat.
• You can also turn the temperature control to maximum heat, the mode control to
floor and the blower control to high. This allows the heater core to act as a
supplement to the radiator and aids in removing heat from the engine cooling
system.
CAUTION!
Driving with a hot cooling system could damage your vehicle. If the temperature
gauge reads HOT (H), pull over and stop the vehicle. Idle the vehicle with the air
conditioner turned off until the pointer drops back into the normal range. If the
pointer remains on HOT (H), and you hear continuous chimes, turn the engine off
immediately, and call for service.
WARNING!
You or others can be badly burned by hot engine coolant (antifreeze) or steam from
your radiator. If you see or hear steam coming from under the hood, do not open
the hood until the radiator has had time to cool. Never try to open a cooling system
pressure cap when the radiator or coolant bottle is hot.
WHAT TO DO IN EMERGENCIES
182
Page 186 of 244
Tire Service Kit Usage Precautions
• Replace the Tire Service Kit Sealant Bottle (1) and Sealant Hose (6) prior to the
expiration date (printed on the bottle label) to assure optimum operation of the
system. Refer to “Sealing A Tire With Tire Service Kit” section (F) “Sealant Bottle
and Hose Replacement.”
• The Sealant Bottle (1) and Sealant Hose (6) are a one tire application use. After
each use, always replace these components immediately at an authorized dealer.
• When the Tire Service Kit sealant is in a liquid form, clean water, and a damp cloth
will remove the material from the vehicle or tire and wheel components. Once the
sealant dries, it can easily be peeled off and properly discarded.
• For optimum performance, make sure the valve stem on the wheel is free of debris
before connecting the Tire Service Kit.
• You can use the Tire Service Kit air pump to inflate bicycle tires. The kit also
comes with two needles, located in the Accessory Storage Compartment (on the
bottom of the air pump) for inflating sport balls, rafts, or similar inflatable items.
However, use only the Air Pump Hose (7) and make sure the Mode Select Knob (5)
is in the Air Mode when inflating such items to avoid injecting sealant into them.
The Tire Service Kit Sealant is only intended to seal punctures less than 1/4”
(6 mm) diameter in the tread of your vehicle.
• Do not lift or carry the Tire Service Kit by the hoses.
Sealing A Tire With Tire Service Kit
(A) Whenever You Stop To Use Tire Service Kit:
1. Pull over to a safe location and turn on the vehicle’s Hazard Warning flashers.
2. Verify that the valve stem (on the wheel with the deflated tire) is in a position that
is near to the ground. This will allow the Tire Service Kit Hoses (6) and (7) to reach
the valve stem and keep the Tire Service Kit flat on the ground. This will provide
the best positioning of the kit when injecting the sealant into the deflated tire and
running the air pump. Move the vehicle as necessary to place the valve stem in
this position before proceeding.
3. Place the transmission in PARK (auto transmission) or in Gear (manual transmis-
sion) and cycle the ignition to the OFF position.
4. Set the parking brake.
(B) Setting Up To Use Tire Service Kit:
1. Turn the Mode Select Knob (5) to the Sealant Mode position.
2. Uncoil the Sealant Hose (6) and then remove the cap from the fitting at the end
of the hose.
3. Place the Tire Service Kit flat on the ground next to the deflated tire.
4. Remove the cap from the valve stem and then screw the fitting at the end of the
Sealant Hose (6) onto the valve stem.
WHAT TO DO IN EMERGENCIES
184
Page 187 of 244
5. Uncoil the Power Plug (8) and insert the plug into the vehicle’s 12 Volt power
outlet.
6. Do not remove foreign objects (e.g., screws or nails) from the tire.
(C) Injecting Tire Service Kit Sealant Into The Deflated Tire:
Always start the engine before turning ON the Tire Service Kit.
NOTE:
Manual transmission vehicles must have the parking brake engaged and the shift
lever in NEUTRAL.
After pressing the Power Button (4), the sealant (white fluid) will flow from the
Sealant Bottle (1) through the Sealant Hose (6) and into the tire.
NOTE:
Sealant may leak out through the puncture in the tire.
If the sealant (white fluid) does not flow within0–10seconds through the Sealant Hose
(6):
1. Press the Power Button (4) to turn Off the Tire Service Kit. Disconnect the Sealant
Hose (6) from the valve stem. Make sure the valve stem is free of debris.
Reconnect the Sealant Hose (6) to the valve stem. Check that the Mode Select
Knob (5) is in the Sealant Mode position and not Air Mode. Press the Power
Button (4) to turn On the Tire Service Kit.
2. Connect the Power Plug (8) to a different 12 Volt power outlet in your vehicle or
another vehicle, if available. Make sure the engine is running before turning ON
the Tire Service Kit.
3. The Sealant Bottle (1) may be empty due to previous use. Call for assistance.
NOTE:
If the Mode Select Knob (5) is on Air Mode and the pump is operating, air will
dispense from the Air Pump Hose (7) only, not the Sealant Hose (6).
If the sealant (white fluid) does flow through the Sealant Hose (6):
1. Continue to operate the pump until sealant is no longer flowing through the hose
(typically takes 30 - 70 seconds). As the sealant flows through the Sealant Hose
(6), the Pressure Gauge (3) can read as high as 70 psi (4.8 Bar). The Pressure
Gauge (3) will decrease quickly from approximately 70 psi (4.8 Bar) to the actual
tire pressure when the Sealant Bottle (1) is empty.
2. The pump will start to inject air into the tire immediately after the Sealant Bottle
(1) is empty. Continue to operate the pump and inflate the tire to the pressure
indicated on the tire pressure label on the driver-side latch pillar (recommended
pressure). Check the tire pressure by looking at the Pressure Gauge (3).
WHAT TO DO IN EMERGENCIES
185
Page 195 of 244
WARNING!
• Being under a jacked-up vehicle is dangerous. The vehicle could slip off the
jack and fall on you. You could be crushed. Never put any part of your body
under a vehicle that is on a jack. If you need to get under a raised vehicle, take
it to a service center where it can be raised on a lift.
• Never start or run the engine while the vehicle is on a jack.
• The jack is designed to be used as a tool for changing tires only. The jack
should not be used to lift the vehicle for service purposes. The vehicle should
be jacked on a firm level surface only. Avoid ice or slippery areas.
• Do not attempt to change a tire on the side of the vehicle close to moving
traffic, pull far enough off the road to avoid the danger of being hit when
operating the jack or changing the wheel.
• Carefully follow these tire changing warnings to help prevent personal injury or
damage to your vehicle:
• Always park on a firm, level surface as far from the edge of the roadway
as possible before raising the vehicle.
• Turn on the Hazard Warning flasher.
• Chock the wheel diagonally opposite the wheel to be raised.
• Set the parking brake firmly and set an automatic transmission in PARK.
• Do not let anyone sit in the vehicle when it is on a jack.
• Do not get under the vehicle when it is on a jack.
• Only use the jack in the positions indicated and for lifting this vehicle during
a tire change.
• If working on or near a roadway, be extremely careful of motor traffic.
• Assure that spare tires, flat or inflated, are securely stowed, spares must be
stowed in the rear cargo area with the wing nut attached.
• Raising the vehicle higher than necessary can make the vehicle less stable. It
could slip off the jack and hurt someone near it. Raise the vehicle only enough
to remove the tire.
• A loose tire or jack thrown forward in a collision or hard stop could injure the
occupants in the vehicle. Have the deflated (flat) tire repaired or replaced
immediately.
• To avoid the risk of forcing the vehicle off the jack, do not tighten the lug bolts
fully until the vehicle is lowered to the ground. Failure to follow this warning
may result in personal injury.
WHAT TO DO IN EMERGENCIES
193
Page 196 of 244
JUMP-STARTING
• If your vehicle has a discharged battery it can be jump-started using a set of
jumper cables and a battery in another vehicle or by using a portable battery
booster pack.
• Jump-starting can be dangerous if done improperly so please follow the proce-
dures in this section carefully.
NOTE:
When using a portable battery booster pack follow the manufacturer’s operating
instructions and precautions.
CAUTION!
Do not use a portable battery booster pack or any other booster source with a
system voltage greater than 12 Volts or damage to the battery, starter motor,
alternator or electrical system may occur.
WARNING!
Do not attempt jump-starting if the battery is frozen. It could rupture or explode
and cause personal injury.
Preparations For Jump-Start
• The battery in your vehicle is located in the front of the engine compartment,
behind the left headlight assembly.
NOTE:
The positive battery post is covered with a protective cap. Lift up on the cap to gain
access to the positive battery post.
• Set the parking brake, shift the automatic transmission into PARK and turn the
ignition to OFF.
• Turn off the heater, radio, and all unnecessary electrical accessories.
• If using another vehicle to jump-start the battery, park the vehicle within the
jumper cables reach, set the parking brake and make sure the ignition is OFF.
WHAT TO DO IN EMERGENCIES
194
Page 199 of 244
FREEING A STUCK VEHICLE
• If your vehicle becomes stuck in mud, sand or snow, it can often be moved by a
rocking motion. Turn your steering wheel right and left to clear the area around the
front wheels. Then shift back and forth between REVERSE and DRIVE. Using
minimal accelerator pedal pressure to maintain the rocking motion, without
spinning the wheels, is most effective.
NOTE:
If your vehicle is equipped with Traction Control or Electronic Stability Control (ESC),
turn the system OFF before attempting to “rock” the vehicle.
CAUTION!
• Racing the engine or spinning the wheels may lead to transmission overheating
and failure. Allow the engine to idle with the shift lever in NEUTRAL for at least
one minute after every five rocking-motion cycles. This will minimize overheat-
ing and reduce the risk of transmission failure during prolonged efforts to free
a stuck vehicle.
• When “rocking” a stuck vehicle by moving between REVERSE and DRIVE, do
not spin the wheels faster than 15 mph (24 km/h), or drivetrain damage may
result.
• Revving the engine or spinning the wheels too fast may lead to transmission
overheating and failure. It can also damage the tires. Do not spin the wheels
above 30 mph (48 km/h) while in gear (no transmission shifting occurring).
WARNING!
Fast spinning tires can be dangerous. Forces generated by excessive wheel speeds
may cause damage, or even failure, of the axle and tires. A tire could explode and
injure someone. Do not spin your vehicle's wheels faster than 30 mph (48 km/h)
or for longer than 30 seconds continuously without stopping when you are stuck
and do not let anyone near a spinning wheel, no matter what the speed.
WHAT TO DO IN EMERGENCIES
197
Page 201 of 244
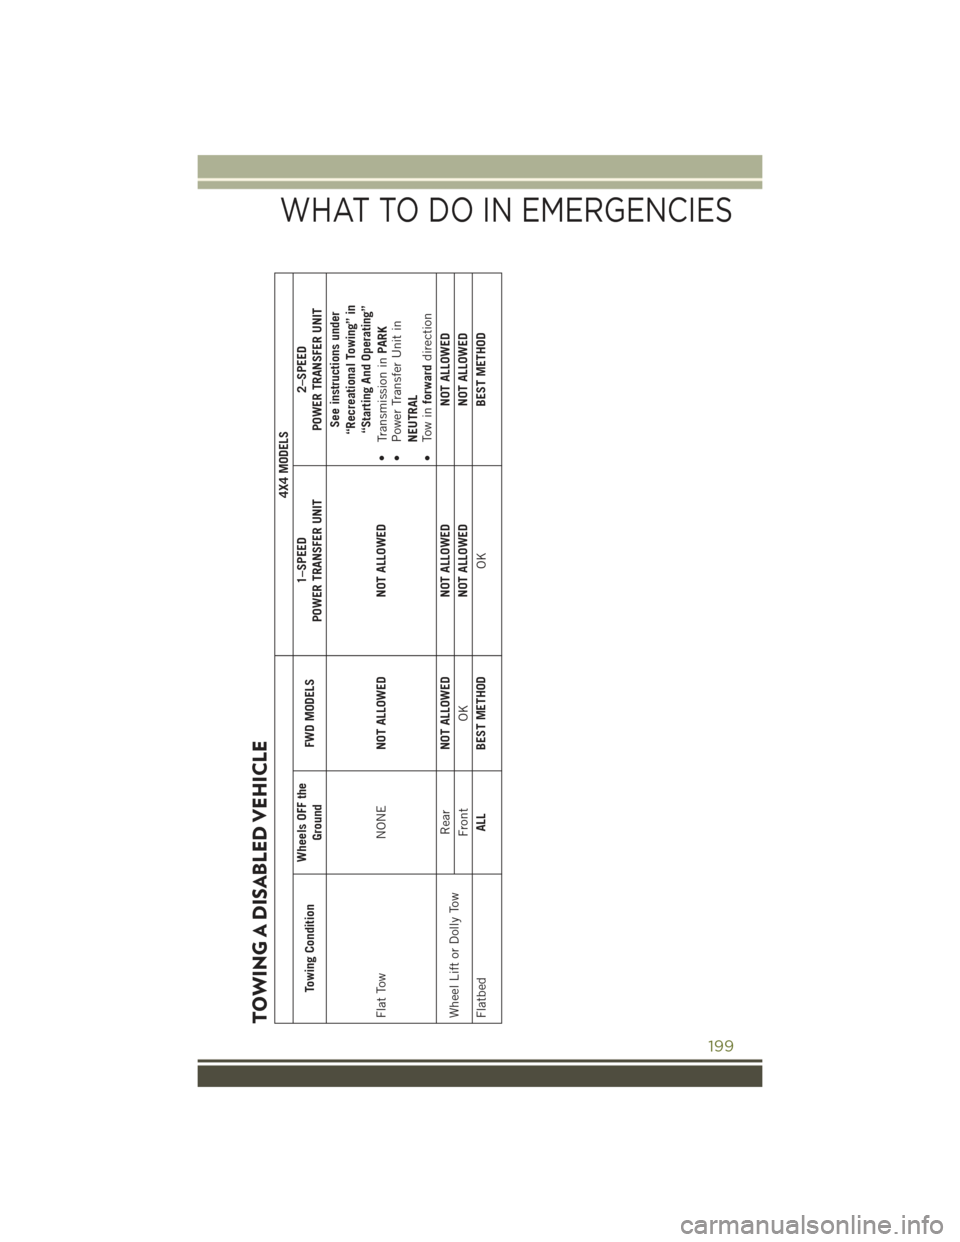
TOWING A DISABLED VEHICLE
4X4 MODELS
Towing Condition
Wheels OFF the
Ground
FWD MODELS
1–SPEED
POWER TRANSFER UNIT
2–SPEED
POWER TRANSFER UNIT
Flat Tow
NONE
NOT ALLOWED
NOT ALLOWED
See instructions under“Recreational Towing” in“Starting And Operating”
•
Transmission in
PARK
• Power Transfer Unit in
NEUTRAL
• Tow in
forward
direction
Wheel Lift or Dolly Tow
Rear
NOT ALLOWED
NOT ALLOWED
NOT ALLOWED
Front
OK
NOT ALLOWED
NOT ALLOWED
Flatbed
ALL
BEST METHOD
OK
BEST METHOD
WHAT TO DO IN EMERGENCIES
199
Page 209 of 244
CAUTION!
• Mixing of engine coolant (antifreeze) other than specified Organic Additive
Technology (OAT) engine coolant (antifreeze), may result in engine damage and
may decrease corrosion protection. Organic Additive Technology (OAT) engine
coolant is different and should not be mixed with Hybrid Organic Additive
Technology (HOAT) engine coolant (antifreeze) or any “globally compatible”
coolant (antifreeze). If a non-OAT engine coolant (antifreeze) is introduced into
the cooling system in an emergency, the cooling system will need to be drained,
flushed, and refilled with fresh OAT coolant (conforming to MS-12106), by an
authorized dealer as soon as possible.
• Do not use water alone or alcohol-based engine coolant (antifreeze) products.
Do not use additional rust inhibitors or antirust products, as they may not be
compatible with the radiator engine coolant and may plug the radiator.
• This vehicle has not been designed for use with propylene glycol-based engine
coolant (antifreeze). Use of propylene glycol-based engine coolant (antifreeze)
is not recommended.
E85 FLEXIBLE FUEL — 2.4L ENGINE ONLY
Refer to your Owner's Manual on the DVD for further details.
CAUTION!
Only vehicles with the E-85 fuel filler door label or a yellow gas cap can operate on
E-85.
Chassis
ComponentFluid, Lubricant, or Genuine Part
Automatic TransmissionUse only MOPAR®ZF 8&9 Speed ATF™Automatic Transmission Fluid, or equiva-lent.Failure to use the correct fluid may affectthe function or performance of your trans-mission.
Brake Master CylinderWe recommend you use MOPAR®DOT 3Brake Fluid, SAE J1703 should be used.If DOT 3, SAE J1703 brake fluid is notavailable, then DOT 4 is acceptable. Useonly recommended brake fluids.
MAINTAINING YOUR VEHICLE
207
Page 216 of 244
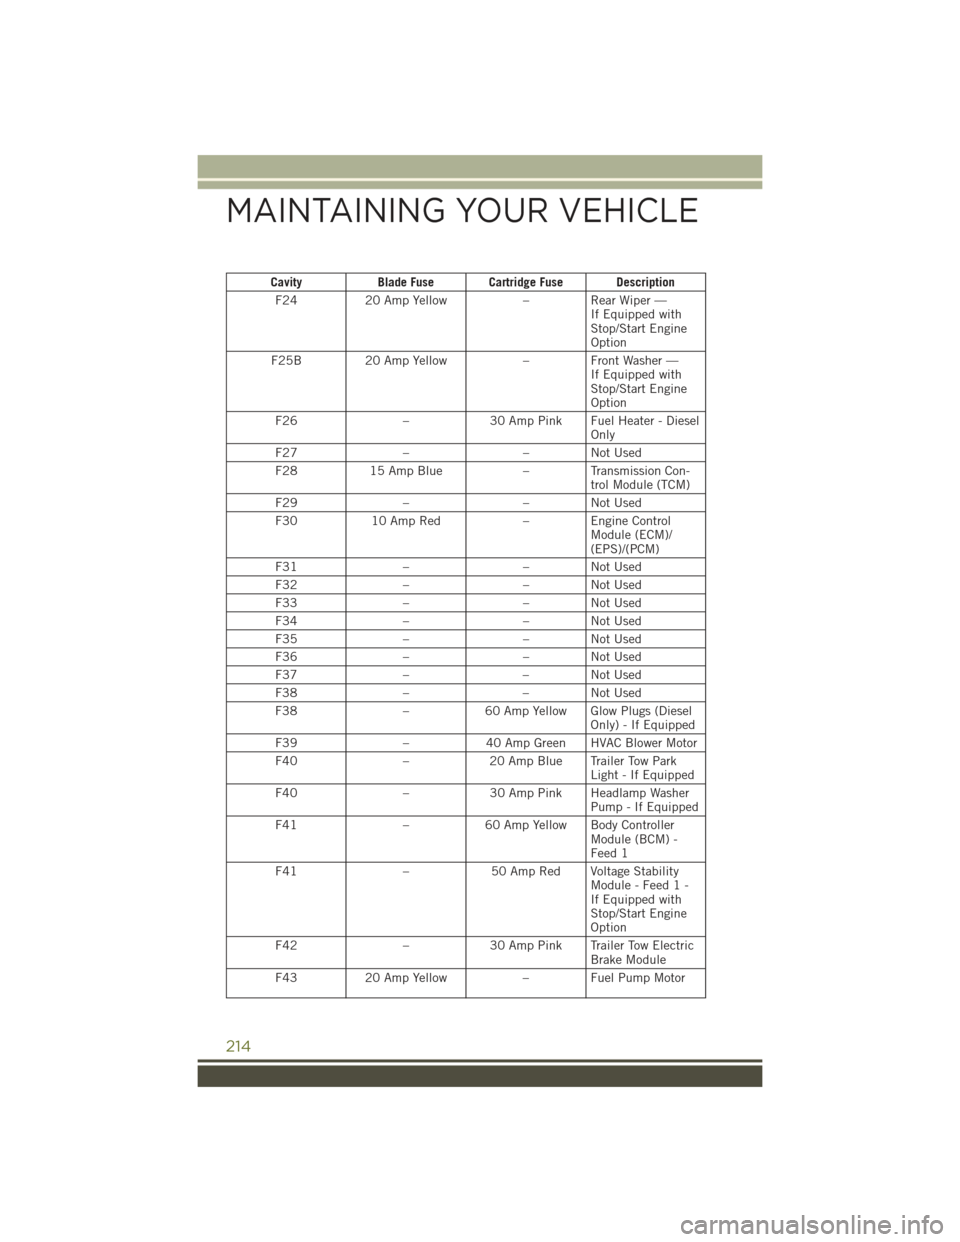
CavityBlade Fuse Cartridge Fuse Description
F2420 Amp Yellow–RearWiper—If Equipped withStop/Start EngineOption
F25B20 Amp Yellow–FrontWasher—If Equipped withStop/Start EngineOption
F26–30 Amp Pink Fuel Heater - DieselOnly
F27––NotUsed
F2815 Amp Blue–TransmissionCon-trol Module (TCM)
F29––NotUsed
F3010 Amp Red–EngineControlModule (ECM)/(EPS)/(PCM)
F31––NotUsed
F32––NotUsed
F33––NotUsed
F34––NotUsed
F35––NotUsed
F36––NotUsed
F37––NotUsed
F38––NotUsed
F38–60 Amp Yellow Glow Plugs (DieselOnly) - If Equipped
F39–40 Amp Green HVAC Blower Motor
F40–20 Amp Blue Trailer Tow ParkLight - If Equipped
F40–30 Amp Pink Headlamp WasherPump - If Equipped
F41–60 Amp Yellow Body ControllerModule (BCM) -Feed 1
F41–50 Amp Red Voltage StabilityModule - Feed 1 -If Equipped withStop/Start EngineOption
F42–30 Amp Pink Trailer Tow ElectricBrake Module
F4320 Amp Yellow–FuelPumpMotor
MAINTAINING YOUR VEHICLE
214
Page 231 of 244
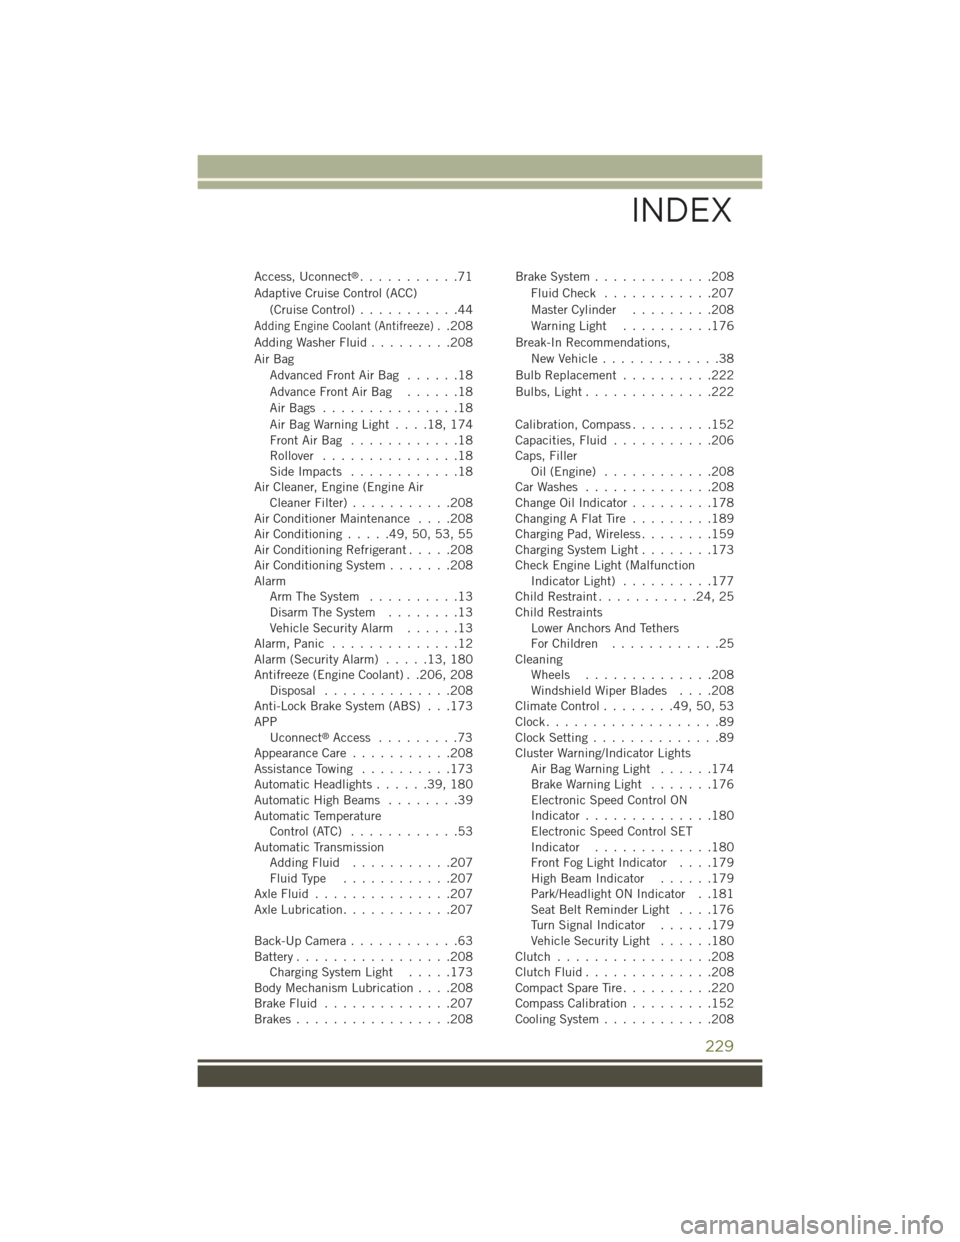
Access, Uconnect®...........71
Adaptive Cruise Control (ACC)
(Cruise Control)...........44
Adding Engine Coolant (Antifreeze)..208
Adding Washer Fluid.........208
Air Bag
Advanced Front Air Bag . . . . . .18
Advance Front Air Bag . . . . . .18
Air Bags . . . . . . . . . . . . . . .18
Air Bag Warning Light . . . .18, 174Front Air Bag . . . . . . . . . . . .18Rollover...............18Side Impacts . . . . . . . . . . . .18Air Cleaner, Engine (Engine AirCleaner Filter)...........208Air Conditioner Maintenance....208Air Conditioning.....49,50,53,55Air Conditioning Refrigerant.....208Air Conditioning System.......208AlarmArm The System..........13Disarm The System........13Vehicle Security Alarm......13Alarm, Panic . . . . . . . . . . . . . .12Alarm (Security Alarm).....13,180Antifreeze (Engine Coolant) . .206, 208Disposal..............208Anti-Lock Brake System (ABS) . . .173APPUconnect®Access.........73Appearance Care...........208Assistance Towing..........173Automatic Headlights......39,180Automatic High Beams........39Automatic TemperatureControl (ATC)............53Automatic TransmissionAdding Fluid...........207Fluid Type . . . . . . . . . . . .207Axle Fluid . . . . . . . . . . . . . . .207Axle Lubrication............207
Back-Up Camera............63Battery.................208Charging System Light.....173Body Mechanism Lubrication....208Brake Fluid..............207Brakes.................208
Brake System.............208
Fluid Check . . . . . . . . . . . .207
Master Cylinder.........208
Warning Light . . . . . . . . . .176
Break-In Recommendations,
New Vehicle.............38
Bulb Replacement..........222
Bulbs, Light..............222
Calibration, Compass.........152Capacities, Fluid...........206Caps, FillerOil (Engine) . . . . . . . . . . . .208Car Washes . . . . . . . . . . . . . .208Change Oil Indicator.........178Changing A Flat Tire . . . . . . . . .189Charging Pad, Wireless........159Charging System Light........173Check Engine Light (MalfunctionIndicator Light)..........177Child Restraint...........24,25Child RestraintsLower Anchors And TethersFor Children............25CleaningWheels..............208Windshield Wiper Blades....208Climate Control........49,50,53Clock...................89Clock Setting..............89Cluster Warning/Indicator LightsAir Bag Warning Light . . . . . .174Brake Warning Light.......176Electronic Speed Control ONIndicator..............180Electronic Speed Control SETIndicator.............180Front Fog Light Indicator....179High Beam Indicator......179Park/Headlight ON Indicator . .181Seat Belt Reminder Light....176Turn Signal Indicator......179Vehicle Security Light......180Clutch . . . . . . . . . . . . . . . . .208Clutch Fluid . . . . . . . . . . . . . .208Compact Spare Tire . . . . . . . . . .220Compass Calibration.........152Cooling System............208
INDEX
229