instrument cluster JEEP CHEROKEE 2015 KL / 5.G User Guide
[x] Cancel search | Manufacturer: JEEP, Model Year: 2015, Model line: CHEROKEE, Model: JEEP CHEROKEE 2015 KL / 5.GPages: 244, PDF Size: 30.6 MB
Page 3 of 244
INTRODUCTION/WELCOME
WELCOME FROM CHRYSLERGROUP LLC.................. 3
CONTROLS AT A GLANCE
DRIVER COCKPIT.............. 6INSTRUMENT CLUSTER.......... 8
GETTING STARTED
KEY FOB . . . . . . . . . . . . . . . . . . . 10REMOTE START............... 12VEHICLE SECURITY ALARM....... 13KEYLESS ENTER-N-GO™......... 13SEAT BELT SYSTEMS........... 17SUPPLEMENTAL RESTRAINT SYSTEM(SRS) — AIR BAGS............ 18CHILD RESTRAINTS............ 24HEAD RESTRAINTS............. 29FRONT SEATS................ 31REAR SEATS................ 34HEATED/VENTILATED SEATS....... 35HEATED STEERING WHEEL....... 36TILT/TELESCOPING STEERINGCOLUMN................... 37
OPERATING YOUR VEHICLE
ENGINE BREAK-INRECOMMENDATIONS........... 38TURN SIGNAL/HIGH BEAM LEVER . . . 38HEADLIGHT SWITCH............ 39WIPER/WASHER LEVER.......... 40ELECTRONIC SPEED CONTROL..... 41ADAPTIVE CRUISE CONTROL (ACC) . . . 44FORWARD COLLISION WARNING (FCW)WITH MITIGATION . . . . . . . . . . . . . 47MANUAL CLIMATE CONTROLSWITHOUT TOUCHSCREEN........ 49MANUAL CLIMATE CONTROLSWITH TOUCHSCREEN........... 50AUTOMATIC TEMPERATURECONTROLS (ATC).............. 53STOP/START SYSTEM — 3.2L ENGINE . . 57ELECTRIC PARKING BRAKE (EPB) . . . 59PA R K S E N S E®................ 61PARKVIEW®REAR BACK-UP CAMERA.. 63POWER SUNROOF............. 64WIND BUFFETING............. 67
ELECTRONICS
YOUR VEHICLE'S SOUND SYSTEM . . . 68IDENTIFYING YOUR RADIO........ 70Uconnect®ACCESS............. 71Uconnect®5.0 . . . . . . . . . . . . . . . . 88
Uconnect®8.4A . . . . . . . . . . . . . . 100Uconnect®8.4AN . . . . . . . . . . . . . 133STEERING WHEEL AUDIOCONTROLS................. 151ELECTRONIC VEHICLE INFORMATIONCENTER (EVIC) AND DRIVERINFORMATION DISPLAY (DID)..... 151PROGRAMMABLE FEATURES...... 153UNIVERSAL GARAGE DOOR OPENER(HomeLink®)................154POWER INVERTER............ 156POWER OUTLET............. 157WIRELESS CHARGING PAD....... 159
OFF-ROAD CAPABILITIES
FOUR-WHEEL DRIVE OPERATION . . . 162SELEC-TERRAIN™............ 165
UTILITY
CARGO AREA FEATURES........ 166TRAILER TOWING WEIGHTS (MAXIMUMTRAILER WEIGHT RATINGS)...... 167RECREATIONAL TOWING (BEHINDMOTORHOME, ETC.)........... 168
WHAT TO DO IN EMERGENCIES
ROADSIDE ASSISTANCE......... 173INSTRUMENT CLUSTER WARNINGLIGHTS................... 173INSTRUMENT CLUSTER INDICATORLIGHTS................... 179IF YOUR ENGINE OVERHEATS..... 182TIRE SERVICE KIT . . . . . . . . . . . . 183JACKING AND TIRE CHANGING.... 189JUMP-STARTING............. 194FREEING A STUCK VEHICLE...... 197RECOVERY STRAP............ 198SHIFT LEVER OVERRIDE........ 198TOWING A DISABLED VEHICLE.... 199EVENT DATA RECORDER (EDR).... 200
MAINTAINING YOUR VEHICLE
OPENING THE HOOD.......... 201ENGINE COMPARTMENT........ 202FLUID CAPACITIES............ 206FLUIDS, LUBRICANTS AND GENUINEPA RT S . . . . . . . . . . . . . . . . . . . . 2 0 6MAINTENANCE PROCEDURES..... 208MAINTENANCE SCHEDULE...... 208FUSES.................... 213TIRE PRESSURES............. 219SPARE TIRES — IF EQUIPPED..... 219WHEEL AND WHEEL TRIM CARE . . . 221REPLACEMENT BULBS......... 222
TABLE OF CONTENTS
Page 10 of 244
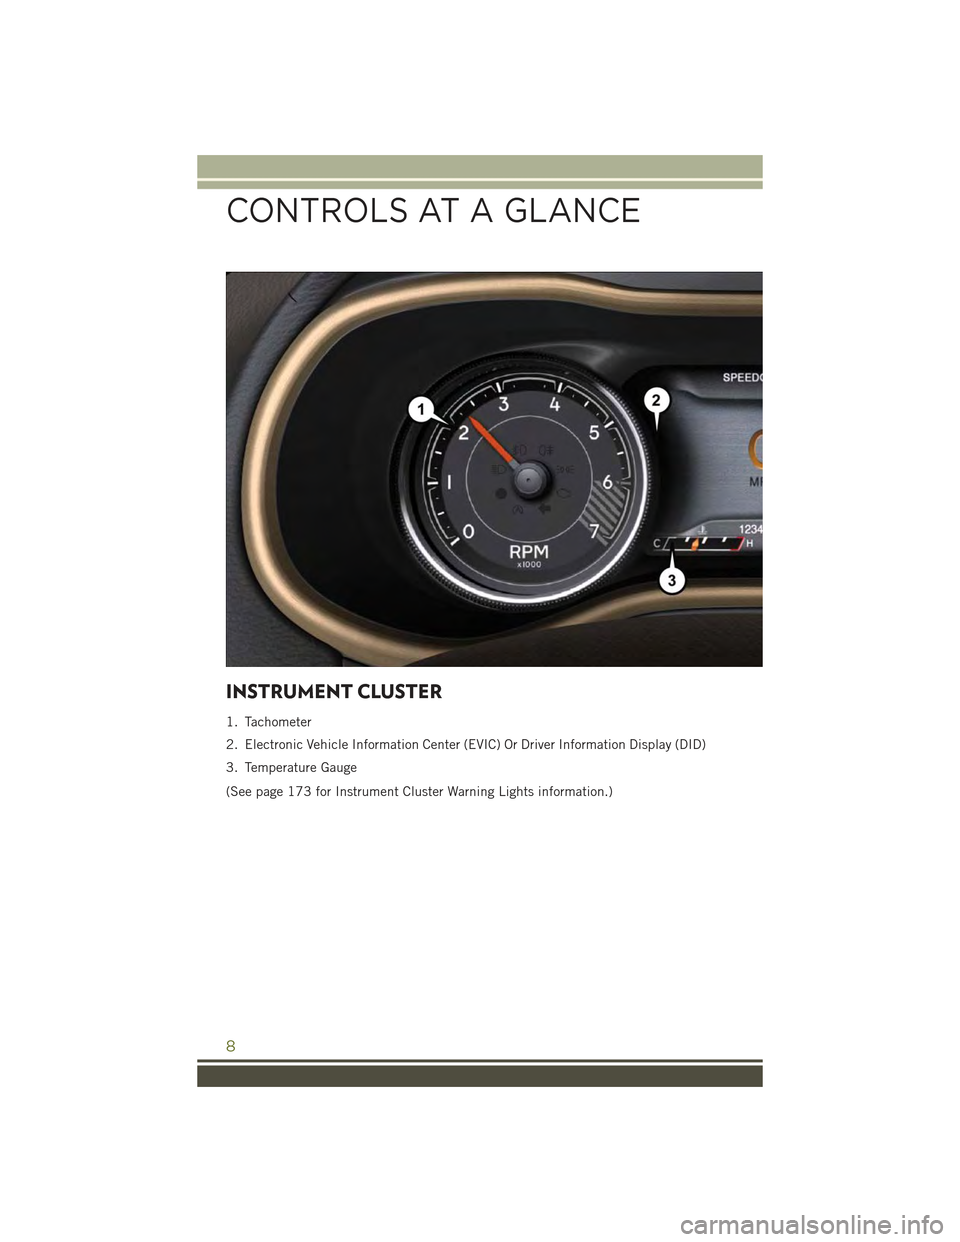
INSTRUMENT CLUSTER
1. Tachometer
2. Electronic Vehicle Information Center (EVIC) Or Driver Information Display (DID)
3. Temperature Gauge
(See page 173 for Instrument Cluster Warning Lights information.)
CONTROLS AT A GLANCE
8
Page 15 of 244
VEHICLE SECURITY ALARM
The Vehicle Security Alarm monitors the vehicle doors for unauthorized entry and the
Keyless Enter-N-Go™ START/STOP button for unauthorized operation. While the
Vehicle Security Alarm is armed, interior switches for door locks and decklid release
are disabled. If something triggers the alarm, the Vehicle Security Alarm will provide
the following audible and visible signals: the horn will pulse, the park lamps and/or
turn signals will flash, and the Vehicle Security Light in the instrument cluster will
flash.
To A r m :
• Lock the door using either the power door lock switch (one door must be open) or
the LOCK button on the Remote Keyless Entry (RKE) transmitter (doors can be
open or closed), and close all doors.
The Vehicle Security Light in the instrument cluster will flash for 16 seconds. This
shows that the Vehicle Security Alarm is arming. During this period, if a door is
opened, the ignition is cycled to ON/RUN, or the power door locks are unlocked in any
manner, the Vehicle Security Alarm will automatically disarm.
NOTE:
• The Vehicle Security Alarm will not arm if you lock the doors with the manual door
lock plungers.
• Once armed, the Vehicle Security Alarm disables the unlock switch on the driver
door trim panel and passenger door trim panel.
To D i s a r m T h e S y s t e m :
• Push the Key Fob UNLOCK button or cycle the ignition to the ON/RUN position.
The Vehicle Security Alarm is designed to protect your vehicle; however, you can
create conditions where the Vehicle Security Alarm will give you a false alarm. If one
of the previously described arming sequences has occurred, the Vehicle Security
Alarm will arm regardless of whether you are in the vehicle or not. If you remain in the
vehicle and open a door, the alarm will sound. If this occurs, disarm the Vehicle
Security Alarm.
If the Vehicle Security Alarm is armed and the battery becomes disconnected the
Vehicle Security Alarm will remain armed when the battery is reconnected. The
exterior lights will flash, and the horn will sound. If this occurs, disarm the Vehicle
Security Alarm.
KEYLESS ENTER-N-GO™
The Keyless Enter-N-Go™ system is an enhancement to the vehicle’s Remote
Keyless Entry (RKE) feature. This feature allows you to lock and unlock the vehicle's
door(s) and liftgate without having to push the Key Fob lock or unlock buttons, as well
as starting and stopping the vehicle with the push of a button.
GETTING STARTED
13
Page 61 of 244
ELECTRIC PARKING BRAKE (EPB)
Your vehicle is equipped with a new Electric Park Brake System (EPB) that offers
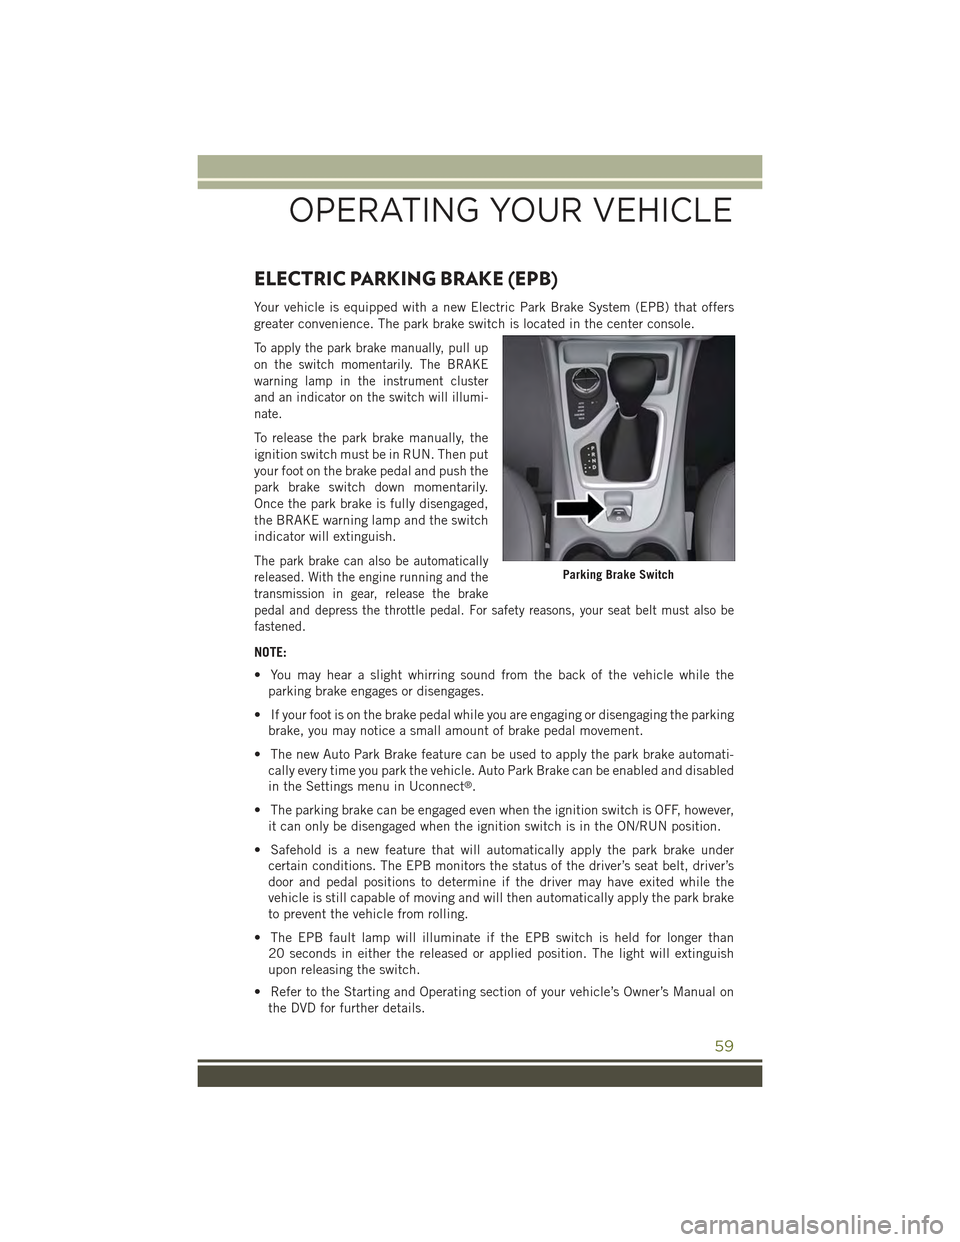
greater convenience. The park brake switch is located in the center console.
To apply the park brake manually, pull up
on the switch momentarily. The BRAKE
warning lamp in the instrument cluster
and an indicator on the switch will illumi-
nate.
To release the park brake manually, the
ignition switch must be in RUN. Then put
your foot on the brake pedal and push the
park brake switch down momentarily.
Once the park brake is fully disengaged,
the BRAKE warning lamp and the switch
indicator will extinguish.
The park brake can also be automatically
released. With the engine running and the
transmission in gear, release the brake
pedal and depress the throttle pedal. For safety reasons, your seat belt must also be
fastened.
NOTE:
• You may hear a slight whirring sound from the back of the vehicle while the
parking brake engages or disengages.
• If your foot is on the brake pedal while you are engaging or disengaging the parking
brake, you may notice a small amount of brake pedal movement.
• The new Auto Park Brake feature can be used to apply the park brake automati-
cally every time you park the vehicle. Auto Park Brake can be enabled and disabled
in the Settings menu in Uconnect®.
• The parking brake can be engaged even when the ignition switch is OFF, however,
it can only be disengaged when the ignition switch is in the ON/RUN position.
• Safehold is a new feature that will automatically apply the park brake under
certain conditions. The EPB monitors the status of the driver’s seat belt, driver’s
door and pedal positions to determine if the driver may have exited while the
vehicle is still capable of moving and will then automatically apply the park brake
to prevent the vehicle from rolling.
• The EPB fault lamp will illuminate if the EPB switch is held for longer than
20 seconds in either the released or applied position. The light will extinguish
upon releasing the switch.
• Refer to the Starting and Operating section of your vehicle’s Owner’s Manual on
the DVD for further details.
Parking Brake Switch
OPERATING YOUR VEHICLE
59
Page 165 of 244
Shifting Procedures
4X4 HI To 4X4 LOW
• With the vehicle at speeds of 0 to 3 mph (0 to 5 km/h), the ignition switch in the
ON position or the engine running, shift the transmission into NEUTRAL, and
press the “4WD LOW” button once. The “4WD LOW” indicator light in the
instrument cluster will begin to flash and remain on solid when the shift is
complete.
NOTE:
If shift conditions/interlocks are not met a message will flash from the Electronic
Vehicle Information Center (EVIC)/Driver Information Display (DID) with instructions
on how to complete the requested shift. Refer to “Electronic Vehicle Information
Center (EVIC)/Driver Information Display (DID)” in “Understanding Your Instrument
Panel” on the DVD for further information.
4X4 LOW To 4X4 HI
• With the vehicle at speeds of 0 to 3 mph (0 to 5 km/h), the ignition switch in the
ON position or the engine running, shift the transmission into NEUTRAL, and
press the “4WD LOW” button once. The “4WD LOW” indicator light in the
instrument cluster will flash and go out when the shift is complete.
NOTE:
If shift conditions/interlocks are not met a message will flash from the Electronic
Vehicle Information Center (EVIC)/Driver Information Display (DID) with instructions
on how to complete the requested shift. Refer to “Electronic Vehicle Information
Center (EVIC)/Driver Information Display (DID)” in “Understanding Your Instrument
Panel” on the DVD for further information.
NEUTRAL Shift Procedure
1. Bring the vehicle to a complete stop and shift the transmission to PARK.
2. Turn the engine OFF.
3. Turn the ignition switch to the ON/RUN position, but do not start the engine.
4. Press and hold the brake pedal.
5. Shift the transmission into NEUTRAL.
6. Using a ballpoint pen or similar object, press and hold the recessed Power
Transfer Unit NEUTRAL (N) button (located by the selector switch) for four
seconds. The light behind the NEUTRAL (N) symbol will blink, indicating shift in
progress. The light will stop blinking (stay on solid) when the shift to NEUTRAL
(N) is complete.
7. After the shift is completed and the NEUTRAL light stays on, release the
NEUTRAL (N) button.
8. Start the engine.
9. Shift the transmission into REVERSE.
OFF-ROAD CAPABILITIES
163
Page 166 of 244
10. Release the brake pedal for five seconds and ensure that there is no vehicle
movement.
11. Shift the transmission to NEUTRAL.
12. Apply the parking brake.
NOTE:
Repeat these Steps to shift out of NEUTRAL.
REAR ELECTRONIC LOCKER (E-LOCKER) SYSTEM
• The Rear E-Locker System features a mechanical locking rear differential to
provide better traction in the 4WD LOW position. The “REAR LOCK” button is on
the Selec-Terrain Knob
Activating The Rear E-Locker
To activate the Rear E-Locker System, the following conditions must be met:
• The 4WD system must be in 4WD LOW.
• The ignition switch in the ON position or the engine running.
• Vehicle speed must be below 15 MPH (24 km/h).
• To engage Rear E-Locker, press the REAR LOCK button once.
Deactivating The Rear E-Locker System
To deactivate the Rear E-Locker System, the following conditions must be met:
• Rear E-Locker must be engaged, and the REAR LOCK indicator light on.
• The ignition switch in the ON position or the engine running.
• To disengage Rear E-Locker , press the REAR LOCK button once.
NOTE:
• It may also be necessary to drive slowly steering back and forth to complete
engagement and disengagement of the E- Locker.
• When engaging Rear E-Locker, the indicator lights in the instrument cluster and
on the REAR LOCK button will begin to flash. When the shift is complete the REAR
LOCK indicator lights will remain on.
• When disengaging Rear E-Locker, the indicator lights in the instrument cluster
and on the REAR LOCK button will begin to flash. When the shift is complete the
REAR LOCK indicator lights will remain off.
OFF-ROAD CAPABILITIES
164
Page 175 of 244
ROADSIDE ASSISTANCE
Dial toll-free 1-800-521-2779 for U.S. Residents or 1-800-363-4869 for Canadian
Residents.
• Provide your name, vehicle identification number, license plate number, and your
location, including the telephone number from which you are calling.
• Briefly describe the nature of the problem and answer a few simple questions.
• You will be given the name of the service provider and an estimated time of arrival.
If you feel you are in an “unsafe situation”, please let us know. With your consent,
we will contact local police or safety authorities.
INSTRUMENT CLUSTER WARNING LIGHTS
- Low Fuel Warning Light
This warning light indicates when the fuel level reaches approximately 2.0 gal
(7.8 L), this light will turn on and a single chime will sound.
-ChargingSystemLight
This light shows the status of the electrical charging system. If the charging system
light remains on, it means that the vehicle is experiencing a problem with the
charging system.
We recommend you do not continue driving if the charging system light is on. Have
the vehicle serviced immediately.
- Oil Pressure Warning Light
This light indicates low engine oil pressure. If the light turns on while driving, stop
the vehicle and shut off the engine as soon as possible. A chime will sound for four
minutes when this light turns on.
We recommend you do not operate the vehicle or engine damage will occur. Have the
vehicle serviced immediately.
- Anti-Lock Brake (ABS) Light
This light monitors the Anti-Lock Brake System (ABS). The light will turn on when the
ignition switch is turned to the ON/RUN position and may stay on for as long as four
seconds.
WHAT TO DO IN EMERGENCIES
173
Page 181 of 244
2. Push and release theDOWNarrow button to access the ”Oil Life” menu
screen.
3. Push theLEFTarrow button orRIGHTarrow button to access the “OIL
LIFE” submenu.
4. Push theOKbutton to reset the “OIL LIFE” to 100%
5. Push theUParrow button to exit the EVIC menu screen
Vehicles Not Equipped With Passive Entry
Without pushing the brake pedal, cycle the ignition to the ON/RUN position (Do not
start the engine.)
1. Push theOKbutton to enter the EVIC menu screen.
2. Push and release theDOWNarrow button to access the ”Oil Life” menu
screen.
3. Push theLEFTarrow button orRIGHTarrow button to access the “OIL
LIFE” submenu.
4. Push theOKbutton to reset the “OIL LIFE” to 100%
5. Push theUParrow button to exit the EVIC menu screen
NOTE:
If the indicator message illuminates when you start the vehicle, the oil change
indicator system did not reset. If necessary, repeat this procedure.
INSTRUMENT CLUSTER INDICATOR LIGHTS
A- Stop/Start Indicator — If Equipped
This icon indicates that the Stop/Start System is active. Whenever the system is active
the telltale will illuminate in the instrument cluster. Refer to “Stop Start System” in
“Operating Your Vehicle” in this manual.
- Turn Signal Indicator
The arrows will flash with the exterior turn signals when the turn signal lever is
operated. A tone will chime, and a EVIC/DID message will appear if either turn signal
is left on for more than 1 mile (1.6 km).
NOTE:
If either indicator flashes at a rapid rate, check for a defective outside light bulb.
- High Beam Indicator
Indicates that headlights are on high beam.
- Front Fog Light Indicator
This indicator will illuminate when the front fog lights are on.
WHAT TO DO IN EMERGENCIES
179
Page 210 of 244
MAINTENANCE PROCEDURES
For information on the maintenance procedures for your vehicle, please refer to
“Maintenance Procedures” in “Maintaining Your Vehicle” in your Owner’s Manual or
applicable supplement on the DVD for further details.
MAINTENANCE SCHEDULE
Your vehicle is equipped with an automatic oil change indicator system. The oil
change indicator system will remind you that it is time to take your vehicle in for
scheduled maintenance.
Based on engine operation conditions, the oil change indicator message will
illuminate. This means that service is required for your vehicle. Operating conditions
such as frequent short-trips, trailer tow, extremely hot or cold ambient temperatures
will influence when the “Oil Change Required” message is displayed. Severe
Operating Conditions can cause the change oil message to illuminate as early as
3,500 miles (5,600 km) since last reset. Have your vehicle serviced as soon as
possible, within the next 500 miles (805 km).
Your authorized dealer will reset the oil change indicator message after completing
the scheduled oil change. If a scheduled oil change is performed by someone other
than your authorized dealer, the message can be reset by referring to the steps
described under “Instrument Cluster Warning Lights” in “What To Do In Emergen-
cies” in this guide or “Electronic Vehicle Information Center (EVIC)” or “Driver
Information Display (DID)” in “Understanding Your Instrument Panel” in your
Owners Manual on the DVD for further information.
NOTE:
Under no circumstances should oil change intervals exceed 10,000 miles
(16,000 km) or twelve months, whichever comes first.
MAINTAINING YOUR VEHICLE
208
Page 218 of 244
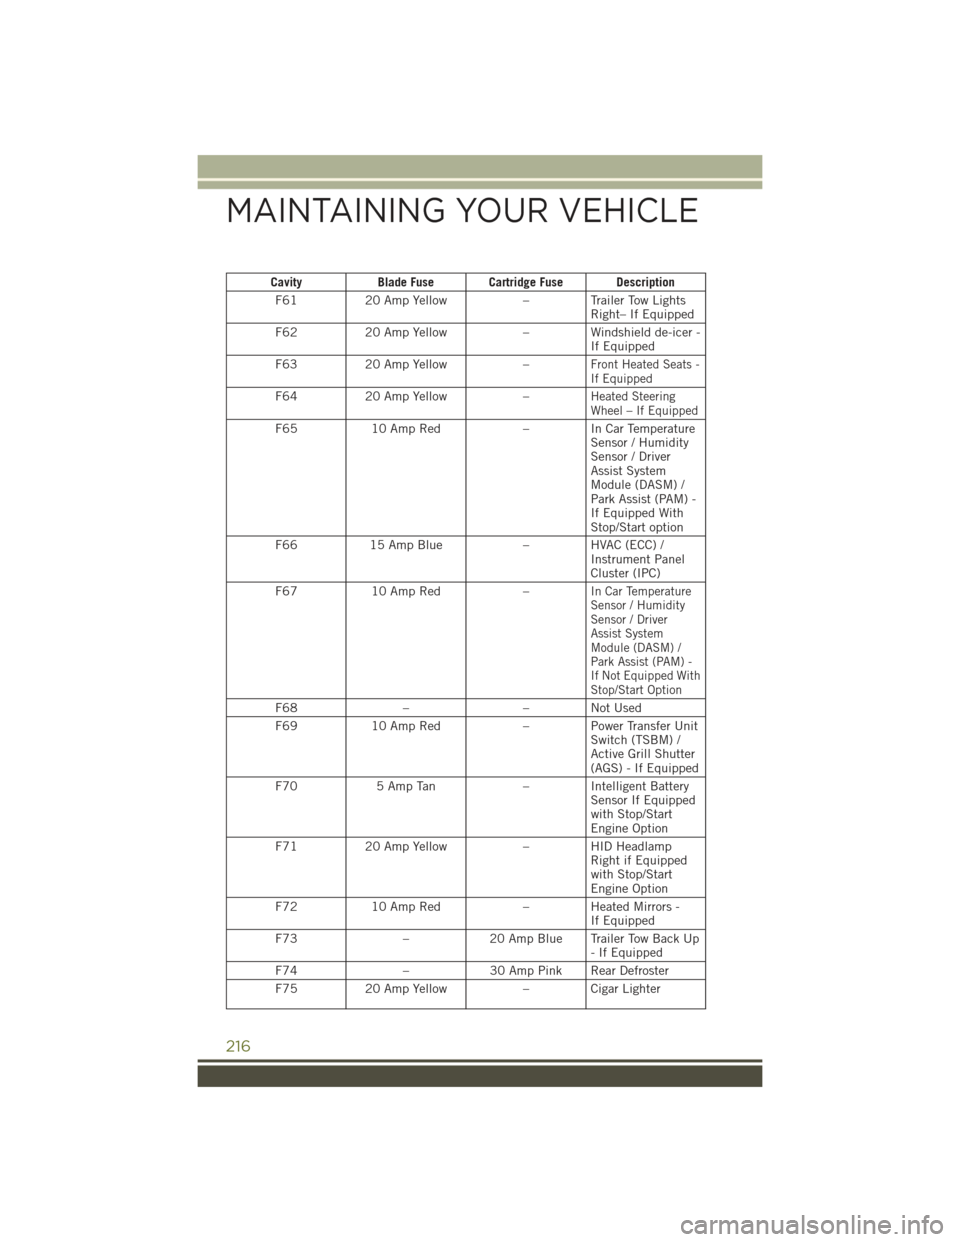
CavityBlade Fuse Cartridge Fuse Description
F6120 Amp Yellow– Trailer Tow LightsRight– If Equipped
F6220 Amp Yellow– Windshield de-icer -If Equipped
F6320 Amp Yellow–Front Heated Seats -If Equipped
F6420 Amp Yellow–Heated SteeringWheel – If Equipped
F6510 Amp Red–InCarTemperatureSensor / HumiditySensor / DriverAssist SystemModule (DASM) /Park Assist (PAM) -If Equipped WithStop/Start option
F6615 Amp Blue–HVAC(ECC)/Instrument PanelCluster (IPC)
F6710 Amp Red–In Car TemperatureSensor / HumiditySensor / DriverAssist SystemModule (DASM) /Park Assist (PAM) -If Not Equipped WithStop/Start Option
F68––NotUsed
F6910 Amp Red–PowerTransferUnitSwitch (TSBM) /Active Grill Shutter(AGS) - If Equipped
F705 Amp Tan– Intelligent BatterySensor If Equippedwith Stop/StartEngine Option
F7120 Amp Yellow–HIDHeadlampRight if Equippedwith Stop/StartEngine Option
F7210 Amp Red– Heated Mirrors -If Equipped
F73–20 Amp Blue Trailer Tow Back Up-IfEquipped
F74–30 Amp Pink Rear Defroster
F7520 Amp Yellow– Cigar Lighter
MAINTAINING YOUR VEHICLE
216