ad blue JEEP CHEROKEE 2016 KL / 5.G Owner's Manual
[x] Cancel search | Manufacturer: JEEP, Model Year: 2016, Model line: CHEROKEE, Model: JEEP CHEROKEE 2016 KL / 5.GPages: 236, PDF Size: 11.24 MB
Page 141 of 236
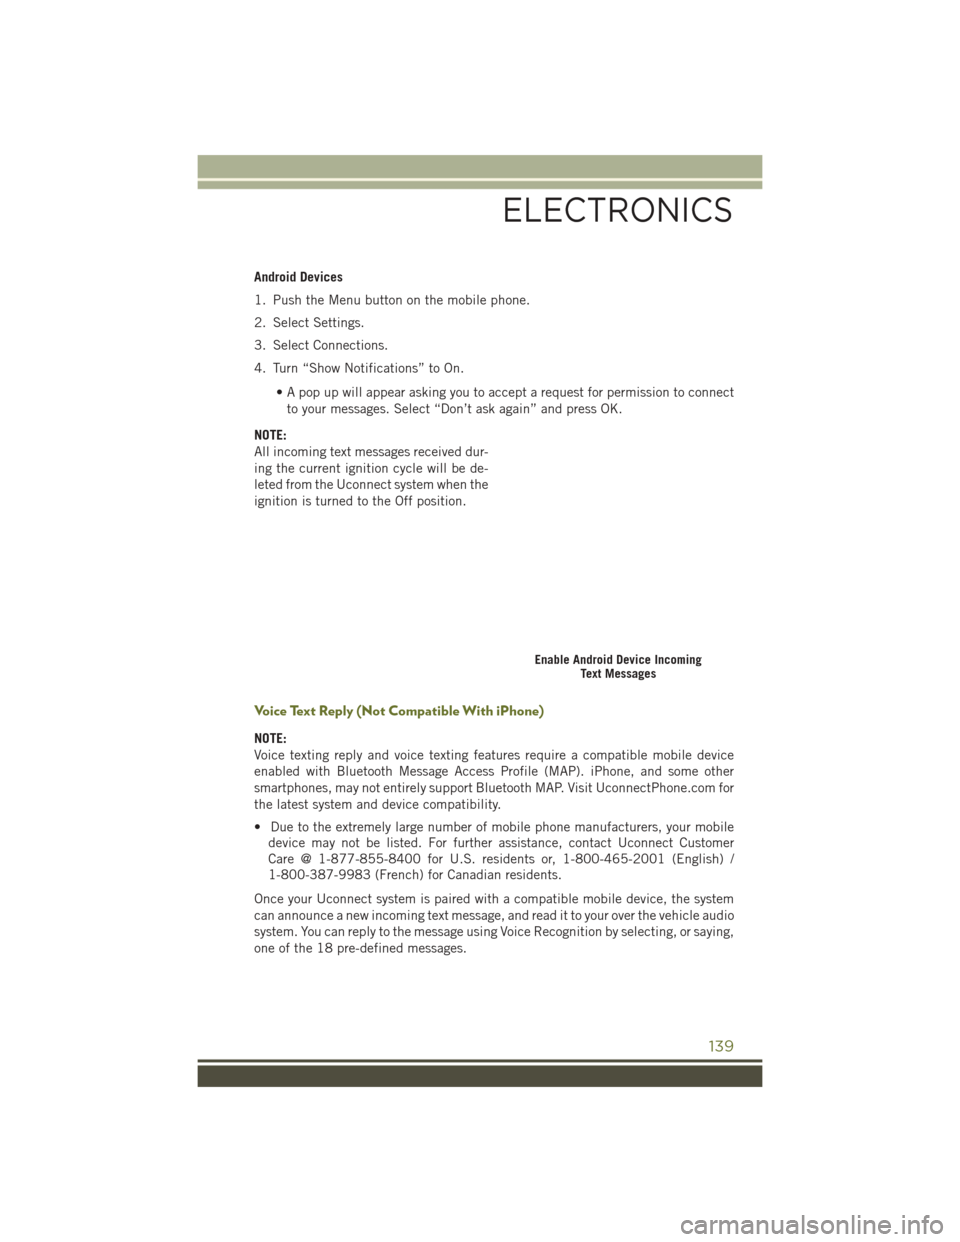
Android Devices
1. Push the Menu button on the mobile phone.
2. Select Settings.
3. Select Connections.
4. Turn “Show Notifications” to On.• A pop up will appear asking you to accept a request for permission to connectto your messages. Select “Don’t ask again” and press OK.
NOTE:
All incoming text messages received dur-
ing the current ignition cycle will be de-
leted from the Uconnect system when the
ignition is turned to the Off position.
Voice Text Reply (Not Compatible With iPhone)
NOTE:
Voice texting reply and voice texting features require a compatible mobile device
enabled with Bluetooth Message Access Profile (MAP). iPhone, and some other
smartphones, may not entirely support Bluetooth MAP. Visit UconnectPhone.com for
the latest system and device compatibility.
• Due to the extremely large number of mobile phone manufacturers, your mobile device may not be listed. For further assistance, contact Uconnect Customer
Care @ 1-877-855-8400 for U.S. residents or, 1-800-465-2001 (English) /
1-800-387-9983 (French) for Canadian residents.
Once your Uconnect system is paired with a compatible mobile device, the system
can announce a new incoming text message, and read it to your over the vehicle audio
system. You can reply to the message using Voice Recognition by selecting, or saying,
one of the 18 pre-defined messages.
Enable Android Device Incoming Text Messages
ELECTRONICS
139
Page 142 of 236
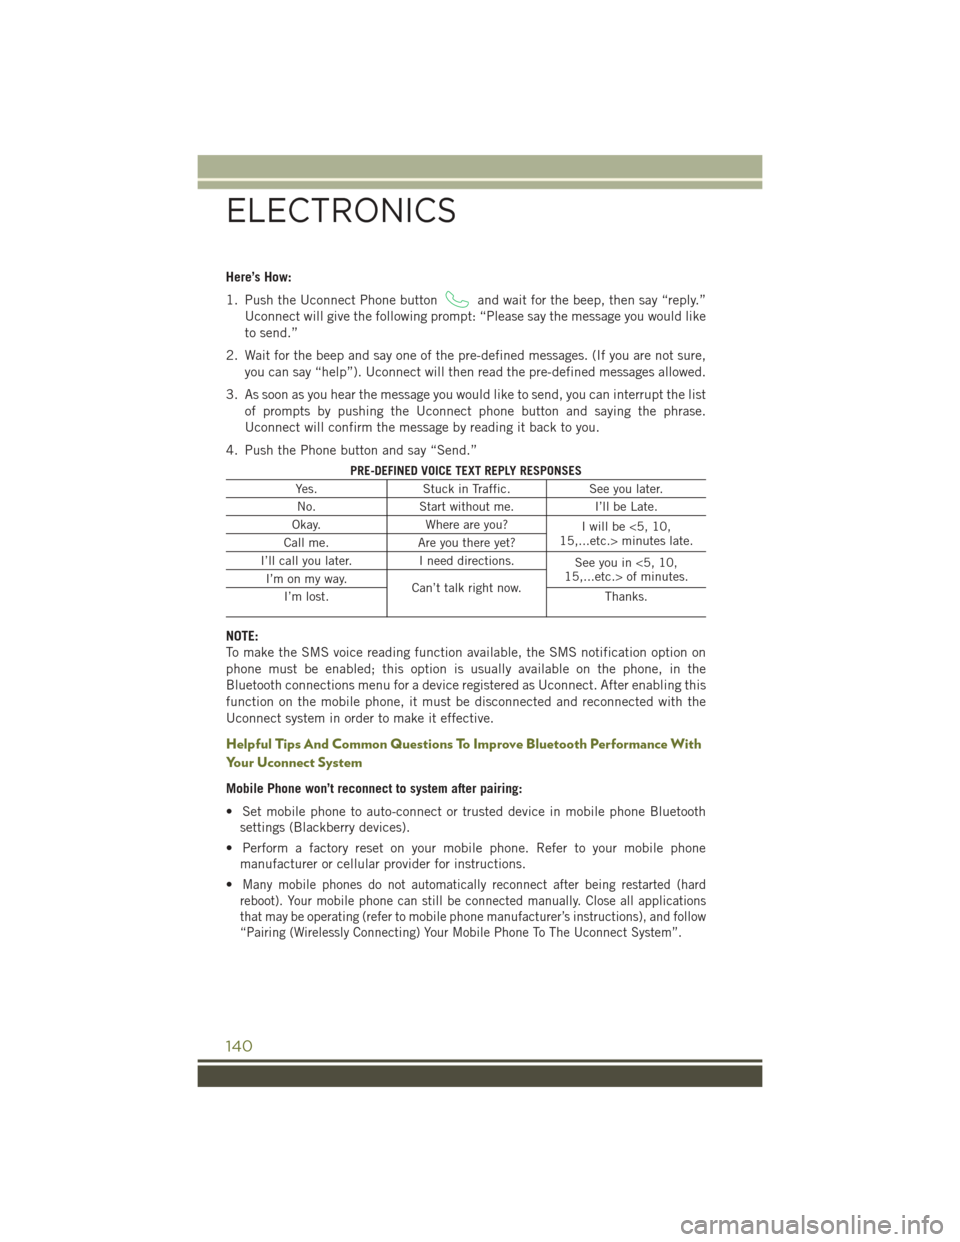
Here’s How:
1. Push the Uconnect Phone button
and wait for the beep, then say “reply.”
Uconnect will give the following prompt: “Please say the message you would like
to send.”
2. Wait for the beep and say one of the pre-defined messages. (If you are not sure, you can say “help”). Uconnect will then read the pre-defined messages allowed.
3. As soon as you hear the message you would like to send, you can interrupt the list of prompts by pushing the Uconnect phone button and saying the phrase.
Uconnect will confirm the message by reading it back to you.
4. Push the Phone button and say “Send.”
PRE-DEFINED VOICE TEXT REPLY RESPONSES
Yes. Stuck in Traffic. See you later.
No. Start without me. I’ll be Late.
Okay. Where are you?
I will be <5, 10,
15,...etc.> minutes late.
Call me. Are you there yet?
I’ll call you later. I need directions.
See you in <5, 10,
15,...etc.> of minutes.
I’m on my way.
Can’t talk right now.
I’m lost. Thanks.
NOTE:
To make the SMS voice reading function available, the SMS notification option on
phone must be enabled; this option is usually available on the phone, in the
Bluetooth connections menu for a device registered as Uconnect. After enabling this
function on the mobile phone, it must be disconnected and reconnected with the
Uconnect system in order to make it effective.
Helpful Tips And Common Questions To Improve Bluetooth Performance With
Your Uconnect System
Mobile Phone won’t reconnect to system after pairing:
• Set mobile phone to auto-connect or trusted device in mobile phone Bluetooth
settings (Blackberry devices).
• Perform a factory reset on your mobile phone. Refer to your mobile phone manufacturer or cellular provider for instructions.
•
Many mobile phones do not automatically reconnect after being restarted (hard
reboot). Your mobile phone can still be connected manually. Close all applications
that may be operating (refer to mobile phone manufacturer’s instructions), and follow
“Pairing (Wirelessly Connecting) Your Mobile Phone To The Uconnect System”.
ELECTRONICS
140
Page 143 of 236
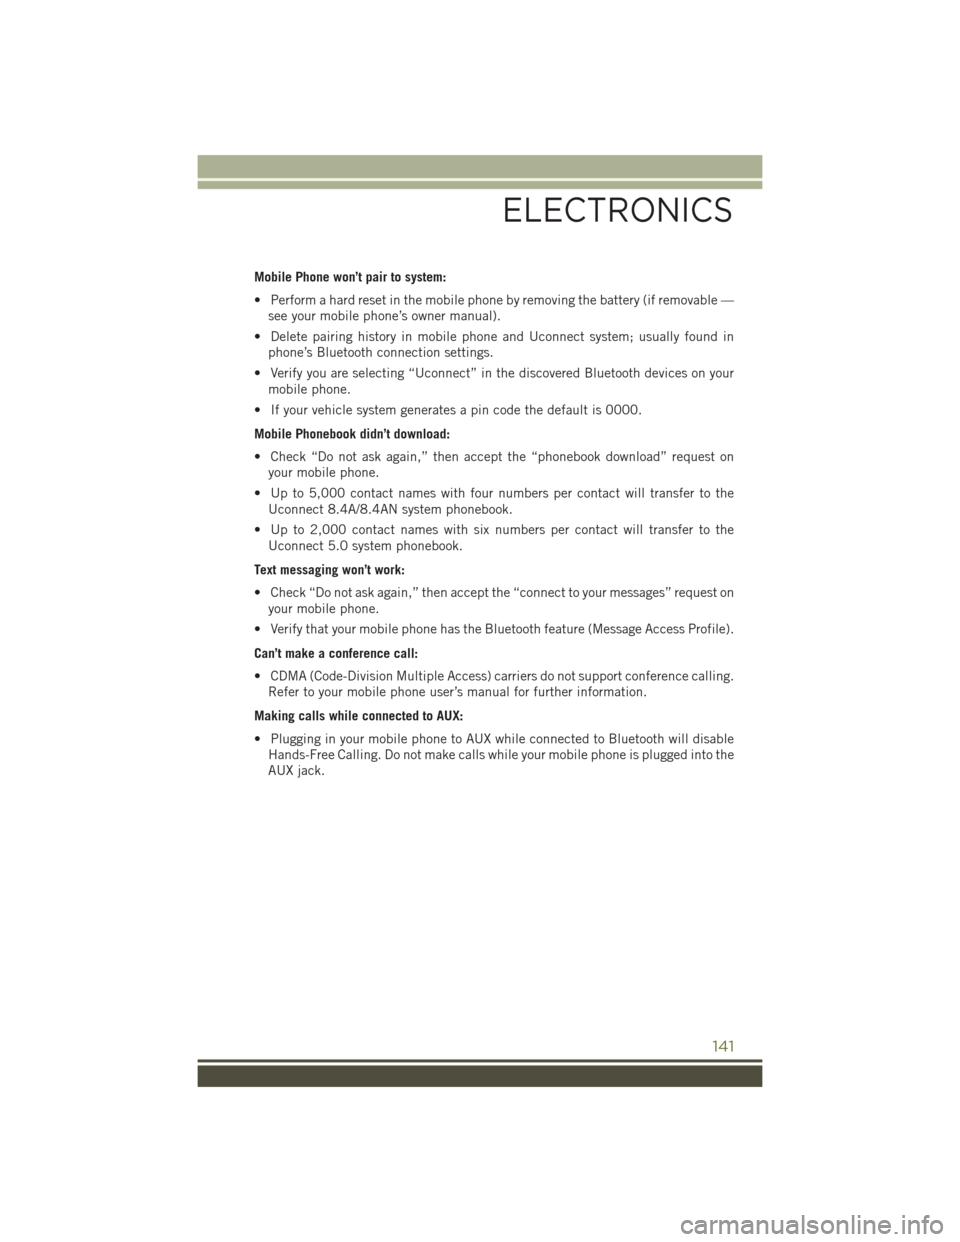
Mobile Phone won’t pair to system:
• Perform a hard reset in the mobile phone by removing the battery (if removable —see your mobile phone’s owner manual).
• Delete pairing history in mobile phone and Uconnect system; usually found in phone’s Bluetooth connection settings.
• Verify you are selecting “Uconnect” in the discovered Bluetooth devices on your mobile phone.
• If your vehicle system generates a pin code the default is 0000.
Mobile Phonebook didn’t download:
• Check “Do not ask again,” then accept the “phonebook download” request on your mobile phone.
• Up to 5,000 contact names with four numbers per contact will transfer to the Uconnect 8.4A/8.4AN system phonebook.
• Up to 2,000 contact names with six numbers per contact will transfer to the Uconnect 5.0 system phonebook.
Text messaging won’t work:
• Check “Do not ask again,” then accept the “connect to your messages” request on your mobile phone.
• Verify that your mobile phone has the Bluetooth feature (Message Access Profile).
Can’t make a conference call:
• CDMA (Code-Division Multiple Access) carriers do not support conference calling. Refer to your mobile phone user’s manual for further information.
Making calls while connected to AUX:
• Plugging in your mobile phone to AUX while connected to Bluetooth will disable Hands-Free Calling. Do not make calls while your mobile phone is plugged into the
AUX jack.
ELECTRONICS
141
Page 145 of 236
• Push theRIGHTarrow button to access the information screens or submenu
screens of a main menu item.
• Push the LEFT
arrow button to access the information screens or submenu
screens of a main menu item.
• Push the OKbutton to access/select the information screens or submenu screens
of a main menu item. Push and hold the OKarrow button for two seconds to reset
displayed/selected features that can be reset.
Compass Calibration
This compass is self-calibrating, which eliminates the need to set the compass
manually. When the vehicle is new, the compass may appear erratic, and the
EVIC/DID will display “CAL” until the compass is calibrated.
You may also calibrate the compass by completing one or more 360 degree turns (in
an area free from large metal or metallic objects) until the “CAL” message displayed
in the EVIC/DID turns off. The compass will now function normally.
PROGRAMMABLE FEATURES
Uconnect Customer Programmable Features
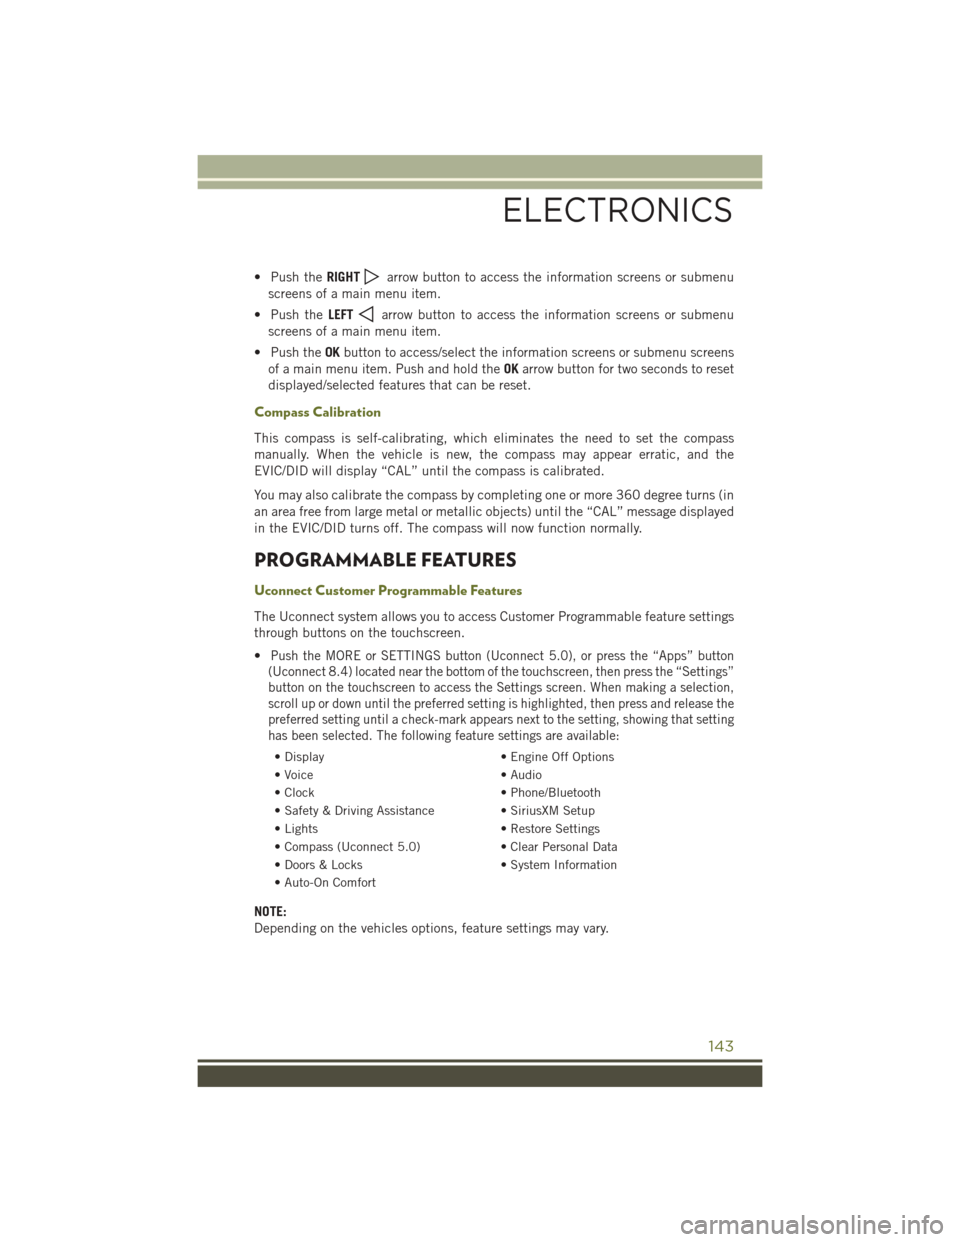
The Uconnect system allows you to access Customer Programmable feature settings
through buttons on the touchscreen.
•
Push the MORE or SETTINGS button (Uconnect 5.0), or press the “Apps” button
(Uconnect 8.4) located near the bottom of the touchscreen, then press the “Settings”
button on the touchscreen to access the Settings screen. When making a selection,
scroll up or down until the preferred setting is highlighted, then press and release the
preferred setting until a check-mark appears next to the setting, showing that setting
has been selected. The following feature settings are available:
• Display • Engine Off Options
• Voice • Audio
• Clock • Phone/Bluetooth
• Safety & Driving Assistance • SiriusXM Setup
• Lights • Restore Settings
• Compass (Uconnect 5.0) • Clear Personal Data
• Doors & Locks • System Information
• Auto-On Comfort
NOTE:
Depending on the vehicles options, feature settings may vary.
ELECTRONICS
143
Page 206 of 236
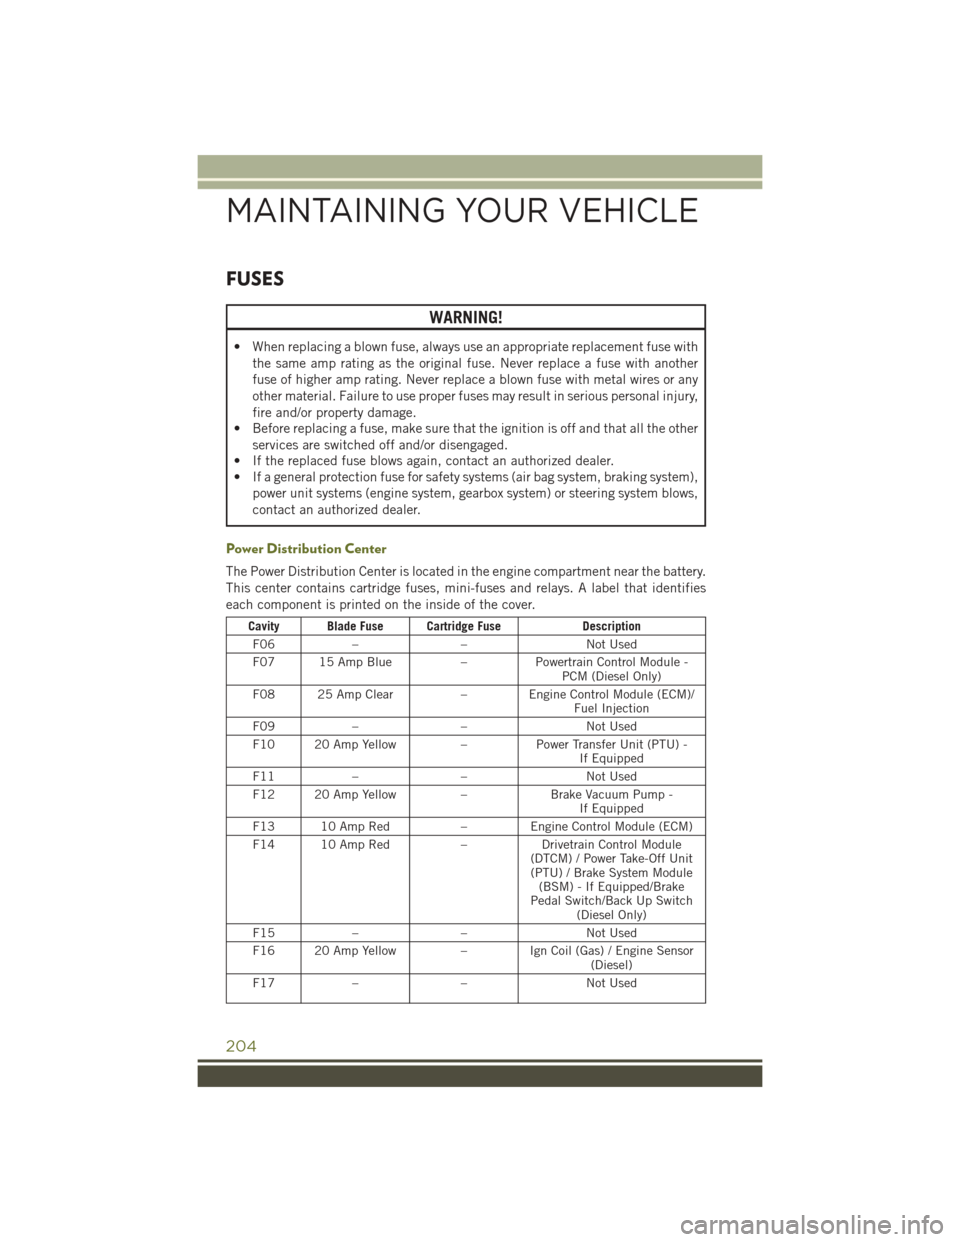
FUSES
WARNING!
• When replacing a blown fuse, always use an appropriate replacement fuse withthe same amp rating as the original fuse. Never replace a fuse with another
fuse of higher amp rating. Never replace a blown fuse with metal wires or any
other material. Failure to use proper fuses may result in serious personal injury,
fire and/or property damage.
• Before replacing a fuse, make sure that the ignition is off and that all the other
services are switched off and/or disengaged.
• If the replaced fuse blows again, contact an authorized dealer.
• If a general protection fuse for safety systems (air bag system, braking system),
power unit systems (engine system, gearbox system) or steering system blows,
contact an authorized dealer.
Power Distribution Center
The Power Distribution Center is located in the engine compartment near the battery.
This center contains cartridge fuses, mini-fuses and relays. A label that identifies
each component is printed on the inside of the cover.
Cavity Blade Fuse Cartridge Fuse Description
F06 – – Not Used
F07 15 Amp Blue –Powertrain Control Module -
PCM (Diesel Only)
F08 25 Amp Clear – Engine Control Module (ECM)/
Fuel Injection
F09 – – Not Used
F10 20 Amp Yellow –Power Transfer Unit (PTU) -
If Equipped
F11 – – Not Used
F12 20 Amp Yellow –Brake Vacuum Pump -
If Equipped
F13 10 Amp Red –Engine Control Module (ECM)
F14 10 Amp Red –Drivetrain Control Module
(DTCM) / Power Take-Off Unit (PTU) / Brake System Module (BSM) - If Equipped/Brake
Pedal Switch/Back Up Switch (Diesel Only)
F15 – – Not Used
F16 20 Amp Yellow –Ign Coil (Gas) / Engine Sensor
(Diesel)
F17 – – Not Used
MAINTAINING YOUR VEHICLE
204
Page 207 of 236
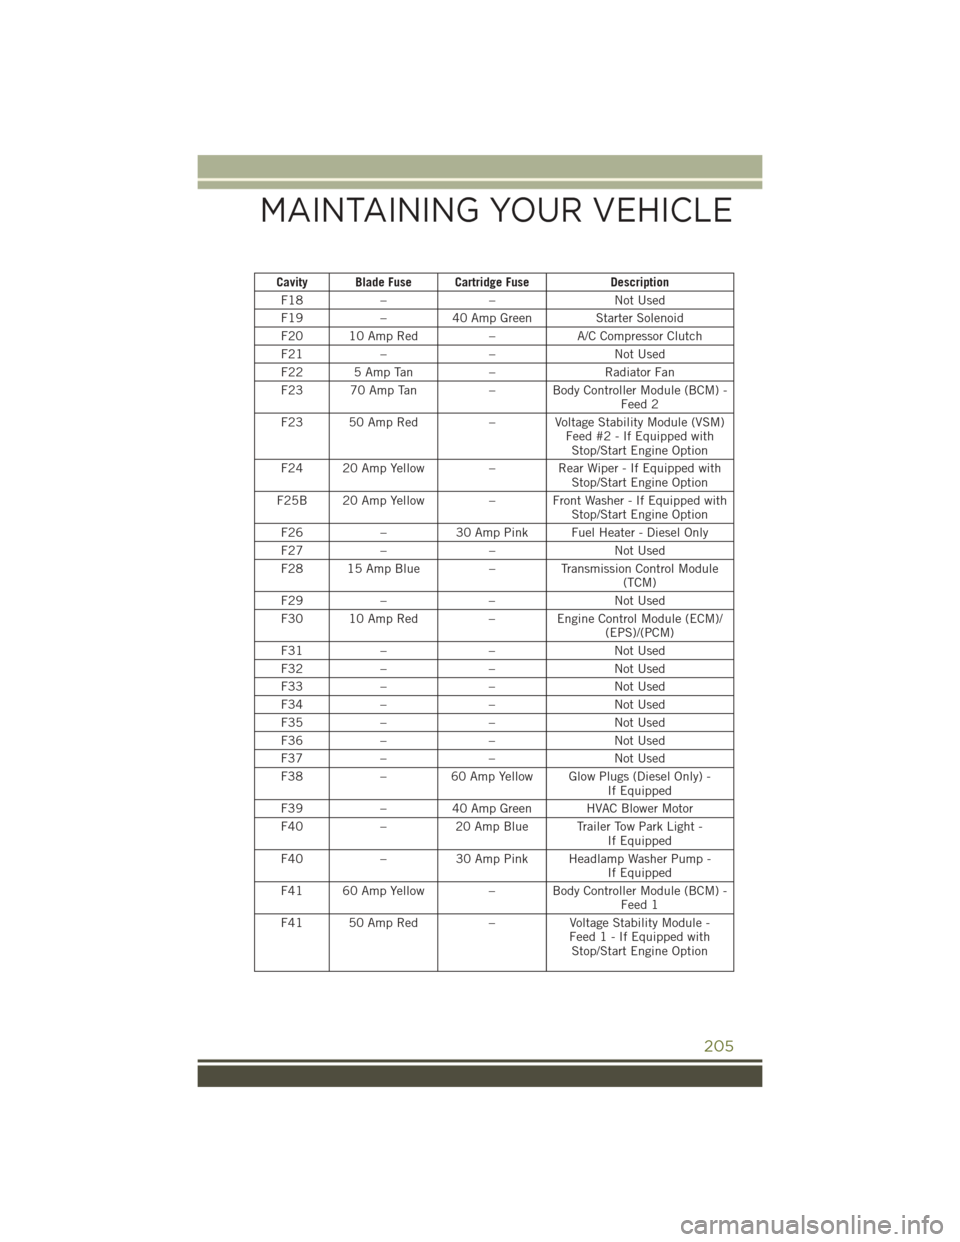
Cavity Blade Fuse Cartridge FuseDescription
F18 – – Not Used
F19 –40 Amp Green Starter Solenoid
F20 10 Amp Red –A/C Compressor Clutch
F21 – – Not Used
F22 5 Amp Tan –Radiator Fan
F23 70 Amp Tan – Body Controller Module (BCM) -
Feed 2
F23 50 Amp Red – Voltage Stability Module (VSM)
Feed #2 - If Equipped withStop/Start Engine Option
F24 20 Amp Yellow –Rear Wiper - If Equipped with
Stop/Start Engine Option
F25B 20 Amp Yellow – Front Washer - If Equipped with
Stop/Start Engine Option
F26 –30 Amp Pink Fuel Heater - Diesel Only
F27 – – Not Used
F28 15 Amp Blue –Transmission Control Module
(TCM)
F29 – – Not Used
F30 10 Amp Red – Engine Control Module (ECM)/
(EPS)/(PCM)
F31 – – Not Used
F32 – – Not Used
F33 – – Not Used
F34 – – Not Used
F35 – – Not Used
F36 – – Not Used
F37 – – Not Used
F38 –60 Amp Yellow Glow Plugs (Diesel Only) -
If Equipped
F39 –40 Amp Green HVAC Blower Motor
F40 –20 Amp Blue Trailer Tow Park Light -
If Equipped
F40 –30 Amp Pink Headlamp Washer Pump -
If Equipped
F41 60 Amp Yellow – Body Controller Module (BCM) -
Feed 1
F41 50 Amp Red –Voltage Stability Module -
Feed 1 - If Equipped with Stop/Start Engine Option
MAINTAINING YOUR VEHICLE
205
Page 208 of 236
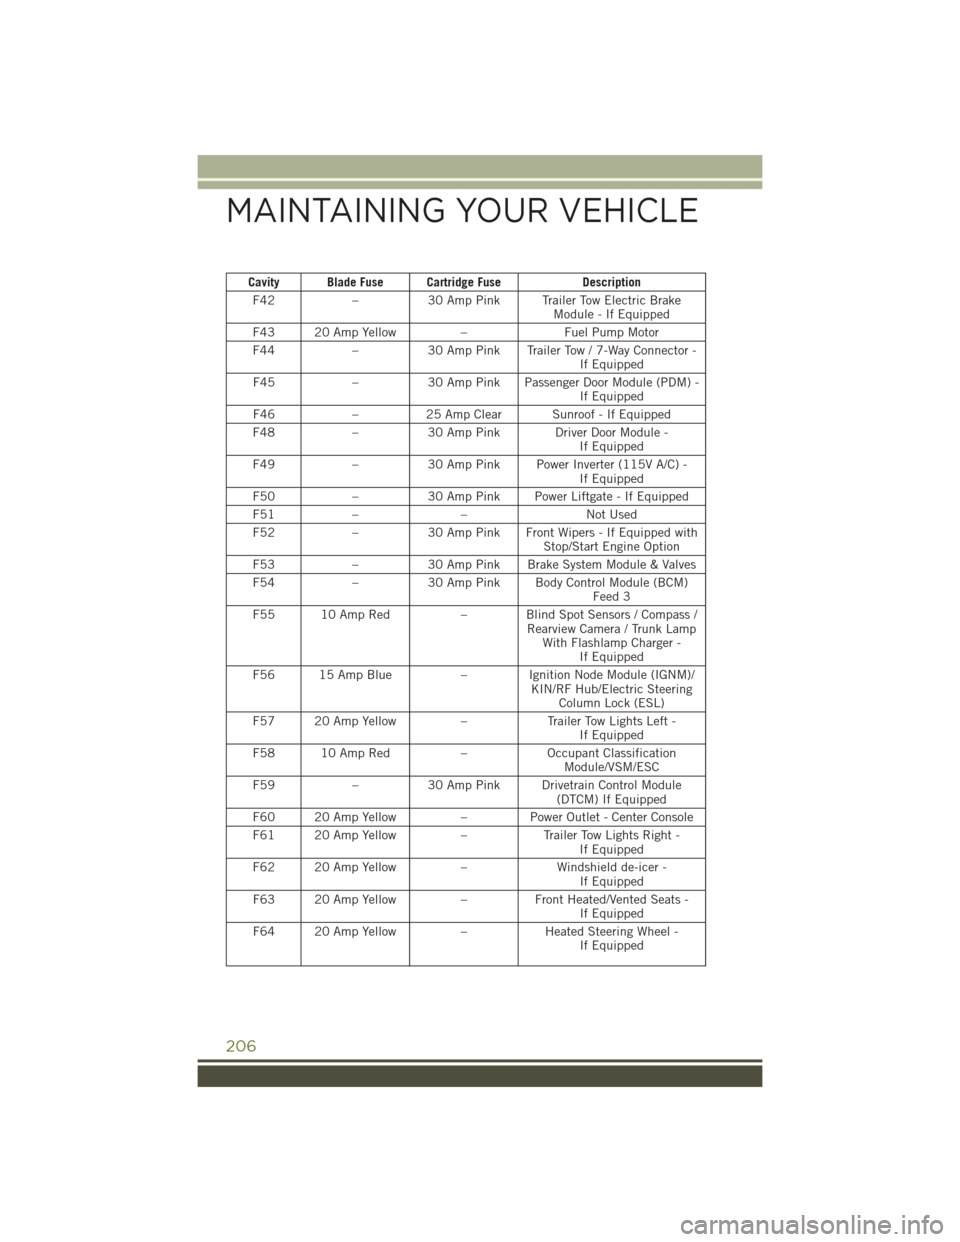
Cavity Blade Fuse Cartridge FuseDescription
F42 –30 Amp Pink Trailer Tow Electric Brake
Module - If Equipped
F43 20 Amp Yellow –Fuel Pump Motor
F44 –30 Amp Pink Trailer Tow / 7-Way Connector -
If Equipped
F45 –30 Amp Pink Passenger Door Module (PDM) -
If Equipped
F46 –25 Amp Clear Sunroof - If Equipped
F48 –30 Amp Pink Driver Door Module -
If Equipped
F49 –30 Amp Pink Power Inverter (115V A/C) -
If Equipped
F50 –30 Amp Pink Power Liftgate - If Equipped
F51 – – Not Used
F52 –30 Amp Pink Front Wipers - If Equipped with
Stop/Start Engine Option
F53 –30 Amp Pink Brake System Module & Valves
F54 –30 Amp Pink Body Control Module (BCM)
Feed 3
F55 10 Amp Red – Blind Spot Sensors / Compass /
Rearview Camera / Trunk LampWith Flashlamp Charger - If Equipped
F56 15 Amp Blue – Ignition Node Module (IGNM)/
KIN/RF Hub/Electric SteeringColumn Lock (ESL)
F57 20 Amp Yellow –Trailer Tow Lights Left -
If Equipped
F58 10 Amp Red –Occupant Classification
Module/VSM/ESC
F59 –30 Amp Pink Drivetrain Control Module
(DTCM) If Equipped
F60 20 Amp Yellow –Power Outlet - Center Console
F61 20 Amp Yellow –Trailer Tow Lights Right -
If Equipped
F62 20 Amp Yellow –Windshield de-icer -
If Equipped
F63 20 Amp Yellow –Front Heated/Vented Seats -
If Equipped
F64 20 Amp Yellow –Heated Steering Wheel -
If Equipped
MAINTAINING YOUR VEHICLE
206
Page 209 of 236
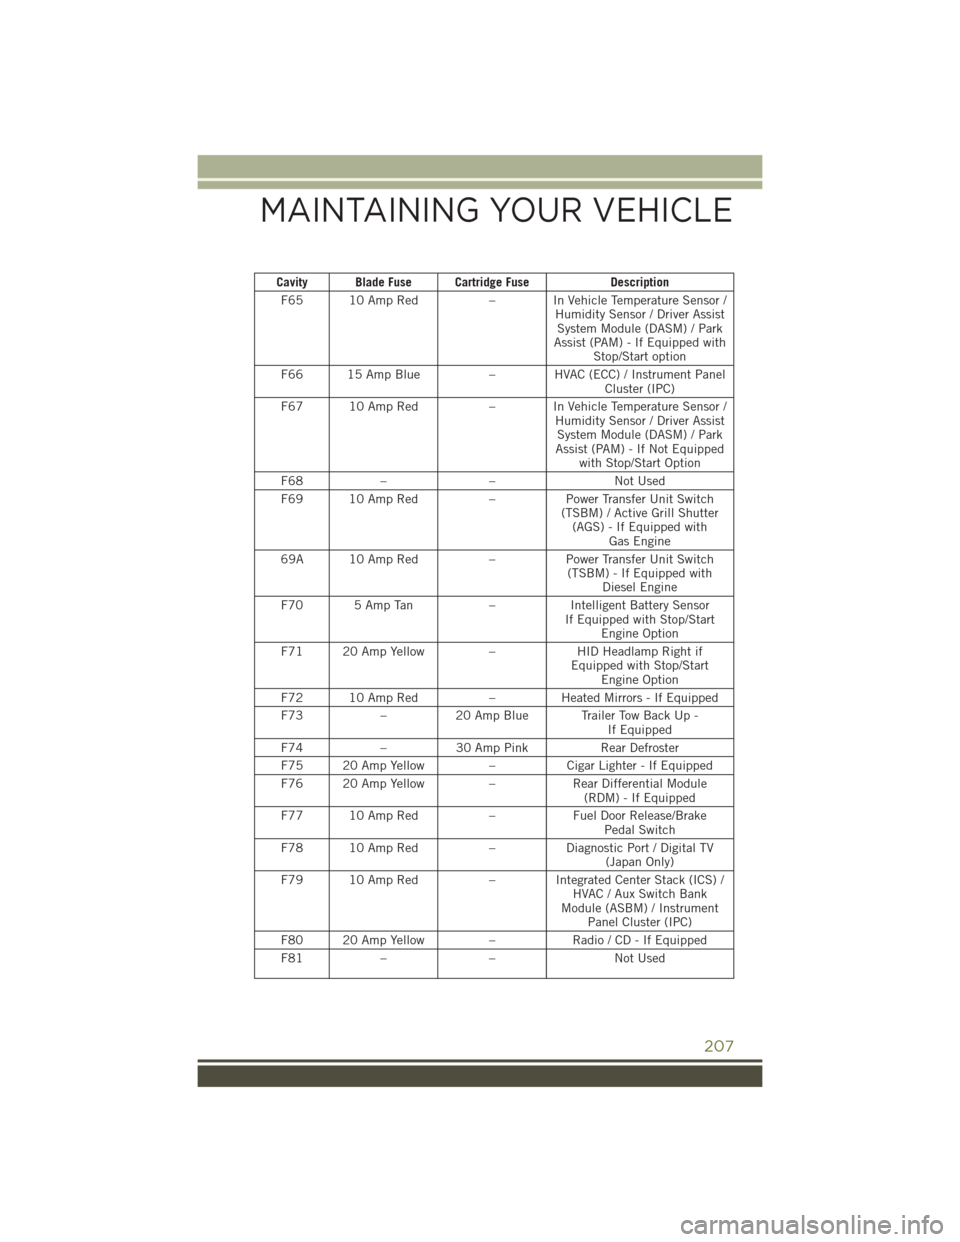
Cavity Blade Fuse Cartridge FuseDescription
F65 10 Amp Red – In Vehicle Temperature Sensor /
Humidity Sensor / Driver AssistSystem Module (DASM) / Park
Assist (PAM) - If Equipped with Stop/Start option
F66 15 Amp Blue – HVAC (ECC) / Instrument Panel
Cluster (IPC)
F67 10 Amp Red – In Vehicle Temperature Sensor /
Humidity Sensor / Driver AssistSystem Module (DASM) / Park
Assist (PAM) - If Not Equipped with Stop/Start Option
F68 – – Not Used
F69 10 Amp Red –Power Transfer Unit Switch
(TSBM) / Active Grill Shutter (AGS) - If Equipped with Gas Engine
69A 10 Amp Red –Power Transfer Unit Switch
(TSBM) - If Equipped with Diesel Engine
F70 5 Amp Tan –Intelligent Battery Sensor
If Equipped with Stop/Start Engine Option
F71 20 Amp Yellow –HID Headlamp Right if
Equipped with Stop/Start Engine Option
F72 10 Amp Red –Heated Mirrors - If Equipped
F73 –20 Amp Blue Trailer Tow Back Up -
If Equipped
F74 –30 Amp Pink Rear Defroster
F75 20 Amp Yellow –Cigar Lighter - If Equipped
F76 20 Amp Yellow –Rear Differential Module
(RDM) - If Equipped
F77 10 Amp Red –Fuel Door Release/Brake
Pedal Switch
F78 10 Amp Red –Diagnostic Port / Digital TV
(Japan Only)
F79 10 Amp Red – Integrated Center Stack (ICS) /
HVAC / Aux Switch Bank
Module (ASBM) / Instrument Panel Cluster (IPC)
F80 20 Amp Yellow –Radio / CD - If Equipped
F81 – – Not Used
MAINTAINING YOUR VEHICLE
207
Page 210 of 236
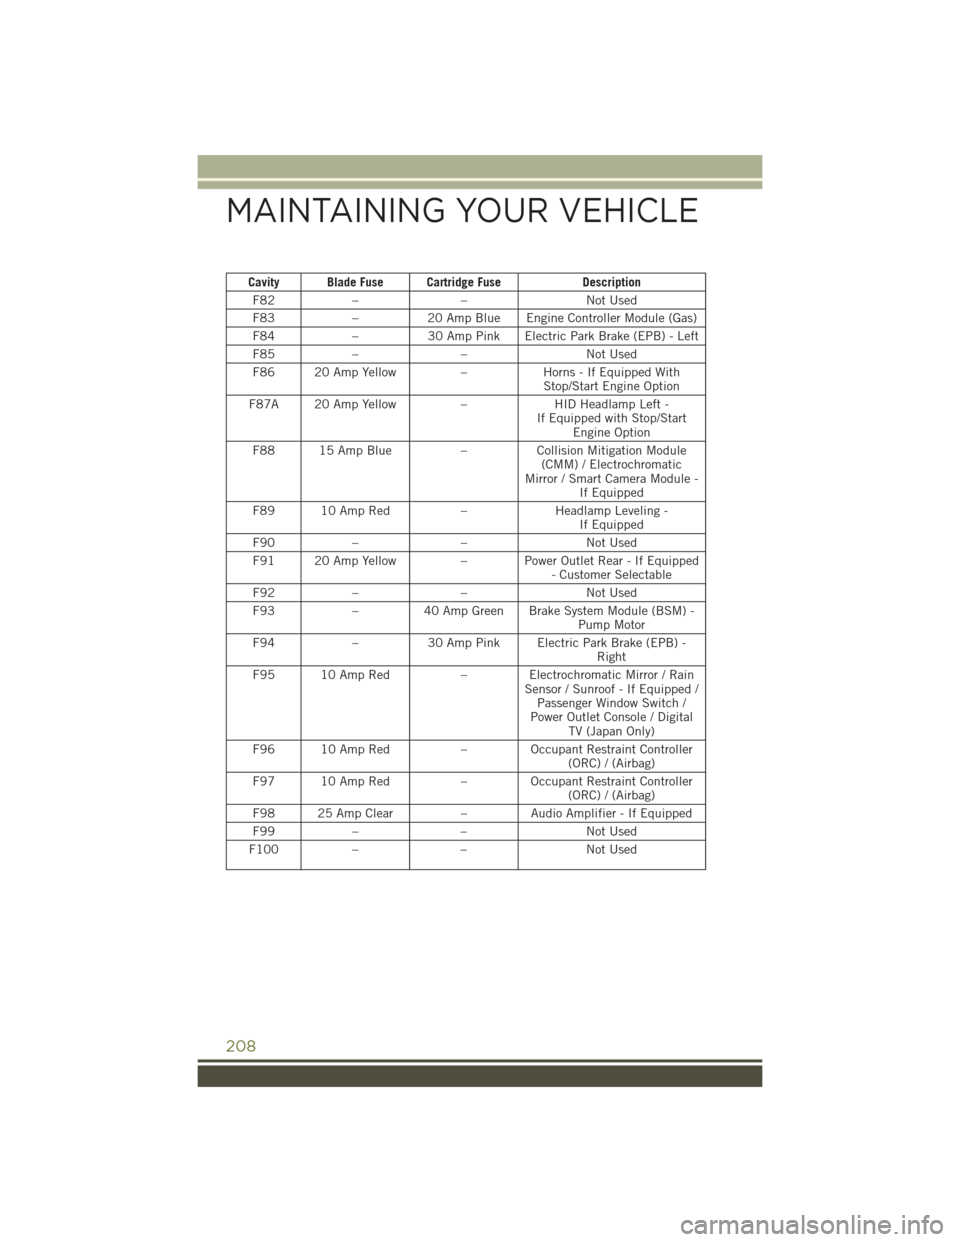
Cavity Blade Fuse Cartridge FuseDescription
F82 – – Not Used
F83 –20 Amp Blue Engine Controller Module (Gas)
F84 –30 Amp Pink Electric Park Brake (EPB) - Left
F85 – – Not Used
F86 20 Amp Yellow –Horns - If Equipped With
Stop/Start Engine Option
F87A 20 Amp Yellow –HID Headlamp Left -
If Equipped with Stop/Start Engine Option
F88 15 Amp Blue –Collision Mitigation Module
(CMM) / Electrochromatic
Mirror / Smart Camera Module - If Equipped
F89 10 Amp Red –Headlamp Leveling -
If Equipped
F90 – – Not Used
F91 20 Amp Yellow – Power Outlet Rear - If Equipped
- Customer Selectable
F92 – – Not Used
F93 –40 Amp Green Brake System Module (BSM) -
Pump Motor
F94 –30 Amp Pink Electric Park Brake (EPB) -
Right
F95 10 Amp Red – Electrochromatic Mirror / Rain
Sensor / Sunroof - If Equipped /Passenger Window Switch /
Power Outlet Console / Digital TV (Japan Only)
F96 10 Amp Red –Occupant Restraint Controller
(ORC) / (Airbag)
F97 10 Amp Red –Occupant Restraint Controller
(ORC) / (Airbag)
F98 25 Amp Clear –Audio Amplifier - If Equipped
F99 – – Not Used
F100 – – Not Used
MAINTAINING YOUR VEHICLE
208
Page 211 of 236
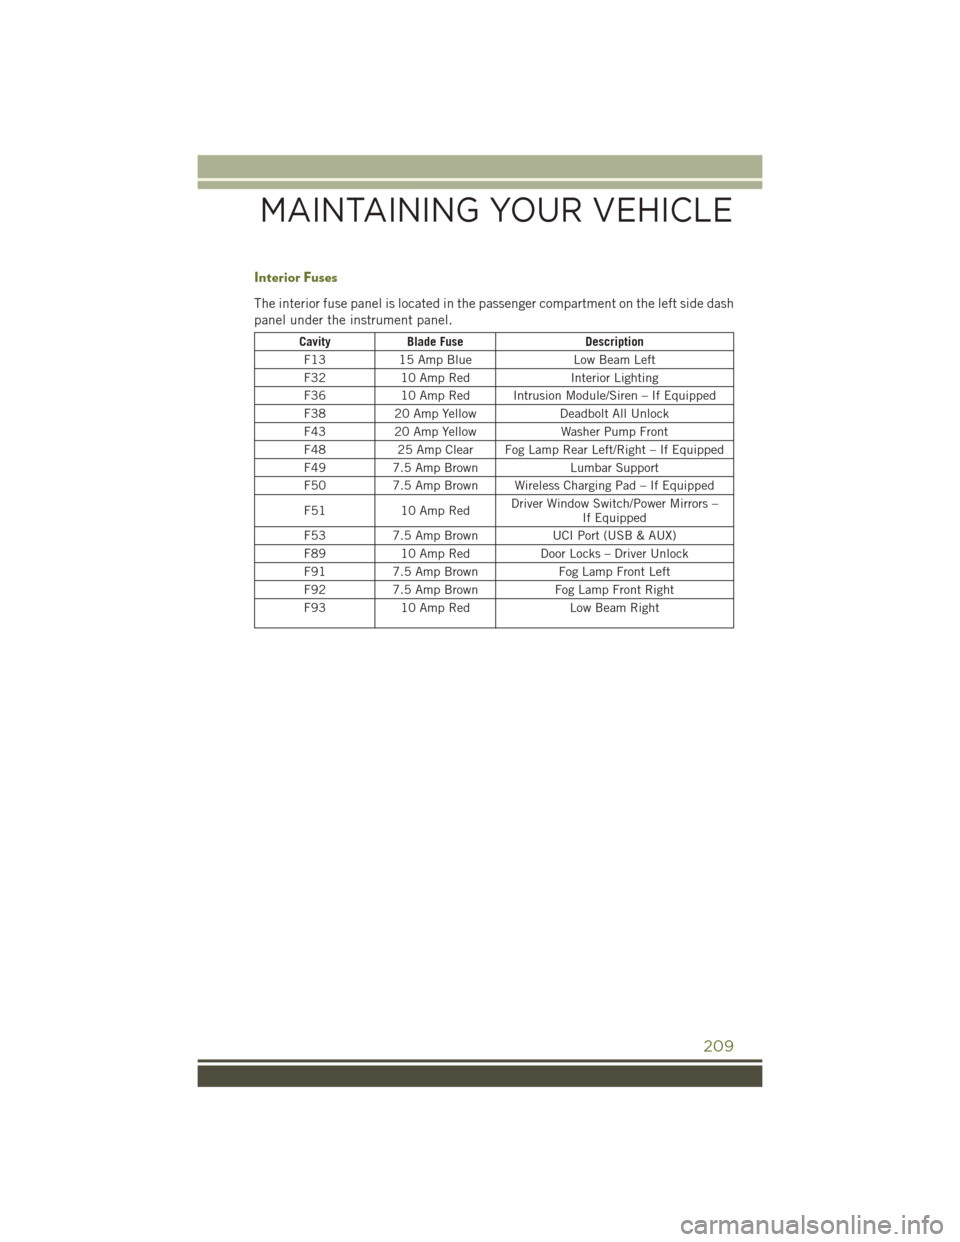
Interior Fuses
The interior fuse panel is located in the passenger compartment on the left side dash
panel under the instrument panel.
CavityBlade Fuse Description
F13 15 Amp Blue Low Beam Left
F32 10 Amp Red Interior Lighting
F36 10 Amp Red Intrusion Module/Siren – If Equipped
F38 20 Amp Yellow Deadbolt All Unlock
F43 20 Amp Yellow Washer Pump Front
F48 25 Amp Clear Fog Lamp Rear Left/Right – If Equipped
F49 7.5 Amp Brown Lumbar Support
F50 7.5 Amp Brown Wireless Charging Pad – If Equipped
F51 10 Amp Red Driver Window Switch/Power Mirrors –
If Equipped
F53 7.5 Amp Brown UCI Port (USB & AUX)
F89 10 Amp Red Door Locks – Driver Unlock
F91 7.5 Amp Brown Fog Lamp Front Left
F92 7.5 Amp Brown Fog Lamp Front Right
F93 10 Amp Red Low Beam Right
MAINTAINING YOUR VEHICLE
209