tow JEEP CHEROKEE 2017 KL / 5.G Manual Online
[x] Cancel search | Manufacturer: JEEP, Model Year: 2017, Model line: CHEROKEE, Model: JEEP CHEROKEE 2017 KL / 5.GPages: 615, PDF Size: 5.72 MB
Page 455 of 615
Checking Oil Level
To assure proper engine lubrication, the engine oil must be
maintained at the correct level. Check the oil level at
regular intervals, such as every month. The best time to
check the engine oil level is about five minutes after a fully
warmed up engine is shut off.
Checking the oil while the vehicle is on level ground will
improve the accuracy of the oil level readings.
There are three possible dipstick types,
•Crosshatched zone.
• Crosshatched zone marked SAFE.
• Crosshatched zone marked with MIN at the low end of
the range and MAX at the high end of the range.
NOTE: Always maintain the oil level within the crosshatch
markings on the dipstick.
Adding 1 quart (1.0 liters) of oil when the reading is at the
low end of the dipstick range will raise the oil level to the
high end of the range marking.
CAUTION!
Overfilling or underfilling the crankcase will cause
aeration or loss of oil pressure. This could damage your
engine.
Adding Washer Fluid
The windshield and rear window washers share the same
fluid reservoir. The fluid reservoir is located in the front of
the engine compartment. Be sure to check the fluid level in
the reservoir at regular intervals. Fill the reservoir with
windshield washer solvent (not radiator antifreeze) and
operate the system for a few seconds to flush out the
residual water.
When refilling the washer fluid reservoir, take some
washer fluid and apply it to a cloth or towel and wipe clean
the wiper blades, this will help blade performance.
To prevent freeze-up of your windshield washer system in
cold weather, select a solution or mixture that meets or
exceeds the temperature range of your climate. This rating
information can be found on most washer fluid containers.
8
SERVICING AND MAINTENANCE 453
Page 471 of 615
2. To disengage the wiper blade from the wiper arm, flipup the release tab on the wiper blade and while holding
the wiper arm with one hand, slide the wiper blade
down towards the base of the wiper arm. 3. With the wiper blade disengaged, remove the wiper
blade from the wiper arm by holding the wiper arm
with one hand and separating the wiper blade from the
wiper arm with the other hand (move the wiper blade
toward the right side of the vehicle to separate the wiper
blade from the wiper arm).
4. Gently lower the wiper arm onto the glass.
Wiper Blade With Release Tab In Unlocked Position
1—WiperBlade
2 — Release Tab
3—WiperArmWiper Blade Removed From Wiper Arm
1 — Wiper Blade
2—WiperArm
3 — Release Tab
8
SERVICING AND MAINTENANCE 469
Page 475 of 615
CAUTION!
•The catalytic converter requires the use of unleaded
fuel only. Leaded gasoline will destroy the effective-
ness of the catalyst as an emissions control device
and may seriously reduce engine performance and
cause serious damage to the engine.
• Damage to the catalytic converter can result if your
vehicle is not kept in proper operating condition. In
the event of engine malfunction, particularly involv-
ing engine misfire or other apparent loss of perfor-
mance, have your vehicle serviced promptly. Contin-
ued operation of your vehicle with a severe
malfunction could cause the converter to overheat,
resulting in possible damage to the converter and
vehicle.
Under normal operating conditions, the catalytic converter
will not require maintenance. However, it is important to
keep the engine properly tuned to assure proper catalyst
operation and prevent possible catalyst damage. NOTE:
Intentional tampering with emissions control sys-
tems can result in civil penalties being assessed against
you.
In unusual situations involving grossly malfunctioning
engine operation, a scorching odor may suggest severe and
abnormal catalyst overheating. If this occurs, stop the
vehicle, turn off the engine and allow it to cool. Service,
including a tune-up to manufacturer’s specifications,
should be obtained immediately.
To minimize the possibility of catalytic converter damage:
• Do not shut off the engine or interrupt the ignition,
when the transmission is in gear and the vehicle is in
motion.
• Do not try to start the engine by pushing or towing the
vehicle.
• Do not idle the engine with any spark plug wires
disconnected or removed, such as when diagnostic
testing, or for prolonged periods during very rough idle
or malfunctioning operating conditions.
8
SERVICING AND MAINTENANCE 473
Page 488 of 615
Tire And Loading Information Placard
This placard tells you important information about the:
1. Number of people that can be carried in the vehicle.
2. Total weight your vehicle can carry.
3. Tire size designed for your vehicle.
4. Cold tire inflation pressures for the front, rear, and sparetires.Loading
The vehicle maximum load on the tire must not exceed the
load carrying capacity of the tire on your vehicle. You will
not exceed the tire’s load carrying capacity if you adhere to
the loading conditions, tire size, and cold tire inflation
pressures specified on the Tire and Loading Information
placard in “Vehicle Loading” in the “Starting And Operat-
ing” section of this manual.
NOTE: Under a maximum loaded vehicle condition, gross
axle weight ratings (GAWRs) for the front and rear axles
must not be exceeded. For further information on GAWRs,
vehicle loading, and trailer towing, refer to “Vehicle Load-
ing” in the “Starting And Operating” section of this
manual.
To determine the maximum loading conditions of your
vehicle, locate the statement “The combined weight of
occupants and cargo should never exceed XXX kg or
XXX lbs” on the Tire and Loading Information placard. The
combined weight of occupants, cargo/luggage and trailer
tongue weight (if applicable) should never exceed the
weight referenced here.
Tire And Loading Information Placard
486 SERVICING AND MAINTENANCE
Page 489 of 615
Steps For Determining Correct Load Limit—
(1) Locate the statement “The combined weight of
occupants and cargo should never exceed XXX kg or
XXX lbs.” on your vehicle’s placard.
(2) Determine the combined weight of the driver and
passengers that will be riding in your vehicle.
(3) Subtract the combined weight of the driver and
passengers from XXX kg or XXX lbs.
(4) The resulting figure equals the available amount of
cargo and luggage load capacity. For example, if “XXX”
amount equals 1400 lbs. and there will be five 150 lb
passengers in your vehicle, the amount of available
cargo and luggage load capacity is 650 lbs. (1400-750
(5x150) = 650 lbs.)
(5) Determine the combined weight of luggage and
cargo being loaded on the vehicle. That weight may not
safely exceed the available cargo and luggage load
capacity calculated in Step 4.(6) If your vehicle will be towing a trailer, load from
your trailer will be transferred to your vehicle. Consult
this manual to determine how this reduces the available
cargo and luggage load capacity of your vehicle.
Metric Example For Load Limit
For example, if “XXX” amount equals 635 kg and there will
be five 68 kg passengers in your vehicle, the amount of
available cargo and luggage load capacity is 295 kg (635-
340 (5x68) = 295 kg) as shown in step 4.
NOTE:
•
If your vehicle will be towing a trailer, load from your
trailer will be transferred to your vehicle. The following
table shows examples on how to calculate total load,
cargo/luggage, and towing capacities of your vehicle
with varying seating configurations and number and
size of occupants. This table is for illustration purposes
only and may not be accurate for the seating and load
carry capacity of your vehicle.
8
SERVICING AND MAINTENANCE 487
Page 494 of 615
Tire Repair
If your tire becomes damaged, it may be repaired if it meets
the following criteria:
•The tire has not been driven on when flat.
• The damage is only on the tread section of your tire
(sidewall damage is not repairable).
• The puncture is no greater thana¼ofaninch (6 mm).
Consult an authorized tire dealer for tire repairs and
additional information.
Damaged Run Flat tires, or Run Flat tires that have
experienced a loss of pressure should be replaced immedi-
ately with another Run Flat tire of identical size and service
description (Load Index and Speed Symbol).
Run Flat Tires — If Equipped
Run Flat tires allow you the capability to drive 50 miles
(80 km) at 50 mph (80 km/h) after a rapid loss of inflation
pressure. This rapid loss of inflation is referred to as the
Run Flat mode. A Run Flat mode occurs when the tire
inflation pressure is of/or below 14 psi (96 kPa). Once a
Run Flat tire reaches the run flat mode it has limited
driving capabilities and needs to be replaced immediately.
A Run Flat tire is not repairable. It is not recommended driving a vehicle loaded at full
capacity or to tow a trailer while a tire is in the run flat
mode.
See the tire pressure monitoring section for more information.
Tire Spinning
When stuck in mud, sand, snow, or ice conditions, do not
spin your vehicle’s wheels above 30 mph (48 km/h) or for
longer than 30 seconds continuously without stopping.
Refer to “Freeing A Stuck Vehicle” in “In Case Of Emer-
gency” for further information.
WARNING!
Fast spinning tires can be dangerous. Forces generated
by excessive wheel speeds may cause tire damage or
failure. A tire could explode and injure someone. Do
not spin your vehicle’s wheels faster than 30 mph
(48 km/h) for more than 30 seconds continuously when
you are stuck, and do not let anyone near a spinning
wheel, no matter what the speed.
492 SERVICING AND MAINTENANCE
Page 511 of 615
CAUTION!
Do not use Alcohol and Alcohol-based and/or Keton
based cleaning products to clean leather seats, as
damage to the seat may result.
Glass Surfaces
All glass surfaces should be cleaned on a regular basis with
MOPAR Glass Cleaner, or any commercial household-type
glass cleaner. Never use an abrasive type cleaner. Use
caution when cleaning the inside rear window equipped
with electric defrosters or windows equipped with radio
antennas. Do not use scrapers or other sharp instrument
that may scratch the elements.
When cleaning the rear view mirror, spray cleaner on the
towel or cloth that you are using. Do not spray cleaner
directly on the mirror.
8
SERVICING AND MAINTENANCE 509
Page 565 of 615
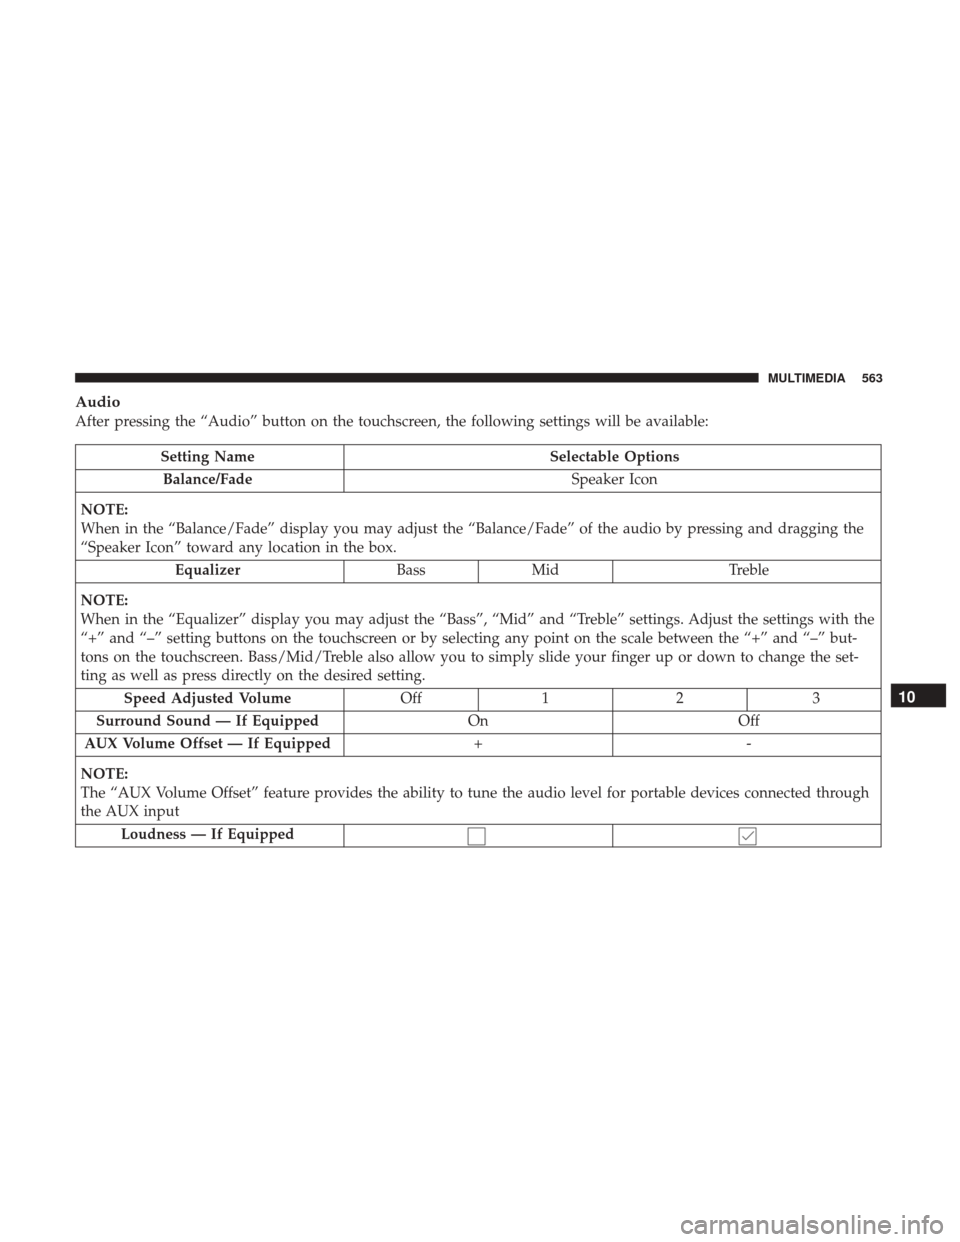
Audio
After pressing the “Audio” button on the touchscreen, the following settings will be available:
Setting NameSelectable Options
Balance/Fade Speaker Icon
NOTE:
When in the “Balance/Fade” display you may adjust the “Balance/Fade” of the audio by pressing and dragging the
“Speaker Icon” toward any location in the box. Equalizer BassMid Treble
NOTE:
When in the “Equalizer” display you may adjust the “Bass”, “Mid” and “Treble” settings. Adjust the settings with the
“+” and “–” setting buttons on the touchscreen or by selecting any point on the scale between the “+” and “–” but-
tons on the touchscreen. Bass/Mid/Treble also allow you to simply slide your finger up or down to change the set-
ting as well as press directly on the desired setting. Speed Adjusted Volume Off12 3
Surround Sound — If Equipped OnOff
AUX Volume Offset — If Equipped +-
NOTE:
The “AUX Volume Offset” feature provides the ability to tune the audio level for portable devices connected through
the AUX input Loudness — If Equipped
10
MULTIMEDIA 563
Page 602 of 615
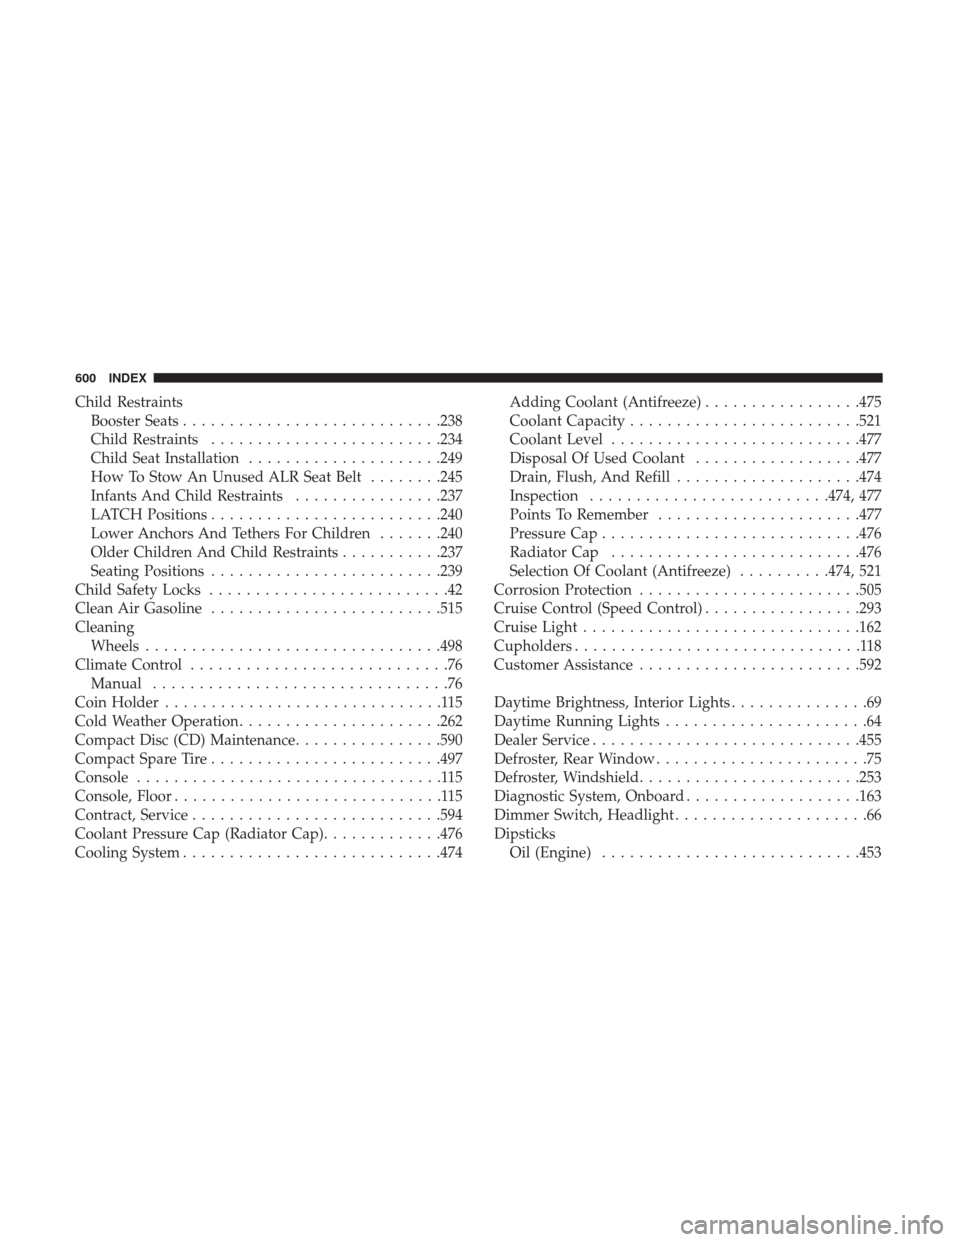
Child RestraintsBooster Seats ........................... .238
Child Restraints ........................ .234
Child Seat Installation .....................249
How To Stow An Unused ALR Seat Belt ........245
Infants And Child Restraints ................237
LATCH Positions ........................ .240
Lower Anchors And Tethers For Children .......240
Older Children And Child Restraints ...........237
Seating Positions ........................ .239
Child Safety Locks ..........................42
Clean Air Gasoline ........................ .515
Cleaning Wheels ............................... .498
Climate Control ............................76
Manual ................................76
Coin Holder ..............................115
Cold Weather Operation ..................... .262
Compact Disc (CD) Maintenance ................590
Compact Spare Tire ........................ .497
Console .................................115
Console, Floor .............................115
Contract, Service .......................... .594
Coolant Pressure Cap (Radiator Cap) .............476
Cooling System ........................... .474Adding Coolant (Antifreeze)
.................475
Coolant Capacity ........................ .521
Coolant Level .......................... .477
Disposal Of Used Coolant ..................477
Drain, Flush, And Refill ....................474
Inspection ......................... .474, 477
Points To Remember ..................... .477
Pressure Cap ........................... .476
Radiator Cap .......................... .476
Selection Of Coolant (Antifreeze) ..........474, 521
Corrosion Protection ....................... .505
Cruise Control (Speed Control) .................293
Cruise Light ............................. .162
Cupholders ...............................
118
Customer Assistance ....................... .592
Daytime Brightness, Interior Lights ...............69
Daytime Running Lights ......................64
Dealer Service ............................ .455
Defroster, Rear Window .......................75
Defroster, Windshield ....................... .253
Diagnostic System, Onboard ...................163
Dimmer Switch, Headlight .....................66
Dipsticks Oil (Engine) ........................... .453
600 INDEX
Page 603 of 615
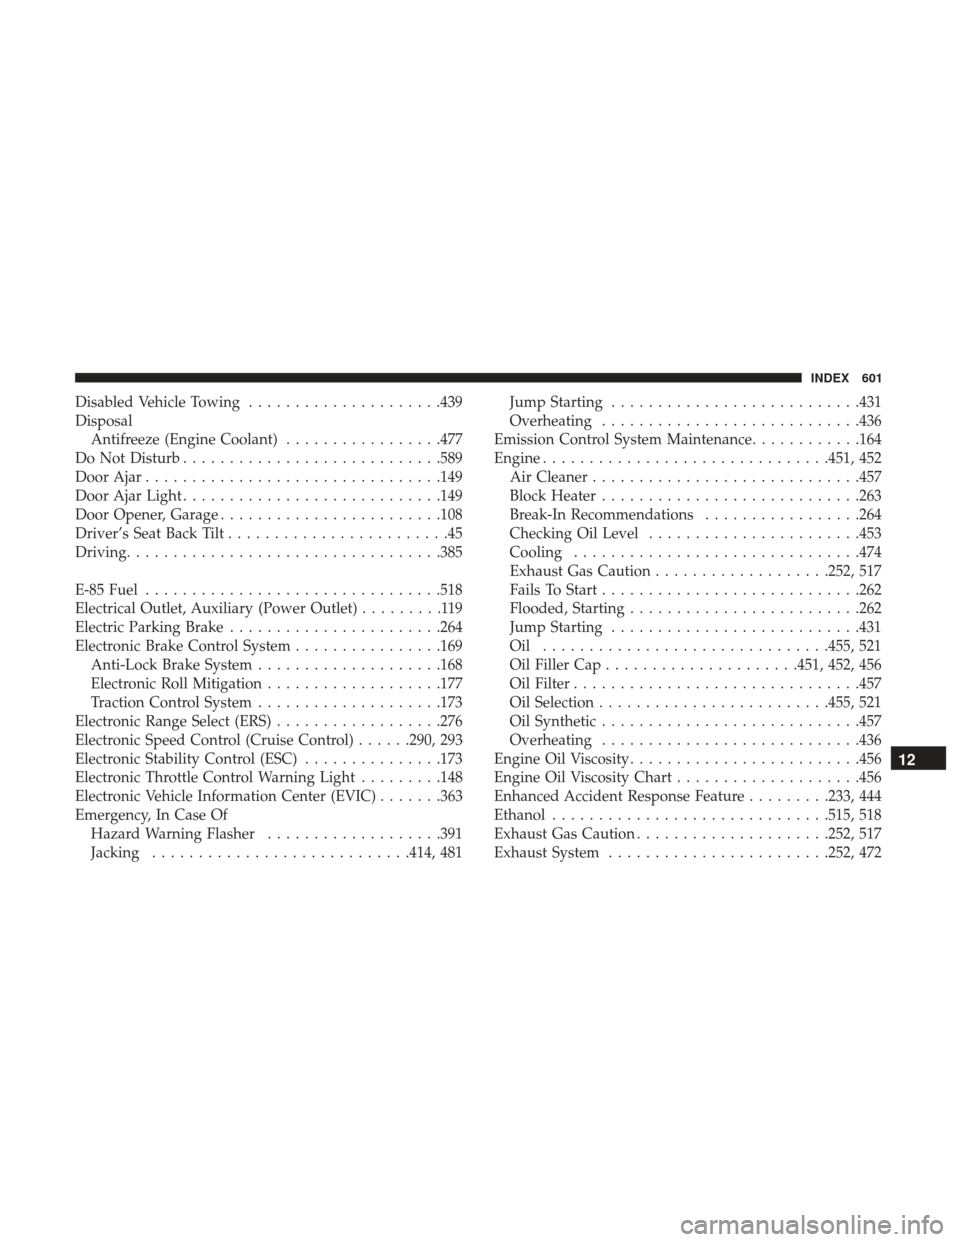
Disabled Vehicle Towing.....................439
Disposal Antifreeze (Engine Coolant) .................477
Do Not Disturb ........................... .589
Door Ajar ............................... .149
Door Ajar Light ........................... .149
Door Opener, Garage ....................... .108
Driver’s Seat Back Tilt ........................45
Driving ................................. .385
E-85 Fuel ............................... .518
Electrical Outlet, Auxiliary (Power Outlet) .........119
Electric Parking Brake ...................... .264
Electronic Brake Control System ................169
Anti-Lock Brake System ....................168
Electronic Roll Mitigation ...................177
Traction Control System ....................173
Electronic Range Select (ERS)..................276
Electronic Speed Control (Cruise Control) ......290, 293
Electronic Stability Control (ESC) ...............173
Electronic Throttle Control Warning Light .........148
Electronic Vehicle Information Center (EVIC) .......363
Emergency, In Case Of Hazard Warning Flasher ...................391
Jacking ........................... .414, 481Jump Starting
.......................... .431
Overheating ........................... .436
Emission Control System Maintenance ............164
Engine .............................. .451, 452
Air Cleaner ............................ .457
Block Heater ........................... .263
Break-In Recommendations .................264
Checking Oil Level ...................... .453
Cooling .............................. .474
Exhaust Gas Caution ...................252, 517
Fails To Start ........................... .262
Flooded, Starting ........................ .262
Jump
Starting .......................... .431
Oil .............................. .455, 521
Oil Filler Cap .....................451, 452, 456
Oil Filter .............................. .457
Oil Selection ........................ .455, 521
Oil Synthetic ........................... .457
Overheating ........................... .436
Engine Oil Viscosity ........................ .456
Engine Oil Viscosity Chart ....................456
Enhanced Accident Response Feature .........233, 444
Ethanol ............................. .515, 518
Exhaust Gas Caution .....................252, 517
Exhaust System ....................... .252, 472
12
INDEX 601