tow JEEP CHEROKEE 2017 KL / 5.G Manual PDF
[x] Cancel search | Manufacturer: JEEP, Model Year: 2017, Model line: CHEROKEE, Model: JEEP CHEROKEE 2017 KL / 5.GPages: 615, PDF Size: 5.72 MB
Page 423 of 615
9. Install the wheel bolts with the threaded end of thewheel bolt toward the wheel. Lightly tighten the wheel
bolts.
WARNING!
To avoid the risk of forcing the vehicle off the jack, do
not tighten the wheel nuts fully until the vehicle has
been lowered. Failure to follow this warning may
result in serious injury.
10. Lower the vehicle to the ground by turning the jack handle counterclockwise.
11. Finish tightening the wheel bolts. Push down on the wrench while at the end of the handle for increased
leverage. Tighten the wheel bolts in a star pattern until
each wheel bolt has been tightened twice. Refer to
“Torque Specifications” in “Technical Specifications”
for the proper lug bolt torque. If in doubt about the
correct tightness, have them checked with a torque
wrench by your authorized dealer or at a service
station. 12. Securely stow the jack, tools, chocks and flat tire.
Assembled Jack
7
IN CASE OF EMERGENCY 421
Page 424 of 615
WARNING!
A loose tire or jack thrown forward in a collision or
hard stop could endanger the occupants of the vehicle.
Always stow the jack parts and the spare tire in the
places provided. Have the deflated (flat) tire repaired
or replaced immediately.
Road Tire Installation
1. Mount the road tire on the axle.
2. Install the remaining wheel bolts with the threaded endof the wheel bolt toward the wheel. Lightly tighten the
wheel bolts.
WARNING!
To avoid the risk of forcing the vehicle off the jack, do
not tighten the wheel nuts fully until the vehicle has
been lowered. Failure to follow this warning may
result in serious injury.
3. Lower the vehicle to the ground by turning the jack handle counterclockwise.
4. Finish tightening the wheel bolts. Push down on the wrench while at the end of the handle for increased
leverage. Tighten the wheel bolts in a star pattern until
each wheel bolt has been tightened twice. Refer to
“Torque Specifications” in “Technical Specifications” for
the proper lug bolt torque. If in doubt about the correct
tightness, have them checked with a torque wrench by
your authorized dealer or service station.
Stowed Tire, Jack And Chock
422 IN CASE OF EMERGENCY
Page 425 of 615
5. Lower the jack until it is free. Remove the wheel chocks.Reassemble the lug wrench to the jack assembly and
stow it in the spare tire area. Secure the assembly using
the means provided. Release the parking brake before
driving the vehicle.
6. After 25 miles (40 km) check the wheel bolt torque with a torque wrench to ensure that all wheel bolts are
properly seated against the wheel.
TIRE SERVICE KIT — IF EQUIPPED
Small punctures up to 1/4 inch (6 mm) in the tire tread can
be sealed with Tire Service Kit. Foreign objects (e.g., screws
or nails) should not be removed from the tire. Tire Service
Kit can be used in outside temperatures down to approxi-
mately -4°F (-20°C).
This kit will provide a temporary tire seal, allowing you to
drive your vehicle up to 100 miles (160 km) with a
maximum speed of 55 mph (90 km/h).
Tire Service Kit Storage
The Tire Service Kit is stowed under the load floor behind
the rear seat.
1. Open the liftgate.
2. Lift the access cover using the load floor handle.
Load Floor Handle
7
IN CASE OF EMERGENCY 423
Page 428 of 615
WARNING!
•Do not attempt to seal a tire on the side of the vehicle
closest to traffic. Pull far enough off the road to avoid
the danger of being hit when using the Tire Service Kit.
• Do not use Tire Service Kit or drive the vehicle under
the following circumstances:
– If the puncture in the tire tread is approximately 1/4 inch (6 mm) or larger.
– If the tire has any sidewall damage.
– If the tire has any damage from driving with extremely low tire pressure.
– If the tire has any damage from driving on a flat tire.
– If the wheel has any damage.
– If you are unsure of the condition of the tire or the wheel.
• Keep Tire Service Kit away from open flames or heat
source.
(Continued)
WARNING! (Continued)
•A loose Tire Service Kit thrown forward in a collision
or hard stop could endanger the occupants of the
vehicle. Always stow the Tire Service Kit in the place
provided. Failure to follow these warnings can result
in injuries that are serious or fatal to you, your
passengers, and others around you.
• Take care not to allow the contents of Tire Service Kit
to come in contact with hair, eyes, or clothing. Tire
Service Kit sealant is harmful if inhaled, swallowed,
or absorbed through the skin. It causes skin, eye, and
respiratory irritation. Flush immediately with plenty
of water if there is any contact with eyes or skin.
Change clothing as soon as possible, if there is any
contact with clothing.
•
Tire Service Kit Sealant solution contains latex. In case
of an allergic reaction or rash, consult a physician
immediately. Keep Tire Service Kit out of reach of
children. If swallowed, rinse mouth immediately with
plenty of water and drink plenty of water. Do not
induce vomiting! Consult a physician immediately.
426 IN CASE OF EMERGENCY
Page 441 of 615
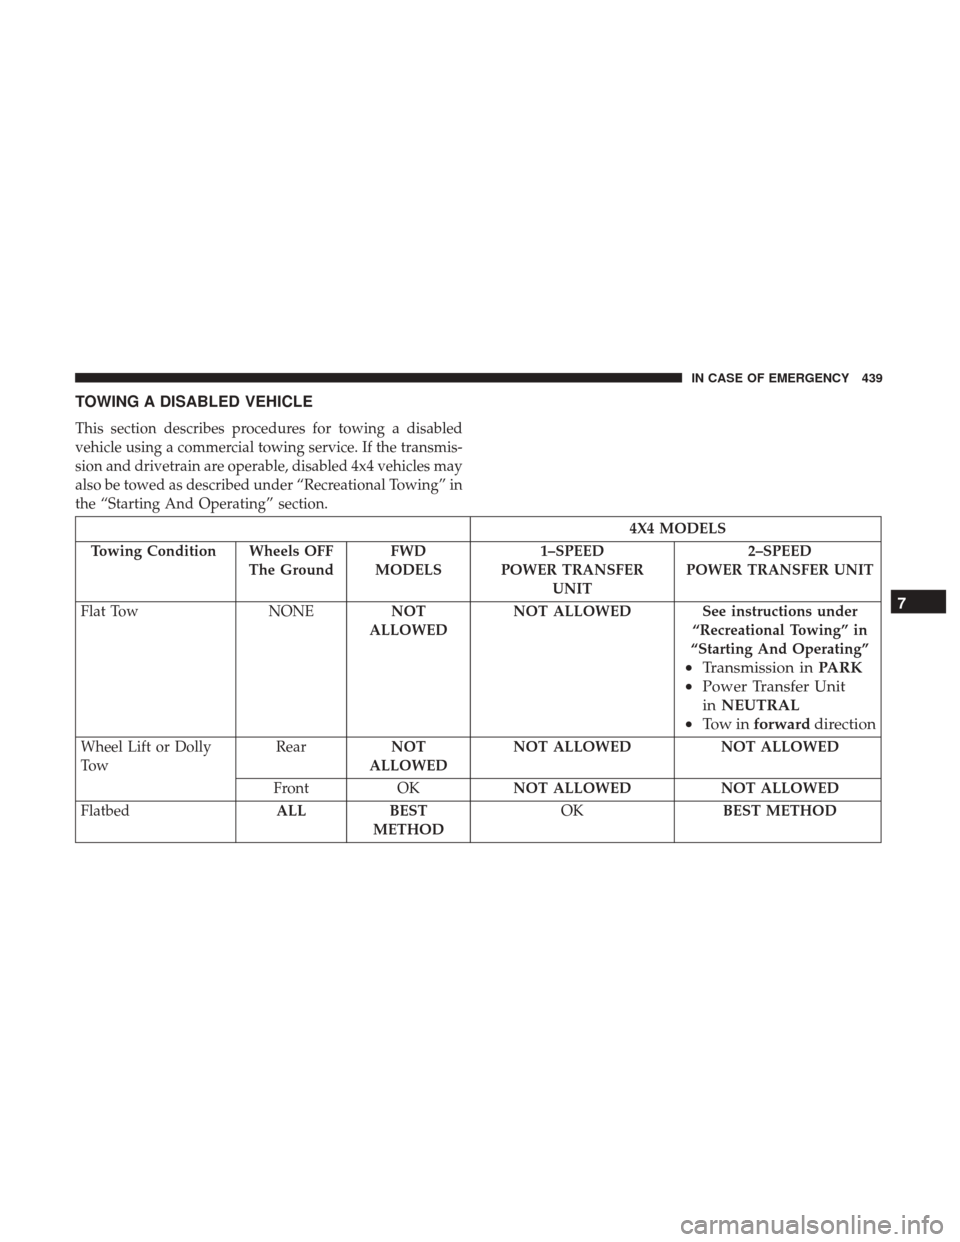
TOWING A DISABLED VEHICLE
This section describes procedures for towing a disabled
vehicle using a commercial towing service. If the transmis-
sion and drivetrain are operable, disabled 4x4 vehicles may
also be towed as described under “Recreational Towing” in
the “Starting And Operating” section.
4X4 MODELS
Towing Condition Wheels OFF The GroundFWD
MODELS 1–SPEED
POWER TRANSFER UNIT 2–SPEED
POWER TRANSFER UNIT
Flat Tow NONENOT
ALLOWED NOT ALLOWED See instructions under
“Recreational Towing” in
“Starting And Operating”
• Transmission in PARK
• Power Transfer Unit
in NEUTRAL
• To w i n forward direction
Wheel Lift or Dolly
To w Rear
NOT
ALLOWED NOT ALLOWED
NOT ALLOWED
Front OKNOT ALLOWED NOT ALLOWED
Flatbed ALLBEST
METHOD OK
BEST METHOD
7
IN CASE OF EMERGENCY 439
Page 442 of 615
Proper towing or lifting equipment is required to prevent
damage to your vehicle. Use only tow bars and other
equipment designed for this purpose, following equipment
manufacturer ’s instructions. Use of safety chains is man-
datory. Attach a tow bar or other towing device to main
structural members of the vehicle, not to bumpers or
associated brackets. State and local laws regarding vehicles
under tow must be observed.
NOTE:
•You must ensure that the Auto Park Brake feature is
disabled before towing this vehicle, to avoid inadvertent
Electric Park Brake engagement. The Auto Park Brake
feature is enabled or disabled via the customer program-
mable features in the Uconnect Settings.
• Vehicles with a discharged battery or total electrical
failure when the electric parking brake (EPB) is engaged,
will need a wheel dolly or jack to raise the rear wheels
off the ground when moving the vehicle onto a flatbed.
If you must use the accessories (wipers, defrosters, etc.)
while being towed, the ignition must be in the ON/RUN
mode, not the ACC mode. Note that the Safehold feature
will engage the Electric Park Brake whenever the driver’s
door is opened (if the ignition is ON, transmission is not in PARK, and brake pedal is released). If you are towing this
vehicle with the ignition in the ON/RUN mode, you must
manually disable the Electric Park Brake each time the
driver’s door is opened, by pressing the brake pedal and
then releasing the EPB.
If the key fob is unavailable, or the vehicle’s battery is
discharged, refer to “Gear Selector Override” in this section
for instructions on shifting the transmission out of PARK so
that the vehicle can be moved.
CAUTION!
•
Do not use sling type equipment when towing.
Vehicle damage may occur.
• When securing the vehicle to a flat bed truck, do not
attach to front or rear suspension components. Dam-
age to your vehicle may result from improper towing.
• Ensure that the Electric Park Brake is released, and
remains released, while being towed.
440 IN CASE OF EMERGENCY
Page 443 of 615
Front-Wheel Drive (FWD) Models
The manufacturer recommends towing your vehicle with
all four wheelsOFFthe ground using a flatbed.
If flatbed equipment is not available, this vehicle must
towed with the front wheels OFF the ground (using a
towing dolly, or wheel lift equipment with the front wheels
raised).
Ensure that the Electric Park Brake is released, and remains
released, while being towed.
CAUTION!
Towing this vehicle in violation of the above require-
ments can cause severe transmission damage. Damage
from improper towing is not covered under the New
Vehicle Limited Warranty.
4x4 Models With 1–Speed Power Transfer Unit
The manufacturer requires towing with all four wheels
OFF the ground.
Acceptable methods are to tow the vehicle on a flatbed, or
with one end of vehicle raised and the opposite end on a
towing dolly.
CAUTION!
• DO NOT tow this vehicle with ANY of its wheels on
the ground. Damage to the drivetrain will result.
•
Front or rear wheel lifts must not be used. Internal
damage to the transmission or power transfer unit will
occur if a front or rear wheel lift is used when towing.
•Towing this vehicle in violation of the above require-
ments can cause severe transmission and/or power
transfer unit damage. Damage from improper towing is
not covered under the New Vehicle Limited Warranty.
7
IN CASE OF EMERGENCY 441
Page 444 of 615
4x4 Models With 2–Speed Power Transfer Unit
The manufacturer recommends towing with all four
wheelsOFFthe ground.
Acceptable methods are to tow the vehicle on a flatbed or
with one end of the vehicle raised and the opposite end on
a towing dolly.
If flatbed equipment is not available and the Power Trans-
fer Unit is operable, vehicles with a 2–speed Power Trans-
fer Unit may be towed (in the forward direction, with ALL
wheels on the ground), under the following conditions:
• The Power Transfer Unit must be in NEUTRAL (N).
• The transmission must be in PARK.
• Ensure that the Electric Park Brake is released, and
remains released, while being towed.
Refer to “Recreational Towing” in “Starting And Operat-
ing” for detailed instructions.
CAUTION!
• Front or rear wheel lifts must not be used. Internal
damage to the transmission or transfer case will
occur if a front or rear wheel lift is used when
towing.
• Towing this vehicle in violation of the above require-
ments can cause severe transmission and/or transfer
case damage. Damage from improper towing is not
covered under the New Vehicle Limited Warranty.
442 IN CASE OF EMERGENCY
Page 445 of 615
Recovery Strap — If Equipped
Your vehicle may be included with a recovery strap.
Recovery straps do not act like traditional tow straps,
chains, or winch cables.
WARNING!
Recovery straps should only be used in emergencies to
rescue stranded vehicles. Only use Recovery straps on
vehicles that fit within the recommended GVW of your
recovery strap. Only attach recovery straps to OE
recommended anchor points or emergency towing an-
chor points. Never attach to tow ball or vehicle tie
down point, these are not designed for this purpose.
Never attach to vehicle steering, drive train, or any
other suspension components. NEVER pull a strap
over sharp edges or abrasive surfaces that can damage
the recovery strap. NEVER use a damaged strap, it has
reduced strength. DO NOT attempt to repair straps.
ONLY persons involved in the recovery should be in
either vehicle. No passengers. Anyone inside the ve-
hicles can be struck by strap recoil, causing serious
injury. MOVE bystanders at least 40 ft (12.2 m) from
the recovery area when using the recovery strap.Using Recovery Strap
1. Review all warnings and instructions first.
2. Position the recovery vehicle.
3. Connect the recovery strap.
4. Add a recovery damper or blanket.
5. Clear the danger zone.
6. Safely and slowly start pulling.
7. Disconnect the recovery strap after both vehicle are
secure and parked.
7
IN CASE OF EMERGENCY 443
Page 449 of 615
SCHEDULED SERVICING
Your vehicle is equipped with an automatic oil change
indicator system. The oil change indicator system will
remind you that it is time to take your vehicle in for
scheduled maintenance.
Based on engine operation conditions, the oil change
indicator message will illuminate. This means that service
is required for your vehicle. Operating conditions such as
frequent short-trips, trailer tow, extremely hot or cold
ambient temperatures will influence when the “Oil Change
Required” message is displayed. Severe Operating Condi-
tions can cause the change oil message to illuminate as
early as 3,500 miles (5,600 km) since last reset. Have your
vehicle serviced as soon as possible, within the next 500
miles (805 km).
Your authorized dealer will reset the oil change indicator
message after completing the scheduled oil change. If a
scheduled oil change is performed by someone other than
your authorized dealer, the message can be reset by
referring to the steps described under “Instrument Cluster
Display” in “Understanding Your Instrument Panel” for
further information.NOTE:
Under no circumstances should oil change inter-
vals exceed 10,000 miles (16,000 km), twelve months or 350
hours of engine run time, whichever comes first. The 350
hours of engine run or idle time is generally only a concern
for fleet customers.
Severe Duty All Models
Change Engine Oil at 4,000 miles (6,500 km) if the vehicle
is operated in a dusty and off road environment or is
operated predominately at idle or only very low engine
RPM’s. This type of vehicle use is considered Severe Duty.
Once A Month Or Before A Long Trip:
• Check engine oil level.
• Check windshield washer fluid level.
• Check tire pressure and look for unusual wear or
damage. Rotate tires at the first sign of irregular wear,
even if it occurs before the oil indicator system turns on.
• Check the fluid levels of the coolant reservoir and brake
master cylinder, fill as needed.
• Check function of all interior and exterior lights.
8
SERVICING AND MAINTENANCE 447