climate settings JEEP CHEROKEE 2019 Owner handbook (in English)
[x] Cancel search | Manufacturer: JEEP, Model Year: 2019, Model line: CHEROKEE, Model: JEEP CHEROKEE 2019Pages: 344, PDF Size: 6.35 MB
Page 28 of 344
4. Push and release the lock button on the
key fob within 10 seconds.
NOTE:
Your key fob can be unlinked to your memory
settings by pushing the set (S) button, fol-
lowed by pushing the unlock button on the
key fob within 10 seconds.
Memory Position Recall
To recall the memory settings for driver one,
push memory button (1) or the unlock button
on the key fob linked to memory position 1.
To recall the memory settings for driver two,
push memory button (2) or the unlock button
on the key fob linked to memory position 2.
A recall can be cancelled by pushing any of
the memory buttons (S, 1, or 2) during a
recall. When a recall is cancelled, the driver
seat will stop moving. A delay of one second
will occur before another recall can be se-
lected.
Easy Entry/Exit Seat — If Equipped
This feature provides automatic driver seat
positioning to enhance driver mobility when
entering and exiting the vehicle.The distance the driver seat moves depends
on where you have the driver seat positioned
when you cycle the vehicle’s ignition to the
OFF position.
Each stored memory setting will have an
associated Easy Entry and Easy Exit position.
NOTE:
The Easy Entry/Exit feature is not enabled
when the vehicle is delivered from the fac-
tory. The Easy Entry/Exit feature is enabled
(or later disabled) through the programmable
features in the Uconnect system.
Refer to “Uconnect Settings/Customer Pro-
grammable Features” in “Multimedia” in the
Owner’s Manual for further information.
Heated Seats
On some models, the front and rear seats may
be equipped with heaters located in the seat
cushions and seat backs.
WARNING!
• Persons who are unable to feel pain to
the skin because of advanced age,
WARNING!
chronic illness, diabetes, spinal cord in-
jury, medication, alcohol use, exhaus-
tion or other physical condition must
exercise care when using the seat
heater. It may cause burns even at low
temperatures, especially if used for long
periods of time.
• Do not place anything on the seat or
seatback that insulates against heat,
such as a blanket or cushion. This may
cause the seat heater to overheat. Sit-
ting in a seat that has been overheated
could cause serious burns due to the
increased surface temperature of the
seat.
Front Heated Seats
If your vehicle is equipped with front heated
seats, the control buttons are located within
the Uconnect system. You can gain access to
the control buttons through the climate
screen or the controls screen.
• Press the heated seat button
once to
turn the HI setting on.
GETTING TO KNOW YOUR VEHICLE
26
Page 46 of 344
Climate Control With A Touchscreen Descriptions
Icon Description
MAX A/C Button
Press and release to change the current setting, the indicator illuminates when MAX A/C is on. Performing this function
again will cause the MAX A/C operation to switch into manual mode and the MAX A/C indicator will turn off.
A/C Button
Press and release to change the current setting, the indicator illuminates when A/C is on.
Recirculation Button
Press and release this button on the touchscreen, or push the button on the faceplate, to change the system between
recirculation mode and outside air mode. Recirculation can be used when outside conditions, such as smoke, odors,
dust, or high humidity are present. Recirculation can be used in all modes. Recirculation may be unavailable (button on
the touchscreen greyed out) if conditions exist that could create fogging on the inside of the windshield. The A/C can be
deselected manually without disturbing the mode control selection. Continuous use of the Recirculation mode may
make the inside air stuffy and window fogging may occur. Extended use of this mode is not recommended.
AUTO Button — If Equipped
Automatically controls the interior cabin temperature by adjusting airflow distribution and amount. Toggling this button
will cause the system to switch between manual mode and automatic modes. Refer to “Automatic Operation” in this
section for more information.
FRONT
Front Defrost Button
Press and release the touchscreen button, or push and release the button on the faceplate, to change the current airflow
setting to Defrost mode. The indicator illuminates when this feature is on. Air comes from the windshield and side win-
dow demist outlets. When the defrost button is selected, the blower level may increase. Use Defrost mode with maxi-
mum temperature settings for best windshield and side window defrosting and defogging. When toggling the front de-
frost mode button, the climate system will return to the previous setting.
GETTING TO KNOW YOUR VEHICLE
44
Page 47 of 344
Icon Description
REAR
Rear Defrost Button
Push and release the button on the touchscreen, or push and release the button on the faceplate, to turn on the rear
window defroster and the heated outside mirrors (if equipped). An indicator will illuminate when the rear window de-
froster is on. The rear window defroster automatically turns off after ten minutes.
Uconnect 3
Uconnect 4/4C/4C NAV
Driver and Passenger Temperature Up and Down Buttons
Provides the driver and passenger with independent temperature control. Push the red button on the faceplate or touch-
screen or press and slide the temperature bar towards the red arrow button on the touchscreen for warmer temperature
settings. Push the blue button on the faceplate or touchscreen or press and slide the temperature bar towards the blue
arrow button on the touchscreen for cooler temperature settings.
NOTE:
The numbers within the temperature display will only appear if the system is equipped with an automatic climate con-
trol system.
SYNC Button — If Equipped
Press the SYNC button on the touchscreen to toggle the SYNC feature on/off. The SYNC indicator is illuminated when
this feature is enabled. SYNC is used to synchronize the passenger temperature setting with the driver temperature set-
ting. Changing the passenger’s temperature setting while in SYNC will automatically exit this feature.
45
Page 49 of 344
Icon Description
Mix Mode
Mix Mode
Air is directed through the floor, defrost, and side window demister outlets. This setting works best in cold or snowy con-
ditions that require extra heat to the windshield. This setting is good for maintaining comfort while reducing moisture on
the windshield.
Climate Control OFF Button
Press and release this button to turn the Climate Controls off.
Climate Control Functions
A/C (Air Conditioning)
The Air Conditioning (A/C) button allows the
operator to manually activate or deactivate
the air conditioning system. When the air
conditioning system is turned on, cool dehu-
midified air will flow through the outlets into
the cabin. For improved fuel economy, press
the A/C button to turn off the air conditioning
and manually adjust the blower and airflow
mode settings. Also, make sure to select only
Panel, Bi-Level, or Floor modes.NOTE:
• If fog or mist appears on the windshield or
side glass, select Defrost mode, and in-
crease blower speed if needed.
• If your air conditioning performance seems
lower than expected, check the front of the
A/C condenser (located in front of the ra-
diator), for an accumulation of dirt or in-
sects. Clean with a gentle water spray from
the front of the radiator and through the
condenser.
MAX A/C
MAX A/C sets the control for maximum cool-
ing performance.Press and release to toggle between MAX A/C
and the prior settings. The button illuminates
when MAX A/C is on.
In MAX A/C, the blower level and mode posi-
tion can be adjusted to desired user settings.
Pressing other settings will cause the MAX
A/C operation to switch to the selected set-
ting and MAX A/C to exit.
Recirculation
In cold weather, use of Recirculation mode
may lead to excessive window fogging. The
Recirculation feature may be unavailable
47
Page 59 of 344
NOTE:
Activation zone is the same for vehicles
equipped with and without trailer tow package.
When a valid kicking motion is completed,
the liftgate will chime, the hazard lights will
flash and the liftgate will open after approxi-
mately one second, or close after approxi-
mately three seconds. This assumes all op-
tions are enabled in the radio.
NOTE:
• Opening or closing the Hands-Free Liftgate
requires a valid Passive Entry key fob within
5 ft (1.5 m) of the door handle. If a valid
Passive Entry key fob is not within 5 ft
(1.5 m), the liftgate will not respond to any
kicks.
• The Hands-Free Liftgate feature may be
turned on or off in Uconnect Settings. Refer
to “Uconnect Settings” in “Multimedia” in
the Owner’s Manual for further information.
The Hands-Free Liftgate feature should be
turned off during Jacking, Tire Changing,
Manual Car Wash, and Vehicle Service.NOTE:
The Hands-free liftgate feature can be acti-
vated by any metallic object making a similar
in-and-out motion under the rear bumper,
such as cleaning using a metal broom.
NOTE:
• The Hands-Free Liftgate will only operate
when the transmission is in PARK.
• If anything obstructs the Hands-Free lift-
gate while it is opening or closing, the
liftgate will automatically reverse to the
closed/open position, provided it meets
sufficient resistance.
• There are pinch sensors attached to the
side of the liftgate opening. Light pressure
anywhere along these strips will cause the
liftgate to return to the open position.
• If the power liftgate encounters multiple
obstructions within the same cycle, the
system will automatically stop. If this oc-
curs, the liftgate must be operated manu-
ally.• The power liftgate will release, but not
power open, in temperatures below −12° F
(−24° C). Be sure to remove any buildup of
snow or ice from the liftgate before opening
the liftgate.
• If the liftgate is left open for an extended
period of time, the liftgate may need to be
closed manually to reset power liftgate
functionality.
WARNING!
• Driving with the liftgate open can allow
poisonous exhaust gases into your ve-
hicle. You and your passengers could be
injured by these fumes. Keep the liftgate
closed when you are operating the ve-
hicle.
• If you are required to drive with the
liftgate open, make sure that all win-
dows are closed, and the climate control
blower switch is set at high speed. Do
not use the recirculation mode.
57
Page 144 of 344
The engine oil installed in the engine at the
factory is a high-quality energy conserving
type lubricant. Oil changes should be consis-
tent with anticipated climate conditions un-
der which vehicle operations will occur.
For the recommended viscosity and quality
grades, refer to “Fluids And Lubricants” in
“Technical Specifications”.
CAUTION!
Never use Non-Detergent Oil or Straight
Mineral Oil in the engine or damage may
result.
NOTE:
A new engine may consume some oil during
its first few thousand miles (kilometers) of
operation. This should be considered a nor-
mal part of the break-in and not interpreted
as a problem.
PARKING BRAKE
Electric Park Brake (EPB)
Your vehicle is equipped with a new Electric
Park Brake System (EPB) that offers greater
convenience. The park brake switch is lo-
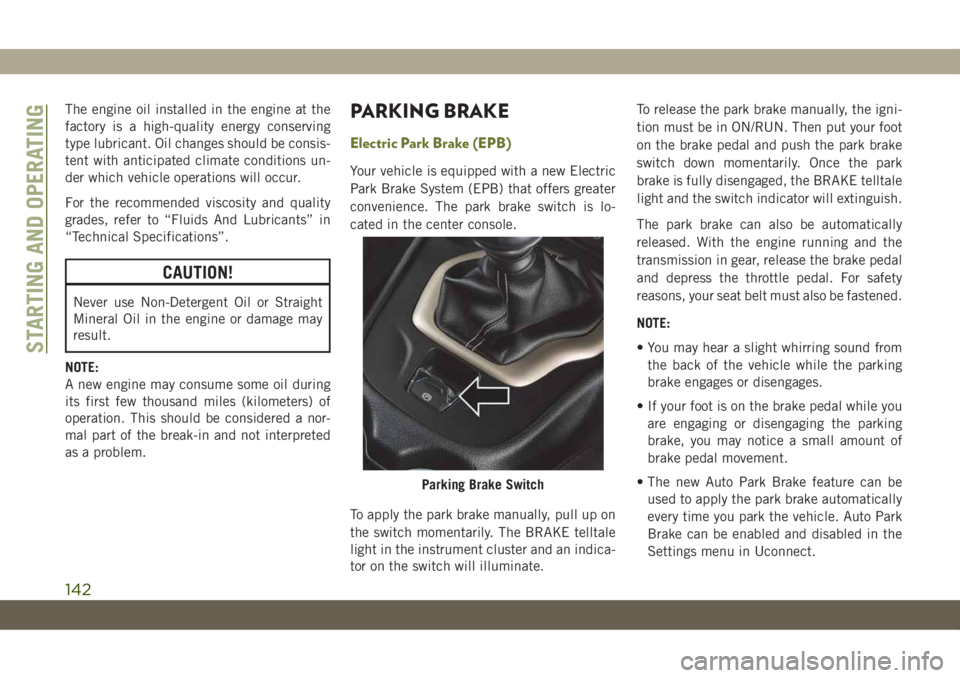
cated in the center console.
To apply the park brake manually, pull up on
the switch momentarily. The BRAKE telltale
light in the instrument cluster and an indica-
tor on the switch will illuminate.To release the park brake manually, the igni-
tion must be in ON/RUN. Then put your foot
on the brake pedal and push the park brake
switch down momentarily. Once the park
brake is fully disengaged, the BRAKE telltale
light and the switch indicator will extinguish.
The park brake can also be automatically
released. With the engine running and the
transmission in gear, release the brake pedal
and depress the throttle pedal. For safety
reasons, your seat belt must also be fastened.
NOTE:
• You may hear a slight whirring sound from
the back of the vehicle while the parking
brake engages or disengages.
• If your foot is on the brake pedal while you
are engaging or disengaging the parking
brake, you may notice a small amount of
brake pedal movement.
• The new Auto Park Brake feature can be
used to apply the park brake automatically
every time you park the vehicle. Auto Park
Brake can be enabled and disabled in the
Settings menu in Uconnect.
Parking Brake Switch
STARTING AND OPERATING
142
Page 312 of 344
Apple iPhone iOS 6 or later supports reading
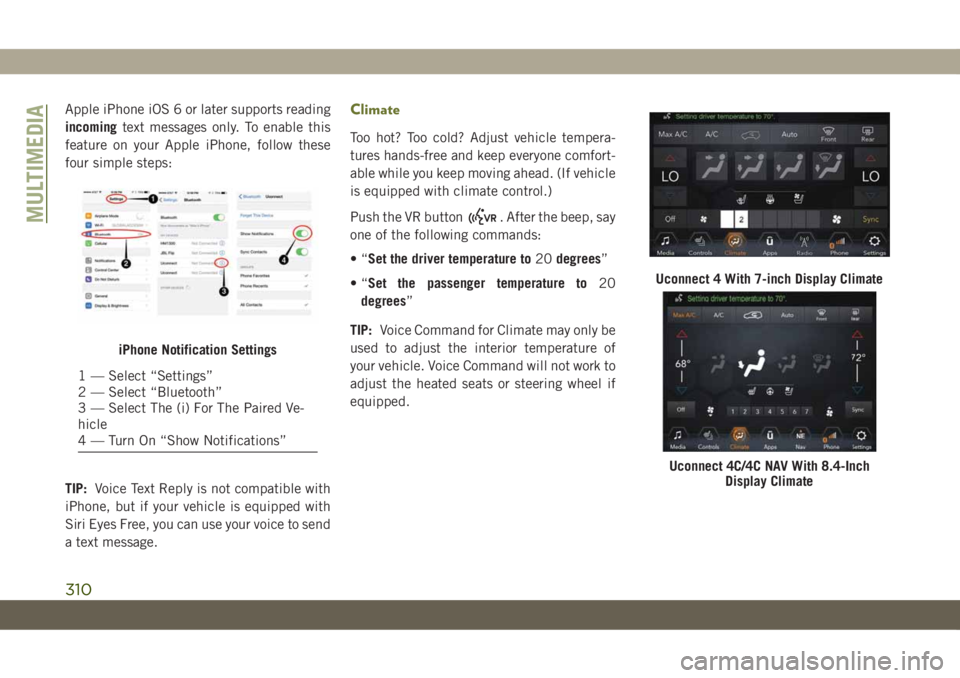
incomingtext messages only. To enable this
feature on your Apple iPhone, follow these
four simple steps:
TIP:Voice Text Reply is not compatible with
iPhone, but if your vehicle is equipped with
Siri Eyes Free, you can use your voice to send
a text message.Climate
Too hot? Too cold? Adjust vehicle tempera-
tures hands-free and keep everyone comfort-
able while you keep moving ahead. (If vehicle
is equipped with climate control.)
Push the VR button
. After the beep, say
one of the following commands:
•“Set the driver temperature to20degrees”
•“Set the passenger temperature to20
degrees”
TIP:Voice Command for Climate may only be
used to adjust the interior temperature of
your vehicle. Voice Command will not work to
adjust the heated seats or steering wheel if
equipped.
iPhone Notification Settings
1 — Select “Settings”
2 — Select “Bluetooth”
3 — Select The (i) For The Paired Ve-
hicle
4 — Turn On “Show Notifications”
Uconnect 4 With 7-inch Display Climate
Uconnect 4C/4C NAV With 8.4-Inch
Display Climate
MULTIMEDIA
310
Page 336 of 344
Bulb Replacement.............184
Bulbs, Light.................138
Camera, Rear................173
Capacities, Fluid..............260
Caps, Filler
Fuel....................212
Oil (Engine).....227, 228, 229, 230
Carbon Monoxide Warning.........136
Car Washes..................250
Changing A Flat Tire.........196, 239
Checking Your Vehicle For Safety. . . .136
Checks, Safety................136
Child Restraint................119
Child Restraints
Child Seat Installation.........130
How To Stow An unused ALR Seat
Belt....................130
Clean Air Gasoline.............255
Cleaning
Wheels..................246
Climate Control................40
Automatic.................40
Clock Settings................269
Cold Weather Operation..........140
Compact Spare Tire.............245
Cooling System...............231Cooling Capacity............260
Inspection................232
Selection Of Coolant
(Antifreeze)............260, 262
Cruise Control (Speed Control) . . .161, 162
Cruise Light.............73, 74, 75
Customer Assistance............315
Cybersecurity.................267
Daytime Running Lights...........33
Dealer Service................235
Defroster, Windshield............137
Diagnostic System, Onboard........75
Diesel
Display Messages.............63
Dipsticks
Oil (Engine)
...............231
Disable Vehicle Towing...........214
Disturb.................302, 312
Door Ajar.................66, 67
Door Ajar Light..............66, 67
Doors......................20
Drag And Drop Menu........273, 279
Driver’s Seat Back Tilt............23
Easy Entry Seats...............26
Electrical Power Outlets...........58Electric Brake Control System.......78
Anti-Lock Brake System.........77
Electronic Roll Mitigation.....80, 83
Electric Parking Brake...........142
Electronic Speed Control (Cruise
Control)...............161, 162
Electronic Stability Control (ESC).....80
Electronic Throttle Control Warning
Light.....................66
Emergency Braking..............93
Emergency, In Case Of
Gear Selector Override.........213
Hazard Warning Flasher........184
Jacking...............196, 239
Jump Starting..............209
Emissions...................265
Engine..........227, 228, 229, 230
Break-In Recommendations......141
Checking Oil Level...........231
Coolant (Antifreeze)..........262
Cooling..................231
Exhaust Gas Caution..........136
Fuel Requirements...........260
Jump Starting..............209
Oil..................260, 262
Oil Filler Cap. . . .227, 228, 229, 230
Oil Selection...............260
INDEX
334