phone JEEP CHEROKEE 2019 Owner handbook (in English)
[x] Cancel search | Manufacturer: JEEP, Model Year: 2019, Model line: CHEROKEE, Model: JEEP CHEROKEE 2019Pages: 344, PDF Size: 6.35 MB
Page 11 of 344
RAISING THE VEHICLE................. 239
TIRES.......................... 239
Tires — General Information......... 239
Tire Types..................... 244
Spare Tires — If Equipped........... 244
Wheel And Wheel Trim Care.......... 246
Tire Chains (Traction Devices)......... 247
Tire Rotation Recommendations........ 248
STORING THE VEHICLE................ 249
BODYWORK....................... 250
Preserving The Bodywork............ 250
INTERIORS....................... 251Seats And Fabric Parts............. 251
Plastic And Coated Parts............ 251
Leather Parts................... 252
Glass Surfaces.................. 252
TECHNICAL SPECIFICATIONS
VEHICLE IDENTIFICATION NUMBER.......... 253
WHEEL AND TIRE TORQUE SPECIFICATIONS.... 253
Torque Specifications.............. 254
FUEL REQUIREMENTS — GASOLINE ENGINE.... 254Methanol..................... 255
Ethanol....................... 255
Clean Air Gasoline................ 255
CNG And LP Fuel System Modifications . . . 255
MMT In Gasoline................. 256
Materials Added To Fuel............ 256
Fuel Icon Identification Compliant To
EN16942..................... 256
FUEL REQUIREMENTS — DIESEL ENGINE...... 258Fuel Icon Identification Compliant To
EN16942..................... 259
FLUID CAPACITIES................... 260
FLUIDS AND LUBRICANTS............... 262
Engine....................... 262
Chassis....................... 265
FUEL CONSUMPTION AND CO2EMISSIONS..... 265
MOPAR ACCESSORIES................. 265
Authentic Accessories By Mopar........ 265
MULTIMEDIA
CYBERSECURITY................... 267
UCONNECT 3 WITH 5–INCH DISPLAY — IF
EQUIPPED....................... 268
Uconnect 3 With 5–inch Display At A
Glance....................... 268
Clock Setting................... 269
Audio Setting................... 269
Radio Operation................. 270
Voice Text Reply
(Not Compatible With iPhone)........ 270
Apps — If Equipped............... 271
UCONNECT 4 WITH 7-INCH DISPLAY......... 272Uconnect 4 At A Glance............ 272
Drag & Drop Menu Bar............. 273
Radio....................... 274
Android Auto — If Equipped.......... 275
Apple CarPlay Integration — If Equipped . . 276
Apps — If Equipped............... 277
UCONNECT 4C/4C NAV WITH 8.4-INCH DISPLAY . . 278Uconnect 4C/4C NAV At A Glance...... 278
Drag & Drop Menu Bar............. 279
Radio....................... 280
Android Auto — If Equipped.......... 281
Apple CarPlay Integration — If Equipped . . 285
Apps — If Equipped............... 287
UCONNECT SETTINGS................ 288
TIPS CONTROLS AND GENERAL INFORMATION . . . 288
Steering Wheel Audio Controls........ 288
AUX/USB/MP3 CONTROL — IF EQUIPPED...... 289
NAVIGATION — IF EQUIPPED............. 290
Changing The Navigation Voice Prompt
Volume....................... 290
Finding Points Of Interest........... 292
Finding A Place By Spelling The Name . . . 292
One-Step Voice Destination Entry....... 292
Setting Your Home Location.......... 292
Home........................ 292
Adding A Stop.................. 294
Taking A Detour.................. 294
Map Update.................... 294
UCONNECT PHONE.................. 295Uconnect Phone (Bluetooth Hands Free
Calling)...................... 295
Pairing (Wirelessly Connecting) Your Mobile
Phone To The Uconnect System....... 298
Common Phone Commands (Examples) . . . 301
Mute (Or Unmute) Microphone During Call . 302
Transfer Ongoing Call Between Handset And
Vehicle...................... 302
Phonebook.................... 302
Voice Command Tips.............. 302
Changing The Volume.............. 302
Using Do Not Disturb.............. 302
Incoming Text Messages............ 303
Helpful Tips And Common Questions To Improve
Bluetooth Performance With Your Uconnect
System...................... 304
9
Page 12 of 344
UCONNECT VOICE RECOGNITION QUICK TIPS.... 305Introducing Uconnect.............. 305
Get Started.................... 306
Basic Voice Commands............. 307
Radio........................ 307
Media....................... 307
Phone....................... 308
Voice Text Reply................. 309
Climate...................... 310
Navigation (4C NAV)............... 311
Siri Eyes Free — If Equipped......... 311
Using Do Not Disturb.............. 312
Android Auto — If Equipped.......... 312
Apple CarPlay — If Equipped......... 313
Additional Information............. 314
CUSTOMER ASSISTANCE
IF YOU NEED ASSISTANCE.............. 315ARGENTINA................... 316
AUSTRALIA.................... 316
AUSTRIA..................... 316
BALANCE OF THE CARIBBEAN........ 316
BELGIUM..................... 317
BOLIVIA...................... 317
BRAZIL...................... 317
BULGARIA.................... 317CHILE....................... 317
CHINA....................... 318
COLOMBIA.................... 318
COSTA RICA................... 318
CROATIA...................... 318
CZECH REPUBLIC................ 318
DENMARK.................... 319
DOMINICAN REPUBLIC............ 319
ECUADOR..................... 319
EL SALVADOR.................. 319
ESTONIA..................... 319
FINLAND..................... 320
FRANCE...................... 320
GERMANY..................... 320
GREECE...................... 321
GUATEMALA................... 321
HONDURAS.................... 321
HUNGARY..................... 321
INDIA....................... 321
IRELAND..................... 322
ITALY ........................ 322
LATVIA....................... 322
LITHUANIA.................... 323
LUXEMBURG................... 323
NETHERLANDS................. 323
NEW ZEALAND.................. 324NORWAY ...................... 324
PANAMA...................... 324
PARAGUAY.................... 324
PERU....................... 324
POLAND...................... 325
PORTUGAL.................... 325
PUERTO RICO AND U.S. VIRGIN ISLANDS . 325
REUNION..................... 326
ROMANIA..................... 326
RUSSIA...................... 326
SERBIA...................... 327
SLOVAKIA..................... 327
SLOVENIA..................... 327
SOUTH AFRICA................. 327
SPAIN ....................... 328
SWEDEN..................... 328
SWITZERLAND.................. 328
TAIWAN ...................... 329
TURKEY...................... 329
UKRAINE..................... 329
UNITED KINGDOM............... 330
URUGUAY..................... 330
VENEZUELA................... 330
INDEX....................... 333
TABLE OF CONTENTS
10
Page 15 of 344
KEYS
Key Fob
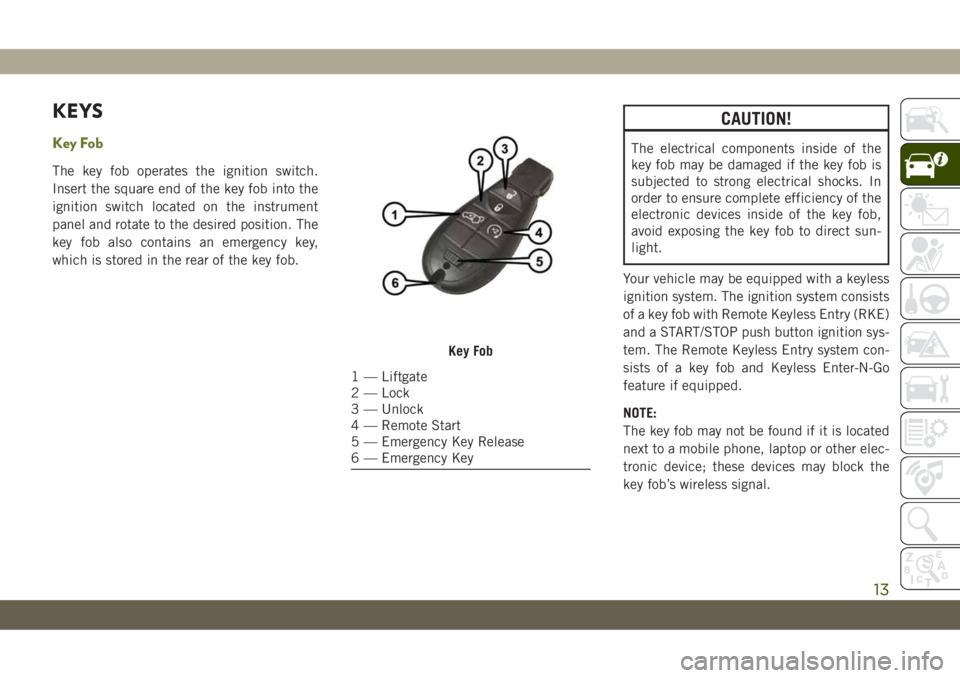
The key fob operates the ignition switch.
Insert the square end of the key fob into the
ignition switch located on the instrument
panel and rotate to the desired position. The
key fob also contains an emergency key,
which is stored in the rear of the key fob.
CAUTION!
The electrical components inside of the
key fob may be damaged if the key fob is
subjected to strong electrical shocks. In
order to ensure complete efficiency of the
electronic devices inside of the key fob,
avoid exposing the key fob to direct sun-
light.
Your vehicle may be equipped with a keyless
ignition system. The ignition system consists
of a key fob with Remote Keyless Entry (RKE)
and a START/STOP push button ignition sys-
tem. The Remote Keyless Entry system con-
sists of a key fob and Keyless Enter-N-Go
feature if equipped.
NOTE:
The key fob may not be found if it is located
next to a mobile phone, laptop or other elec-
tronic device; these devices may block the
key fob’s wireless signal.
Key Fob
1 — Liftgate
2 — Lock
3 — Unlock
4 — Remote Start
5 — Emergency Key Release
6 — Emergency Key
13
Page 22 of 344
battery is reconnected; the exterior lights will
flash, and the horn will sound. If this occurs,
disarm the vehicle security alarm.
DOORS
Keyless Enter-N-Go — Passive Entry
The Passive Entry system is an enhancement
to the vehicle’s Remote Keyless Entry system
and a feature of Keyless Enter-N-Go — Pas-
sive Entry. This feature allows you to lock and
unlock the vehicle’s door(s) and fuel door
without having to push the key fob lock or
unlock buttons.
NOTE:
• Passive Entry may be programmed ON/
OFF; refer to “Uconnect Settings” in “Mul-
timedia” in the Owner’s Manual for further
information.
• If wearing gloves on your hands, or if it has
been raining/snowing on the Passive Entry
door handle, the unlock sensitivity can be
affected, resulting in a slower response
time.• If the vehicle is unlocked by Passive Entry
and no door is opened within 60 seconds,
the vehicle will re-lock and if equipped will
arm the security alarm.
• The key fob may not be able to be detected
by the vehicle passive entry system if it is
located next to a mobile phone, laptop or
other electronic device; these devices may
block the key fob's wireless signal and
prevent the passive entry handle from
locking/unlocking the vehicle.
• Passive Entry activates illuminated ap-
proach for the time set by the customer (0,
30, 60, or 90 seconds), and flashes the
turn signal lights. Refer to “Uconnect Set-
tings” in “Multimedia in the Owner’s
Manual for further information.
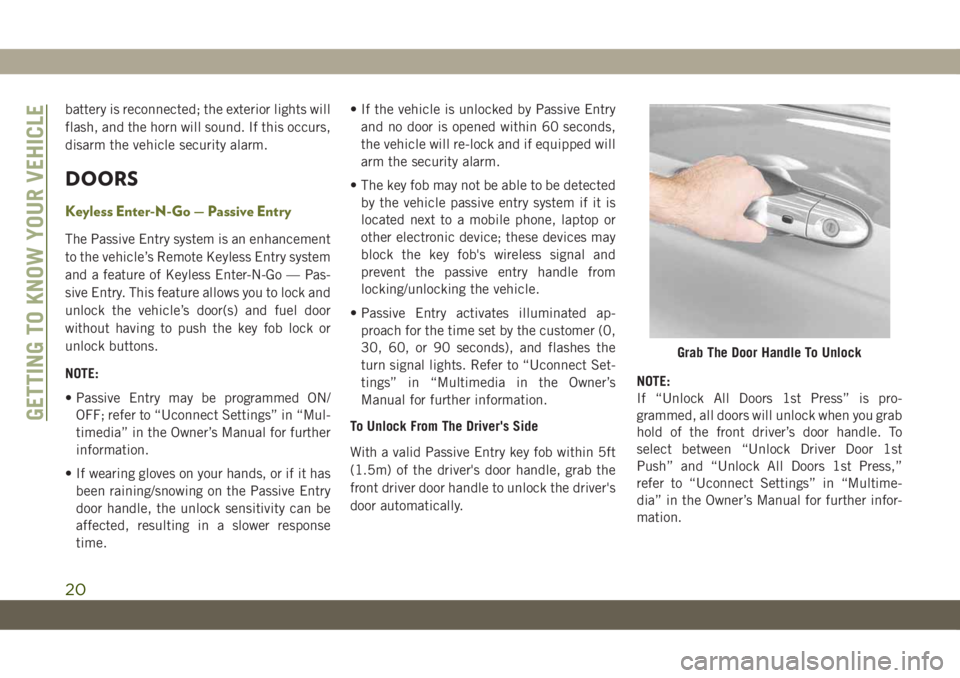
To Unlock From The Driver's Side
With a valid Passive Entry key fob within 5ft
(1.5m) of the driver's door handle, grab the
front driver door handle to unlock the driver's
door automatically.NOTE:
If “Unlock All Doors 1st Press” is pro-
grammed, all doors will unlock when you grab
hold of the front driver’s door handle. To
select between “Unlock Driver Door 1st
Push” and “Unlock All Doors 1st Press,”
refer to “Uconnect Settings” in “Multime-
dia” in the Owner’s Manual for further infor-
mation.
Grab The Door Handle To Unlock
GETTING TO KNOW YOUR VEHICLE
20
Page 60 of 344
Gas props support the liftgate in the open
position. However, because the gas pressure
drops with temperature, it may be necessary
to assist the props when opening the liftgate
in cold weather.
NOTE:
Allow the power system to open the liftgate.
Manually pushing or pulling the liftgate may
activate the liftgate obstacle detection fea-
ture and stop the power operation or reverse
its direction.
WARNING!
During power operation, personal injury or
cargo damage may occur. Ensure the lift-
gate travel path is clear. Make sure the
liftgate is closed and latched before driv-
ing away.
INTERNAL EQUIPMENT
Power Outlets
Your vehicle is equipped with 12 Volt
(13 Amp) power outlets that can be used to
power cellular phones, small electronics and
other low powered electrical accessories. The
power outlets are labeled with either a “key”
or a “battery” symbol to indicate how the
outlet is powered. Power outlets labeled with
a “key” are powered when the ignition switch
is in the ON or ACC position, while the outlets
labeled with a “battery” are connected di-
rectly to the battery and powered at all times.
NOTE:
• All accessories connected to the “battery”
powered outlets should be removed or
turned off when the vehicle is not in use to
protect the battery against discharge.
CAUTION!
Power outlets are designed for accessory
plugs only. Do not insert any other object
in the power outlets as this will damage
the outlet and blow the fuse. Improper use
CAUTION!
of the power outlet can cause damage not
covered by your New Vehicle Limited War-
ranty.
The front power outlet is located inside the
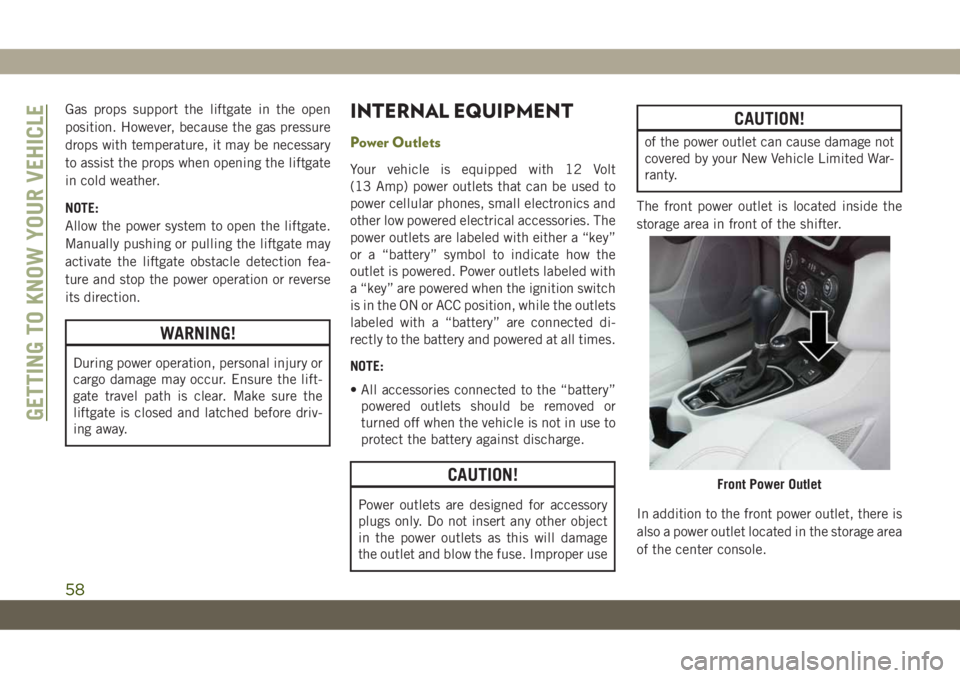
storage area in front of the shifter.
In addition to the front power outlet, there is
also a power outlet located in the storage area
of the center console.
Front Power Outlet
GETTING TO KNOW YOUR VEHICLE
58
Page 61 of 344
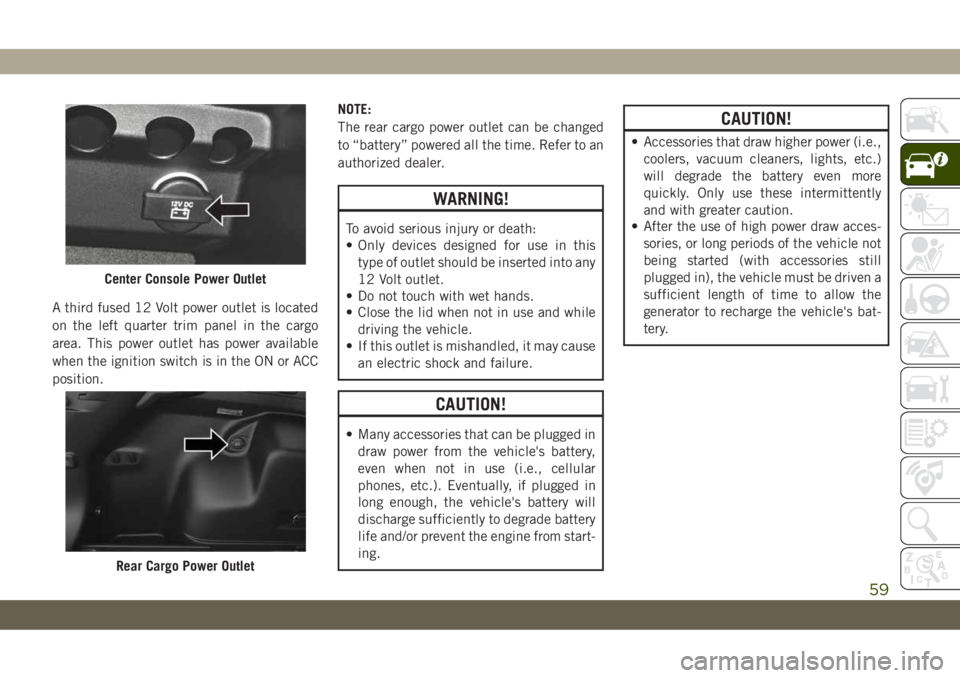
A third fused 12 Volt power outlet is located
on the left quarter trim panel in the cargo
area. This power outlet has power available
when the ignition switch is in the ON or ACC
position.NOTE:
The rear cargo power outlet can be changed
to “battery” powered all the time. Refer to an
authorized dealer.
WARNING!
To avoid serious injury or death:
• Only devices designed for use in this
type of outlet should be inserted into any
12 Volt outlet.
• Do not touch with wet hands.
• Close the lid when not in use and while
driving the vehicle.
• If this outlet is mishandled, it may cause
an electric shock and failure.
CAUTION!
• Many accessories that can be plugged in
draw power from the vehicle's battery,
even when not in use (i.e., cellular
phones, etc.). Eventually, if plugged in
long enough, the vehicle's battery will
discharge sufficiently to degrade battery
life and/or prevent the engine from start-
ing.
CAUTION!
• Accessories that draw higher power (i.e.,
coolers, vacuum cleaners, lights, etc.)
will degrade the battery even more
quickly. Only use these intermittently
and with greater caution.
• After the use of high power draw acces-
sories, or long periods of the vehicle not
being started (with accessories still
plugged in), the vehicle must be driven a
sufficient length of time to allow the
generator to recharge the vehicle's bat-
tery.
Center Console Power Outlet
Rear Cargo Power Outlet
59
Page 62 of 344
Power Inverter — If Equipped
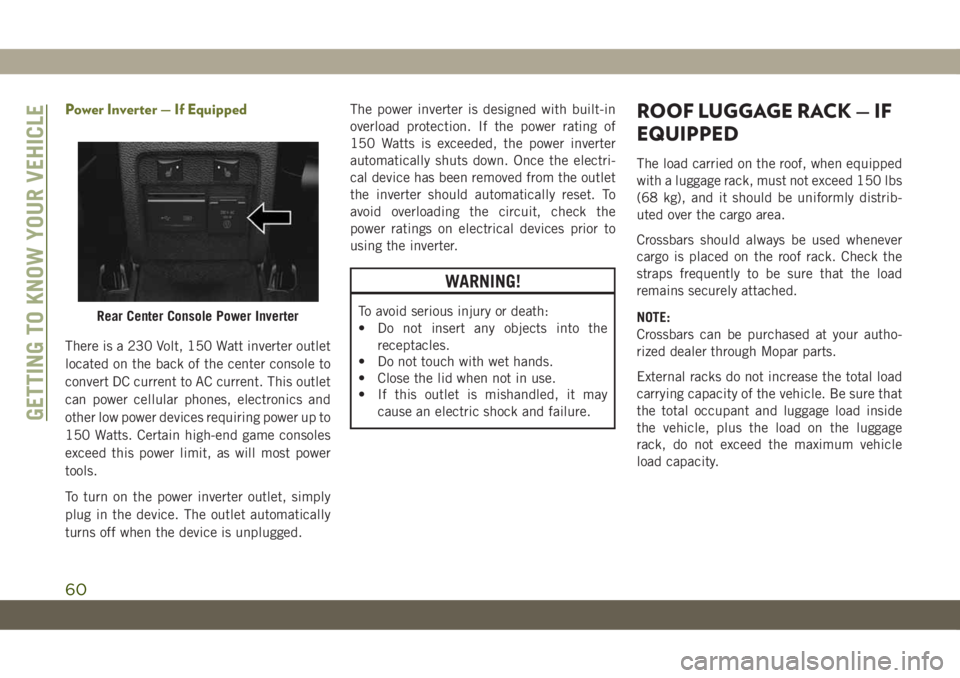
There is a 230 Volt, 150 Watt inverter outlet
located on the back of the center console to
convert DC current to AC current. This outlet
can power cellular phones, electronics and
other low power devices requiring power up to
150 Watts. Certain high-end game consoles
exceed this power limit, as will most power
tools.
To turn on the power inverter outlet, simply
plug in the device. The outlet automatically
turns off when the device is unplugged.The power inverter is designed with built-in
overload protection. If the power rating of
150 Watts is exceeded, the power inverter
automatically shuts down. Once the electri-
cal device has been removed from the outlet
the inverter should automatically reset. To
avoid overloading the circuit, check the
power ratings on electrical devices prior to
using the inverter.
WARNING!
To avoid serious injury or death:
• Do not insert any objects into the
receptacles.
• Do not touch with wet hands.
• Close the lid when not in use.
• If this outlet is mishandled, it may
cause an electric shock and failure.
ROOF LUGGAGE RACK — IF
EQUIPPED
The load carried on the roof, when equipped
with a luggage rack, must not exceed 150 lbs
(68 kg), and it should be uniformly distrib-
uted over the cargo area.
Crossbars should always be used whenever
cargo is placed on the roof rack. Check the
straps frequently to be sure that the load
remains securely attached.
NOTE:
Crossbars can be purchased at your autho-
rized dealer through Mopar parts.
External racks do not increase the total load
carrying capacity of the vehicle. Be sure that
the total occupant and luggage load inside
the vehicle, plus the load on the luggage
rack, do not exceed the maximum vehicle
load capacity.
Rear Center Console Power Inverter
GETTING TO KNOW YOUR VEHICLE
60
Page 269 of 344
CYBERSECURITY
Your vehicle may be a connected vehicle and
may be equipped with both wired and wire-
less networks. These networks allow your ve-
hicle to send and receive information. This
information allows systems and features in
your vehicle to function properly.
Your vehicle may be equipped with certain
security features to reduce the risk of unau-
thorized and unlawful access to vehicle sys-
tems and wireless communications. Vehicle
software technology continues to evolve over
time and FCA, working with its suppliers,
evaluates and takes appropriate steps as
needed. Similar to a computer or other de-
vices, your vehicle may require software up-
dates to improve the usability and perfor-
mance of your systems or to reduce the
potential risk of unauthorized and unlawful
access to your vehicle systems.
The risk of unauthorized and unlawful access
to your vehicle systems may still exist, even if
the most recent version of vehicle software
(such as Uconnect software) is installed.
WARNING!
• It is not possible to know or to predict all
of the possible outcomes if your vehi-
cle’s systems are breached. It may be
possible that vehicle systems, including
safety related systems, could be im-
paired or a loss of vehicle control could
occur that may result in an accident
involving serious injury or death.
• ONLY insert media (e.g., USB, SD card,
or CD) into your vehicle if it came from a
trusted source. Media of unknown origin
could possibly contain malicious soft-
ware, and if installed in your vehicle, it
may increase the possibility for vehicle
systems to be breached.
• As always, if you experience unusual
vehicle behavior, take your vehicle to
your nearest authorized dealer immedi-
ately.
NOTE:
• FCA or your dealer may contact you directly
regarding software updates.• To help further improve vehicle security and
minimize the potential risk of a security
breach, vehicle owners should:
– Only connect and use trusted media
devices (e.g. personal mobile phones,
USBs, CDs).
Privacy of any wireless and wired communi-
cations cannot be assured. Third parties may
unlawfully intercept information and private
communications without your consent. For
further information, refer to “Onboard Diag-
nostic System (OBD II) Cybersecurity” in
“Getting To Know Your Instrument Panel” in
your Owner’s Manual.
267
Page 270 of 344
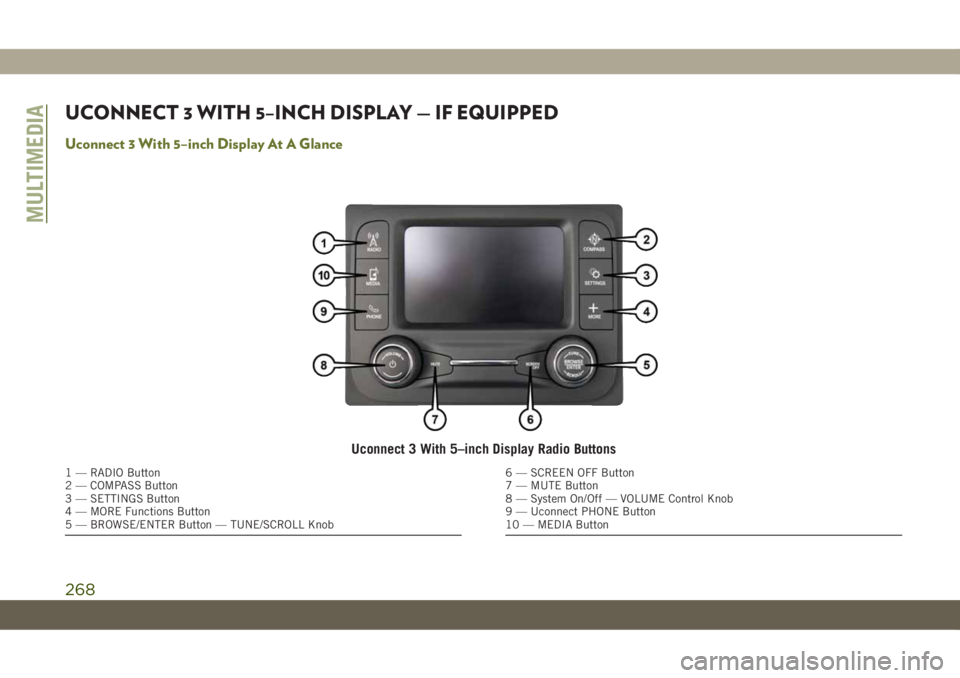
UCONNECT 3 WITH 5–INCH DISPLAY — IF EQUIPPED
Uconnect 3 With 5–inch Display At A Glance
Uconnect 3 With 5–inch Display Radio Buttons
1 — RADIO Button
2 — COMPASS Button
3 — SETTINGS Button
4 — MORE Functions Button
5 — BROWSE/ENTER Button — TUNE/SCROLL Knob6 — SCREEN OFF Button
7 — MUTE Button
8 — System On/Off — VOLUME Control Knob
9 — Uconnect PHONE Button
10 — MEDIA Button
MULTIMEDIA
268
Page 272 of 344
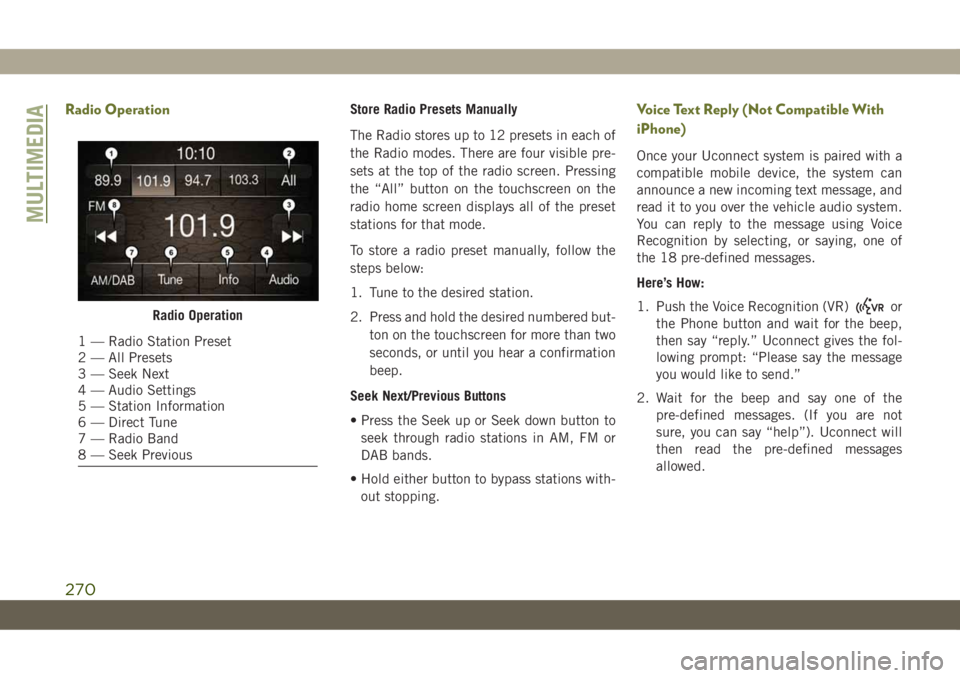
Radio OperationStore Radio Presets Manually
The Radio stores up to 12 presets in each of
the Radio modes. There are four visible pre-
sets at the top of the radio screen. Pressing
the “All” button on the touchscreen on the
radio home screen displays all of the preset
stations for that mode.
To store a radio preset manually, follow the
steps below:
1. Tune to the desired station.
2. Press and hold the desired numbered but-
ton on the touchscreen for more than two
seconds, or until you hear a confirmation
beep.
Seek Next/Previous Buttons
• Press the Seek up or Seek down button to
seek through radio stations in AM, FM or
DAB bands.
• Hold either button to bypass stations with-
out stopping.Voice Text Reply (Not Compatible With
iPhone)
Once your Uconnect system is paired with a
compatible mobile device, the system can
announce a new incoming text message, and
read it to you over the vehicle audio system.
You can reply to the message using Voice
Recognition by selecting, or saying, one of
the 18 pre-defined messages.
Here’s How:
1. Push the Voice Recognition (VR)
or
the Phone button and wait for the beep,
then say “reply.” Uconnect gives the fol-
lowing prompt: “Please say the message
you would like to send.”
2. Wait for the beep and say one of the
pre-defined messages. (If you are not
sure, you can say “help”). Uconnect will
then read the pre-defined messages
allowed.Radio Operation
1 — Radio Station Preset
2 — All Presets
3 — Seek Next
4 — Audio Settings
5 — Station Information
6 — Direct Tune
7 — Radio Band
8 — Seek Previous
MULTIMEDIA
270