brakes JEEP CHEROKEE 2020 Owner handbook (in English)
[x] Cancel search | Manufacturer: JEEP, Model Year: 2020, Model line: CHEROKEE, Model: JEEP CHEROKEE 2020Pages: 332, PDF Size: 8.87 MB
Page 159 of 332
157
Possible Reasons The Engine Does Not
Autostop
Prior to engine shut down, the system will
check many safety and comfort conditions to
see if they are fulfilled. Detailed information
about the operation of the Stop/Start system
may be viewed in the instrument cluster
Stop/Start Screen. In the following situations
the engine will not stop:
Driver’s seat belt is not buckled.
Driver’s door is not closed.
Battery temperature is too warm or cold.
The vehicle is on a steep grade.
Cabin heating or cooling is in process and
an acceptable cabin temperature has not
been achieved.
HVAC is set to full defrost mode at a high
blower speed.
Engine has not reached normal operating
temperature.
Battery charge is low.
The transmission is not in DRIVE (auto-
matic transmission) or NEUTRAL (manual
transmission).
Hood is open.
Vehicle is in 4WD LOW transfer case
mode.
Exhaust system regeneration in process.
Other Factors Which Can Inhibit Autostop
Include:
Fuel level.
Accelerator pedal input (automatic trans-
mission only).
Engine temperature too high.
It may be possible for the vehicle to be driven
several times without the Stop/Start system
going into a STOP/START READY state
under more extreme conditions of the items
listed above.
To Start The Engine While In Autostop
Mode
Automatic Transmission:
While in DRIVE, the engine will start when the
brake pedal is released or the throttle pedal is
depressed. The transmission will automatically
re-engage upon engine restart. During this tran -
sition, the brakes will hold the vehicle to avoid
undesired vehicle movement.
Manual Transmission:
When the gear selector is in NEUTRAL, the
engine will start when the clutch pedal is
pressed. The vehicle will go into STOP/START
SYSTEM NOT READY mode until the vehicle
speed is greater than 4 mph (7 km/h).
Conditions That Will Cause The Engine To Start
Automatically While In Autostop Mode:
The transmission gear selector is moved
from DRIVE to REVERSE or NEUTRAL.
To maintain cabin temperature comfort.
HVAC is set to full defrost mode.
Battery voltage drops too low.
Low brake vacuum (e.g. after several brake
pedal applications).
Stop/Start OFF switch is pushed.
4WD system is put into 4WD LOW mode.
The emissions system requires it.
A Stop/Start system error occurs.
HVAC system temperature or fan speed is
manually adjusted.
2020_JEEP_CHEROKEE_UG_RHD_UK.book Page 157
Page 166 of 332
STARTING AND OPERATING
164
(resume) button, or apply the accelerator
pedal to reengage the ACC to the existing
set speed.
The ACC system maintains set speed when
driving uphill and downhill. However, a
slight speed change on moderate hills is
normal. In addition, downshifting may
occur while climbing uphill or descending
downhill. This is normal operation and
necessary to maintain set speed. When
driving uphill and downhill, the ACC
system will cancel if the braking tempera-
ture exceeds normal range (overheated).
Setting The Following Distance In ACC
The specified following distance for ACC can
be set by varying the distance setting
between four bars (longest), three bars
(long), two bars (medium) and one bar
(short). Using this distance setting and the
vehicle speed, ACC calculates and sets the
distance to the vehicle ahead. This distance
setting appears in the instrument cluster
display.
To increase the distance setting, push the
Distance Setting — Increase button and
release. Each time the button is pushed, the
distance setting increases by one bar (longer).
To decrease the distance setting, push the
Distance Setting — Decrease button and
release. Each time the button is pushed, the
distance setting decreases by one bar
(shorter).
PARKSENSE REAR PARK
ASSIST — IF EQUIPPED
The ParkSense Rear Park Assist system
provides visual and audible indications of
the distance between the rear fascia and a
detected obstacle when backing up (e.g.
during a parking maneuver). The vehicle
brakes may be automatically applied and
released when performing a reverse parking
maneuver if the system detects a possible
collision with an obstacle. Refer to “Ucon
-
nect Settings” in “Multimedia” in the
Owner’s Manual for information on turning
Rear Braking Assist on or off.
Refer to “ParkSense System Usage Precau -
tions” in this section for limitations of this
system and recommendations.
ParkSense will retain the last system state
(enabled or disabled) from the last ignition
cycle when the ignition is changed to the ON/
RUN position.
ParkSense Sensors
The four ParkSense sensors, located in the
rear fascia/bumper, monitor the area behind
the vehicle that is within the sensors’ field of
view. The sensors can detect obstacles from
approximately 12 inches (30 cm) up to
79 inches (200 cm) from the rear fascia/
bumper in the horizontal direction,
depending on the location, type and orienta -
tion of the obstacle.
ParkSense Warning Display
The ParkSense Warning screen will only be
displayed if Sound and Display is selected
from the Customer - Programmable Features
section of the Uconnect System.
Refer to "Uconnect Settings” in “Multi -
media” in the Owner’s Manual for further
information.
The ParkSense Warning screen is located
within the instrument cluster display. It
provides visual warnings to indicate the
distance between the rear fascia/bumper and
the detected obstacle.
Refer to “Instrument Cluster Display” in
“Getting To Know Your Instrument Panel” in
the Owner’s Manual for further information.
2020_JEEP_CHEROKEE_UG_RHD_UK.book Page 164
Page 168 of 332
STARTING AND OPERATING
166
PARKSENSE FRONT AND
REAR PARK ASSIST — IF
EQUIPPED
The ParkSense Park Assist system provides
visual and audible indications of the
distance between the rear and/or front fascia
and a detected obstacle when backing up or
moving forward (e.g. during a parking
maneuver). The vehicle brakes may be auto-
matically applied and released when
performing a reverse parking maneuver if the
system detects a possible collision with an
obstacle.
Refer to “ParkSense System Usage Precau -
tions” in “Starting And Operating” in the
Owner’s Manual for limitations of this system
and recommendations.
ParkSense will retain the last system state
(enabled or disabled) from the last ignition
cycle when the ignition is changed to the ON/
RUN position.
WARNING!
Drivers must be careful when backing up
even when using ParkSense. Always
check carefully behind your vehicle, look
behind you, and be sure to check for
pedestrians, animals, other vehicles,
obstructions, and blind spots before
backing up. You are responsible for
safety and must continue to pay atten -
tion to your surroundings. Failure to do
so can result in serious injury or death.
Before using ParkSense, it is strongly
recommended that the ball mount and
hitch ball assembly is disconnected from
the vehicle when the vehicle is not used
for towing. Failure to do so can result in
injury or damage to vehicles or obstacles
because the hitch ball will be much
closer to the obstacle than the rear fascia
when the loudspeaker sounds the contin -
uous tone. Also, the sensors could detect
the ball mount and hitch ball assembly,
depending on its size and shape, giving
a false indication that an obstacle is
behind the vehicle.
CAUTION!
ParkSense is only a parking aid and it is
unable to recognize every obstacle,
including small obstacles. Parking curbs
might be temporarily detected or not
detected at all. Obstacles located above
or below the sensors will not be detected
when they are in close proximity.
The vehicle must be driven slowly when
using ParkSense in order to be able to
stop in time when an obstacle is
detected. It is recommended that the
driver looks over his/her shoulder when
using ParkSense.
2020_JEEP_CHEROKEE_UG_RHD_UK.book Page 166
Page 170 of 332
STARTING AND OPERATING
168
PARKSENSE ACTIVE PARK
ASSIST SYSTEM — IF
EQUIPPED
The ParkSense Active Park Assist system is
intended to assist the driver during parallel
and perpendicular parking maneuvers by
identifying a proper parking space, providing
audible/visual instructions, and controlling
the steering wheel. The ParkSense Active
Park Assist system is defined as “semi-auto-
matic” since the driver maintains control of
the accelerator, gear selector and brakes.
Depending on the driver's parking maneuver
selection, the ParkSense Active Park Assist
system is capable of maneuvering a vehicle
into a parallel or a perpendicular parking
space on either side (i.e., driver side or
passenger side).
NOTE:
The driver is always responsible for
controlling the vehicle, responsible for any
surrounding objects, and must intervene
as required.
The system is provided to assist the driver
and not to substitute the driver.
During a semi-automatic maneuver, if the
driver touches the steering wheel after
being instructed to remove their hands
from the steering wheel, the system will
cancel, and the driver will be required to
manually complete the parking maneuver.
The system may not work in all conditions
(e.g. environmental conditions such as
heavy rain, snow, etc., or if searching for a
parking space that has surfaces that will
absorb the ultrasonic sensor waves).
New vehicles from the dealer must have at
least 30 miles (48 km) accumulated
before the ParkSense Active Park Assist
system is fully calibrated and performs
accurately. This is due to the system’s
dynamic vehicle calibration to improve the
performance of the feature. The system
will also continuously perform the
dynamic vehicle calibration to account for
differences such as over or under inflated
tires and new tires.
The ParkSense Active Park Assist system can
be enabled and disabled with the ParkSense
Active Park Assist switch, located on the
switch panel below the Uconnect display. To enable the ParkSense Active
Park Assist system, push the Park
-
Sense Active Park Assist switch
once (LED turns on).
To disable the ParkSense Active Park Assist
system, push the ParkSense Active Park
Assist switch again (LED turns off).
Refer to the Owner’s Manual for further infor -
mation.LANESENSE — IF EQUIPPED
LaneSense Operation
The LaneSense system is operational at
speeds above 37 mph (60 km/h) and below
112 mph (180 km/h). The LaneSense
system uses a forward looking camera to
detect lane markings and measure vehicle
position within the lane boundaries.
When both lane markings are detected and the
driver unintentionally drifts out of the lane (no
turn signal applied), the LaneSense system
provides a haptic warning in the form of torque
applied to the steering wheel, as well as a
visual warning in the instrument cluster
display, to prompt the driver to remain within
the lane boundaries. The LaneSense system
2020_JEEP_CHEROKEE_UG_RHD_UK.book Page 168
Page 173 of 332
171
(Continued)
For example: If approaching the left side
of the lane the steering wheel will turn to
the right.
When the LaneSense system senses the
lane has been approached and is in a lane
departure situation, the left thick lane line
flashes yellow (on/off) and the left thin
line remains solid yellow. The LaneSense
telltale changes from solid yellow to
flashing yellow. At this time torque is
applied to the steering wheel in the oppo-
site direction of the lane boundary.For example: If approaching the left side
of the lane the steering wheel will turn to
the right.
NOTE:
The LaneSense system operates with the
similar behavior for a right lane departure.
Changing LaneSense Status
The LaneSense system has settings to adjust
the intensity of the torque warning and the
warning zone sensitivity (early/late) that you
can configure through the Uconnect system
screen.
Refer to “Uconnect Settings” in “Multi -
media” in the Owner’s Manual for further
information. NOTE:
When enabled, the system operates above
37 mph (60 km/h) and below 112 mph
(180 km/h).
Use of the turn signal suppresses the
warnings.
The system will not apply torque to the
steering wheel whenever a safety system
engages (Anti-Lock Brakes, Traction
Control System, Electronic Stability
Control, Forward Collision Warning, etc.).
PARKVIEW REAR BACK UP
CAMERA — IF EQUIPPED
Your vehicle may be equipped with the
ParkView Rear Back Up Camera that allows
you to see an on-screen image of the rear
surroundings of your vehicle whenever the
gear selector is put into REVERSE. The
image will be displayed in the touchscreen
display along with a caution note to “check
entire surroundings” across the top of the
screen. After five seconds this note will
disappear. The ParkView camera is located
on the rear of the vehicle above the rear
license plate. NOTE:
The ParkView Rear Back Up Camera has
programmable modes of operation that may
be selected through the Uconnect System.
Refer to “Uconnect Settings” in “Multi
-
media” in the Owner’s Manual for further
information.
WARNING!
Drivers must be careful when backing up
even when using the ParkView Rear Back
Up Camera. Always check carefully behind
your vehicle, and be sure to check for
pedestrians, animals, other vehicles,
obstructions, or blind spots before backing
up. You are responsible for the safety of
your surroundings and must continue to
pay attention while backing up. Failure to
do so can result in serious injury or death.
CAUTION!
To avoid vehicle damage, ParkView
should only be used as a parking aid. The
ParkView camera is unable to view every
obstacle or object in your drive path.
2020_JEEP_CHEROKEE_UG_RHD_UK.book Page 171
Page 180 of 332
STARTING AND OPERATING
178
Gross Vehicle Weight Rating (GVWR)
The Gross Vehicle Weight Rating (GVWR) is
the total permissible weight of your vehicle
including driver, passengers, vehicle,
options and cargo. The label also specifies
maximum capacities of front and rear axle
systems (GAWR). Total load must be limited
so GVWR and front and rear GAWR are not
exceeded.
Payload
The payload of a vehicle is defined as the
allowable load weight a truck can carry,
including the weight of the driver, all passen-
gers, options and cargo.
Gross Axle Weight Rating (GAWR)
The Gross Axle Weight Rating (GAWR) is the
maximum permissible load on the front and
rear axles. The load must be distributed in
the cargo area so that the GAWR of each axle
is not exceeded.
Each axle GAWR is determined by the
components in the system with the lowest
load carrying capacity (axle, springs, tires or
wheels). Heavier axles or suspension compo -nents sometimes specified by purchasers for
increased durability does not necessarily
increase the vehicle's GVWR.
Curb Weight
The curb weight of a vehicle is defined as the
total weight of the vehicle with all fluids,
including vehicle fuel, at full capacity condi
-
tions, and with no occupants or cargo loaded
into the vehicle. The front and rear curb
weight values are determined by weighing
your vehicle on a commercial scale before
any occupants or cargo are added.
Loading
The actual total weight and the weight of the
front and rear of your vehicle at the ground
can best be determined by weighing it when
it is loaded and ready for operation.
The entire vehicle should first be weighed on
a commercial scale to ensure that the GVWR
has not been exceeded. The weight on the
front and rear of the vehicle should then be
determined separately to be sure that the
load is properly distributed over the front and
rear axle. Weighing the vehicle may show
that the GAWR of either the front or rear
axles has been exceeded but the total load is
within the specified GVWR. If so, weight must be shifted from front to rear or rear to
front as appropriate until the specified
weight limitations are met. Store the heavier
items down low and be sure that the weight
is distributed equally. Stow all loose items
securely before driving.
Improper weight distributions can have an
adverse effect on the way your vehicle steers
and handles and the way the brakes operate.
CAUTION!
Do not load your vehicle any heavier than
the GVWR or the maximum front and rear
GAWR. If you do, parts on your vehicle can
break, or it can change the way your
vehicle handles. This could cause you to
lose control. Also overloading can shorten
the life of your vehicle.
2020_JEEP_CHEROKEE_UG_RHD_UK.book Page 178
Page 223 of 332
221
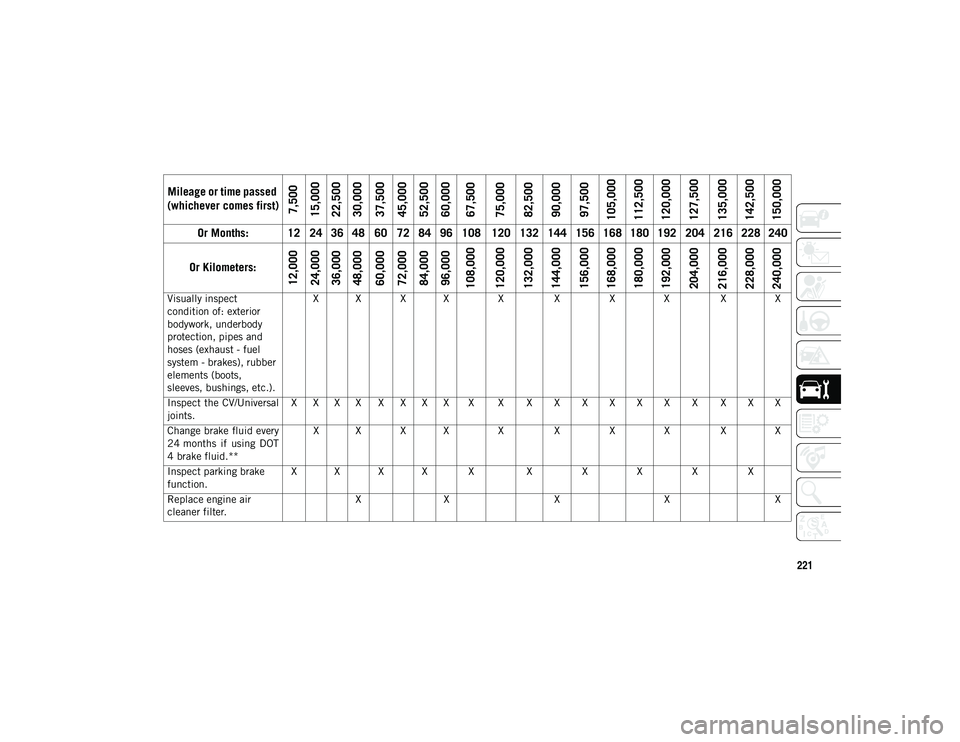
Visually inspect
condition of: exterior
bodywork, underbody
protection, pipes and
hoses (exhaust - fuel
system - brakes), rubber
elements (boots,
sleeves, bushings, etc.).X X X X X X X X X X
Inspect the CV/Universal
joints. X X X X X X X X X X X X X X X X X X X X
Change brake fluid every
24 months if using DOT
4 brake fluid.** X X X X X X X X X X
Inspect parking brake
function. X X X X X
X X X X X
Replace engine air
cleaner filter. X
X XX X
Mileage or time passed
(whichever comes first)
7,500
15,000
22,500
30,000
37,500
45,000
52,500
60,000
67,500
75,000
82,500
90,000
97,500
105,000
112,500
120,000
127,500
135,000
142,500
150,000
Or Months: 12 24 36 48 60 72 84 96 108 120 132 144 156 168 180 192 204 216 228 240
Or Kilometers:
12,000
24,000
36,000
48,000
60,000
72,000
84,000
96,000
108,000
120,000
132,000
144,000
156,000
168,000
180,000
192,000
204,000
216,000
228,000
240,000
2020_JEEP_CHEROKEE_UG_RHD_UK.book Page 221
Page 228 of 332
SERVICING AND MAINTENAN
CE
226Mileage or time passed (whichever comes first)
12,500
25,000
37,500
50,000
62,500
75,000
87,500
100,000
112,500
125,000
137,500
150,000
162,500
175,000
187,500
Or Years: 1 2 3 4 5 6 7 8 9 10 11 12 13 14 15
Or Kilometers:
20,000
40,000
60,000
80,000
100,000
120,000
140,000
160,000
180,000
200,000
220,000
240,000
260,000
280,000
300,000
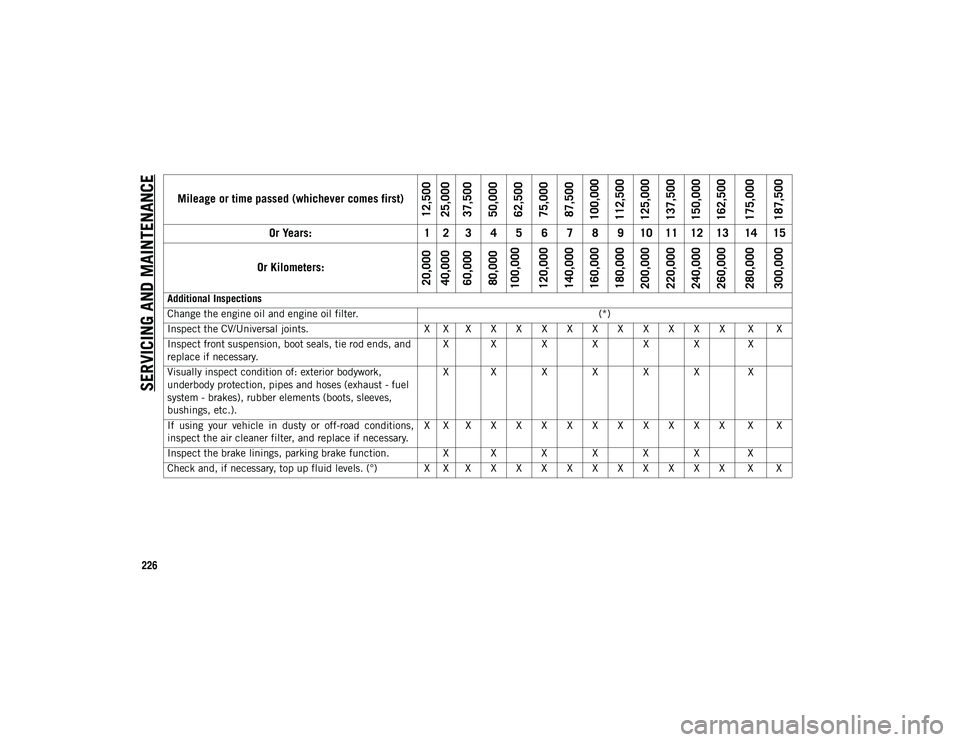
Additional Inspections
Change the engine oil and engine oil filter. (*)
Inspect the CV/Universal joints. X X X X X X X X X X X X X X X
Inspect front suspension, boot seals, tie rod ends, and
replace if necessary. X X X X X X X
Visually inspect condition of: exterior bodywork,
underbody protection, pipes and hoses (exhaust - fuel
system - brakes), rubber elements (boots, sleeves,
bushings, etc.). X X X X X X X
If using your vehicle in dusty or off-road conditions,
inspect the air cleaner filter, and replace if necessary. X X X X X X X X X X X X X X X
Inspect the brake linings, parking brake function. X X X X X X X
Check and, if necessary, top up fluid levels. (°) X X X X X X X X X X X X X X X
2020_JEEP_CHEROKEE_UG_RHD_UK.book Page 226
Page 237 of 332
235
(Continued)
Fluid Level Check — Brake Master Cylinder
The fluid level of the master cylinder should
be checked whenever the vehicle is serviced,
or immediately if the brake system warning
light is on. If necessary, add fluid to bring
level within the designated marks on the side
of the reservoir of the brake master cylinder.
Be sure to clean the top of the master
cylinder area before removing cap. With disc
brakes, fluid level can be expected to fall as
the brake pads wear. Brake fluid level should
be checked when pads are replaced. If the
brake fluid is abnormally low, check the
system for leaks.
Refer to “Fluids And Lubricants” in “Tech-
nical Specifications” for further information.
WARNING!
Riding the brakes can lead to brake failure
and possibly a collision. Driving with your
foot resting or riding on the brake pedal
can result in abnormally high brake
temperatures, excessive lining wear, and
possible brake damage. You would not
have your full braking capacity in an
emergency.
WARNING!
Use only manufacturer's recommended
brake fluid. Refer to “Fluids And Lubri -
cants” in “Technical Specifications” for
further information. Using the wrong
type of brake fluid can severely damage
your brake system and/or impair its
performance. The proper type of brake
fluid for your vehicle is also identified on
the original factory installed hydraulic
master cylinder reservoir.
To avoid contamination from foreign
matter or moisture, use only new brake
fluid or fluid that has been in a tightly
closed container. Keep the master
cylinder reservoir cap secured at all
times. Brake fluid in a open container
absorbs moisture from the air resulting
in a lower boiling point. This may cause
it to boil unexpectedly during hard or
prolonged braking, resulting in sudden
brake failure. This could result in a colli -
sion.
Overfilling the brake fluid reservoir can
result in spilling brake fluid on hot
engine parts, causing the brake fluid to
catch fire. Brake fluid can also damage
painted and vinyl surfaces, care should
be taken to avoid its contact with these
surfaces.
Do not allow petroleum based fluid to
contaminate the brake fluid. Brake seal
components could be damaged, causing
partial or complete brake failure. This
could result in a collision.
WARNING! (Continued)
2020_JEEP_CHEROKEE_UG_RHD_UK.book Page 235
Page 250 of 332
SERVICING AND MAINTENAN
CE
248
Wheel And Wheel Trim Care
All wheels and wheel trim, especially
aluminum and chrome plated wheels, should
be cleaned regularly using mild (neutral Ph)
soap and water to maintain their luster and
to prevent corrosion. Wash wheels with the
same soap solution recommended for the
body of the vehicle and remember to always
wash when the surfaces are not hot to the
touch.Your wheels are susceptible to deterioration
caused by salt, sodium chloride, magnesium
chloride, calcium chloride, etc., and other
road chemicals used to melt ice or control
dust on dirt roads. Use a soft cloth or sponge
and mild soap to wipe away promptly. Do not
use harsh chemicals or a stiff brush. They
can damage the wheel’s protective coating
that helps keep them from corroding and
tarnishing.
When cleaning extremely dirty wheels
including excessive brake dust, care must be
taken in the selection of tire and wheel
cleaning chemicals and equipment to
prevent damage to the wheels. Select a
non-abrasive, non-acidic cleaner for
aluminum or chrome wheels.
NOTE:
If you intend parking or storing your vehicle
for an extended period after cleaning the
wheels with wheel cleaner, drive your vehicle
and apply the brakes to remove the water
droplets from the brake components. This
activity will remove the red rust on the brake
rotors and prevent vehicle vibration when
braking.
WARNING!
Limited use spares are for emergency use
only. Installation of this limited use spare
tire affects vehicle handling. With this tire,
do not drive more than the speed listed on
the limited use spare wheel. Keep inflated
to the cold tire inflation pressures listed on
your Tire and Loading Information Placard
located on the driver’s side B-Pillar or the
rear edge of the driver’s side door. Replace
(or repair) the original equipment tire at
the first opportunity and reinstall it on your
vehicle. Failure to do so could result in
loss of vehicle control.
CAUTION!
Avoid products or automatic car washes
that use acidic solutions or strong alkaline
additives or harsh brushes. Many
aftermarket wheel cleaners and automatic
car washes may damage the wheel's
protective finish. Such damage is not
covered by the New Vehicle Limited
Warranty. Only car wash soap is
recommended.
CAUTION!
Do not use scouring pads, steel wool, a
bristle brush, metal polishes or oven
cleaner. These products may damage the
wheel's protective finish. Such damage is
not covered by the New Vehicle Limited
Warranty. Only car wash soap is
recommended.
2020_JEEP_CHEROKEE_UG_RHD_UK.book Page 248