fuel cap JEEP CHEROKEE 2020 Owner handbook (in English)
[x] Cancel search | Manufacturer: JEEP, Model Year: 2020, Model line: CHEROKEE, Model: JEEP CHEROKEE 2020Pages: 332, PDF Size: 8.87 MB
Page 12 of 332
10
IF YOUR ENGINE OVERHEATS ............... 212
GEAR SELECTOR OVERRIDE .................. 213FREEING A STUCK VEHICLE .................. 214TOWING A DISABLED VEHICLE ............. 215
Without The Key Fob .................... 216
Front-Wheel Drive (FWD) Models .... 216
4x4 Models .................................. 216
Recovery Strap — If Equipped ....... 217
ENHANCED ACCIDENT RESPONSE
SYSTEM (EARS) .................................. 217
EVENT DATA RECORDER (EDR) .............. 217
SERVICING AND MAINTENANCE
SCHEDULED SERVICING ....................... 218
Scheduled Servicing —
Gasoline Engine .......................... 218 Scheduled Servicing —
Diesel Engine ............................... 224
ENGINE COMPARTMENT ....................... 229
2.0L Engine ................................ 229
2.4L Engine ................................ 230
3.2L Engine ................................ 231
2.2L Diesel Engine ...................... 232
Checking Oil Level ........................ 233
Cooling System ............................ 234
Adding Washer Fluid .................... 234
Brake System .............................. 234 Manual Transmission —
If Equipped ................................. 236 Automatic Transmission —
If Equipped ................................. 236 Maintenance-Free Battery ............ 236
Pressure Washing ......................... 237
DEALER SERVICE ................................237
Windshield Wiper Blades ............. 237
RAISING THE VEHICLE ..........................241
TIRES .................................................241
Tires — General Information ........ 241
Tire Types ................................... 246
Spare Tires — If Equipped ........... 246
Wheel And Wheel Trim Care ......... 248
Tire Chains And Traction
Devices ...................................... 249 Tire Rotation Recommendations .... 250
STORING THE VEHICLE .........................251BODYWORK .........................................252
Preserving The Bodywork .............. 252
INTERIORS .........................................253
Seats And Fabric Parts ................. 253
Plastic And Coated Parts............... 254
Leather Parts ............................... 254
Glass Surfaces ............................ 254
TECHNICAL SPECIFICATIONS
VEHICLE IDENTIFICATION NUMBER........255BRAKE SYSTEM ...................................255
WHEEL AND TIRE TORQUE
SPECIFICATIONS ..................................256
Torque Specifications ....................256
WHEELS ..............................................256
WEIGHTS.............................................256
FUEL REQUIREMENTS —
GASOLINE ENGINES ..............................257
2.0L Engine .................................257
2.4L And 3.2L Engines .................257
Materials Added To Fuel ................257
Fuel Icon Identification Compliant
To EN16942 ................................257
FUEL REQUIREMENTS —
DIESEL ENGINE ....................................259
Fuel Icon Identification Compliant
To EN16942 ................................259
FLUID CAPACITIES ..............................261
FLUIDS AND LUBRICANTS .....................262
Engine .........................................262
Chassis ........................................265
FUEL CONSUMPTION AND
CO
2 EMISSIONS ..................................266
MOPAR ACCESSORIES .........................266
Authentic Accessories By Mopar .....266
2020_JEEP_CHEROKEE_UG_RHD_UK.book Page 10
Page 70 of 332
GETTING TO KNOW YOUR INSTRUMENT PANEL
68
ously with the engine running, a malfunction
has been detected in the ESC system. If this
warning light remains on after several igni-
tion cycles, and the vehicle has been driven
several miles (kilometers) at speeds greater
than 30 mph (48 km/h), see an authorized
dealer as soon as possible to have the
problem diagnosed and corrected.
The “ESC OFF Indicator Light” and the
“ESC Indicator Light” come on momen -
tarily each time the ignition is placed in
the ON/RUN or ACC/ON/RUN position.
The ESC system will make buzzing or
clicking sounds when it is active. This is
normal; the sounds will stop when ESC
system becomes inactive.
This light will come on when the vehicle is
in an ESC event.
— Electronic Stability Control (ESC) OFF
Warning Light — If Equipped
This warning light indicates the Electronic
Stability Control (ESC) is off.
Each time the ignition is turned to ON/RUN
or ACC/ON/RUN, the ESC system will be on,
even if it was turned off previously.
— Low Fuel Warning Light
When the fuel level reaches approximately 2
gal (7.5 L) this light will turn on, and remain
on until fuel is added.
A single warning chime will sound with Low
Fuel Warning.
— Low Washer Fluid Warning Light — If
Equipped
This warning light will illuminate when the
windshield washer fluid is low.
— Service LaneSense Warning Light — If
Equipped
This warning light will illuminate when the
LaneSense system is not operating and
requires service. Please see an authorized
dealer.
— LaneSense Warning Light — If
Equipped
The LaneSense Warning Light will be solid
yellow when the vehicle is approaching a lane
marker. The warning light will flash when the
vehicle is crossing the lane marker.
Refer to “LaneSense — If Equipped" in
“Starting And Operating” for further informa
-
tion.
— Engine Check/Malfunction Indicator
Warning Light (MIL)
The Engine Check/Malfunction Indicator
Light (MIL) is a part of an Onboard Diag -
nostic System called OBD II that monitors
engine and automatic transmission control
systems. This warning light will illuminate
when the ignition is in the ON/RUN position
before engine start. If the bulb does not
come on when turning the ignition switch
from OFF to ON/RUN, have the condition
checked promptly.
Certain conditions, such as a loose or
missing gas cap, poor quality fuel, etc., may
illuminate the light after engine start. The
vehicle should be serviced if the light stays
on through several typical driving styles. In
most situations, the vehicle will drive
normally and will not require towing.
When the engine is running, the Malfunction
Indicator Light (MIL) may flash to alert
serious conditions that could lead to imme -
diate loss of power or severe catalytic
2020_JEEP_CHEROKEE_UG_RHD_UK.book Page 68
Page 97 of 332
95
NOTE:
The TPMS is not intended to replace
normal tire care and maintenance, or to
provide warning of a tire failure or condi-
tion.
Driving on a significantly underinflated
tire causes the tire to overheat and can
lead to tire failure. Underinflation also
reduces fuel efficiency and tire tread life,
and may affect the vehicle’s handling and
stopping ability.
The TPMS is not a substitute for proper tire
maintenance, and it is the driver’s responsi -
bility to maintain correct tire pressure using
an accurate tire pressure gauge, even if
underinflation has not reached the level to
trigger illumination of the “Tire Pressure
Monitoring Telltale Light.”
Seasonal temperature changes will affect
tire pressure, and the TPMS will monitor
the actual tire pressure in the tire.
Premium System
The Tire Pressure Monitoring System (TPMS)
uses wireless technology with wheel rim
mounted electronic sensors to monitor tire
pressure levels. Sensors, mounted to each
wheel as part of the valve stem, transmit tire
pressure readings to the receiver module.
NOTE:
It is particularly important for you to check
the tire pressure in all of the tires on your
vehicle monthly and to maintain the proper
pressure. The TPMS consists of the following compo
-
nents:
Receiver module
Four Tire Pressure Monitoring sensors
Various Tire Pressure Monitoring System
messages, which display in the instrument
cluster
Tire Pressure Monitoring System Warning
Light
Tire Pressure Monitoring Low Pressure Warnings
The “Tire Pressure Monitoring
Warning Light” will illuminate in
the instrument cluster and a chime
will sound when tire pressure is low
in one or more of the four active road tires. In
addition, the instrument cluster will display
a "Tire Low" message for a minimum of five
seconds and a graphic showing the pressure
values of each tire with the low tire pressure
values in a different color.
After inspecting or adjusting the tire
pressure always reinstall the valve stem
cap. This will prevent moisture and dirt
from entering the valve stem, which
could damage the TPMS sensor.
CAUTION! (Continued)
2020_JEEP_CHEROKEE_UG_RHD_UK.book Page 95
Page 174 of 332
STARTING AND OPERATING
172
NOTE:
If snow, ice, mud, or any foreign substance
builds up on the camera lens, clean the lens,
rinse with water, and dry with a soft cloth. Do
not cover the lens.
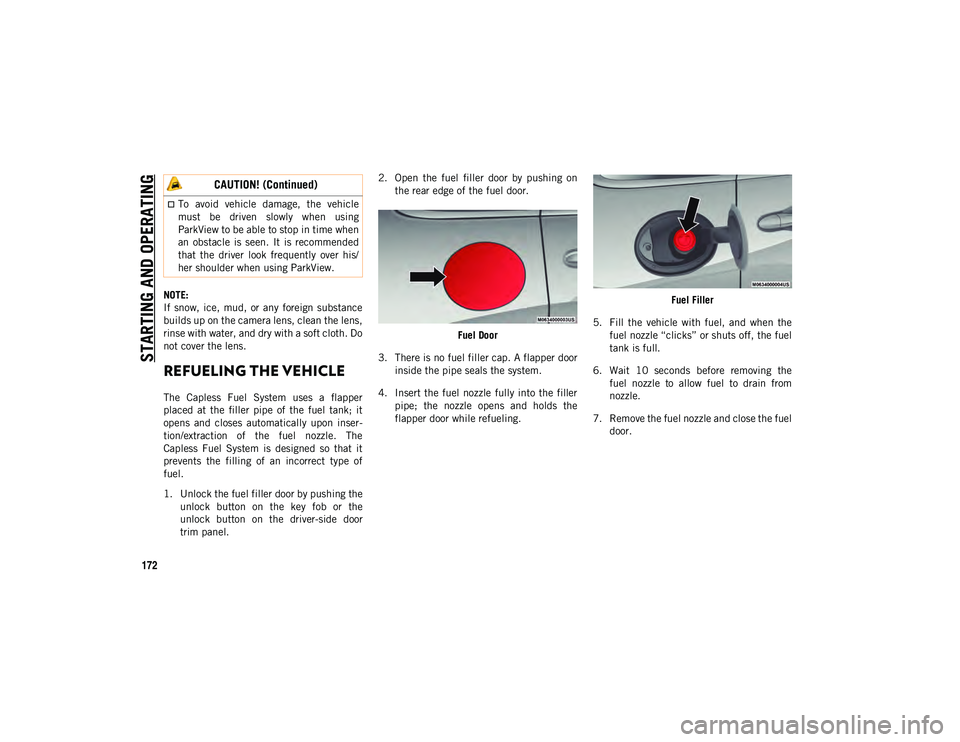
REFUELING THE VEHICLE
The Capless Fuel System uses a flapper
placed at the filler pipe of the fuel tank; it
opens and closes automatically upon inser-
tion/extraction of the fuel nozzle. The
Capless Fuel System is designed so that it
prevents the filling of an incorrect type of
fuel.
1. Unlock the fuel filler door by pushing the unlock button on the key fob or the
unlock button on the driver-side door
trim panel. 2. Open the fuel filler door by pushing on
the rear edge of the fuel door.
Fuel Door
3. There is no fuel filler cap. A flapper door inside the pipe seals the system.
4. Insert the fuel nozzle fully into the filler pipe; the nozzle opens and holds the
flapper door while refueling. Fuel Filler
5. Fill the vehicle with fuel, and when the fuel nozzle “clicks” or shuts off, the fuel
tank is full.
6. Wait 10 seconds before removing the fuel nozzle to allow fuel to drain from
nozzle.
7. Remove the fuel nozzle and close the fuel door.
To avoid vehicle damage, the vehicle
must be driven slowly when using
ParkView to be able to stop in time when
an obstacle is seen. It is recommended
that the driver look frequently over his/
her shoulder when using ParkView.
CAUTION! (Continued)
2020_JEEP_CHEROKEE_UG_RHD_UK.book Page 172
Page 175 of 332
173
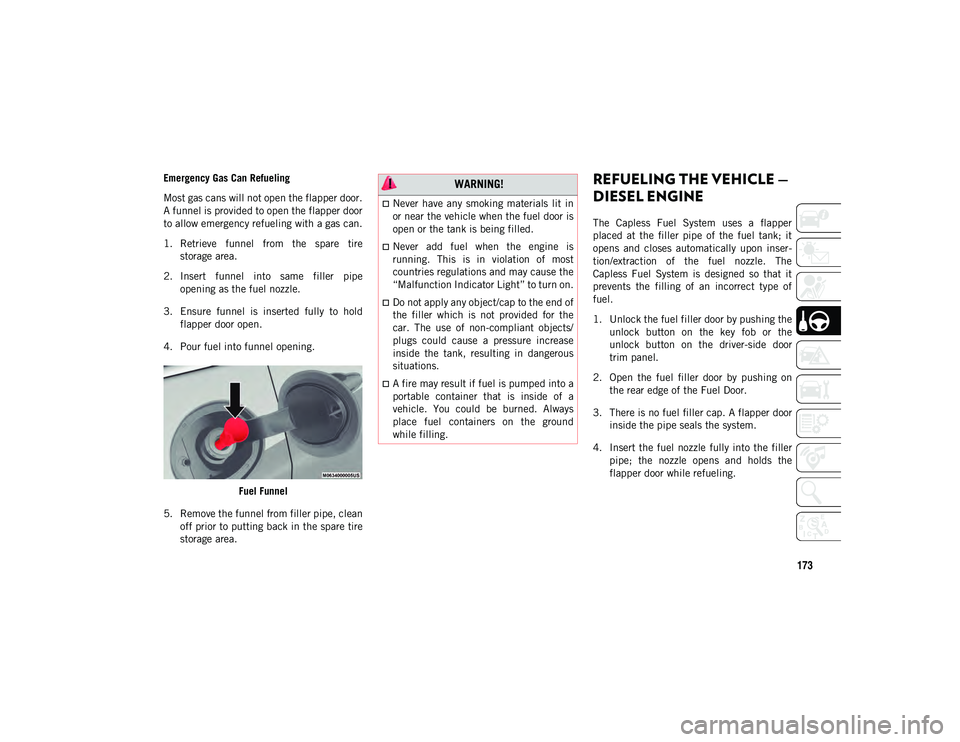
Emergency Gas Can Refueling
Most gas cans will not open the flapper door.
A funnel is provided to open the flapper door
to allow emergency refueling with a gas can.
1. Retrieve funnel from the spare tirestorage area.
2. Insert funnel into same filler pipe opening as the fuel nozzle.
3. Ensure funnel is inserted fully to hold flapper door open.
4. Pour fuel into funnel opening.
Fuel Funnel
5. Remove the funnel from filler pipe, clean off prior to putting back in the spare tire
storage area.REFUELING THE VEHICLE —
DIESEL ENGINE
The Capless Fuel System uses a flapper
placed at the filler pipe of the fuel tank; it
opens and closes automatically upon inser -
tion/extraction of the fuel nozzle. The
Capless Fuel System is designed so that it
prevents the filling of an incorrect type of
fuel.
1. Unlock the fuel filler door by pushing the unlock button on the key fob or the
unlock button on the driver-side door
trim panel.
2. Open the fuel filler door by pushing on the rear edge of the Fuel Door.
3. There is no fuel filler cap. A flapper door inside the pipe seals the system.
4. Insert the fuel nozzle fully into the filler pipe; the nozzle opens and holds the
flapper door while refueling.
WARNING!
Never have any smoking materials lit in
or near the vehicle when the fuel door is
open or the tank is being filled.
Never add fuel when the engine is
running. This is in violation of most
countries regulations and may cause the
“Malfunction Indicator Light” to turn on.
Do not apply any object/cap to the end of
the filler which is not provided for the
car. The use of non-compliant objects/
plugs could cause a pressure increase
inside the tank, resulting in dangerous
situations.
A fire may result if fuel is pumped into a
portable container that is inside of a
vehicle. You could be burned. Always
place fuel containers on the ground
while filling.
2020_JEEP_CHEROKEE_UG_RHD_UK.book Page 173
Page 176 of 332
STARTING AND OPERATING
174
(Continued)
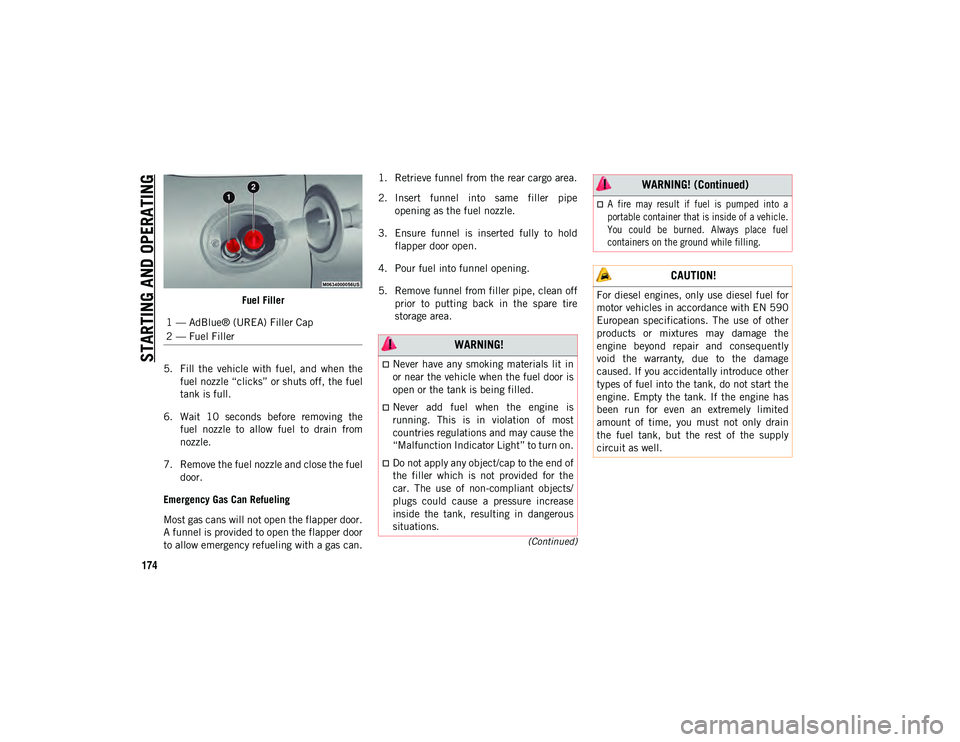
Fuel Filler
5. Fill the vehicle with fuel, and when the fuel nozzle “clicks” or shuts off, the fuel
tank is full.
6. Wait 10 seconds before removing the fuel nozzle to allow fuel to drain from
nozzle.
7. Remove the fuel nozzle and close the fuel door.
Emergency Gas Can Refueling
Most gas cans will not open the flapper door.
A funnel is provided to open the flapper door
to allow emergency refueling with a gas can. 1. Retrieve funnel from the rear cargo area.
2. Insert funnel into same filler pipe
opening as the fuel nozzle.
3. Ensure funnel is inserted fully to hold flapper door open.
4. Pour fuel into funnel opening.
5. Remove funnel from filler pipe, clean off prior to putting back in the spare tire
storage area.
1 — AdBlue® (UREA) Filler Cap
2 — Fuel Filler
WARNING!
Never have any smoking materials lit in
or near the vehicle when the fuel door is
open or the tank is being filled.
Never add fuel when the engine is
running. This is in violation of most
countries regulations and may cause the
“Malfunction Indicator Light” to turn on.
Do not apply any object/cap to the end of
the filler which is not provided for the
car. The use of non-compliant objects/
plugs could cause a pressure increase
inside the tank, resulting in dangerous
situations.
A fire may result if fuel is pumped into a
portable container that is inside of a vehicle.
You could be burned. Always place fuel
containers on the ground while filling.
CAUTION!
For diesel engines, only use diesel fuel for
motor vehicles in accordance with EN 590
European specifications. The use of other
products or mixtures may damage the
engine beyond repair and consequently
void the warranty, due to the damage
caused. If you accidentally introduce other
types of fuel into the tank, do not start the
engine. Empty the tank. If the engine has
been run for even an extremely limited
amount of time, you must not only drain
the fuel tank, but the rest of the supply
circuit as well.
WARNING! (Continued)
2020_JEEP_CHEROKEE_UG_RHD_UK.book Page 174
Page 177 of 332
175
Adblue® (UREA) — If Equipped
The vehicle is equipped with an UREA injec-
tion system and Selective Catalytic Reduc -
tion to meet emission standards. These two
systems ensure compliance with the diesel
emissions requirements; at the same time,
they ensure fuel-efficiency, handling, torque
and power. For messages and system warn -
ings, refer to the “Warning Lights And
Messages” in the “Getting To Know Your
Instrument Panel” section. AdBlue® (UREA)
is a very stable product with a long shelf life.
Stored at temperatures LOWER than 90 °F
(32 °C), it has a shelf life of at least one year.
For more information on the AdBlue® liquid
type, see the “Fluids and lubricants” in the
“Technical specifications” section. The
vehicle is equipped with an automatic
AdBlue® heating system when the engine
starts allowing the system to work correctly
at temperatures lower than 12 °F (-11 °C).
NOTE:
AdBlue® freezes at temperatures lower than
12 °F (-11 °C).
AdBlue® (UREA) Storage
AdBlue® (UREA) is considered a very stable
product with a long shelf life. If AdBlue®
(UREA) is kept in temperatures between 10°
and 90°F (-12° and 32°C), it will last a
minimum of one year.
AdBlue® (UREA) is subject to freezing at the
lowest temperatures. For example, AdBlue®
(UREA) may freeze at temperatures at or
below 12° F (-11° C). The system has been
designed to operate in this environment.
NOTE:
When working with AdBlue® (UREA), it is
important to know that:
Any containers or parts that come into
contact with AdBlue® (UREA) must be
AdBlue® (UREA) compatible (plastic or
stainless steel). Copper, brass, aluminum,
iron or non-stainless steel should be
avoided as they are subject to corrosion by
AdBlue® (UREA).
If AdBlue® (UREA) is spilled, it should be
wiped up completely.
Adding AdBlue® (UREA)
Preliminary Conditions
AdBlue® (UREA) freezes at temperatures
lower than 12° F (-11° C). If the car stands
for a long time at this temperature refilling
could be difficult. For this reason, it is
advised to park the vehicle in a garage and/
or heated environment and wait for the
UREA to return to liquid state before topping
up.
Proceed as follows:
Park the car on flat ground and stop the
engine by placing the ignition in the OFF
position.
Open the fuel door, undo and remove the
cap (blue) from the AdBlue® (UREA)
filler.
2020_JEEP_CHEROKEE_UG_RHD_UK.book Page 175
Page 178 of 332
STARTING AND OPERATING
176
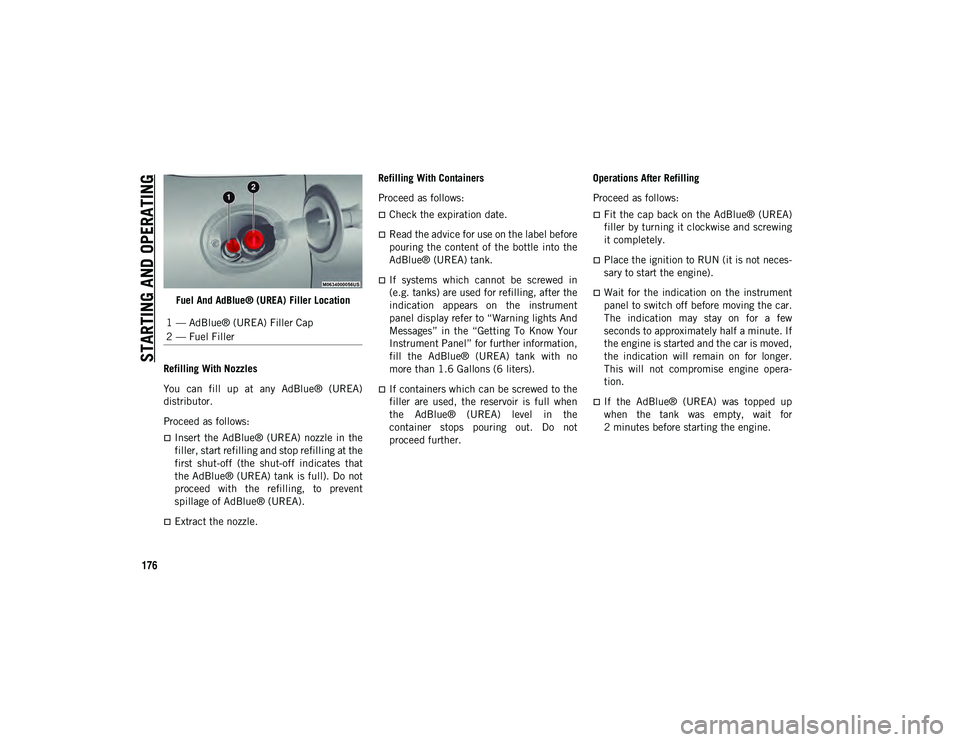
Fuel And AdBlue® (UREA) Filler Location
Refilling With Nozzles
You can fill up at any AdBlue® (UREA)
distributor.
Proceed as follows:
Insert the AdBlue® (UREA) nozzle in the
filler, start refilling and stop refilling at the
first shut-off (the shut-off indicates that
the AdBlue® (UREA) tank is full). Do not
proceed with the refilling, to prevent
spillage of AdBlue® (UREA).
Extract the nozzle. Refilling With Containers
Proceed as follows:
Check the expiration date.
Read the advice for use on the label before
pouring the content of the bottle into the
AdBlue® (UREA) tank.
If systems which cannot be screwed in
(e.g. tanks) are used for refilling, after the
indication appears on the instrument
panel display refer to “Warning lights And
Messages” in the “Getting To Know Your
Instrument Panel” for further information,
fill the AdBlue® (UREA) tank with no
more than 1.6 Gallons (6 liters).
If containers which can be screwed to the
filler are used, the reservoir is full when
the AdBlue® (UREA) level in the
container stops pouring out. Do not
proceed further.
Operations After Refilling
Proceed as follows:
Fit the cap back on the AdBlue® (UREA)
filler by turning it clockwise and screwing
it completely.
Place the ignition to RUN (it is not neces-
sary to start the engine).
Wait for the indication on the instrument
panel to switch off before moving the car.
The indication may stay on for a few
seconds to approximately half a minute. If
the engine is started and the car is moved,
the indication will remain on for longer.
This will not compromise engine opera-
tion.
If the AdBlue® (UREA) was topped up
when the tank was empty, wait for
2 minutes before starting the engine.
1 — AdBlue® (UREA) Filler Cap
2 — Fuel Filler
2020_JEEP_CHEROKEE_UG_RHD_UK.book Page 176
Page 180 of 332
STARTING AND OPERATING
178
Gross Vehicle Weight Rating (GVWR)
The Gross Vehicle Weight Rating (GVWR) is
the total permissible weight of your vehicle
including driver, passengers, vehicle,
options and cargo. The label also specifies
maximum capacities of front and rear axle
systems (GAWR). Total load must be limited
so GVWR and front and rear GAWR are not
exceeded.
Payload
The payload of a vehicle is defined as the
allowable load weight a truck can carry,
including the weight of the driver, all passen-
gers, options and cargo.
Gross Axle Weight Rating (GAWR)
The Gross Axle Weight Rating (GAWR) is the
maximum permissible load on the front and
rear axles. The load must be distributed in
the cargo area so that the GAWR of each axle
is not exceeded.
Each axle GAWR is determined by the
components in the system with the lowest
load carrying capacity (axle, springs, tires or
wheels). Heavier axles or suspension compo -nents sometimes specified by purchasers for
increased durability does not necessarily
increase the vehicle's GVWR.
Curb Weight
The curb weight of a vehicle is defined as the
total weight of the vehicle with all fluids,
including vehicle fuel, at full capacity condi
-
tions, and with no occupants or cargo loaded
into the vehicle. The front and rear curb
weight values are determined by weighing
your vehicle on a commercial scale before
any occupants or cargo are added.
Loading
The actual total weight and the weight of the
front and rear of your vehicle at the ground
can best be determined by weighing it when
it is loaded and ready for operation.
The entire vehicle should first be weighed on
a commercial scale to ensure that the GVWR
has not been exceeded. The weight on the
front and rear of the vehicle should then be
determined separately to be sure that the
load is properly distributed over the front and
rear axle. Weighing the vehicle may show
that the GAWR of either the front or rear
axles has been exceeded but the total load is
within the specified GVWR. If so, weight must be shifted from front to rear or rear to
front as appropriate until the specified
weight limitations are met. Store the heavier
items down low and be sure that the weight
is distributed equally. Stow all loose items
securely before driving.
Improper weight distributions can have an
adverse effect on the way your vehicle steers
and handles and the way the brakes operate.
CAUTION!
Do not load your vehicle any heavier than
the GVWR or the maximum front and rear
GAWR. If you do, parts on your vehicle can
break, or it can change the way your
vehicle handles. This could cause you to
lose control. Also overloading can shorten
the life of your vehicle.
2020_JEEP_CHEROKEE_UG_RHD_UK.book Page 178
Page 235 of 332
233
(Continued)
Checking Oil Level
To ensure proper engine lubrication, the
engine oil must be maintained at the correct
level. Check the oil level at regular intervals,
such as every fuel stop. The best time to
check the engine oil level is about five
minutes after a fully warmed up engine is
shut off.
Checking the oil while the vehicle is on level
ground will improve the accuracy of the oil
level readings.There are four possible dipstick types,
Crosshatched zone.
Crosshatched zone marked SAFE.
Crosshatched zone marked with MIN at
the low end of the range and MAX at the
high end of the range.
Crosshatched zone marked with dimples
at the MIN and the MAX ends of the range.
NOTE:
Always maintain the oil level within the
crosshatch markings on the dipstick.
Adding 1 quart (1.0 liters) of oil when the
reading is at the low end of the dipstick
range will raise the oil level to the high end
of the range marking.
WARNING!
Never smoke while working in the engine
compartment: gas and inflammable
vapors may be present, with the risk of
fire.
Be very careful when working in the
engine compartment when the engine is
hot: you may get burned. Do not get too
close to the radiator cooling fan: the
electric fan may start; danger of injury.
Scarves, ties and other loose clothing
might be pulled by moving parts.
CAUTION!
Be careful not to confuse the various
types of fluids while topping up: they are
not compatible with each other! Topping
up with an unsuitable fluid could
severely damage your car.
The oil level must never exceed the MAX
mark.
Always top up using engine oil of the
same specifications as that already in
the engine.
If the engine oil is being topped up, wait
for the engine to cool down before loos-
ening the filler cap, particularly for vehi -
cles with aluminium cap (if equipped).
WARNING: risk of burns!
Overfilling or underfilling the crankcase
will cause aeration or loss of oil pressure.
This could damage your engine.
CAUTION! (Continued)
2020_JEEP_CHEROKEE_UG_RHD_UK.book Page 233