check engine JEEP CJ 1953 Service Manual
[x] Cancel search | Manufacturer: JEEP, Model Year: 1953, Model line: CJ, Model: JEEP CJ 1953Pages: 376, PDF Size: 19.96 MB
Page 231 of 376
'Jeep1
UNIVERSAL
SERIES SERVICE
MANUAL
I
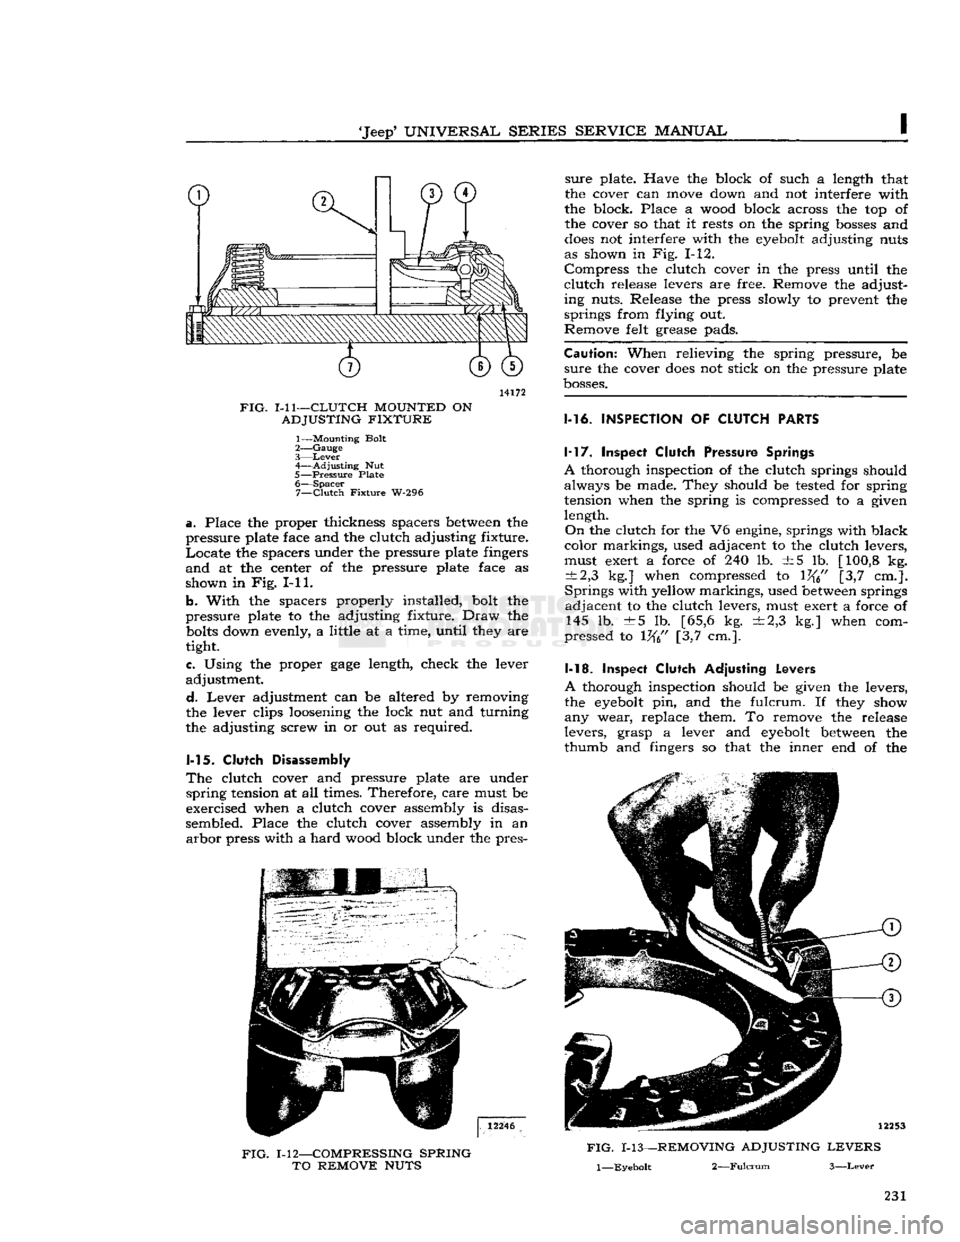
14172
FIG.
1-11—CLUTCH
MOUNTED
ON
ADJUSTING
FIXTURE
1— Mounting Bolt
2—
Gauge
3—
Lever
4—
Adjusting
Nut
5—
Pressure
Plate 6—
Spacer
7—
Clutch
Fixture
W-296
a.
Place the proper thickness
spacers
between the
pressure
plate face and the
clutch
adjusting
fixture.
Locate the
spacers
under the
pressure
plate fingers
and at the center of the
pressure
plate face as
shown
in Fig. I-11.
b.
With
the
spacers
properly installed,
bolt
the
pressure
plate to the adjusting
fixture.
Draw the
bolts
down evenly, a
little
at a
time,
until
they are
tight.
e. Using the proper
gage
length, check the lever
adjustment.
d.
Lever adjustment can be altered by removing
the lever clips loosening the
lock
nut and
turning
the adjusting screw in or out as required.
1-15.
Clutch
Disassembly
The
clutch
cover and
pressure
plate are under
spring
tension at all times. Therefore,
care
must be
exercised when a
clutch
cover assembly is disas
sembled. Place the
clutch
cover assembly in an arbor
press
with
a hard
wood
block under the pres-
FIG.
1-12—COMPRESSING
SPRING
TO
REMOVE
NUTS
sure
plate. Have the block of such a length that
the cover can move down and not interfere
with
the block. Place a
wood
block
across
the top of the cover so that it
rests
on the spring
bosses
and
does
not interfere
with
the eyebolt adjusting nuts
as shown in Fig. 1-12.
Compress the
clutch
cover in the
press
until
the
clutch
release
levers are free. Remove the adjust
ing
nuts.
Release
the
press
slowly
to prevent the
springs
from
flying
out.
Remove
felt
grease
pads.
Caution:
When
relieving
the spring
pressure,
be
sure
the cover
does
not stick on the
pressure
plate
bosses.
1-16.
INSPECTION
OF
CLUTCH
PARTS 1-17. Inspect
Clutch
Pressure
Springs
A
thorough inspection of the
clutch
springs should always be made. They should be tested for spring
tension when the spring is compressed to a given
length.
On
the
clutch
for the V6 engine, springs
with
black
color
markings, used adjacent to the
clutch
levers,
must exert a force of 240 lb. ±5 lb. [100,8 kg.
±2,3
kg.] when compressed to 1%" [3,7 cm.].
Springs
with
yellow
markings, used between springs adjacent to the
clutch
levers, must exert a force of 145 lb. ±5 lb. [65,6 kg. ±2,3 kg.] when com
pressed
to 1%" [3,7 cm.].
1-18. Inspect
Clutch
Adjusting
Levers
A
thorough inspection should be given the levers,
the eyebolt pin, and the
fulcrum.
If they show
any wear, replace them. To remove the
release
levers,
grasp
a lever and eyebolt between the
thumb
and fingers so that the inner end of the
FIG.
1-13—REMOVING
ADJUSTING
LEVERS
l—Eyebolt
2—Fulcrum
3—Lever
231
Page 232 of 376
CLUTCH
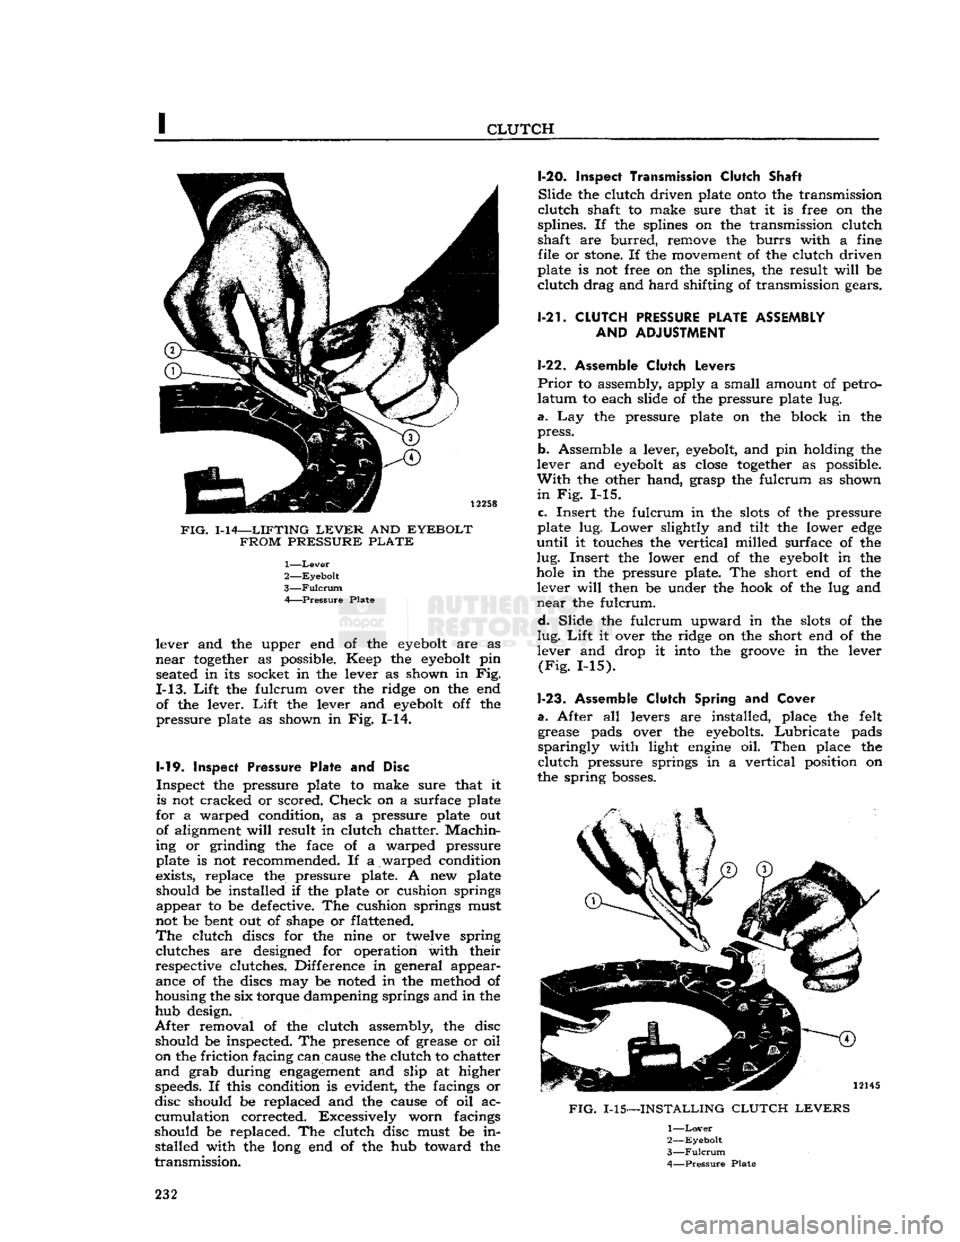
FIG.
1-14—LIFTING
LEVER
AND
EYEBOLT FROM PRESSURE PLATE
1—
Lever
2—
Eyebolt
3—
Fulcrum
A Pressure Plate
lever and the upper end of the
eyebolt
are as
near
together
as possible. Keep the
eyebolt
pin seated in its socket in the lever as shown in Fig.
1-13.
Lift
the fulcrum over the ridge on the end of the lever.
Lift
the lever and
eyebolt
off the
pressure plate as shown in Fig. 1-14.
1-19.
Inspect
Pressure Plate and Disc
Inspect the pressure plate to make sure that it is not cracked or scored.
Check
on a surface plate
for a warped condition, as a pressure plate out of alignment
will
result in clutch chatter.
Machin
ing or grinding the face of a warped pressure
plate is not recommended. If a warped condition
exists, replace the pressure plate. A new plate
should be installed if the plate or cushion springs appear to be defective. The cushion springs must
not be bent out of shape or flattened.
The
clutch discs for the nine or twelve spring clutches are designed for operation with their
respective clutches. Difference in general appear ance of the discs may be noted in the method of
housing the six torque dampening springs and in the
hub design.
After
removal of the clutch assembly, the disc should be inspected. The presence of grease or oil
on the friction facing can cause the clutch to chatter
and
grab during
engagement
and slip at higher speeds. If this condition is evident, the facings or
disc should be replaced and the cause of oil ac
cumulation corrected. Excessively worn facings
should be replaced. The clutch disc must be in stalled with the long end of the hub toward the
transmission.
1-20.
Inspect Transmission Clutch
Shaft
Slide
the clutch driven plate
onto
the transmission
clutch
shaft to make sure that it is free on the
splines. If the splines on the transmission clutch
shaft are
burred,
remove the
burrs
with a fine file or
stone.
If the movement of the clutch driven
plate is not free on the splines, the result
will
be
clutch
drag and
hard
shifting of transmission gears.
1-21.
CLUTCH
PRESSURE
PLATE ASSEMBLY AND
ADJUSTMENT
1-22. Assemble
Clutch
Levers
Prior
to assembly, apply a small amount of petro
latum
to each slide of the pressure plate lug.
a.
Lay the pressure plate on the block in the
press.
b. Assemble a lever,
eyebolt,
and pin holding the
lever and
eyebolt
as
close
together
as possible.
With
the other hand, grasp the fulcrum as shown
in
Fig. 1-15.
c.
Insert the fulcrum in the
slots
of the pressure
plate lug.
Lower
slightly and tilt the lower
edge
until
it touches the vertical milled surface of the
lug.
Insert the lower end of the
eyebolt
in the
hole
in the pressure plate. The short end of the lever
will
then be under the hook of the lug and
near
the fulcrum.
d.
Slide the fulcrum upward in the
slots
of the
lug.
Lift
it over the ridge on the short end of the
lever and drop it into the
groove
in the lever
(Fig.
1-15).
1-23.
Assemble
Clutch
Spring and
Cover
a.
After all levers are installed, place the felt grease pads over the eyebolts.
Lubricate
pads
sparingly
with light
engine
oil.
Then
place the
clutch
pressure springs in a vertical position on
the spring
bosses.
FIG.
1-15—INSTALLING
CLUTCH LEVERS
1—
Lover
2—
Eyebolt
3—
Fulcrum
4—
Pressure
Plate
232
Page 239 of 376
'Jeep'
UNIVERSAL
SERIES
SERVICE
MANUAL
J
THREE-SPEED
TRANSMISSION
Contents
SUBJECT
PAR.
GENERAL
J-l
TRANSMISSION
SHIFTING
CONTROL.
. J-2
TRANSMISSION
REMOTE
CONTROL
ADJUSTMENT
J-3
REMOTE
CONTROL
DISASSEMBLY
J-4
REMOTE
CONTROL
REASSEMBLY.
. . . . J-5
TRANSMISSION
REMOVAL
J-6
SEPARATING
TRANSMISSION
AND
TRANSFER
CASE
J-7
SUBJECT
PAR.
DISASSEMBLY
OF
CANE
SHIFT
TRANSMISSION
J-8, J-12, J-16
Transmission
Cleaning and
Inspection J-10, J-18
Transmission
Interlocking Sleeve Inspection J-9
REASSEMBLY
OF
CANE
SHIFT
TRANSMISSION
J-ll,
J-14, J-19
SERVICE
DIAGNOSIS
J-20
TRANSMISSION
SPECIFICATIONS
J-21
J-1.
GENERAL
A
three speed synchromesh transmission is standard
equipment on all 'Jeep' Universal vehicles.
The
models T90 and T96 transmissions are used
with
the
Hurricane
F4 engine, and models
T86AA
and
T14A transmissions are used with the Daunt
less
V-6 engine. All model transmissions are similar
in
design with exception of the T14A which is a
fully
synchronized (all forward gears) transmission
with
helical drive gears throughout.
The
transmission assembly is attached to the
rear
face of the flywheel bell housing and is supported on a rubber insulator at the frame center cross member which forms the
rear
engine
support.
All
4-wheel-drive vehicles are equipped with a
transfer
case attached to the
rear
of the transmission.
Transfer
case service and repair procedures
are
described in Section
K.
Models
CJ-5A,
and
CJ-6A
are equipped with the
same transmission, but with a remote control shift.
Models DJ-5 and DJ-6 are equipped with a similar
transmission,
however, the construction is
some
what different because it is not designed to receive a transfer case for four-wheel drive.
For
DJ-5 and DJ-6 2WD vehicles, the trans mission repair procedures begin with Par. J-12.
J-2.
TRANSMISSION SHIFTING CONTROL
The
shift of the three-speed transmission is smooth
and
positive. The cane control lever shifts the trans
mission gears direct from the shift control housing
mounted to the top side of the transmission housing.
The
remote control lever shifts the transmission
gears through remote control rods attached to the
adjusting
levers of the shift shafts protruding from the left side of the transmission housing. Poppet
balls and springs retain the transmission gears in mesh and an interlocking mechanism prevents
shifting into two gears at the same time.
J-3.
Transmission Remote Control Adjustment
•
Early
CJ-5A,
CJ-6A
First
disconnect the transmission shift rods from the remote control levers.
Check
for binding of
the remote control shaft on the steering column
and
make the necessary corrections to eliminate any binding condition.
If
the shift is not smooth and positive, first make
sure
the gears are in neutral position then remove
the shift rods at the transmission by removing
clevis pins, Fig. J-l No. 17, and slip a short piece
of snug fitting 34" [6,35 mm.] aligning rod, through
the gearshift levers and housing as shown in insert
drawing.
This
places the clutch and shift lever assemblies
in
the neutral position. Adjust the shift rod yokes
at the transmission end, so clevis pins can be in stalled freely without moving the shift levers on the
transmission after which remove alignment pin.
If
shifting from first to second is difficult or trans
mission hangs in first gear, shorten the low and
reverse shift rod one
turn
at a time until the con
dition is corrected. Usually three turns are re
quired.
Should
the fault continue after completing the above adjustment, check further as outlined below.
First
remove the lubricating fitting. Use a narrow
feeler
gauge
which
will
enter the opening for the
lubricator
and check the clearance
between
the
faces of the shifting clutches.
This
clearance should
be .015" to .031", [W to W]
[0,397-0,794
mm.]. If
this clearance is greater the assembly must be removed for adjustment. The shift dog, which
engages
the clutch slots, should not have more than .009" [0,229 mm.] clearance in the slots. If the clear
ance
between
the clutch
grooves
and cross pins is
too great,
these
parts must be replaced.
J-4.
Removal
of
Remote Control
m
Early
CJ-5A,
CJ-6A
•
Refer to Fig. J-l
To
remove the remote control the following pro cedure is
suggested:
a.
Remove shifting rods from the transmission
and
also from the steering remote control clutch levers. 239
Page 240 of 376
THREE-SPEED
TRANSMISSION
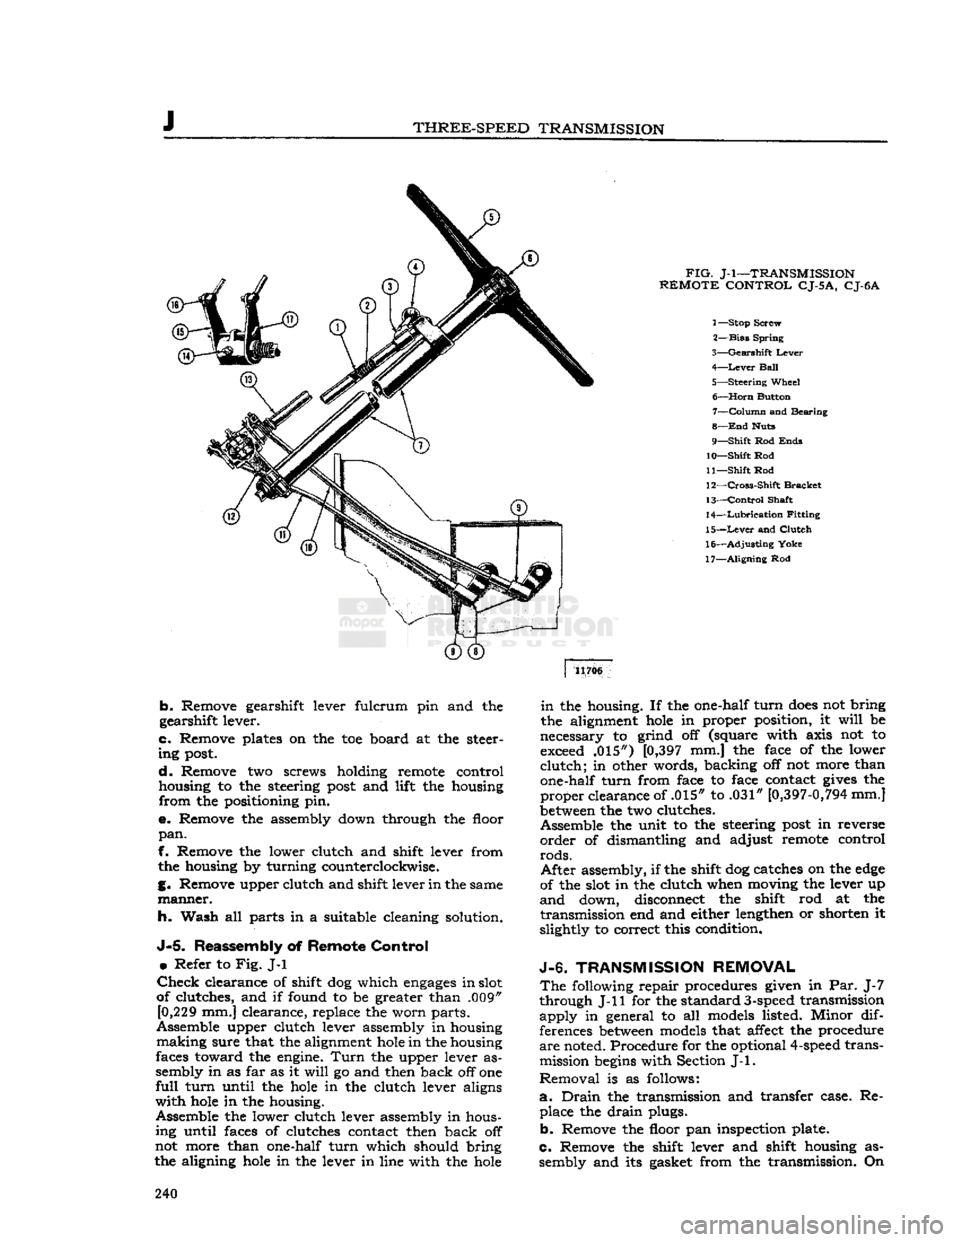
FIG.
J-l—TRANSMISSION
REMOTE
CONTROL
CJ-5
A,
CJ-6A
1— Stop Screw
2—
Bias
Spring
3—
Gearshift
Lever
4—
Lever
Ball
5—
Steering
Wheel 6—
Horn
Button 7—
Column
and Bearing
8—
End
Huts
9—
Shift
Rod
Ends
10—
Shift
Rod
11—
Shift
Rod
12—
Cross-Shift
Bracket
13—
Control
Shaft
14—
Lubrication
Fitting
15—
Lever
and
Clutch
16—
Adjusting
Yoke
17—
Aligning
Rod 11706
b.
Remove gearshift lever fulcrum pin and the
gearshift lever.
c.
Remove plates on the toe board at the steer
ing
post.
d.
Remove two screws holding remote control
housing to the steering
post
and lift the housing
from
the positioning pin.
e.
Remove the assembly down through the floor
pan.
f. Remove the lower clutch and shift lever from the housing by turning counterclockwise.
g. Remove upper clutch and shift lever in the same
manner.
h. Wash all parts in a suitable cleaning solution.
J-5.
Reassembly of
Remote
Control
•
Refer to
Fig.
J-l
Check
clearance of shift dog which
engages
in slot
of clutches, and if found to be greater than .009" [0,229 mm.] clearance, replace the worn parts.
Assemble upper clutch lever assembly in housing
making
sure that the alignment
hole
in the housing
faces toward the engine.
Turn
the upper lever as
sembly in as far as it
will
go and then back off one
full
turn
until the
hole
in the clutch lever aligns
with
hole
in the housing.
Assemble the lower clutch lever assembly in hous ing until faces of clutches contact then back off
not more than one-half
turn
which should bring
the aligning
hole
in the lever in line with the
hole
in
the housing. If the one-half
turn
does
not bring
the alignment
hole
in proper position, it
will
be
necessary to grind off (square with axis not to exceed .015") [0,397 mm.] the face of the lower
clutch;
in other words, backing off not more than
one-half
turn
from face to face contact
gives
the
proper
clearance of .015" to .031"
[0,397-0,794
mm.]
between
the two clutches.
Assemble the unit to the steering
post
in reverse
order
of dismantling and adjust remote control
rods.
After
assembly, if the shift dog catches on the
edge
of the slot in the clutch when moving the lever up
and
down, disconnect the shift rod at the
transmission
end and either lengthen or shorten it
slightly to correct this condition.
J-6.
TRANSMISSION
REMOVAL
The
following repair procedures given in Par. J-7
through J-ll for the standard
3-speed
transmission
apply
in general to all models listed. Minor dif
ferences
between
models that affect the procedure
are
noted. Procedure for the optional
4-speed
transmission
begins
with Section
J-l.
Removal
is as follows:
a.
Drain
the transmission and transfer case. Re place the
drain
plugs.
b.
Remove the floor pan inspection plate.
c.
Remove the shift lever and shift housing as sembly and its gasket from the transmission. On 240
Page 276 of 376
L
PROPELLER
SHAFTS
AND
UNIVERSAL JOINTS
move
the snap rings, pinch the ends
together
with
a
pair
of pliers. If the rings do not readily snap
out of the groove, tap the end of the bearing lightly
which
will
relieve pressure against the rings.
After
removing the snap rings, press on the end of
one bearing until the
opposite
bearing is pushed
from
the yoke arm.
Turn
the joint over and press
the first bearing back out of that arm by pressing
on the
exposed
end of the
journal
shaft. Use a
soft
ground drift with a flat face about [0,8 mm.]
smaller
in diameter than the
hole
in the yoke arm
and
drive it out, otherwise there is danger of damaging the bearing.
Repeat
this operation for the other two bearings,
then lift out
journal
assembly by sliding it to one
side.
L-4.
Snap
Ring
Type Assembly
Wash
all parts in cleaning solvent and inspect the
parte
after cleaning. Replace any parts that indicate
extensive
wear.
It is advisable to install new gaskets
on the
journal
assembly regardless of the condition of the old gaskets. Make certain that the grease
channel
in each
journal
trunnion is open.
Pack
the bearing
cones
one-third
full
of lubricant
and
install the rollers.
Draw
the bearings into the end yoke arm and seat
them firmly against the bearing shoulders. Hold
the bearings in a vertical position to prevent the
needles
from dropping out until the joint is as sembled. If the joint binds when assembled, tap
the arms lightly to relieve any pressure on the bear
ings at the end of the
journal.
L-5.
U-Bolt
Type Disassembly
Removal
of the attaching "U"-bolt releases one set
of bearing races. Slide the propeller shaft into the
yoke flange to remove them using care not to
lose
the rollers.
After
the removal of the one set of bearing races,
release the other set by removing the snap rings
in
the
sleeve
yoke by pinching the ends
together
with
a
pair
of pliers. Should the rings
fail
to snap
readily
from the groove, tap the end of the bearing
lightly,
which
will
relieve the pressure against them.
Press
on the end of one bearing, until the
opposite
bearing
is pushed out of the yoke arm.
Turn
the
universal
joint over and press the first bearing out
by pressing on the
exposed
end of the
journal
as
sembly. Use a
soft
ground drift with a flat face about
\{i
[0,8 mm.] smaller in diameter than the
hole
in the yoke
arm
and drive out the bearing.
Lift
the
journal
out by sliding to one side.
Clean
all
parts
and check for wear.
L-6.
U-Bolt Type Assembly
Wash
all parts in cleaning solvent and inspect the
parts
after cleaning. Replace any parts that indicate
extensive
wear.
It is advisable to install new gaskets
on the
journal
assembly regardless of the condition
of the old gaskets. Make certain that the grease
channel
in each
journal
trunnion is open.
Pack
the bearing
cones
one-third
full
of lubricant
and
install the rollers.
Draw
the bearings into the end yoke arm and seat
them firmly against the bearing shoulders. Hold the
bearings in a vertical position to prevent the
needles
from dropping out until the joint is as
sembled. If the joint binds when assembled, tap the arms lightly to relieve any pressure on the
bearings at the end of the
journal.
Tighten the
U-bolts equally. U-bolt torque wrench reading is 15 to 20 lb-ft. [2,07 a 2,76 kg-m.].
When
installing the assembly in the vehicle be sure
that the arrows on the propeller shaft and yoke
sleeve
are in alignment as shown in Fig. L-2, or
that the unmarked joints are aligned with the yokes in the same parallel plane.
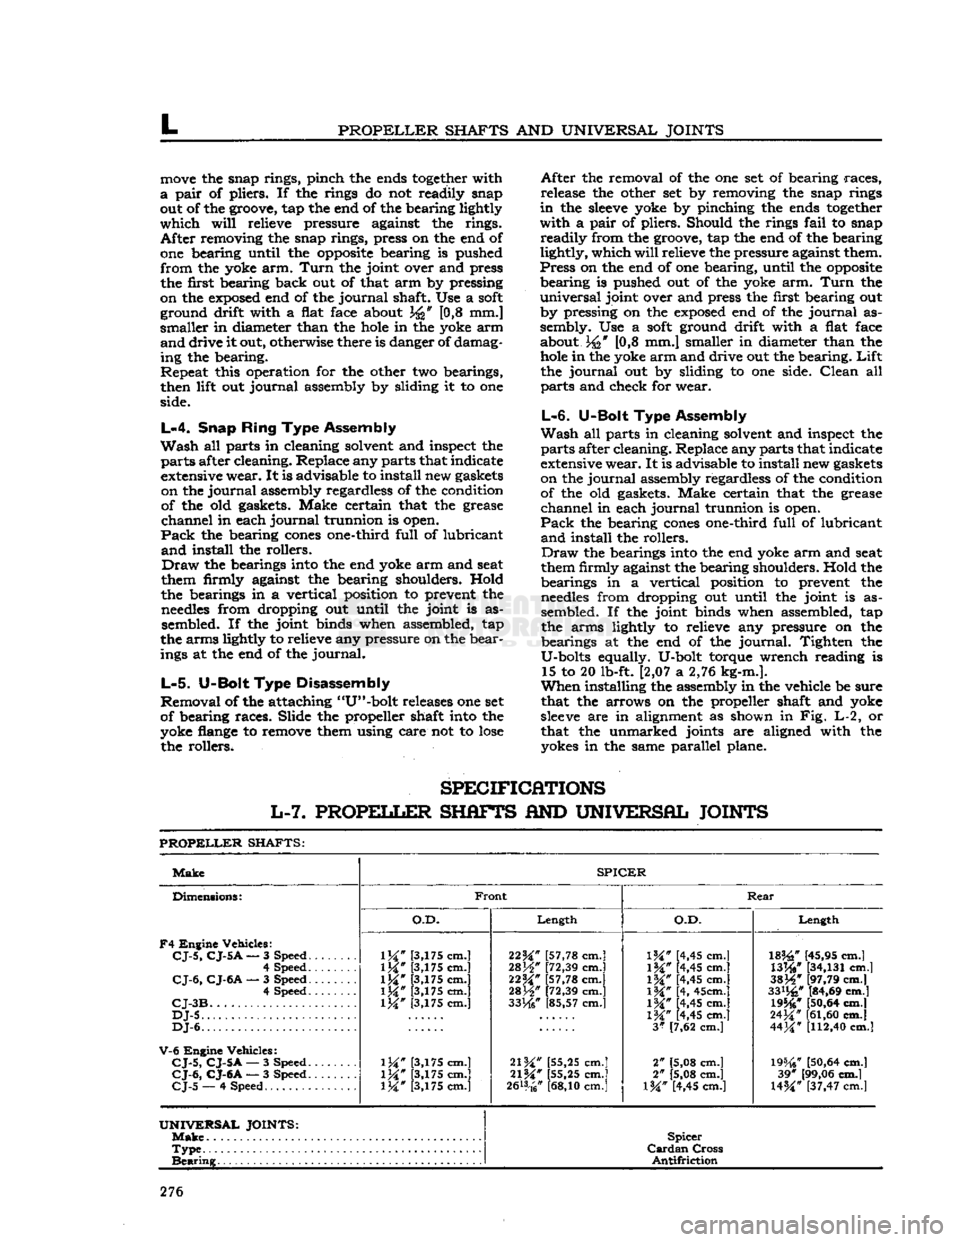
SPECIFICATIONS
L-7.
PROPELLER
SHAFTS
AND
UNIVERSAL JOINTS
PROPELLER
SHAFTS:
Make
SPICER
Dimensions:
F4
Engine Vehicles:
CJ-5,
CJ-5
A
— 3 Speed.
......
4 Speed
CJ-6,
CJ-6A
— 3 Speed 4 Speed
CJ-3B
DJ-5
DJ-6.
V-6
Engine Vehicles:
CJ-5,
CJ-5A
— 3 Speed.
CJ-6,
CJ-6A
— 3 Speed.
CJ-5
— 4 Speed
Front
Rear
Dimensions:
F4
Engine Vehicles:
CJ-5,
CJ-5
A
— 3 Speed.
......
4 Speed
CJ-6,
CJ-6A
— 3 Speed 4 Speed
CJ-3B
DJ-5
DJ-6.
V-6
Engine Vehicles:
CJ-5,
CJ-5A
— 3 Speed.
CJ-6,
CJ-6A
— 3 Speed.
CJ-5
— 4 Speed
O.D.
Length
O.D.
Length
Dimensions:
F4
Engine Vehicles:
CJ-5,
CJ-5
A
— 3 Speed.
......
4 Speed
CJ-6,
CJ-6A
— 3 Speed 4 Speed
CJ-3B
DJ-5
DJ-6.
V-6
Engine Vehicles:
CJ-5,
CJ-5A
— 3 Speed.
CJ-6,
CJ-6A
— 3 Speed.
CJ-5
— 4 Speed
1M"
[3,175 cm.]
1M*
[3,175 cm.]
\W
[3,175 cm.]
1M*
[3,175 cm.] [3,175 cm.]
\W
[3,175 cm.]
\W
[3,175 cm.] [3,175 cm.] 22^" [57,78 cm.]
28H"
[72,39 cm.]
22M*
[57,78 cm.]
mW
[72,39 cm.]
33He"
[85,57 cm.]
21W
[55,25 cm.]
21%"
[55,25 cm.]
2&*
cm.]
IK"
[4,45 cm.]
1M#
[4,45 cm.]
\%"
[4,45 cm.]
\%"
[4, 45cm.]
IW
[4,45 cm.]
1M*
[4,45 cm.]
3*
[7,62 cm.]
2" [5,08 cm.]
2" [5,08 cm.]
l%" [4,45 cm.]
182£"
[45,95 cm.]
WW
[34,131
cm.]
3SJ4*
[97,79 cm.]
33%"
[84,69 cm.] 19546*
[50,64
cm.]
24^"
[61,60
cm.]
44M*
[112,40
cm.]
19%?
[50,64
cm.] 39* [99,06 cm.]
U%"
[37,47 cm.l
UNIVERSAL
JOINTS:
Make
Spicer
Cardan
Cross
Antifriction
Type
Spicer
Cardan
Cross
Antifriction
Bearing
Spicer
Cardan
Cross
Antifriction
276
Page 341 of 376
'Jeep'
UNIVERSAL
SERIES
SERVICE
MANUAL
R
FRAME
Contents
SUBJECT
PAR.
Draw
Bar
R-6
Frame
Alignment
.R-2
Frame
Dimensions
.R-3
Front
Axle Alignment.
R-5
Straightening
Frame
R-4
R-1.
GENERAL
equipped with V6 engines, refer
to
measurements
The
frame
is the
structural center
of
the vehicle,
B£?wn
in
FiB-
R"f
, _ , r' .
for in addition
to
carrying
the load,
it
provides and The inost convenient method
of
making this check,
maintains
correct relationship
between
other units
Particularly
when
the
body
is on the
chassis,
is by
to assure their normal functioning. marking
on the
floor
all
dimensional points from
Of
rugged design, the frame
is
constructed of heavy
fhlch
measurements should
be
taken.
This
is
channel
steel side
rails
and cross-members.
Brack-
known
a\
Plumb-bobbing
the
frame Select
a
ets and diagonal braces
are
used
to
maintain
the
?Pace
on the
floof
^hlch
»
extr«nely
level If
work-
proper
longitudinal position
of the
side
rails
rela-
ing Pn
a.,fPen^
c*ean
* s°
that
the fha*k
tive
to
each other, and
at the
same time provide
*****
Jl!*
be
vJs.lble
underneath
the
frame
to be
additional
resistance
to
torsional strains. Fig. R-1, checked
If
workmg
on a
wooden
floor
it is ad-
R-2,
and R-3 illustrate
the
subject models. disable
la^
f f * V
Underneath
*he ve"
Vehicles
that have been
in an
accident
of any
hide
and
carefully tack them
m
place. Drop
a
nature,
which
may
result
in a
swayed
or
sprung gumb-bob from each point indicated
in
Figures
frame,
should always
be
carefully checked
for ^
an?
L'maJkl?g the uflo?r
Meetly underneath
proper
frame alignment, steering geometry,
and the
point. Satisfactory checking depends entirely
axle alignment.
on the
accuracy
of the
marks
in
relation
to the
frame.
To
check points that have been marked, carefully
move
the vehicle away from the layout on the floor,
R-2.
Checking
Frame
Alignment
anci
proceed
as
follows:
The
most efficient
and
satisfactory method
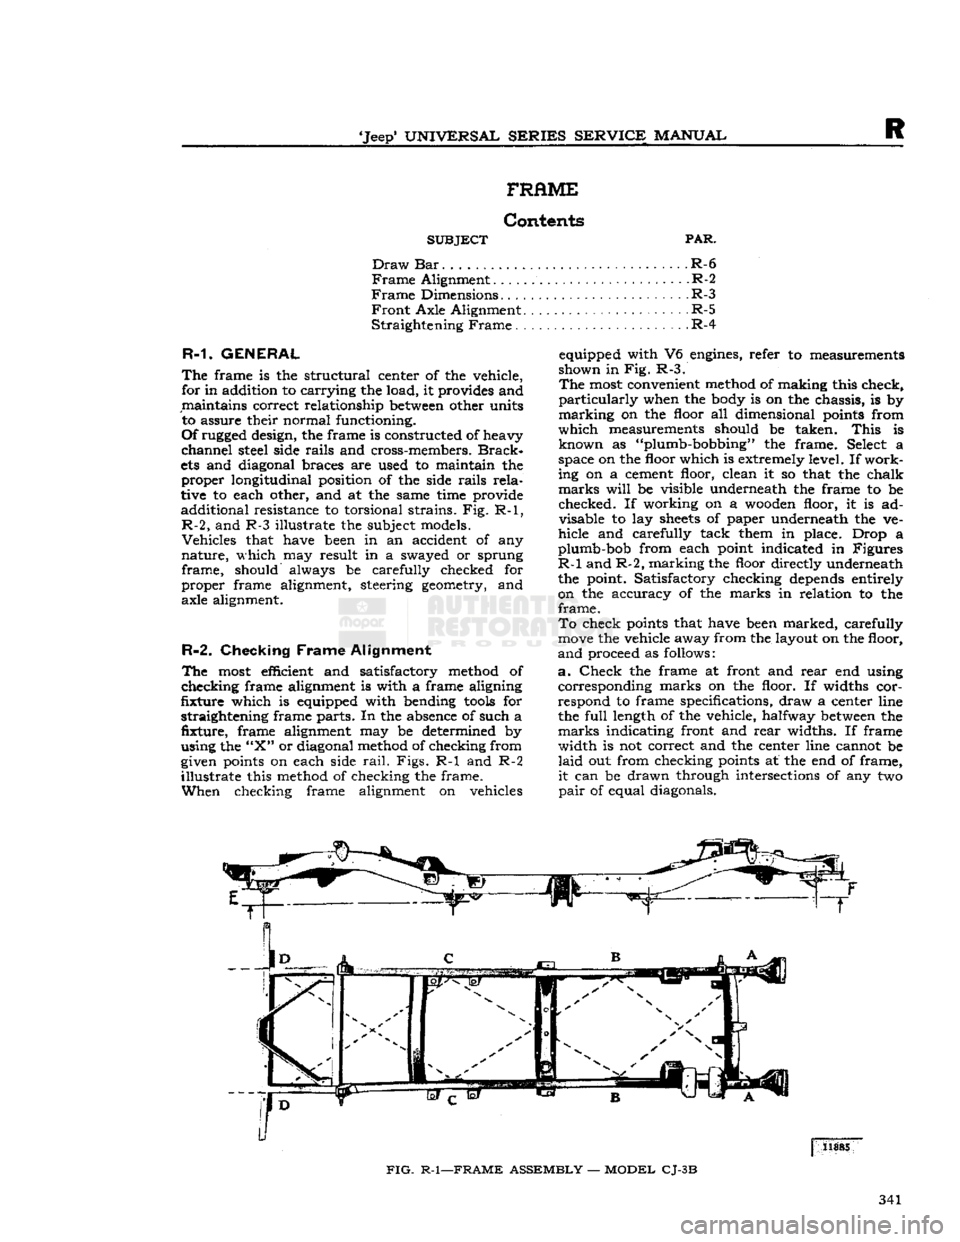
of a.
Check
the
frame
at
front
and
rear
end
using
checking
frame alignment
is
with
a
frame aligning corresponding marks
on the
floor.
If
widths
cor-
fixture
which
is
equipped with bending
tools
for
respond
to
frame specifications, draw
a
center line
straightening frame parts. In the absence
of
such
a the
full
length
of
the vehicle, halfway
between
the
fixture,
frame
alignment
may be
determined
by
marks indicating front and
rear
widths.
If
frame
using the
"X"
or diagonal method of checking from width
is not
correct and
the
center line cannot
be
given points
on
each side
rail.
Figs.
R-1 and R-2
laid
out
from checking points
at the
end
of
frame,
illustrate
this method
of
checking
the
frame.
it
can
be
drawn through intersections
of
any
two
When
checking frame alignment
on
vehicles
pair
of
equal diagonals.
FIG.
R-1—FRAME
ASSEMBLY
—
MODEL
CJ-3B
341
Page 343 of 376
'Jeep*
UNIVERSAL
SERIES
SERVICE
MANUAL
R
frame.
This
could cause the already aligned sec
tions of the frame to
become
misaligned or weak ened.
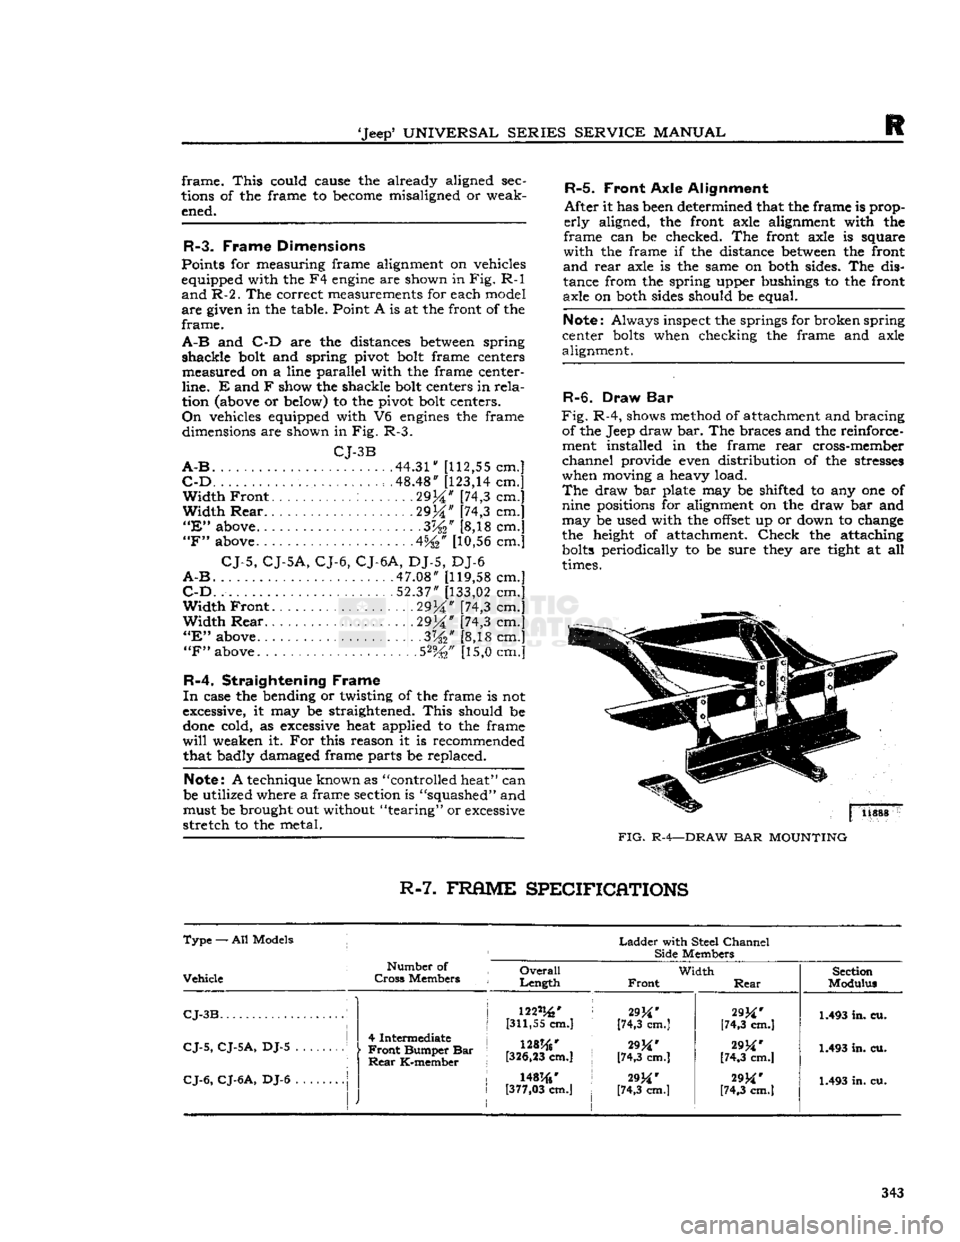
R-3.
Frame Dimensions
Points for measuring frame alignment on vehicles
equipped with the F4
engine
are shown in
Fig.
R-l
and
R-2.
The correct measurements for each model
are
given in the table. Point A is at the front of the
frame.
A-B
and C-D are the distances
between
spring
shackle
bolt and spring pivot bolt frame centers
measured
on a line parallel with the frame center-
line.
E and F show the shackle bolt centers in
rela
tion (above or below) to the pivot bolt centers.
On
vehicles equipped with V6
engines
the frame dimensions are shown in Fig. R-3.
CJ-3B
A-B
44.31"
[112,55
cm.]
C-D
. . . . . .48.48"
[123,14
cm.]
Width
Front
29%" [74,3 cm.]
Width
Rear
29M" [74,3 cm.]
"E"
above .3W [8,18 cm.]
"F"
above 4%* [10,56 cm.]
CJ-5,
CJ-5A,
CJ-6,
CJ-6A,
DJ-5, DJ-6
A-B
.47.08"
[119,58
cm.]
C-D.
52.37"
[133,02
cm.]
Width
Front
2934"
[74,3 cm.]
Width
Rear
29j|" [74,3 cm.]
"E"
above 3%" [8,18 cm.]
"F"
above. .5%" [15,0 cm.]
R-4.
Straightening Frame
In
case the bending or twisting of the frame is not
excessive, it may be straightened.
This
should be
done
cold, as excessive heat applied to the frame
will
weaken it. For this reason it is recommended that badly damaged frame parts be replaced.
Note:
A technique known as "controlled heat" can
be utilized where a frame section is "squashed" and must be brought out without "tearing" or excessive
stretch
to the metal.
R-5.
Front
Axle
Alignment
After
it has been determined that the frame is prop
erly
aligned, the front axle alignment with the
frame
can be checked. The front axle is square
with
the frame if the distance
between
the front
and
rear
axle is the same on both sides. The dis
tance from the spring upper bushings to the front
axle on both sides should be equal.
Note:
Always inspect the springs for broken spring
center
bolts
when checking the frame and axle
alignment.
R-6. Draw Bar
Fig.
R-4, shows method of attachment and bracing of the Jeep draw bar. The braces and the reinforce
ment installed in the frame
rear
cross-member
channel
provide even distribution of the stresses
when moving a heavy load.
The
draw bar plate may be shifted to any one of
nine positions for alignment on the draw bar and
may
be used with the
offset
up or down to change
the height of attachment.
Check
the attaching
bolts
periodically to be sure they are tight at all
times.
FIG.
R-4—DRAW
BAR
MOUNTING
R-7.
FRflME
SPECIFICATIONS
Type
— All Models j
Ladder
with Steel
Channel
Side
Members
Vehicle
Number
of
Cross
Members
Overall
Length
Width
Front
Rear
Section
Modulus
CJ-3B
i
CJ-5,
CJ-5A,
DJ-5 1
j
4 Intermediate j
•
Front
Bumper Bar
Rear
K-member 122%'
[311,55 cm.]
128%'
[326,23
cm.] 29^*
[74,3 cm.]
[74,3 cm.]
29M'
[74,3 cm.]
[74,3 cm.] 1.493 in. cu.
1.493 in. cu.
CJ-6,
CJ-6A,
DJ-6
|
J
1
I
r
\mw t
[377,03
cm.]
29M'
[74,3 cm.]
29M'
[74,3 cm.] 1.493 in. cu.
343
Page 357 of 376
'Jeep'
UNIVERSAL SERIES SERVICE
MANUAL
u
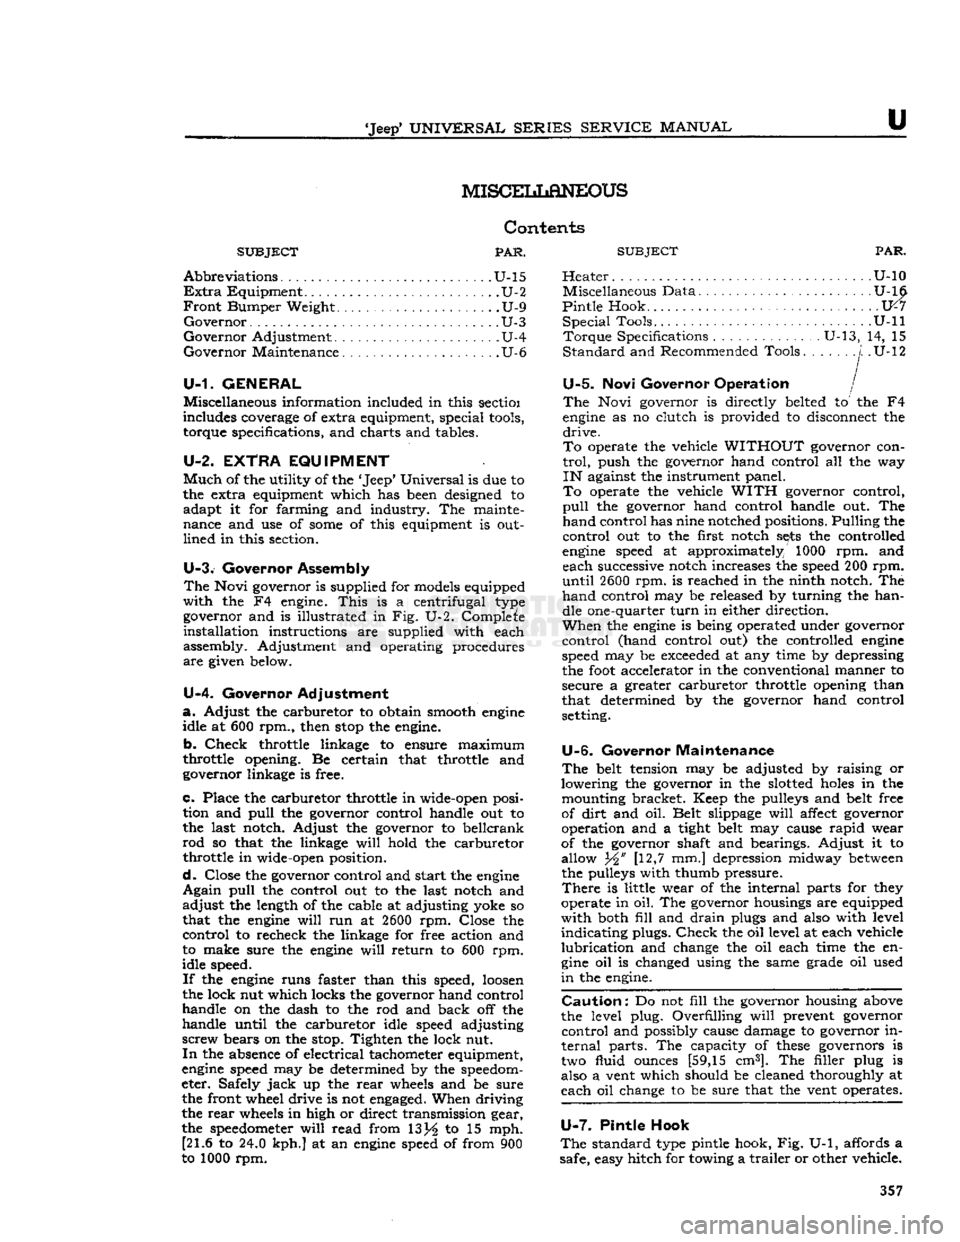
MISCEIiLaNEOUS
Contents
SUBJECT
PAR.
Abbreviations
U-15
Extra
Equipment U-2
Front
Bumper Weight U-9
Governor
U-3
Governor
Adjustment U-4
Governor
Maintenance. U-6
U-1. GENERAL
Miscellaneous information included in this sectioi
includes coverage of extra equipment, special
tools,
torque specifications, and charts and tables.
U-2. EXTRA
EQUIPMENT
Much
of the utility of the
*
Jeep*
Universal
is due to
the extra equipment which has been designed to adapt it for farming and industry. The mainte
nance and use of
some
of this equipment is out
lined
in this section.
U-3.
Governor Assembly
The
Novi governor is supplied for models equipped
with
the F4 engine.
This
is a centrifugal type governor and is illustrated in Fig. U-2. Complete
installation
instructions are supplied with each
assembly. Adjustment and operating procedures
are
given below.
U-4.
Governor Adjustment
a.
Adjust the carburetor to obtain smooth
engine
idle at 600 rpm., then
stop
the engine.
b.
Check
throttle linkage to ensure maximum
throttle opening. Be certain that throttle and
governor linkage is free.
c.
Place the carburetor throttle in wide-open posi tion and
pull
the governor control handle out to
the last notch. Adjust the governor to bellcrank
rod
so that the linkage
will
hold the carburetor
throttle in wide-open position.
d.
Close the governor control and start the
engine
Again
pull
the control out to the last notch and
adjust
the length of the cable at adjusting yoke so
that the
engine
will
run at
2600
rpm. Close the
control
to recheck the linkage for free action and
to make sure the
engine
will
return to 600 rpm.
idle speed.
If
the
engine
runs faster than this speed,
loosen
the lock nut which locks the governor hand control
handle on the dash to the rod and back off the
handle until the carburetor idle speed adjusting
screw
bears on the stop. Tighten the lock nut.
In
the absence of electrical tachometer equipment,
engine
speed may be determined by the speedom
eter. Safely
jack
up the
rear
wheels and be sure the front wheel drive is not
engaged.
When driving
the
rear
wheels in high or direct transmission gear,
the
speedometer
will
read from 13j^ to 15 mph. [21.6 to 24.0 kph.] at an
engine
speed of from 900
to 1000 rpm.
SUBJECT
PAR.
Heater
U-10 Miscellaneous Data U-16
Pintle
Hook 1X7
Special
Tools. U-ll
Torque
Specifications U-13, 14, 15
Standard
and Recommended Tools
j.
.U-12
U-5.
Novi Governor Operation /
The
Novi governor is directly belted to the F4
engine
as no clutch is provided to disconnect the
drive.
To
operate the vehicle
WITHOUT
governor con
trol,
push the governor hand control all the way
IN
against the instrument panel.
To
operate the vehicle
WITH
governor control,
pull
the governor hand control handle out. The
hand
control has nine notched positions. Pulling the
control
out to the first notch
sets
the controlled
engine
speed at approximately 1000 rpm. and each successive notch increases the speed 200 rpm.
until
2600
rpm. is reached in the ninth notch. The
hand
control may be released by turning the han dle one-quarter
turn
in either direction.
When
the
engine
is being operated under governor
control
(hand control out) the controlled
engine
speed may be
exceeded
at any time by depressing
the
foot
accelerator in the conventional manner to
secure a greater carburetor throttle opening than
that determined by the governor hand control
setting.
U-6.
Governor Maintenance
The
belt tension may be adjusted by raising or
lowering the governor in the slotted
holes
in the mounting bracket. Keep the pulleys and belt free
of
dirt
and oil. Belt slippage
will
affect governor
operation and a tight belt may cause
rapid
wear
of the governor shaft and bearings. Adjust it to
allow Yi' [12,7 mm.] depression midway
between
the pulleys with thumb pressure.
There
is little wear of the internal parts for they
operate in oil. The governor housings are equipped
with
both
fill
and
drain
plugs and also with level
indicating
plugs.
Check
the oil level at each vehicle
lubrication
and change the oil each time the en
gine
oil is changed using the same grade oil used
in
the engine.
Caution:
Do not
fill
the governor housing above
the level plug. Overfilling
will
prevent governor
control
and possibly cause damage to governor in
ternal
parts. The capacity of
these
governors is two fluid ounces [59,15 cm3]. The filler plug is
also a vent which should be cleaned thoroughly at
each oil change to be sure that the vent operates.
U-7.
Pintle Hook
The
standard type pintle hook, Fig. U-1, affords a
safe, easy hitch for towing a
trailer
or other vehicle. 357
Page 361 of 376
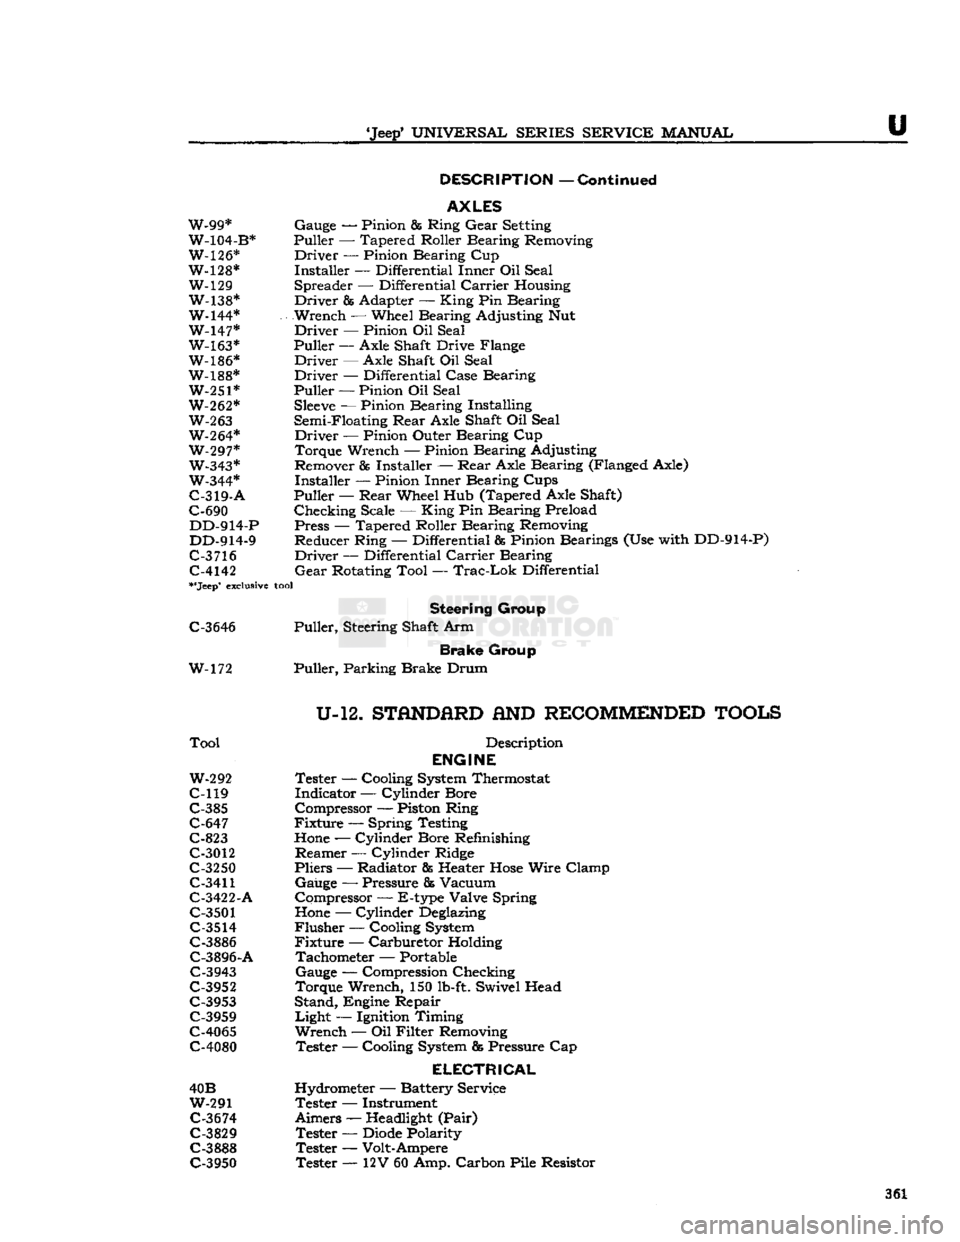
'Jeep*
UNIVERSAL
SERIES
SERVICE
MANUAL
U
DESCRIPTION
—
Continued
AXLES
W-99* Gauge — Pinion & Ring
Gear
Setting
W-104-B* Puller — Tapered Roller Bearing Removing
W-126* Driver — Pinion Bearing Cup
W-128* Installer — Differential Inner Oil Seal W-129 Spreader — Differential
Carrier
Housing
W-138* Driver & Adapter —
King
Pin Bearing
W-144* Wrench — Wheel Bearing Adjusting Nut W-147* Driver — Pinion Oil Seal W-163* Puller
—-
Axle Shaft Drive Flange
W-186* Driver — Axle Shaft Oil Seal
W-188* Driver — Differential Case Bearing W-251* Puller — Pinion Oil Seal
W-262*
Sleeve
— Pinion Bearing Installing
W-263
Semi-Floating
Rear
Axle Shaft Oil Seal W-264* Driver — Pinion Outer Bearing Cup
W-297* Torque Wrench — Pinion Bearing Adjusting W-343* Remover
85
Installer —
Rear
Axle Bearing (Flanged Axle)
W-344* Installer — Pinion Inner Bearing Cups
C-319-A
Puller —
Rear
Wheel Hub (Tapered Axle Shaft)
C-690 Checking Scale —
King
Pin Bearing Preload DD-914-P Press — Tapered Roller Bearing Removing
DD-914-9 Reducer Ring — Differential & Pinion Bearings (Use with DD-914-P)
C-3
716 Driver — Differential
Carrier
Bearing C-4142
Gear
Rotating Tool —
Trac-Lok
Differential
**Jeep*
exclusive
tool
Steering
Group
C-3646 Puller, Steering Shaft Arm
Brake
Group
W-172 Puller, Parking Brake Drum
U-12.
STflNDfiRD
AND
RECOMMENDED
TOOLS
Tool
Description
ENGINE
W-292
Tester — Cooling
System
Thermostat
C-119 Indicator — Cylinder Bore C-385 Compressor — Piston Ring
C-647 Fixture — Spring Testing
C-823
Hone
— Cylinder Bore Refinishing
C-3012 Reamer — Cylinder Ridge
C-3250 Pliers — Radiator fis Heater
Hose
Wire Clamp
C-3411
Gauge — Pressure & Vacuum
C-3422-A Compressor — E-type Valve Spring
C-3501
Hone
— Cylinder
Deglazing
C-3514
Flusher — Cooling
System
C-3886 Fixture — Carburetor Holding C-3896-A Tachometer — Portable
C-3943 Gauge — Compression Checking
C-3952 Torque Wrench, 150
lb-ft.
Swivel Head C-3953 Stand, Engine Repair
C-3959 Light — Ignition Timing
C-4065 Wrench — Oil Filter Removing
C-4080 Tester — Cooling
System
fig
Pressure Cap
ELECTRICAL
40B Hydrometer — Battery Service
W-291 Tester — Instrument
C-3674
Aimers —
Headlight
(Pair)
C-3829 Tester —
Diode
Polarity
C-3888 Tester — Volt-Ampere C-3950 Tester — 12V 60 Amp. Carbon Pile Resistor 361
Page 362 of 376
u
MISCELLANEOUS
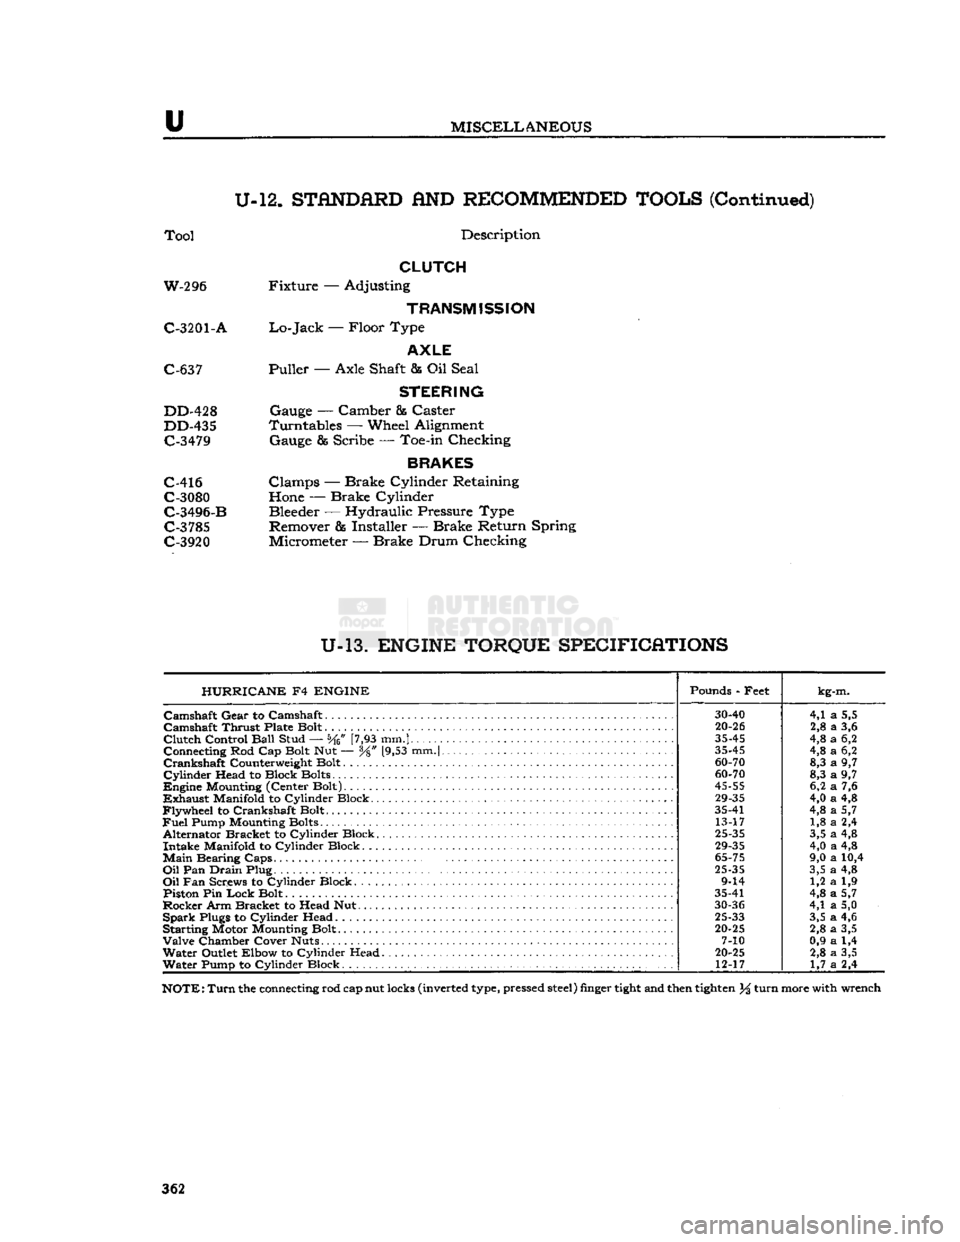
U-12.
STANDARD
AND
RECOMMENDED TOOLS
(Continued)
Tool
Description
CLUTCH
W-296 Fixture — Adjusting
TRANSMISSION
C-3201
- A
Lo-Jack
— Floor Type
AXLE
C-637 Puller — Axle Shaft & Oil Seal
STEERING
DD-428 Gauge — Camber & Caster
DD-435 Turntables — Wheel Alignment C-3479 Gauge & Scribe — Toe-in Checking
BRAKES
C-416 Clamps — Brake Cylinder Retaining C-3080 Hone — Brake Cylinder
C-3496-B Bleeder — Hydraulic Pressure Type C-3785 Remover & Installer — Brake Return Spring
C-3920 Micrometer — Brake Drum Checking
U-13.
ENGINE TORQUE SPECIFICATIONS HURRICANE
F4
ENGINE
Pounds - Feet
kg-m.
30-40
4,1
a
5,5
Camshaft
Thrust Plate Bolt
20-26
2,8
a
3,6
Clutch
Control
Ball
Stud — [7,93 mm.]
35-45
4,8
a
6,2
Connecting Rod Cap Bolt Nut — y8" [9,53 mm.|
35-45
4,8
a
6,2
60-70
8,3
a
9,7
Cylinder
Head to Block Bolts
60-70
8,3
a
9,7
45-55
6,2
a
7,6
29-35
4,0
a
4,8
Flywheel
to Crankshaft Bolt. 35-41
4,8
a
5,7
Fuel
Pump Mounting Bolts 13-17 1,8
a
2,4
Alternator Bracket to Cylinder Block.
25-35
3,5
a
4,8
29-35
4,0
a
4,8
Main
Bearing
Caps.
.
65-75
9,0
a
10,4
Oil
Pan
Drain
Plug
25-35
3,5
a
4,8
9-14 1,2
a
1,9
Piston Pin
Lock
Bolt 35-41
4,8
a
5,7
30-36
4,1
a
5,0
Spark
Plugs to Cylinder Head
25-33
3,5
a
4,6
Starting Motor Mounting Bolt.
20-25
2,8
a
3,5
7-10 0,9
a
1,4
Water
Outlet Elbow to Cylinder Head
20-25
2,8
a
3,5
Water
Pump to Cylinder Block 12-17
1,7
a
2,4
NOTE:
Turn
the connecting rod cap nut locks (inverted type, pressed
steel)
finger
tight
and then
tighten
% turn more with wrench
362