spark plugs JEEP CJ 1953 Owner's Manual
[x] Cancel search | Manufacturer: JEEP, Model Year: 1953, Model line: CJ, Model: JEEP CJ 1953Pages: 376, PDF Size: 19.96 MB
Page 80 of 376
Dl
DAUNTLESS
V-6
ENGINE
In
addition to the instructions covering operations
for disassembling the
engine
out of the vehicle, special instructions are given to cover different
operations required when disassembly is
done
with
the
engine
installed.
During
disassembly operations, the
engine
should be mounted in a suitable
engine
repair stand.
Where
practicable, modify or adapt an existing re
pair
stand as necessary to accommodate the
engine.
If
an
engine
repair stand is not used, take care to
perform
disassembly operations in a manner that
will
protect personnel against an accident and the
engine
and its parts against damage.
Dl-6.
Mounting Engine
On
Engine Stand
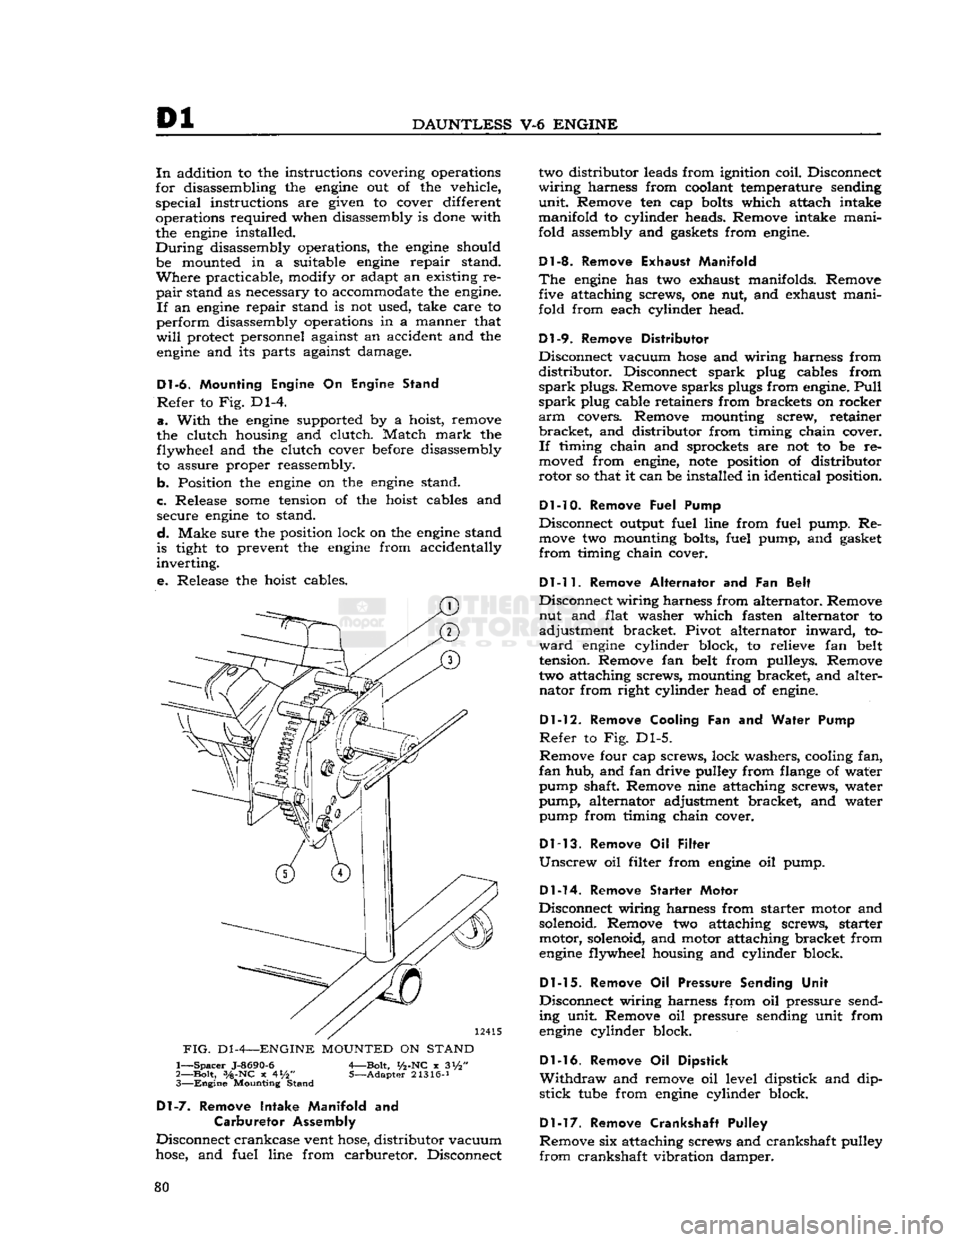
Refer
to Fig. Dl-4.
a.
With
the
engine
supported by a hoist, remove
the clutch housing and clutch. Match
mark
the flywheel and the clutch cover before disassembly to assure proper reassembly.
b. Position the
engine
on the
engine
stand.
c. Release
some
tension of the hoist cables and secure
engine
to stand.
d.
Make sure the position lock on the
engine
stand
is tight to prevent the
engine
from accidentally
inverting.
e.
Release the hoist cables.
FIG.
D1
-4—ENGINE
MOUNTED
ON
STAND
1—
Spacer
J-8690-6
A—Bolt,
i/2-NC
x 3i/2"
2—
Bolt,
3/a-NC
x 4*/2" 5—Adapter 21316-J 3—
Engine
Mounting Stand
Dl-7.
Remove Intake Manifold
and
Carburetor Assembly
Disconnect crankcase vent
hose,
distributor vacuum
hose,
and fuel line from carburetor. Disconnect two distributor leads from ignition coil. Disconnect
wiring
harness from coolant temperature sending
unit.
Remove ten cap
bolts
which attach intake
manifold to cylinder heads. Remove intake mani
fold assembly and gaskets from
engine.
Dl-8. Remove Exhaust Manifold
The
engine
has two exhaust manifolds. Remove five attaching screws, one nut, and exhaust mani
fold from each cylinder head.
Dl-9.
Remove Distributor
Disconnect vacuum
hose
and wiring harness from
distributor.
Disconnect spark plug cables from
spark
plugs. Remove sparks plugs from
engine.
Pull
spark
plug cable retainers from brackets on rocker
arm
covers. Remove mounting screw, retainer
bracket,
and distributor from timing chain cover.
If
timing chain and sprockets are not to be re
moved from
engine,
note
position of distributor
rotor so that it can be installed in identical position.
Dl-10. Remove
Fuel Pump
Disconnect output fuel line from fuel pump. Re
move
two mounting bolts, fuel pump, and gasket
from
timing chain cover.
Dl-11.
Remove Alternator
and Fan
Belt
Disconnect wiring harness from alternator. Remove nut and flat washer which fasten alternator to
adjustment bracket. Pivot alternator
inward,
to
ward
engine
cylinder block, to relieve fan belt
tension. Remove fan belt from pulleys. Remove
two attaching screws, mounting bracket, and alter nator from right cylinder head of
engine.
Dl-12.
Remove Cooling
Fan and
Water Pump
Refer
to Fig. Dl-5.
Remove four cap screws, lock washers, cooling fan,
fan
hub, and fan drive pulley from flange of water
pump shaft. Remove nine attaching screws, water
pump, alternator adjustment bracket, and water pump from timing chain cover.
Dl-13.
Remove
Oil
Filter
Unscrew
oil filter from
engine
oil pump.
Dl-14.
Remove Starter Motor
Disconnect wiring harness from starter motor and
solenoid. Remove two attaching screws, starter motor, solenoid, and motor attaching bracket from
engine
flywheel housing and cylinder block.
Dl-15.
Remove
Oil
Pressure Sending Unit
Disconnect wiring harness from oil pressure send
ing unit. Remove oil pressure sending unit from
engine
cylinder block.
Dl-16.
Remove
Oil
Dipstick
Withdraw
and remove oil level dipstick and dip
stick
tube
from
engine
cylinder block.
Dl-17.
Remove Crankshaft Pulley
Remove six attaching screws and crankshaft pulley
from
crankshaft vibration damper. 80
Page 103 of 376
'Jeep1
UNIVERSAL
SERIES
SERVICE
MANUAL
Dl
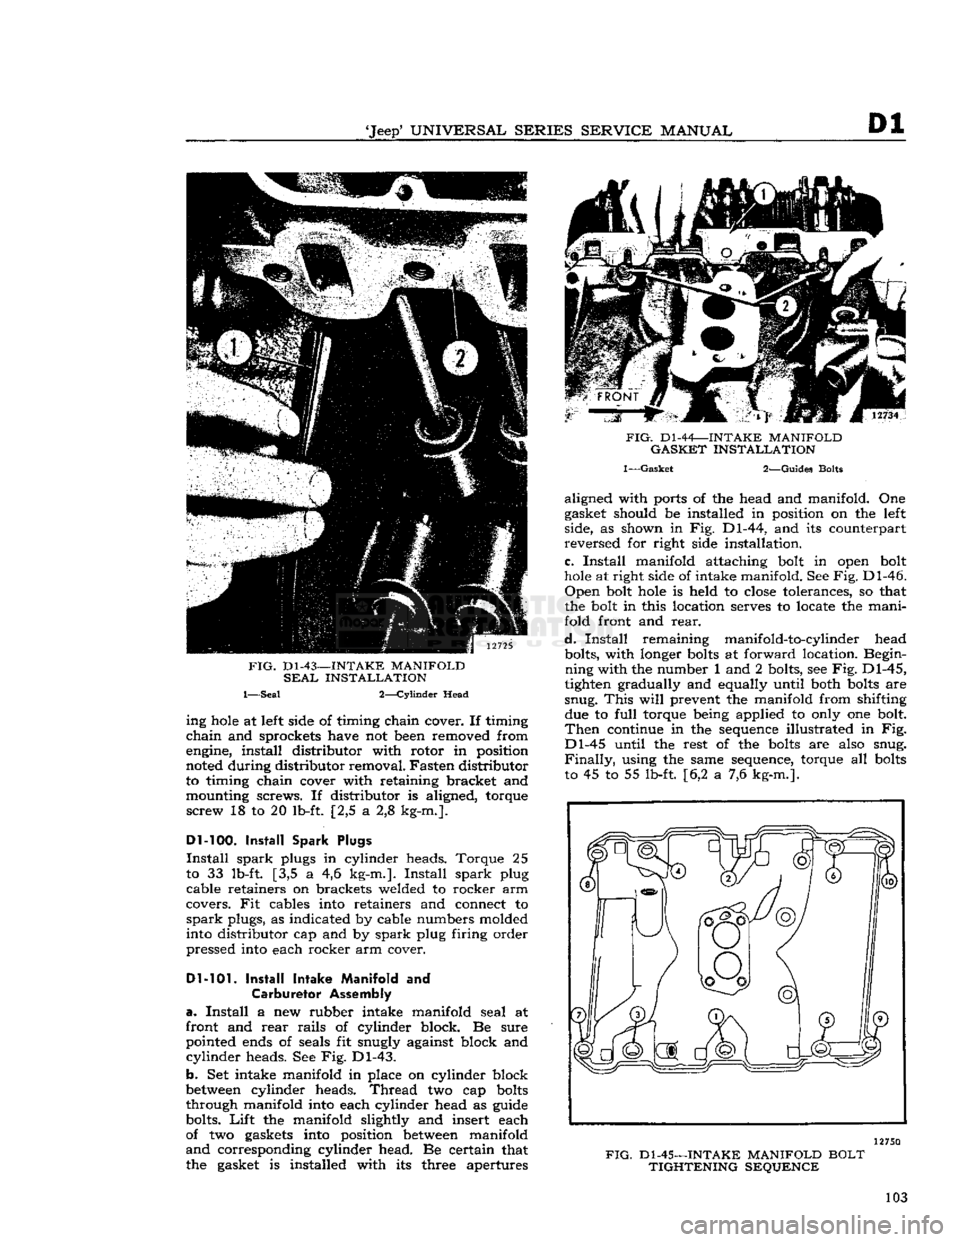
FIG.
D1-43—INTAKE
MANIFOLD
SEAL
INSTALLATION
1—Seal 2—Cylinder Head ing
hole
at left side of timing chain cover. If timing
chain
and sprockets have not been removed from
engine, install distributor with rotor in position
noted during distributor removal. Fasten distributor
to timing chain cover with retaining bracket and
mounting screws. If distributor is aligned, torque
screw
18 to 20 lb-ft. [2,5 a 2,8 kg-m.].
Dl-100.
Install Spark Plugs
Install
spark
plugs in cylinder heads. Torque 25
to 33 lb-ft. [3,5 a 4,6 kg-m.].
Install
spark
plug cable retainers on brackets welded to rocker arm
covers. Fit cables into retainers and connect to
spark
plugs, as indicated by cable numbers molded
into distributor cap and by
spark
plug firing order
pressed into each rocker arm cover.
Dl-101.
Install Intake Manifold
and
Carburetor
Assembly
a.
Install
a new rubber intake manifold seal at
front and
rear
rails
of cylinder block. Be sure
pointed ends of seals fit snugly against block and
cylinder
heads. See Fig. Dl-43.
b.
Set intake manifold in place on cylinder block
between
cylinder heads.
Thread
two cap
bolts
through manifold into each cylinder head as guide
bolts.
Lift
the manifold slightly and insert each
of two gaskets into position
between
manifold
and
corresponding cylinder head. Be certain that
the gasket is installed with its three apertures
FIG.
Dl-44—INTAKE
MANIFOLD
GASKET
INSTALLATION
1—Gasket
2—Guides Bolts aligned with ports of the head and manifold. One
gasket should be installed in position on the left
side, as shown in Fig. Dl-44, and its counterpart
reversed
for right side installation.
c.
Install
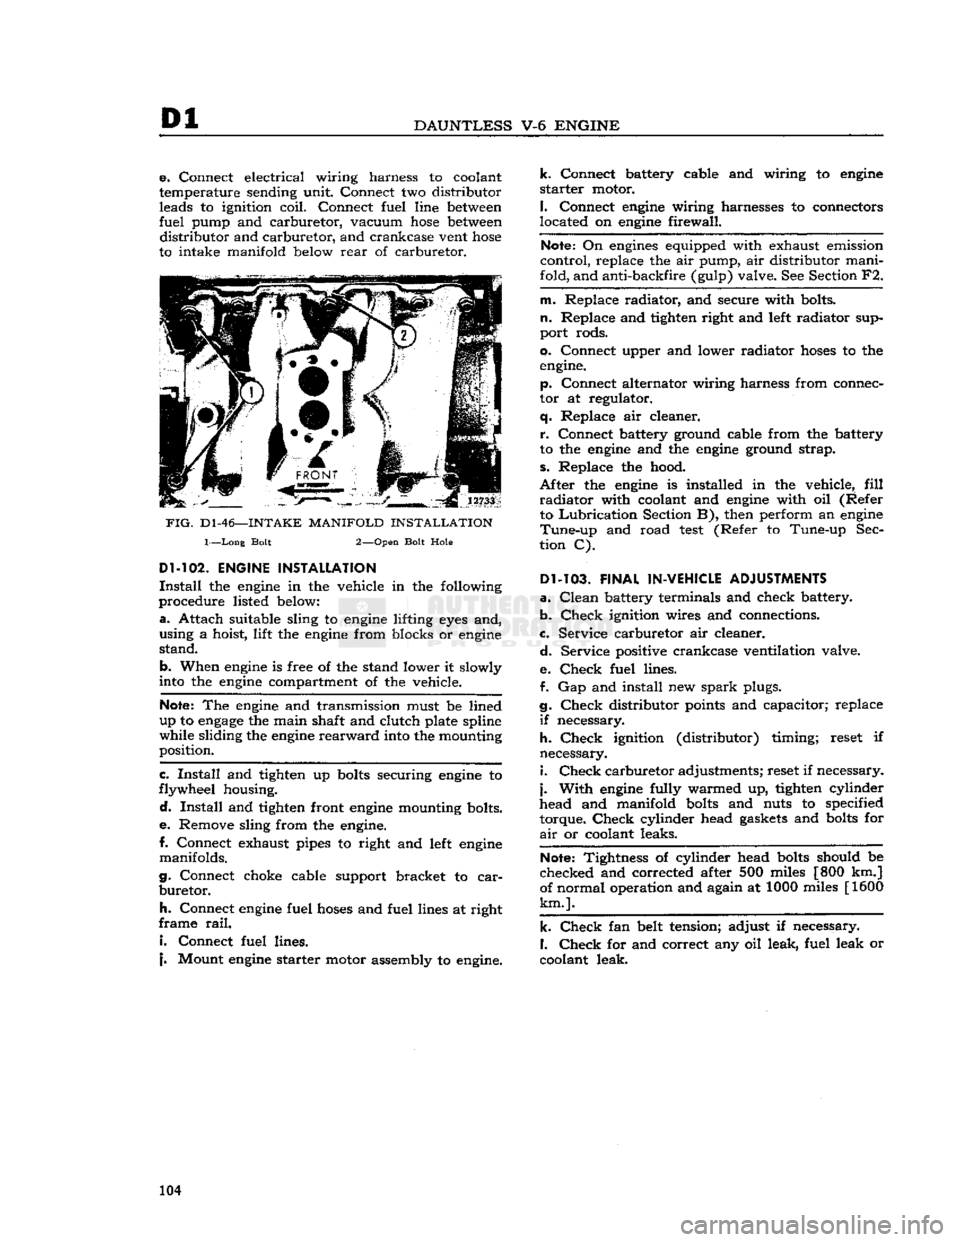
manifold attaching bolt in open bolt
hole
at right side of intake manifold. See
Fig.
Dl-46.
Open
bolt
hole
is held to
close
tolerances, so that
the bolt in this location serves to locate the mani
fold front and
rear.
d.
Install
remaining manifold-to-cylinder head bolts, with longer
bolts
at forward location. Begin
ning
with the number 1 and 2 bolts, see
Fig.
Dl-45,
tighten gradually and equally until both
bolts
are
snug.
This
will
prevent the manifold from shifting due to
full
torque being applied to only one bolt.
Then
continue in the sequence illustrated in Fig.
Dl-45
until the rest of the
bolts
are also snug.
Finally,
using the same sequence, torque all
bolts
to 45 to 55 lb-ft. [6,2 a 7,6 kg-m.].
12750
FIG.
Dl-45—INTAKE
MANIFOLD
BOLT
TIGHTENING
SEQUENCE
103
Page 104 of 376
Dl
DAUNTLESS
V-6
ENGINE
e.
Connect electrical wiring harness to coolant
temperature sending unit. Connect two distributor leads to ignition coil. Connect fuel line
between
fuel pump and carburetor, vacuum
hose
between
distributor and carburetor, and crankcase vent
hose
to intake manifold
below
rear
of carburetor.
FIG.
D1-46—-INTAKE
MANIFOLD
INSTALLATION
1—Long Bolt 2—Open Bolt Hole
Dl-102.
ENGINE INSTALLATION
Install
the
engine
in the vehicle in the following
procedure listed
below:
a.
Attach suitable sling to
engine
lifting
eyes
and,
using a hoist, lift the
engine
from blocks or
engine
stand.
b. When
engine
is free of the stand lower it slowly
into
the
engine
compartment of the vehicle.
Note:
The
engine
and transmission must be lined
up to
engage
the main shaft and clutch plate spline
while sliding the
engine
rearward
into
the mounting
position.
c.
Install
and tighten up
bolts
securing
engine
to
flywheel housing.
d.
Install
and tighten front
engine
mounting bolts.
e.
Remove sling from the
engine.
I.
Connect exhaust pipes to right and
left
engine
manifolds.
g. Connect choke cable support bracket to
car
buretor.
h.
Connect
engine
fuel
hoses
and fuel lines at right
frame
rail.
I.
Connect fuel lines.
j.
Mount
engine
starter motor assembly to
engine.
k.
Connect battery cable and wiring to
engine
starter
motor.
I.
Connect
engine
wiring harnesses to connectors
located on
engine
firewall.
Note:
On
engines
equipped with exhaust emission
control, replace the air pump, air distributor mani
fold, and anti-backfire (gulp) valve. See Section F2.
m. Replace radiator, and secure with bolts,
n.
Replace and tighten right and
left
radiator sup
port rods.
0. Connect upper and lower radiator
hoses
to the
engine.
p. Connect alternator wiring harness from connec
tor at regulator,
q.
Replace air cleaner.
r.
Connect battery ground cable from the battery
to the
engine
and the
engine
ground strap,
s.
Replace the hood.
After
the
engine
is installed in the vehicle,
fill
radiator
with coolant and
engine
with oil (Refer to
Lubrication
Section B), then perform an
engine
Tune-up
and road
test
(Refer to Tune-up Sec
tion C).
Dl-103.
FINAL IN-VEHICLE ADJUSTMENTS
a.
Clean
battery terminals and check battery.
b.
Check
ignition wires and connections.
c. Service carburetor air cleaner.
d.
Service positive crankcase ventilation valve.
e.
Check
fuel lines.
f. Gap and install new
spark
plugs.
g.
Check
distributor
points
and capacitor; replace
if
necessary.
h.
Check
ignition (distributor) timing; reset if
necessary. 1.
Check
carburetor adjustments; reset if necessary,
j.
With
engine
fully warmed up, tighten cylinder
head and manifold
bolts
and nuts to specified
torque.
Check
cylinder head
gaskets
and
bolts
for
air
or coolant leaks.
Note:
Tightness of cylinder head
bolts
should be
checked and corrected after 500 miles [800 km.]
of normal operation and again at 1000 miles [1600
km.].
k.
Check
fan belt tension; adjust if necessary.
I.
Check
for and correct any oil leak, fuel leak or
coolant leak. 104
Page 105 of 376
'Jeep'
UNIVERSAL
SERIES SERVICE
MANUAL
Dl
Dl-104.
SERVICE
DIAGNOSIS
Poor Fuel Economy
Ignition Timing Late or Spark Advance Inoperative
Carburetor
Float Setting Too High
Accelerator Pump Improperly Adjusted
Fuel
Pump Pressure High
Fuel
Line
Leakage
Fuel
Pump Diaphragm Leakage
Cylinder
Compression Low
Valves Do Not Seat Properly
Spark
Plugs
Defective
Spark
Plug Cables
Defective
Ignition
Coil
or Capacitor
Defective
Carburetor
Air Cleaner Dirty
Brakes
Drag
Wheel Alignment Incorrect
Tire
Pressure Incorrect Odometer Inaccurate
Fuel
Tank
Cap Clogged or
Defective
Muffler or Exhaust Pipe Clogged or Bent
Lack
of
Power
Cylinder
Compression Low
Ingitdon Timing Late
Carburetor
or
Fuel
Pump Clogged or
Defective
Fuel
Lines Clogged
Air
Cleaner Restricted
Engine Temperature High Valves Do Not Seat Property
Valve
Timing Late Intake Manifold or Cylinder Head
Gasket Leaks
Muffler or Exhaust Pipe Clogged or Bent
Spark
Plugs Dirty or
Defective
Breaker
Point Gap Incorrect
Breaker
Points
Defective
Ignition
Coil
or Capacitor
Defective
Electrical
Connection Loose
Broken
Valve Spring
Broken
Piston Ring or Piston
Cylinder
Head Gasket
Defective
Distributor Cap Cracked
Low
Compression
Valves Not Seating Properly Piston Rings Seal Poorly
Valve
Spring Weak or Broken
Cylinder
Scored or Worn
Piston Clearance Too Great
Cylinder
Head Gasket Leaks
Burned
Valves and
Seats
Valves Stick or Are Too Loose in Guides
Valve
Timing Incorrect
Valve
Head and Seat Have Excessive Carbon
Engine Overheats
Valve
Spring Weak or Broken
Valve
Lifter Seized or Collapsed
Exhaust
System Clogged
Valves Sticking
Valve
Stem Warped
Valve
Stem Carbonized or Scored
Valve
Stem Clearance Insufficient in Guide
Valve
Spring Weak or Broken
Valve
Spring Distorted
Oil
Contaminated
Overheating
Cooling System Inoperative
Thermostat Inoperative Ignition Timing Incorrect
Valve
Timing Incorrect
Carbon
Accumulation Excessive
Fan
Belt Loose
Muffler or Exhaust Pipe Clogged or Bent
Oil
System Failure
Piston Rings Worn or Scored
Popping,
Spitting,
Detonation
Ignition Timing Incorrect
Carburetion
Improper
Carbon
Deposit
in Combustion
Chambers Excessive
Valves Not Seating Properly
Valve
Spring Broken
Spark
Plug Electrodes Burned
Water or Dirt in
Fuel
Fuel
Line
Clogged
Valve
Timing Incorrect
Excessive
Oil
Consumption
Piston Rings Stuck in Grooves, Weak,
Worn,
Broken, or Incorrectly Fitted
Crankshaft
Main Bearings or
Connecting Rod Bearings Have
Excessive Clearance
Gaskets or Oil Seals
Leak
Cylinder
Bores Worn, Scored,
Out-of-Round or Tapered
Pistons Have Too Great Clearance to Cylinder Bores
Connecting Rods Misaligned High Road Speed
High Temperature
Crankcase
Ventilation System Inoperative
Bearing Failure
Crankshaft
Bearing Journal Rough or Out-of-Round
Oil
Level Low
Oil
Leakage
Oil
Dirty
Oil
Pressure Low or Lacking
(Oil
Pump Failure)
Drilled
Passages
in Crankshaft or
Crankcase
Clogged
Oil
Screen Dirty
Connecting Rod Bent 105
Page 134 of 376
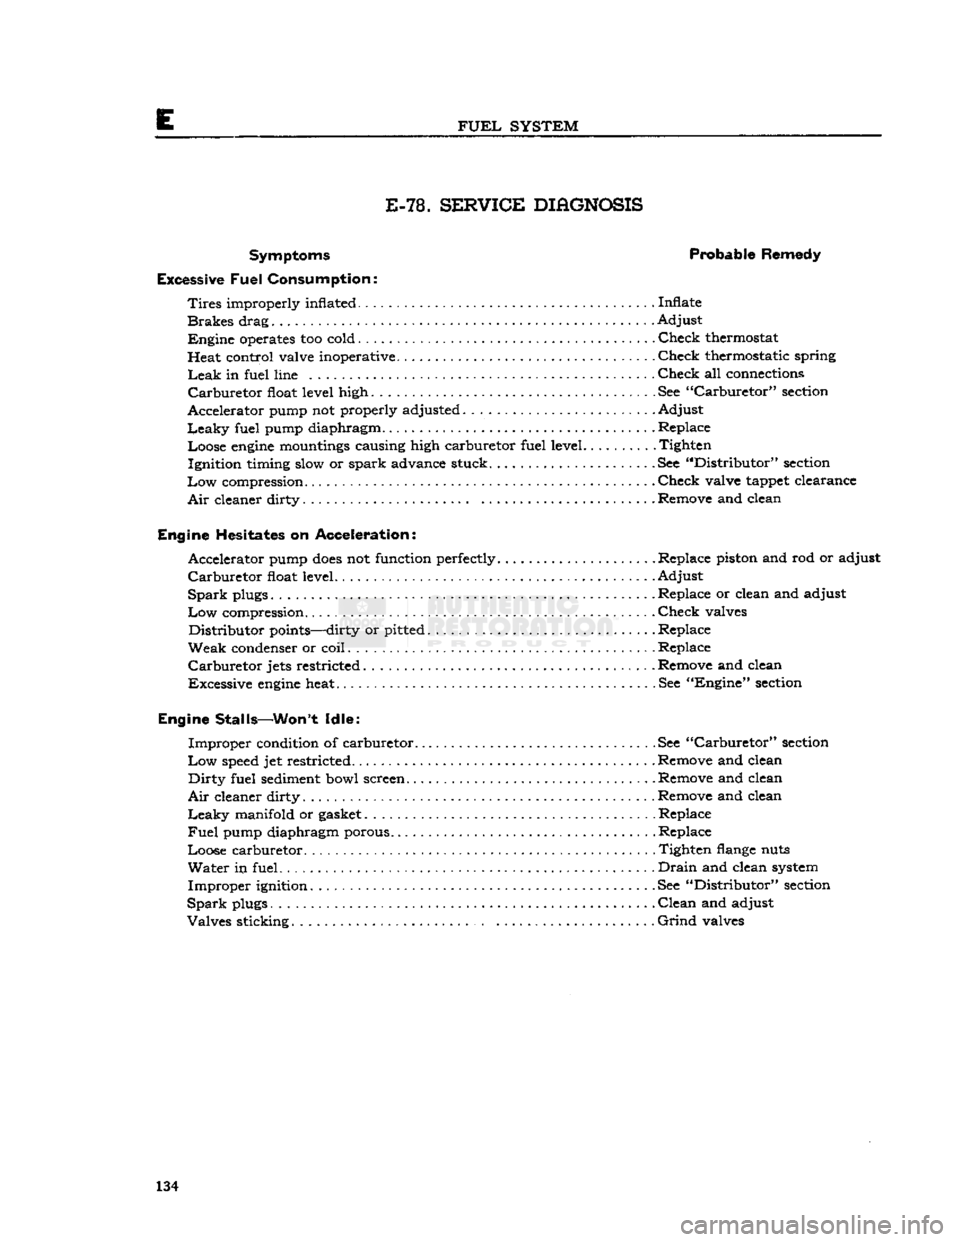
E
FUEL
SYSTEM
E-78. SERVICE DIHGNOSIS
Symptoms Probable Remedy
Excessive
Fuel
Consumption:
Tires
improperly inflated Inflate
Brakes
drag Adjust
Engine
operates too cold Check thermostat
Heat control valve inoperative Check thermostatic spring
Leak
in fuel line Check all connections
Carburetor
float level high. See
"Carburetor"
section
Accelerator pump not properly adjusted Adjust
Leaky
fuel pump diaphragm Replace
Loose
engine
mountings causing high carburetor fuel level Tighten Ignition timing slow or spark advance stuck See "Distributor" section
Low
compression. Check valve tappet clearance
Air
cleaner dirty
.
Remove and clean
Engine
Hesitates on Acceleration: Accelerator pump
does
not function perfectly.
...................
.Replace piston and rod or adjust
Carburetor
float level. ... .Adjust
Spark
plugs Replace or clean and adjust
Low
compression Check valves
Distributor
points—dirty or pitted Replace
Weak
condenser or coil Replace
Carburetor
jets restricted Remove and clean
Excessive
engine
heat See "Engine" section
Engine
Stalls—Won't Idle:
Improper
condition of carburetor See
"Carburetor"
section
Low
speed
jet restricted Remove and clean
Dirty
fuel sediment bowl screen Remove and clean
Air
cleaner dirty Remove and clean
Leaky
manifold or gasket Replace
Fuel
pump diaphragm porous. Replace
Loose carburetor. Tighten
flange
nuts
Water
in fuel
Drain
and clean system
Improper
ignition. .See "Distributor" section
Spark
plugs Clean and adjust
Valves
sticking.
Grind
valves 134
Page 171 of 376
'Jeep'
UNIVERSAL SERIES SERVICE
MANUAL
H
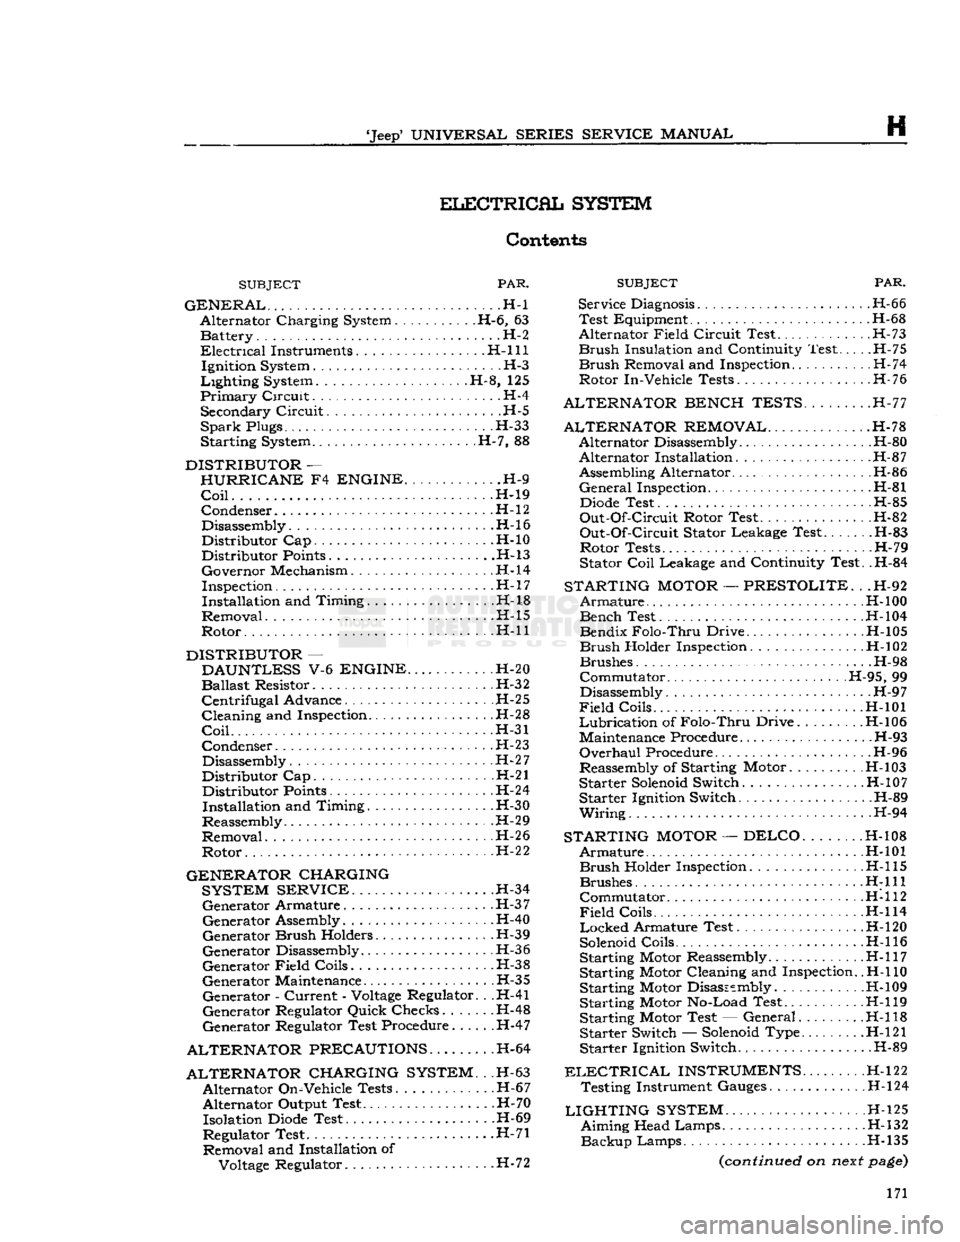
ELECTRICAL
SYSTEM
Contents
SUBJECT
PAR.
GENERAL
. -H-l Alternator Charging System H-6, 63 Battery. . . .H-2
Electrical
Instruments. H-l 11 Ignition System H-3
Lighting
System H-8, 125
Primary
Circuit.
.. H-4 Secondary
Circuit
H-5
SparkPlugs H-33
Starting System H-7, 88
DISTRIBUTOR
—
HURRICANE
F4
ENGINE
H-9
Coil
H-19 Condenser
.H-l
2
Disassembly.
.........................
.H-16
Distributor Cap H-10 Distributor
Points
H-13
Governor Mechanism H-l4
Inspection H-l
7
Installation and Timing H-18
Removal H-15
Rotor H-ll
DISTRIBUTOR
—
DAUNTLESS
V-6
ENGINE
H-20
Ballast
Resistor. H-32
Centrifugal
Advance H-25
Cleaning and Inspection H-28
Coil
H-31
Condenser H-23
Disassembly. H-27
Distributor Cap H-21 Distributor
Points
H-24
Installation and Timing. . .H-30
Reassembly. H-29
Removal H-2 6
Rotor H-2
2
GENERATOR CHARGING SYSTEM SERVICE
H-34 Generator Armature H-3
7
Generator Assembly. H-40
Generator
Brush
Holders H-39
Generator Disassembly H-36
Generator
Field
Coils.
H-38
Generator Maintenance H-35 Generator -
Current
-
Voltage
Regulator. . .H-41
Generator Regulator Quick Checks...... .H-48
Generator Regulator Test Procedure H-47
ALTERNATOR PRECAUTIONS.
H-64
ALTERNATOR CHARGING SYSTEM.
. .H-63 Alternator On-Vehicle Tests. .H-67
Alternator Output Test. .H-70 Isolation
Diode
Test H-69
Regulator Test .H-71 Removal and Installation of
Voltage
Regulator. H-72
SUBJECT
PAR.
Service
Diagnosis
H-66 Test Equipment H-68
Alternator
Field
Circuit
Test H-73
Brush
Insulation and Continuity Test H-75
Brush
Removal and Inspection H-74
Rotor In-Vehicle Tests H-76
ALTERNATOR BENCH TESTS.
.H-77
ALTERNATOR REMOVAL
H-78 Alternator Disassembly H-80 Alternator Installation. H-87
Assembling Alternator H-86
General
Inspection H-81
Diode
Test H-85
Out-Of-Circuit
Rotor Test. .H-82
Out-Of-Circuit
Stator Leakage Test.. . H-83 Rotor Tests H-79
Stator
Coil
Leakage and Continuity Test. .H-84
STARTING
MOTOR
—
PRESTOLITE.
. .H-92
Armature
.H-l
00 Bench Test H-l04
Bendix
Folo-Thru
Drive H-105
Brush
Holder Inspection. .H-102
Brushes H-98
Commutator H-95, 99
Disassembly H-9 7
Field
Coils H-101
Lubrication
of
Folo-Thru
Drive H-l06
Maintenance Procedure H-93
Overhaul
Procedure H-96
Reassembly of Starting Motor. .
H-l
03
Starter
Solenoid
Switch H-10 7 Starter Ignition Switch. .H-89
Wiring.
. . . H-94
STARTING
MOTOR
—DELCO
H-108
Armature
H-101
Brush
Holder Inspection H-l 15 Brushes
H:lll
Commutator H-112
Field
Coils........
H-114
Locked
Armature Test. . . H-l20
Solenoid
Coils H-l 16
Starting Motor Reassembly H-l 17
Starting Motor Cleaning and Inspection.
.H-l
10
Starting Motor Disassembly .H-109 Starting Motor No-Load Test H-119
Starting Motor Test — General H-l 18 Starter Switch —
Solenoid
Type. H-l21
Starter Ignition Switch. .H-89
ELECTRICAL
INSTRUMENTS
H-122 Testing Instrument Gauges H-l24
LIGHTING
SYSTEM
H-l25 Aiming Head Lamps H-132
Backup
Lamps H-135
(continued
on
next
page)
171
Page 173 of 376
'Jeep'
UNIVERSAL
SERIES
SERVICE
MANUAL
H
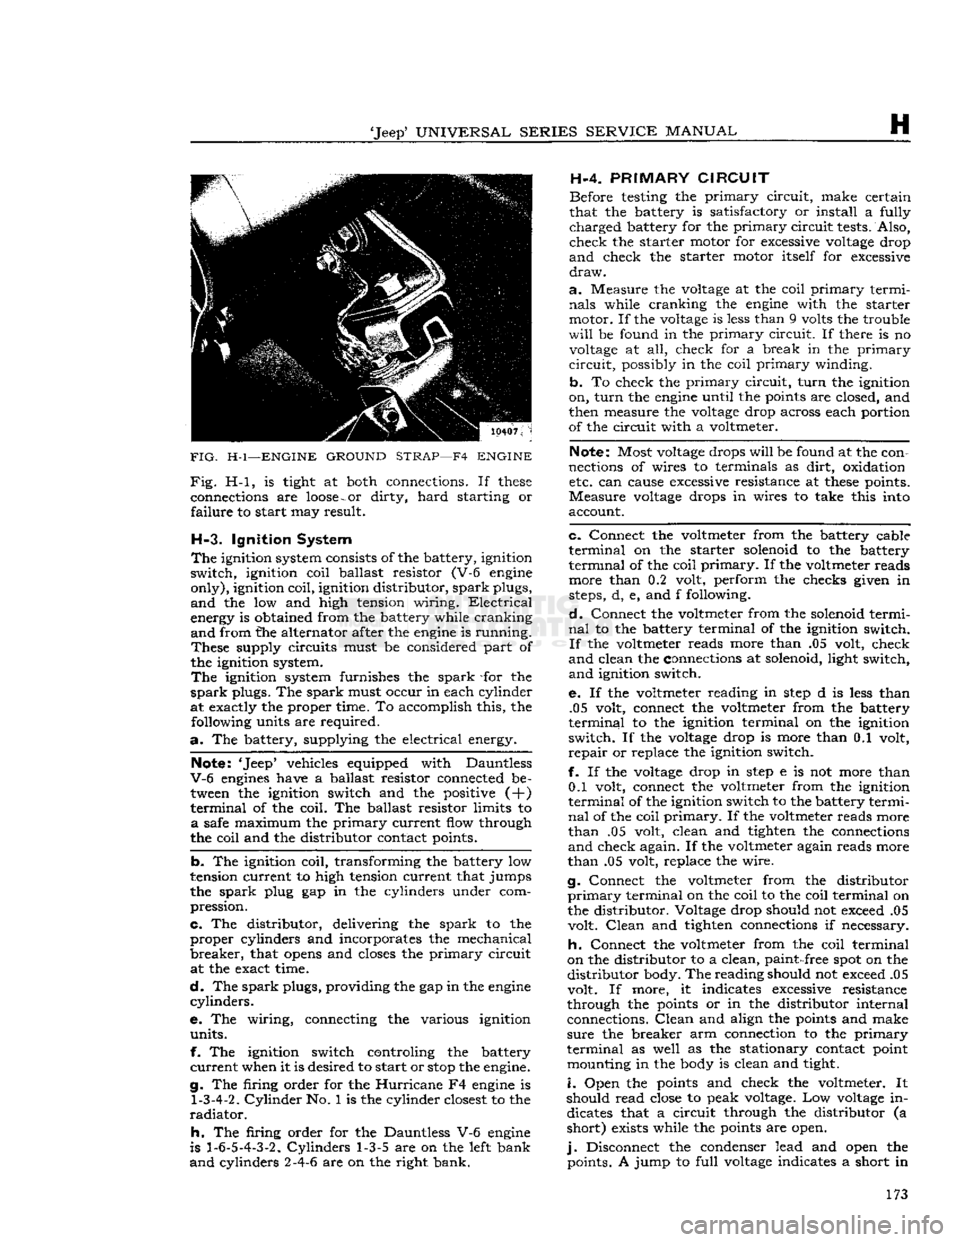
FIG.
H-l—ENGINE
GROUND
STRAP—F4
ENGINE
Fig.
H-l, is tight at both connections. If
these
connections are
loose
-
or
dirty,
hard
starting or
failure
to start may result.
H-3.
Ignition System
The
ignition system consists of the battery, ignition
switch,
ignition coil ballast resistor (V-6 engine
only),
ignition coil, ignition distributor,
spark
plugs,
and
the low and high tension wiring.
Electrical
energy is obtained from the battery while cranking
and
from the alternator after the engine is running.
These
supply circuits must be considered part of
the ignition system.
The
ignition system furnishes the
spark
-for the
spark
plugs. The
spark
must occur in each cylinder
at exactly the proper time. To accomplish this, the following units are required.
a.
The battery, supplying the electrical energy.
Note: 'Jeep* vehicles equipped with Dauntless
V-6
engines have a ballast resistor connected be tween the ignition switch and the positive (+)
terminal
of the coil. The ballast resistor limits to
a
safe maximum the
primary
current flow through
the coil and the distributor contact points.
b.
The ignition coil, transforming the battery low
tension current to high tension current that jumps
the
spark
plug gap in the cylinders under com
pression.
c.
The distributor, delivering the
spark
to the
proper
cylinders and incorporates the mechanical
breaker,
that
opens
and closes the
primary
circuit at the exact time.
d.
The
spark
plugs, providing the gap in the engine
cylinders.
e. The wiring, connecting the various ignition
units.
f. The ignition switch controling the battery
current
when it is desired to start or
stop
the engine.
g. The firing order for the
Hurricane
F4 engine is
1-3-4-2.
Cylinder
No. 1 is the cylinder closest to the
radiator.
h.
The firing order for the Dauntless V-6 engine
is
1-6-5-4-3-2.
Cylinders
1-3-5 are on the left bank
and
cylinders 2-4-6 are on the right bank. H-4.
PRIMARY
CIRCUIT
Before testing the
primary
circuit,
make certain
that the battery is satisfactory or install a fully
charged
battery for the
primary
circuit
tests. Also,
check
the starter motor for excessive voltage drop
and
check the starter motor itself for excessive
draw.
a.
Measure the voltage at the coil
primary
termi
nals
while cranking the engine with the starter
motor. If the voltage is less than 9 volts the trouble
will
be found in the
primary
circuit.
If there is no voltage at all, check for a break in the
primary
circuit,
possibly in the coil
primary
winding.
b.
To check the
primary
circuit,
turn
the ignition
on,
turn
the engine until the points are closed, and
then measure the voltage drop across each portion
of the circuit with a voltmeter.
Note: Most voltage drops
will
be found at the con
nections of wires to terminals as
dirt,
oxidation etc. can cause excessive resistance at
these
points.
Measure
voltage drops in wires to take this into
account.
c.
Connect the voltmeter from the battery cable
terminal
on the starter solenoid to the battery
terminal
of the coil
primary.
If the voltmeter reads more than 0.2 volt, perform the checks given in
steps, d, e, and f following.
d.
Connect the voltmeter from the solenoid termi
nal
to the battery terminal of the ignition switch.
If
the voltmeter reads more than .05 volt, check
and
clean the connections at solenoid, light switch,
and
ignition switch.
e. If the voltmeter reading in
step
d is less than .05 volt, connect the voltmeter from the battery
terminal
to the ignition terminal on the ignition
switch.
If the voltage drop is more than 0.1 volt,
repair
or replace the ignition switch.
f. If the voltage drop in
step
e is not more than 0.1 volt, connect the voltmeter from the ignition
terminal
of the ignition switch to the battery termi
nal
of the coil
primary.
If the voltmeter reads more
than
.05 volt, clean and tighten the connections
and
check again. If the voltmeter again reads more
than
.05 volt, replace the wire.
g. Connect the voltmeter from the distributor
primary
terminal on the coil to the coil terminal on
the distributor. Voltage drop should not exceed .05 volt.
Clean
and tighten connections if necessary.
h.
Connect the voltmeter from the coil terminal
on the distributor to a clean,
paint-
free spot on the
distributor
body. The reading should not exceed .05
volt. If more, it indicates excessive resistance
through the points or in the distributor internal connections.
Clean
and align the points and make
sure
the breaker arm connection to the
primary
terminal
as well as the stationary contact point mounting in the body is clean and tight.
i.
Open the points and check the voltmeter. It
should read close to peak voltage. Low voltage in dicates that a circuit through the distributor (a
short)
exists while the points are open.
j.
Disconnect the condenser lead and open the points. A jump to
full
voltage indicates a short in 173
Page 174 of 376
H
ELECTRICAL
SYSTEM
the condenser. Replace the condenser. If there is
no jump to full voltage, overhaul or replace the
distributor.
k.
With the points closed, connect the voltmeter
from
a clean, paint-free
post
on the distributor
body to the negative
post
of the battery. The volt
age drop should be practically zero, a hardly
readable deflection on the voltmeter. If the volt meter registers a
voltage
drop, perform the checks
in
steps
1
and m following.
I.
Check
for
voltage
drop in the battery ground
cable.
Clean
the battery
post,
cable terminals, and contact surface on the bellhousing, or on body if
a
noticeable deflection of the voltmeter occurs,
m.
Check
for any
voltage
drop
between
the dis
tributor
body and a clean, paint-free
spot
on the
cylinder
block. If there is any
voltage
drop, remove
the distributor and clean the mounting surfaces of
distributor
body and cylinder block.
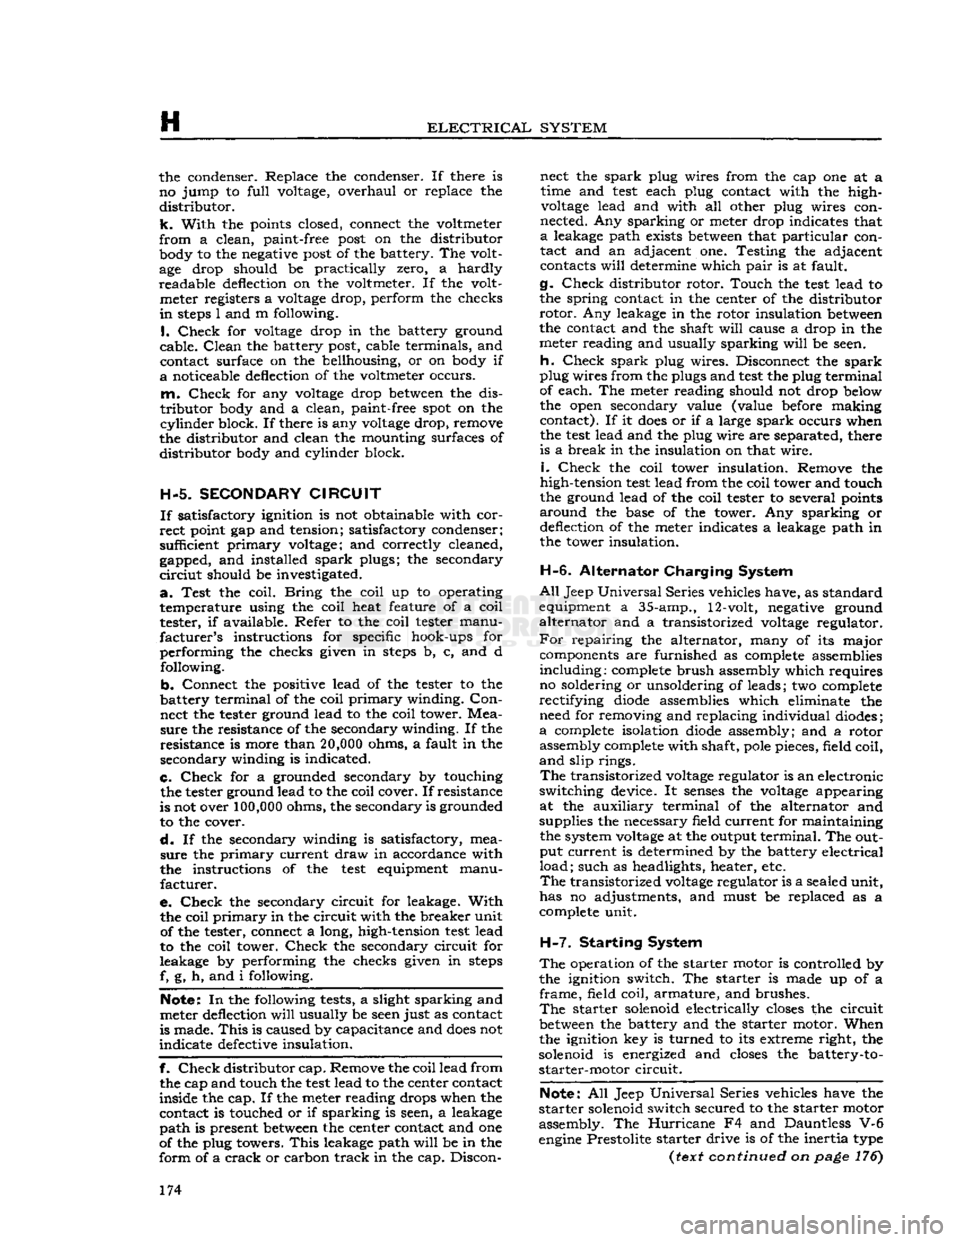
H-5.
SECONDARY
CIRCUIT
If
satisfactory ignition is not obtainable with cor
rect
point gap and tension; satisfactory condenser;
sufficient primary voltage; and correctly cleaned, gapped, and installed spark plugs; the secondary
circiut
should be investigated.
a.
Test the coil.
Bring
the coil up to operating
temperature using the coil heat feature of a coil tester, if available. Refer to the coil tester manu
facturer's
instructions for specific hook-ups for
performing the checks given in
steps
b, c, and d following.
b. Connect the positive lead of the tester to the
battery terminal of the coil primary winding.
Con
nect the tester ground lead to the coil tower. Mea
sure
the resistance of the secondary winding. If the
resistance is more than
20,000
ohms, a fault in the
secondary winding is indicated.
c.
Check
for a grounded secondary by touching the tester ground lead to the coil cover. If resistance
is not over
100,000
ohms, the secondary is grounded
to the cover.
d.
If the secondary winding is satisfactory, mea
sure
the primary current draw in accordance with
the instructions of the
test
equipment manu
facturer.
e.
Check
the secondary circuit for leakage. With the coil primary in the circuit with the breaker unit of the tester, connect a long, high-tension
test
lead
to the coil tower.
Check
the secondary circuit for
leakage by performing the checks given in
steps
f. g, h, and i following.
Note:
In the following
tests,
a slight sparking and
meter deflection
will
usually be
seen
just as contact
is made.
This
is caused by capacitance and
does
not
indicate defective insulation.
f.
Check
distributor cap. Remove the coil lead from the cap and touch the
test
lead to the center contact
inside the cap. If the meter reading drops when the contact is touched or if sparking is seen, a leakage
path is present
between
the center contact and one
of the plug towers.
This
leakage path
will
be in the
form
of a
crack
or carbon track in the cap. Discon nect the spark plug wires from the cap one at a
time and
test
each plug contact with the high-
voltage
lead and with all other plug wires con
nected. Any sparking or meter drop indicates that
a
leakage path exists
between
that particular con
tact and an adjacent one. Testing the adjacent contacts
will
determine which pair is at fault,
g-
Check
distributor rotor. Touch the
test
lead to
the spring contact in the center of the distributor
rotor.
Any leakage in the rotor insulation
between
the contact and the shaft
will
cause a drop in the meter reading and usually sparking
will
be seen.
h.
Check
spark plug wires. Disconnect the spark
plug wires from the plugs and
test
the plug terminal of each. The meter reading should not drop below
the open secondary value (value before making contact). If it
does
or if a large spark occurs when
the
test
lead and the plug wire are separated, there
is a break in the insulation on that wire.
i.
Check
the coil tower insulation. Remove the
high-tension
test
lead from the coil tower and touch
the ground lead of the coil tester to several points
around
the base of the tower. Any sparking or deflection of the meter indicates a leakage path in
the tower insulation.
H-6.
Alternator Charging System
All
Jeep
Universal
Series vehicles have, as standard
equipment a 35-amp., 12-volt, negative ground
alternator and a transistorized
voltage
regulator.
For
repairing the alternator, many of its major components are furnished as complete assemblies
including:
complete brush assembly which requires no soldering or unsoldering of leads; two complete
rectifying
diode
assemblies which eliminate the need for removing and replacing individual diodes;
a
complete isolation
diode
assembly; and a rotor assembly complete with shaft,
pole
pieces, field coil,
and
slip rings.
The
transistorized
voltage
regulator is an electronic
switching device. It
senses
the
voltage
appearing at the auxiliary terminal of the alternator and
supplies the necessary field current for maintaining the system
voltage
at the output
terminal.
The out
put current is determined by the battery electrical
load;
such as headlights, heater, etc.
The
transistorized
voltage
regulator is a sealed unit,
has no adjustments, and must be replaced as a
complete unit.
H-7.
Starting System
The
operation of the starter motor is controlled by
the ignition switch. The starter is made up of a
frame,
field coil, armature, and brushes.
The
starter solenoid electrically
closes
the circuit
between
the battery and the starter motor. When the ignition key is turned to its extreme right, the
solenoid is energized and
closes
the battery-to- starter-motor circuit.
Note:
All Jeep Universal Series vehicles have the
starter
solenoid switch secured to the starter motor
assembly. The Hurricane F4 and Dauntless V-6
engine
Prestolite starter drive is of the inertia type
(rexr
continued on
page
176) 174
Page 178 of 376
H
ELECTRICAL
SYSTEM
14365
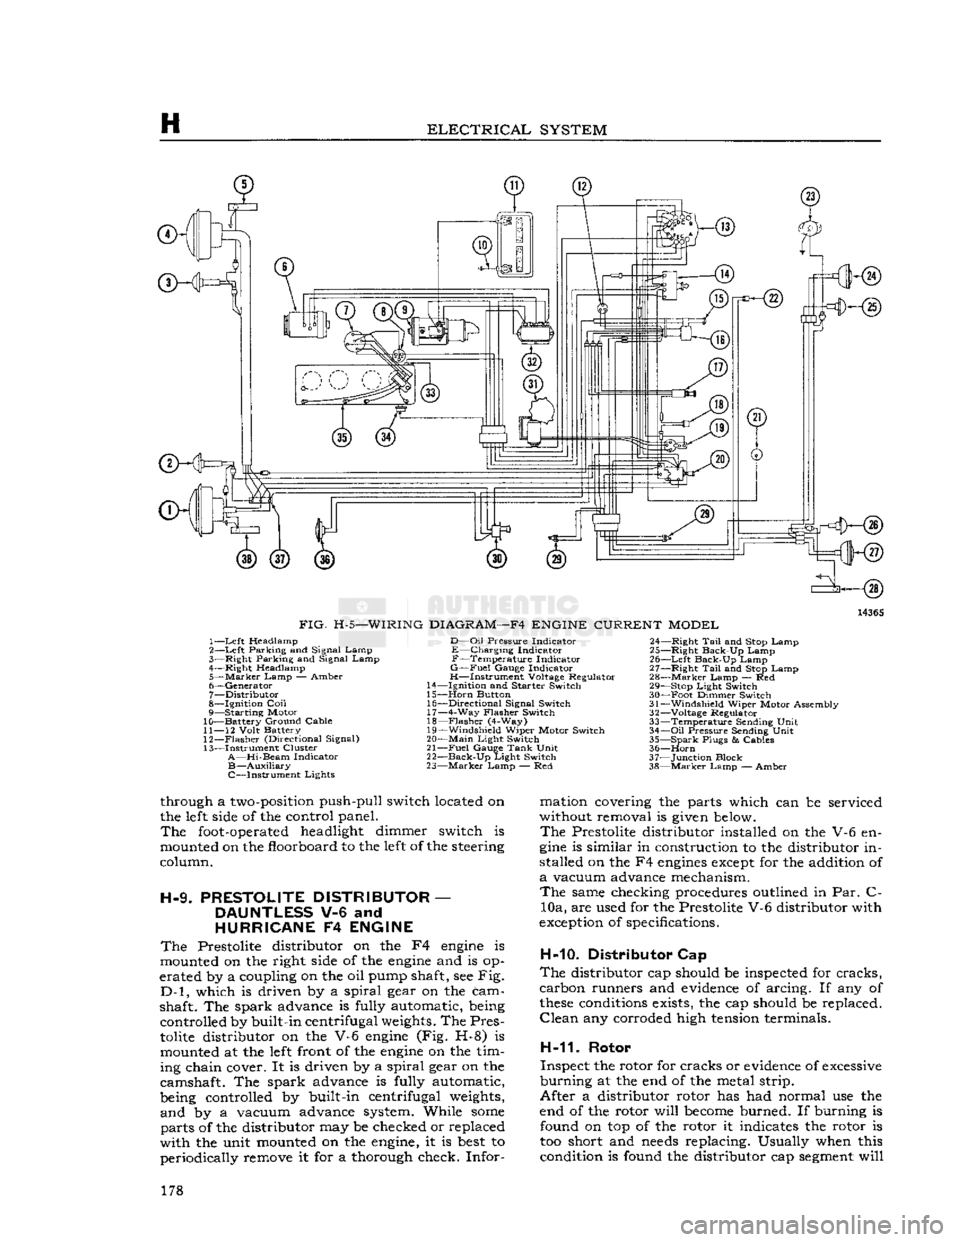
FIG.
H-5—WIRING
DIAGRAM—F4
ENGINE
CURRENT
MODEL
1—
Left
Headlamp
2—
Left
Parking and Signal Lamp
3—
Right
Parking and Signal Lamp
4—
Right
Headlamp
5—
Marker
Lamp
— Amber
6—
Generator
7—
Distributor
8—
Ignition
Coil
9— Starting Motor
10— Battery Ground Cable
11—
12
Volt
Battery
12—
Flasher
(Directional Signal)
13— Instrument Cluster
A—Hi-Beam
Indicator
B—Auxiliary
C—Instrument Lights
D—Oil
Pressure
Indicator
E—Charging Indicator
F—Temperature Indicator
G—Fuel
Gauge
Indicator
H—Instrument Voltage Regulator
14—
Ignition
and
Starter
Switch
15—
Horn
Button 16—
Directional
Signal Switch 17— 4-Way
Flasher
Switch
18—
Flasher
(4-Way)
19—
Windshield
Wiper Motor Switch
20—
Main
Light
Switch
21—
Fuel
Gauge
Tank
Unit
22—
Back-Up
Light
Switch
23—
Marker
Lamp — Red 24—
Right
Tail
and Stop Lamp
25—
Right
Back-Up Lamp
26—
Left
Back-Up Lamp
27—
Right
Tail
and Stop Lamp
28—
Marker
Lamp — Red 29— Stop
Light
Switch
30— Foot Dimmer Switch
31—
Windshield
Wiper Motor Assembly
32—
Voltage Regulator
33— Temperature Sending
Unit
34—
Oil
Pressure
Sending
Unit
35— Spark
Plugs
&
Cables
36—
Horn
37— Junction Block
38—
Marker
Lamp — Amber
through a
two-position
push-pull switch located on
the
left
side
of the control panel.
The
foot-operated
headlight dimmer switch is
mounted on the floorboard to the
left
of the steering
column.
H-9.
PRESTOLITE
DISTRIBUTOR
—
DAUNTLESS
V-6 and
HURRICANE
F4
ENGINE
The
Prestolite distributor on the F4
engine
is
mounted on the right
side
of the
engine
and is op
erated by a coupling on the oil pump shaft, see Fig.
D-l,
which is driven by a spiral gear on the cam
shaft. The spark advance is fully automatic, being controlled by built-in centrifugal
weights.
The Pres
tolite
distributor on the V-6
engine
(Fig. H-8) is mounted at the
left
front of the
engine
on the tim
ing chain cover. It is driven by a spiral gear on the
camshaft. The spark advance is fully automatic,
being controlled by built-in centrifugal
weights,
and by a vacuum advance system. While
some
parts of the distributor may be checked or replaced
with the unit mounted on the
engine,
it is
best
to periodically remove it for a thorough check. Infor mation covering the parts which can be serviced
without removal is
given
below.
The
Prestolite distributor installed on the V-6 en
gine
is similar in construction to the distributor in
stalled on the F4
engines
except
for the addition of
a
vacuum advance mechanism.
The
same checking procedures outlined in Par. C- 10a, are used for the Prestolite V-6 distributor with
exception
of specifications.
H-10. Distributor Cap
The
distributor cap should be inspected for cracks,
carbon runners and
evidence
of arcing. If any of
these
conditions
exists, the cap should be replaced.
Clean
any corroded high
tension
terminals.
H-11.
Rotor
Inspect the rotor for cracks or
evidence
of
excessive
burning at the end of the metal strip.
After a distributor rotor has had normal use the
end of the rotor will
become
burned. If burning is found on top of the rotor it indicates the rotor is
too short and
needs
replacing. Usually when this condition is found the distributor cap
segment
will 178
Page 180 of 376
H
ELECTRICAL
SYSTEM
ffKHs)
3—<§)
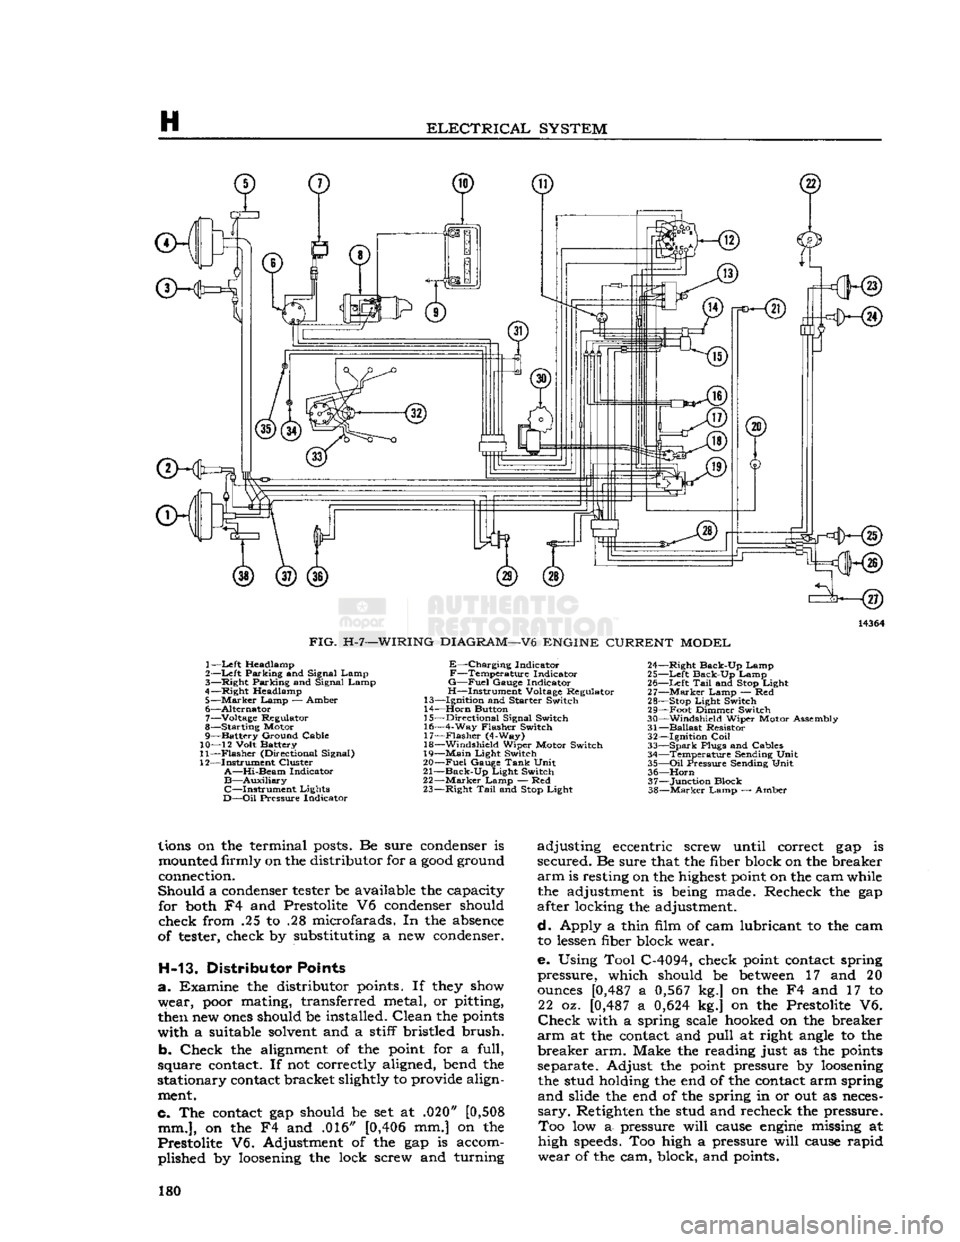
FIG.
H-7—WIRING
DIAGRAM—V6
ENGINE
CURRENT
MODEL
1—
Left
Headlamp
2—Left Parking and Signal Lamp
3— Right Parking and Signal Lamp
4—Right Headlamp 5—
Marker
Lamp — Amber
6— Alternator 7— Voltage Regulator
8— Starting Motor
9— Battery Ground Cable
10— 12 Volt Battery
11—
Flasher
(Directional Signal)
12— Instrument Cluster
A—Hi-Beam
Indicator
B—Auxiliary
C—Instrument
Lights
D—Oil
Pressure Indicator
E—Charging
Indicator
F—Temperature
Indicator
G—Fuel
Gauge Indicator
H—Instrument Voltage Regulator
13— Ignition and Starter Switch
14—
Horn
Button
15— Directional Signal Switch
16— 4-Way Flasher Switch 17—
Flasher
(4-Way)
18— Windshield Wiper Motor Switch
19—
Main
Light Switch
20—
Fuel
Gauge
Tank
Unit
21—
Back-Up
Light Switch
22—
Marker
Lamp — Red
23— Right
Tail
and
Stop
Light 24— Right Back-Up Lamp
25—
Left
Back-Up Lamp 26—
Left
Tail
and
Stop
Light
27—
Marker
Lamp — Red
28—
Stop
Light Switch
29— Foot Dimmer Switch
30— Windshield Wiper Motor Assembly
31—
Ballast
Resistor 32— Ignition
Coil
33—
Spark
Plugs and Cables 34— Temperature Sending Unit
35—
Oil
Pressure Sending Unit 36—
Horn
37— Junction Block
38—
Marker
Lamp — Amber
lions
on the terminal
posts.
Be sure
condenser
is
mounted
firmly on the distributor for a
good
ground
connection.
Should a
condenser
tester
be available the capacity for
both
F4 and Prestolite V6
condenser
should
check from .25 to .28 microfarads. In the
absence
of
tester,
check by substituting a new
condenser.
H-13. Distributor Points
a. Examine the distributor
points.
If
they
show
wear,
poor
mating, transferred metal, or pitting,
then
new
ones
should be installed. Clean the
points
with a suitable
solvent
and a stiff bristled brush.
b. Check the
alignment
of the
point
for a full,
square
contact.
If not correctly aligned, bend the
stationary
contact
bracket slightly to provide align
ment.
c. The
contact
gap should be set at .020"
[0,508
mm.],
on the F4 and .016"
[0,406
mm.] on the
Prestolite V6. Adjustment of the gap is accom plished by
loosening
the lock screw and turning adjusting eccentric screw until correct gap is
secured. Be sure that the fiber block on the breaker
arm
is resting on the
highest
point
on the cam while the adjustment is
being
made. Recheck the gap
after locking the adjustment.
d. Apply a thin film of cam lubricant to the cam to
lessen
fiber block wear.
e. Using Tool C-4094, check
point
contact
spring
pressure, which should be
between
17 and 20
ounces
[0,487
a
0,567
kg.] on the F4 and 17 to 22 oz.
[0,487
a
0,624
kg.] on the Prestolite V6.
Check
with a spring scale
hooked
on the breaker
arm
at the
contact
and pull at right
angle
to the
breaker arm. Make the reading just as the
points
separate. Adjust the
point
pressure by
loosening
the stud holding the end of the
contact
arm spring
and slide the end of the spring in or out as
neces
sary.
Retighten the stud and recheck the pressure. Too low a- pressure will
cause
engine
missing at
high
speeds.
Too high a pressure will
cause
rapid
wear of the cam, block, and
points.
180