wheel JEEP CJ 1953 Manual PDF
[x] Cancel search | Manufacturer: JEEP, Model Year: 1953, Model line: CJ, Model: JEEP CJ 1953Pages: 376, PDF Size: 19.96 MB
Page 286 of 376
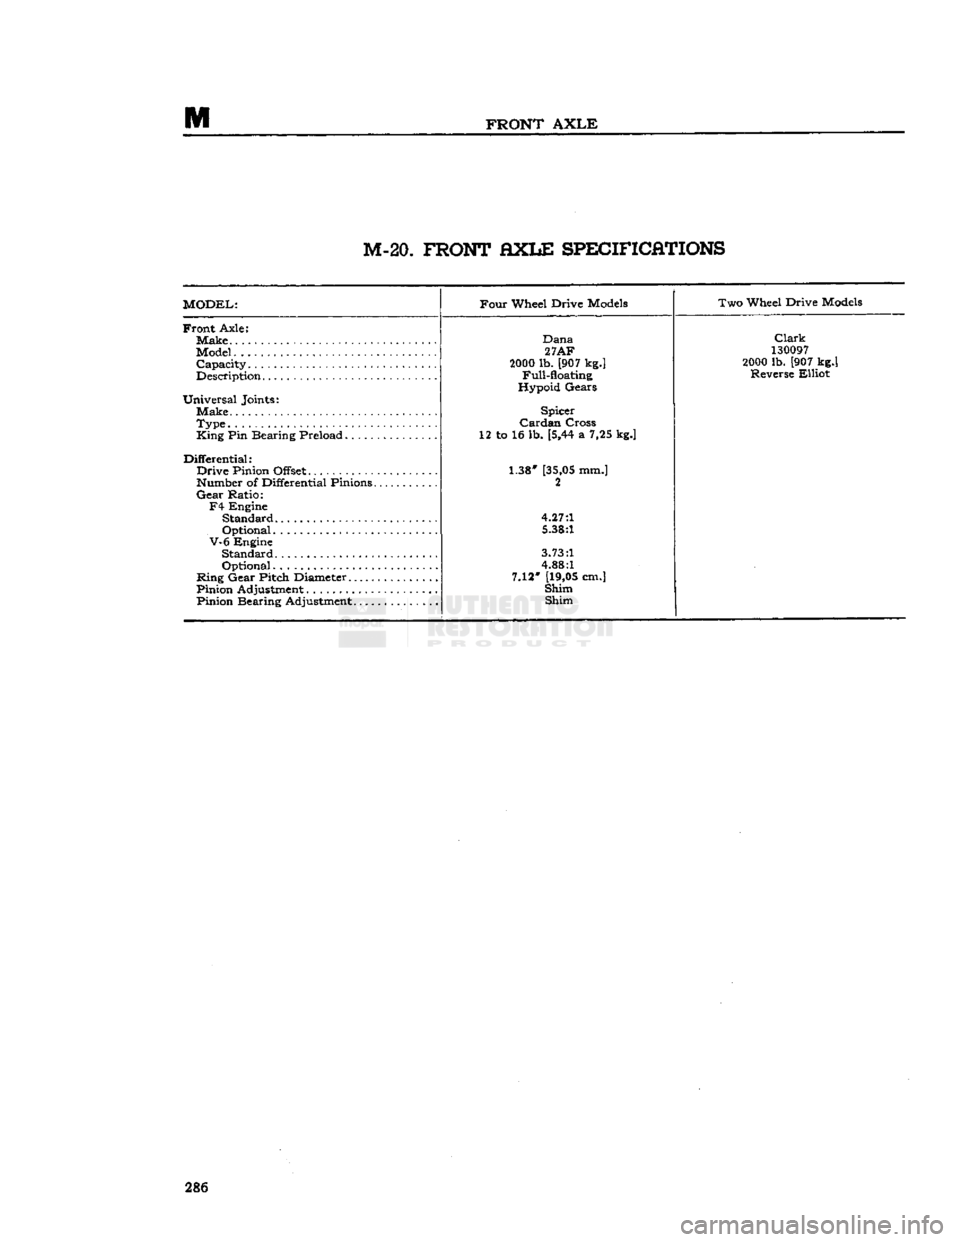
FRONT
AXLE
M-20.
FRONT
AXLE
SPECIFICATIONS
MODEL:
Four
Wheel Drive
Models
Two Wheel Drive
Models
Front
Axle:
Make.
Model
Capacity
Description
Universal
Joints: Make
Type.
King
Pin Bearing Preload
Differential:
Drive
Pinion Offset:
Number of Differential Pinions
Gear
Ratio:
F4
Engine
Standard
Optional
V-6
Engine
Standard
Optional
Ring
Gear Pitch Diameter
Pinion Adjustment
Pinion Bearing Adjustment
Dana
27AF
2000
lb. [907 kg.] Full-floating
Hypoid Gears
Spicer
Cardan
Cross
12 to 16 lb. [5,44 a 7,25 kg.]
1.38*
[35,05
mm.] 2
4.27:1
5.38:1
3.73:1
4.88:1
7.12'
[19,05
cm.]
Shim Shim
Clark
130097
2000
lb. [907 kg.] Reverse Elliot 286
Page 287 of 376
'Jeep*
UNIVERSAL SERIES SERVICE
MANUAL
N
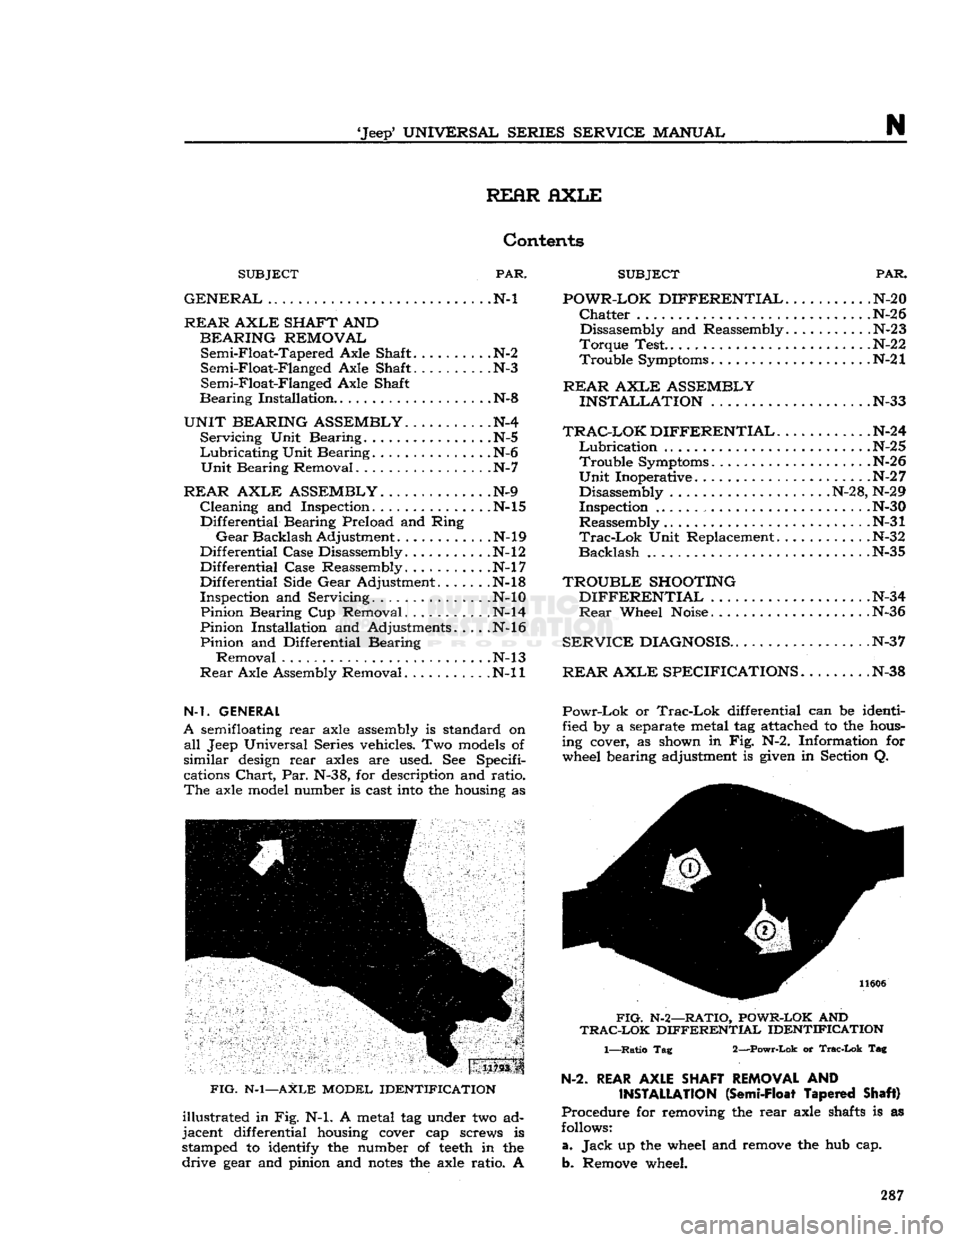
REAR
AXLE
Contents
PAR. SUBJECT
PAR.
N-l POWR-LOK DIFFERENTIAL
N-20
Chatter
.N-26 Dissasembly and Reassembly. .N-23
Torque Test .N-22
21* Trouble Symptoms N-21
SUBJECT
GENERAL
REAR
AXLE SHAFT
AND
BEARING REMOVAL
Semi-Float-Tapered Axle Shaft
Semi-Float-Flanged Axle Shaft
Semi-Float-Flanged Axle Shaft
Bearing Installation. N-8
UNIT
BEARING ASSEMBLY
N-4 Servicing Unit Bearing. N-5
Lubricating
Unit Bearing............... N-6
Unit
Bearing Removal
.
N-7
REAR
AXLE ASSEMBLY
N-9 Cleaning and Inspection.
..............N-15
Differential Bearing Preload and Ring
Gear
Backlash Adjustment.
..........
.N-l9
Differential Case Disassembly N-l2
Differential Case Reassembly N-l7
Differential Side
Gear
Adjustment. . .... .N-18
Inspection and Servicing N-10 Pinion Bearing Cup Removal .N-l4
Pinion Installation and Adjustments. ... .N-l6 Pinion and Differential Bearing Removal N-13
Rear
Axle Assembly Removal N-ll
N-l. GENERAL
A
semifloating
rear axle assembly is standard on
all
Jeep Universal Series vehicles. Two
models
of
similar
design
rear
axles
are used. See Specifi
cations
Chart,
Par. N-38, for description and ratio.
The
axle
model
number is cast
into
the
housing
as
FIG.
N-l—AXLE MODEL IDENTIFICATION
illustrated in Fig. N-l. A metal tag under two ad
jacent differential
housing
cover cap screws is
stamped to
identify
the number of
teeth
in the
drive
gear
and pinion and
notes
the axle ratio. A
REAR
AXLE ASSEMBLY
INSTALLATION
N-33
TRAC-LOK
DIFFERENTIAL.
..........
.N-24
Lubrication
N-25 Trouble Symptoms N-26
Unit
Inoperative N-2 7 Disassembly N-28, N-29 Inspection .N-30
Reassembly .N-31
Trac-Lok
Unit Replacement .N-32
Backlash
N-35
TROUBLE
SHOOTING
DIFFERENTIAL
N-34
Rear
Wheel
Noise
.N-36
SERVICE
DIAGNOSIS
.N-37
REAR
AXLE SPECIFICATIONS.
. N-38
Powr-Lok
or
Trac-Lok
differential can be identi
fied by a separate metal tag attached to the
hous
ing cover, as shown in Fig. N-2. Information for wheel bearing adjustment is
given
in Section Q.
FIG.
N-2—RATIO,
POWR-LOK
AND
TRAC-LOK
DIFFERENTIAL IDENTIFICATION
1—Ratio Tag 2—Powr-Lok or
Trac-Lok
Tag
N-2.
REAR AXLE SHAFT REMOVAL
AND
INSTALLATION
(Semi-Float Tapered Shaft)
Procedure for removing the rear axle
shafts
is as
follows:
a.
Jack
up the wheel and
remove
the hub cap.
b. Remove wheel. 287
Page 288 of 376
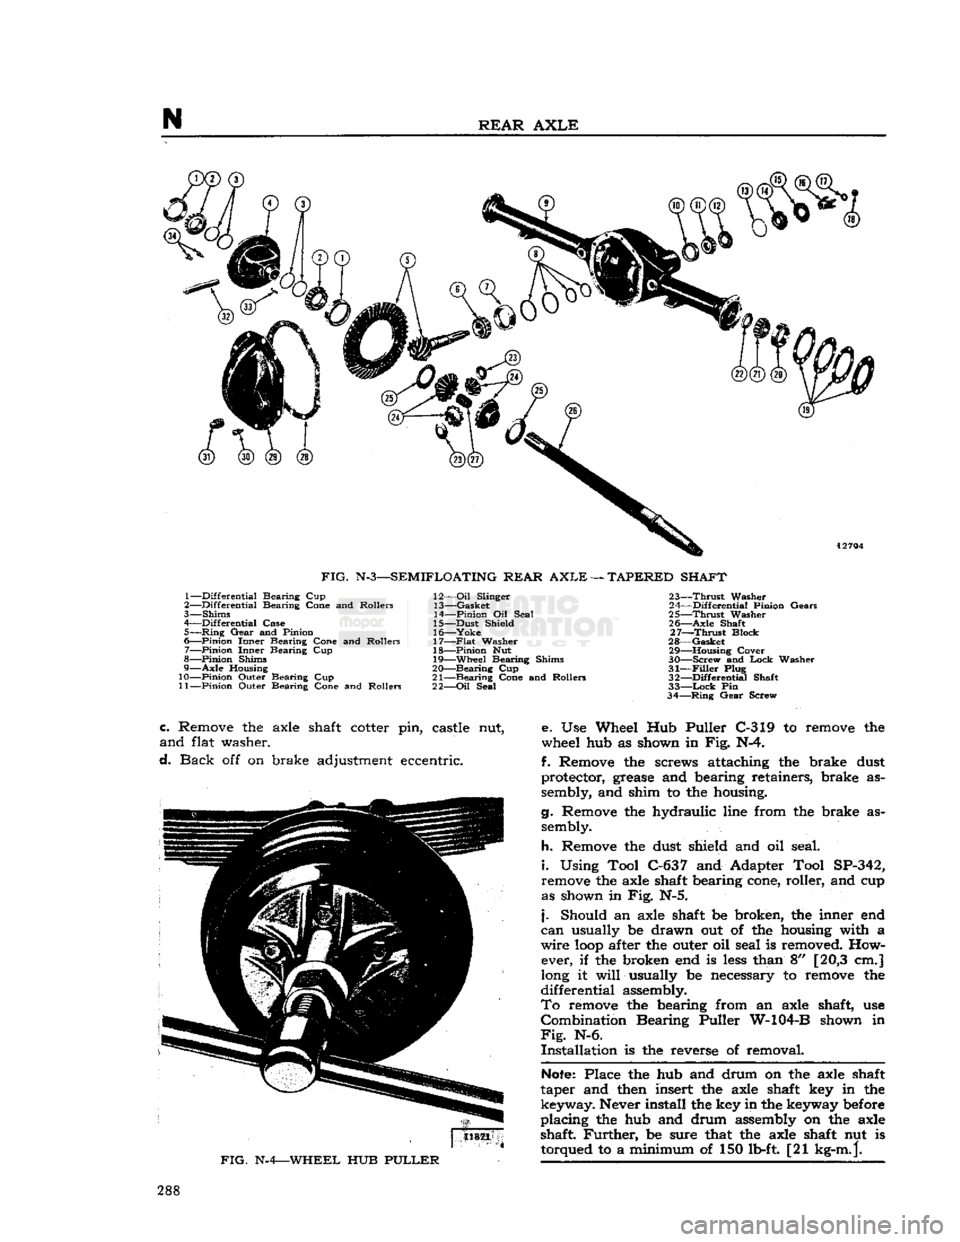
FIG.
N-3—SEMIFLOATING REAR
AXLE
—
TAPERED SHAFT
1— Differential Bearing Cup
2— Differential Bearing Cone and Rollers
3— Shims
4— Differential Case 5—
Ring
Gear and Pinion
6— Pinion Inner Bearing Cone and Rollers
7— Pinion Inner Bearing Cup
8— Pinion Shims
9— Axle
Housing
10— Pinion Outer Bearing Cup
11— Pinion Outer Bearing Cone and Rollers 12—
Oil
Slinger
13— Gasket
14— Pinion Oil Seal
15— Dust Shield
16— Yoke
17—
Flat
Washer
18— Pinion Nut 19— Wheel Bearing Shims
20— Bearing Cup
21— Bearing Cone and Rollers
22—
Oil
Seal 23—
Thrust
Washer
24— Differential Pinion Gears
25—
Thrust
Washer
26— Axle Shaft 27—
Thrust
Block
28— Gasket 29—
—Housing
Cover
30— —Screw and Lock Washer
31—
Filler
Plug 32— Differential Shaft
33—
Lock
Pin
34—
Ring
Gear Screw
c.
Remove the axle shaft cotter pin, castle nut,
and
flat washer.
d.
Back
off on brake adjustment eccentric.
FIG.
N-4—WHEEL
HUB
PULLER
e. Use Wheel Hub Puller C-319 to remove the
wheel hub as shown in Fig. N-4.
f. Remove the screws attaching the brake dust
protector, grease and bearing retainers, brake as
sembly, and shim to the housing.
g. Remove the hydraulic line from the brake as sembly.
h.
Remove the dust shield and oil seal.
i.
Using Tool C-637 and Adapter Tool SP-342,
remove the axle shaft bearing cone, roller, and cup
as shown in Fig. N-5.
j.
Should an axle shaft be broken, the inner end
can
usually be drawn out of the housing with a
wire
loop
after the outer oil seal is removed. How ever, if the broken end is
less
than 8" [20,3 cm.]
long it
will
usually be necessary to remove the
differential
assembly.
To
remove the bearing from an axle shaft, use
Combination
Bearing Puller W-104-B shown in
Fig.
N-6.
Installation
is the reverse of removal.
Note:
Place the hub and drum on the axle shaft
taper and then insert the axle shaft key in the
keyway.
Never install the key in the keyway before
placing
the hub and drum assembly on the axle
shaft
Further,
be sure that the axle shaft nut is torqued to a minimum of 150 lb-ft. [21 kg-m.j. 288
Page 289 of 376
'Jeep'
UNIVERSAL
SERIES SERVICE
MANUAL
N
11465
FIG.
N-S—REMOVING
TAPERED
AXLE
SHAFT
1—Cone and Roller 2—Axle 3—Tool C-637
Check
the shaft oil seal
before
installing the rear
axle. If replacement is necessary, use Axle Shaft
Oil
Seal Driver W-186, Fig. N-l7.
Before installing the axle shaft nut
cotter
pin, ad
just the wheel bearings as outlined in Section Q.
FIG.
N-6—REMOVING
AXLE
SHAFT BEARING —
TAPERED SHAFT
N-3.
Rear
Axle Shaft Removal (Sercii-Float-Flanged Shaft)
a.
Jack
up vehicle and
remove
wheels.
b. Remove brake drum.
c. Remove axle shaft
flange
cup plug by piercing
the center with a sharp
tool
and prying it out.
d. Using
access
hole
in axle shaft
flange
remove
@ ® (30) (29)
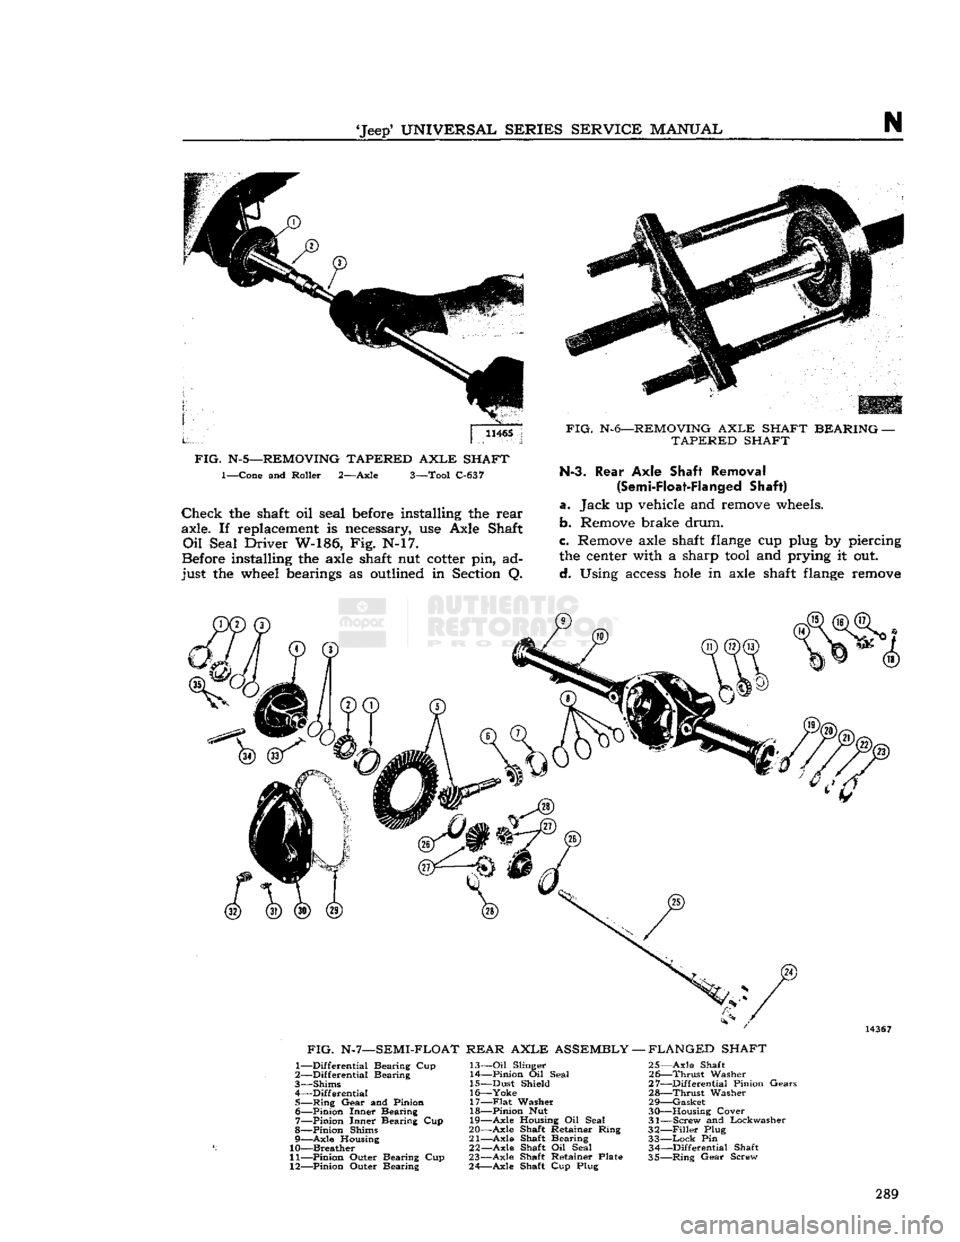
FIG.
N-7—SEMI-FLOAT REAR
AXLE
ASSEMBLY — FLANGED SHAFT
1— Differential Bearing Cup
2— Differential Bearing
3— Shims
4— Differential 5—
Ring
Gear
and Pinion 6— -Pinion Inner Bearing
7— Pinion Inner Bearing Cup
8— Pinion Shims
9— Axle Housing
10— Breather
11— Pinion Outer Bearing Cup
12— Pinion Outer Bearing 13—
Oil
Slinger
14— Pinion Oil Seal
15— Dust Shield
16—
Yoke
17—
Flat
Washer
18— Pinion Nut
19— Axle Housing Oil Seal
20— Axle Shaft Retainer Ring
21— Axle Shaft Bearing
22— Axle Shaft Oil Seal
23— Axle Shaft Retainer Plate
24— Axle Shaft Cup Plug 25— Axle Shaft
26—
Thrust
Washer
27— Differential Pinion Gears
28—
Thrust
Washer 29— Gasket
30— Housing Cover 31— Screw and Lockwasher
32—
Filler
Plug 33—
Lock
Pin 34— Differential Shaft
35—
Ring
Gear
Screw 289
Page 291 of 376
'Jeep*
UNIVERSAL
SERIES
SERVICE
MANUAL
N
N-6.
Lubricating
Unit Bearing
a.
After the bearing has been inspected and ap
proved for continued service, it must be
relubri-
cated
prior
to re-installation into the axle housing.
The
Unit Bearing assembly can be hand packed
with
grease on the axle shaft by the method out
lined
below.
Lithium
soap wheel bearing grease
Part
No.
998386
should be used to relubricate Unit
Bearing
assembly.
b.
Push seal away from bearing and
fill
the area
or
cavity
between
the seal and bearing with the recommended grease. Refer to Fig. N-9.
c.
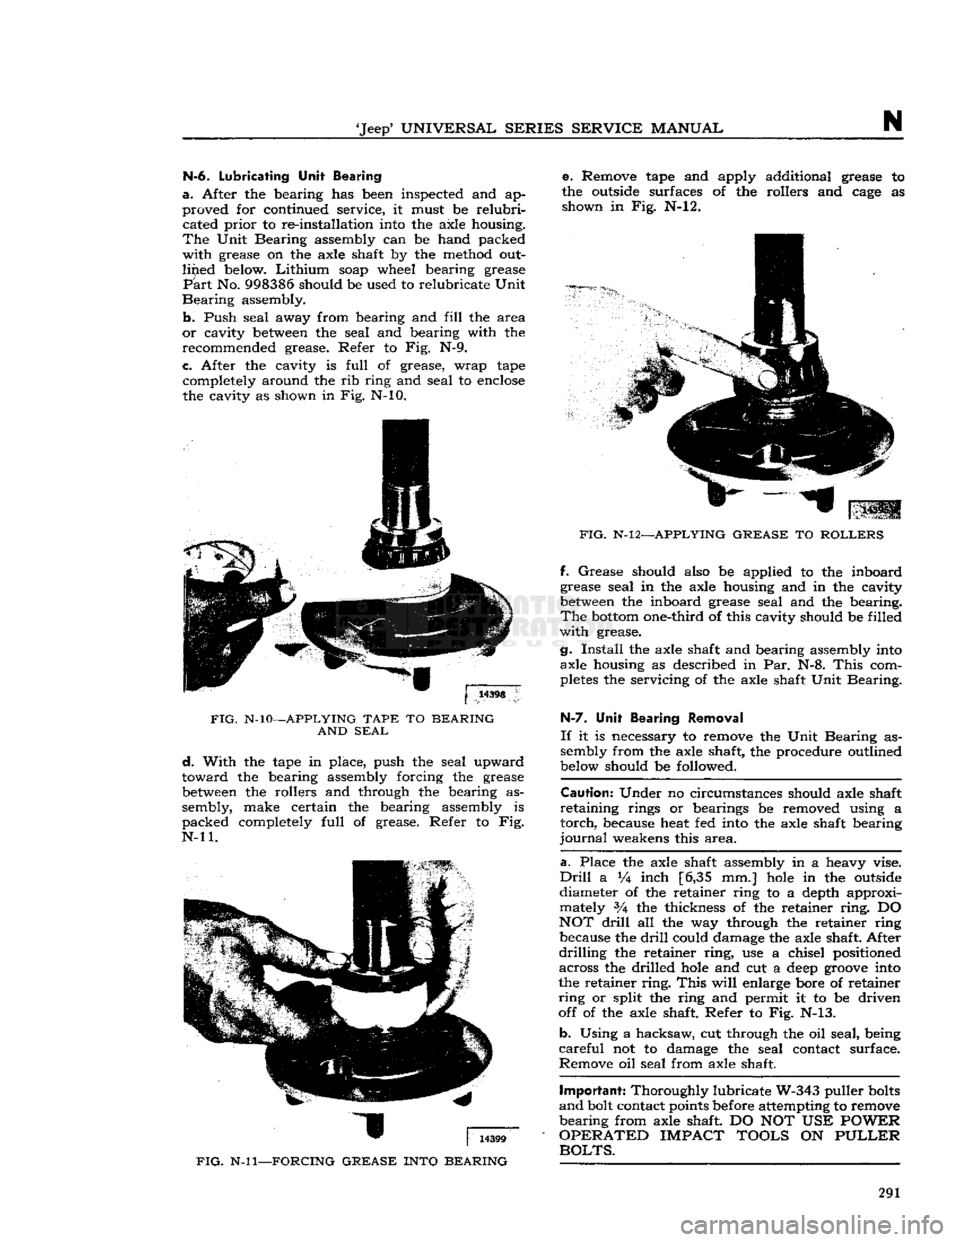
After the cavity is
full
of grease, wrap tape completely around the rib ring and seal to
enclose
the cavity as shown in Fig. N-10.
FIG.
N-10—APPLYING
TAPE
TO
BEARING
AND
SEAL
d.
With
the tape in place, push the seal upward
toward
the bearing assembly forcing the grease
between
the rollers and through the bearing as
sembly, make certain the bearing assembly is
packed
completely
full
of grease. Refer to Fig.
N-ll.
FIG.
N-ll—FORCING
GREASE
INTO
BEARING
e. Remove tape and apply additional grease to
the outside surfaces of the rollers and
cage
as shown in Fig. N-l2.
FIG.
N-12—APPLYING
GREASE
TO
ROLLERS
ff.
Grease
should also be applied to the inboard
grease seal in the axle housing and in the cavity
between
the inboard grease seal and the bearing.
The
bottom
one-third of this cavity should be filled
with
grease.
g.
Install
the axle shaft and bearing assembly into axle housing as described in Par. N-8.
This
com
pletes
the servicing of the axle shaft Unit Bearing.
H-7.
Unit Bearing Removal
If
it is necessary to remove the Unit Bearing as
sembly from the axle shaft, the procedure outlined
below should be followed.
Caution:
Under no circumstances should axle shaft
retaining
rings or bearings be removed using a
torch,
because heat fed into the axle shaft bearing
journal
weakens this
area.
a.
Place the axle shaft assembly in a heavy vise.
Drill
a Vi inch [6,35 mm.]
hole
in the outside
diameter of the retainer ring to a depth approxi mately 3A the thickness of the retainer
ring.
DO
NOT
drill
all the way through the retainer ring because the
drill
could damage the axle shaft. After
drilling
the retainer
ring,
use a chisel positioned across the drilled
hole
and cut a
deep
groove
into
the retainer
ring.
This
will
enlarge bore of retainer
ring
or split the ring and permit it to be driven
off of the axle shaft. Refer to Fig. N-13.
b.
Using a hacksaw, cut through the oil seal, being
careful
not to damage the seal contact surface.
Remove oil seal from axle shaft.
Important:
Thoroughly lubricate W-343 puller
bolts
and
bolt contact points before attempting to remove
bearing
from axle shaft DO NOT USE
POWER
OPERATED
IMPACT
TOOLS
ON
PULLER
BOLTS.
291
Page 292 of 376
N
REAR
AXLE
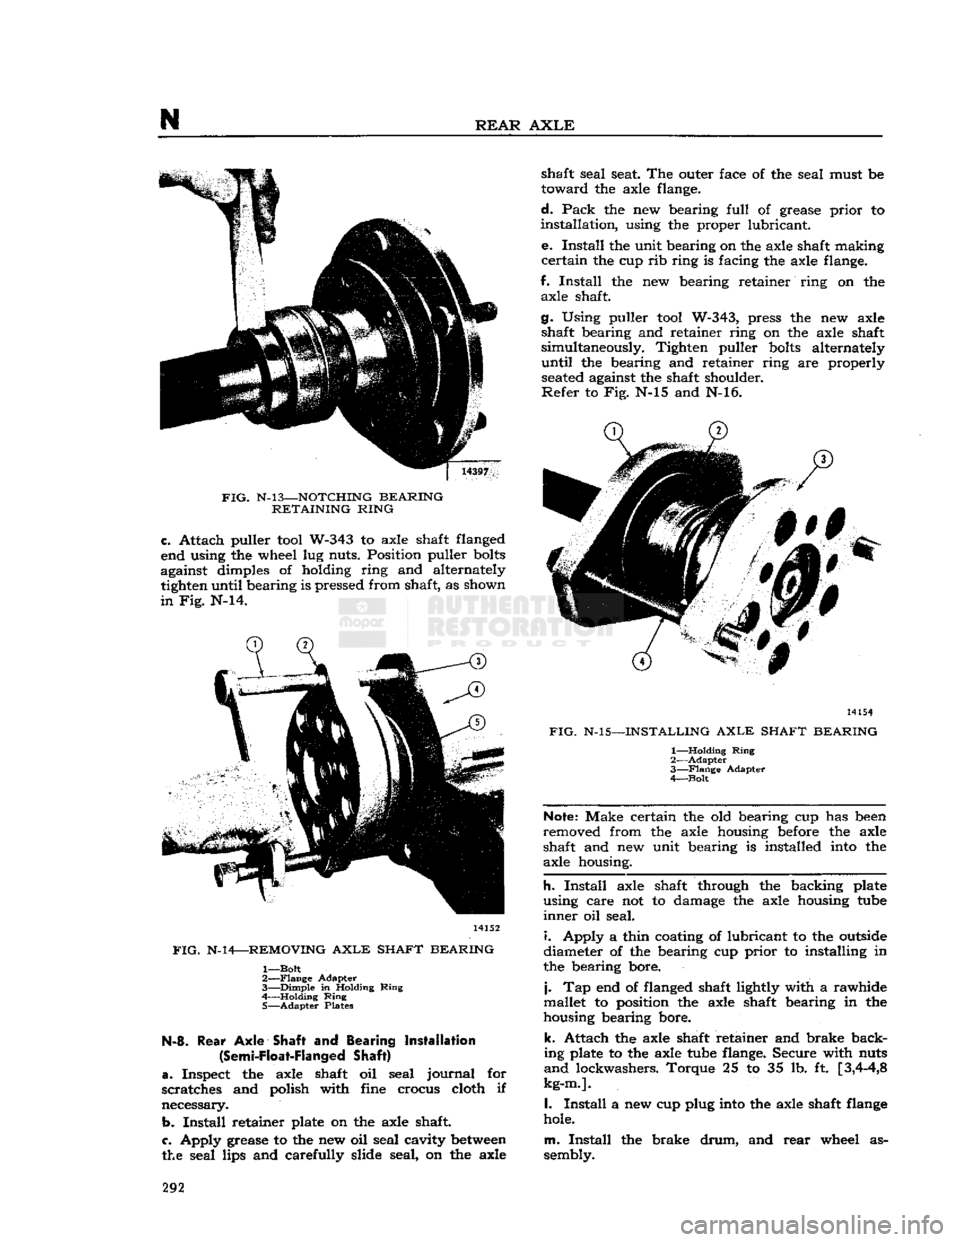
FIG.
N-l3—NOTCHING
BEARING
RETAINING
RING
c.
Attach puller
tool
W-343 to axle shaft flanged
end using the wheel lug nuts. Position puller
bolts
against dimples of holding ring and alternately tighten until bearing is pressed from shaft, as shown
in
Fig. N-14. 14152
FIG.
N-14—REMOVING
AXLE
SHAFT
BEARING
1—
Bolt
2—
Flange
Adapter
3—
Dimple
in Holding
Ring
4 Holding
Ring
5—
Adapter
Plates N-8.
Rear
Axle
Shaft and Bearing Installation
(Semi-Float-Flanged
Shaft)
a.
Inspect the axle shaft oil seal
journal
for
scratches and polish with fine crocus cloth if
necessary.
b.
Install
retainer plate on the axle shaft
c.
Apply grease to the new oil seal cavity
between
the seal lips and carefully slide seal, on the axle shaft seal seat. The outer face of the seal must be
toward
the axle flange.
d.
Pack
the new bearing
full
of grease
prior
to
installation,
using the proper lubricant.
e.
Install
the unit bearing on the axle shaft making
certain
the cup rib ring is facing the axle flange.
f.
Install
the new bearing retainer ring on the axle shaft.
g. Using puller
tool
W-343, press the new axle shaft bearing and retainer ring on the axle shaft
simultaneously. Tighten puller
bolts
alternately
until
the bearing and retainer ring are properly
seated
against the shaft shoulder.
Refer
to Fig. N-15 and N-16. 14154
FIG.
N-15—INSTALLING
AXLE
SHAFT
BEARING
1—
Holding
Ring
2—
Adapter
3—
Flange
Adapter
4—
Bolt
Note:
Make certain the old bearing cup has
been
removed from the axle housing
before
the axle
shaft and new unit bearing is installed
into
the
axle housing.
h.
Install
axle shaft through the backing plate
using care not to damage the axle housing
tube
inner
oil seal.
i.
Apply a thin coating of lubricant to the
outside
diameter of the bearing cup
prior
to installing in
the bearing bore.
j.
Tap end of flanged shaft lightly with a rawhide
mallet to position the axle shaft bearing in the
housing bearing bore.
k.
Attach the axle shaft retainer and brake back
ing plate to the axle
tube
flange. Secure with nuts
and
lockwashers. Torque 25 to 35 lb. ft
[3,4-4,8
kg-m.].
I.
Install
a new cup plug
into
the axle shaft
flange
hole.
m.
Install
the brake
drum,
and
rear
wheel as
sembly. 292
Page 293 of 376
'Jeep*
UNIVERSAL
SERIES
SERVICE
MANUAL
N
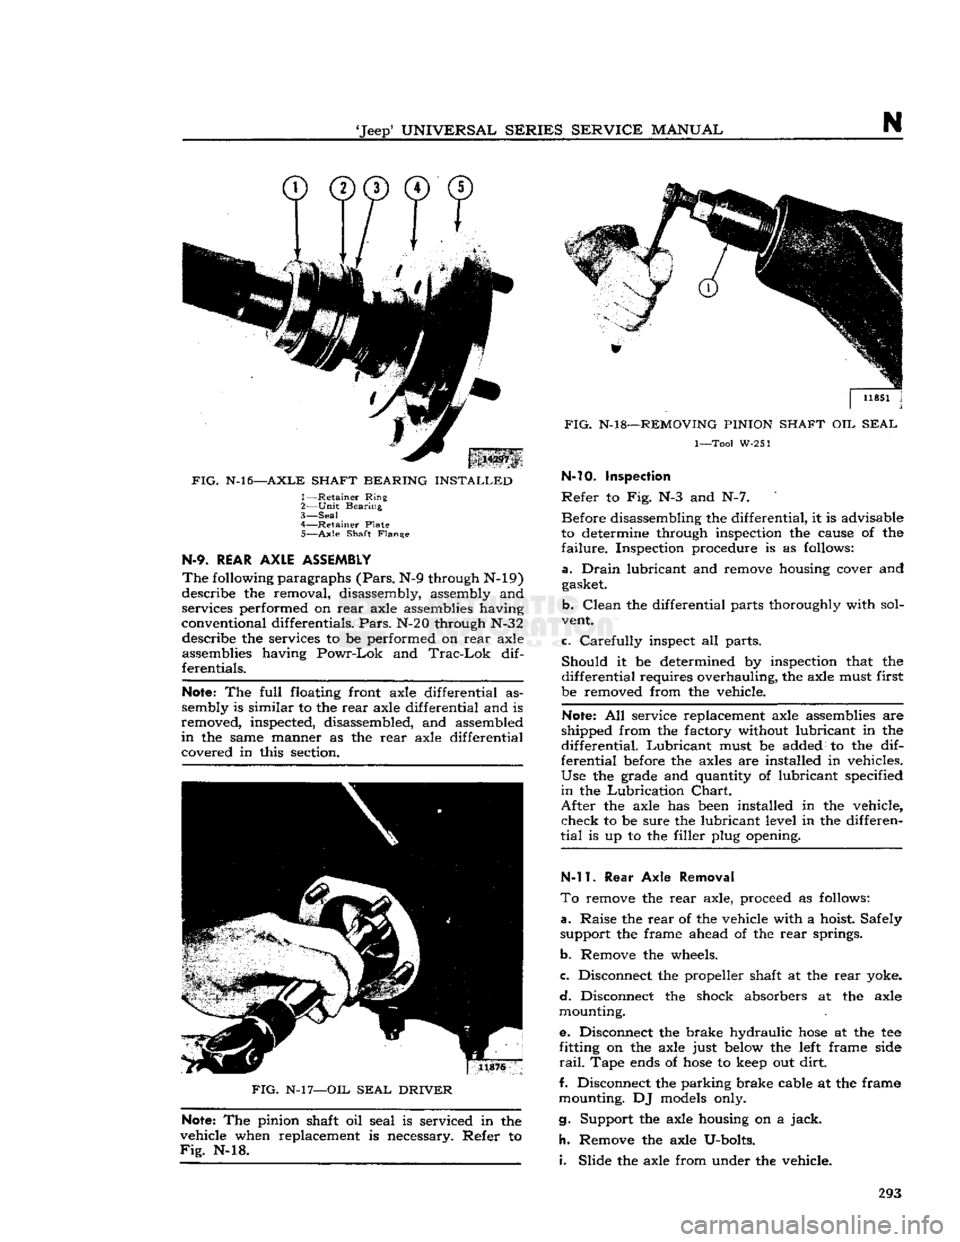
FIG.
N-l6—AXLE
SHAFT
BEARING
INSTALLED
1—
Retainer
Ring
2—
Unit
Bearing
3—
Seal
4—
Retainer
Plate
5—
Axle
Shaft
Flange
N-9.
REAR
AXLE
ASSEMBLY
The
following
paragraphs
(Pars.
N-9 through N-19)
describe the removal, disassembly, assembly and
services performed on
rear
axle assemblies having
conventional differentials.
Pars.
N-20 through N-32 describe the services to be performed on
rear
axle
assemblies having
Powr-Lok
and
Trac-Lok
dif
ferentials.
Note:
The
full
floating front axle differential as
sembly is similar to the
rear
axle differential and is
removed, inspected, disassembled, and assembled
in
the same manner as the
rear
axle differential
covered in this section.
FIG.
N-l
7—OIL
SEAL
DRIVER
Note:
The pinion shaft oil seal is serviced in the
vehicle when replacement is necessary. Refer to
Fig.
N-l8.
11851
j
J
FIG.
N-l8—REMOVING
PINION
SHAFT
OIL
SEAL
1—Tool
W-251 N-10. Inspection
Refer
to Fig. N-3 and N-7. Before disassembling the differential, it is advisable
to determine through inspection the cause of the
failure.
Inspection procedure is as follows:
a.
Drain
lubricant and remove housing cover and gasket.
b.
Clean
the differential parts thoroughly with sol
vent.
c.
Carefully
inspect all parts.
Should
it be determined by inspection that the
differential
requires overhauling, the axle must first
be removed from the vehicle.
Note:
All service replacement axle assemblies are
shipped from the factory without lubricant in the
differential.
Lubricant
must be added to the dif
ferential
before
the axles are installed in vehicles.
Use
the grade and quantity of lubricant specified
in
the
Lubrication
Chart.
After
the axle has
been
installed in the vehicle,
check
to be sure the lubricant level in the differen
tial
is up to the filler plug opening.
N-l
1.
Rear
Axle Removal
To
remove the
rear
axle, proceed as follows:
a.
Raise the
rear
of the vehicle with a hoist. Safely
support the frame ahead of the
rear
springs.
b.
Remove the wheels.
c.
Disconnect the propeller shaft at the
rear
yoke.
d.
Disconnect the shock absorbers at the axle
mounting.
e. Disconnect the brake hydraulic
hose
at the tee
fitting on the axle just
below
the
left
frame side
rail.
Tape
ends
of
hose
to
keep
out
dirt.
f. Disconnect the parking brake cable at the frame
mounting. DJ
models
only.
g. Support the axle housing on a
jack.
h.
Remove the axle U-bolts.
i.
Slide the axle from under the vehicle. 293
Page 301 of 376
'Jeep'
UNIVERSAL
SERIES SERVICE
MANUAL
N
13189
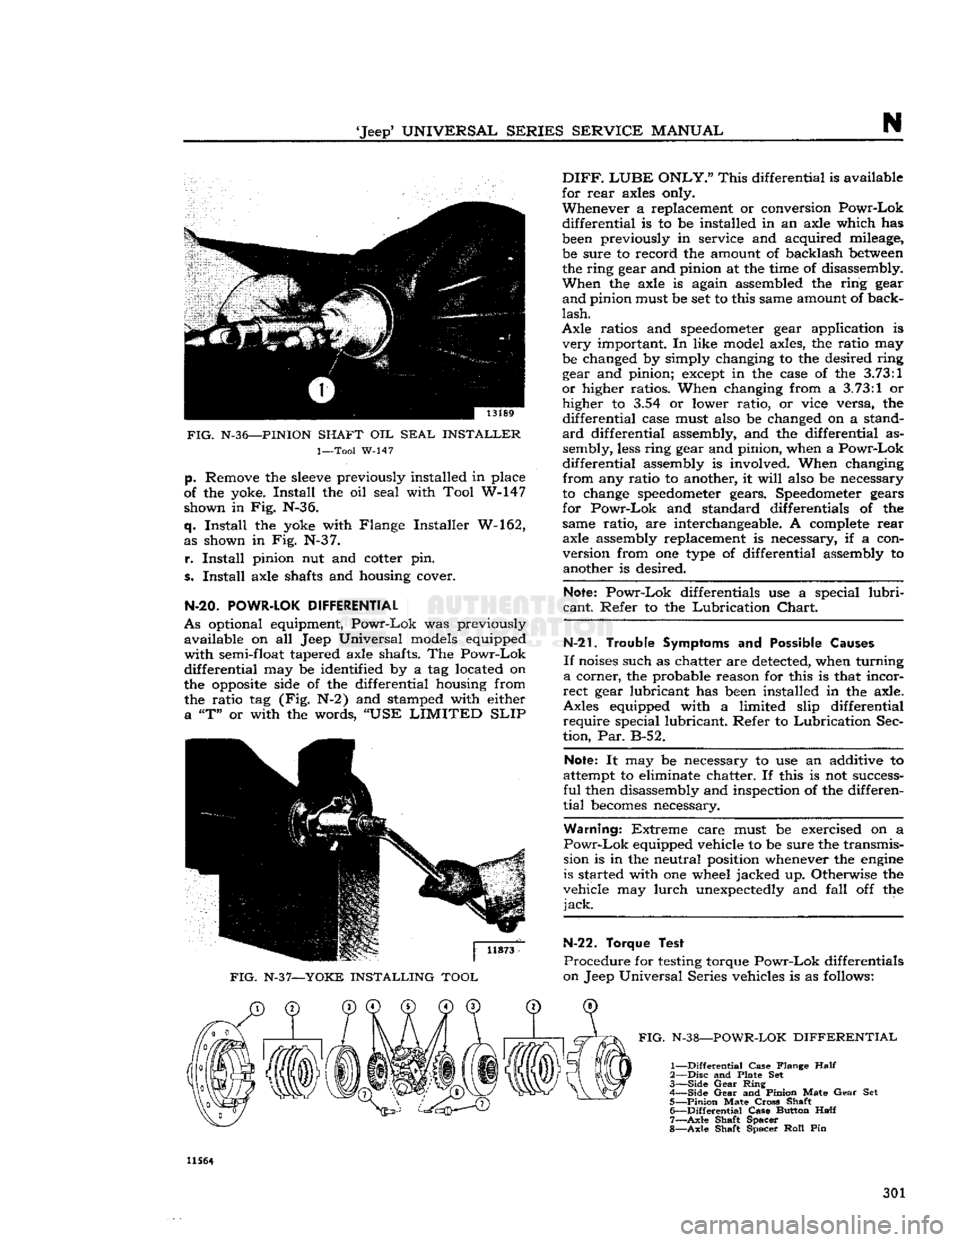
FIG.
N-36—PINION
SHAFT OIL
SEAL
INSTALLER
1—Tool
W-147
p.
Remove
the
sleeve
previously installed in
place
of
the yoke. Install the oil
seal
with
Tool
W-147 shown in Fig. N-36.
q. Install the yoke
with
Flange
Installer W-162,
as shown in Fig. N-3 7.
r.
Install pinion nut and cotter pin.
s. Install axle
shafts
and housing cover.
N-20.
POWR-LOK
DIFFERENTIAL
As
optional equipment, Powr-Lok was previously available on all
Jeep
Universal
models
equipped
with
semi-float
tapered
axle
shafts.
The Powr-Lok
differential
may be identified by a tag located on
the opposite
side
of the differential housing
from
the ratio tag (Fig. N-2) and
stamped
with
either a "T" or
with
the words, "USE
LIMITED
SLIP
FIG.
N-37—YOKE INSTALLING TOOL
DIFF.
LUBE
ONLY."
This differential is available
for
rear
axles
only.
Whenever a
replacement
or conversion Powr-Lok
differential
is to be installed in an axle which has
been
previously in
service
and acquired mileage, be
sure
to record the amount of backlash
between
the ring
gear
and pinion at the time of
disassembly.
When the axle is again
assembled
the ring
gear
and pinion must be set to this
same
amount of
back
lash.
Axle
ratios and
speedometer
gear
application is very important. In
like
model
axles,
the ratio may
be
changed
by simply changing to the desired ring
gear
and pinion;
except
in the
case
of the
3.73:1
or higher ratios. When changing
from
a
3.73:1
or higher to 3.54 or lower ratio, or vice
versa,
the
differential
case
must
also
be
changed
on a
stand
ard differential
assembly,
and the differential as sembly,
less
ring
gear
and pinion, when a Powr-Lok
differential
assembly
is involved. When changing
from
any ratio to
another,
it
will
also
be
necessary
to
change
speedometer
gears.
Speedometer
gears
for
Powr-Lok and
standard
differentials of the
same
ratio, are
interchangeable.
A complete
rear
axle
assembly
replacement
is
necessary,
if a con
version
from
one type of differential
assembly
to
another
is desired.
Note: Powr-Lok differentials use a special
lubri
cant.
Refer to the Lubrication Chart.
N-21.
Trouble Symptoms and
Possible
Causes
If
noises
such
as
chatter
are
detected,
when turning
a corner, the probable
reason
for this is that incor
rect
gear
lubricant has
been
installed in the axle.
Axles
equipped
with
a
limited
slip differential require special lubricant. Refer to Lubrication
Sec
tion,
Par. B-52.
Note: It may be
necessary
to use an additive to
attempt to eliminate
chatter.
If this is not
success
ful
then
disassembly
and inspection of the differen
tial
becomes
necessary.
Warning:
Extreme
care
must be exercised on a
Powr-Lok
equipped vehicle to be
sure
the transmis
sion is in the neutral position
whenever
the
engine
is
started
with
one wheel jacked up. Otherwise the
vehicle may lurch unexpectedly and
fall
off the
jack.
N-22. Torque Test
Procedure
for testing torque Powr-Lok differentials
on
Jeep
Universal
Series
vehicles is as follows:
FIG.
N-38—POWR-LOK DIFFERENTIAL
1—
Differential
Case Flange
Half
2—
Disc
and Plate Set
3—
Side
Gear
Ring
4— Side
Gear
and Pinion Mate
Gear
Set
5—
Pinion
Mate
Cross
Shaft 6—
Differential
Case Button
Half
7—
Axle
Shaft Spacer
8—
Axle
Shaft Spacer
Roll
Pin 11564
301
Page 302 of 376
N
REAR
AXLE a.
Place the transmission in neutral.
b.
Raise one wheel off the floor and place a block
in
front and at the
rear
of the
opposite
wheel.
c.
Apply a torque wrench to the axle shaft nut of
the elevated wheel.
d.
Turn
wheel with torque wrench. Disregard
breakaway
torque and observe torque required to
continuously
turn
wheel smoothly. Torque should
read
40 lb-ft [5,53 kg-m.] or more.
N-23. Powr-Lok
Differential Disassembly
/
and Reassembly
Refer
to
Figs.
N-38 and N-39.
The
procedure for overhauling disc type
Powr-Lok
differentials is as follows:
a.
Remove axle shafts following procedure de
scribed
in Par. N-2.
b.
Remove housing cover and gasket.
c.
Remove the
Powr-Lok
differential from the axle.
Do not remove the ring gear or bearing
cone
and
rollers
unless replacement is to be made.
Mark
the hearing cups so they may later be reassembled
with
the same bearing cones.
Mark
the differential
case halves for correct alignment at reassembly.
Each
pinion mate cross shaft should also be marked
so that each pin cam surface
will
match with the
same
V-ramp
in the case when reassembled.
d.
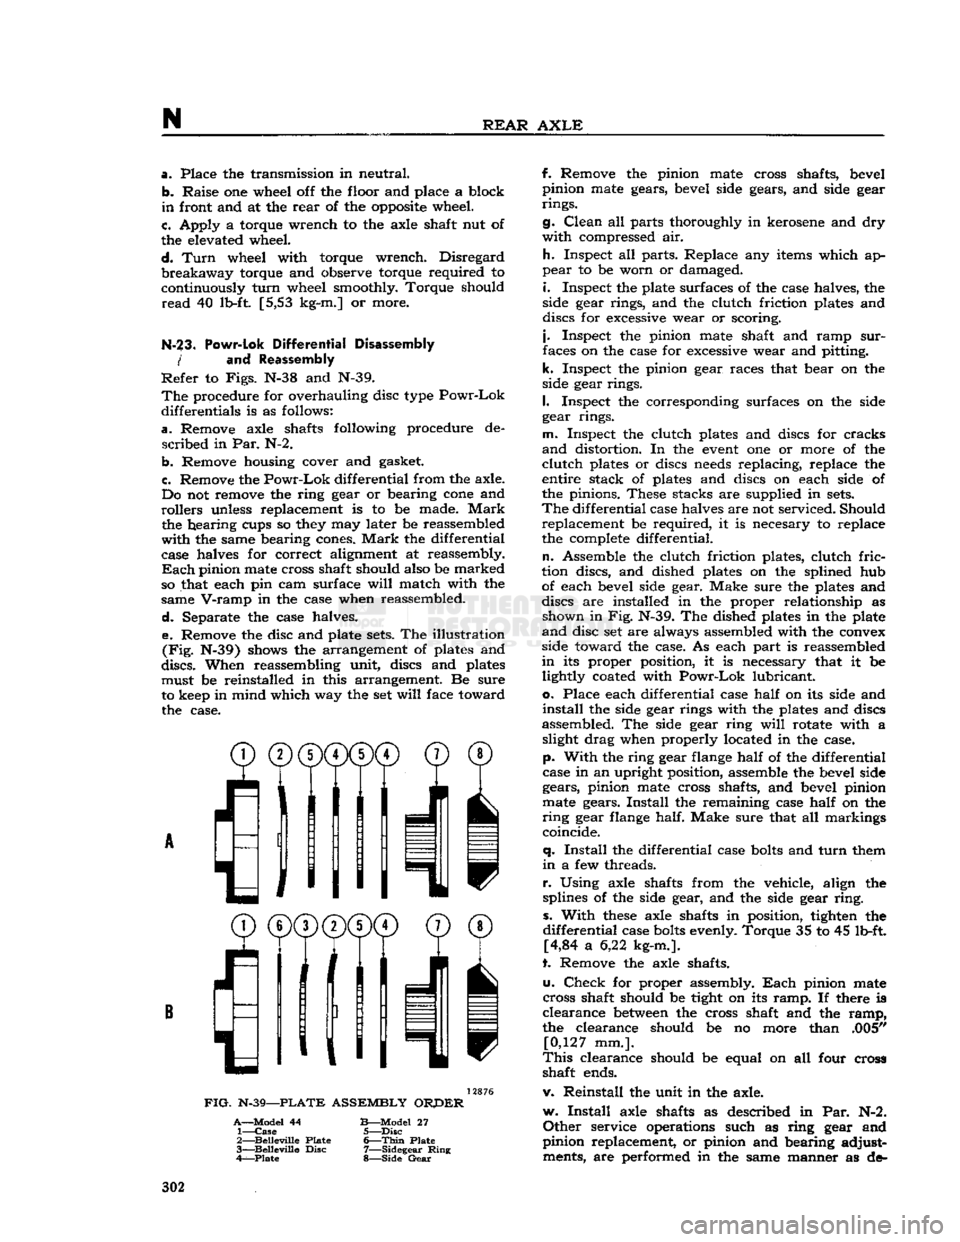
Separate the case halves. e. Remove the disc and plate
sets.
The illustration
(Fig.
N-39) shows the arrangement of plates and
discs.
When reassembling unit, discs and plates must be reinstalled in this arrangement. Be sure
to keep in mind which way the set
will
face toward the case.
^®(j)(j)CD©
® /'Ml
I
11
11 v
FIG.
N-39—PLATE
ASSEMBLY
ORPER
A—Model
44
B—Model
27 1—
Case
5—Disc
2—
Belleville
Plate
6—Thin
Plate
3—
Belleville
Disc
7—Sidegear
Ring
4—Plate
8—Side
Gear
f. Remove the pinion mate cross shafts, bevel
pinion mate gears, bevel side gears, and side gear
rings.
g.
Clean
all parts thoroughly in kerosene and dry
with
compressed air.
h.
Inspect all parts. Replace any items which ap
pear
to be worn or damaged.
i.
Inspect the plate surfaces of the case halves, the
side gear rings, and the clutch friction plates and
discs for excessive wear or scoring.
j.
Inspect the pinion mate shaft and ramp
sur
faces on the case for excessive wear and pitting,
k.
Inspect the pinion gear races that bear on the
side gear rings.
I.
Inspect the corresponding surfaces on the side
gear rings.
m.
Inspect the clutch plates and discs for cracks
and
distortion. In the
event
one or more of the
clutch
plates or discs
needs
replacing, replace the
entire stack of plates and discs on each side of
the pinions. These stacks are supplied in
sets.
The
differential case halves are not serviced. Should replacement be required, it is necesary to replace
the complete differential.
n.
Assemble the clutch friction plates, clutch
fric
tion discs, and dished plates on the splined hub of each bevel side gear. Make sure the plates and
discs are installed in the proper relationship as shown in Fig. N-39. The dished plates in the plate
and
disc set are always assembled with the convex
side toward the case. As each part is reassembled
in
its proper position, it is necessary that it be lightly coated with
Powr-Lok
lubricant,
o.
Place each differential case
half
on its side and
install
the side gear rings with the plates and discs
assembled. The side gear ring
will
rotate with a slight drag when properly located in the case,
p.
With
the ring gear flange
half
of the differential
case in an upright position, assemble the bevel side gears, pinion mate cross shafts, and bevel pinion
mate gears.
Install
the remaining case
half
on the
ring
gear flange half. Make sure that all markings
coincide.
q.
Install
the differential case
bolts
and
turn
them
in
a few threads.
r.
Using axle shafts from the vehicle, align the
splines of the side gear, and the side gear
ring,
s.
With
these
axle shafts in position, tighten the
differential
case
bolts
evenly. Torque 35 to 45 lb-ft. [4,84 a 6,22 kg-m.].
t. Remove the axle shafts.
u.
Check
for proper assembly.
Each
pinion mate
cross shaft should be tight on its
ramp.
If there is
clearance
between
the cross shaft and the
ramp,
the clearance should be no more than .005" [0,127 mm.].
This
clearance should be equal on all four cross
shaft ends.
v. Reinstall the unit in the axle.
w.
Install
axle shafts as described in Par. N-2.
Other
service operations such as ring gear and
pinion replacement, or pinion and bearing adjust ments, are performed in the same manner as de- 302
Page 303 of 376
'Jeep*
UNIVERSAL
SERIES SERVICE
MANUAL
N
scribed
in
Pars.
N-ll through N-l9 for standard
axles, with the exception of the following torque
recommendations. Torque the differential case
bearing
cap screws 70 to 90 lb-ft. [9,7 a 12,4 kg-m.]
and
the cover screws 15 to 25 lb-ft. [2,1 a 3,4
kg-m.].
The ring gear screws on axles with Powr-
Lok
differentials should be torqued as follows:
Model
30 and 44 axles 35 to 55 lb-ft. [4,84 a 7,60 kg-m.].
N-24. TRAC-LOK DIFFERENTIAL
As
optional equipment
Trac-Lok
Model 44 differen
tial
is available on all Jeep Universal vehicles equipped with semi-float flanged axle shafts.
A
conventional differential transmits all of the
ring
gear torque through the differential gears to the axle shafts. Torque is at all
times
equal on the axle shafts, and if one wheel slips, the other wheel
can
only put out as much torque as the slipping
wheel.
The
Trac-Lok
differential is similar,
except
that
part
of the torque from the ring gear is trans mitted through clutch packs
between
the side gears
and
differential case. The multiple disc clutches
with
radial
grooves
on the plates and concentric
grooves
on the discs are
engaged
by a preload
from
Belleville springs, plus separating forces from
the side gears as torque is applied through the
ring
gear.
The
Trac-Lok
construction permits differential action when required for turning corners and transmits equal torque to both
wheels
when driving
straight
ahead. However, when one wheel tries to spin due to leaving the ground, a patch of ice,
etc., the clutch packs automatically provide more
torque to the wheel which is not trying to spin.
It
can be
seen
then that the
Trac-Lok
differential
resists wheel spin on bumpy roads and provides
more pulling power when one wheel tries to slip.
In
many cases of differences in traction, pulling
power
will
be automatically provided until both
wheels
start to slip.
In
diagnosis of vehicle operators' complaints, it
is important to recognize two things:
a.
If, with unequal traction, both
wheels
slip, the
Trac-Lok
has
done
all it can possibly do.
b.
In extreme cases of differences in traction, the
wheel with least traction may spin after the
Trac-
Lok
has transferred as much torque as possible
to the non-slipping wheel.
N-25.
Lubrication
The
Trac-Lok
differential requires a special
lubri
cant
and ordinary multipurpose gear lubricants
MUST
NOT be used. Use only 'Jeep* Differential
Oil,
Part
No. 94557.
Trac-Lok
differential may be cleaned only by disassembling the unit and wiping with clean rags. Do not flush the
Trac-Lok
unit.
Note:
The
Trac-Lok
differential is serviced at the
same time intervals as the standard differential.
N-26.
Trouble
Symptoms
If
noises
or roughness, such as chatter, are present
in
turning corners, the probable cause is incorrect
or
contaminated lubricant.
Before any differential is removed and disassem
bled for chatter complaints, the correctness of
lubri
cant
can and should be determined.
A
complete
lubricant
drain,
and
refill
with specified
Limited
Slip Differential lubricant
will
usually
correct
chatter.
The
following procedure is recommended to ensure
complete
removal of old lubricant.
a.
Warm
the lubricant by vehicle road operation,
or
5 minutes of operation in gear at 30 mph with
both
wheels
off the ground on a hoist.
Caution:
Never place the transmission in gear with
the
engine
running when only one wheel of a
Limited
Slip Differential equipped vehicle is raised.
The
vehicle might drive itself off the
jack
and produce damage or
injury.
b.
Drain
lubricant while
warm.
Remove
drain
plug
or
cover to
drain
completely. If cover is removed,
it
may be necessary to replace gasket at this time.
c.
Refill
axle with specified
Limited
Slip Differen
tial
lubricant.
d.
Operate the vehicle for approximately ten miles
[16,09
km.], making at least ten figure 8 turns
to flush the old lubricant out of the clutch packs.
e.
Repeat
steps
b, c, and d, making sure to replace
the cover gasket if required in
step
c.
f. It is possible that slight chatter, requiring ad
ditional
vehicle operation, may remain after
step
e. If chatter persists after 100 miles
[160,9
km.]
of vehicle operation, or remains severe after
step
e above, disassembly and repair
will
be necessary.
N-27.
Unit
Inoperative
Proper
performance and capabilities of
Limited
Slip
Differentials are
often
misunderstood. No
precise
methods
of measuring
Limited
Slip Dif
ferential
performance are generally available in the field. A functioning unit can be determined by
relatively
simple vehicle operational
tests,
as
follows:
a.
Place one wheel on
good
dry pavement, and the
other on ice, mud, grease, etc.
b.
Gradually
increase
engine
rpm to obtain maxi
mum
traction
prior
to "break-a-way." The ability
to
move
the vehicle
effectively
will
demonstrate
proper
performance.
c.
If extremely slick surfaces, such as ice or grease,
are
used
some
question may exist as to proper per
formance at
step
b. In
these
extreme cases a prop
erly
performing
Limited
Slip Differential
will
pro
vide greater "pulling" power by lightly applying
the parking brake.
N-23.
Trac-Lok
Differential Disassembly
and
Reassembly
It
is recommended that the
complete
axle assembly
be removed from the vehicle, when it
becomes
necessary to remove the
Trac-Lok
from the hous
ing.
Refer to Par. N-3 and N-12 for removal of axle shafts and differential case from axle housing. 303