wheel JEEP CJ 1953 Workshop Manual
[x] Cancel search | Manufacturer: JEEP, Model Year: 1953, Model line: CJ, Model: JEEP CJ 1953Pages: 376, PDF Size: 19.96 MB
Page 237 of 376
'Jeep'
UNIVERSAL
SERIES
SERVICE
MANUAL
I
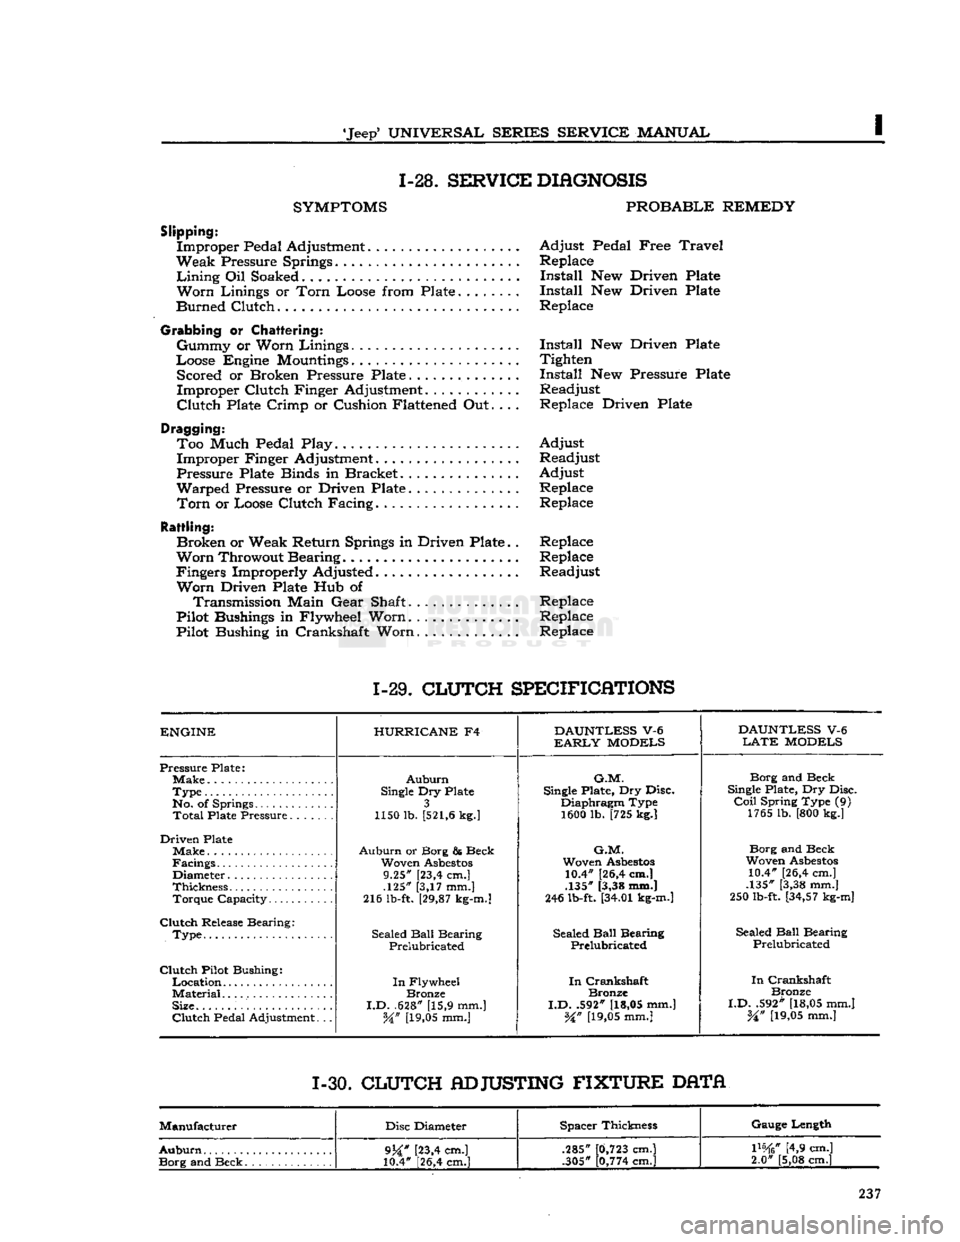
1-28.
SERVICE
DIAGNOSIS
SYMPTOMS
PROBABLE
REMEDY
Slipping:
Improper Pedal Adjustment Adjust Pedal Free
Travel
Weak Pressure Springs Replace
Lining
Oil Soaked Install New Driven Plate
Worn
Linings or
Torn
Loose from Plate Install New Driven Plate
Burned Clutch Replace
Grabbing
or
Chattering:
Gummy or Worn Linings Install New Driven Plate
Loose Engine
Mountings
Tighten Scored or Broken Pressure Plate Install New Pressure Plate
Improper Clutch Finger Adjustment............ Readjust
Clutch
Plate Crimp or Cushion Flattened Out.... Replace Driven Plate
Dragging: Too Much Pedal Play. Adjust Improper Finger Adjustment. Readjust
Pressure Plate Binds in Bracket Adjust
Warped Pressure or Driven Plate Replace
Torn
or Loose Clutch Facing. Replace
Rattling:
Broken or Weak Return Springs in Driven Plate.. Replace
Worn
Throwout Bearing Replace
Fingers Improperly Adjusted Readjust
Worn
Driven Plate Hub of Transmission Main Gear Shaft.............. Replace
Pilot Bushings in Flywheel Worn.
.............
Replace
Pilot Bushing in Crankshaft Worn Replace
1-29.
CLUTCH
SPECIFICATIONS
ENGINE
HURRICANE
F4
DAUNTLESS
V-6
DAUNTLESS
V-6
EARLY
MODELS
LATE
MODELS
Pressure Plate;
Auburn
G.M.
Borg and Beck
Type
Single
Dry Plate
Single
Plate, Dry Disc.
Single
Plate, Dry Disc.
No. of Springs 3 Diaphragm Type
Coil
Spring Type (9)
Total
Plate Pressure 1150 lb.
[521,6
kg.]
1600 lb. [725 kg.] 1765 lb. [800 kg.]
Driven Plate Make
Auburn
or Borg & Beck
G.M.
Borg and Beck
Facings Woven
Asbestos
Woven
Asbestos
Woven
Asbestos
Diameter 9.25" [23,4 cm.] 10.4" [26,4 cm.]
10.4" [26,4 cm.]
Thickness .125" [3,17 mm.] .135" [3,38 mm.]
.135" [3,38 mm.]
Torque Capacity 216 lb-ft.
[29,87
kg-m.]
246 lb-ft.
[34.01
kg-m.]
250 lb-ft.
[34,57
kg-m]
Clutch
Release Bearing: Sealed
Ball
Bearing
.
Type Sealed
Ball
Bearing Sealed
Ball
Bearing Sealed
Ball
Bearing
.
Type
Prelubricated Prelubricated
Prelubricated
Clutch
Pilot Bushing:
In
Crankshaft
In
Flywheel
In
Crankshaft
In
Crankshaft
Material
Bronze Bronze
Bronze
Size.
I.D.
.628" [15,9 mm.]
I.D.
.592"
[18,05
mm.]
I.D.
.592"
[18,05
mm.]
Clutch
Pedal Adjustment. .. W
[19,05
mm.]
%n
[19,05
mm.]
%n
[19,05
mm.]
1-30.
CLUTCH
ADJUSTING
FIXTURE
DATA
Manufacturer Disc Diameter Spacer Thickness Gauge Length
Auburn
9j£"
[23,4 cm.]
10.4" [26,4 cm.] .285"
.305"
0,723
cm.]
0,774
cm.]
mtf
[4,9 cm.]
2.0" [5,08 cm.]
9j£"
[23,4 cm.]
10.4" [26,4 cm.] .285"
.305"
0,723
cm.]
0,774
cm.]
mtf
[4,9 cm.]
2.0" [5,08 cm.]
Page 239 of 376
'Jeep'
UNIVERSAL
SERIES
SERVICE
MANUAL
J
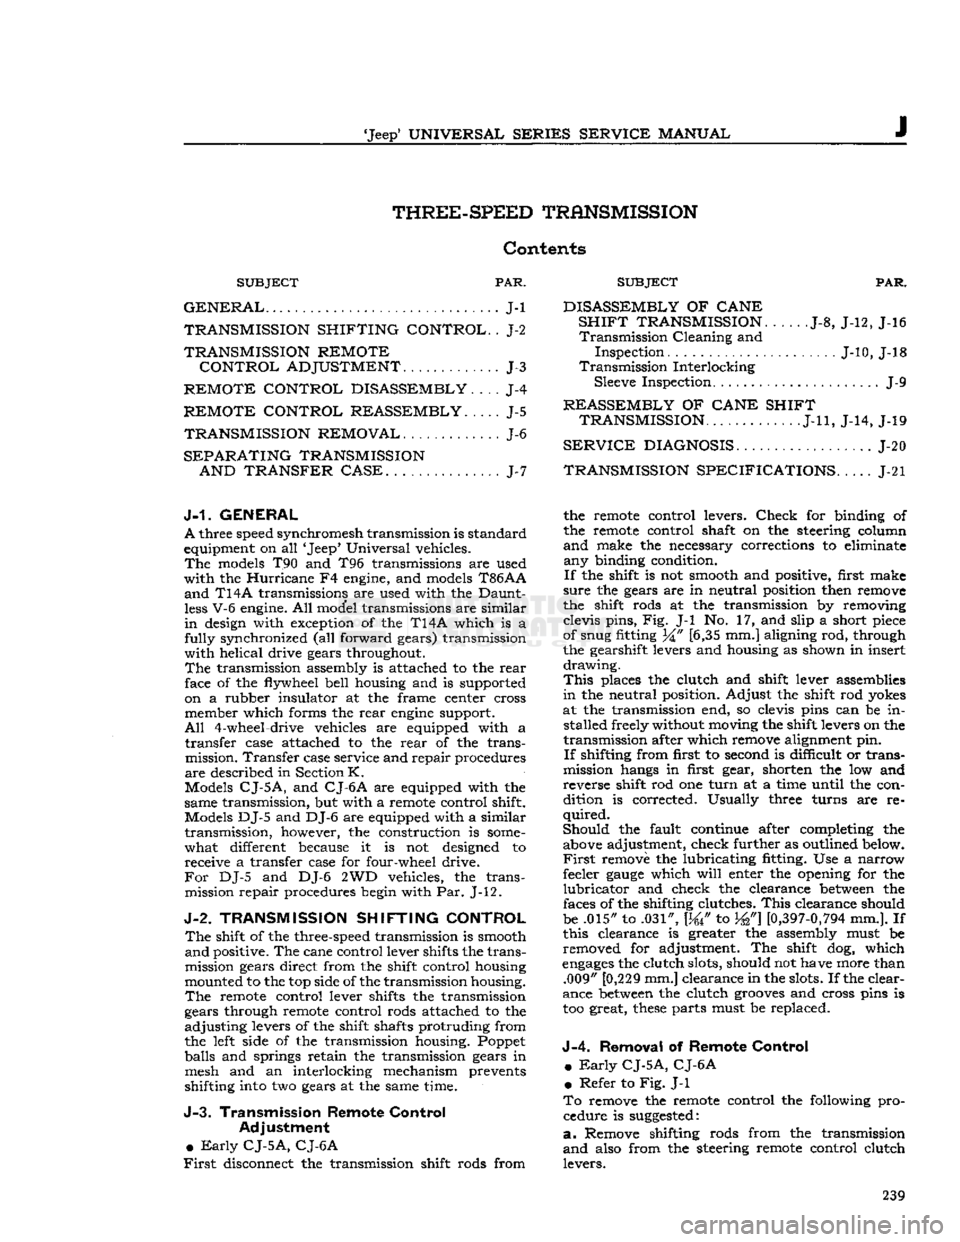
THREE-SPEED
TRANSMISSION
Contents
SUBJECT
PAR.
GENERAL
J-l
TRANSMISSION
SHIFTING
CONTROL.
. J-2
TRANSMISSION
REMOTE
CONTROL
ADJUSTMENT
J-3
REMOTE
CONTROL
DISASSEMBLY
J-4
REMOTE
CONTROL
REASSEMBLY.
. . . . J-5
TRANSMISSION
REMOVAL
J-6
SEPARATING
TRANSMISSION
AND
TRANSFER
CASE
J-7
SUBJECT
PAR.
DISASSEMBLY
OF
CANE
SHIFT
TRANSMISSION
J-8, J-12, J-16
Transmission
Cleaning and
Inspection J-10, J-18
Transmission
Interlocking Sleeve Inspection J-9
REASSEMBLY
OF
CANE
SHIFT
TRANSMISSION
J-ll,
J-14, J-19
SERVICE
DIAGNOSIS
J-20
TRANSMISSION
SPECIFICATIONS
J-21
J-1.
GENERAL
A
three speed synchromesh transmission is standard
equipment on all 'Jeep' Universal vehicles.
The
models T90 and T96 transmissions are used
with
the
Hurricane
F4 engine, and models
T86AA
and
T14A transmissions are used with the Daunt
less
V-6 engine. All model transmissions are similar
in
design with exception of the T14A which is a
fully
synchronized (all forward gears) transmission
with
helical drive gears throughout.
The
transmission assembly is attached to the
rear
face of the flywheel bell housing and is supported on a rubber insulator at the frame center cross member which forms the
rear
engine
support.
All
4-wheel-drive vehicles are equipped with a
transfer
case attached to the
rear
of the transmission.
Transfer
case service and repair procedures
are
described in Section
K.
Models
CJ-5A,
and
CJ-6A
are equipped with the
same transmission, but with a remote control shift.
Models DJ-5 and DJ-6 are equipped with a similar
transmission,
however, the construction is
some
what different because it is not designed to receive a transfer case for four-wheel drive.
For
DJ-5 and DJ-6 2WD vehicles, the trans mission repair procedures begin with Par. J-12.
J-2.
TRANSMISSION SHIFTING CONTROL
The
shift of the three-speed transmission is smooth
and
positive. The cane control lever shifts the trans
mission gears direct from the shift control housing
mounted to the top side of the transmission housing.
The
remote control lever shifts the transmission
gears through remote control rods attached to the
adjusting
levers of the shift shafts protruding from the left side of the transmission housing. Poppet
balls and springs retain the transmission gears in mesh and an interlocking mechanism prevents
shifting into two gears at the same time.
J-3.
Transmission Remote Control Adjustment
•
Early
CJ-5A,
CJ-6A
First
disconnect the transmission shift rods from the remote control levers.
Check
for binding of
the remote control shaft on the steering column
and
make the necessary corrections to eliminate any binding condition.
If
the shift is not smooth and positive, first make
sure
the gears are in neutral position then remove
the shift rods at the transmission by removing
clevis pins, Fig. J-l No. 17, and slip a short piece
of snug fitting 34" [6,35 mm.] aligning rod, through
the gearshift levers and housing as shown in insert
drawing.
This
places the clutch and shift lever assemblies
in
the neutral position. Adjust the shift rod yokes
at the transmission end, so clevis pins can be in stalled freely without moving the shift levers on the
transmission after which remove alignment pin.
If
shifting from first to second is difficult or trans
mission hangs in first gear, shorten the low and
reverse shift rod one
turn
at a time until the con
dition is corrected. Usually three turns are re
quired.
Should
the fault continue after completing the above adjustment, check further as outlined below.
First
remove the lubricating fitting. Use a narrow
feeler
gauge
which
will
enter the opening for the
lubricator
and check the clearance
between
the
faces of the shifting clutches.
This
clearance should
be .015" to .031", [W to W]
[0,397-0,794
mm.]. If
this clearance is greater the assembly must be removed for adjustment. The shift dog, which
engages
the clutch slots, should not have more than .009" [0,229 mm.] clearance in the slots. If the clear
ance
between
the clutch
grooves
and cross pins is
too great,
these
parts must be replaced.
J-4.
Removal
of
Remote Control
m
Early
CJ-5A,
CJ-6A
•
Refer to Fig. J-l
To
remove the remote control the following pro cedure is
suggested:
a.
Remove shifting rods from the transmission
and
also from the steering remote control clutch levers. 239
Page 240 of 376
THREE-SPEED
TRANSMISSION
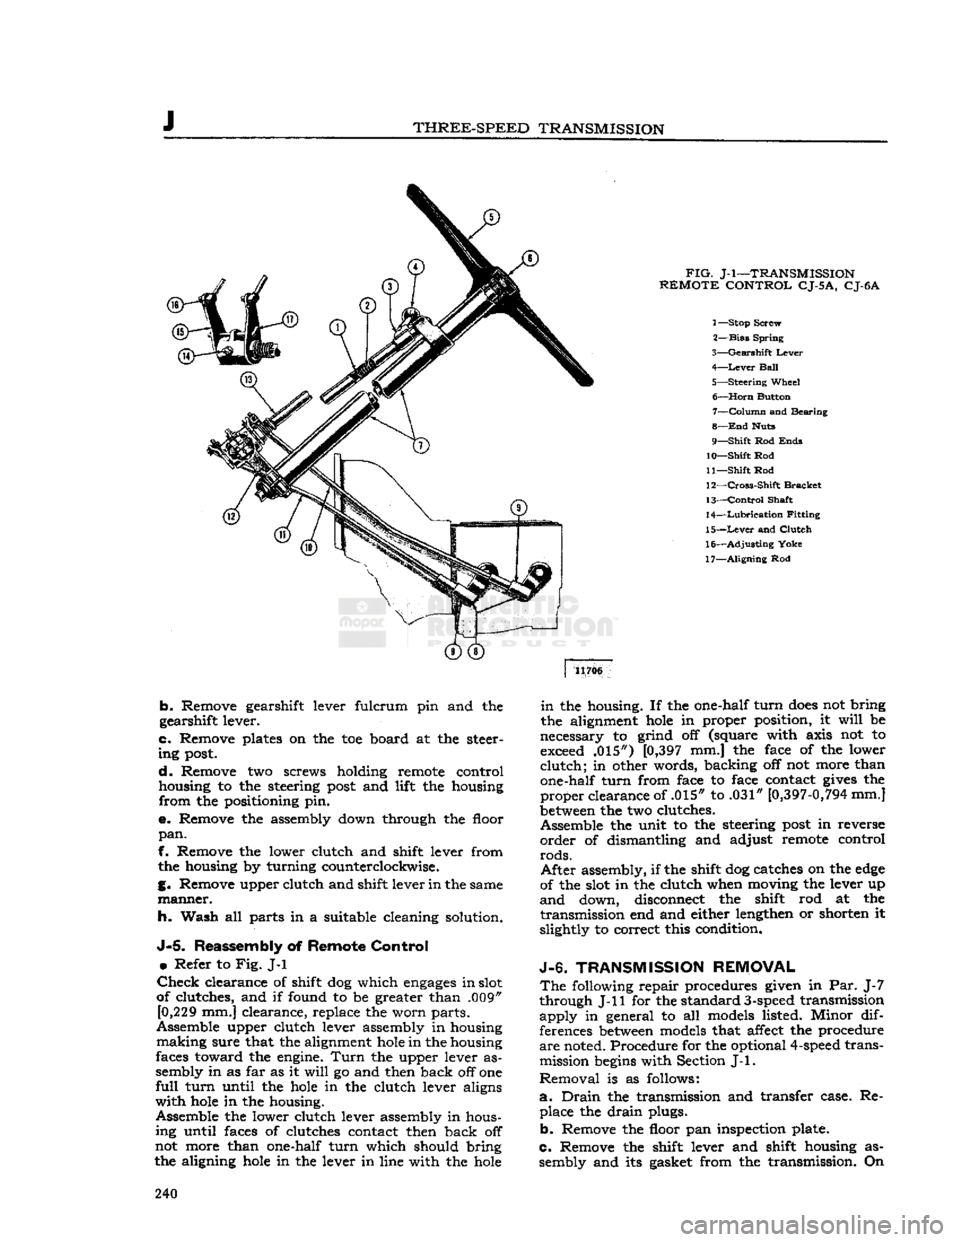
FIG.
J-l—TRANSMISSION
REMOTE
CONTROL
CJ-5
A,
CJ-6A
1— Stop Screw
2—
Bias
Spring
3—
Gearshift
Lever
4—
Lever
Ball
5—
Steering
Wheel 6—
Horn
Button 7—
Column
and Bearing
8—
End
Huts
9—
Shift
Rod
Ends
10—
Shift
Rod
11—
Shift
Rod
12—
Cross-Shift
Bracket
13—
Control
Shaft
14—
Lubrication
Fitting
15—
Lever
and
Clutch
16—
Adjusting
Yoke
17—
Aligning
Rod 11706
b.
Remove gearshift lever fulcrum pin and the
gearshift lever.
c.
Remove plates on the toe board at the steer
ing
post.
d.
Remove two screws holding remote control
housing to the steering
post
and lift the housing
from
the positioning pin.
e.
Remove the assembly down through the floor
pan.
f. Remove the lower clutch and shift lever from the housing by turning counterclockwise.
g. Remove upper clutch and shift lever in the same
manner.
h. Wash all parts in a suitable cleaning solution.
J-5.
Reassembly of
Remote
Control
•
Refer to
Fig.
J-l
Check
clearance of shift dog which
engages
in slot
of clutches, and if found to be greater than .009" [0,229 mm.] clearance, replace the worn parts.
Assemble upper clutch lever assembly in housing
making
sure that the alignment
hole
in the housing
faces toward the engine.
Turn
the upper lever as
sembly in as far as it
will
go and then back off one
full
turn
until the
hole
in the clutch lever aligns
with
hole
in the housing.
Assemble the lower clutch lever assembly in hous ing until faces of clutches contact then back off
not more than one-half
turn
which should bring
the aligning
hole
in the lever in line with the
hole
in
the housing. If the one-half
turn
does
not bring
the alignment
hole
in proper position, it
will
be
necessary to grind off (square with axis not to exceed .015") [0,397 mm.] the face of the lower
clutch;
in other words, backing off not more than
one-half
turn
from face to face contact
gives
the
proper
clearance of .015" to .031"
[0,397-0,794
mm.]
between
the two clutches.
Assemble the unit to the steering
post
in reverse
order
of dismantling and adjust remote control
rods.
After
assembly, if the shift dog catches on the
edge
of the slot in the clutch when moving the lever up
and
down, disconnect the shift rod at the
transmission
end and either lengthen or shorten it
slightly to correct this condition.
J-6.
TRANSMISSION
REMOVAL
The
following repair procedures given in Par. J-7
through J-ll for the standard
3-speed
transmission
apply
in general to all models listed. Minor dif
ferences
between
models that affect the procedure
are
noted. Procedure for the optional
4-speed
transmission
begins
with Section
J-l.
Removal
is as follows:
a.
Drain
the transmission and transfer case. Re place the
drain
plugs.
b.
Remove the floor pan inspection plate.
c.
Remove the shift lever and shift housing as sembly and its gasket from the transmission. On 240
Page 241 of 376
'Jeep'
UNIVERSAL
SERIES
SERVICE
MANUAL
J
10489
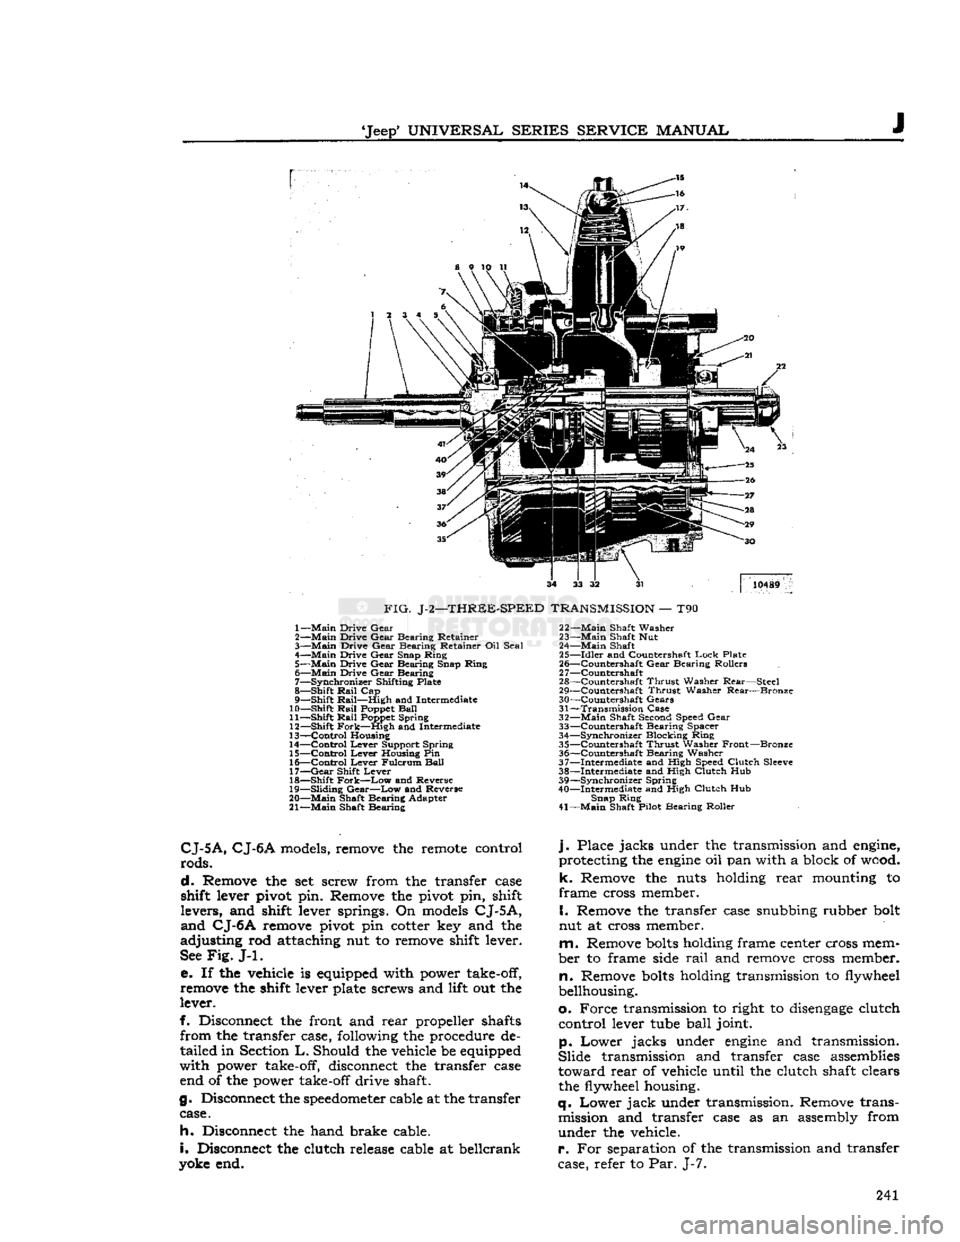
FIG.
J-2—THREE-SPEED
TRANSMISSION
— T90 1—
Main
Drive
Gear
2—
Main
Drive
Gear
Bearing
Retainer
3—
Main
Drive
Gear
Bearing
Retainer Oil
Seal
4—
Main
Drive
Gear
Snap
Ring
5—
Main
Drive
Gear
Bearing
Snap
Ring
6—
Main
Drive
Gear
Bearing
7—
Synchronizer
Shifting Plate
8—
Shift
Rail
Cap
9—
Shift
Rail—High
and Intermediate
10—
Shift
Rail
Poppet
Ball
11—
Shift
Rail
Poppet
Spring
12—
Shift
Fork—High
and Intermediate
13—
Control
Housing
14—
Control
Lever
Support
Spring
15—
Control
Lever
Housing Pin
16—
Control
Lever
Fulcrum
Ball
17—
Gear
Shift
Lever
18—
Shift
Fork—Low
and Reverse
19—
Sliding
Gear—Low
and Reverse
20—
Main
Shaft
Bearing
Adapter
21—
Main
Shaft
Bearing
22—
Main
Shaft
Washer
23—
Main
Shaft Nut
24—
Main
Shaft
25—
Idler
and Countershaft
Lock
Plate
26—
^Countershaft
Gear
Bearing
Rollers
2
7—Countershaft
28—
Countershaft
Thrust
Washer
Rear—Steel
29—
Countershaft
Thrust
Washer
Rear—Bronze
30—
Countershaft
Gears
31—
Transmission
Case
32—
Main
Shaft Second Speed
Gear
33—
Countershaft
Bearing
Spacer
34—
Synchronizer
Blocking
Ring
35—
Countershaft
Thrust
Washer
Front—Bronze
36—
Countershaft
Bearing
Washer
37—
Intermediate
and High Speed
Clutch
Sleeve
38—
Intermediate
and High
Clutch
Hub
39—
Synchronizer
Spring
40—
Intermediate
and High
Clutch
Hub
Snap
Ring
41—
Main
Shaft Pilot
Bearing
Roller
CJ-5A,
CJ-6A
models, remove the remote control
rods.
d.
Remove the set screw from the transfer case
shift lever pivot pin. Remove the pivot pin, shift
levers,
and shift lever springs. On models
CJ-5A,
and
CJ-6A
remove pivot pin cotter key and the
adjusting
rod attaching nut to remove shift lever.
See
Fig.
J-l.
e. If the vehicle is equipped with power take-off,
remove the shift lever plate screws and lift out the
lever.
f. Disconnect the front and
rear
propeller shafts
from
the transfer case, following the procedure de
tailed
in Section
L.
Should the vehicle be equipped
with
power take-off, disconnect the transfer case end of the power take-off drive shaft.
g. Disconnect the
speedometer
cable at the transfer case.
h.
Disconnect the hand brake cable.
i.
Disconnect the clutch release cable at beilcrank
yoke end.
j.
Place
jacks
under the transmission and engine,
protecting the
engine
oil pan with a block of wood,
k.
Remove the nuts holding
rear
mounting to
frame
cross member.
I.
Remove the transfer case snubbing rubber bolt
nut at cross member.
m.
Remove
bolts
holding frame center cross mem
ber
to frame side
rail
and remove cross member,
n.
Remove
bolts
holding transmission to flywheel
bellhousing.
o.
Force
transmission to right to
disengage
clutch
control
lever tube
ball
joint.
p.
Lower
jacks
under
engine
and transmission.
Slide
transmission and transfer case assemblies
toward
rear
of vehicle until the clutch shaft clears the flywheel housing.
q.
Lower
jack
under transmission. Remove trans mission and transfer case as an assembly from
under
the vehicle.
r.
For separation of the transmission and transfer
case, refer to Par. J-7. 241
Page 265 of 376
'Jeep'
UNIVERSAL SERIES SERVICE
MANUAL
Jl
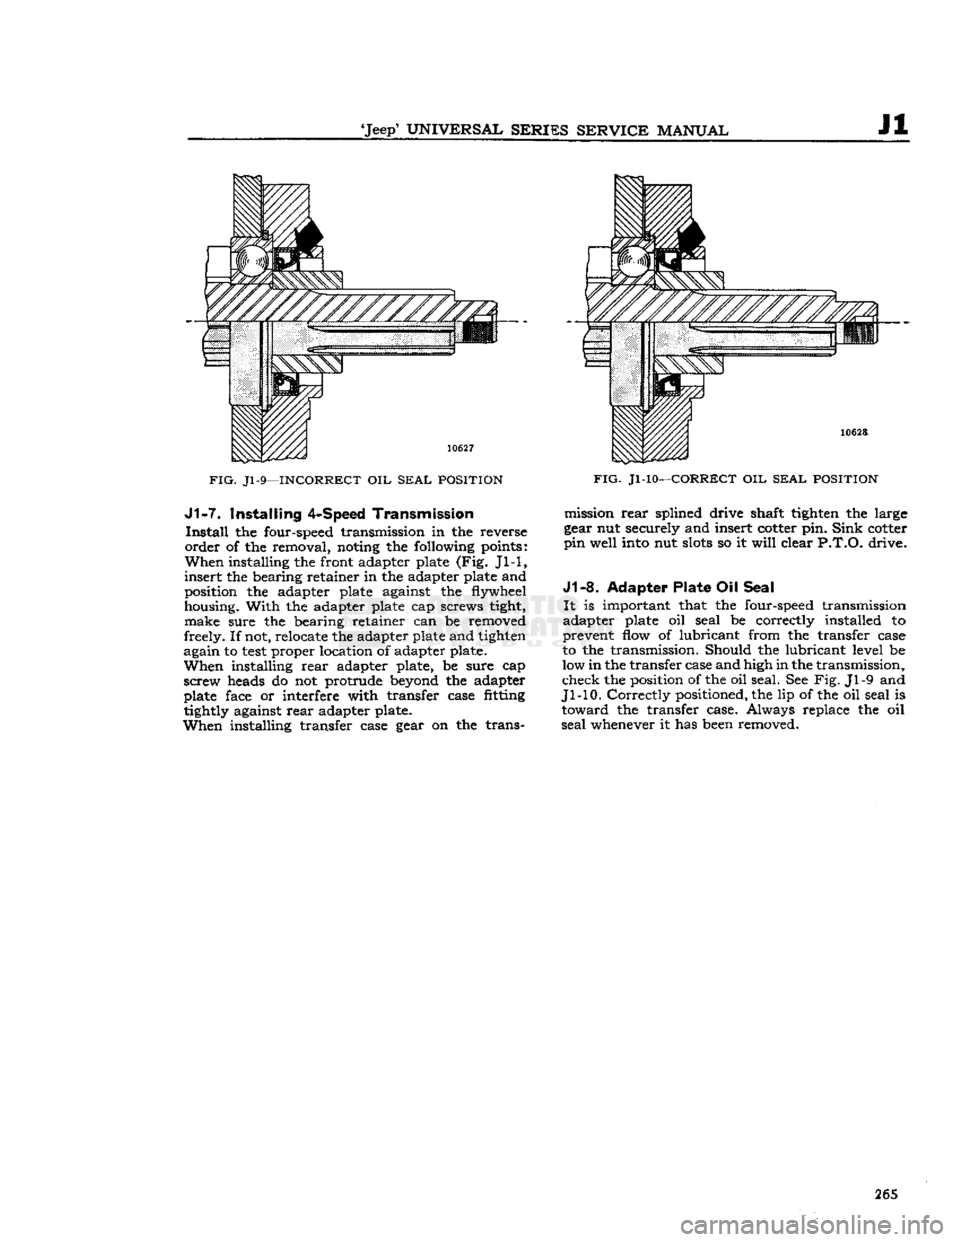
FIG.
Jl-9—INCORRECT
OIL
SEAL POSITION J1-7.
Installing
4-Speed
Transmission
Install
the four-speed transmission in the reverse
order
of the removal, noting the following points:
When
installing the front adapter plate (Fig. Jl-1,
insert
the bearing retainer in the adapter plate and
position the adapter plate against the flywheel
housing.
With
the adapter plate cap screws tight, make sure the bearing retainer can be removed
freely. If not, relocate the adapter plate and tighten
again to
test
proper location of adapter plate.
When
installing
rear
adapter plate, be sure cap
screw heads do not protrude beyond the adapter
plate face or interfere with transfer case fitting
tightly against
rear
adapter plate.
When
installing transfer case gear on the trans-
FIG.
Jl-10—CORRECT
OIL
SEAL POSITION
mission
rear
splined drive shaft tighten the large
gear nut securely and insert cotter pin.
Sink
cotter
pin
well into nut
slots
so it
will
clear
P.T.O.
drive.
J1-8.
Adapter Plate
Oil
Seal
It
is important that the four-speed transmission
adapter plate oil seal be correctly installed to
prevent flow of lubricant from the transfer case
to the transmission. Should the lubricant level be
low in the transfer case and high in the transmission,
check the position of the oil seal. See Fig. Jl-9 and
Jl-10.
Correctly
positioned, the lip of the oil seal is
toward
the transfer case. Always replace the oil
seal
whenever it has been removed. 265
Page 267 of 376
'Jeep'
UNIVERSAL SERIES SERVICE
MANUAL
ft
TRANSFER CASE
Contents
SUBJECT
PAR.
GENERAL
. . .K-1
TRANSFER CASE REMOVAL
K-2
TRANSFER CASE DISASSEMBLY
K-3
Front
Bearing Cap K-4
Rear
Bearing Cap K-5
TRANSFER CASE REASSEMBLY.
. .K-6
TRANSFER CASE INSTALLATION
K-7
TRANSFER CASE LINKAGE
ADJUSTMENT
K-8
SERVICE
DIAGNOSIS
K-9
SPECIFICATIONS
.K-10
K-1. GENERAL
All
4-wheel-drive models are equipped with a
transfer
case to connect the power to the front
axle.
It is essentially a
two-speed
transmission
located at the
rear
of the standard transmission
and
provides a low and direct gear.
The
transfer case gears are controlled by the
driver
through
one shift lever.
Early
'Jeep'
Universal
Models with the F4-134
Hurricane
engine
are equipped with two transfer case shift control levers.
a.
On vehicles equipped with one transfer case
shift
lever, the transfer case shift lever has four
positions: 2WD
High,
4WD
High,
Neutral, and
4WD
low. The forward position of the lever 2WD
High
allows the
rear
wheels only to drive. The
first
rear
position (4WD High)
engages
the 4- wheel drive and provides high range 4-wheel drive.
The
second
rear
position (Neutral)
disengages
all power to the wheels and is used for stationary
power take-off operations. The last
rear
position
(4WD
Low) provides low range 4-wheel drive.
b.
On vehicles equipped with two transfer case
shift
levers, the transfer case front axle drive lever (left hand lever)
gives
a choice of 2-wheel or 4-
wheel drive. In the forward (out) position the
vehicle is in 2-wheel drive. Move the lever to the
rear
(in) position for 4-wheel drive operation.
The
4-wheel-drive
auxiliary-range
shift lever (right
hand
lever) has three positions; low, neutral, and
high.
The forward position (low)
gives
low-range
4-wheel drive. The center position (neutral) dis
engages
all power to the wheels and is used for
stationary
power take-off operations. A built-in in
terlock
prevents shifting into low range, 2-wheel
drive.
This
feature protects the
rear
axle from over
load.
K-2.
Removal of
Transfer
Case
The
transfer case may be removed from the vehicle
without removing the transmission. Where both
transmission
and transfer case are to be removed
together,
refer to Section J. To remove only the
transfer
case from the vehicle, proceed as follows:
a.
Drain
transmission
and transfer case and replace
drain
plugs.
b.
Disconnect the brake cable.
c.
Disconnect front and
rear
propeller shafts at
the transfer case. See "Propeller Shafts and
Uni
versal
Joints."
d.
Disconnect
speedometer
cable at transfer case. e. Disconnect the transfer case shift levers. On
vehicles equipped with two shift levers
loosen
set screw and remove pivot pin. Use a screw
driver
to pry shift lever springs away from shift levers.
Lift
levers from transfer case. On models equipped
with
a single shift lever remove pivot pin cotter
key,
and the adjusting rod attaching nut to remove
shift
lever. See Fig. K-4.
f. Remove cover plate on
rear
face of transfer case.
Remove
cotter key, nut and washer from trans
mission
main shaft.
g. If possible, at this point remove the transfer case main drive gear from the transmission main
shaft.
If not possible, see
step
j below.
h.
Remove transfer case torque reaction support
bracket
bolt and nut.
i.
Remove transmission to transfer case bolts.
j.
Remove transfer case. If the transfer case main
drive
gear has not been removed in
step
g above,
proceed as follows:
Brace
the end of the trans
mission
main shaft so that it cannot
move
in the
transmission,
pull
the transfer case to the
rear
to 267
Page 269 of 376
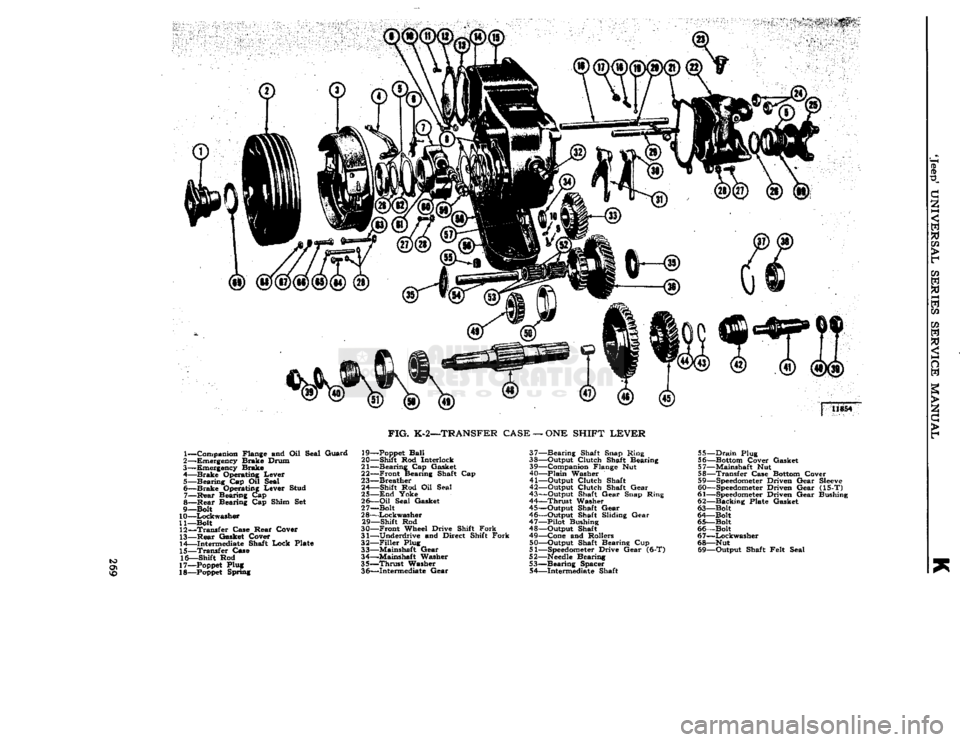
FIG.
K-2—TRANSFER CASE
— ONE
SHIFT
LEVER
1— Companion Flange and Oil Seal
Guard
2— Emergency Brake Drum
3— Emergency Brake 4—
Brake
Operating Lever
5—
Bearing
Cap Ofl Seal 6—
Brake
Operating Lever Stud 7—
Rear
Bearing Cap
8—
Rear
Bearing Cap Shim Set
9— Bolt
10—
Lockwasher
11— Bolt 12—
Transfer
Case Hear Cover
13—
Rear
Gasket Cover 14—
Intermediate
Shaft
Lock
Plate
15—
Transfer
Case
1G—Shift
Rod
17—
Poppet
Plug
18—
Poppet
Spring 19—
Poppet
Ball
20— Shift Rod Interlock
21—
Bearing
Cap Gasket
22—
Front
Bearing Shaft Cap
23—
Breather
24— Shift Rod Oil Seal
25—
End
Yoke
26—
Oil
Seal Gasket
27— Bolt
2 8—Lockwasher 29— Shift Rod
30—
Front
Wheel Drive Shift
Fork
31— Underdrive and Direct Shift
Fork
32—
Filler
Plug 33— Mainshaft
Gear
34— Mainshaft Washer 35—
Thrust
Washer
36—
Intermediate
Gear
37—
Bearing
Shaft Snap Ring
38— Output Clutch Shaft Bearing
39— Companion Flange Nut
40—
Plain
Washer
41— Output Clutch Shaft
42— Output Clutch Shaft
Gear
43— Output Shaft
Gear
Snap Ring
44—
Thrust
Washer
45— Output Shaft
Gear
46— Output Shaft Sliding
Gear
47—
Pilot
Bushing
48— Output Shaft
49— Cone and Rollers 50— Output Shaft Bearing Cup
51—
Speedometer
Drive
Gear
(6-T)
52—
Needle
Bearing 53—
Bearing
Spacer 54—
Intermediate
Shaft 55—
Drain
Plug
56—
Bottom
Cover Gasket
57— Mainshaft Nut
58—
Transfer
Case
Bottom
Cover
59—
Speedometer
Driven
Gear
Sleeve
60—
Speedometer
Driven
Gear
(15-T)
61—
Speedometer
Driven
Gear
Bushing
62—
Backing
Plate
Gasket
63— Bolt
64— Bolt
65— Bolt
66— Bolt
67—
Lockwasher
68— Nut 69— Output Shaft Felt Seal
Page 270 of 376
K
TRANSFER
CASE
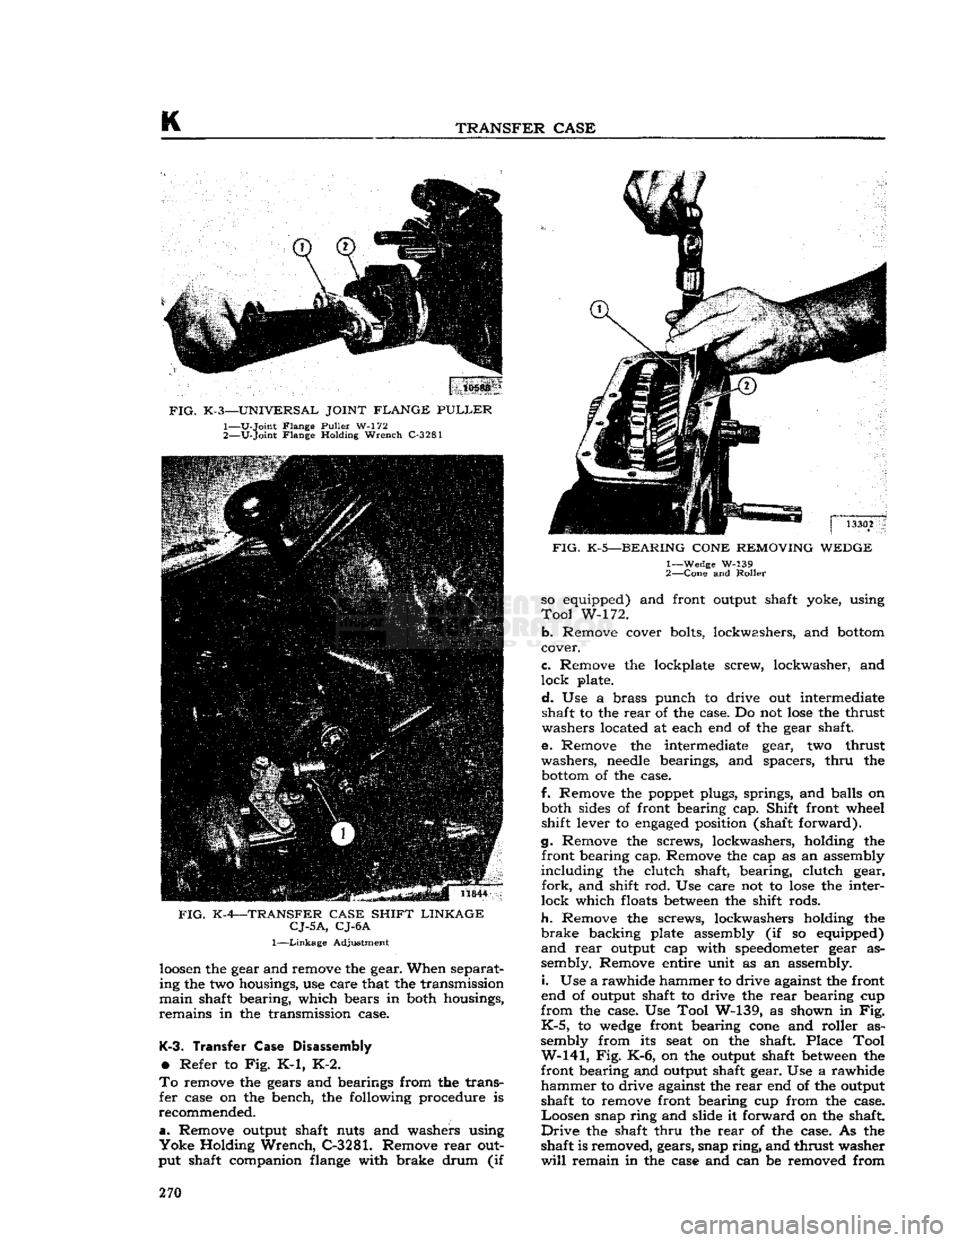
FIG.
K-3—UNIVERSAL JOINT FLANGE
PULLER
1—
U-Joint
Flange
Puller
W-172
2—
V-Joint
Flange Holding
Wrench
C-3281
FIG.
K-4—TRANSFER CASE SHIFT LINKAGE
CJ-5A,
CJ-6A
1—Linkage
Adjustment
loosen
the gear and remove the gear. When separat
ing the two housings, use care that the transmission
main
shaft bearing, which bears in both housings,
remains
in the transmission case.
K-3.
Transfer
Case
Disassembly
•
Refer to Fig. K-1, K-2.
To
remove the gears and bearings from the trans
fer
case on the bench, the following procedure is
recommended.
a.
Remove output shaft nuts and washers using
Yoke
Holding
Wrench,
C-3281. Remove
rear
out
put shaft companion flange with brake drum (if
FIG.
K-5—BEARING CONE REMOVING WEDGE
1— Wedge W-139
2—
Cone
and
Roller
so equipped) and front output shaft yoke, using
Tool
W-172.
b.
Remove cover bolts, lockwashers, and
bottom
cover.
c.
Remove the lockplate screw, lockwasher, and
lock
plate.
d.
Use a brass punch to drive out intermediate shaft to the
rear
of the case. Do not
lose
the thrust
washers located at each end of the gear shaft.
e. Remove the intermediate gear, two thrust
washers,
needle
bearings, and spacers,
thru
the
bottom
of the case.
f. Remove the
poppet
plugs, springs, and balls on both sides of front bearing cap. Shift front wheel
shift lever to
engaged
position (shaft forward).
g. Remove the screws, lockwashers, holding the front bearing cap. Remove the cap as an assembly
including
the clutch shaft, bearing, clutch gear,
fork,
and shift rod. Use care not to
lose
the inter
lock
which floats
between
the shift rods.
h.
Remove the screws, lockwashers holding the
brake
backing plate assembly (if so equipped)
and
rear
output cap with
speedometer
gear as
sembly. Remove entire unit as an assembly.
i.
Use a rawhide hammer to drive against the front
end of output shaft to drive the
rear
bearing cup
from
the case. Use Tool W-139, as shown in Fig.
K-5,
to
wedge
front bearing
cone
and roller as
sembly from its seat on the shaft. Place Tool
W-141,
Fig. K-6, on the output shaft
between
the
front bearing and output shaft gear. Use a rawhide
hammer
to drive against the
rear
end of the output shaft to remove front bearing cup from the case.
Loosen
snap ring and slide it forward on the shaft.
Drive
the shaft
thru
the
rear
of the case. As the shaft is removed, gears, snap
ring,
and thrust washer
will
remain in the case and can be removed from 270
Page 271 of 376
'Jeep'
UNIVERSAL SERIES SERVICE
MANUAL
K
the
bottom.
Remove
rear
bearing
cone
and roller
assembly from the shaft by striking the end of the
shaft lightly against a
wooden
block,
j.
Remove the set screw in sliding gear shift fork.
Remove shift rod.
See the following paragraphs for disassembly of
the front and
rear
bearing caps.
K-4.
Front
Bearing Cap Disassembly
•
Refer to Fig. K-1, K-2.
The
front bearing cap is a separate assembly which
may
be removed for service. Should difficulty be
experienced in this section of the transfer case,
follow
the
sequence
below
for removal and dis assembly.
a.
Remove the output shaft yoke as outlined in
Par. K-3.
Remove the
poppet
balls and
move
the
front wheel drive shift rod forward as outlined in
Par.
K-3f.
b.
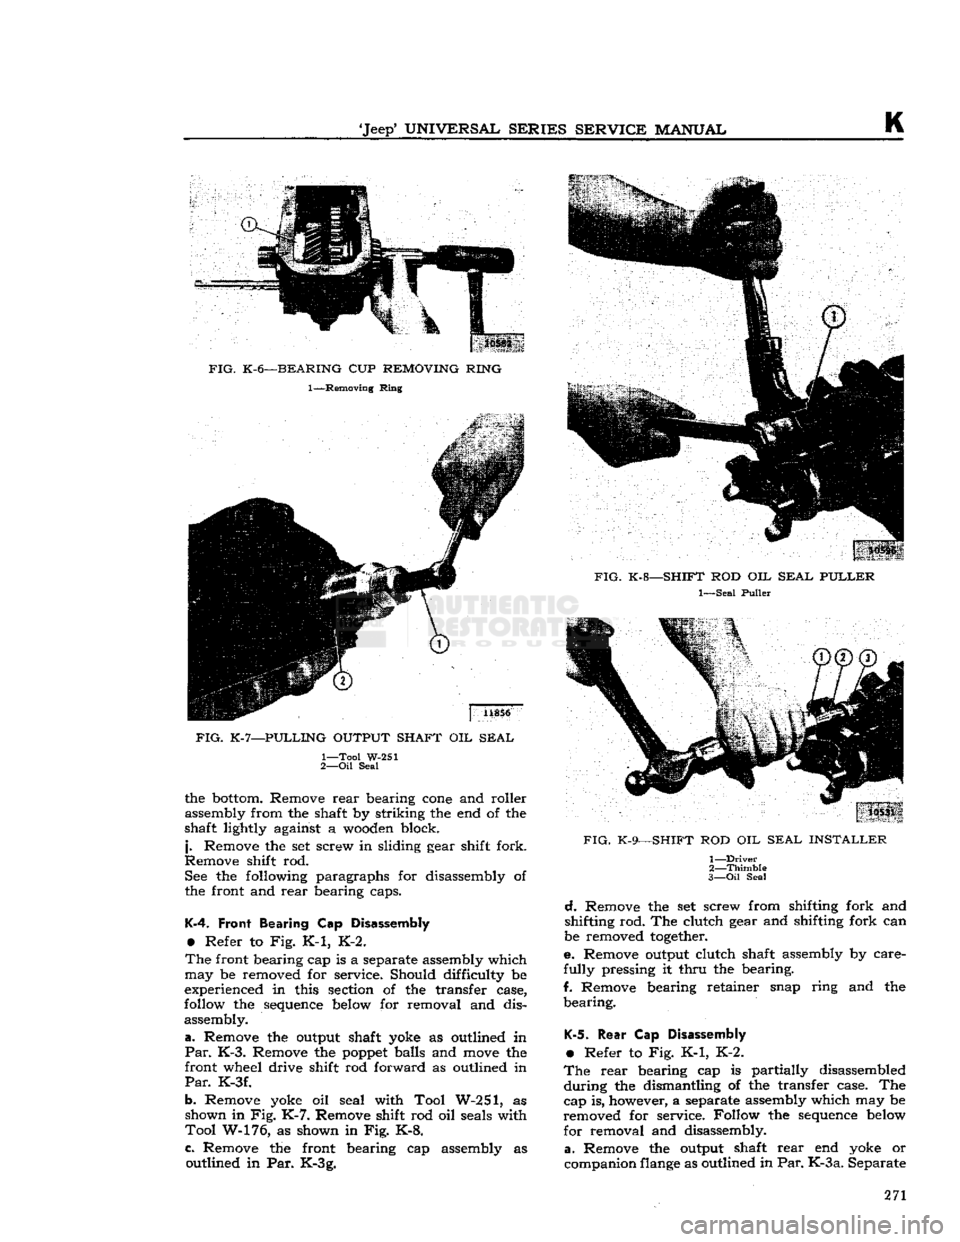
Remove yoke oil seal with Tool W-251, as shown in Fig.
K-7.
Remove shift rod oil seals with
Tool
W-176, as shown in Fig. K-8.
c.
Remove the front bearing cap assembly as outlined in Par. K-3g.
FIG.
K-9—SHIFT
ROD OIL
SEAL INSTALLER
1—
Driver
2—
Thimble
3— Oil
Seal
d.
Remove the set screw from shifting fork and
shifting rod. The clutch gear and shifting fork can
be removed
together.
e. Remove output clutch shaft assembly by care
fully
pressing it
thru
the bearing.
f. Remove bearing retainer snap ring and the
bearing.
K-5.
Rear
Cap Disassembly
•
Refer to Fig. K-1, K-2.
The
rear
bearing cap is partially disassembled
during
the dismantling of the transfer case. The
cap is, however, a separate assembly which may be
removed for service. Follow the
sequence
below
for removal and disassembly,
a.
Remove the output shaft
rear
end yoke or
companion
flange
as outlined in
Par. K-3 a.
Separate 271
Page 273 of 376
![JEEP CJ 1953 Workshop Manual
Jeep*
UNIVERSAL
SERIES
SERVICE
MANUAL
K
ment, the shaft should have .004" to .008"
[0,102
a
0,203
mm.] end play. Adjustment is made by
selective
shim installation
between
the cap an JEEP CJ 1953 Workshop Manual
Jeep*
UNIVERSAL
SERIES
SERVICE
MANUAL
K
ment, the shaft should have .004" to .008"
[0,102
a
0,203
mm.] end play. Adjustment is made by
selective
shim installation
between
the cap an](/img/16/57040/w960_57040-272.png)
'Jeep*
UNIVERSAL
SERIES
SERVICE
MANUAL
K
ment, the shaft should have .004" to .008"
[0,102
a
0,203
mm.] end play. Adjustment is made by
selective
shim installation
between
the cap and the
case. Shims .003", .010" and .031" [0,076,
0,254,
0,787
mm.] in thickness are available for this ad
justment. Do not install the rear cap oil seal until
the bearings are correctly adjusted. Both the front
and
rear oil seals may be installed with oil seal
driver
Tool W-143, shown in Fig. K-12.
When
installing the end yokes on the output shafts,
inspect for the presence of
felt
seals in each oil
seal guard. (The oil seal guard is a part of each
yoke assembly.) Felt seals should be installed in the oil seal guards if
they
are not present. When
installing the shift
rail
oil seals in the front bear
ing cap, it is necessary to protect the seals against
damage when passing over the shift
rail
notches.
Protect them with the thimble, and install them with the driver, Tool W-130, shown in Fig. K-9.
K-7.
Transfer Case Installation
The
installation of the assembly in the vehicle is
the reverse of the removal operation covered in
Par.
K-2.
If
the transmission was removed from the vehicle,
lubricate the pilot bearing and also lubricate the
transmission and transfer case as outlined in the
"Lubrication
Section". Be sure that the clutch pedal has %"
[19,05
mm.] free travel as outlined
in
the
"Clutch
Section".
K-8.
Transfer Case Linkage Adjustment
Adjust
the link to provide
xh"
[12,7 mm.] clear
ance
between
the floor pan and the shift lever
bend when operating in four wheel drive low
position. Refer to Fig. K-4.
K-3.
TRENSFER
CESE
SERVICE
DIAGNOSIS
SYMPTOMS PROBABLE REMEDY
Slips
Out of
Gear (High-Low)
Shifting
Lock
Spring Weak Replace Spring
Bearing
Broken or Worn Replace
Shifting
Fork
Bent Replace
Slips
Out of
Front Wheel Drive
Shifting
Lock
Spring Weak. Replace
Bearing
Worn or Broken Replace
End
Play in Shaft. . . ..... Adjust Shifting
Fork
Bent.. Replace
Hard Shifting
Lack
of
Lubricant
Drain
and
Refill
Shift
Lever
Stuck on Shaft Remove, Clean and Lubricate
Shifting
Lock
Ball
Scored Replace
Ball
Shifting
Fork
Bent Replace
Fork
Low
Tire
Pressure Inflate
Grease Leak
at
Front
or
Rear Drive
Grease
Leak
at Covers. Install New Gaskets
Grease
Leak
between
Transmission and Transfer Cases Install New Gaskets
Grease
Leak
at Output Shaft Install New Oil Seal
K-10.
TRANSFER
CESE
SPECIFICATIONS
Transfer
Case:
All
Models
Spicer
18
On
Floor
Gear
Ratio: 1.00 to 1
2.46 to 1 273