parking brake JEEP COMMANDER 2010 1.G User Guide
[x] Cancel search | Manufacturer: JEEP, Model Year: 2010, Model line: COMMANDER, Model: JEEP COMMANDER 2010 1.GPages: 78, PDF Size: 7.31 MB
Page 5 of 78
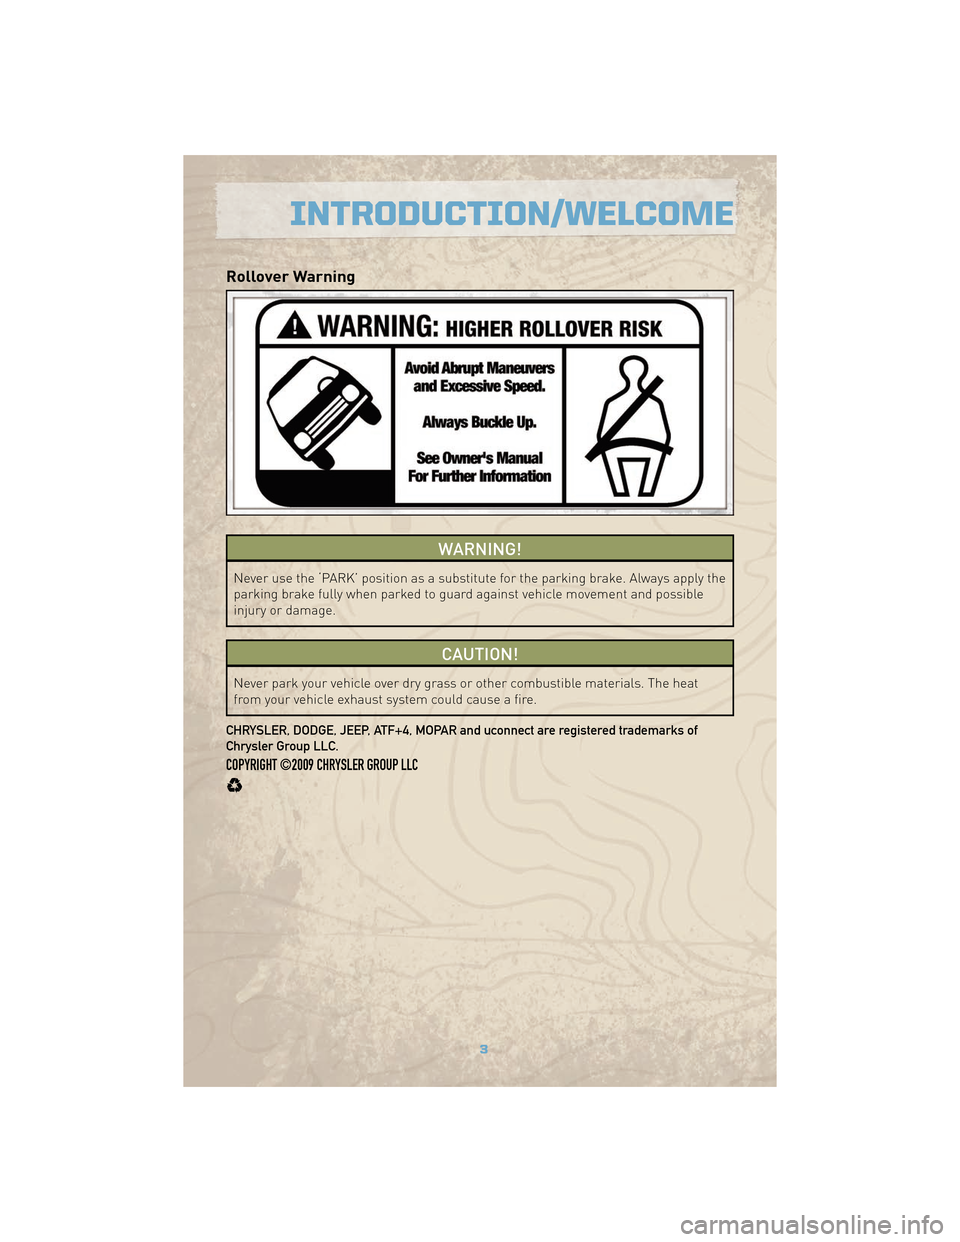
Rollover Warning
WARNING!
Never use the ‘PARK’ position as a substitute for the parking brake. Always apply the
parking brake fully when parked to guard against vehicle movement and possible
injury or damage.
CAUTION!
Never park your vehicle over dry grass or other combustible materials. The heat
from your vehicle exhaust system could cause a fire.
CHRYSLER, DODGE, JEEP, ATF+4, MOPAR and uconnect are registered trademarks of
Chrysler Group LLC.
COPYRIGHT ©2009 CHRYSLER GROUP LLC
3
INTRODUCTION/WELCOME
Page 10 of 78
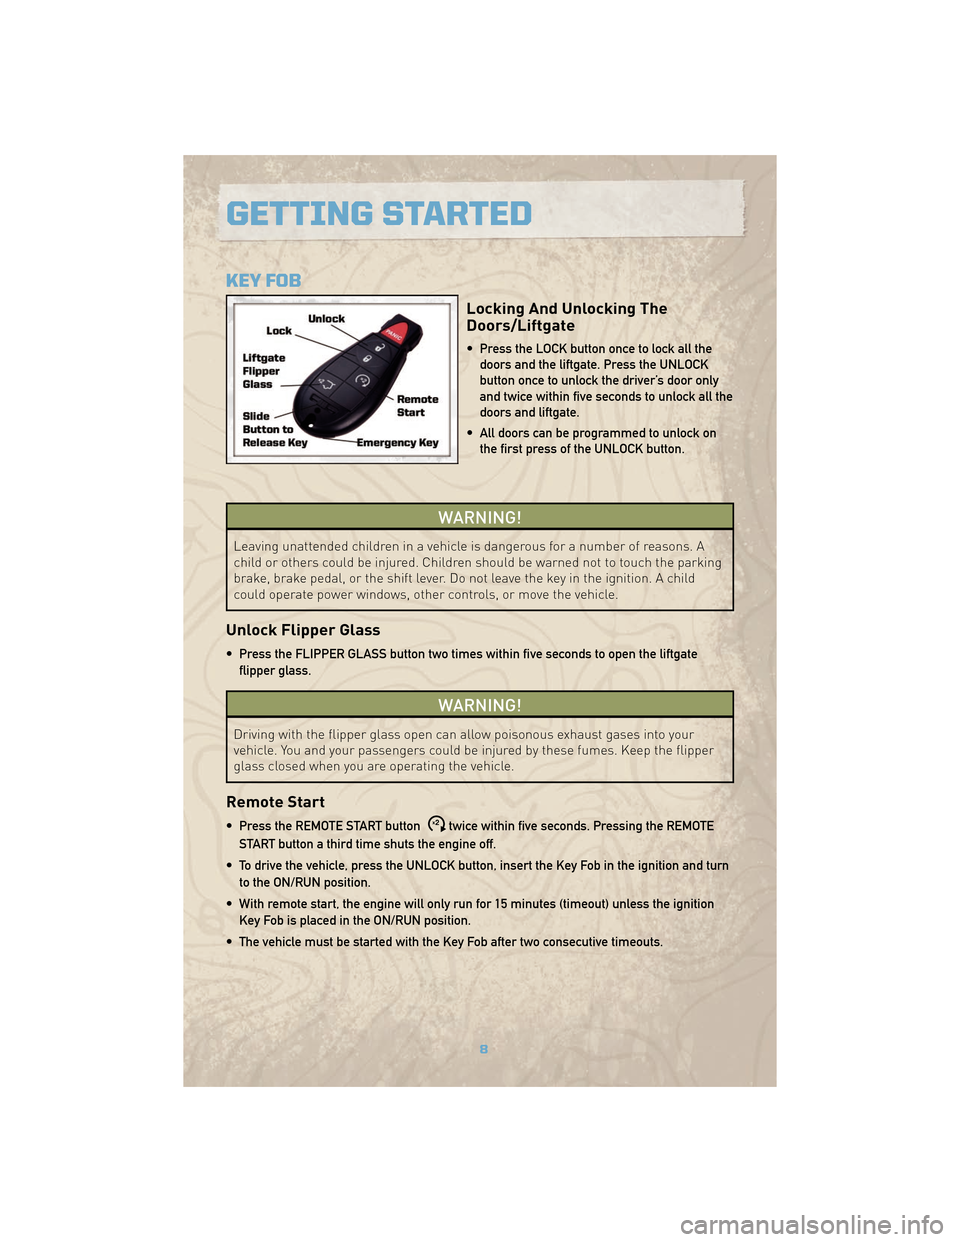
KEY FOB
Locking And Unlocking The
Doors/Liftgate
• Press the LOCK button once to lock all thedoors and the liftgate. Press the UNLOCK
button once to unlock the driver’s door only
and twice within five seconds to unlock all the
doors and liftgate.
• All doors can be programmed to unlock on the first press of the UNLOCK button.
WARNING!
Leaving unattended children in a vehicle is dangerous for a number of reasons. A
child or others could be injured. Children should be warned not to touch the parking
brake, brake pedal, or the shift lever. Do not leave the key in the ignition. A child
could operate power windows, other controls, or move the vehicle.
Unlock Flipper Glass
• Press the FLIPPER GLASS button two times within five seconds to open the liftgate
flipper glass.
WARNING!
Driving with the flipper glass open can allow poisonous exhaust gases into your
vehicle. You and your passengers could be injured by these fumes. Keep the flipper
glass closed when you are operating the vehicle.
Remote Start
• Press the REMOTE START buttonx2twice within five seconds. Pressing the REMOTE
START button a third time shuts the engine off.
• To drive the vehicle, press the UNLOCK button, insert the Key Fob in the ignition and turn to the ON/RUN position.
• With remote start, the engine will only run for 15 minutes (timeout) unless the ignition Key Fob is placed in the ON/RUN position.
• The vehicle must be started with the Key Fob after two consecutive timeouts.
GETTING STARTED
8
Page 40 of 78
FOUR-WHEEL DRIVE
OPERATION
Quadra-Trac I®Operating
Instructions/Precautions
• The Quadra-Trac I®is a single-speed
(HI range only) transfer case, which
provides convenient full-time
four–wheel drive. No driver interaction
is required. The Brake Traction Control
(BTC) System, which combines
standard ABS and Traction Control,
provides resistance to any wheel that is
slipping to allow additional torque
transfer to wheels with traction.
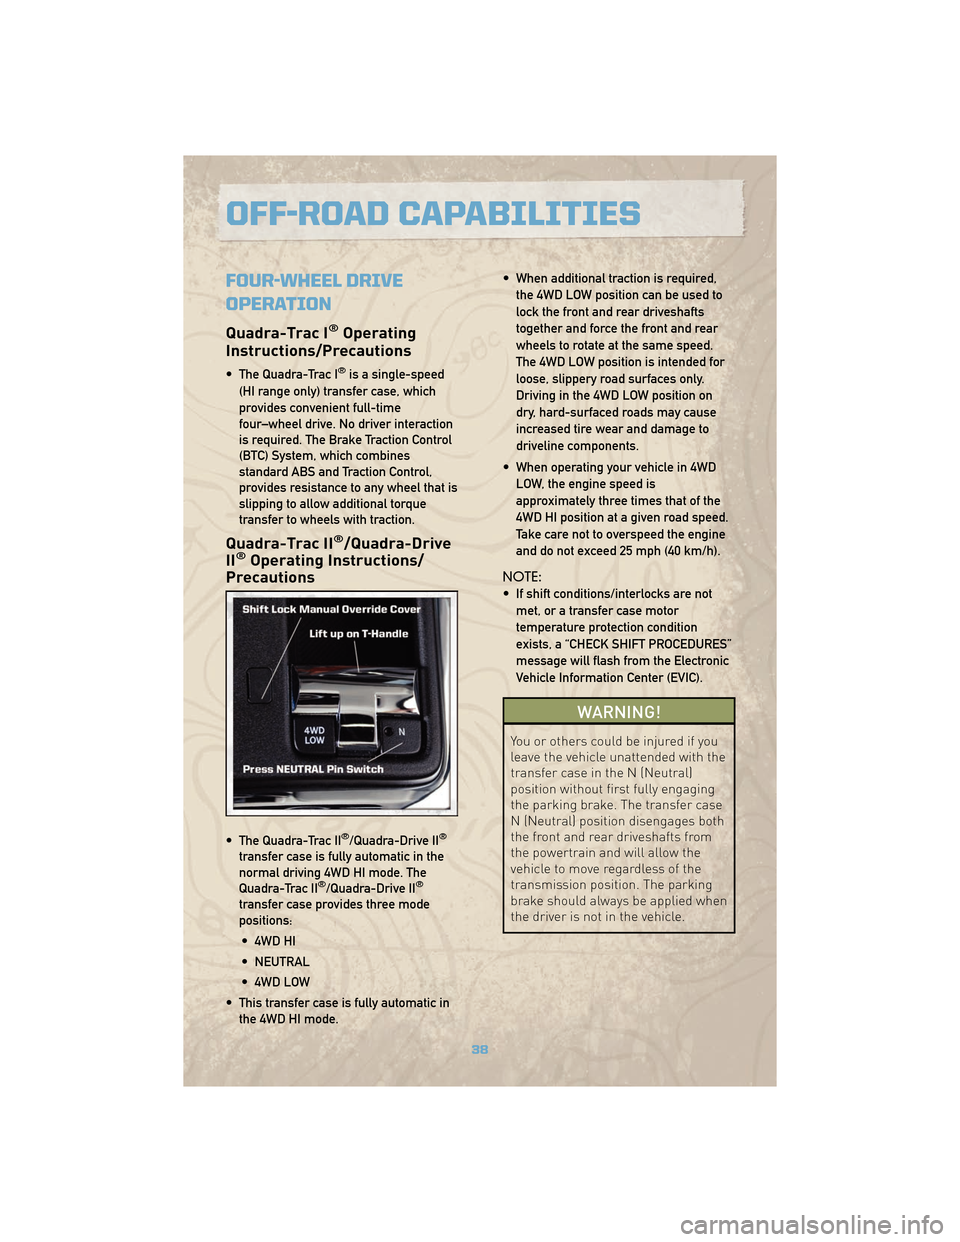
Quadra-Trac II®/Quadra-Drive
II®Operating Instructions/
Precautions
• The Quadra-Trac II®/Quadra-Drive II®
transfer case is fully automatic in the
normal driving 4WD HI mode. The
Quadra-Trac II
®/Quadra-Drive II®
transfer case provides three mode
positions:
• 4WD HI
• NEUTRAL
• 4WD LOW
• This transfer case is fully automatic in the 4WD HI mode. • When additional traction is required,
the 4WD LOW position can be used to
lock the front and rear driveshafts
together and force the front and rear
wheels to rotate at the same speed.
The 4WD LOW position is intended for
loose, slippery road surfaces only.
Driving in the 4WD LOW position on
dry, hard-surfaced roads may cause
increased tire wear and damage to
driveline components.
• When operating your vehicle in 4WD LOW, the engine speed is
approximately three times that of the
4WD HI position at a given road speed.
Take care not to overspeed the engine
and do not exceed 25 mph (40 km/h).
NOTE:
• If shift conditions/interlocks are not met, or a transfer case motor
temperature protection condition
exists, a “CHECK SHIFT PROCEDURES”
message will flash from the Electronic
Vehicle Information Center (EVIC).
WARNING!
You or others could be injured if you
leave the vehicle unattended with the
transfer case in the N (Neutral)
position without first fully engaging
the parking brake. The transfer case
N (Neutral) position disengages both
the front and rear driveshafts from
the powertrain and will allow the
vehicle to move regardless of the
transmission position. The parking
brake should always be applied when
the driver is not in the vehicle.
OFF-ROAD CAPABILITIES
38
Page 44 of 78
RECREATIONAL TOWING
(BEHIND MOTORHOME,
ETC.)
Towing - Two-Wheel Drive
Models
• Recreational towing is allowed ONLY ifthe driveshaft is removed. Towing with
the rear wheels on the ground while
the driveshaft is connected can result
in severe transmission damage.
WARNING!
If the driveshaft is removed, the
vehicle can roll even if the
transmission is in PARK, which could
cause serious injury or death.
• The parking brake must be firmly engaged and the wheels chocked
during driveshaft removal and
installation. The parking brake must
remain engaged unless the vehicle is
securely and properly connected to the
tow vehicle, or the driveshaft is
completely reinstalled. See your
authorized dealer for proper driveshaft
removal and reinstallation procedures,
including flange orientation/alignment,
use of thread-locking compound,
proper bolt torque specifications, etc.
Towing - Quadra-Trac I®
(Single-Speed Transfer Case)
Four-Wheel Drive Models
• Recreational towing is not allowed.This model does not have a NEUTRAL
position in the transfer case.
Towing - Quadra-Trac II®
/Quadra-Drive II®Four-Wheel
Drive Models
• Depress the brake pedal and turn the
ignition switch ON with the engine shut
off.
• Shift the transmission into NEUTRAL.
• Shift the transfer case into NEUTRAL by holding down the NEUTRAL Pin
switch for four seconds until the LED
starts to blink. The LED will stop
blinking and remain on when the shift
is complete.
• Start the engine and shift into DRIVE to ensure there is no vehicle movement.
• Shut the engine off and shift the transmission into PARK.
• Place the ignition switch in the OFF position and remove the key.
• Apply the parking brake, attach the vehicle to the tow vehicle with a tow
bar and release the parking brake.
• Refer to your Owner's Manual on the DVD for further details.
UTILITY
42
Page 45 of 78
BRAKE/TRANSMISSION
INTERLOCK MANUAL
OVERRIDE
• The manual override may be used inthe event that the shift lever should fail
to move from PARK with the Key Fob in
the ON position and the brake pedal
pressed.
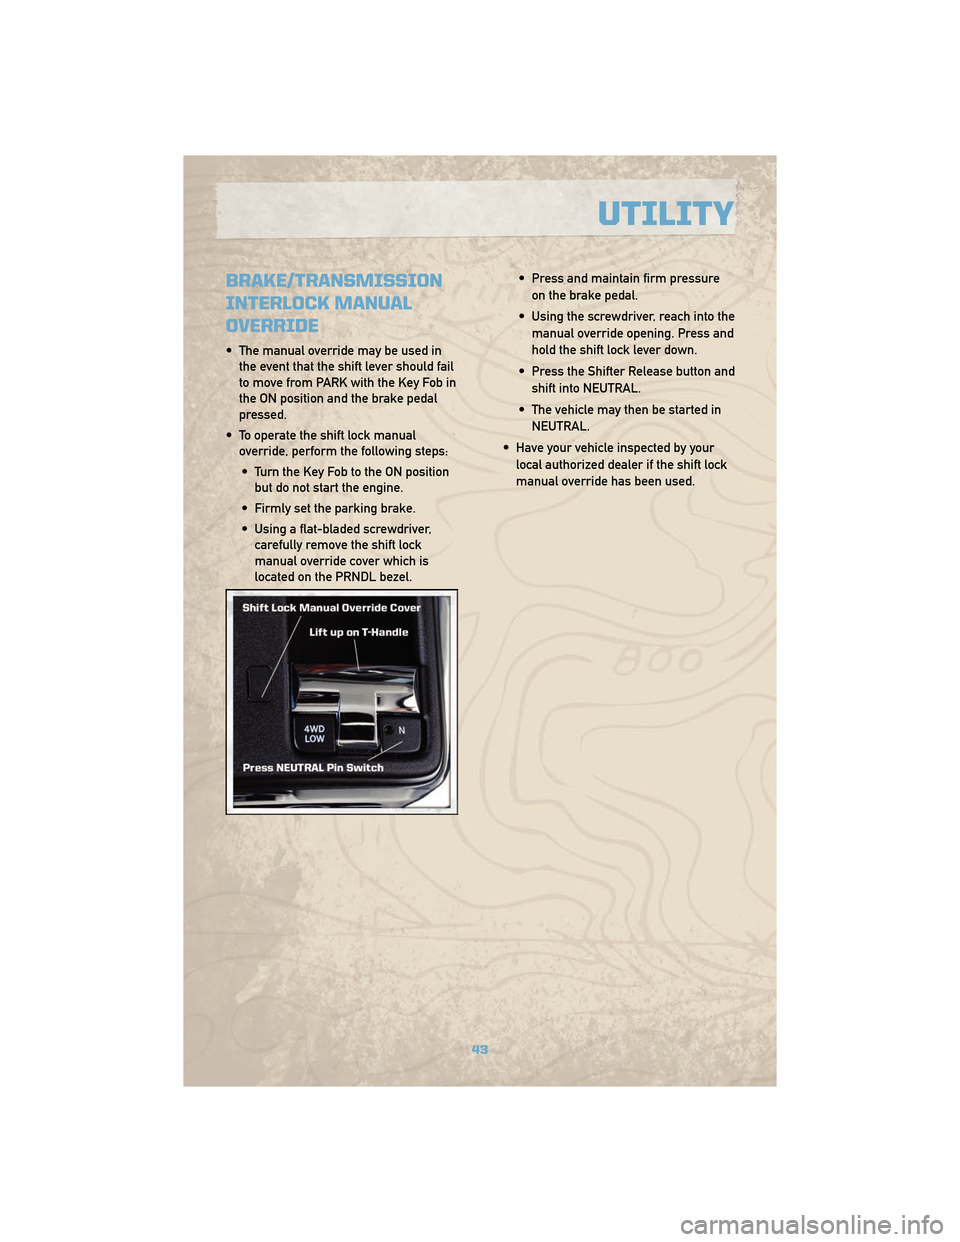
• To operate the shift lock manual override, perform the following steps:
• Turn the Key Fob to the ON position but do not start the engine.
• Firmly set the parking brake.
• Using a flat-bladed screwdriver, carefully remove the shift lock
manual override cover which is
located on the PRNDL bezel. • Press and maintain firm pressure
on the brake pedal.
• Using the screwdriver, reach into the manual override opening. Press and
hold the shift lock lever down.
• Press the Shifter Release button and shift into NEUTRAL.
• The vehicle may then be started in NEUTRAL.
• Have your vehicle inspected by your local authorized dealer if the shift lock
manual override has been used.
43
UTILITY
Page 46 of 78
24 HOUR TOWING ASSISTANCE
• Dial toll-free 1-800-521-2779.
• Provide your name, vehicle identification number and license plate number.
• Provide your location, including telephone number, from which you are calling.
• Briefly describe the nature of the problem and answer a few simple questions.
• You will be given the name of the service provider and an estimated time of arrival. If youfeel you are in an “unsafe situation”, please let us know. With your consent, we will
contact local police or safety authorities.
INSTRUMENT CLUSTER WARNING LIGHTS
- Electronic Stability Program (ESP) Indicator Light
• If this indicator light flashes during acceleration, apply as little throttle as possible. Whiledriving, ease up on the accelerator. Adapt your speed and driving to the prevailing road
conditions. To improve the vehicles traction when starting off in deep snow, sand or
gravel, it may be desirable to switch the ESP system off.
- Tire Pressure Monitoring System (TPMS) Light
• A Tire Pressure Monitoring Light and a “low tire” message will display in your instrumentcluster along with an audible chime if one or more of your vehicle’s four road tires are
significantly under-inflated.
• Check the inflation pressure of each tire and inflate to the recommended pressure for your vehicle. The tire pressures recommended for your vehicle are found on the “Tire and
Loading Information” label located on the driver’s side door opening. The TPMS light
should not be used as a tire pressure gauge when adjusting your tire pressure.
• It is recommended that you check the tire pressure in the morning when tires are cool; inflate each tire to the recommended pressure for your vehicle. The light will turn off
after your vehicle’s tire pressures are properly inflated and the pressure has been
recognized. The vehicle may need to be driven for up to 20 minutes above 15 mph
(25 km/h) before the light will turn off.
• Temperature changes can affect tire pressure, causing the TPMS light to turn on. Tire pressures will also increase as the vehicle is driven – this is normal and you should not
adjust for this increased pressure.
• Driving on under-inflated tires reduces your vehicle’s fuel efficiency and tire tread life. If a spare tire is in use on the vehicle, the TPMS light may turn on.
- Brake Warning Light
• The Brake Warning light illuminates when there is either a system malfunction or theparking brake is applied. If the light is on and the parking brake is not applied, it
indicates a possible brake hydraulic malfunction, brake booster problem or an Anti-Lock
Brake System problem.
• We recommend you drive to the nearest Service Center and have the vehicle serviced immediately.
WHAT TO DO IN EMERGENCIES
44
Page 51 of 78
Spare Tire Stowage
• To remove or stow the spare, use the jack handle to rotate the “spare tire drive” nut whichis located under a plastic cover under the cargo load floor, just inside the liftgate opening.
• Lower the spare tire by turning the drive nut counterclockwise with the jack-handle assembly until the spare tire is on the ground with enough cable slack to allow you to
pull the spare tire out from underneath the vehicle.
• When the spare is clear, tilt the retainer at the end of the cable and pull it through the center of the wheel.
Preparations For Jacking
• Park on a firm, level surface. Avoid ice or slippery areas.
• Set the parking brake and shift the automatic transmission into PARK.
• Turn the ignition to LOCK and turn on the Hazard Warning flasher.
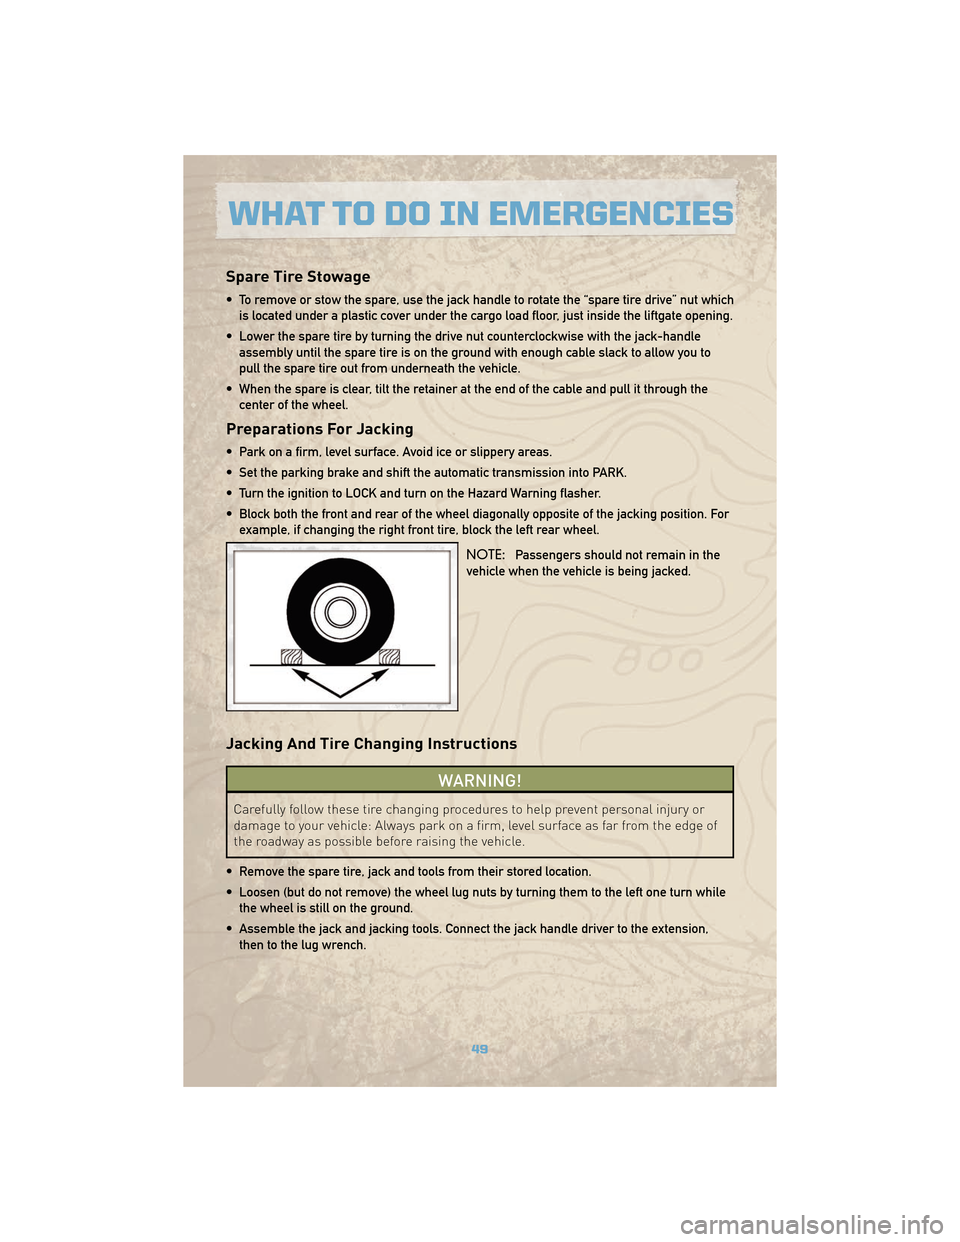
• Block both the front and rear of the wheel diagonally opposite of the jacking position. Forexample, if changing the right front tire, block the left rear wheel.
NOTE:Passengers should not remain in the
vehicle when the vehicle is being jacked.
Jacking And Tire Changing Instructions
WARNING!
Carefully follow these tire changing procedures to help prevent personal injury or
damage to your vehicle: Always park on a firm, level surface as far from the edge of
the roadway as possible before raising the vehicle.
• Remove the spare tire, jack and tools from their stored location.
• Loosen (but do not remove) the wheel lug nuts by turning them to the left one turn while the wheel is still on the ground.
• Assemble the jack and jacking tools. Connect the jack handle driver to the extension, then to the lug wrench.
49
WHAT TO DO IN EMERGENCIES
Page 54 of 78
WARNING!(Continued)
• A battery generates hydrogen gas which is flammable and explosive. Keep flamesor sparks away from the battery vent holes. Don’t lean over the battery when
attaching clamps or allow the clamps to touch each other.
• Do not use a booster battery or any other booster source with an output that exceeds 12-volts (i.e., do not use a 24-volt power source).
• Check the battery test indicator (if equipped). If a light or bright colored dot is visible in the indicator, DO NOT jump-start the battery. If the indicator is dark or shows a green dot,
proceed as follows:
• Remove all metal jewelry, such as watch bands or bracelets, which might make an unintended electrical contact.
WARNING!
• Do not permit vehicles to touch each other as this could establish a ground connection and personal injury could result.
• Do not connect the cable to the negative post of the discharged battery. The resulting electrical spark could cause the battery to explode and could result in
personal injury.
• Park the booster vehicle within cable reach but without letting the vehicles touch. Set the parking brake on both vehicles, shift the automatic transmission into PARK, and turn the
ignition to LOCK.
• Turn off the heater, radio, and all unnecessary electrical loads.
• Connect one end of a jumper cable to the positive terminal of the booster battery. Connect the other end of the same cable to the positive terminal of the discharged battery.
• Connect the other cable, first to the negative terminal of the booster battery and then to the engine ground (-) of the vehicle with the discharged battery. Make sure you have a
good contact on the engine ground.
• Start the engine in the vehicle which has the booster battery; let the engine idle a few minutes.
• Start the engine in the vehicle with the discharged battery.
• When removing the jumper cables, reverse the above sequence exactly. Be careful of the moving belts and fan.
WARNING!
During cold weather when temperatures are below the freezing point, electrolyte in a
discharged battery may freeze. Do not attempt jump-starting because the battery
could rupture or explode. The battery temperature must be brought up above the
freezing point before attempting a jump-start.
WHAT TO DO IN EMERGENCIES
52
Page 62 of 78
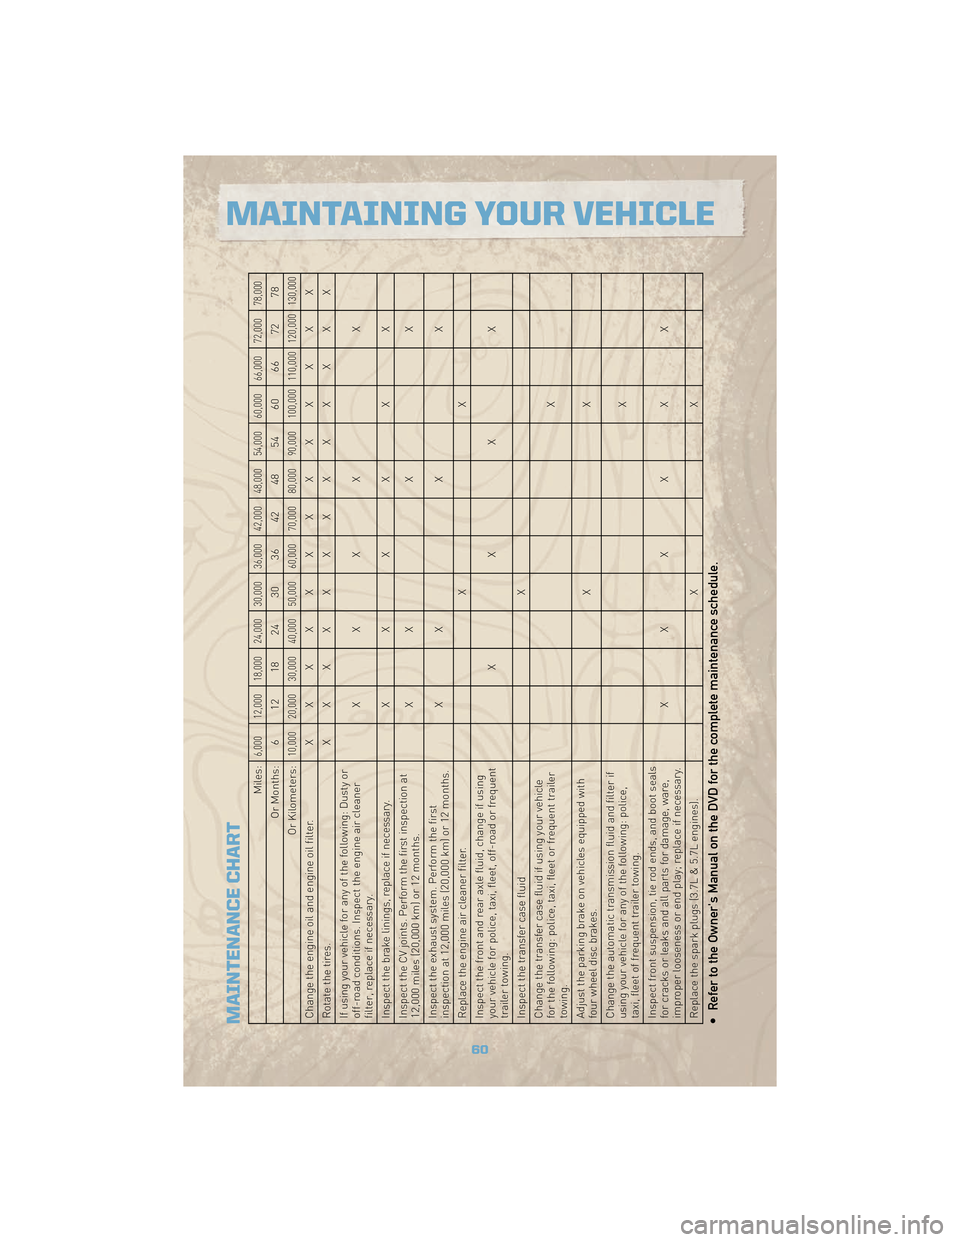
MAINTENANCE CHART
Miles:
6,000 12,000 18,000 24,000 30,000 36,000 42,000 48,000 54,000 60,000 66,000 72,000 78,000
Or Months: 6 12 18 24 30 36 42 48 54 60 66 72 78
Or Kilometers:
10,000 20,000 30,000 40,000 50,000 60,000 70,000 80,000 90,000 100,000 110,000 120,000 130,000
Change the engine oil and engine oil filter. XXXXXXXXXXXXX
Rotatethetires. XXXXXXXXXXXXX
If using your vehicle for any of the following: Dusty or
off-road conditions. Inspect the engine air cleaner
filter, replace if necessary. XXXX
X
Inspect the brake linings, replace if necessary. XXXXXX
Inspect the CV joints. Perform the first inspection at
12,000 miles (20,000 km) or 12 months. X
XXX
Inspect the exhaust system. Perform the first
inspection at 12,000 miles (20,000 km) or 12 months. X
XXX
Replace the engine air cleaner filter. XX
Inspect the front and rear axle fluid, change if using
your vehicle for police, taxi, fleet, off-road or frequent
trailer towing. XXXX
Inspect the transfer case fluid X
Change the transfer case fluid if using your vehicle
for the following: police, taxi, fleet or frequent trailer
towing. X
Adjust the parking brake on vehicles equipped with
four wheel disc brakes. XX
Change the automatic transmission fluid and filter if
using your vehicle for any of the following: police,
taxi, fleet of frequent trailer towing. X
Inspect front suspension, tie rod ends, and boot seals
for cracks or leaks and all parts for damage, ware,
improper looseness or end play; replace if necessary. XXXXXX
Replace the spark plugs (3.7L & 5.7L engines). XX• Refer to the Owner's Manual on the DVD for the complete maintenance schedule.
60
MAINTAINING YOUR VEHICLE