light JEEP COMPASS 2012 1.G Owner's Manual
[x] Cancel search | Manufacturer: JEEP, Model Year: 2012, Model line: COMPASS, Model: JEEP COMPASS 2012 1.GPages: 108, PDF Size: 4.03 MB
Page 73 of 108
7. Finish tightening the nuts. Push down on the wrench while at the end of
the handle for increased leverage. Tighten the lug nuts in a star pattern
until each nut has been tightened twice. The correct wheel nut torque is
100 ft lbs (135 N·m). If you doubt that you have tightened the nuts
correctly, have them checked with a torque wrench by your authorized
dealer or service station.
8. Remove the wheel blocks and lower the jack until it is free. Reassemble
the lug wrench to the jack assembly and stow it in the spare tire area.
Secure the assembly using the means provided.
9. Place the deflated (flat) tire in the cargo area,have the tire repaired or
replaced as soon as possible.
10. Check the spare tire pressure as soon as possible. Correct the tire
pressure as required.
Road Tire Installation
Vehicles Equipped With Wheel Covers
1. Mount the road tire on the axle.
2. To ease the installation process for steel wheels with wheel covers,
install two lug nuts on the mounting studs which are on each side of the
valve stem. Install the lug nuts with the cone shaped end of the nut
toward the wheel. Lightly tighten the lug nuts.
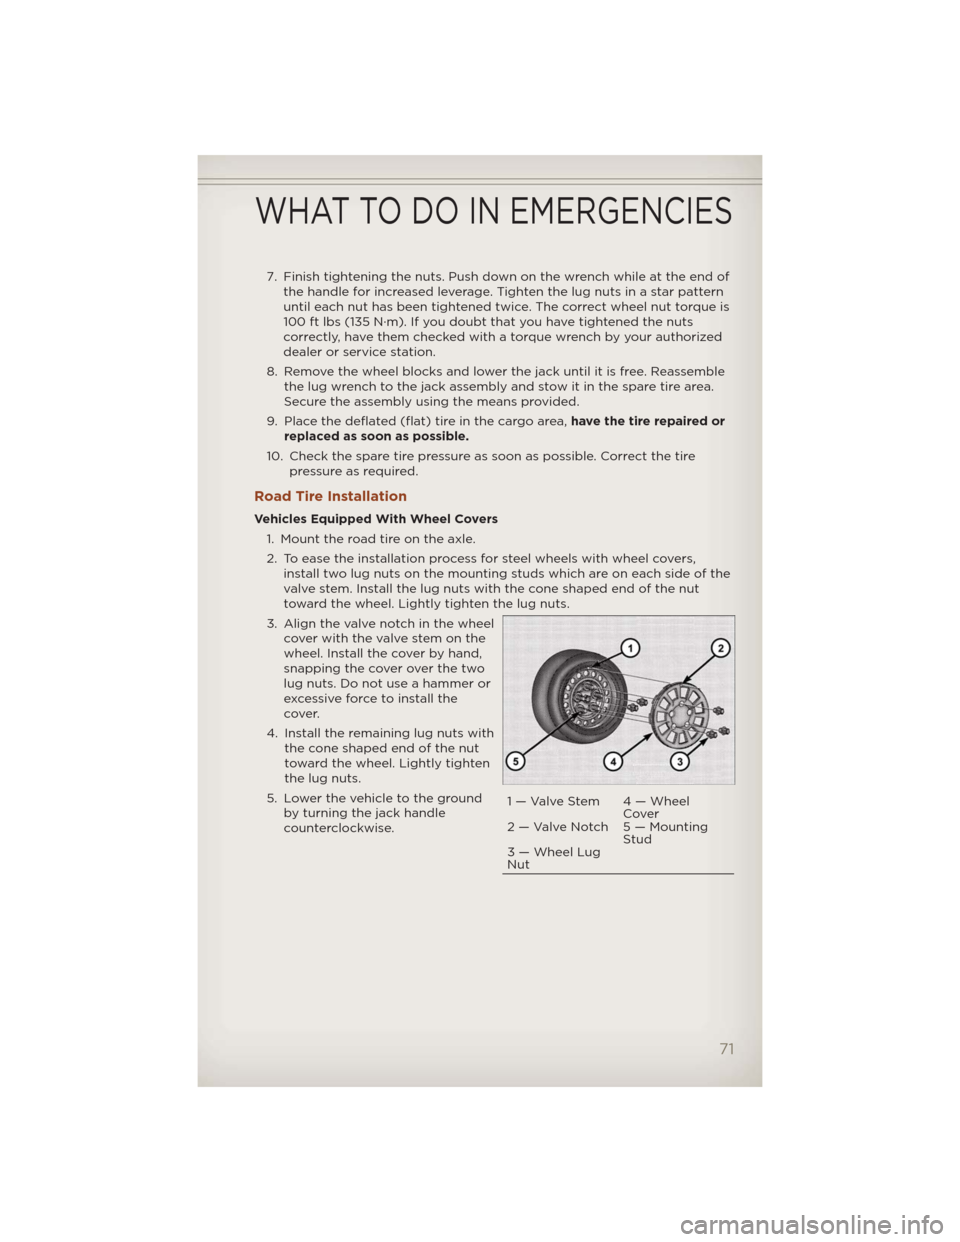
3. Align the valve notch in the wheel
cover with the valve stem on the
wheel. Install the cover by hand,
snapping the cover over the two
lug nuts. Do not use a hammer or
excessive force to install the
cover.
4. Install the remaining lug nuts with
the cone shaped end of the nut
toward the wheel. Lightly tighten
the lug nuts.
5. Lower the vehicle to the ground
by turning the jack handle
counterclockwise.
1 — Valve Stem 4 — Wheel
Cover
2 — Valve Notch 5 — Mounting
Stud
3 — Wheel Lug
Nut
WHAT TO DO IN EMERGENCIES
71
Page 74 of 108
6. Finish tightening the lug nuts. Push down on the wrench while at the
end of the handle for increased leverage. Tighten the lug nuts in a star
pattern until each nut has been tightened twice. The correct tightness of
each lug nut is 100 ft/lbs (135 N·m). If in doubt about the correct
tightness, have them checked with a torque wrench by your authorized
dealer or service station.
7. After 25 miles (40 km) check the lug nut torque with a torque wrench to
ensure that all lug nuts are properly seated against the wheel.
Vehicles Without Wheel Covers
1. Mount the road tire on the axle.
2. Install the remaining lug nuts with the cone shaped end of the nut
toward the wheel. Lightly tighten the lug nuts.
3. Lower the vehicle to the ground by turning the jack handle
counterclockwise.
4. Finish tightening the lug nuts. Push down on the wrench while at the
end of the handle for increased leverage. Tighten the lug nuts in a star
pattern until each nut has been tightened twice. The correct tightness of
each lug nut is 100 ft/lbs (135 N·m). If in doubt about the correct
tightness, have them checked with a torque wrench by your authorized
dealer or service station.
5. After 25 miles (40 km) check the lug nut torque with a torque wrench to
ensure that all lug nuts are properly seated against the wheel.
CAUTION!
• Do not attempt to raise the vehicle by jacking on locations other
than those indicated in the Jacking Instructions for this vehicle.
• Be sure to mount the spare tire with the valve stem facing outward.
The vehicle could be damaged if the spare tire is mounted
incorrectly.
WHAT TO DO IN EMERGENCIES
72
Page 89 of 108
FUSES
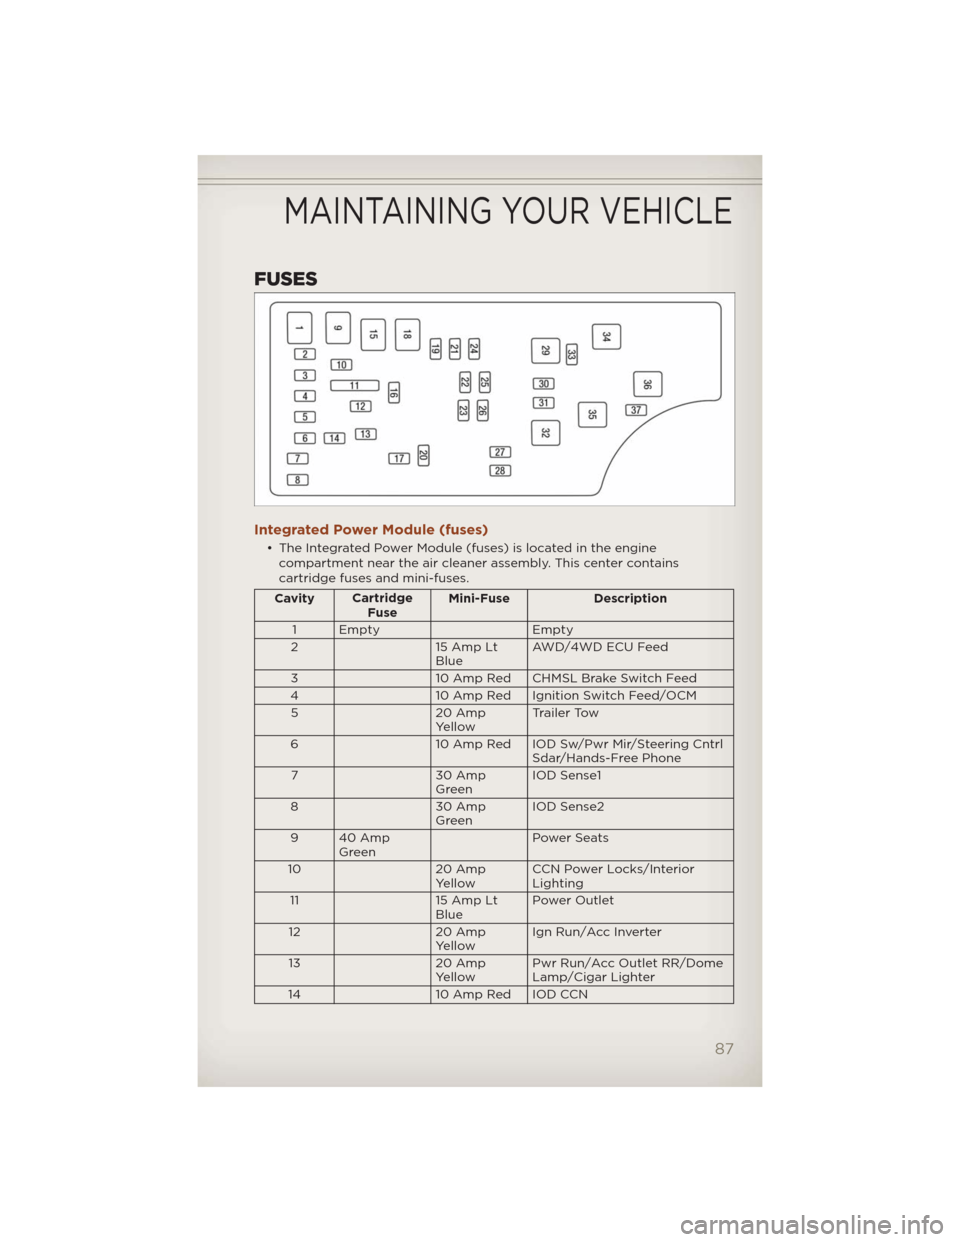
Integrated Power Module (fuses)
• The Integrated Power Module (fuses) is located in the engine
compartment near the air cleaner assembly. This center contains
cartridge fuses and mini-fuses.
CavityCartridge
FuseMini-Fuse Description
1 Empty Empty
2 15 Amp Lt
BlueAWD/4WD ECU Feed
3 10 Amp Red CHMSL Brake Switch Feed
4 10 Amp Red Ignition Switch Feed/OCM
5 20 Amp
YellowTrailer Tow
6 10 Amp Red IOD Sw/Pwr Mir/Steering Cntrl
Sdar/Hands-Free Phone
7 30 Amp
GreenIOD Sense1
8 30 Amp
GreenIOD Sense2
9 40 Amp
GreenPower Seats
10 20 Amp
YellowCCN Power Locks/Interior
Lighting
11 15 Amp Lt
BluePower Outlet
12 20 Amp
YellowIgn Run/Acc Inverter
13 20 Amp
YellowPwr Run/Acc Outlet RR/Dome
Lamp/Cigar Lighter
14 10 Amp Red IOD CCN
MAINTAINING YOUR VEHICLE
87
Page 92 of 108
WHEEL AND WHEEL TRIM CARE
• All wheels and wheel trim, especially aluminum and chrome plated
wheels, should be cleaned regularly with a mild soap and water to
prevent corrosion.
• To remove heavy soil and/or excessive brake dust, use MOPAR® Wheel
Cleaner or equivalent or select a non-abrasive, non-acidic cleaner.
CAUTION!
Do not use scouring pads, steel wool, a bristle brush, or metal
polishes. Do not use oven cleaner. These products may damage the
wheel's protective finish. Avoid automatic car washes that use acidic
solutions or harsh brushes that may damage the wheel's protective
finish. Only MOPAR® Wheel Cleaner or equivalent is recommended.
EXTERIOR BULBS
LIGHT BULBS – Exterior Bulb Number
Low Beam Headlamp H11
High Beam Headlamp 9005
Front Park/Turn Signal 7444NA
Front Side Marker Lamp 194
Front Fog Lamp H11
Center High Mounted Stop Lamp
(CHMSL)LED Assembly (Serviced at
Authorized Dealer)
Rear Tail/Stop Lamp LED (Serviced at Authorized Dealer)
Rear Turn Lamp 7440NA (WY21W) Amber
Backup Lamp 7440 (W21W) Crystal
License Lamp W5W
MAINTAINING YOUR VEHICLE
90
Page 95 of 108
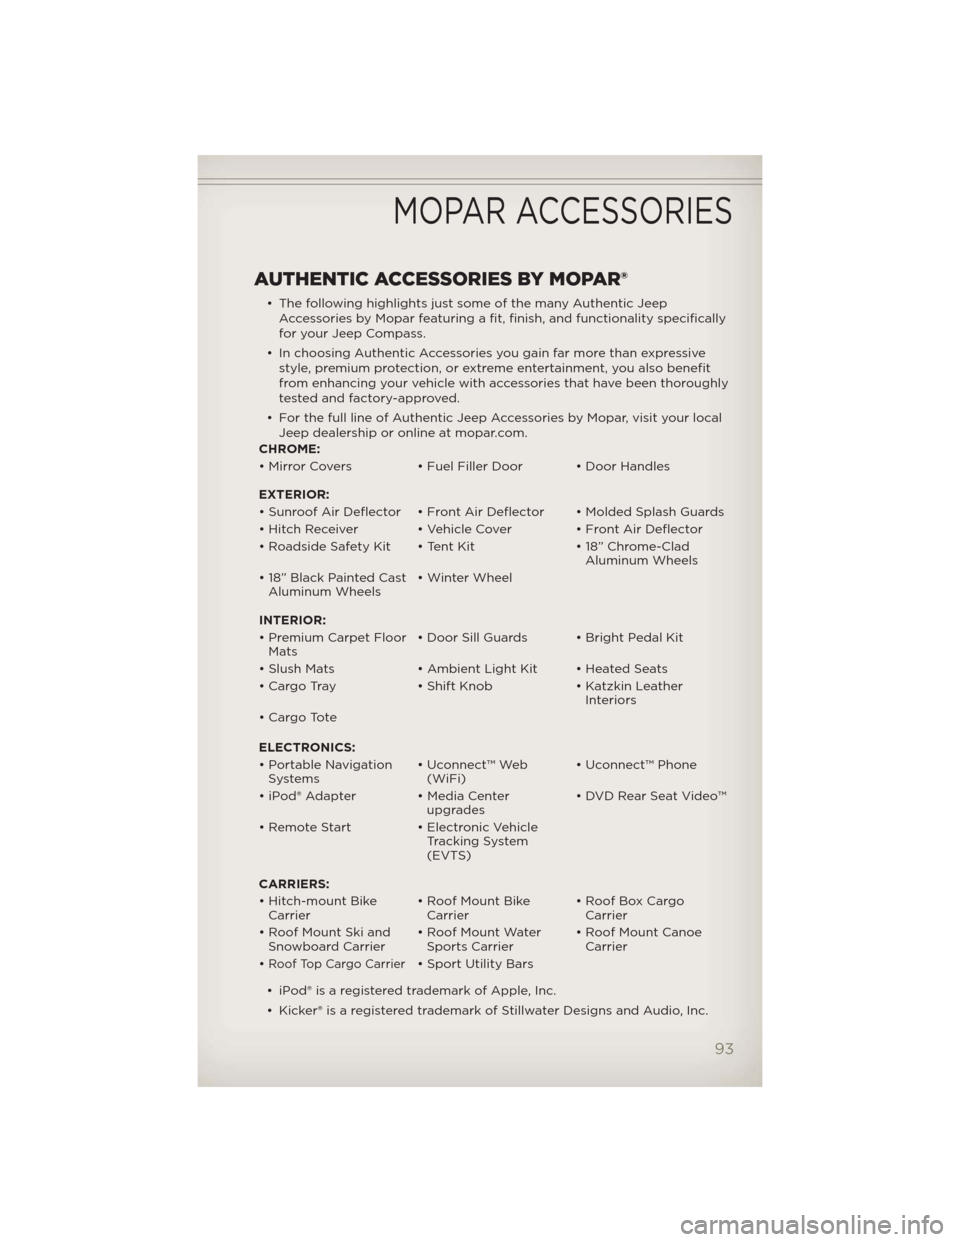
AUTHENTIC ACCESSORIES BY MOPAR®
• The following highlights just some of the many Authentic Jeep
Accessories by Mopar featuring a fit, finish, and functionality specifically
for your Jeep Compass.
• In choosing Authentic Accessories you gain far more than expressive
style, premium protection, or extreme entertainment, you also benefit
from enhancing your vehicle with accessories that have been thoroughly
tested and factory-approved.
• For the full line of Authentic Jeep Accessories by Mopar, visit your local
Jeep dealership or online at mopar.com.
CHROME:
• Mirror Covers • Fuel Filler Door • Door Handles
EXTERIOR:
• Sunroof Air Deflector • Front Air Deflector • Molded Splash Guards
• Hitch Receiver • Vehicle Cover • Front Air Deflector
• Roadside Safety Kit • Tent Kit • 18” Chrome-Clad
Aluminum Wheels
• 18” Black Painted Cast
Aluminum Wheels• Winter Wheel
INTERIOR:
• Premium Carpet Floor
Mats• Door Sill Guards • Bright Pedal Kit
• Slush Mats • Ambient Light Kit • Heated Seats
• Cargo Tray • Shift Knob • Katzkin Leather
Interiors
• Cargo Tote
ELECTRONICS:
• Portable Navigation
Systems• Uconnect™ Web
(WiFi)• Uconnect™ Phone
• iPod® Adapter • Media Center
upgrades• DVD Rear Seat Video™
• Remote Start • Electronic Vehicle
Tracking System
(EVTS)
CARRIERS:
• Hitch-mount Bike
Carrier• Roof Mount Bike
Carrier• Roof Box Cargo
Carrier
• Roof Mount Ski and
Snowboard Carrier• Roof Mount Water
Sports Carrier• Roof Mount Canoe
Carrier
•
Roof Top Cargo Carrier• Sport Utility Bars
• iPod® is a registered trademark of Apple, Inc.
• Kicker® is a registered trademark of Stillwater Designs and Audio, Inc.
MOPAR ACCESSORIES
93
Page 96 of 108
Airbag .................10
Alarm,Panic ..............8
Arming Theft System (Security
Alarm) ..................9
AudioSettings ........26,27,28,
30,31,32,36
Automatic Temperature Control
(ATC) ..................22
Automatic Transmission
FluidType..............83
Overheating ............68
AxleFluid ...............83
Belts, Seat................9
BrakeFluid ..............83
Break-In Recommendations, New
Vehicle .................17
Bulb Replacement.........90
Calibration, Compass........53
Change Oil Indicator........67
Changing A Flat Tire........68
ChildRestraint .............11
Child Restraint Tether Anchors . . 11
Clock Setting.......26,28,31,33
Compass Calibration........53
Cooling System
Coolant Capacity.........83
Cruise Control (Speed Control)..20
CruiseLight ..............20
Customer Assistance........91
Defects, Reporting.........92
Dimmer Control............18
Dimmer Switch, Headlight.....18
Disarming, Theft System . . . . . . 9
Electronic Speed Control (Cruise
Control) ................20
Electronic Vehicle Information
Center(EVIC) ...........52,53
Electronics
Your Vehicle's Sound System . 24
Emergency, In Case of
Jacking...............68
Jump Starting...........74
Overheating ............67Engine
Break-In Recommendations . . . 17
Compartment . . . . . . . . . . . 81
Jump Starting...........74
OilSelection ............83
Overheating ............67
Event Data Recorder . . . . . . . . 79
Exterior Lights . . . . . . . . . . . . 90
Flash-To-Pass .............18
Fluid Capacities . . . . . . . . . . . 83
Fluids ..................83
FogLights ...............18
Folding Front Passenger Seat . . 14
FoldingRearSeat ..........14
Freeing A Stuck Vehicle . . . . . . 78
Front Heated Seats . . . . . . . . . 16
Fuel
Specifications . . . . . . .....83
Garage Door Opener
(HomeLink®) . . ...........54
Headlights . . . . . . . . . . . . . . . 18
Dimmer Switch . . . . . . . . . . . 18
High Beam . . . . . . . . . . . . . 18
HeatedMirrors ..........21,22
HeatedSeats .............16
High Beam/Low Beam Select
(Dimmer) Switch . . . . . . . . . . . 18
HomeLink® (Garage Door Opener)
Transmitter . . . . . . . . . . . . . . 54
Hood Release . . . . . . . . . . . . 80
Instrument Cluster . . . . . . . . . . 6
Indicators ...............7
Instrument Cluster Warning
Lights ................6,63
Intermittent Wipers
(DelayWipers) ............19
Introduction . . . . . . . . ......2
Inverter Outlet (115V) . . . . . . . . 57
Inverter,Power ............57
iPod®/USB/MP3 Control . . . . . . 46
Bluetooth Streaming Audio . . 52
INDEX
94
Page 97 of 108
Jack Location............68
Jack Operation..........68,69
Jacking Instructions . . . .....69
Jump Starting............74
KeyFob .................8
Key Fob Programmable
Features ................53
Lane Change Assist . . . . . . . . . 18
LATCH (Lower Anchors and Tether
forCHildren) ..............11
Lights
Headlights..............18
Park ..................18
Turn Signal.............18
Warning (Instrument Cluster
Description) .............6
Maintenance Record . . ......86
Maintenance Schedule . . . . . . . 84
Media Center Radio.....26,28,30
Mirrors
Heated ..............21,22
MOPAR®Accessories ........93
Navigation...............39
New Vehicle Break-In Period . . . 17
Oil Change Indicator........67
Oil, Engine
Capacity...............83
Outlet
Power ................58
Overheating, Engine . . . . . . . . 67
PanicAlarm ...............8
Phone (Pairing)...........47
Phone (Uconnect)..........47
Placard, Tire and Loading
Information ..............89
Power
Glass Sunroof...........22
Inverter ...............57
Outlet (Auxiliary Electrical
Outlet) ................58Seats .................13
Steering ...............83
Preparation for Jacking......69
Programmable Electronic
Features ................53
Radio Operation . . . . . . . . . . . 33
Rain Sensitive Wiper System . . . 19
Rear Seat, Folding . . . . . . . . . . 14
Recreational Towing . . . . . . . . 62
Remote Starting System ......8
Replacement Bulbs . . . . . . . . . 90
Reporting Safety Defects . . . . . 92
Restraints,Child ............11
RollOverWarning ..........3
SeatBelts ................9
Seats ..................13
Adjustment . . . . .........13
Folding Front Passenger . . . . 14
Heated ................16
Power .................13
RearFolding ............14
Seek Button . . ......27,29,31,32
Setting the Clock . . . . . 26,28,31,33
Shift Lever Override . . . . . . . . 76
Short Message Service (SMS) . . . 51
Signals,Turn ..............18
SIRIUS Travel Link . . . . . . . . . . 45
Spare Tire . . . . . . . . . . . . . . . 68
Spark Plugs . . . . . . . . . . . . . . 83
Speed Control
Accel/Decel ............20
Cancel . . . . . . . . . . . . . . . . 20
Resume ...............20
Speed Control (Cruise
Control) ................20
Starting
Remote . . . . . . . . . . . . . . . . 8
Steering
TiltColumn .............15
Steering Wheel Audio
Controls ................46
Store Radio Presets . . . . . 27,29,31
SunRoof ................22
Supplemental Restraint
System-Airbag ...........10
INDEX
95
Page 98 of 108
Temperature Gauge,
Engine Coolant............67
TextMessaging ............51
Theft Alarm (Security Alarm) . . . 9
TheftSystemArming.........9
TheftSystemDisarming .......9
TiltSteeringColumn .........15
Tires
AirPressure ............89
Changing..............68
Jacking...............68
Pressure Warning Light . . . . . 63
Spare Tire..............68
Towing .................61
24-Hour Towing Assistance . . 63
DisabledVehicle..........77
Recreational............62
Trailer Towing
Trailer and Tongue Weight . . . 61TrailerWeight .............61
Transmission
Fluid .................83
Turn Signals . . ............18
Uconnect™ Phone . . . . . . . . . . 47
Uconnect™ Voice Command . . . 50
Voice Commands . . . . . . . . . . 50
Warning, Roll Over . . . . . . . . . . 3
Washer
Rear ..................19
Washers, Windshield . . ......19
Wheel and Wheel Trim Care . . . 90
WindBuffeting ............23
Windshield Washers . . . . . . . . . 19
Windshield Wipers . . . . . . . . . . 19
Wiper,Rear ..............19
INDEX
96
Page 99 of 108
FREQUENTLY ASKED QUESTIONS
GETTING STARTED
• How do I install my LATCH Equipped Child Seat? pg. 11
• How do my heated seats operate? pg. 16
ELECTRONICS
• Which radio is in my vehicle? pg. 26, 28, 30, 33
• How do I activate the Audio Jack? pg. 27, 30, 32, 36
• How do I set the clock on my radio? pg. 26, 28, 31, 33
• How do I use the Navigation feature? pg. 39
• How do I pair my cell phone via Bluetooth® with the UConnect™
Hands-Free Voice Activation System? pg. 47
• How do I configure my Universal Garage Door Opener (HomeLink)?
pg. 54
UTILITY
• How do I know how much I can tow with my Jeep Compass? pg. 61
WHAT TO DO IN EMERGENCIES
• What do I do if my TPMS warning light is blinking? pg. 63
• How do I change a flat tire? pg. 68
• How do I Jump-Start my vehicle? pg. 74
MAINTAINING YOUR VEHICLE
• Where is my Fuse Block located? pg. 87
• What type of oil do I use? pg. 83
• How often should I change my engine’s oil? pg. 84
• What should my tire pressure be set at? pg. 89
FAQ (How To?)
97