check engine light JEEP COMPASS 2019 Owner handbook (in English)
[x] Cancel search | Manufacturer: JEEP, Model Year: 2019, Model line: COMPASS, Model: JEEP COMPASS 2019Pages: 362, PDF Size: 6.23 MB
Page 141 of 362
Front seat belt assemblies must be replaced
after a collision. Rear seat belt assemblies
must be replaced after a collision if they have
been damaged (i.e., bent retractor, torn web-
bing, etc.). If there is any question regarding
seat belt or retractor condition, replace the
seat belt.
Air Bag Warning Light
The Air Bag warning light
will turn on for
four to eight seconds as a bulb check when
the ignition switch is first turned to ON/RUN.
If the light is either not on during starting,
stays on, or turns on while driving, have the
system inspected at an authorized dealer as
soon as possible. After the bulb check, this
light will illuminate with a single chime when
a fault with the Air Bag System has been
detected. It will stay on until the fault is
removed. If the light comes on intermittently
or remains on while driving, have an autho-
rized dealer service the vehicle immediately.
Refer to “Occupant Restraint Systems” in
“Safety” for further information.Defroster
Check operation by selecting the defrost
mode and place the blower control on high
speed. You should be able to feel the air
directed against the windshield. See an au-
thorized dealer for service if your defroster is
inoperable.
Floor Mat Safety Information
Always use floor mats designed to fit your
vehicle. Only use a floor mat that does not
interfere with the operation of the accelera-
tor, brake or clutch pedals. Only use a floor
mat that is securely attached using the floor
mat fasteners so it cannot slip out of position
and interfere with the accelerator, brake or
clutch pedals or impair safe operation of your
vehicle in other ways.
WARNING!
An improperly attached, damaged, folded,
or stacked floor mat, or damaged floor mat
fasteners may cause your floor mat to in-
terfere with the accelerator, brake, or
clutch pedals and cause a loss of vehicle
control. To prevent SERIOUS INJURY or
WARNING!
DEATH:
• ALWAYS securely attach
your floor
mat using the floor mat fasteners. DO
NOT install your floor mat upside down
or turn your floor mat over. Lightly pull to
confirm mat is secured using the floor
mat fasteners on a regular basis.
• ALWAYS REMOVE THE EXISTING
FLOOR MAT FROM THE VEHICLE
before installing any other floor mat.
NEVER install or stack an additional
floor mat on top of an existing floor mat.
• ONLY install floor mats designed to fit
your vehicle. NEVER install a floor mat
that cannot be properly attached and
secured to your vehicle. If a floor mat
needs to be replaced, only use a FCA
approved floor mat for the specific
make, model, and year of your vehicle.
• ONLY use the driver’s side floor mat on
the driver’s side floor area. To check for
interference, with the vehicle properly
parked with the engine off, fully depress
the accelerator, the brake, and the
clutch pedal (if present) to check for
139
Page 146 of 362
WARNING!
N-Go in the ACC or ON/RUN mode. A
child could operate power windows,
other controls, or move the vehicle.
• Do not leave children or animals inside
parked vehicles in hot weather. Interior
heat build-up may cause serious injury
or death.
NOTE:
Engine start up in very low ambient tempera-
ture could result in evident white smoke. This
condition will disappear as the engine warms
up.
CAUTION!
The engine is allowed to crank as long as
30 seconds. If the engine fails to start
during this period, please wait at least two
minutes for the starter to cool before re-
peating start procedure.
Normal Starting Procedure — Keyless
Enter-N-Go
Observe the instrument panel cluster lights
when starting the engine.
NOTE:
Normal starting of either a cold or a warm
engine is obtained without pumping or press-
ing the accelerator pedal.
1. Always apply the parking brake.
2. Press and hold the brake pedal while
pushing the ENGINE START/STOP button
once.
NOTE:
A delay of the start of up to five seconds is
possible under very cold conditions. The
“Wait to Start” telltale will be illuminated
during the pre-heat process, When the
engine Wait To Start light goes off the
engine will automatically crank.
CAUTION!
If the “Water in Fuel Indicator Light” re-
mains on, DO NOT START the engine be-
fore the water is drained from the fuel
filters to avoid engine damage.
3. The system will automatically engage the
starter to crank the engine. If the vehicle
fails to start, the starter will disengage
automatically after 30 seconds.
4. If you wish to stop the cranking of the
engine prior to the engine starting, push
the button again.
5. Check that the oil pressure warning light
has turned off.
6. Release the parking brake.
STARTING AND OPERATING
144
Page 188 of 362
Proceed as follows:
• Insert the AdBlue (UREA) nozzle in the
filler, start refilling and stop refilling at the
first shut-off (the shut-off indicates that the
AdBlue (UREA) tank is full). Do not pro-
ceed with the refilling, to prevent spillage
of AdBlue (UREA).
• Extract the nozzle.
Refilling With Containers
Proceed as follows:
• Check the expiration date.
• Read the advice for use on the label before
pouring the content of the bottle into the
AdBlue (UREA) tank.
• If systems which cannot be screwed in (e.g.
tanks) are used for refilling, after the indi-
cation appears on the instrument panel
display refer to “Warning lights And Mes-
sages" in the “Getting To Know Your Instru-
ment Panel” for further information, fill the
AdBlue (UREA) tank with no more than
2 Gallons (8 liters).• If containers which can be screwed to the
filler are used, the reservoir is full when the
AdBlue (UREA) level in the container stops
pouring out. Do not proceed further.
Operations After Refilling
Proceed as follows:
• Fit the cap back on the AdBlue (UREA)
filler by turning it clockwise and screwing it
completely.
• Cycle the ignition to RUN (it is not neces-
sary to start the engine).
• Wait for the indication on the instrument
panel to switch off before moving the car.
The indication may stay on for a few sec-
onds to approximately half a minute. If the
engine is started and the car is moved, the
indication will remain on for longer. This
will not compromise engine operation.
• If the AdBlue (UREA) was topped up when
the tank was empty, wait for 2 minutes
before starting the engine.NOTE:
• If AdBlue (UREA) is spilled out of the filler
neck, clean up well the area and proceed to
filling up again. If the liquid crystallizes,
eliminate it with a sponge and warm water.
• DO NOT EXCEED THE MAXIMUM LEVEL:
this could cause damage to the reservoir.
AdBlue (UREA) freezes at under 12° F
(-11° C). Although the system is designed
to operate below the freezing point of the
UREA, it is advisable not to fill the tank
beyond the maximum level because if the
UREA freezes the system can be damaged.
Follow the instructions in this section.
• If the AdBlue (UREA) is spilled on painted
surfaces or aluminium, immediately clean
the area with water and use absorbent ma-
terial to collect the fluid that has been
spilled on the ground.
•
Do not try to start the engine if AdBlue
(UREA) was accidentally added to the diesel
fuel tank, this can result in serious engine
damage, contact an authorized dealer.
•Do not add additives or other fluids to AdBlue
(UREA), doing so could damage the system.
STARTING AND OPERATING
186
Page 233 of 362
SCHEDULED SERVICING
Correct servicing is crucial for guaranteeing a
long life for the car under the best conditions.
For this reason, Jeep has planned a series of
checks and services at fixed distance inter-
vals and, where provided, at fixed time inter-
vals, as described in the Scheduled Servicing
plan. To keep the car’s efficiency in tip-top
condition, in the following Scheduled Service
plan pages a few additional checks are listed
that should be carried out more frequently
with respect to the normal coupon redemp-
tion schedule. Scheduled Servicing is offered
by all authorized dealerships according to
fixed time or mileage intervals. If, during
each operation, in addition to the ones sched-
uled, the need arises for further replace-
ments or repairs, these may be carried out
with the owner's explicit agreement only.
The technicians at your dealership know your
vehicle best, and have access to factory trained
information, genuine Mopar parts, and specially
designed electronic and mechanical tools that
can help prevent future costly repairs. If your car
is used frequently for towing, the interval be-
tween one scheduled servicing operation and
the next should be reduced. More frequentmaintenance may be needed for vehicles in
severe operating conditions, such as dusty areas
and very short trip driving.
NOTE:
Scheduled Servicing interventions are set out
by the Manufacturer. Failure to have them
carried out may invalidate the warranty. It is
advised to inform an authorized dealership of
any small operating irregularities without
waiting for the next service.
1.4L Gasoline Engine
NOTE:
Under no circumstances should oil change
intervals exceed 9,000 miles (15,000 km) or
12 months, whichever comes first.
Once A Month Or Before A Long Trip
• Check engine oil level.
• Check windshield washer fluid level.
• Check tire pressure and look for unusual
wear or damage. Rotate tires at the first
sign of irregular wear, even if it occurs
before the oil indicator system turns on.
•
Check the fluid levels of the coolant reservoir
and brake master cylinder, fill as needed.
• Check function of all interior and exterior
lights.
At Each Oil Change
• Change oil and filter.
• Rotate the tires.Rotate at the first sign of
irregular wear, even if it occurs before the oil
indicator system turns on.
• Inspect battery and clean and tighten ter-
minals as required.
• Inspect brake pads, shoes, rotors, drums,
hoses and park brake.
• Inspect engine cooling system protection
and hoses.
• Inspect exhaust system.
• Inspect engine air cleaner if using in dusty
or off-road conditions.
Refer to the “Maintenance Plan” on the fol-
lowing page for the required maintenance
intervals.
CAUTION!
Failure to perform the required maintenance
items may result in damage to the vehicle.
231
Page 238 of 362
•Areas that are not dusty: recommended maxi-
mum distance 75,000 mi (120,000 km). The
belt must be replaced every 6 years, regard-
less of distance travelled. Dusty areas and/or
heavy conditions (severe weather conditions,
very low or very high temperatures for ex-
tended periods, urban driving, long periods of
idling): the recommended maximum distance
is 37,500 mi (60,000 km). The belt must be
replaced every 4 years, regardless of dis-
tance travelled.
Once A Month Or Before A Long Trip
• Check engine oil level.
• Check windshield washer fluid level.
• Check tire pressure and look for unusual
wear or damage. Rotate tires at the first
sign of irregular wear, even if it occurs
before the oil indicator system turns on.
• Check the fluid levels of the coolant reser-
voir and brake master cylinder, fill as
needed.• Check function of all interior and exterior
lights.
• Control and recovery of additive level for
AdBlue Diesel emissions (UREA) (if
equipped).
At Each Oil Change
• Change the engine oil filter.
• Inspect the brake hoses and lines.
• Inspect for the presence of water in the fuel
filter/water separator unit.
Demanding Vehicle Use
• Restore additive level for AdBlue Diesel
emissions (UREA) (if equipped), when the
lamp is illuminated or the message on the
instrument panel.
CAUTION!
Failure to perform the required mainte-
nance items may result in damage to the
vehicle.
SERVICING AND MAINTENANCE
236
Page 250 of 362
WARNING!
• Do not open hot engine cooling system.
Never add engine coolant (antifreeze)
when the engine is overheated. Do not
loosen or remove the cap to cool an
overheated engine. Heat causes pres-
sure to build up in the cooling system. To
prevent scalding or injury, do not remove
the pressure cap while the system is hot
or under pressure.
• Do not use a pressure cap other than the
one specified for your vehicle. Personal
injury or engine damage may result.
Brake System
In order to assure brake system performance,
all brake system components should be in-
spected periodically. Refer to the “Mainte-
nance Plan” in this section for the proper
maintenance intervals.
WARNING!
Riding the brakes can lead to brake failure
and possibly a collision. Driving with your
foot resting or riding on the brake pedal
can result in abnormally high brake tem-
peratures, excessive lining wear, and pos-
sible brake damage. You would not have
your full braking capacity in an emergency.
Brake Master Cylinder
The fluid in the master cylinder should be
checked when performing under hood ser-
vices or immediately if the “Brake Warning
Light” is illuminated.
Be sure to clean the top of the master cylin-
der area before removing the cap. If neces-
sary, add fluid to bring the fluid level up to
the requirements described on the brake
fluid reservoir. With disc brakes, fluid level
can be expected to fall as the brake pads
wear. Brake fluid level should be checked
when pads are replaced. However, low fluid
level may be caused by a leak and a checkup
may be needed.
Use only manufacturer's recommended brake
fluid. Refer to “Fluids And Lubricants” in
“Technical Specifications” for further information.
WARNING!
• Use only manufacturer's recommended
brake fluid. Refer to “Fluids And Lubri-
cants” in “Technical Specifications” for
further information. Using the wrong
type of brake fluid can severely damage
your brake system and/or impair its per-
formance. The proper type of brake fluid
for your vehicle is also identified on the
original factory installed hydraulic mas-
ter cylinder reservoir.
• To avoid contamination from foreign
matter or moisture, use only new brake
fluid or fluid that has been in a tightly
closed container. Keep the master cylin-
der reservoir cap secured at all times.
Brake fluid in a open container absorbs
moisture from the air resulting in a lower
boiling point. This may cause it to boil
unexpectedly during hard or prolonged
braking, resulting in sudden brake fail-
ure. This could result in a collision.
SERVICING AND MAINTENANCE
248
Page 261 of 362
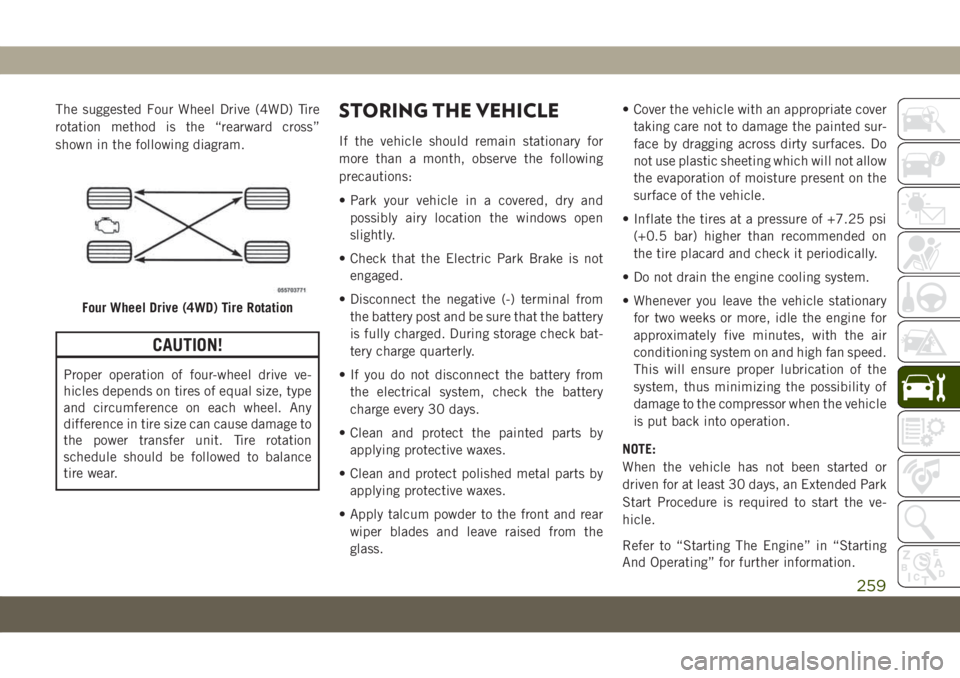
The suggested Four Wheel Drive (4WD) Tire
rotation method is the “rearward cross”
shown in the following diagram.
CAUTION!
Proper operation of four-wheel drive ve-
hicles depends on tires of equal size, type
and circumference on each wheel. Any
difference in tire size can cause damage to
the power transfer unit. Tire rotation
schedule should be followed to balance
tire wear.
STORING THE VEHICLE
If the vehicle should remain stationary for
more than a month, observe the following
precautions:
• Park your vehicle in a covered, dry and
possibly airy location the windows open
slightly.
• Check that the Electric Park Brake is not
engaged.
• Disconnect the negative (-) terminal from
the battery post and be sure that the battery
is fully charged. During storage check bat-
tery charge quarterly.
• If you do not disconnect the battery from
the electrical system, check the battery
charge every 30 days.
• Clean and protect the painted parts by
applying protective waxes.
• Clean and protect polished metal parts by
applying protective waxes.
• Apply talcum powder to the front and rear
wiper blades and leave raised from the
glass.• Cover the vehicle with an appropriate cover
taking care not to damage the painted sur-
face by dragging across dirty surfaces. Do
not use plastic sheeting which will not allow
the evaporation of moisture present on the
surface of the vehicle.
• Inflate the tires at a pressure of +7.25 psi
(+0.5 bar) higher than recommended on
the tire placard and check it periodically.
• Do not drain the engine cooling system.
• Whenever you leave the vehicle stationary
for two weeks or more, idle the engine for
approximately five minutes, with the air
conditioning system on and high fan speed.
This will ensure proper lubrication of the
system, thus minimizing the possibility of
damage to the compressor when the vehicle
is put back into operation.
NOTE:
When the vehicle has not been started or
driven for at least 30 days, an Extended Park
Start Procedure is required to start the ve-
hicle.
Refer to “Starting The Engine” in “Starting
And Operating” for further information.
Four Wheel Drive (4WD) Tire Rotation
259
Page 271 of 362
CAUTION!
Do not load your vehicle any heavier than
the GVWR or the maximum front and rear
GAWR. If you do, parts on your vehicle can
break, or it can change the way your ve-
hicle handles. This could cause you to lose
control. Also overloading can shorten the
life of your vehicle. Never exceed the maxi-
mum combined vehicle load value: the
maximum towable load is only allowed if it
does not exceed the maximum combined
vehicle load.
FUEL REQUIREMENTS —
GASOLINE ENGINE
1.4L Turbo Gasoline Engine
This engine is designed to meet all emission
regulations and provide satisfactory fuel
economy and performance when using high-
quality unleaded gasoline having a minimum
research octane rating (RON) of 95. For op-
timum performance and fuel economy the
use of minimum research octane rating
(RON) of 98 or higher is recommended.Light spark knock at low engine speeds is not
harmful to your engine. However, continued
heavy spark knock at high speeds can cause
damage, and immediate service is required.
Poor quality gasoline can cause problems
such as hard starting, stalling, and hesita-
tions. If you experience these symptoms, try
another brand of gasoline before considering
service for the vehicle.
Poor quality gasoline can cause problems
such as hard starting, stalling, and hesita-
tions. If you experience these symptoms, try
another brand of gasoline before considering
service for the vehicle.
Ethanol
The manufacturer recommends that your ve-
hicle be operated on fuel containing no more
than 10% ethanol. Purchasing your fuel from
a reputable supplier may reduce the risk of
exceeding this 10% limit and/or of receiving
fuel with abnormal properties.
CAUTION!
Use of fuel with Ethanol content higher
than 10% may result in engine malfunc-
tion, starting and operating difficulties,
and materials degradation. These adverse
effects could result in permanent damage
to your vehicle.
Materials Added To Fuel
Indiscriminate use of fuel system cleaning
agents should be avoided. Many of these
materials intended for gum and varnish re-
moval may contain active solvents or similar
ingredients. These can harm fuel system gas-
ket and diaphragm materials.
Fuel Icon Identification Compliant To
EN16942
The following symbols make it easier to rec-
ognize the correct type of fuel to be used on
your vehicle. Before proceeding with the sup-
ply, check the symbols placed inside the fuel
filler flap (if present) and compare them with
the symbol on the fuel pump (if present).
269
Page 309 of 362
UCONNECT SETTINGS
The Uconnect system allows you to access
Customer Programmable feature settings
such as Display, Units, Voice, Clock, Safety &
Driving Assistance, Lights, Doors & Locks,
Auto-On Comfort, Engine Off Options, Audio,
Phone/Bluetooth, Restore Settings, Clear
Personal Data, and System Information
through buttons on the touchscreen.
Push the SETTINGS button (Uconnect
3 With 5–inch Display and Uconnect 4 With
7–inch Display), or press the “Apps” button
(Uconnect 4C/4C NAV With 8.4–inch Dis-
play) located near the bottom of the touch-
screen, then press the “Settings” button on
the touchscreen to access the Settings
screen. When making a selection, scroll up or
down until the preferred setting is high-
lighted, then press the preferred setting until
a check-mark appears next to the setting,
showing that setting has been selected.The following feature settings are available:• Language • Auto-On Comfort
& Remote Start
— If Equipped
• Display • Engine Off
Options
• Units • Audio
• Voice • Radio Setup
• Clock or
Time & Date• Phone/Bluetooth
• Safety & Driving
Assistance• Restore Settings
• Brakes • Clear Personal
Data
• Lights • System
Information
• Doors & Locks
NOTE:
Depending on the vehicles options, feature
settings may vary.
Refer to “Uconnect Settings” in “Multimedia”
in the Owner’s Manual for further information.
TIPS CONTROLS AND
GENERAL INFORMATION
Steering Wheel Audio Controls
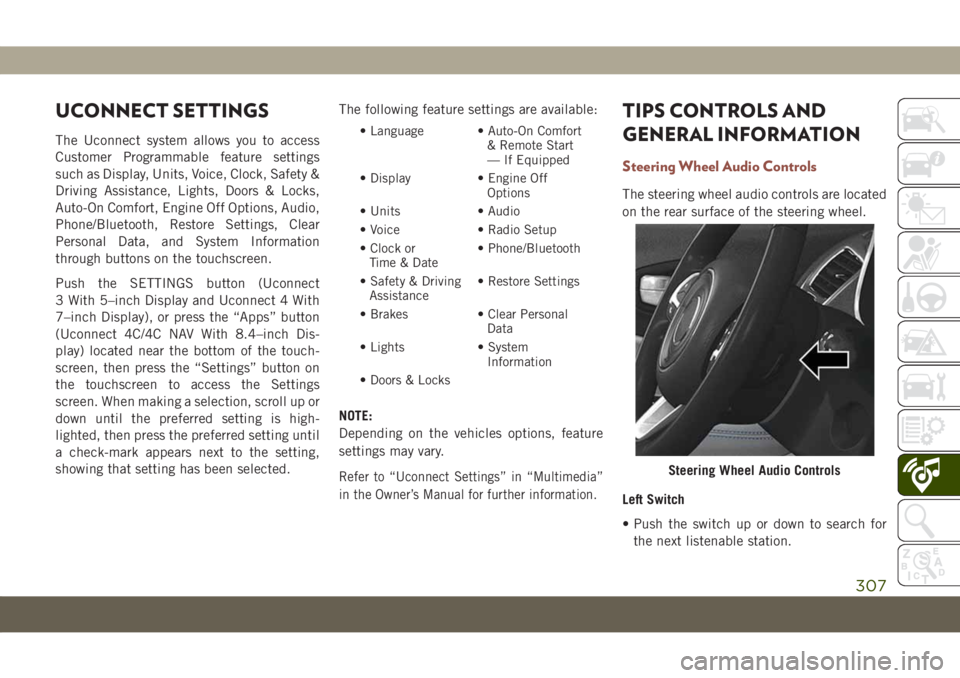
The steering wheel audio controls are located
on the rear surface of the steering wheel.
Left Switch
• Push the switch up or down to search for
the next listenable station.
Steering Wheel Audio Controls
307
Page 351 of 362
Accessories..................280
Mopar...................280
Active Speed Limiter............162
Adaptive Cruise Control (ACC)
(Cruise Control)..............165
Adding Fuel.................183
Additives, Fuel................269
AirBag ....................108
Air Bag Operation............109
Air Bag Warning Light.........107
Enhanced Accident Response .119, 230
Event Data Recorder (EDR)......230
If Deployment Occurs.........118
Knee Impact Bolsters.........115
Maintaining Your Air Bag System . .121
Maintenance...............121
Redundant Air Bag Warning Light . .108
Side Air Bags..............115
Transporting Pets............137
Air Bag Light...........64, 107, 139
Air Conditioner Maintenance.......245
Air Conditioner Refrigerant........245
Air Conditioner System...........245
Air Conditioning................46
Air Conditioning Filter.........48, 245Air Conditioning, Operating Tips......47
Air Pressure
Tires....................251
Alarm
Arm The System.............18
Disarm The System............19
Security Alarm............18, 68
Alarm System
Security Alarm............18, 19
Android Auto.............293, 330
Antifreeze (Engine Coolant)........274
Anti-Lock Brake System (ABS).......79
Anti-Lock Warning Light...........68
Apple CarPlay.............294, 330
Arming System
Security Alarm..............18
Assist, Hill Start................86
Audio Jack..............
.291, 299
Audio Systems (Radio)...........285
Auto Down Power Windows.........49
Automatic Headlights............34
Automatic High Beams...........34
Automatic Temperature Control (ATC) . . .47
Automatic Transaxle............151
Automatic Transmission..........152Adding Fluid...............279
Fluid Level Check............249
Fluid Type.............249, 279
Special Additives............249
Auto Up Power Windows...........49
Auxiliary Electrical Outlet
(Power Outlet)...............56
Auxiliary (Power Outlet)...........56
Axle Lubrication...............279
Battery..................66, 244
Charging System Light..........66
Belts, Seat..................138
Blind Spot Monitoring............88
Brake Assist System...........80, 91
Brake Control System, Electronic.....80
Brake Fluid..................279
Brake System................248
Fluid Check............248, 279
Master Cylinder.............248
Parking..................145
Warning Light...............65
Brake/Transmission Interlock.......152
Bulb Replacement.............193
INDEX
349