JEEP COMPASS 2019 Owner handbook (in English)
Manufacturer: JEEP, Model Year: 2019, Model line: COMPASS, Model: JEEP COMPASS 2019Pages: 362, PDF Size: 6.23 MB
Page 201 of 362
Rear Fog Lamps
We advise referring to an authorized dealer
for service.
NOTE:
We advise referring to an authorized dealer.
Reverse Lamps
We advise referring to an authorized dealer
for service.
3rd Stop Lamp
The CHMSL is LED. For their replacement,
see an authorized dealer.
License Plate Lights
The license plate light is LED. For their re-
placement, see an authorized dealer.WARNING!
• Before proceeding with the replacement
of the lamp wait until the exhaust pipes
are cool: DANGER OF BURNS!
• Modifications or repair of the electrical
system performed incorrectly and with-
out taking into account the technical
characteristics can cause malfunctions
with the risk of fire.
• Halogen lamps contain gas under pres-
sure, in the event of breakage be careful
of the projection of fragments of glass.
• Halogen lamps must be handled by
touching only the metallic part. If the
transparent bulb is in contact with the
fingers, reduces the intensity of the
emitted light and you can also affect the
life of the lamp. In case of accidental
contact, rub the bulb with a cloth damp-
ened with alcohol and allow to dry.
NOTE:
It is recommended to have your bulbs re-
placed by an authorized dealer.
FUSES
WARNING!
• When replacing a blown fuse, always use
an appropriate replacement fuse with
the same amp rating as the original fuse.
Never replace a fuse with another fuse of
higher amp rating. Never replace a
blown fuse with metal wires or any other
material. Do not place a fuse inside a
circuit breaker cavity or vice versa. Fail-
ure to use proper fuses may result in
serious personal injury, fire and/or prop-
erty damage.
• Before replacing a fuse, make sure that
the ignition is off and that all the other
services are switched off and/or disen-
gaged.
• If the replaced fuse blows again, contact
an authorized dealer.
•
If a general protection fuse for safety
systems (air bag system, braking system),
power unit systems (engine system, trans-
mission system) or steering system blows,
contact an authorized dealer.
199
Page 202 of 362
CAUTION!
If it is necessary to wash the engine com-
partment, take care not to directly hit the
fuse box, and the windshield wiper motors
with water.
General Information
The fuses protect electrical systems against
excessive current.
When a device does not work, you must check
the fuse element inside the blade fuse for a
break/melt.
Also, please be aware that when using power
outlets for extended periods of time with the
engine off may result in vehicle battery dis-
charge.
Fuse Location
The fuses are grouped into controllers lo-
cated in the engine compartment.
Engine Compartment Fuses/Distribution
Unit
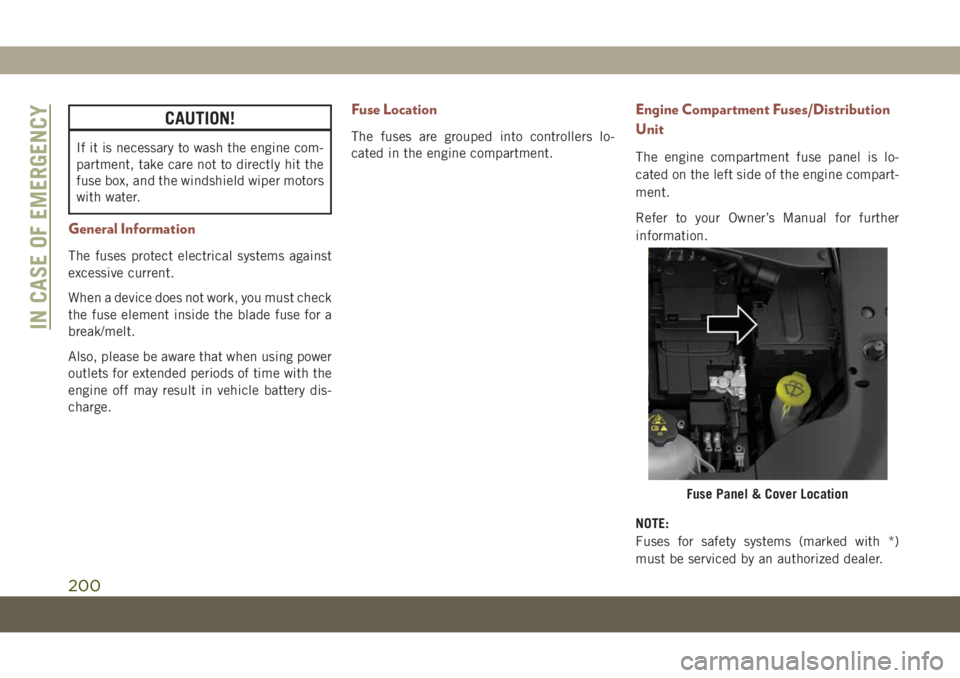
The engine compartment fuse panel is lo-
cated on the left side of the engine compart-
ment.
Refer to your Owner’s Manual for further
information.
NOTE:
Fuses for safety systems (marked with *)
must be serviced by an authorized dealer.
Fuse Panel & Cover Location
IN CASE OF EMERGENCY
200
Page 203 of 362
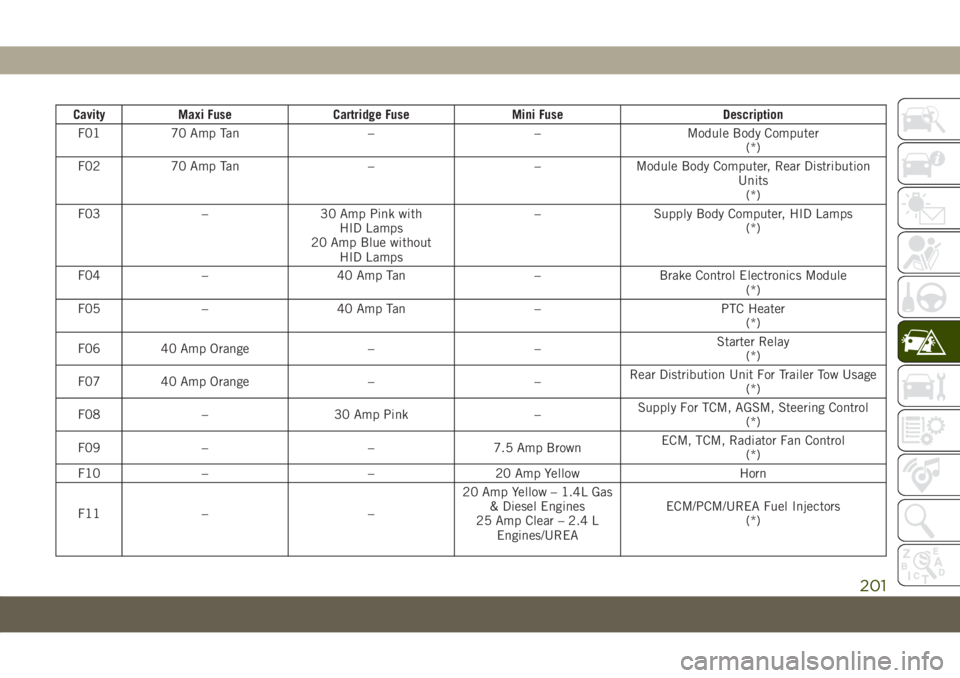
Cavity Maxi Fuse Cartridge Fuse Mini Fuse Description
F01 70 Amp Tan – – Module Body Computer
(*)
F02 70 Amp Tan – – Module Body Computer, Rear Distribution
Units
(*)
F03 – 30 Amp Pink with
HID Lamps
20 Amp Blue without
HID Lamps– Supply Body Computer, HID Lamps
(*)
F04 – 40 Amp Tan – Brake Control Electronics Module
(*)
F05 – 40 Amp Tan – PTC Heater
(*)
F06 40 Amp Orange – –Starter Relay
(*)
F07 40 Amp Orange – –Rear Distribution Unit For Trailer Tow Usage
(*)
F08 – 30 Amp Pink –Supply For TCM, AGSM, Steering Control
(*)
F09 – – 7.5 Amp BrownECM, TCM, Radiator Fan Control
(*)
F10 – – 20 Amp Yellow Horn
F11 – –20 Amp Yellow – 1.4L Gas
& Diesel Engines
25 Amp Clear – 2.4 L
Engines/UREAECM/PCM/UREA Fuel Injectors
(*)
201
Page 204 of 362
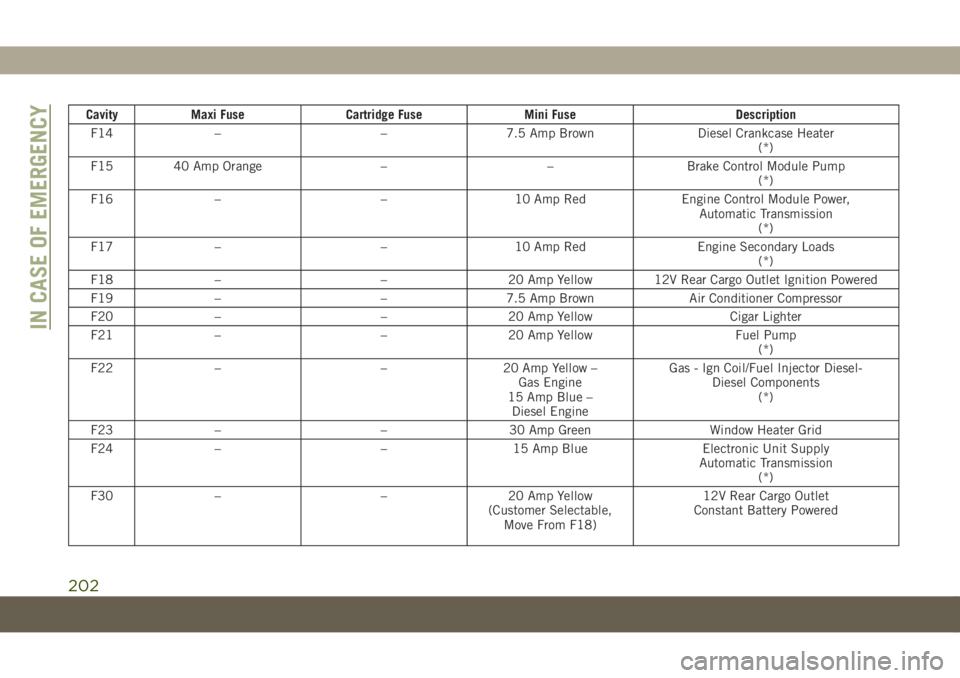
Cavity Maxi Fuse Cartridge Fuse Mini Fuse Description
F14 – – 7.5 Amp Brown Diesel Crankcase Heater
(*)
F15 40 Amp Orange – – Brake Control Module Pump
(*)
F16 – – 10 Amp Red Engine Control Module Power,
Automatic Transmission
(*)
F17 – – 10 Amp Red Engine Secondary Loads
(*)
F18 – – 20 Amp Yellow 12V Rear Cargo Outlet Ignition Powered
F19 – – 7.5 Amp Brown Air Conditioner Compressor
F20 – – 20 Amp Yellow Cigar Lighter
F21 – – 20 Amp Yellow Fuel Pump
(*)
F22 – – 20 Amp Yellow –
Gas Engine
15 Amp Blue –
Diesel EngineGas - Ign Coil/Fuel Injector Diesel-
Diesel Components
(*)
F23 – – 30 Amp Green Window Heater Grid
F24 – – 15 Amp Blue Electronic Unit Supply
Automatic Transmission
(*)
F30 – – 20 Amp Yellow
(Customer Selectable,
Move From F18)12V Rear Cargo Outlet
Constant Battery Powered
IN CASE OF EMERGENCY
202
Page 205 of 362
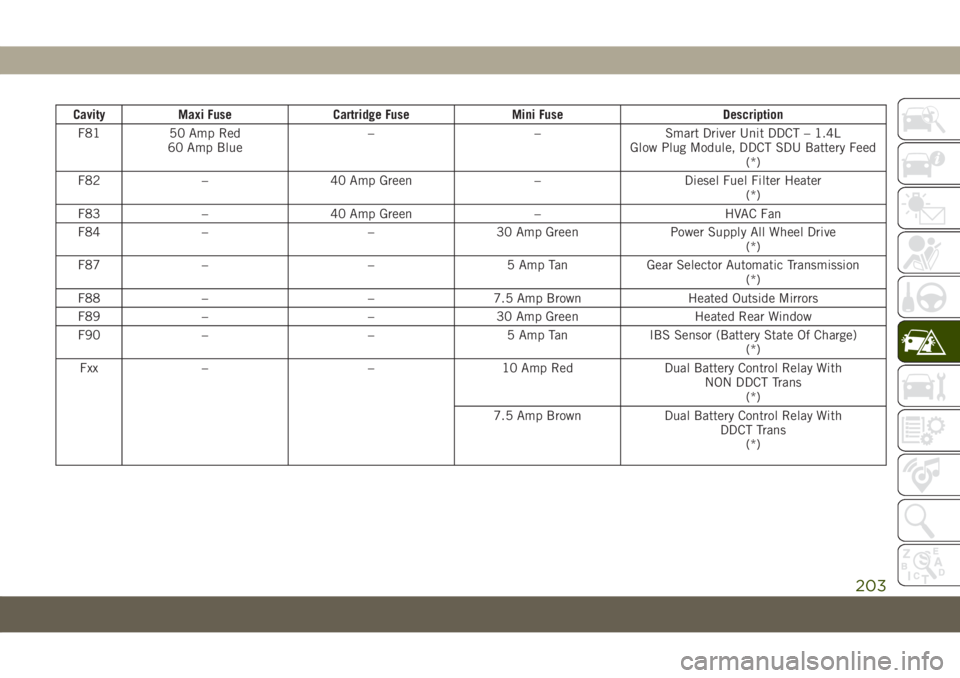
Cavity Maxi Fuse Cartridge Fuse Mini Fuse Description
F81 50 Amp Red
60 Amp Blue– – Smart Driver Unit DDCT – 1.4L
Glow Plug Module, DDCT SDU Battery Feed
(*)
F82 – 40 Amp Green – Diesel Fuel Filter Heater
(*)
F83 – 40 Amp Green – HVAC Fan
F84 – – 30 Amp Green Power Supply All Wheel Drive
(*)
F87 – – 5 Amp Tan Gear Selector Automatic Transmission
(*)
F88 – – 7.5 Amp Brown Heated Outside Mirrors
F89 – – 30 Amp Green Heated Rear Window
F90 – – 5 Amp Tan IBS Sensor (Battery State Of Charge)
(*)
Fxx – – 10 Amp Red Dual Battery Control Relay With
NON DDCT Trans
(*)
7.5 Amp Brown Dual Battery Control Relay With
DDCT Trans
(*)
203
Page 206 of 362
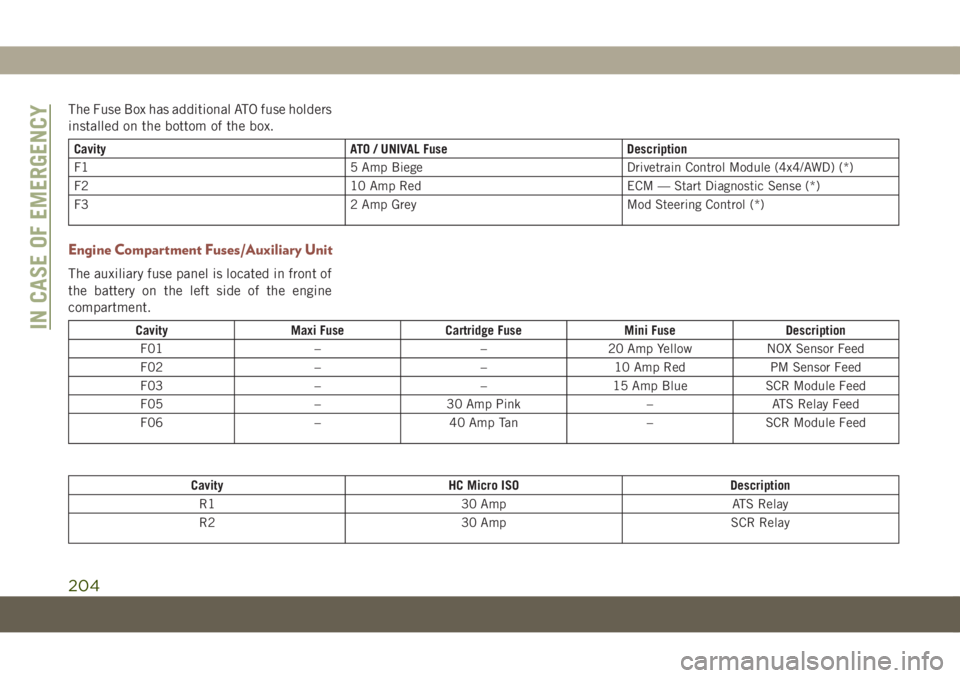
The Fuse Box has additional ATO fuse holders
installed on the bottom of the box.
Cavity ATO / UNIVAL Fuse Description
F1 5 Amp Biege Drivetrain Control Module (4x4/AWD) (*)
F2 10 Amp Red ECM — Start Diagnostic Sense (*)
F3 2 Amp Grey Mod Steering Control (*)
Engine Compartment Fuses/Auxiliary Unit
The auxiliary fuse panel is located in front of
the battery on the left side of the engine
compartment.
Cavity Maxi Fuse Cartridge Fuse Mini Fuse Description
F01 – – 20 Amp Yellow NOX Sensor Feed
F02 – – 10 Amp Red PM Sensor Feed
F03 – – 15 Amp Blue SCR Module Feed
F05 – 30 Amp Pink – ATS Relay Feed
F06 – 40 Amp Tan – SCR Module Feed
Cavity HC Micro ISO Description
R1 30 Amp ATS Relay
R2 30 Amp SCR Relay
IN CASE OF EMERGENCY
204
Page 207 of 362
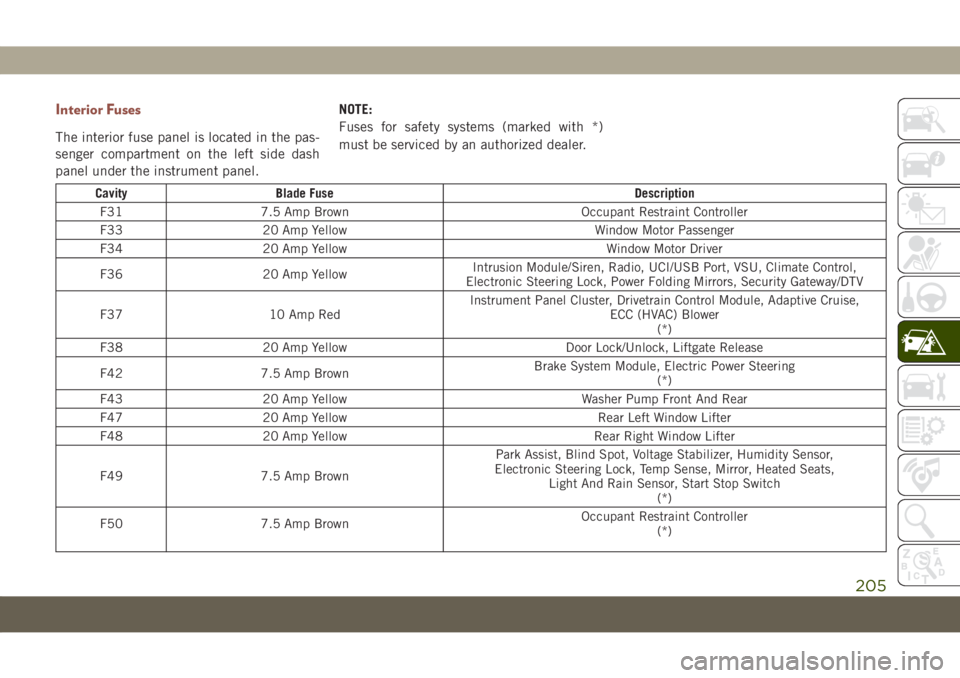
Interior Fuses
The interior fuse panel is located in the pas-
senger compartment on the left side dash
panel under the instrument panel.NOTE:
Fuses for safety systems (marked with *)
must be serviced by an authorized dealer.
Cavity Blade Fuse Description
F31 7.5 Amp Brown Occupant Restraint Controller
F33 20 Amp Yellow Window Motor Passenger
F34 20 Amp Yellow Window Motor Driver
F36 20 Amp YellowIntrusion Module/Siren, Radio, UCI/USB Port, VSU, Climate Control,
Electronic Steering Lock, Power Folding Mirrors, Security Gateway/DTV
F37 10 Amp RedInstrument Panel Cluster, Drivetrain Control Module, Adaptive Cruise,
ECC (HVAC) Blower
(*)
F38 20 Amp Yellow Door Lock/Unlock, Liftgate Release
F42 7.5 Amp BrownBrake System Module, Electric Power Steering
(*)
F43 20 Amp Yellow Washer Pump Front And Rear
F47 20 Amp Yellow Rear Left Window Lifter
F48 20 Amp Yellow Rear Right Window Lifter
F49 7.5 Amp BrownPark Assist, Blind Spot, Voltage Stabilizer, Humidity Sensor,
Electronic Steering Lock, Temp Sense, Mirror, Heated Seats,
Light And Rain Sensor, Start Stop Switch
(*)
F50 7.5 Amp BrownOccupant Restraint Controller
(*)
205
Page 208 of 362
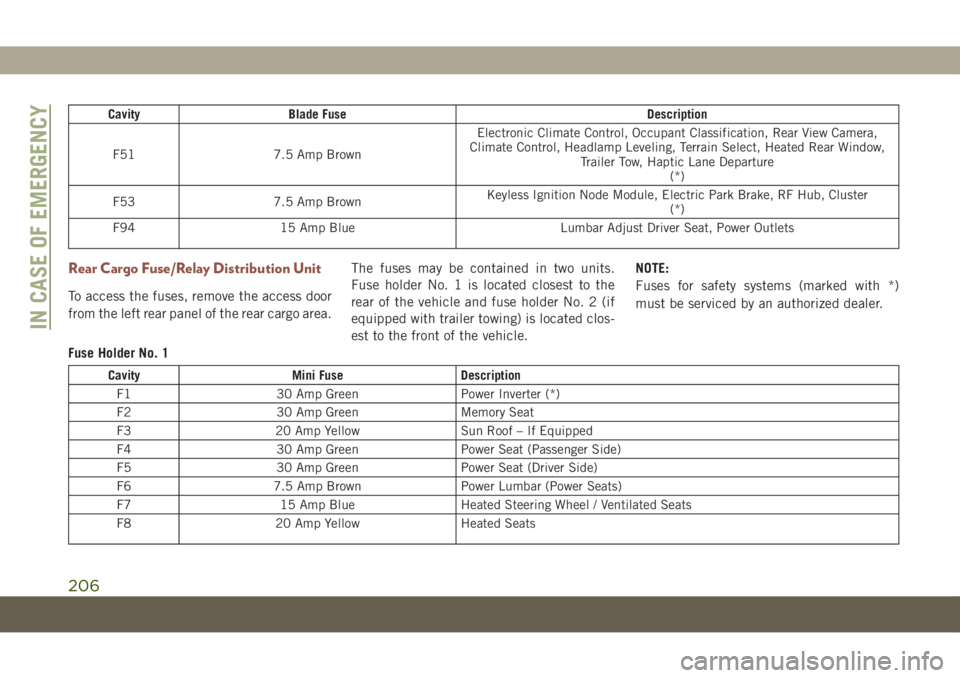
Cavity Blade Fuse Description
F51 7.5 Amp BrownElectronic Climate Control, Occupant Classification, Rear View Camera,
Climate Control, Headlamp Leveling, Terrain Select, Heated Rear Window,
Trailer Tow, Haptic Lane Departure
(*)
F53 7.5 Amp BrownKeyless Ignition Node Module, Electric Park Brake, RF Hub, Cluster
(*)
F94 15 Amp Blue Lumbar Adjust Driver Seat, Power Outlets
Rear Cargo Fuse/Relay Distribution Unit
To access the fuses, remove the access door
from the left rear panel of the rear cargo area.The fuses may be contained in two units.
Fuse holder No. 1 is located closest to the
rear of the vehicle and fuse holder No. 2 (if
equipped with trailer towing) is located clos-
est to the front of the vehicle.NOTE:
Fuses for safety systems (marked with *)
must be serviced by an authorized dealer.
Fuse Holder No. 1
Cavity Mini Fuse Description
F1 30 Amp Green Power Inverter (*)
F2 30 Amp Green Memory Seat
F3 20 Amp Yellow Sun Roof – If Equipped
F4 30 Amp Green Power Seat (Passenger Side)
F5 30 Amp Green Power Seat (Driver Side)
F6 7.5 Amp Brown Power Lumbar (Power Seats)
F7 15 Amp Blue Heated Steering Wheel / Ventilated Seats
F8 20 Amp Yellow Heated Seats
IN CASE OF EMERGENCY
206
Page 209 of 362
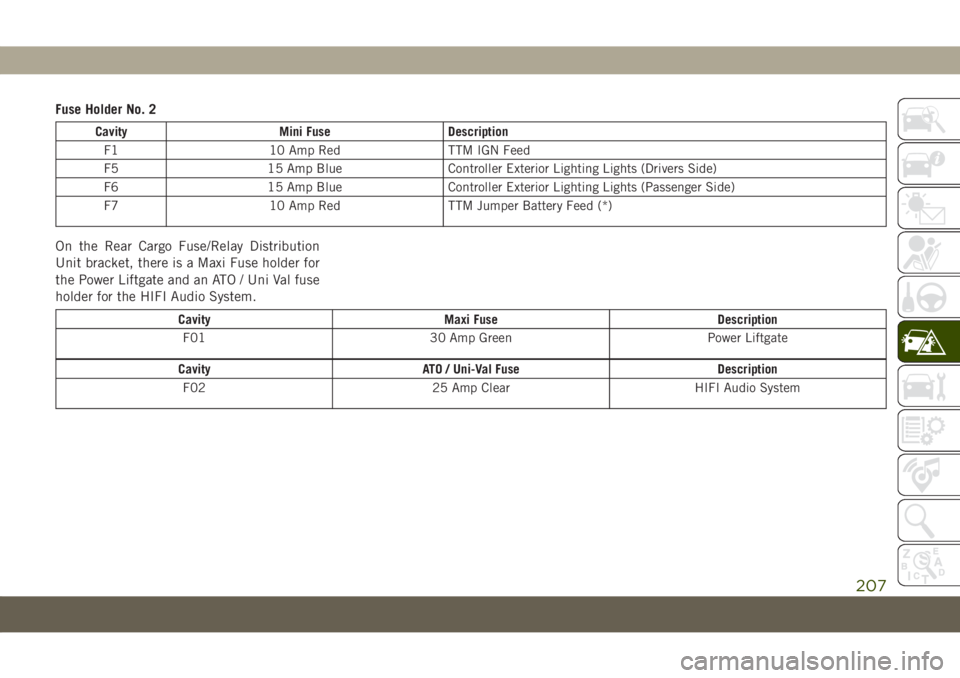
Fuse Holder No. 2
Cavity Mini Fuse Description
F1 10 Amp Red TTM IGN Feed
F5 15 Amp Blue Controller Exterior Lighting Lights (Drivers Side)
F6 15 Amp Blue Controller Exterior Lighting Lights (Passenger Side)
F7 10 Amp Red TTM Jumper Battery Feed (*)
On the Rear Cargo Fuse/Relay Distribution
Unit bracket, there is a Maxi Fuse holder for
the Power Liftgate and an ATO / Uni Val fuse
holder for the HIFI Audio System.
Cavity Maxi Fuse Description
F01 30 Amp Green Power Liftgate
Cavity ATO / Uni-Val Fuse Description
F02 25 Amp Clear HIFI Audio System
207
Page 210 of 362
JACKING AND TIRE
CHANGING
WARNING!
• Do not attempt to change a tire on the
side of the vehicle close to moving traf-
fic. Pull far enough off the road to avoid
the danger of being hit when operating
the jack or changing the wheel.
• Being under a jacked-up vehicle is dan-
gerous. The vehicle could slip off the
jack and fall on you. You could be
crushed. Never put any part of your body
under a vehicle that is on a jack. If you
need to get under a raised vehicle, take
it to a service center where it can be
raised on a lift.
• Never start or run the engine while the
vehicle is on a jack.
• The jack is designed to be used as a tool
for changing tires only. The jack should
not be used to lift the vehicle for service
purposes. The vehicle should be jacked
on a firm level surface only. Avoid ice or
slippery areas.
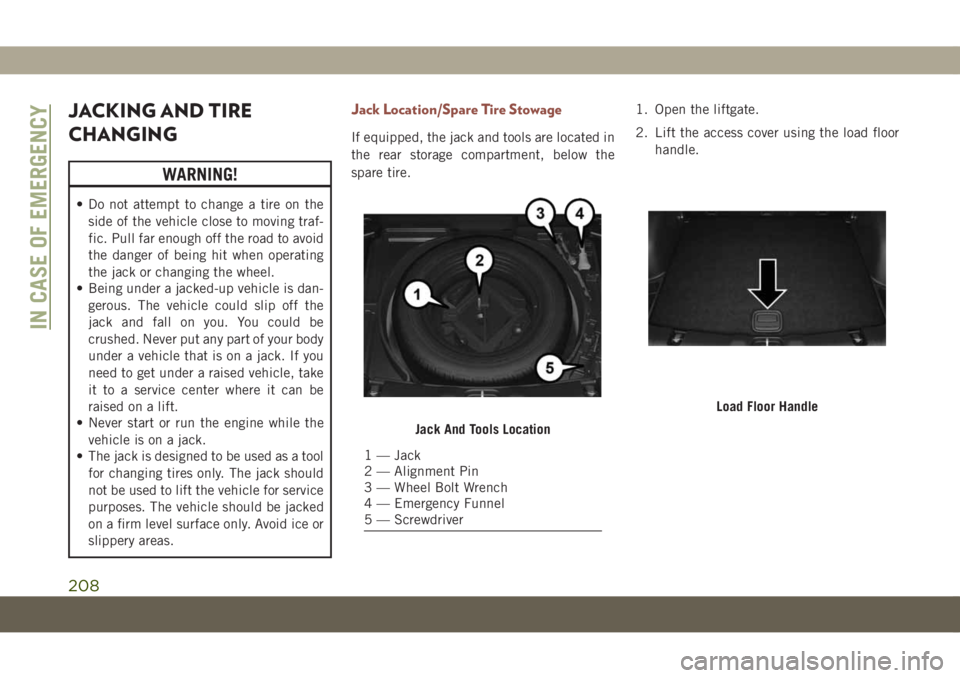
Jack Location/Spare Tire Stowage
If equipped, the jack and tools are located in
the rear storage compartment, below the
spare tire.1. Open the liftgate.
2. Lift the access cover using the load floor
handle.
Jack And Tools Location
1 — Jack
2 — Alignment Pin
3 — Wheel Bolt Wrench
4 — Emergency Funnel
5 — Screwdriver
Load Floor Handle
IN CASE OF EMERGENCY
208