check engine JEEP COMPASS 2019 Owner handbook (in English)
[x] Cancel search | Manufacturer: JEEP, Model Year: 2019, Model line: COMPASS, Model: JEEP COMPASS 2019Pages: 362, PDF Size: 6.23 MB
Page 236 of 362
Mileage or time passed
(whichever comes first)
9,000
18,000
27,000
36,000
45,000
54,000
63,000
72,000
81,000
90,000
99,000
108,000
117,000
126,000
135,000
144,000
153,000
162,000
171,000
180,000
Or Months: 12 24 36 48 60 72 84 96 108 120 132 144 156 168 180 192 204 216 228 240
Or Kilometers:
15,000
30,000
45,000
60,000
75,000
90,000
105,000
120,000
135,000
150,000
165,000
180,000
195,000
210,000
225,000
240,000
255,000
270,000
285,000
300,000
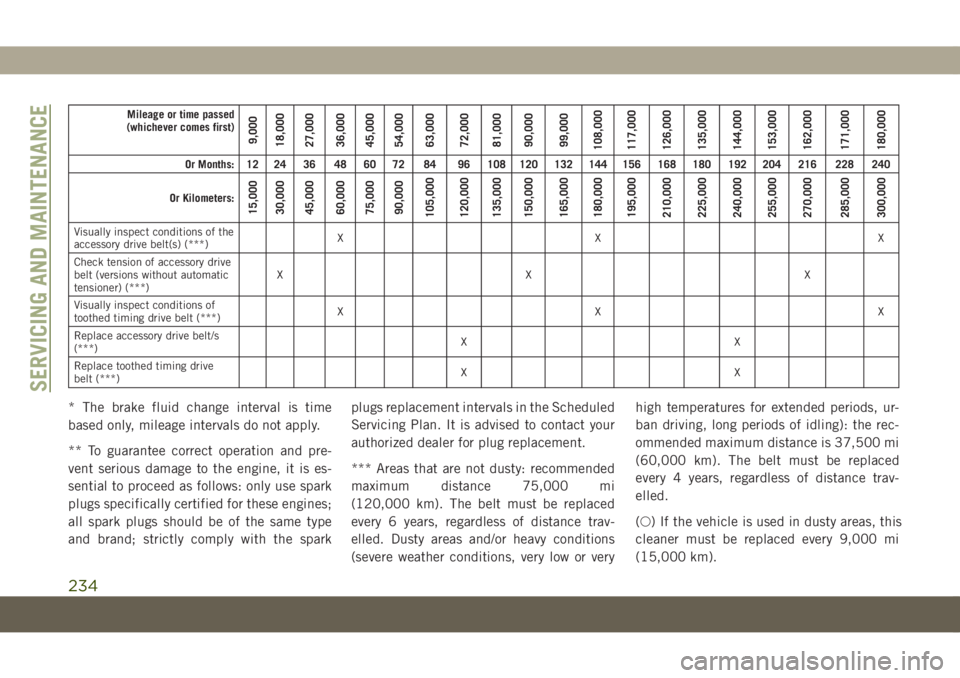
Visually inspect conditions of the
accessory drive belt(s) (***)XX X
Check tension of accessory drive
belt (versions without automatic
tensioner) (***)XX X
Visually inspect conditions of
toothed timing drive belt (***)XX X
Replace accessory drive belt/s
(***)XX
Replace toothed timing drive
belt (***)XX
* The brake fluid change interval is time
based only, mileage intervals do not apply.
** To guarantee correct operation and pre-
vent serious damage to the engine, it is es-
sential to proceed as follows: only use spark
plugs specifically certified for these engines;
all spark plugs should be of the same type
and brand; strictly comply with the sparkplugs replacement intervals in the Scheduled
Servicing Plan. It is advised to contact your
authorized dealer for plug replacement.
*** Areas that are not dusty: recommended
maximum distance 75,000 mi
(120,000 km). The belt must be replaced
every 6 years, regardless of distance trav-
elled. Dusty areas and/or heavy conditions
(severe weather conditions, very low or veryhigh temperatures for extended periods, ur-
ban driving, long periods of idling): the rec-
ommended maximum distance is 37,500 mi
(60,000 km). The belt must be replaced
every 4 years, regardless of distance trav-
elled.
(○) If the vehicle is used in dusty areas, this
cleaner must be replaced every 9,000 mi
(15,000 km).
SERVICING AND MAINTENANCE
234
Page 238 of 362
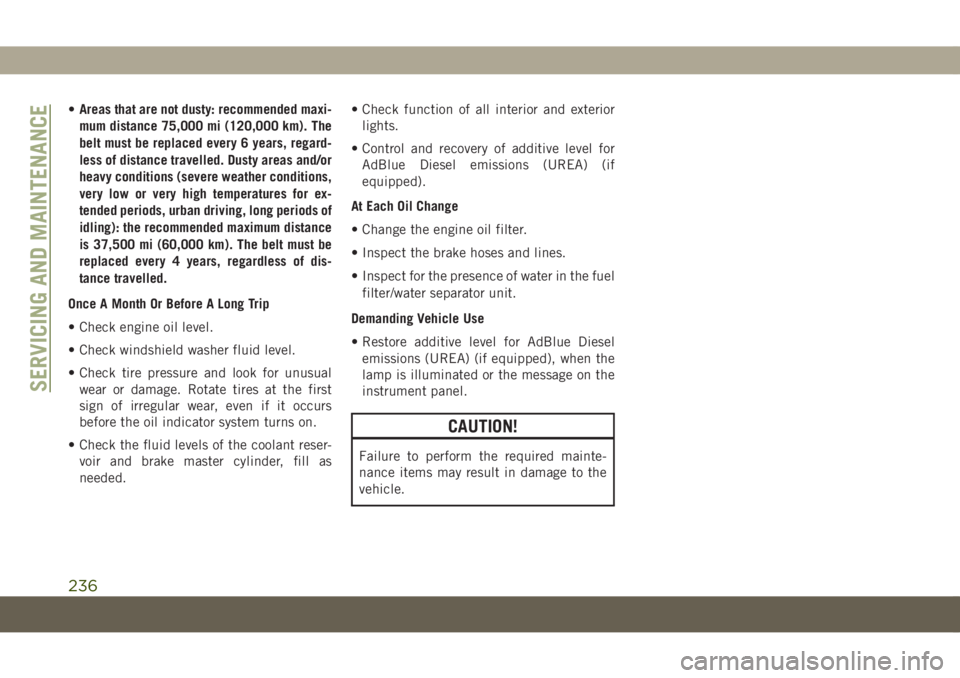
•Areas that are not dusty: recommended maxi-
mum distance 75,000 mi (120,000 km). The
belt must be replaced every 6 years, regard-
less of distance travelled. Dusty areas and/or
heavy conditions (severe weather conditions,
very low or very high temperatures for ex-
tended periods, urban driving, long periods of
idling): the recommended maximum distance
is 37,500 mi (60,000 km). The belt must be
replaced every 4 years, regardless of dis-
tance travelled.
Once A Month Or Before A Long Trip
• Check engine oil level.
• Check windshield washer fluid level.
• Check tire pressure and look for unusual
wear or damage. Rotate tires at the first
sign of irregular wear, even if it occurs
before the oil indicator system turns on.
• Check the fluid levels of the coolant reser-
voir and brake master cylinder, fill as
needed.• Check function of all interior and exterior
lights.
• Control and recovery of additive level for
AdBlue Diesel emissions (UREA) (if
equipped).
At Each Oil Change
• Change the engine oil filter.
• Inspect the brake hoses and lines.
• Inspect for the presence of water in the fuel
filter/water separator unit.
Demanding Vehicle Use
• Restore additive level for AdBlue Diesel
emissions (UREA) (if equipped), when the
lamp is illuminated or the message on the
instrument panel.
CAUTION!
Failure to perform the required mainte-
nance items may result in damage to the
vehicle.
SERVICING AND MAINTENANCE
236
Page 240 of 362
Mileage or time passed (whichever comes first)12,000
24,000
36,000
48,000
60,000
72,000
84,000
96,000
108,000
120,000
132,000
144,000
156,000
168,000
180,000
Or Years: 1 2 3 4 5 6 7 8 9 10 11 12 13 14 15
Or Kilometers:
20,000
40,000
60,000
80,000
100,000
120,000
140,000
160,000
180,000
200,000
220,000
240,000
260,000
280,000
300,000
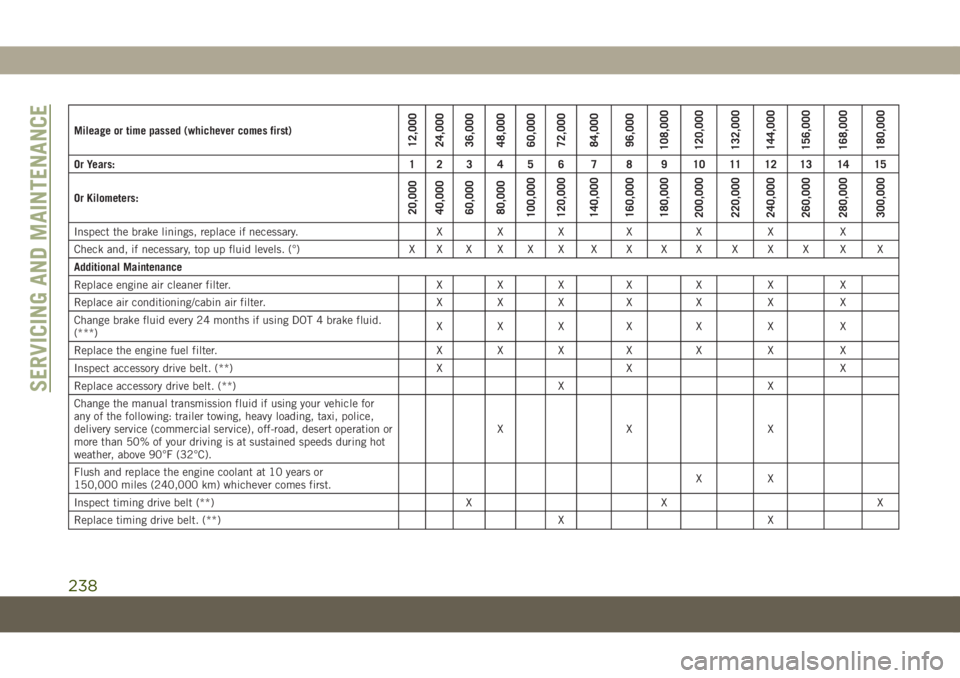
Inspect the brake linings, replace if necessary. X X X X X X X
Check and, if necessary, top up fluid levels. (°) X X X X X X X X X X X X X X X
Additional Maintenance
Replace engine air cleaner filter. X X X X X X X
Replace air conditioning/cabin air filter. X X X X X X X
Change brake fluid every 24 months if using DOT 4 brake fluid.
(***)XXX X X X X
Replace the engine fuel filter. X X X X X X X
Inspect accessory drive belt. (**) X X X
Replace accessory drive belt. (**) X X
Change the manual transmission fluid if using your vehicle for
any of the following: trailer towing, heavy loading, taxi, police,
delivery service (commercial service), off-road, desert operation or
more than 50% of your driving is at sustained speeds during hot
weather, above 90°F (32°C).XX X
Flush and replace the engine coolant at 10 years or
150,000 miles (240,000 km) whichever comes first.XX
Inspect timing drive belt (**) X X X
Replace timing drive belt. (**) X X
SERVICING AND MAINTENANCE
238
Page 245 of 362
Checking Oil Level
WARNING!
• Never smoke while working in the engine
compartment: gas and inflammable va-
pors may be present, with the risk of fire.
• Be very careful when working in the
engine compartment when the engine is
hot: you may get burned. Do not get too
close to the radiator cooling fan: the
electric fan may start; danger of injury.
Scarves, ties and other loose clothing
might be pulled by moving parts.
CAUTION!
• Be careful not to confuse the various
types of fluids while topping up: they are
not compatible with each other! Topping
up with an unsuitable fluid could se-
verely damage your car.
• The oil level must never exceed the MAX
mark.
• Always top up using engine oil of the
same specifications as that already in
the engine.
CAUTION!
• If the engine oil is being topped up, wait
for the engine to cool down before loos-
ening the filler cap, particularly for ve-
hicles with aluminium cap (if equipped).
WARNING: risk of burns!
• Overfilling or underfilling the crankcase
will cause aeration or loss of oil pressure.
This could damage your engine.
To assure proper engine lubrication, the en-
gine oil must be maintained at the correct
level. Check the oil level at regular intervals,
such as every fuel stop. The best time to
check the engine oil level is about five min-
utes after a fully warmed up engine is shut
off.
Checking the oil while the vehicle is on level
ground will improve the accuracy of the oil
level readings.
There are three possible dipstick types,
• Crosshatched zone.
• Crosshatched zone marked SAFE.• Crosshatched zone marked with MIN at the
low end of the range and MAX at the high
end of the range.
• Crosshatched zone marked with dimples at
the MIN and the MAX ends of the range.
NOTE:
Always maintain the oil level within the cross-
hatch markings on the dipstick.
Adding 1 quart (1.0 liters) of oil when the
reading is at the low end of the dipstick range
will raise the oil level to the high end of the
range marking.
Adding Washer Fluid
The fluid reservoir is located in the front of
the engine compartment. Be sure to check
the fluid level in the reservoir at regular
intervals. Fill the reservoir with windshield
washer solvent (not radiator antifreeze) and
operate the system for a few seconds to flush
out the residual washer fluid.
When refilling the washer fluid reservoir, take
some washer fluid, apply it to a cloth or towel,
and wipe clean the wiper blades; this will
help blade performance.
243
Page 249 of 362
Under normal operating conditions, the cata-
lytic converter will not require maintenance.
However, it is important to keep the engine
properly tuned to assure proper catalyst opera-
tion and prevent possible catalyst damage.
NOTE:
Intentional tampering with emissions control
systems can result in civil penalties being
assessed against you.
In unusual situations involving grossly mal-
functioning engine operation, a scorching
odor may suggest severe and abnormal cata-
lyst overheating. If this occurs, stop the ve-
hicle, turn off the engine and allow it to cool.
Service, including a tune-up to manufactur-
er's specifications, should be obtained imme-
diately.
To minimize the possibility of catalytic con-
verter damage:
• Do not interrupt the ignition when the
transmission is in gear and the vehicle is in
motion.
• Do not try to start the vehicle by pushing or
towing the vehicle.• Do not idle the engine with any ignition
components disconnected or removed,
such as when diagnostic testing, or for
prolonged periods during very rough idle or
malfunctioning operating conditions.Cooling System
WARNING!
• You or others can be badly burned by hot
engine coolant (antifreeze) or steam
from your radiator. If you see or hear
steam coming from under the hood, do
not open the hood until the radiator has
had time to cool. Never open a cooling
system pressure cap when the radiator or
coolant bottle is hot.
• Keep hands, tools, clothing, and jewelry
away from the radiator cooling fan when
the hood is raised. The fan starts auto-
matically and may start at any time,
whether the engine is running or not.
• When working near the radiator cooling
fan, turn the ignition to the OFF mode.
The fan is temperature controlled and
can start at any time the ignition is in the
ON mode.
Coolant Checks
Check engine coolant (antifreeze) protection
every 12 months (before the onset of freezing
weather, where applicable). If the engine
coolant (antifreeze) is dirty or rusty in appear-
ance, the system should be drained, flushed
and refilled with fresh engine coolant (anti-
freeze). Check the front of the A/C condenser
for any accumulation of bugs, leaves, etc. If
dirty, clean by gently spraying water from a
garden hose vertically down the face of the
condenser.
Cooling System Pressure Cap
The cap must be fully tightened to prevent
loss of engine coolant (antifreeze), and to
ensure that engine coolant (antifreeze) will
return to the radiator from the coolant expan-
sion bottle/recovery tank if so equipped.
The cap should be inspected and cleaned if
there is any accumulation of foreign material
on the sealing surfaces.
247
Page 250 of 362
WARNING!
• Do not open hot engine cooling system.
Never add engine coolant (antifreeze)
when the engine is overheated. Do not
loosen or remove the cap to cool an
overheated engine. Heat causes pres-
sure to build up in the cooling system. To
prevent scalding or injury, do not remove
the pressure cap while the system is hot
or under pressure.
• Do not use a pressure cap other than the
one specified for your vehicle. Personal
injury or engine damage may result.
Brake System
In order to assure brake system performance,
all brake system components should be in-
spected periodically. Refer to the “Mainte-
nance Plan” in this section for the proper
maintenance intervals.
WARNING!
Riding the brakes can lead to brake failure
and possibly a collision. Driving with your
foot resting or riding on the brake pedal
can result in abnormally high brake tem-
peratures, excessive lining wear, and pos-
sible brake damage. You would not have
your full braking capacity in an emergency.
Brake Master Cylinder
The fluid in the master cylinder should be
checked when performing under hood ser-
vices or immediately if the “Brake Warning
Light” is illuminated.
Be sure to clean the top of the master cylin-
der area before removing the cap. If neces-
sary, add fluid to bring the fluid level up to
the requirements described on the brake
fluid reservoir. With disc brakes, fluid level
can be expected to fall as the brake pads
wear. Brake fluid level should be checked
when pads are replaced. However, low fluid
level may be caused by a leak and a checkup
may be needed.
Use only manufacturer's recommended brake
fluid. Refer to “Fluids And Lubricants” in
“Technical Specifications” for further information.
WARNING!
• Use only manufacturer's recommended
brake fluid. Refer to “Fluids And Lubri-
cants” in “Technical Specifications” for
further information. Using the wrong
type of brake fluid can severely damage
your brake system and/or impair its per-
formance. The proper type of brake fluid
for your vehicle is also identified on the
original factory installed hydraulic mas-
ter cylinder reservoir.
• To avoid contamination from foreign
matter or moisture, use only new brake
fluid or fluid that has been in a tightly
closed container. Keep the master cylin-
der reservoir cap secured at all times.
Brake fluid in a open container absorbs
moisture from the air resulting in a lower
boiling point. This may cause it to boil
unexpectedly during hard or prolonged
braking, resulting in sudden brake fail-
ure. This could result in a collision.
SERVICING AND MAINTENANCE
248
Page 251 of 362
WARNING!
• Overfilling the brake fluid reservoir can
result in spilling brake fluid on hot en-
gine parts, causing the brake fluid to
catch fire. Brake fluid can also damage
painted and vinyl surfaces, care should
be taken to avoid its contact with these
surfaces.
• Do not allow petroleum based fluid to
contaminate the brake fluid. Brake seal
components could be damaged, causing
partial or complete brake failure. This
could result in a collision.
Manual Transmission — If Equipped
Fluid Level Check
Check the fluid level by removing the fill
plug. The fluid level should be between the
bottom of the fill hole and a point not more
than 3/16 inch (4.7 mm) below the bottom of
the hole.
Add fluid, if necessary, to maintain the proper
level.
Please see your authorized dealer for service.
Automatic Transmission
Selection Of Lubricant
It is important to use the proper transmission
fluid to ensure optimum transmission perfor-
mance and life. Use only the manufacturer's
specified transmission fluid. Refer to “Fluids
And Lubricants” in “Technical Specifica-
tions” for fluid specifications. It is important
to maintain the transmission fluid at the
correct level using the recommended fluid.
NOTE:
No chemical flushes should be used in any
transmission; only the approved lubricant
should be used.
CAUTION!
Using a transmission fluid other than the
manufacturer’s recommended fluid may
cause deterioration in transmission shift
quality and/or torque converter shudder.
Refer to “Fluids And Lubricants” in “Tech-
nical Specifications” for fluid specifica-
tions.
Special Additives
The manufacturer strongly recommends
against using any special additives in the
transmission. Automatic Transmission Fluid
(ATF) is an engineered product and its perfor-
mance may be impaired by supplemental
additives. Therefore, do not add any fluid
additives to the transmission. Avoid using
transmission sealers as they may adversely
affect seals.
CAUTION!
Do not use chemical flushes in your trans-
mission as the chemicals can damage your
transmission components. Such damage
is not covered by the New Vehicle Limited
Warranty.
Fluid Level Check
The fluid level is preset at the factory and
does not require adjustment under normal
operating conditions. Routine fluid level
checks are not required; therefore the trans-
mission has no dipstick. An authorized dealer
can check your transmission fluid level using
special service tools. If you notice fluid leak-
249
Page 261 of 362
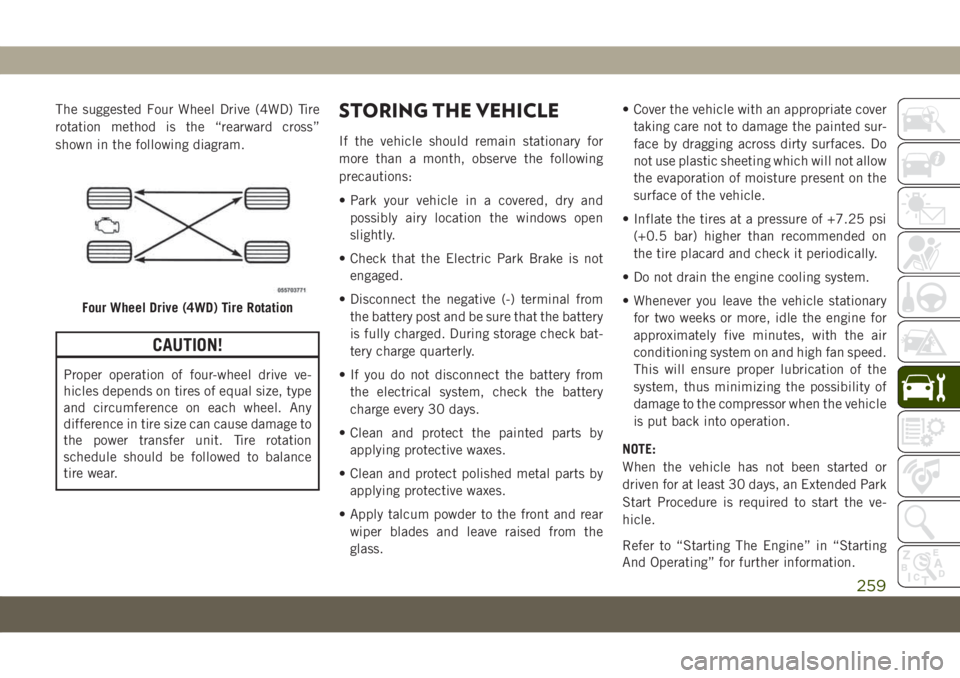
The suggested Four Wheel Drive (4WD) Tire
rotation method is the “rearward cross”
shown in the following diagram.
CAUTION!
Proper operation of four-wheel drive ve-
hicles depends on tires of equal size, type
and circumference on each wheel. Any
difference in tire size can cause damage to
the power transfer unit. Tire rotation
schedule should be followed to balance
tire wear.
STORING THE VEHICLE
If the vehicle should remain stationary for
more than a month, observe the following
precautions:
• Park your vehicle in a covered, dry and
possibly airy location the windows open
slightly.
• Check that the Electric Park Brake is not
engaged.
• Disconnect the negative (-) terminal from
the battery post and be sure that the battery
is fully charged. During storage check bat-
tery charge quarterly.
• If you do not disconnect the battery from
the electrical system, check the battery
charge every 30 days.
• Clean and protect the painted parts by
applying protective waxes.
• Clean and protect polished metal parts by
applying protective waxes.
• Apply talcum powder to the front and rear
wiper blades and leave raised from the
glass.• Cover the vehicle with an appropriate cover
taking care not to damage the painted sur-
face by dragging across dirty surfaces. Do
not use plastic sheeting which will not allow
the evaporation of moisture present on the
surface of the vehicle.
• Inflate the tires at a pressure of +7.25 psi
(+0.5 bar) higher than recommended on
the tire placard and check it periodically.
• Do not drain the engine cooling system.
• Whenever you leave the vehicle stationary
for two weeks or more, idle the engine for
approximately five minutes, with the air
conditioning system on and high fan speed.
This will ensure proper lubrication of the
system, thus minimizing the possibility of
damage to the compressor when the vehicle
is put back into operation.
NOTE:
When the vehicle has not been started or
driven for at least 30 days, an Extended Park
Start Procedure is required to start the ve-
hicle.
Refer to “Starting The Engine” in “Starting
And Operating” for further information.
Four Wheel Drive (4WD) Tire Rotation
259
Page 271 of 362
CAUTION!
Do not load your vehicle any heavier than
the GVWR or the maximum front and rear
GAWR. If you do, parts on your vehicle can
break, or it can change the way your ve-
hicle handles. This could cause you to lose
control. Also overloading can shorten the
life of your vehicle. Never exceed the maxi-
mum combined vehicle load value: the
maximum towable load is only allowed if it
does not exceed the maximum combined
vehicle load.
FUEL REQUIREMENTS —
GASOLINE ENGINE
1.4L Turbo Gasoline Engine
This engine is designed to meet all emission
regulations and provide satisfactory fuel
economy and performance when using high-
quality unleaded gasoline having a minimum
research octane rating (RON) of 95. For op-
timum performance and fuel economy the
use of minimum research octane rating
(RON) of 98 or higher is recommended.Light spark knock at low engine speeds is not
harmful to your engine. However, continued
heavy spark knock at high speeds can cause
damage, and immediate service is required.
Poor quality gasoline can cause problems
such as hard starting, stalling, and hesita-
tions. If you experience these symptoms, try
another brand of gasoline before considering
service for the vehicle.
Poor quality gasoline can cause problems
such as hard starting, stalling, and hesita-
tions. If you experience these symptoms, try
another brand of gasoline before considering
service for the vehicle.
Ethanol
The manufacturer recommends that your ve-
hicle be operated on fuel containing no more
than 10% ethanol. Purchasing your fuel from
a reputable supplier may reduce the risk of
exceeding this 10% limit and/or of receiving
fuel with abnormal properties.
CAUTION!
Use of fuel with Ethanol content higher
than 10% may result in engine malfunc-
tion, starting and operating difficulties,
and materials degradation. These adverse
effects could result in permanent damage
to your vehicle.
Materials Added To Fuel
Indiscriminate use of fuel system cleaning
agents should be avoided. Many of these
materials intended for gum and varnish re-
moval may contain active solvents or similar
ingredients. These can harm fuel system gas-
ket and diaphragm materials.
Fuel Icon Identification Compliant To
EN16942
The following symbols make it easier to rec-
ognize the correct type of fuel to be used on
your vehicle. Before proceeding with the sup-
ply, check the symbols placed inside the fuel
filler flap (if present) and compare them with
the symbol on the fuel pump (if present).
269
Page 309 of 362
UCONNECT SETTINGS
The Uconnect system allows you to access
Customer Programmable feature settings
such as Display, Units, Voice, Clock, Safety &
Driving Assistance, Lights, Doors & Locks,
Auto-On Comfort, Engine Off Options, Audio,
Phone/Bluetooth, Restore Settings, Clear
Personal Data, and System Information
through buttons on the touchscreen.
Push the SETTINGS button (Uconnect
3 With 5–inch Display and Uconnect 4 With
7–inch Display), or press the “Apps” button
(Uconnect 4C/4C NAV With 8.4–inch Dis-
play) located near the bottom of the touch-
screen, then press the “Settings” button on
the touchscreen to access the Settings
screen. When making a selection, scroll up or
down until the preferred setting is high-
lighted, then press the preferred setting until
a check-mark appears next to the setting,
showing that setting has been selected.The following feature settings are available:• Language • Auto-On Comfort
& Remote Start
— If Equipped
• Display • Engine Off
Options
• Units • Audio
• Voice • Radio Setup
• Clock or
Time & Date• Phone/Bluetooth
• Safety & Driving
Assistance• Restore Settings
• Brakes • Clear Personal
Data
• Lights • System
Information
• Doors & Locks
NOTE:
Depending on the vehicles options, feature
settings may vary.
Refer to “Uconnect Settings” in “Multimedia”
in the Owner’s Manual for further information.
TIPS CONTROLS AND
GENERAL INFORMATION
Steering Wheel Audio Controls
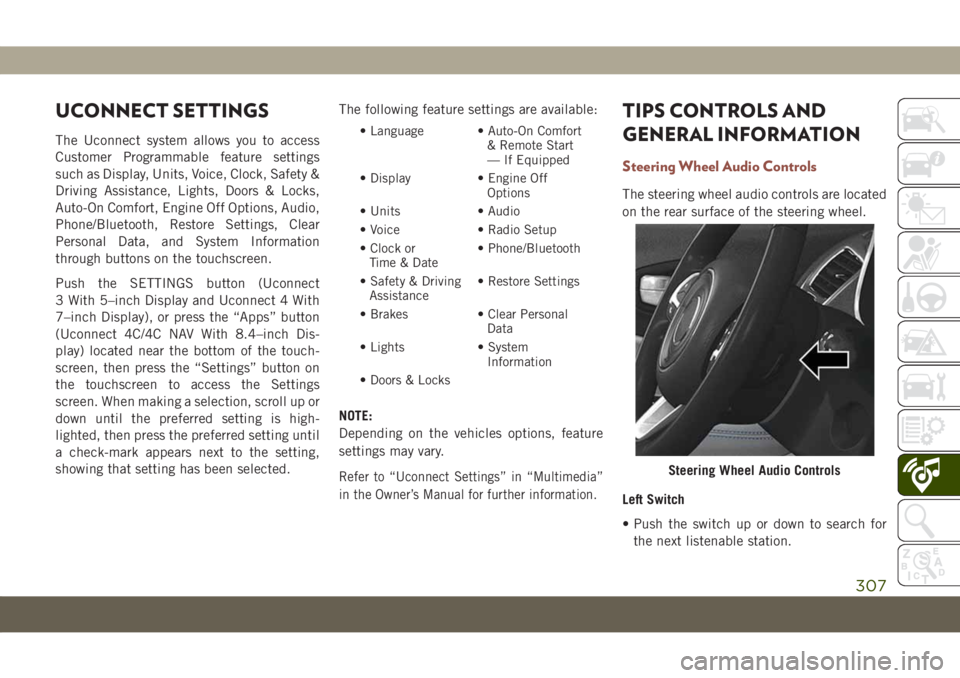
The steering wheel audio controls are located
on the rear surface of the steering wheel.
Left Switch
• Push the switch up or down to search for
the next listenable station.
Steering Wheel Audio Controls
307