ESP JEEP COMPASS 2019 Owner handbook (in English)
[x] Cancel search | Manufacturer: JEEP, Model Year: 2019, Model line: COMPASS, Model: JEEP COMPASS 2019Pages: 362, PDF Size: 6.23 MB
Page 219 of 362
WARNING!
• Do not attempt to seal a tire on the side
of the vehicle closest to traffic. Pull far
enough off the road to avoid the danger
of being hit when using the Tire Service
Kit.
• Do not use Tire Service Kit or drive the
vehicle under the following circum-
stances:
– If the puncture in the tire tread is
approximately 1/4 inch (6 mm) or
larger.
– If the tire has any sidewall damage.
– If the tire has any damage from
driving with extremely low tire pres-
sure.
– If the tire has any damage from
driving on a flat tire.
– If the wheel has any damage.
– If you are unsure of the condition of
the tire or the wheel.
• Keep Tire Service Kit away from open
flames or heat source.
• A loose Tire Service Kit thrown forward in
a collision or hard stop could endanger
the occupants of the vehicle. Always
WARNING!
stow the Tire Service Kit in the place
provided. Failure to follow these warn-
ings can result in injuries that are seri-
ous or fatal to you, your passengers, and
others around you.
• Take care not to allow the contents of
Tire Service Kit to come in contact with
hair, eyes, or clothing. Tire Service Kit
sealant is harmful if inhaled, swallowed,
or absorbed through the skin. It causes
skin, eye, and respiratory irritation.
Flush immediately with plenty of water if
there is any contact with eyes or skin.
Change clothing as soon as possible, if
there is any contact with clothing.
• Tire Service Kit Sealant solution con-
tains latex. In case of an allergic reaction
or rash, consult a physician immedi-
ately. Keep Tire Service Kit out of reach
of children. If swallowed, rinse mouth
immediately with plenty of water and
drink plenty of water. Do not induce
vomiting! Consult a physician immedi-
ately.Sealing A Tire With Tire Service Kit
Whenever You Stop To Use Tire Service
Kit:
1. Pull over to a safe location and turn on the
vehicle’s Hazard Warning flashers.
2. Verify that the valve stem (on the wheel
with the deflated tire) is in a position that
is near to the ground. This will allow the
Tire Service Kit Hose to reach the valve
stem and keep the Tire Service Kit flat on
the ground. This will provide the best
positioning of the kit when injecting the
sealant into the deflated tire and running
the air pump. Move the vehicle as neces-
sary to place the valve stem in this posi-
tion before proceeding.
3. Place the transmission in PARK and cycle
the ignition in the OFF position.
4. Apply the parking brake.
Setting Up To Use Tire Service Kit:
1. Uncoil the Sealant Hose and then remove
the cap from the fitting at the end of the
hose.
217
Page 222 of 362
4. Have the tire inspected and repaired or
replaced at the earliest opportunity at an
authorized dealer or tire service center.
WARNING!
You must always indicate that the tire was
repaired using the Tire Service Kit. Give
the booklet to the technicians who will be
handling the tire that was treated using
the Tire Service Kit.
5. Remove the Speed Limit sticker from the
steering wheel after the tire has been
repaired.
6. Replace the Sealant Bottle at an autho-
rized dealer as soon as possible. Refer to
“Sealant Bottle Replacement”.
NOTE:
When having the tire serviced, advise the
authorized dealer or service center that the
tire has been sealed using the Tire Service
Kit.
Sealant Bottle Replacement:
1. Unwrap the power cord.
2. Unwrap the hose.3. Remove the bottle cover.
4. Rotate the bottle up beyond vertical to
release.
5. Pull the bottle away from the Compressor.
NOTE:
• For sealant bottle installation, follow these
steps in reverse order.
• Replacement sealant bottles are available
at authorized service centers.
WARNING!
As required by current regulations, the in-
formation on chemical substances for the
protection of human health and the environ-
ment and on the safe use of the sealing fluid
are on the packaging label. Compliance with
the indications on the label is an essential
condition to ensure the safety and effective-
ness of the product. Remember to carefully
read the label before use. The user of the
product is responsible for any damages
caused by improper use. The sealing fluid
has an expiration date. Replace the bottle if
the sealant has expired.
CAUTION!
Dispose of the bottle and the sealant liq-
uid properly. Have them disposed of in
compliance with national and local regu-
lations.
JUMP STARTING
If your vehicle has a discharged battery, it can
be jump started using a set of jumper cables
and a battery in another vehicle or by using a
portable battery booster pack. Jump starting
can be dangerous if done improperly, so
please follow the procedures in this section
carefully.
NOTE:
When using a portable battery booster pack,
follow the manufacturer’s operating instruc-
tions and precautions.
WARNING!
Do not attempt jump starting if the battery
is frozen. It could rupture or explode and
cause personal injury.
IN CASE OF EMERGENCY
220
Page 232 of 362
WARNING!
• Failure to follow proper tow eye usage
may cause components to break result-
ing in serious injury or death.
• The brake and steering power assist sys-
tems will not function while the vehicle
is being towed. You will, therefore, need
to apply more force on the brake pedal
and steering wheel. Do not use flexible
ropes when towing, and avoid jerky
movements. Do not start the engine
while towing the car. Before tightening
the ring, clean the threaded housing
thoroughly. Make sure that the ring is
fully screwed into the housing before
towing the car.
Tow Eye Installation
Front Tow Eye
The front tow eye receptacle is located be-
hind a door on the front bumper fascia.To install the tow eye, open the door using the
vehicle key or a small screwdriver, and thread
the tow eye into the receptacle.
Insert the flat end of the jack handle through
the tow eye and tighten, refer to “Jacking And
Tire Changing” in this section for further
information. The tow eye must be fully seated
to the attaching bracket through the lower
front fascia. If the tow eye is not fully seated
to the attaching bracket, the vehicle should
not be moved.
Rear Tow Eye
The rear tow eye receptacle is located behind
a door, located on the right rear bumper
fascia.
To install the tow eye, open the door using the
vehicle key or a small screwdriver, and thread
the tow eye into the receptacle.
Insert the flat end of the jack handle through
the eye and tighten. The tow eye must be fully
seated to the attaching bracket through the
lower rear fascia. If the tow eye is not fully
seated to the attaching bracket, the vehicle
should not be moved.
ENHANCED ACCIDENT
RESPONSE SYSTEM (EARS)
This vehicle is equipped with an Enhanced
Accident Response System.
Please refer to “Occupant Restraint Sys-
tems” in “Safety” for further information on
the Enhanced Accident Response System
(EARS) function.
EVENT DATA RECORDER
(EDR)
This vehicle is equipped with an Event Data
Recorder (EDR). The main purpose of an EDR
is to record data that will assist in under-
standing how a vehicle’s systems performed
under certain crash or near crash-like situa-
tions, such as an air bag deployment or hit-
ting a road obstacle.
Please refer to “Occupant Restraint Sys-
tems” in “Safety” for further information on
the Event Data Recorder (EDR).
IN CASE OF EMERGENCY
230
Page 233 of 362
SCHEDULED SERVICING
Correct servicing is crucial for guaranteeing a
long life for the car under the best conditions.
For this reason, Jeep has planned a series of
checks and services at fixed distance inter-
vals and, where provided, at fixed time inter-
vals, as described in the Scheduled Servicing
plan. To keep the car’s efficiency in tip-top
condition, in the following Scheduled Service
plan pages a few additional checks are listed
that should be carried out more frequently
with respect to the normal coupon redemp-
tion schedule. Scheduled Servicing is offered
by all authorized dealerships according to
fixed time or mileage intervals. If, during
each operation, in addition to the ones sched-
uled, the need arises for further replace-
ments or repairs, these may be carried out
with the owner's explicit agreement only.
The technicians at your dealership know your
vehicle best, and have access to factory trained
information, genuine Mopar parts, and specially
designed electronic and mechanical tools that
can help prevent future costly repairs. If your car
is used frequently for towing, the interval be-
tween one scheduled servicing operation and
the next should be reduced. More frequentmaintenance may be needed for vehicles in
severe operating conditions, such as dusty areas
and very short trip driving.
NOTE:
Scheduled Servicing interventions are set out
by the Manufacturer. Failure to have them
carried out may invalidate the warranty. It is
advised to inform an authorized dealership of
any small operating irregularities without
waiting for the next service.
1.4L Gasoline Engine
NOTE:
Under no circumstances should oil change
intervals exceed 9,000 miles (15,000 km) or
12 months, whichever comes first.
Once A Month Or Before A Long Trip
• Check engine oil level.
• Check windshield washer fluid level.
• Check tire pressure and look for unusual
wear or damage. Rotate tires at the first
sign of irregular wear, even if it occurs
before the oil indicator system turns on.
•
Check the fluid levels of the coolant reservoir
and brake master cylinder, fill as needed.
• Check function of all interior and exterior
lights.
At Each Oil Change
• Change oil and filter.
• Rotate the tires.Rotate at the first sign of
irregular wear, even if it occurs before the oil
indicator system turns on.
• Inspect battery and clean and tighten ter-
minals as required.
• Inspect brake pads, shoes, rotors, drums,
hoses and park brake.
• Inspect engine cooling system protection
and hoses.
• Inspect exhaust system.
• Inspect engine air cleaner if using in dusty
or off-road conditions.
Refer to the “Maintenance Plan” on the fol-
lowing page for the required maintenance
intervals.
CAUTION!
Failure to perform the required maintenance
items may result in damage to the vehicle.
231
Page 252 of 362
age or transmission malfunction, visit an au-
thorized dealer immediately to have the
transmission fluid level checked. Operating
the vehicle with an improper fluid level can
cause severe transmission damage.
CAUTION!
If a transmission fluid leak occurs, visit an
authorized dealer immediately. Severe
transmission damage may occur. An au-
thorized dealer has the proper tools to
adjust the fluid level accurately.
RAISING THE VEHICLE
In the case where it is necessary to raise the
vehicle, go to an authorized dealer or service
station.
TIRES
Tires — General Information
Tire Pressure
Proper tire inflation pressure is essential to
the safe and satisfactory operation of your
vehicle. Four primary areas are affected by
improper tire pressure:
• Safety and Vehicle Stability
• Economy
• Tread Wear
• Ride Comfort
Safety
WARNING!
• Improperly inflated tires are dangerous
and can cause collisions.
• Underinflation increases tire flexing and
can result in overheating and tire failure.
• Overinflation reduces a tire's ability to
cushion shock. Objects on the road and
chuckholes can cause damage that re-
sult in tire failure.
WARNING!
• Overinflated or underinflated tires can
affect vehicle handling and can fail sud-
denly, resulting in loss of vehicle con-
trol.
• Unequal tire pressures can cause steer-
ing problems. You could lose control of
your vehicle.
• Unequal tire pressures from one side of
the vehicle to the other can cause the
vehicle to drift to the right or left.
• Always drive with each tire inflated to
the recommended cold tire inflation
pressure.
Both under-inflation and over-inflation affect
the stability of the vehicle and can produce a
feeling of sluggish response or over respon-
siveness in the steering.
NOTE:
• Unequal tire pressures from side to side
may cause erratic and unpredictable steer-
ing response.
• Unequal tire pressure from side to side may
cause the vehicle to drift left or right.
SERVICING AND MAINTENANCE
250
Page 253 of 362
Fuel Economy
Underinflated tires will increase tire rolling re-
sistance resulting in higher fuel consumption.
Tread Wear
Improper cold tire inflation pressures can
cause abnormal wear patterns and reduced
tread life, resulting in the need for earlier tire
replacement.
Ride Comfort And Vehicle Stability
Proper tire inflation contributes to a comfort-
able ride. Over-inflation produces a jarring
and uncomfortable ride.
Tire Inflation Pressures
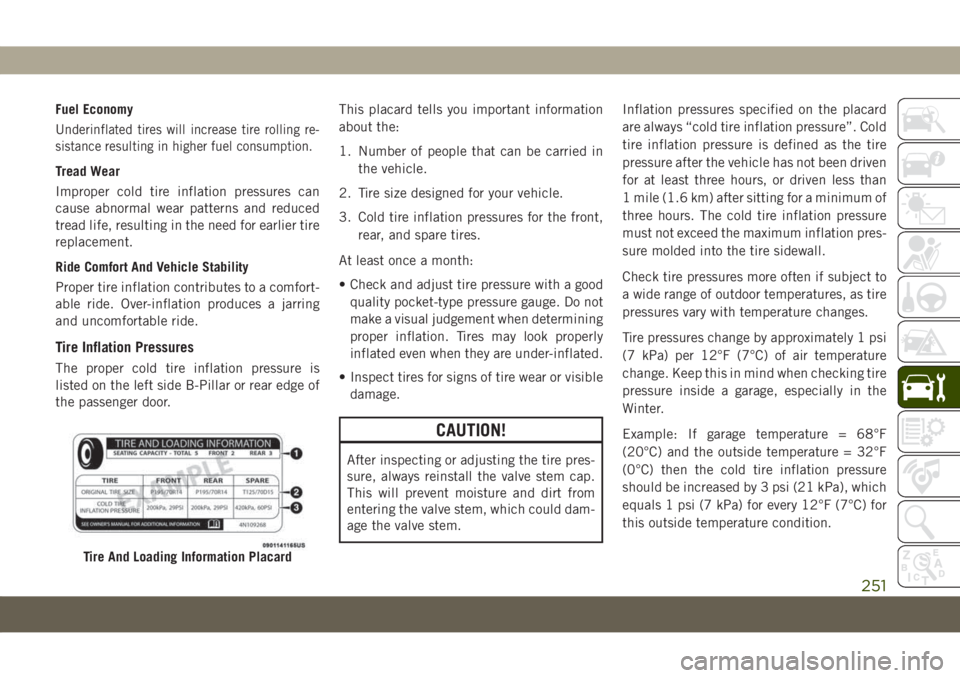
The proper cold tire inflation pressure is
listed on the left side B-Pillar or rear edge of
the passenger door.This placard tells you important information
about the:
1. Number of people that can be carried in
the vehicle.
2. Tire size designed for your vehicle.
3. Cold tire inflation pressures for the front,
rear, and spare tires.
At least once a month:
• Check and adjust tire pressure with a good
quality pocket-type pressure gauge. Do not
make a visual judgement when determining
proper inflation. Tires may look properly
inflated even when they are under-inflated.
• Inspect tires for signs of tire wear or visible
damage.
CAUTION!
After inspecting or adjusting the tire pres-
sure, always reinstall the valve stem cap.
This will prevent moisture and dirt from
entering the valve stem, which could dam-
age the valve stem.Inflation pressures specified on the placard
are always “cold tire inflation pressure”. Cold
tire inflation pressure is defined as the tire
pressure after the vehicle has not been driven
for at least three hours, or driven less than
1 mile (1.6 km) after sitting for a minimum of
three hours. The cold tire inflation pressure
must not exceed the maximum inflation pres-
sure molded into the tire sidewall.
Check tire pressures more often if subject to
a wide range of outdoor temperatures, as tire
pressures vary with temperature changes.
Tire pressures change by approximately 1 psi
(7 kPa) per 12°F (7°C) of air temperature
change. Keep this in mind when checking tire
pressure inside a garage, especially in the
Winter.
Example: If garage temperature = 68°F
(20°C) and the outside temperature = 32°F
(0°C) then the cold tire inflation pressure
should be increased by 3 psi (21 kPa), which
equals 1 psi (7 kPa) for every 12°F (7°C) for
this outside temperature condition.
Tire And Loading Information Placard
251
Page 260 of 362
WARNING!
Using tires of different size and type
(M+S, Snow) between front and rear axles
can cause unpredictable handling. You
could lose control and have a collision.
CAUTION!
To avoid damage to your vehicle or tires,
observe the following precautions:
• Because of restricted traction device
clearance between tires and other sus-
pension components, it is important
that only traction devices in good condi-
tion are used. Broken devices can cause
serious damage. Stop the vehicle imme-
diately if noise occurs that could indi-
cate device breakage. Remove the dam-
aged parts of the device before further
use.
• Install device as tightly as possible and
then retighten after driving about ½ mile
(0.8 km).
• Do not exceed 30 mph (48 km/h).
CAUTION!
• Drive cautiously and avoid severe turns
and large bumps, especially with a
loaded vehicle.
• Do not drive for a prolonged period on
dry pavement.
• Observe the traction device manufactur-
er’s instructions on the method of instal-
lation, operating speed, and conditions
for use. Always use the suggested oper-
ating speed of the device manufacturer’s
if it is less than 30 mph (48 km/h).
• Do not use traction devices on a com-
pact spare tire.
Tire Rotation Recommendations
The tires on the front and rear of your vehicle
operate at different loads and perform differ-
ent steering, handling, and braking func-
tions. For these reasons, they wear at unequal
rates.
These effects can be reduced by timely rota-
tion of tires. The benefits of rotation are espe-
cially worthwhile with aggressive tread designs
such as those on On/Off Road type tires.Rotation will increase tread life, help to main-
tain mud, snow, and wet traction levels, and
contribute to a smooth, quiet ride.
Refer to the “Maintenance Plan” for the
proper maintenance intervals. The reasons
for any rapid or unusual wear should be
corrected prior to rotation being performed.
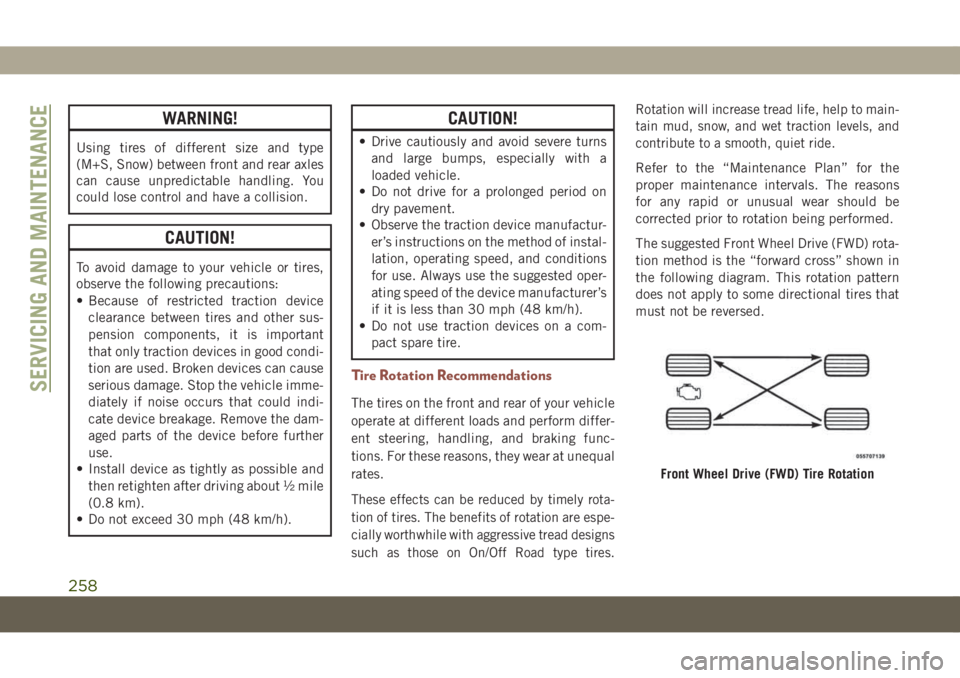
The suggested Front Wheel Drive (FWD) rota-
tion method is the “forward cross” shown in
the following diagram. This rotation pattern
does not apply to some directional tires that
must not be reversed.
Front Wheel Drive (FWD) Tire Rotation
SERVICING AND MAINTENANCE
258
Page 262 of 362
CAUTION!
Before removal of the positive and nega-
tive terminals to the battery, wait at least a
minute with ignition switch in the OFF
position and close the driver’s door. When
reconnecting the positive and negative ter-
minals to the battery be sure the ignition
switch is in the OFF position and the
driver’s door is closed.
BODYWORK
Preserving The Bodywork
Washing
• Wash your vehicle regularly. Always wash
your vehicle in the shade using a mild car
wash soap, and rinse the panels completely
with clear water.
• If insects, tar, or other similar deposits have
accumulated on your vehicle, use a specific
detergent to remove.
• Use a high quality cleaner wax to remove
road film, stains and to protect your paint
finish. Take care never to scratch the paint.• Avoid using abrasive compounds and power
buffing that may diminish the gloss or thin
out the paint finish.
CAUTION!
• Do not use abrasive or strong cleaning
materials such as steel wool or scouring
powder that will scratch metal and
painted surfaces.
• Use of power washers exceeding
1,200 psi (8,274 kPa) can result in
damage or removal of paint and decals.
Special Care
• If you drive on salted or dusty roads or if you
drive near the ocean, hose off the undercar-
riage at least once a month.
• It is important that the drain holes in the
lower edges of the doors, rocker panels, and
trunk be kept clear and open.
• If you detect any stone chips or scratches in
the paint, touch them up immediately. The
cost of such repairs is considered the re-
sponsibility of the owner.• If your vehicle is damaged due to a collision
or similar cause that destroys the paint and
protective coating, have your vehicle re-
paired as soon as possible. The cost of such
repairs is considered the responsibility of
the owner.
• If you carry special cargo such as chemi-
cals, fertilizers, de-icer salt, etc., be sure
that such materials are well packaged and
sealed.
• If a lot of driving is done on gravel roads,
consider mud or stone shields behind each
wheel.
• Touch up the scratches as soon as possible.
An authorized dealer has touch up paint to
match the color of your vehicle.
Some parts of the vehicle may be painted
with a matte paintwork which requires spe-
cial care for its preservation
SERVICING AND MAINTENANCE
260
Page 263 of 362
CAUTION!
Avoid washing with rollers and/or brushes
in washing stations. Wash the vehicle only
by hand using neutral pH detergents; dry it
with a wet chamois leather. Abrasive prod-
ucts and/or polishes should not be used for
cleaning the car. Bird droppings must be
washed off immediately and thoroughly as
the acid they contain is particularly ag-
gressive. Avoid (if at all possible) parking
the vehicle under trees; remove vegetable
resins immediately as, when dried, it may
only be possible to remove them with abra-
sive products and/or polishes, which is
highly inadvisable as they could alter the
typical opaqueness of the paint. Do not
use pure windshield washer fluid for clean-
ing the front windshield and rear window;
dilute it min. 50% with water. Only use
pure windshield washer fluid when strictly
necessary due to outside temperature con-
ditions.
INTERIORS
Seats And Fabric Parts
Use a specific product to clean fabric uphol-
stery and carpeting.
WARNING!
Do not use volatile solvents for cleaning
purposes. Many are potentially flammable,
and if used in closed areas they may cause
respiratory harm.
Stain Repel Fabric Cleaning Procedure —
If Equipped
Stain Repel seats may be cleaned in the
following manner:
• Remove as much of the stain as possible by
blotting with a clean, dry towel.
• Blot any remaining stain with a clean,
damp towel.
• For tough stains, apply a mild soap solution
to a clean, damp cloth and remove stain.
Use a fresh, damp towel to remove soap
residue.• For grease stains, apply a specific product
to a clean, damp cloth and remove stain.
Use a fresh, damp towel to remove soap
residue.
• Do not use any harsh solvents or any other
form of protectants on Stain Repel
products.
Seat Belt Maintenance
Do not bleach, dye or clean the belts with
chemical solvents or abrasive cleaners. This
will weaken the fabric. Sun damage can also
weaken the fabric.
If the belts need cleaning, use a mild soap
solution or lukewarm water. Do not remove
the belts from the vehicle to wash them. Dry
with a soft cloth.
Replace the belts if they appear frayed or
worn or if the buckles do not work properly.
WARNING!
A frayed or torn belt could rip apart in a
collision and leave you with no protection.
Inspect the belt system periodically,
checking for cuts, frays, or loose parts.
261
Page 273 of 362
Fuel IconsWhat It Means
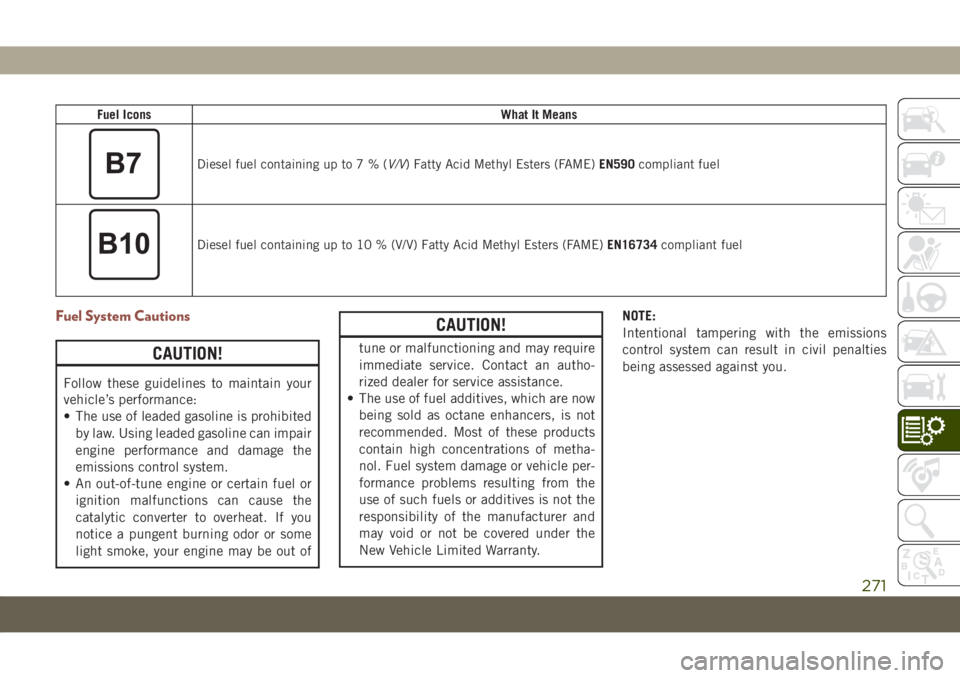
Diesel fuel containing up to7%(V/V) Fatty Acid Methyl Esters (FAME)EN590compliant fuel
Diesel fuel containing up to 10 % (V/V) Fatty Acid Methyl Esters (FAME)EN16734compliant fuel
Fuel System Cautions
CAUTION!
Follow these guidelines to maintain your
vehicle’s performance:
• The use of leaded gasoline is prohibited
by law. Using leaded gasoline can impair
engine performance and damage the
emissions control system.
• An out-of-tune engine or certain fuel or
ignition malfunctions can cause the
catalytic converter to overheat. If you
notice a pungent burning odor or some
light smoke, your engine may be out of
CAUTION!
tune or malfunctioning and may require
immediate service. Contact an autho-
rized dealer for service assistance.
• The use of fuel additives, which are now
being sold as octane enhancers, is not
recommended. Most of these products
contain high concentrations of metha-
nol. Fuel system damage or vehicle per-
formance problems resulting from the
use of such fuels or additives is not the
responsibility of the manufacturer and
may void or not be covered under the
New Vehicle Limited Warranty.NOTE:
Intentional tampering with the emissions
control system can result in civil penalties
being assessed against you.
271