radiator JEEP COMPASS 2019 Owner handbook (in English)
[x] Cancel search | Manufacturer: JEEP, Model Year: 2019, Model line: COMPASS, Model: JEEP COMPASS 2019Pages: 362, PDF Size: 6.23 MB
Page 48 of 362
Icon Description
Climate Control OFF Button
Press and release this button to turn the Climate Controls off or turn the Blower Control knob to the off
position.
Climate Control Functions
A/C (Air Conditioning)
The Air Conditioning (A/C) button allows the
operator to manually activate or deactivate
the air conditioning system. When the air
conditioning system is turned on, cool dehu-
midified air will flow through the outlets into
the cabin. For improved fuel economy, press
the A/C button to turn off the air conditioning
and manually adjust the blower and airflow
mode settings. Also, make sure to select only
Panel, Bi-Level, or Floor modes.
NOTE:
• For Manual Climate Controls, if the system
is in Mix, Floor or Defrost Mode, the A/C can
be turned off, but the A/C system shall
remain active to prevent fogging of the
windows.• If fog or mist appears on the windshield or
side glass, select Defrost mode, and in-
crease blower speed if needed.
•
If your air conditioning performance seems
lower than expected, check the front of the
A/C condenser (located in front of the radia-
tor), for an accumulation of dirt or insects.
Clean with a gentle water spray from the front
of the radiator and through the condenser.
MAX A/C
MAX A/C sets the control for maximum cool-
ing performance.
Press and release to toggle between MAX A/C
and the prior settings. The button illuminates
when MAX A/C is on.
In MAX A/C, the blower level and mode posi-
tion can be adjusted to desired user settings.
Pressing other settings will cause the MAX
A/C operation to switch to the selected set-
ting and MAX A/C to exit.Recirculation
When outside air contains smoke, odors, or
high humidity, or if rapid cooling is desired,
you may wish to recirculate interior air by
pressing the Recirculation control button.
The Recirculation indicator will illuminate
when this button is selected. Press the but-
ton a second time to turn off the Recircula-
tion mode and allow outside air into the
vehicle.
In cold weather, use of Recirculation mode
may lead to excessive window fogging. The
Recirculation feature may be unavailable
(button on the touchscreen greyed out) if
conditions exist that could create fogging on
the inside of the windshield.
GETTING TO KNOW YOUR VEHICLE
46
Page 203 of 362
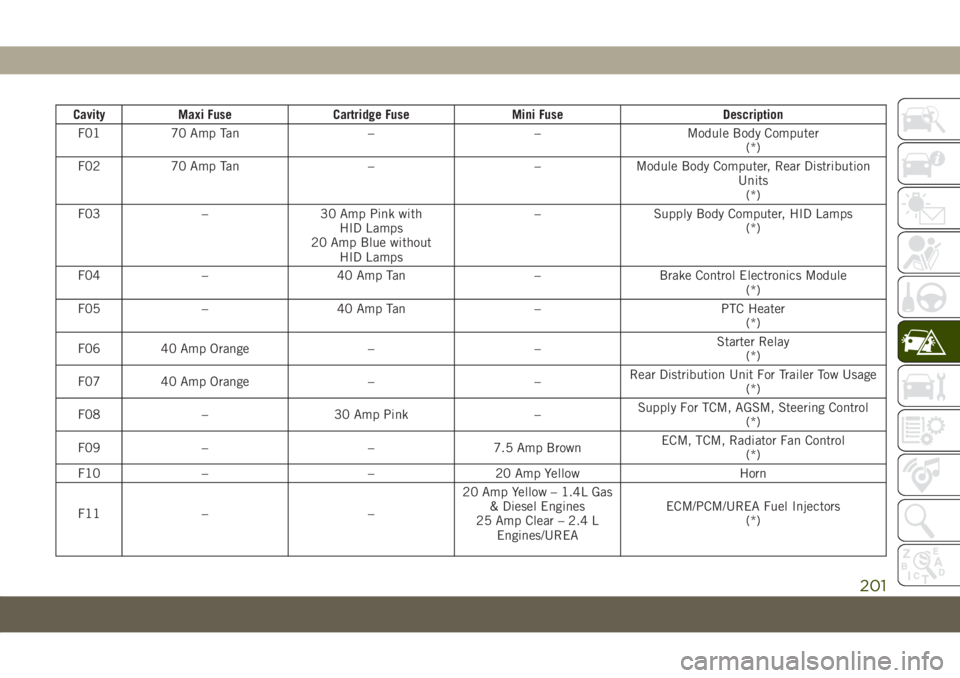
Cavity Maxi Fuse Cartridge Fuse Mini Fuse Description
F01 70 Amp Tan – – Module Body Computer
(*)
F02 70 Amp Tan – – Module Body Computer, Rear Distribution
Units
(*)
F03 – 30 Amp Pink with
HID Lamps
20 Amp Blue without
HID Lamps– Supply Body Computer, HID Lamps
(*)
F04 – 40 Amp Tan – Brake Control Electronics Module
(*)
F05 – 40 Amp Tan – PTC Heater
(*)
F06 40 Amp Orange – –Starter Relay
(*)
F07 40 Amp Orange – –Rear Distribution Unit For Trailer Tow Usage
(*)
F08 – 30 Amp Pink –Supply For TCM, AGSM, Steering Control
(*)
F09 – – 7.5 Amp BrownECM, TCM, Radiator Fan Control
(*)
F10 – – 20 Amp Yellow Horn
F11 – –20 Amp Yellow – 1.4L Gas
& Diesel Engines
25 Amp Clear – 2.4 L
Engines/UREAECM/PCM/UREA Fuel Injectors
(*)
201
Page 223 of 362
CAUTION!
Do not use a portable battery booster pack
or any other booster source with a system
voltage greater than 12 Volts or damage to
the battery, starter motor, alternator or
electrical system may occur.
Preparations For Jump Start
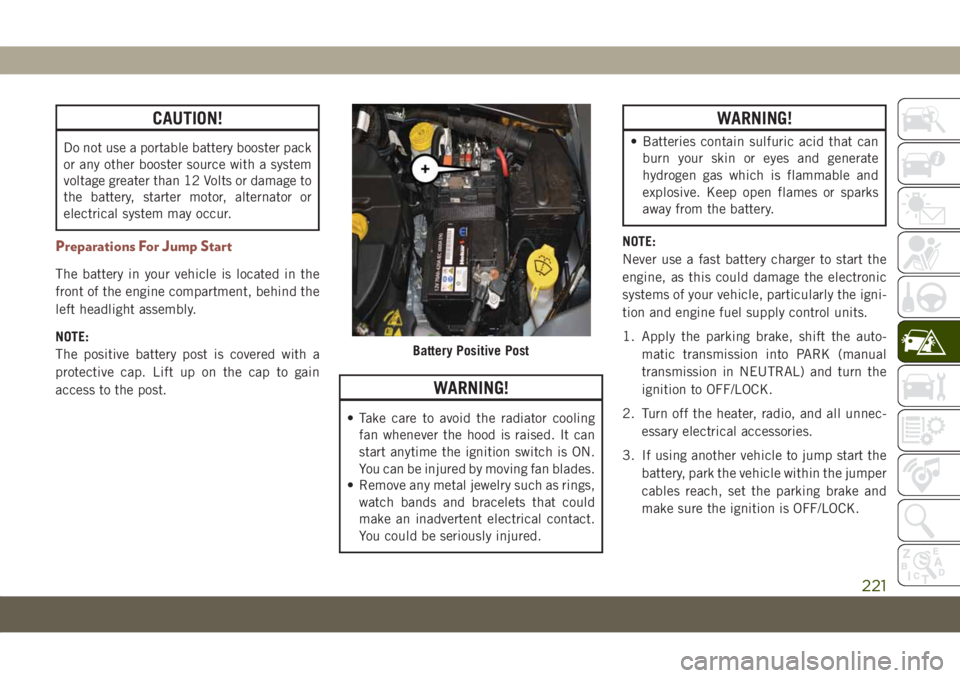
The battery in your vehicle is located in the
front of the engine compartment, behind the
left headlight assembly.
NOTE:
The positive battery post is covered with a
protective cap. Lift up on the cap to gain
access to the post.
WARNING!
• Take care to avoid the radiator cooling
fan whenever the hood is raised. It can
start anytime the ignition switch is ON.
You can be injured by moving fan blades.
• Remove any metal jewelry such as rings,
watch bands and bracelets that could
make an inadvertent electrical contact.
You could be seriously injured.
WARNING!
• Batteries contain sulfuric acid that can
burn your skin or eyes and generate
hydrogen gas which is flammable and
explosive. Keep open flames or sparks
away from the battery.
NOTE:
Never use a fast battery charger to start the
engine, as this could damage the electronic
systems of your vehicle, particularly the igni-
tion and engine fuel supply control units.
1. Apply the parking brake, shift the auto-
matic transmission into PARK (manual
transmission in NEUTRAL) and turn the
ignition to OFF/LOCK.
2. Turn off the heater, radio, and all unnec-
essary electrical accessories.
3. If using another vehicle to jump start the
battery, park the vehicle within the jumper
cables reach, set the parking brake and
make sure the ignition is OFF/LOCK.
Battery Positive Post
221
Page 226 of 362
NOTE:
There are steps that you can take to slow
down an impending overheat condition:
• If your Air Conditioner (A/C) is on, turn it
off. The A/C system adds heat to the engine
cooling system and turning the A/C off can
help remove this heat.
• You can also turn the temperature control
to maximum heat, the mode control to floor
and the blower control to high. This allows
the heater core to act as a supplement to
the radiator and aids in removing heat from
the engine cooling system.
WARNING!
You or others can be badly burned by hot
engine coolant (antifreeze) or steam from
your radiator. If you see or hear steam
coming from under the hood, do not open
the hood until the radiator has had time to
cool. Never try to open a cooling system
pressure cap when the radiator or coolant
bottle is hot.
GEAR SELECTOR OVERRIDE
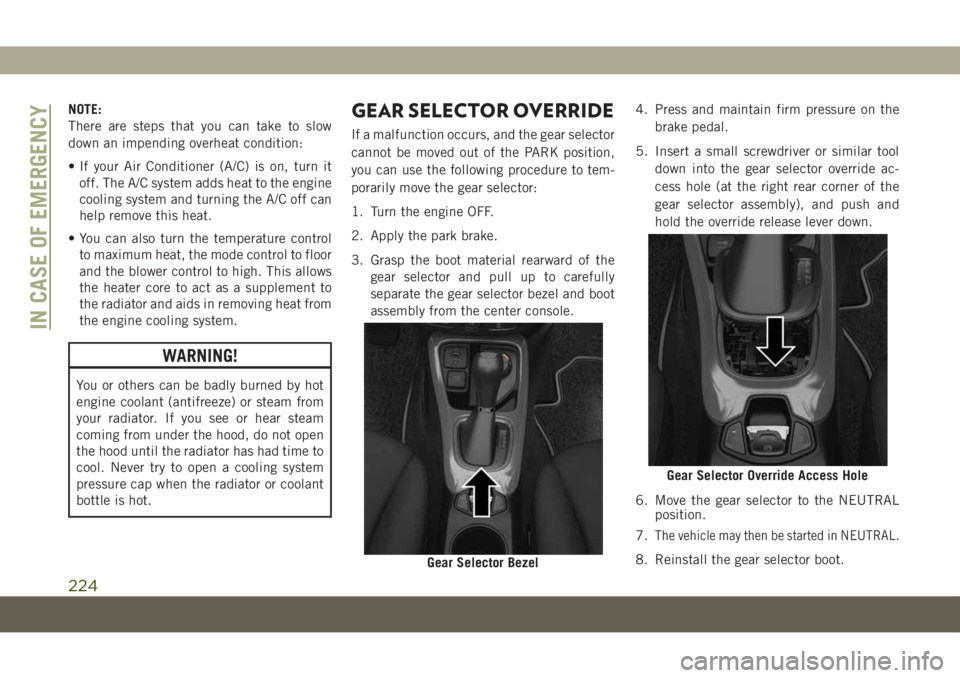
If a malfunction occurs, and the gear selector
cannot be moved out of the PARK position,
you can use the following procedure to tem-
porarily move the gear selector:
1. Turn the engine OFF.
2. Apply the park brake.
3. Grasp the boot material rearward of the
gear selector and pull up to carefully
separate the gear selector bezel and boot
assembly from the center console.4. Press and maintain firm pressure on the
brake pedal.
5. Insert a small screwdriver or similar tool
down into the gear selector override ac-
cess hole (at the right rear corner of the
gear selector assembly), and push and
hold the override release lever down.
6. Move the gear selector to the NEUTRAL
position.
7.
The vehicle may then be started in NEUTRAL.
8. Reinstall the gear selector boot.Gear Selector Bezel
Gear Selector Override Access Hole
IN CASE OF EMERGENCY
224
Page 245 of 362
Checking Oil Level
WARNING!
• Never smoke while working in the engine
compartment: gas and inflammable va-
pors may be present, with the risk of fire.
• Be very careful when working in the
engine compartment when the engine is
hot: you may get burned. Do not get too
close to the radiator cooling fan: the
electric fan may start; danger of injury.
Scarves, ties and other loose clothing
might be pulled by moving parts.
CAUTION!
• Be careful not to confuse the various
types of fluids while topping up: they are
not compatible with each other! Topping
up with an unsuitable fluid could se-
verely damage your car.
• The oil level must never exceed the MAX
mark.
• Always top up using engine oil of the
same specifications as that already in
the engine.
CAUTION!
• If the engine oil is being topped up, wait
for the engine to cool down before loos-
ening the filler cap, particularly for ve-
hicles with aluminium cap (if equipped).
WARNING: risk of burns!
• Overfilling or underfilling the crankcase
will cause aeration or loss of oil pressure.
This could damage your engine.
To assure proper engine lubrication, the en-
gine oil must be maintained at the correct
level. Check the oil level at regular intervals,
such as every fuel stop. The best time to
check the engine oil level is about five min-
utes after a fully warmed up engine is shut
off.
Checking the oil while the vehicle is on level
ground will improve the accuracy of the oil
level readings.
There are three possible dipstick types,
• Crosshatched zone.
• Crosshatched zone marked SAFE.• Crosshatched zone marked with MIN at the
low end of the range and MAX at the high
end of the range.
• Crosshatched zone marked with dimples at
the MIN and the MAX ends of the range.
NOTE:
Always maintain the oil level within the cross-
hatch markings on the dipstick.
Adding 1 quart (1.0 liters) of oil when the
reading is at the low end of the dipstick range
will raise the oil level to the high end of the
range marking.
Adding Washer Fluid
The fluid reservoir is located in the front of
the engine compartment. Be sure to check
the fluid level in the reservoir at regular
intervals. Fill the reservoir with windshield
washer solvent (not radiator antifreeze) and
operate the system for a few seconds to flush
out the residual washer fluid.
When refilling the washer fluid reservoir, take
some washer fluid, apply it to a cloth or towel,
and wipe clean the wiper blades; this will
help blade performance.
243
Page 249 of 362
Under normal operating conditions, the cata-
lytic converter will not require maintenance.
However, it is important to keep the engine
properly tuned to assure proper catalyst opera-
tion and prevent possible catalyst damage.
NOTE:
Intentional tampering with emissions control
systems can result in civil penalties being
assessed against you.
In unusual situations involving grossly mal-
functioning engine operation, a scorching
odor may suggest severe and abnormal cata-
lyst overheating. If this occurs, stop the ve-
hicle, turn off the engine and allow it to cool.
Service, including a tune-up to manufactur-
er's specifications, should be obtained imme-
diately.
To minimize the possibility of catalytic con-
verter damage:
• Do not interrupt the ignition when the
transmission is in gear and the vehicle is in
motion.
• Do not try to start the vehicle by pushing or
towing the vehicle.• Do not idle the engine with any ignition
components disconnected or removed,
such as when diagnostic testing, or for
prolonged periods during very rough idle or
malfunctioning operating conditions.Cooling System
WARNING!
• You or others can be badly burned by hot
engine coolant (antifreeze) or steam
from your radiator. If you see or hear
steam coming from under the hood, do
not open the hood until the radiator has
had time to cool. Never open a cooling
system pressure cap when the radiator or
coolant bottle is hot.
• Keep hands, tools, clothing, and jewelry
away from the radiator cooling fan when
the hood is raised. The fan starts auto-
matically and may start at any time,
whether the engine is running or not.
• When working near the radiator cooling
fan, turn the ignition to the OFF mode.
The fan is temperature controlled and
can start at any time the ignition is in the
ON mode.
Coolant Checks
Check engine coolant (antifreeze) protection
every 12 months (before the onset of freezing
weather, where applicable). If the engine
coolant (antifreeze) is dirty or rusty in appear-
ance, the system should be drained, flushed
and refilled with fresh engine coolant (anti-
freeze). Check the front of the A/C condenser
for any accumulation of bugs, leaves, etc. If
dirty, clean by gently spraying water from a
garden hose vertically down the face of the
condenser.
Cooling System Pressure Cap
The cap must be fully tightened to prevent
loss of engine coolant (antifreeze), and to
ensure that engine coolant (antifreeze) will
return to the radiator from the coolant expan-
sion bottle/recovery tank if so equipped.
The cap should be inspected and cleaned if
there is any accumulation of foreign material
on the sealing surfaces.
247
Page 280 of 362
CAUTION!
• Mixing of engine coolant (antifreeze)
other than specified Organic Additive
Technology (OAT) engine coolant (anti-
freeze), may result in engine damage
and may decrease corrosion protection.
Organic Additive Technology (OAT) en-
gine coolant is different and should not
be mixed with Hybrid Organic Additive
Technology (HOAT) engine coolant (an-
tifreeze) or any “globally compatible”
coolant (antifreeze). If a non-OAT engine
coolant (antifreeze) is introduced into
the cooling system in an emergency, the
cooling system will need to be drained,
flushed, and refilled with fresh OAT
coolant (conforming to MS.90032), by
an authorized dealer as soon as possible.
• Do not use water alone or alcohol-based
engine coolant (antifreeze) products. Do
not use additional rust inhibitors or an-
tirust products, as they may not be com-
patible with the radiator engine coolant
and may plug the radiator.
CAUTION!
• This vehicle has not been designed for
use with propylene glycol-based engine
coolant (antifreeze). Use of propylene
glycol-based engine coolant (antifreeze)
is not recommended.
• The use of products with different speci-
fications than those indicated above
could cause damage to the engine that
is not covered by the warranty.
• Use AdBlue only according to DIN
70 070 and ISO 22241-1. Other fluids
may cause damage to the system: also
exhaust emissions would no longer com-
ply with the law.
• The distribution companies are respon-
sible for the compliance of their prod-
uct. Observe the precautions of storage
and servicing, in order to preserve the
initial qualities. The manufacturer of the
vehicle does not recognize any guaran-
tee in case of malfunctions and damage
caused to the vehicle due to the use of
UREA (AdBlue) not in accordance with
regulations.
TECHNICAL SPECIFICATIONS
278
Page 352 of 362
Bulbs, Light.................140
Camera, Rear................179
Capacities, Fluid..............274
Caps, Filler
Fuel....................180
Oil (Engine)...............240
Radiator (Coolant Pressure)......247
Carbon Monoxide Warning.....138, 272
Car Washes..................260
Chains, Tire..................257
Change Oil Indicator.............61
Changing A Flat Tire.........208, 250
Check Engine Light (Malfunction
Indicator Light)..............77
Checking Your Vehicle For Safety. . . .138
Checks, Safety................138
Child Safety Locks..............23
Cleaning
Windshield Wiper Blades.......245
Climate Control................39
Clock Settings................284
Compact Spare Tire.............256
Computer, Trip/Travel.............64
Cooling Pressure Cap (Radiator Cap) . .247
Cooling System...............247
Coolant Level..............247Cooling Capacity............274
Pressure Cap...............247
Radiator Cap...............247
Selection Of Coolant
(Antifreeze)............274, 276
Cruise Light.............74, 75, 76
Customer Assistance............332
Customer Programmable Features. . . .307
Cybersecurity.................282
Daytime Running Lights........33, 34
Dealer Service................245
Defroster, Windshield............139
Diagnostic System, Onboard........76
Diesel Fuel.................
.272
Diesel Fuel Requirements
.........272
Dimmer Switch
Headlight...............33, 34
Dipsticks
Oil (Engine)...............243
Disabled Vehicle Towing..........226
Do Not Disturb............320, 329
Door Ajar.................66, 67
Door Ajar Light..............66, 67
Drag And Drop Menu............289
Driver’s Seat Back Tilt............24Easy Entry Seats...............27
Electrical Outlet, Auxiliary
(Power Outlet)...............56
Electric Brake Control System.......80
Anti-Lock Brake System.........79
Traction Control System.........80
Electric Parking Brake...........145
Electronic Speed Control
(Cruise Control)..............163
Electronic Stability Control (ESC).....82
Electronic Throttle Control
Warning Light...............66
Emergency, In Case Of
Hazard Warning Flasher........193
Jacking...............208, 250
Jump Starting..............220
Tow Hooks................228
Towing...................226
Emission Control System
Maintenance................77
Emissions...................280
Engine.....................240
Checking Oil Level...........243
Coolant (Antifreeze)..........276
Cooling..................247
Exhaust Gas Caution.......138, 272
Jump Starting..............220
INDEX
350
Page 355 of 362
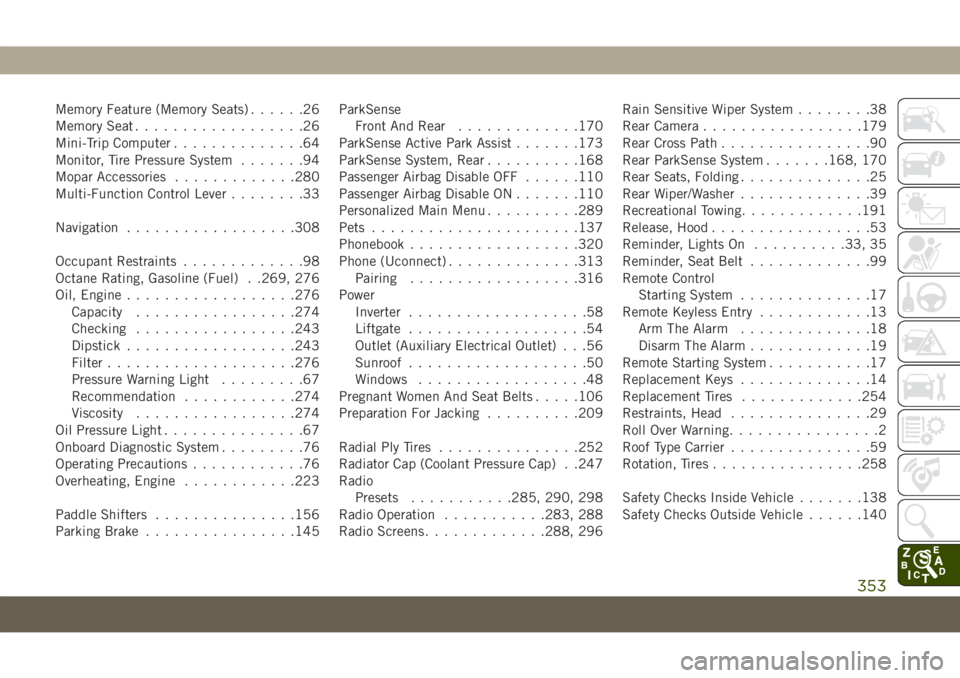
Memory Feature (Memory Seats)......26
Memory Seat..................26
Mini-Trip Computer..............64
Monitor, Tire Pressure System.......94
Mopar Accessories.............280
Multi-Function Control Lever........33
Navigation..................308
Occupant Restraints.............98
Octane Rating, Gasoline (Fuel) . .269, 276
Oil, Engine..................276
Capacity.................274
Checking.................243
Dipstick..................243
Filter....................276
Pressure Warning Light.........67
Recommendation............274
Viscosity.................274
Oil Pressure Light...............67
Onboard Diagnostic System.........76
Operating Precautions............76
Overheating, Engine............223
Paddle Shifters...............156
Parking Brake................145ParkSense
Front And Rear.............170
ParkSense Active Park Assist.......173
ParkSense System, Rear..........168
Passenger Airbag Disable OFF......110
Passenger Airbag Disable ON.......110
Personalized Main Menu..........289
Pets......................137
Phonebook..................320
Phone (Uconnect)..............313
Pairing..................316
Power
Inverter...................58
Liftgate...................54
Outlet (Auxiliary Electrical Outlet) . . .56
Sunroof...................50
Windows..................48
Pregnant Women And Seat Belts.....106
Preparation For Jacking.........
.209
Radial Ply Tires...............252
Radiator Cap (Coolant Pressure Cap) . .247
Radio
Presets...........285, 290, 298
Radio Operation...........283, 288
Radio Screens.............288, 296Rain Sensitive Wiper System........38
Rear Camera.................179
Rear Cross Path................90
Rear ParkSense System.......168, 170
Rear Seats, Folding..............25
Rear Wiper/Washer..............39
Recreational Towing.............191
Release, Hood.................53
Reminder, Lights On..........33, 35
Reminder, Seat Belt.............99
Remote Control
Starting System..............17
Remote Keyless Entry............13
Arm The Alarm..............18
Disarm The Alarm.............19
Remote Starting System...........17
Replacement Keys..............14
Replacement Tires.............254
Restraints, Head...............29
Roll Over Warning................2
Roof Type Carrier...............59
Rotation, Tires................258
Safety Checks Inside Vehicle.......138
Safety Checks Outside Vehicle......140
353